阿里云Zabbix安装实践过程
1、配置阿里云zabbix yum源
[root@VM_0_8_centos ~]# rpm -ivh https://mirrors.aliyun.com/zabbix/zabbix/3.0/rhel/7/x86_64/zabbix-release-3.0-1.el7.noarch.rpm
2、安装相关软件
yum install zabbix-server zabbix-web zabbix-server-mysql zabbix-web-mysql mariadb-server mariadb zabbix-agent -y
3、修改PHP时区配置
[root@VM_0_8_centos ~]# vim /etc/httpd/conf.d/zabbix.conf
将<IfModule mod_php5.c>块的注释打开并且修改时区为Asia/Shanghai
php_value date.timezone Asia/Shanghai
4、数据库配置
由于我们安装的是mariadb数据库所以启动的是mariadb
[root@VM_0_8_centos ~]# systemctl start mariadb
5、创建zabbix 所用的数据库以及用户
进入数据库
[root@VM_0_8_centos ~]# mysql
MariaDB [(none)]> create database zabbix character set utf8 collate utf8_bin;
MariaDB [(none)]> grant all on zabbix.* to zabbix@'%' identified by '123456';
MariaDB [(none)]> grant all on zabbix.* to zabbix@'localhost' identified by '123456';
MariaDB [(none)]> exit;
导入zabbix数据
[root@VM_0_8_centos ~]# cd /usr/share/doc/zabbix-server-mysql-3.0.28
[root@VM_0_8_centos ~]# zcat create.sql.gz |mysql -uzabbix -p123456 zabbix
6、修改zabbix配置文件
[root@VM_0_8_centos ~]# vim /etc/zabbix/zabbix_server.conf
DBHost=localhost #数据库所在主机
DBName=zabbix #数据库名
DBUser=zabbix #数据库用户
DBPassword=123456 #数据库密码
7、启动zabbix及http
[root@VM_0_8_centos ~]# systemctl start httpd.service
[root@VM_0_8_centos ~]# systemctl start zabbix-server.service
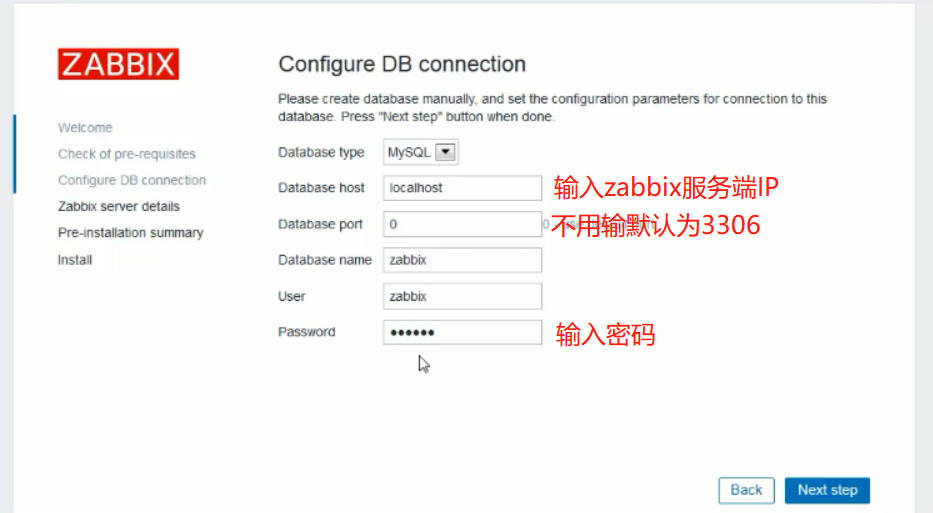
8、用浏览器访问http://zabbix-server服务端的IP地址/zabbix/setup.php


9、配置zabbix-agent 客户端以及启动
[root@VM_0_8_centos ~]# vim /etc/zabbix/zabbix_agentd.conf
Server=127.0.0.1 #zabbix-server地址
ServerActive=127.0.0.1 #zabbix-server地址(主动模式)
[root@VM_0_8_centos ~]# systemctl start zabbix-agent.service
10、检查一下zabbix-server和zabbix-agent
[root@VM_0_8_centos ~]# ss -lntp | grep zabbix
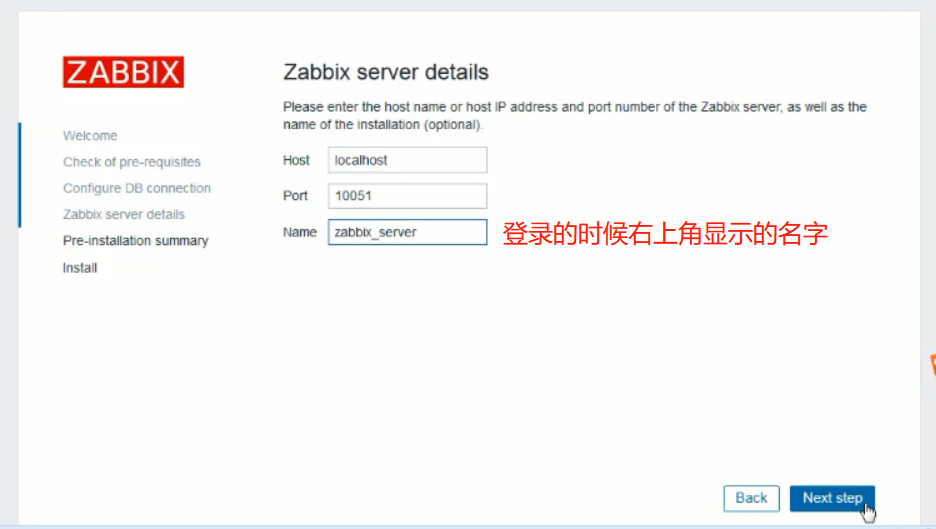
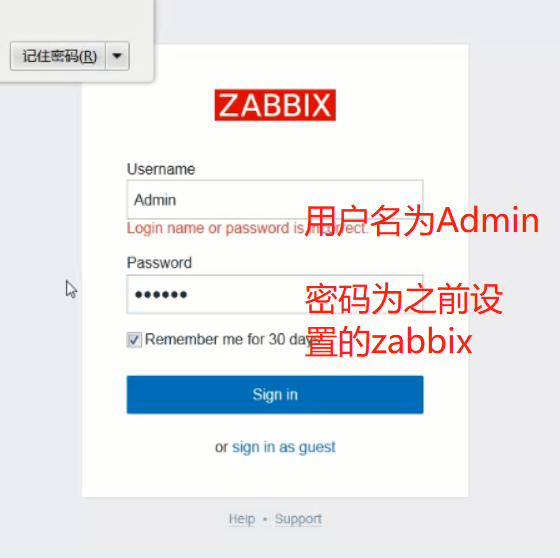
11、在浏览器zabbix-server端操作

12、至此简单的zabbix安装完毕,可以根据自己的实际情况修改zabbix的不同参数

 浙公网安备 33010602011771号