
一.新建项目
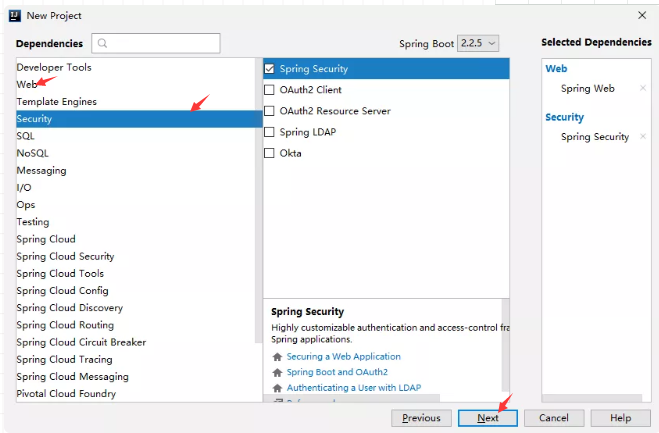
1.首先新建一个 Spring Boot 项目,创建时引入 Spring Security 依赖和 web 依赖,如下图:
2.项目创建成功后,Spring Security 的依赖就添加进来了,在 Spring Boot 中我们加入的是 spring-boot-starter-security
我们添加一个测试的 HelloController,内容如下:
@RestController
public class HelloController {
    @GetMapping("/hello")
    public String hello() {
        return "hello";
    }
}
3.我们直接来启动项目,在项目启动过程中,我们会看到一行日志:Using generated security password:一串uuid的数字----------这就是为默认用户user生成的 密码
4.接下来我们去访问 http://localhost:8080/hello 接口,就可以看到自动重定向到登录页面了:

5.登录时,默认的用户名就是 user,默认的登录密码则是项目启动时控制台打印出来的密码,输入用户名密码之后,就登录成功了,登录成功后,我们就可以访问到 /hello 接口了。
【注】在 Spring Security 中,默认的登录页面和登录接口,都是 /login ,只不过一个是 get 请求(登录页面:即登录时看到的页面),另一个是 post 请求(登录接口:即登录页面被提交
的路径)。
【注】用户相关的自动化配置类在 UserDetailsServiceAutoConfiguration 里边
二.不使用数据库怎么自定义用户名密码?
1.application.properties配置
spring.security.user.name=用户名
spring.security.user.password=密码
2.配置类中配置用户名/密码。
(1)首先我们自定义 MySecurityConfig 继承自 WebSecurityConfigurerAdapter,重写里边的 configure (AuthenticationManagerBuilder auth)
方法
@Configuration
public class MySecurityConfig extends WebSecurityConfigurerAdapter {
    @Bean
    PasswordEncoder passwordEncoder() {
        return NoOpPasswordEncoder.getInstance();
    }
    @Override
    protected void configure(AuthenticationManagerBuilder auth) throws Exception {
        auth.inMemoryAuthentication()
                .withUser("xxx")
                .password("123").roles("admin");
    }
}
解释:
1.提供了一个 PasswordEncoder 的实例,因为目前的案例还比较简单,因此暂时先不给密码进行加密,所以返回 NoOpPasswordEncoder 的实例即可。
2. configure 方法中,我们通过 inMemoryAuthentication 来开启在内存中定义用户,withUser 中是用户名,password 中则是用户密码,roles 中是用户角色。
3.如果需要配置多个用户,用 and 相连。and 符号相当于就是 XML 标签的结束符,表示结束当前标签,这是个时候上下文会回到 inMemoryAuthentication 方法中,然后开启新用户的配置
三.自定义表单登录页
1.继续完善前面的 MySecurityConfig 类,继续重写它的 configure(WebSecurity web) 和 configure(HttpSecurity http) 方法,如下:
@Override
public void configure(WebSecurity web) throws Exception {
  //web.ignoring() 用来配置忽略掉的 URL 地址,一般用于静态文件
    web.ignoring().antMatchers("/js/**", "/css/**");
}
@Override
protected void configure(HttpSecurity http) throws Exception {
    http.authorizeRequests()
            .anyRequest().authenticated()
            .and()
            .formLogin()
            .loginPage("/login.html")   //登录页面的地址
       .loginProcessingUrl("/loginSecuss")   //登录接口的地址,如果不配置,默认和登录页面路径一样,只不过登录页面是get请求,登录接口是post请求
            .usernameParameter("name")    //可以修改登录页面默认的userName用户名
       .passwordParameter("passwd")//可以修改登录页面默认的password密码
       .permitAll()
            .and()
            .csrf().disable();
}
四.登录成功回调(前后端不分离)
- defaultSuccessUrl(重载方法)
- 一个参数的 defaultSuccessUrl 方法。如果我们在 defaultSuccessUrl 中指定登录成功的跳转页面为
/index,此时分两种情况,如果你是直接在浏览器中输入的登录地址,登录成功后,就直接跳转到/index,如果你是在浏览器中输入了其他地址,例如http://localhost:8080/其他页面路径,结果因为没有登录,又重定向到登录页面,此时登录成功后,就不会来到/index,而是来到/其他页面路径。 - 二个参数的 defaultSuccessUrl 方法。如果不设置默认为 false,也就是我们上面的的情况,如果手动设置第二个参数为 true,则 defaultSuccessUrl 的效果和 successForwardUrl 一致。
- 一个参数的 defaultSuccessUrl 方法。如果我们在 defaultSuccessUrl 中指定登录成功的跳转页面为
- successForwardUrl
- 表示不管你是从哪里来的,登录后一律跳转到 successForwardUrl 指定的地址。例如 successForwardUrl 指定的地址为
/index,你在浏览器地址栏输入http://localhost:8080/hello,结果因为没有登录,重定向到登录页面,当你登录成功之后,就会服务端跳转到/index页面;或者你直接就在浏览器输入了登录页面地址,登录成功后也是来到/index。
- 表示不管你是从哪里来的,登录后一律跳转到 successForwardUrl 指定的地址。例如 successForwardUrl 指定的地址为
五.登录失败回调(前后端不分离)
1.failureForwardUrl 是登录失败之后会发生服务端跳转,
2.failureUrl 则在登录失败之后,会发生重定向。
六.注销登录
注销登录的默认接口是 /logout,我们也可以配置
.and()
.logout()
.logoutUrl("/logout")
.logoutRequestMatcher(new AntPathRequestMatcher("/logout","POST"))
.logoutSuccessUrl("/index")
.deleteCookies()
.clearAuthentication(true)
.invalidateHttpSession(true)
.permitAll()
.and()
- 认注销的 URL 是
/logout,是一个 GET 请求,我们可以通过 logoutUrl 方法来修改默认的注销 URL。 - logoutRequestMatcher 方法不仅可以修改注销 URL,还可以修改请求方式,实际项目中,这个方法和 logoutUrl 任意设置一个即可。
- logoutSuccessUrl 表示注销成功后要跳转的页面。
- deleteCookies 用来清除 cookie。
- clearAuthentication 和 invalidateHttpSession 分别表示清除认证信息和使 HttpSession 失效,默认可以不用配置,默认就会清除。
七.前后端分离的登录成功和登录失败的回调
1.登录成功 successHandler
.successHandler((req, resp, authentication) -> {
    Object principal = authentication.getPrincipal();
    resp.setContentType("application/json;charset=utf-8");
    PrintWriter out = resp.getWriter();
    out.write(new ObjectMapper().writeValueAsString(principal));
    out.flush();
    out.close();
})
successHandler 方法的参数是一个 AuthenticationSuccessHandler 对象,这个对象中我们要实现的方法是 onAuthenticationSuccess。
onAuthenticationSuccess 方法有三个参数,分别是:
1.HttpServletRequest //可以做服务端跳转
2.HttpServletResponse //可以做客户端跳转
3.Authentication //保存了我们刚刚登录成功的用户信息
2.登录失败 failureHandler
.failureHandler((req, resp, e) -> {
    resp.setContentType("application/json;charset=utf-8");
    PrintWriter out = resp.getWriter();
    out.write(e.getMessage());
    out.flush();
    out.close();
})
第一第二个参数和登录成功的参数一样,第三个是一个 Exception,对于登录失败,会有不同的原因,Exception 中则保存了登录失败的原因
八 注销登录 (前后端分离)
.and()
.logout()
.logoutUrl("/logout")
.logoutSuccessHandler((req, resp, authentication) -> {
    resp.setContentType("application/json;charset=utf-8");
    PrintWriter out = resp.getWriter();
    out.write("注销成功");
    out.flush();
    out.close();
})
.permitAll()
.and()
前后端分离 之后,返回的是json

 浙公网安备 33010602011771号