

PWA
1 初始化项目
vue create vue-pwa
2 ionic的路由依赖于vue-router,所以接下来安装 vue-router:
vue add router
3 安装ionic
npm install @ionic/vue
4 在main.js引用ionic
import Ionic from '@ionic/vue'
import '@ionic/core/css/ionic.bundle.css'

Vue.use(Ionic)
5 在router.js中使用IonicVueRouter替换vue router
import Vue from 'vue'
import { IonicVueRouter } from '@ionic/vue';
import Home from './views/Home.vue'

Vue.use(IonicVueRouter)

export default new IonicVueRouter({
  mode: 'history',
  base: process.env.BASE_URL,
  routes: [
    {
      path: '/',
      name: 'home',
      component: Home
    }
  ]
})
6 修改App.vue内容为
<template>
  <div id="app">
    <ion-app>
      <ion-vue-router/>
    </ion-app>
  </div>
</template>
7 可以运行 yarn serve看效果
如果页面报这个错误
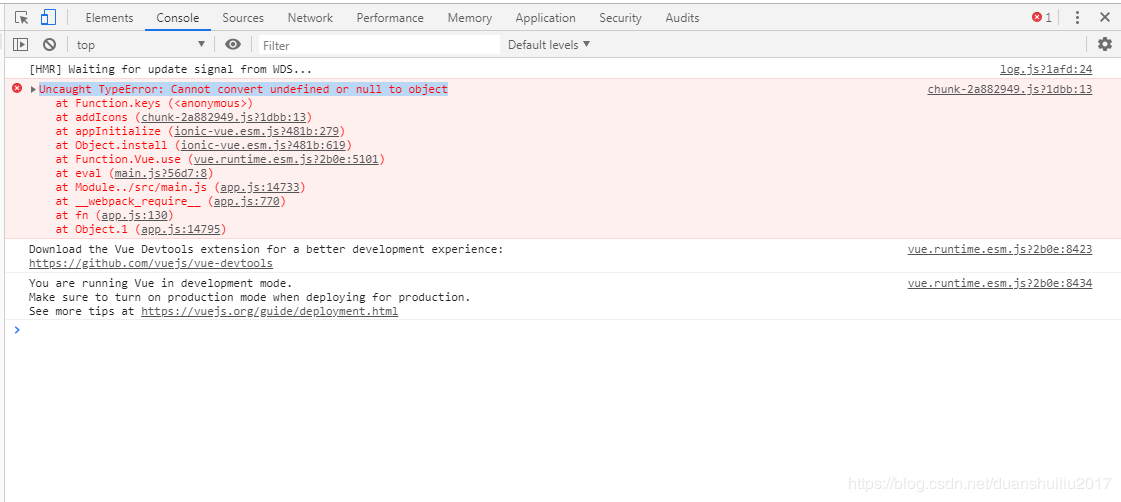
可以安装这个版本
yarn add ionicons@4.5.9-1
页面就可以运行起来了
8 在项目中实现业务代码
我们在 src/components 下面新建 ZipSearch.vue 文件作为邮编搜索组件,主要逻辑为当用户输入一串字符,按下搜索按钮,如果输入合法则触发父组件的get-zip事件,如果不合法则给出提示。
ZipSearch.vue
<template>
  <ion-grid>
    <form @submit="onSubmit">
      <ion-col>
        <ion-item>
          <ion-label>ZipCode:</ion-label>
          <ion-input
            :value="zip"
            @input="zip = $event.target.value"
            name="zip"
            placeholder="Enter US ZipCode"
          />
        </ion-item>
      </ion-col>
      <ion-col>
        <ion-button type="submit" color="primary" expand="block">Find</ion-button>
      </ion-col>
    </form>
  </ion-grid>
</template>

<script>
export default {
  name: 'ZipSearch',
  data() {
    return {
      zip: ""
    };
  },
  methods: {
    onSubmit(e) {
      e.preventDefault();
      const zipRegex = /(^\d{5}$)|(^\d{5}-\d{4}$)/;
      const isValid = zipRegex.test(this.zip);
      if (!isValid) {
        this.showAlert();
      } else {
        this.$emit("get-zip", this.zip);
      }
      this.zip = "";
    },
    showAlert() {
      return this.$ionic.alertController
        .create({
          header: "Enter zipcode",
          message: "Please enter a valid US ZipCode",
          buttons: ["OK"]
        })
        .then(a => a.present());
    }
  }
}
</script>

<style scoped>

</style>
在 src/views/Home.vue 中引入 ZipSearch 组件,当Home接收到get-zip事件时调用 https://www.zippopotam.us 的接口,获取邮编对应的信息:
Home.vue
<template>
  <ion-content class="ion-padding">
      <ZipSearch v-on:get-zip="getZipInfo"/>
      <ZipInfo v-bind:info="info"/>
      <ClearInfo v-bind:info="info" v-on:clear-info="clearInfo"/>
  </ion-content>
</template>

<script>
import ZipSearch from "../components/ZipSearch";
import ZipInfo from "../components/ZipInfo";
import ClearInfo from "../components/ClearInfo";

export default {
  name: 'home',
  components: {
    ZipSearch,
    ZipInfo,
    ClearInfo
  },
  data() {
    return {
      info: null
    };
  },
  methods: {
    async getZipInfo(zip) {
      const res = await fetch(`https://api.zippopotam.us/us/${zip}`);
      if (res.status == 404) {
        this.showAlert();
      }
      this.info = await res.json();
    },
    showAlert() {
      return this.$ionic.alertController
        .create({
          header: "Not Valid",
          message: "Please enter a valid US ZipCode",
          buttons: ["OK"]
        })
        .then(a => a.present());
    },
    clearInfo(){
      this.info = null;
    }
  }
}
</script>
从接口获取到邮编信息后我们需要一个展示邮编信息的组件和一个清除信息的按钮,在 src/components 下面新建 ZipInfo.vue和ClearInfo.vue 。
ZipInfo.vue
<template>
  <ion-card v-if="info">
    <ion-card-header>
      <ion-card-subtitle>{{info['post code']}}</ion-card-subtitle>
      <ion-card-title>{{info['places'][0]['place name']}}</ion-card-title>
    </ion-card-header>
    <ion-card-content>
      <ion-list>
        <ion-item>
          <ion-label>
            <strong>State:</strong>
            {{info['places'][0]['state']}} ({{info['places'][0]['state abbreviation']}})
          </ion-label>
        </ion-item>
        <ion-item>
          <ion-label>
            <strong>Latitude:</strong>
            {{info['places'][0]['latitude']}}
          </ion-label>
        </ion-item>
        <ion-item>
          <ion-label>
            <strong>Longitude:</strong>
            {{info['places'][0]['longitude']}}
          </ion-label>
        </ion-item>
      </ion-list>
    </ion-card-content>
  </ion-card>
</template>

<script>
export default {
  name: "ZipInfo",
  props: ["info"]
};
</script>
ClearInfo.vue
<template>
  <ion-button color="light" expand="block" v-if="info" @click="$emit('clear-info')">Clear</ion-button>
</template>

<script>
    export default {
    name: "ClearInfo",
    props: ["info"]
    };
</script>
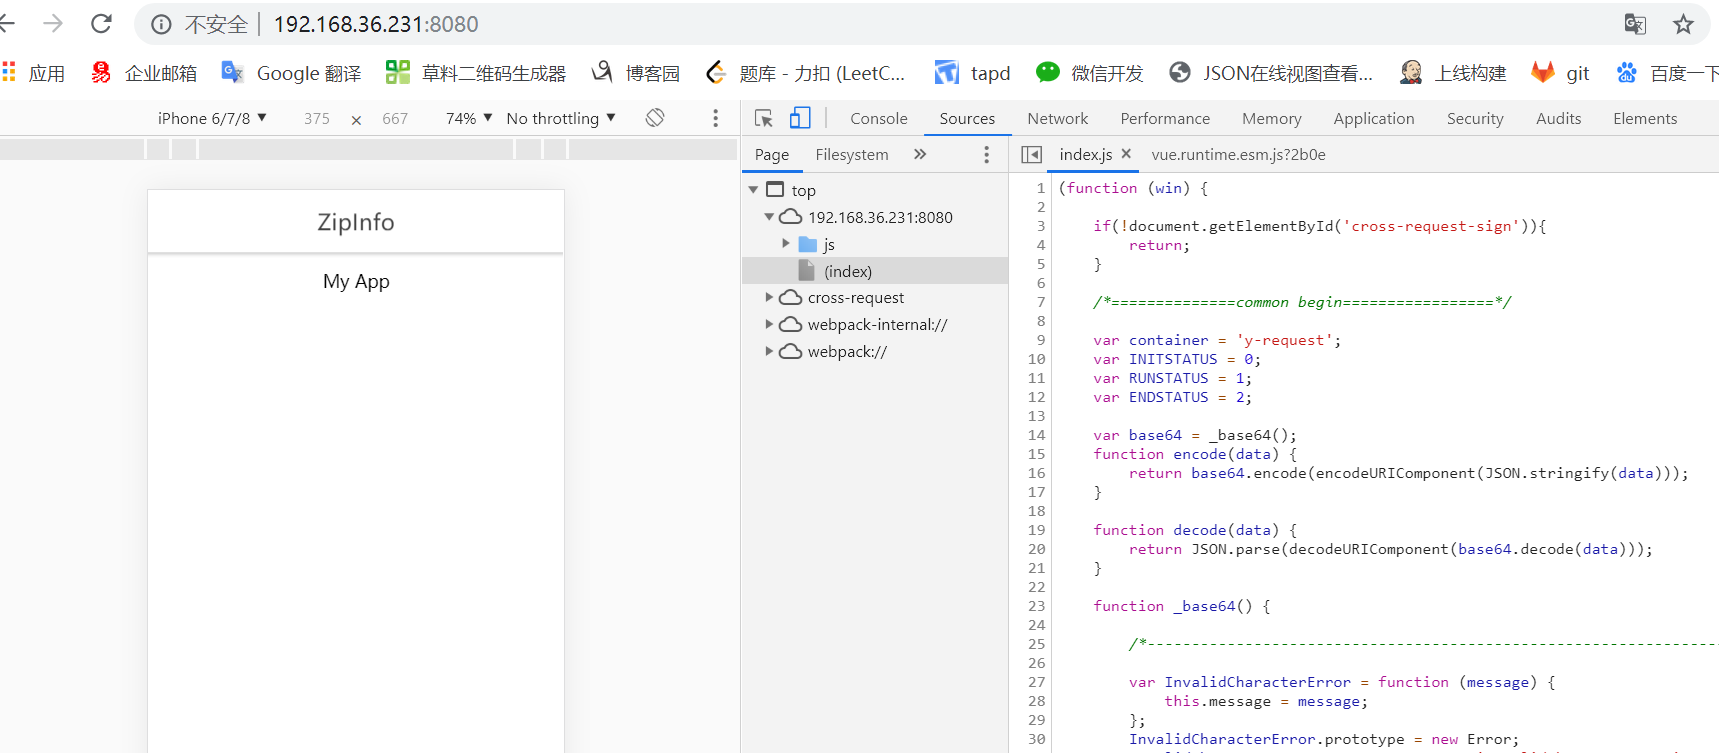
下面是完成后的效果:

9 实现PWA
使用现成的@vue/pwa插件来给我们的项目增加pwa功能。安装@vue/pwa:
vue add @vue/pwa
10 安装完成后在项目的public中增加manifest.json文件,文件内容如下:
{
  "name": "vue-ionic-pwa",
  "short_name": "vue-ionic-pwa",
  "icons": [
    {
      "src": "./img/icons/android-chrome-192x192.png",
      "sizes": "192x192",
      "type": "image/png"
    },
    {
      "src": "./img/icons/android-chrome-512x512.png",
      "sizes": "512x512",
      "type": "image/png"
    }
  ],
  "start_url": "./index.html",
  "display": "standalone",
  "background_color": "#000000",
  "theme_color": "#4DBA87"
}
manifest.json中主要包含app的基本信息,比如名称(name)、图标(icons)、显示方式(display)等等,是web app能被以类似原生的方式安装、展示的必要配置。更多的配置项可参考 MDN Web App Manifest。
重新yarn serve启动项目后,在Chrome浏览器控制台中也可看到app的manifest配置:

11 添加registerServiceWorker.js
registerServiceWorker.js用于注册service worker。service worker通俗来讲就是在浏览器后台独立于网页运行的一段脚本,service worker可以完成一些特殊的功能,比如:消息推送、后台同步、拦截和处理网络请求、管理网络缓存等。Service worker之于pwa的意义在于能够为用户提供离线体验,即掉线状态下用户依旧能够访问网站并获取已被缓存的数据。使用service worker需要HTTPS
registerServiceWorker.js
import { register } from 'register-service-worker'

if (process.env.NODE_ENV === 'production') {
  register(`${process.env.BASE_URL}service-worker.js`, {
    ready () {
      console.log(
        'App is being served from cache by a service worker.\n' +
        'For more details, visit https://goo.gl/AFskqB'
      )
    },
    registered () {
      console.log('Service worker has been registered.')
    },
    cached () {
      console.log('Content has been cached for offline use.')
    },
    updatefound () {
      console.log('New content is downloading.')
    },
    updated () {
      console.log('New content is available; please refresh.')
    },
    offline () {
      console.log('No internet connection found. App is running in offline mode.')
    },
    error (error) {
      console.error('Error during service worker registration:', error)
    }
  })
}
我们可以通过在vue.config.js中增加相关的配置来设置service worker的名称缓存逻辑等:
vue.config.js
module.exports = {
  pwa: {
    workboxPluginMode: 'GenerateSW',
    workboxOptions: {
      navigateFallback: '/index.html',
      runtimeCaching: [
        {
          urlPattern: new RegExp('^https://api.zippopotam.us/us/'),
          handler: 'networkFirst',
          options: {
            networkTimeoutSeconds: 20,
            cacheName: 'api-cache',
            cacheableResponse: {
              statuses: [0, 200]
            }
          }
        }
      ]
    }
  }
}
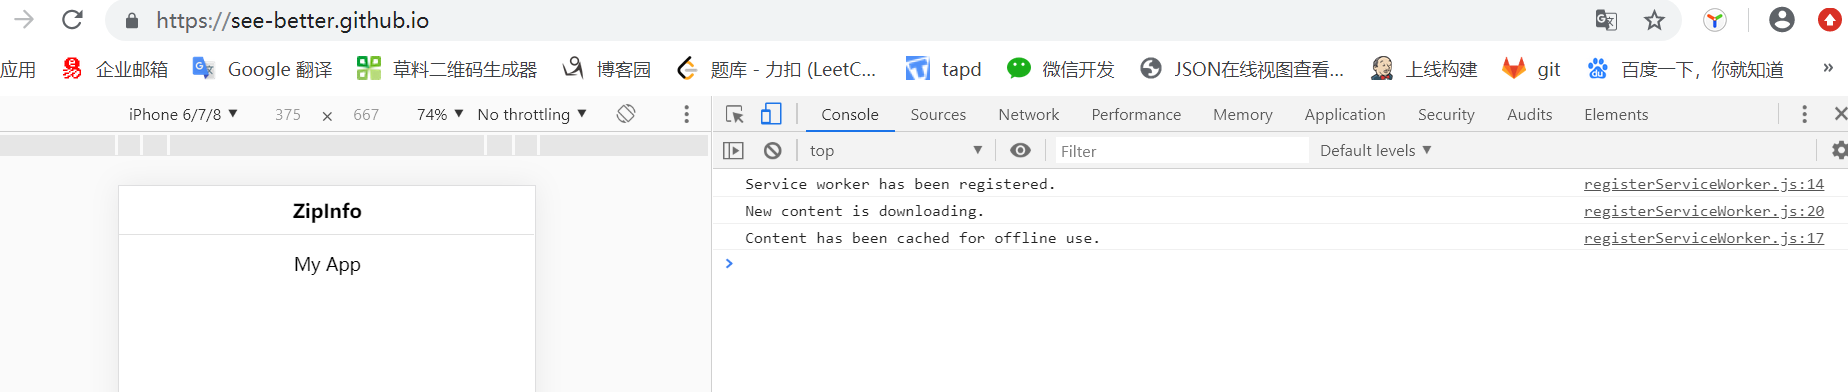
在本地启动项目,在Chrome浏览器控制台中看不到service worker的状态。由于@vue/cli-plugin-pwa生成的service worker只在生产环境生效,所以应该将项目构建之后部署到生产环境测试。本文示例使用 github pages进行部署和展示,把项目构建后放入仓库下,具体上传项目到git在另一篇文章里。在Chrome浏览器控制台就能看到service worker的状态了:

查询一个邮编后发现接口被缓存了:

断网时在请求就从ServiceWorker里取了:

项目地址:https://github.com/see-better/see-better.github.io
新建文件夹里本地项目,其他的是npm run build后的dist包里的文件。
这里用的简单的例子讲解了pwa:https://segmentfault.com/a/1190000015705532
这里主要讲了service worker:https://www.cnblogs.com/webdeve/p/9546079.html

 浙公网安备 33010602011771号