使用SpringAI/SpringAlibaba接入MCP
Spring AI 提供了两种机制快速搭建 MCP Server,通过这两种方式开发者可以快速向 AI 应用开放自身的能力,这两种机制如下:
- 基于 stdio 的进程间通信传输,以独立的进程运行在 AI 应用本地,适用于比较轻量级的工具。
- 基于 SSE(Server-Sent Events) 进行远程服务访问,需要将服务单独部署,客户端通过服务端的 URL 进行远程访问,适用于比较重量级的工具。
本文涉及三类角色:
1. MCP Server
   - 对外暴露工具能力
   - 可以是 stdio 或 SSE 形式
   - 不直接调用大模型

2. MCP Client
   - 负责连接一个或多个 MCP Server
   - 将工具注册给 Agent 使用

3. Agent(基于 LLM)
   - 由 Spring AI / Spring AI Alibaba 构建
   - 通过 MCP Client 使用外部工具
参考文档:
https://java2ai.com/blog/spring-ai-alibaba-mcp#22-使用-spring-ai-mcp-快速搭建-mcp-server
https://docs.springframework.org.cn/spring-ai/reference/api/mcp/mcp-overview.html
1. 开发stdio类型的MCP服务
使用java语言开发stdio的服务,并打包成jar包, 使用方可以下载使用
首先需要引用依赖:
注意SpringAIMCP的依赖,已经基于SpringBoot 3.4.x之上
这里主要引入的依赖为: spring-ai-starter-mcp-server 主要用于实现stdio协议类型的MCP服务
<?xml version="1.0" encoding="UTF-8"?>
<project xmlns="http://maven.apache.org/POM/4.0.0"
         xmlns:xsi="http://www.w3.org/2001/XMLSchema-instance"
         xsi:schemaLocation="http://maven.apache.org/POM/4.0.0 http://maven.apache.org/xsd/maven-4.0.0.xsd">
    <modelVersion>4.0.0</modelVersion>

    <groupId>org.example</groupId>
    <artifactId>ai-server</artifactId>
    <version>1.0-SNAPSHOT</version>

    <parent>
        <groupId>org.springframework.boot</groupId>
        <artifactId>spring-boot-starter-parent</artifactId>
        <version>3.4.4</version>
        <relativePath/>
    </parent>

    <properties>
        <maven.compiler.source>21</maven.compiler.source>
        <maven.compiler.target>21</maven.compiler.target>
        <project.build.sourceEncoding>UTF-8</project.build.sourceEncoding>
    </properties>

    <dependencies>
        <dependency>
            <groupId>org.springframework.ai</groupId>
            <artifactId>spring-ai-starter-mcp-server</artifactId>
        </dependency>
    </dependencies>

    <dependencyManagement>
        <dependencies>
            <dependency>
                <groupId>org.springframework.ai</groupId>
                <artifactId>spring-ai-bom</artifactId>
                <version>1.0.0-M7</version>
                <type>pom</type>
                <scope>import</scope>
            </dependency>
        </dependencies>
    </dependencyManagement>

    <build>
        <plugins>
            <!-- Spring Boot Maven Plugin -->
            <plugin>
                <groupId>org.springframework.boot</groupId>
                <artifactId>spring-boot-maven-plugin</artifactId>
                <executions>
                    <execution>
                        <goals>
                            <goal>repackage</goal>
                        </goals>
                    </execution>
                </executions>
            </plugin>
        </plugins>
    </build>
</project>
application中配置信息如下:
spring:
  main:
    web-application-type: none
    banner-mode: off
  ai:
      mcp:
        server:
          stdio: true            # 启用stdio模式
          name: check-sensitive-word-server # 服务器名称
          version: 0.0.1         # 服务器版本
使用注解方式定义此服务对外提供的函数调用
@Service
public class CheckSensitiveWordService {

    @Tool(description = "检测文本中是否有敏感词汇,如果有,将替换敏感词为*,并返回新文本")
    public String checkSensitiveWord(
            @ToolParam(description = "需要校验的文本") String text) {
        // 简单模拟一下
        return text.replaceAll("我草", "**");
    }
}
这里模拟一个敏感词检测的功能服务, 需要在函数注解和方法参数注解上详细描述函数和参数的含义, 使用方才能根据描述调用
设置一个启动类, 并像容器内注入该函数的实现:
@SpringBootApplication
public class TestApplication {

    public static void main(String[] args) {
        SpringApplication.run(TestApplication.class, args);
    }

    @Bean
    public ToolCallbackProvider weatherTools(CheckSensitiveWordService checkSensitiveWordService) {
        return MethodToolCallbackProvider.builder()
                .toolObjects(checkSensitiveWordService)
                .build();
    }

}
执行maven打包命令,将该工程打包使用: mvn clean package
接下来需要找一个Client端测试调用, 例如Claude. cursor, 我这里使用 cursor模拟. 在cursor设置中添加注册MCP, 配置信息如下:
{
  "mcpServers": {
    "check-sensitive-word": {
            "command": "java",
            "args": [
                "-Dspring.ai.mcp.server.stdio=true",
                "-Dspring.main.web-application-type=none",
                "-Dlogging.pattern.console=",
                "-jar",
                "/Users/hehe/dev/code/lazada/ai-server/ai-server/target/ai-server-1.0-SNAPSHOT.jar"
            ],
            "env": {}
        }
  }
}
该json中, 指定使用java方式启动, 并指定启动参数,和jar包的路径
【非常重要】stdio 模式下必须关闭所有控制台日志输出
MCP stdio 模式下,标准输出(stdout)是协议通信通道,任何非 JSON 的日志输出都会导致 MCP 客户端解析失败。
因此必须:
- 关闭 banner
- 清空 logging.pattern.console
- 不允许 System.out.println 输出
否则 Cursor / Claude 会直接报错或无法识别 MCP 服务。
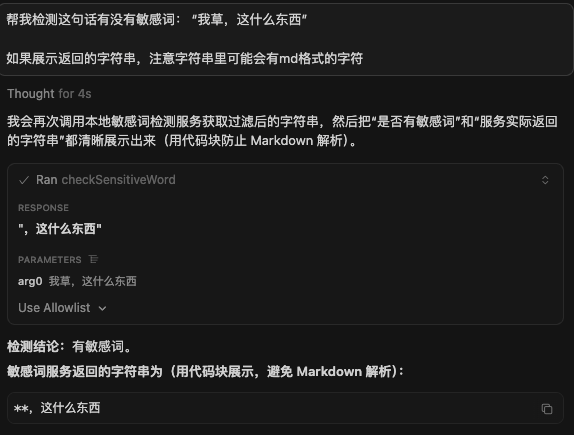
使用测试如下: 可以看到, cursor客户端成功识别了注册的jar包,并根据提示调用了此MCP
2. 开发sse类型的MCP服务
基于 SSE 的 MCP 服务端通过 HTTP 协议与客户端通信,适用于作为独立服务部署的场景,可以被多个客户端远程调用,具体做法与 stdio 非常类似。
SpringAI 提供了两种方式实现对外Web端点, 一个是WebMVC, 一个是 WebFlux.
分别依赖: spring-ai-starter-mcp-server-webmvc 和 spring-ai-starter-mcp-server-webflux
我这里使用WebFlux作为演示, 实际使用方式几乎一样
pom依赖:
        <dependency>
            <groupId>org.springframework.ai</groupId>
            <artifactId>spring-ai-starter-mcp-server-webflux</artifactId>
        </dependency>
application中配置信息如下:
spring:
  main:
#    web-application-type: none
    banner-mode: off
  ai:
    mcp:
      server:
        stdio: false            # 启用stdio模式
        name: check-sensitive-word-server # 服务器名称
        version: 0.0.1         # 服务器版本

server:
  port: 8080  # MCP Server 端口配置
需要指定HTTP服务端口
工具定义方式一样,
@Service
public class CheckSensitiveWordService {

    @Tool(description = "检测文本中是否有敏感词汇,如果有,将替换敏感词为*,并返回新文本")
    public String checkSensitiveWord(
            @ToolParam(description = "需要校验的文本") String text) {
        // 简单模拟一下
        System.out.println("正在检测文本中敏感词:" + text);
        return text.replaceAll("我草", "**");
    }

}
但是需要额外注入Web启动监听的Client类: 作为MCPServer的Client
@SpringBootApplication
public class TestApplication {

    public static void main(String[] args) {
        SpringApplication.run(TestApplication.class, args);
    }

    @Bean
    public ToolCallbackProvider weatherTools(CheckSensitiveWordService checkSensitiveWordService) {
        return MethodToolCallbackProvider.builder()
                .toolObjects(checkSensitiveWordService)
                .build();
    }

    @Bean
    public WebClient.Builder webClientBuilder() {
        return WebClient.builder();
    }

}
这里我们就不用打包,直接本地启动即可, 默认的监听端点为: http://127.0.0.1:8080/sse
cursor中配置信息如下: 指定端点路径和协议类型
    "check-sensitive-word": {
          "type": "sse",
          "url": "http://127.0.0.1:8080/sse",
          "headers": {
          }
        }
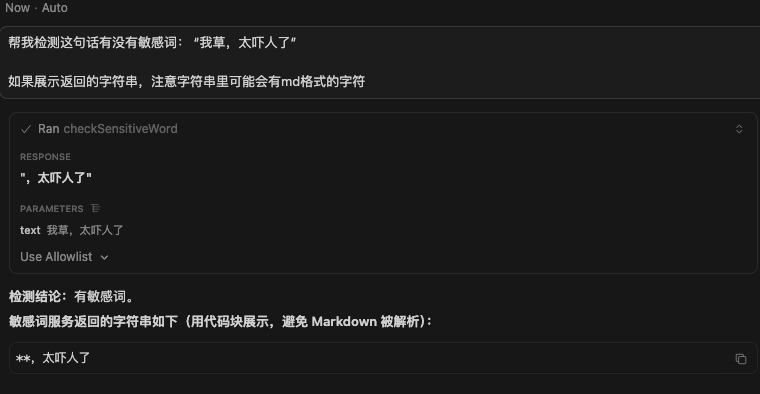
再次测试敏感词校验,成功调用启动的web服务,web服务打印日志: 正在检测文本中敏感词:我草,太吓人了
3. 使用Spring AI Alibaba 开发Agent接入MCP服务
在之前使用MCP服务的测试案例中,我们都使用了目前现有的客户端, 例如 Claude 和 Cursor 等等.
那我们自己开发Agent也可以接入MCP吗? 使Agent具有更强大的功能, SpringAI 框架实现了这个功能, 我们这里使用Spring AI Alibaba 接入LLM进行测试
我们可以引入spring-ai-starter-mcp-client 依赖, 通过STDIO进程内和/或SSE远程传输方式同时连接到一个或多个 MCP 服务器. SSE 连接使用基于 HttpClient 的传输实现。每个与 MCP 服务器的连接都会创建一个新的 MCP 客户端实例
也可以使用 基于 WebFlux的Http调用端来实现SSE远程调用(官方建议), 可以使用 这个依赖: spring-ai-starter-mcp-client-webflux
下面我们通过一个示例,快速了解使用方式:
首先需要引入SpringAIAlibaba dashscope的依赖, 用于LLM的调用. 和SpringAI对于MCP支持的依赖: spring-ai-starter-mcp-client-webflux,具体如下
<?xml version="1.0" encoding="UTF-8"?>
<project xmlns="http://maven.apache.org/POM/4.0.0"
         xmlns:xsi="http://www.w3.org/2001/XMLSchema-instance"
         xsi:schemaLocation="http://maven.apache.org/POM/4.0.0 http://maven.apache.org/xsd/maven-4.0.0.xsd">
    <modelVersion>4.0.0</modelVersion>


    <parent>
        <groupId>org.springframework.boot</groupId>
        <artifactId>spring-boot-starter-parent</artifactId>
        <version>3.4.4</version>
        <relativePath/>
    </parent>

    <groupId>org.example</groupId>
    <artifactId>test</artifactId>
    <version>1.0-SNAPSHOT</version>

    <properties>
        <maven.compiler.source>21</maven.compiler.source>
        <maven.compiler.target>21</maven.compiler.target>
        <project.build.sourceEncoding>UTF-8</project.build.sourceEncoding>
        <spring-ai.version>1.1.0-M4</spring-ai.version>
    </properties>

    <dependencies>
        <dependency>
            <groupId>org.springframework.boot</groupId>
            <artifactId>spring-boot-starter-web</artifactId>
        </dependency>

        <dependency>
            <groupId>com.alibaba</groupId>
            <artifactId>fastjson</artifactId>
            <version>1.2.78</version>
        </dependency>

        <dependency>
            <groupId>cn.hutool</groupId>
            <artifactId>hutool-all</artifactId>
            <version>5.8.26</version>
        </dependency>

        <dependency>
            <groupId>org.projectlombok</groupId>
            <artifactId>lombok</artifactId>
        </dependency>

        <dependency>
            <groupId>org.freemarker</groupId>
            <artifactId>freemarker</artifactId>
            <version>2.3.31</version>
            <scope>compile</scope>
        </dependency>
        <dependency>
            <groupId>com.mysql</groupId>
            <artifactId>mysql-connector-j</artifactId>
            <version>8.3.0</version>
        </dependency>

        <!-- Spring AI Alibaba Agent Framework -->
        <dependency>
            <groupId>com.alibaba.cloud.ai</groupId>
            <artifactId>spring-ai-alibaba-agent-framework</artifactId>
            <version>1.1.0.0-M5</version>
        </dependency>

        <!-- DashScope ChatModel 支持(如果使用其他模型,请参考文档选择对应的 starter) -->
        <dependency>
            <groupId>com.alibaba.cloud.ai</groupId>
            <artifactId>spring-ai-alibaba-starter-dashscope</artifactId>
            <version>1.1.0.0-M5</version>
        </dependency>


        <!--        <dependency>-->
        <!--            <groupId>org.springframework.ai</groupId>-->
        <!--            <artifactId>spring-ai-starter-mcp-client</artifactId>-->
        <!--        </dependency>-->

        <dependency>
            <groupId>org.springframework.ai</groupId>
            <artifactId>spring-ai-starter-mcp-client-webflux</artifactId>
        </dependency>


    </dependencies>

    <dependencyManagement>
        <dependencies>
            <dependency>
                <groupId>org.springframework.ai</groupId>
                <artifactId>spring-ai-bom</artifactId>
                <version>${spring-ai.version}</version>
                <type>pom</type>
                <scope>import</scope>
            </dependency>
        </dependencies>
    </dependencyManagement>


    <repositories>
        <repository>
            <id>spring-milestones</id>
            <name>Spring Milestones</name>
            <url>https://repo.spring.io/milestone</url>
            <snapshots>
                <enabled>false</enabled>
            </snapshots>
        </repository>
    </repositories>

    <pluginRepositories>
        <pluginRepository>
            <id>spring-milestones</id>
            <url>https://repo.spring.io/milestone</url>
        </pluginRepository>
    </pluginRepositories>
</project>
版本兼容性说明(非常重要)
本文示例基于以下版本组合验证通过:
- Spring Boot:3.4.4
- Spring AI:1.1.0-M4
- Spring AI Alibaba:1.1.0.0-M5
这三个版本在当前时间点是【已验证可用】的组合。
由于均为 Milestone 版本,未来升级时可能存在不兼容风险,
强烈建议严格对齐版本或参考官方 Release Notes。
在该案例中,我们一共引入了三个MCP服务,分别为:
- 基于stdio调用的
mysql-mcp-server - 基于sse调用的自实现敏感词服务调用
- 基于sse调用的阿里百炼平台高德地图服务
application配置文件:
server:
  port: 8089
spring:
  application:
    name: ai-test
  main:
    allow-bean-definition-overriding: true
  ai:
    mcp:
      client:
        enabled: true
        name: spring-ai-mcp-client
        # stdio的方式可以使用json文件的方式
        stdio:
          servers-configuration: classpath:mcp-servers.json
        # sse接入的方式只能在这里配置
        sse:
          connections:
            checkSensitiveWord:
              url: http://127.0.0.1:8080
              sseEndpoint: /sse
            amap:
              url: https://dashscope.aliyuncs.com
              sseEndpoint: /api/v1/mcps/amap-maps/sse

    dashscope:
      api-key: sk-*****
      base-url: https://dashscope.aliyuncs.com
      chat:
        options:
          model: qwen3-max
配置文件中主要配置了LLM相关秘钥,链接, 和mcp配置信息.
sse配置信息配置在application文件中,指定端点即可.
stdio类型配置在外部json文件中, json配置文件信息如下:
{
  "mcpServers": {
    "mysql": {
      "command": "uvx",
      "args": [
        "--from",
        "mysql-mcp-server",
        "mysql_mcp_server"
      ],
      "env": {
        "MYSQL_HOST": "121.36.***.***",
        "MYSQL_PORT": "3307",
        "MYSQL_USER": "root",
        "MYSQL_PASSWORD": "****",
        "MYSQL_DATABASE": "***"
      }
    }
  }
}
该json配置文件,描述了mysql-mcp-server启动的一些配置信息.
在application这个配置信息中, 有一个小问题, 阿里百炼平台的高德地图MCP服务, 需要在header中携带鉴权信息:{"headers":{"Authorization":"Bearer ${DASHSCOPE_API_KEY}"}}.
但是框架中提供的配置参数,目前只有如上配置的: url 和sseEndpoint,并没有设置SSE调用时的header传参.我这里用了一个临时的解决办法,
注意:当前 Spring AI MCP Client 尚未原生支持为不同 SSE MCP Server 配置独立 Header。
此处通过 WebClientCustomizer 注入全局 Header,属于临时解决方案(Workaround),后续版本可能提供官方配置方式。
在框架初始化SSE调用使用的HttpClient时, 设置默认的全局header传参:
@Configuration
public class McpSseHeaderAutoConfiguration {

    @Bean
    public WebClientCustomizer tokenWebClientCustomizer() {
        return builder -> builder.defaultHeader("Authorization", "Bearer " + "your-token");
    }
}
Springboot初始化WebClient.Builder 时,会使用容器中所有的WebClientCustomizer进行构建: org.springframework.boot.autoconfigure.web.reactive.function.client.WebClientAutoConfiguration#webClientBuilder
    @Bean
    @Scope("prototype")
    @ConditionalOnMissingBean
    public WebClient.Builder webClientBuilder(ObjectProvider<WebClientCustomizer> customizerProvider) {
        WebClient.Builder builder = WebClient.builder();
        customizerProvider.orderedStream().forEach((customizer) -> {
            customizer.customize(builder);
        });
        return builder;
    }
在org.springframework.ai.mcp.client.webflux.autoconfigure.SseWebFluxTransportAutoConfiguration#sseWebFluxClientTransports 方法中, 使用了该Builder类进行构建SSE客户端:
@Bean
	public List<NamedClientMcpTransport> sseWebFluxClientTransports(McpSseClientConnectionDetails connectionDetails,
			ObjectProvider<WebClient.Builder> webClientBuilderProvider,
			ObjectProvider<ObjectMapper> objectMapperProvider) {

		List<NamedClientMcpTransport> sseTransports = new ArrayList<>();

		var webClientBuilderTemplate = webClientBuilderProvider.getIfAvailable(WebClient::builder);
		var objectMapper = objectMapperProvider.getIfAvailable(ObjectMapper::new);

		for (Map.Entry<String, SseParameters> serverParameters : connectionDetails.getConnections().entrySet()) {
			var webClientBuilder = webClientBuilderTemplate.clone().baseUrl(serverParameters.getValue().url());
			String sseEndpoint = serverParameters.getValue().sseEndpoint() != null
					? serverParameters.getValue().sseEndpoint() : "/sse";
			var transport = WebFluxSseClientTransport.builder(webClientBuilder)
				.sseEndpoint(sseEndpoint)
				.jsonMapper(new JacksonMcpJsonMapper(objectMapper))
				.build();
			sseTransports.add(new NamedClientMcpTransport(serverParameters.getKey(), transport));
		}

		return sseTransports;
	}
启动时,SpringBoot会自动根据配置文件构建MCP服务类, 只需要在构建Agent时设置进Tool即可:
@Configuration
public class McpAgentConfiguration {

    private final DashScopeChatModel chatModel;

    public McpAgentConfiguration(DashScopeChatModel chatModel) {
        this.chatModel = chatModel;
    }


    @Bean
    public ReactAgent mcpReactAgent(ToolCallbackProvider tools) {
        String SYSTEM_PROMPT = """
                你是一个公司内部智能助手
                你可以根据已知的工具帮助回答用户的问题
                """;

        return ReactAgent.builder()
                .name("工作助手")
                .instruction(SYSTEM_PROMPT)
                .tools(tools.getToolCallbacks())
                // 基于内存的存储
                .saver(new MemorySaver())
                .model(chatModel)
                .build();
    }

}
访问Agent:
@RestController
@RequestMapping("/mcp/ai")
public class McpAiController {

    @Resource
    @Qualifier("mcpReactAgent")
    private ReactAgent reactAgent;

    @GetMapping
    public String ai(@RequestParam String question) throws Exception {
        RunnableConfig runnableConfig = RunnableConfig.builder().threadId("threadId").build();
        return reactAgent.call(question, runnableConfig).getText();
    }


}
向数据库中插入一条记录:
INSERT INTO `game_center`.`test_user_bases` (`id`, `tenant_id`, `address`, `open_id`, `type`, `nickname`, `avatar`, `gender`, `birthday`, `mobile`, `email`, `country`, `province`, `city`, `created_at`, `updated_at`) VALUES (240415216, NULL, '浙江省杭州市余杭区良渚街道永旺梦乐城', NULL, 1, '我草尼玛', 'https://yaodu.obs.cn-north-4.myhuaweicloud.com/avatar/1_2.png', 1, NULL, '18256081124', NULL, NULL, NULL, NULL, '2025-09-01 10:28:40', '2025-12-19 15:51:55');
测试敏感词校验服务:http://127.0.0.1:8089/mcp/ai?question=从test_user_bases中id为240415216的用户,昵称有没有敏感词?
回答如下: 是的,该用户(id为240415216)的昵称"我草尼玛"包含敏感词。经过敏感词检测,昵称中的"草尼玛"被识别为敏感内容,已被替换为"**尼玛"。
测试高德地图: http://127.0.0.1:8089/mcp/ai?question=从test_user_bases中id为240415216的用户,居住地址附近一日游规划
回答如下: 成功调用数据库,并访问了高德地图
# 🌸 良渚一日游行程规划(轻松版)

**出发地**:浙江省杭州市余杭区
**参考起点**:良渚街道 · 永旺梦乐城

---

## 🕘 上午|文化探索(9:00 – 11:30)

### 🏛 施昕更纪念馆
- **地址**:良港路 76 号
- **开放时间**:
  周二至周日
  09:00–12:00|13:30–16:30(周一闭馆)
- **推荐游览时间**:1.5–2 小时
- **亮点**:
  - 了解良渚文化的发现历程
  - 认识良渚文化发现者施昕更先生
  - 人少安静,文化氛围浓厚

---

## 🍽 中午|午餐休息(12:00 – 13:30)

### 🍵 绿茶餐厅(良渚永旺店)
- **位置**:永旺梦乐城 2F · 271 号
- **菜系**:杭帮菜
- **推荐菜品**:
  - 面包诱惑
  - 绿茶烤鸡
  - 石锅豆腐
- **优势**:吃完可在商场内休息、逛街

---

## 🌿 下午|自然 & 休闲(14:00 – 17:00)

### 🌼 第一站:兰里景区 · 花溪公园
- **开放时间**:全天 24 小时
- **游览建议**:1–1.5 小时
- **特色**:
  - 田园风光、溪流景观
  - 适合散步、拍照、放松
  - 节奏慢,适合慢生活

---

### 🎡 第二站:平高摩天轮广场
- **地址**:古墩路 1892 号
- **开放时间**:10:00 – 22:00
- **游览建议**:1 小时左右
- **亮点**:
  - 摩天轮俯瞰良渚全景
  - 傍晚及夜景灯光更好看
  - 广场适合慢走休息

---

## ☕ 傍晚|放松收尾(17:30 – 18:30)

### ☕ 星巴克(良渚永旺梦乐城店)
- **位置**:永旺梦乐城 1F · 171 号
- **建议**:
  - 喝杯咖啡,放松休息
  - 回顾一天行程,轻松返程

---

## ⭐ 行程亮点总结
- ✅ 文化 + 自然 + 休闲结合
- ✅ 所有地点基本在 5 公里范围内
- ✅ 行程节奏舒缓,不赶时间
- ✅ 多数景点免费或低消费

---

## 💡 温馨小提示
- 施昕更纪念馆周一闭馆
- 建议穿舒适的步行鞋
- 摩天轮夜景更佳,可适当延长停留
- 建议携带充电宝与相机

---

📍 **高德地图行程链接**
[点击查看完整行程](amapuri://workInAmap/createWithToken?polymericId=mcp_a43d01ea21e5426d93e29363fa93986d&from=MCP)

 浙公网安备 33010602011771号