

Spring Security在标准登录表单中添加一个额外的字段
概述
在本文中,我们将通过向标准登录表单添加额外字段来实现Spring Security的自定义身份验证方案。
我们将重点关注两种不同的方法,以展示框架的多功能性以及我们可以使用它的灵活方式。
我们的第一种方法是一个简单的解决方案,专注于重用现有的核心Spring Security实现。
我们的第二种方法是更加定制的解决方案,可能更适合高级用例。
2. Maven设置
我们将使用Spring Boot启动程序来引导我们的项目并引入所有必需的依赖项。
我们将使用的设置需要父声明,Web启动器和安全启动器;我们还将包括thymeleaf :
<parent>
    <groupId>org.springframework.boot</groupId>
    <artifactId>spring-boot-starter-parent</artifactId>
    <version>2.0.0.M7</version>
    <relativePath/>
</parent>

<dependencies>
    <dependency>
        <groupId>org.springframework.boot</groupId>
        <artifactId>spring-boot-starter-web</artifactId>
    </dependency>
    <dependency>
        <groupId>org.springframework.boot</groupId>
        <artifactId>spring-boot-starter-security</artifactId>
    </dependency>
    <dependency>
        <groupId>org.springframework.boot</groupId>
        <artifactId>spring-boot-starter-thymeleaf</artifactId>
     </dependency>
     <dependency>
        <groupId>org.thymeleaf.extras</groupId>
        <artifactId>thymeleaf-extras-springsecurity4</artifactId>
    </dependency>
</dependencies>
可以在Maven Central找到最新版本的Spring Boot安全启动器。
3.简单的项目设置
在我们的第一种方法中,我们将专注于重用Spring Security提供的实现。特别是,我们将重用DaoAuthenticationProvider和UsernamePasswordToken,因为它们是“开箱即用”的。
关键组件包括:
- SimpleAuthenticationFilter - UsernamePasswordAuthenticationFilter的扩展
- SimpleUserDetailsService - UserDetailsService的实现
- User - Spring Security提供的User类的扩展,它声明了我们的额外域字段
- SecurityConfig - 我们的Spring Security配置,它将SimpleAuthenticationFilter插入到过滤器链中,声明安全规则并连接依赖项
- login.html - 收集用户名,密码和域的登录页面
3.1. 简单Authentication Filter
在我们的SimpleAuthenticationFilter中,域和用户名字段是从请求中提取的。我们连接这些值并使用它们来创建UsernamePasswordAuthenticationToken的实例。
然后将令牌传递给AuthenticationProvider进行身份验证:
public class SimpleAuthenticationFilter
  extends UsernamePasswordAuthenticationFilter {

    @Override
    public Authentication attemptAuthentication(
      HttpServletRequest request,
      HttpServletResponse response)
        throws AuthenticationException {

        // ...

        UsernamePasswordAuthenticationToken authRequest
          = getAuthRequest(request);
        setDetails(request, authRequest);

        return this.getAuthenticationManager()
          .authenticate(authRequest);
    }

    private UsernamePasswordAuthenticationToken getAuthRequest(
      HttpServletRequest request) {

        String username = obtainUsername(request);
        String password = obtainPassword(request);
        String domain = obtainDomain(request);

        // ...

        String usernameDomain = String.format("%s%s%s", username.trim(),
          String.valueOf(Character.LINE_SEPARATOR), domain);
        return new UsernamePasswordAuthenticationToken(
          usernameDomain, password);
    }

    // other methods
}
3.2.简单的UserDetails服务
UserDetailsService定义了一个名为loadUserByUsername的方法。我们的实现提取用户名和域名。然后将值传递给我们的UserRepository以获取用户:
public class SimpleUserDetailsService implements UserDetailsService {

    // ...

    @Override
    public UserDetails loadUserByUsername(String username) throws UsernameNotFoundException {
        String[] usernameAndDomain = StringUtils.split(
          username, String.valueOf(Character.LINE_SEPARATOR));
        if (usernameAndDomain == null || usernameAndDomain.length != 2) {
            throw new UsernameNotFoundException("Username and domain must be provided");
        }
        User user = userRepository.findUser(usernameAndDomain[0], usernameAndDomain[1]);
        if (user == null) {
            throw new UsernameNotFoundException(
              String.format("Username not found for domain, username=%s, domain=%s",
                usernameAndDomain[0], usernameAndDomain[1]));
        }
        return user;
    }
}
3.3. Spring Security配置
我们的设置与标准的Spring Security配置不同,因为我们在默认情况下通过调用addFilterBefore将SimpleAuthenticationFilter插入到过滤器链中:
@Override
protected void configure(HttpSecurity http) throws Exception {

    http
      .addFilterBefore(authenticationFilter(),
        UsernamePasswordAuthenticationFilter.class)
      .authorizeRequests()
        .antMatchers("/css/**", "/index").permitAll()
        .antMatchers("/user/**").authenticated()
      .and()
      .formLogin().loginPage("/login")
      .and()
      .logout()
      .logoutUrl("/logout");
}
我们可以使用提供的DaoAuthenticationProvider,因为我们使用SimpleUserDetailsService配置它。回想一下,我们的SimpleUserDetailsService知道如何解析我们的用户名和域字段,并返回在验证时使用的相应用户。
public AuthenticationProvider authProvider() {
    DaoAuthenticationProvider provider = new DaoAuthenticationProvider();
    provider.setUserDetailsService(userDetailsService);
    provider.setPasswordEncoder(passwordEncoder());
    return provider;
}
由于我们使用的是SimpleAuthenticationFilter,因此我们配置自己的AuthenticationFailureHandler以确保正确处理失败的登录尝试:
public SimpleAuthenticationFilter authenticationFilter() throws Exception {
    SimpleAuthenticationFilter filter = new SimpleAuthenticationFilter();
    filter.setAuthenticationManager(authenticationManagerBean());
    filter.setAuthenticationFailureHandler(failureHandler());
    return filter;
}
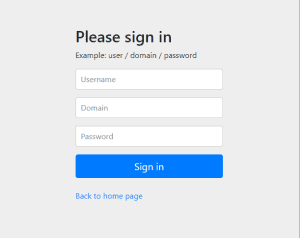
3.4.登录页面
我们使用的登录页面收集我们的SimpleAuthenticationFilter提取的额外的字段:
<form class="form-signin" th:action="@{/login}" method="post">
 <h2 class="form-signin-heading">Please sign in</h2>
 <p>Example: user / domain / password</p>
 <p th:if="${param.error}" class="error">Invalid user, password, or domain</p>
 <p>
   <label for="username" class="sr-only">Username</label>
   <input type="text" id="username" name="username" class="form-control"
     placeholder="Username" required autofocus/>
 </p>
 <p>
   <label for="domain" class="sr-only">Domain</label>
   <input type="text" id="domain" name="domain" class="form-control"
     placeholder="Domain" required autofocus/>
 </p>
 <p>
   <label for="password" class="sr-only">Password</label>
   <input type="password" id="password" name="password" class="form-control"
     placeholder="Password" required autofocus/>
 </p>
 <button class="btn btn-lg btn-primary btn-block" type="submit">Sign in</button><br/>
 <p><a href="/index" th:href="@{/index}">Back to home page</a></p>
</form>
当我们运行应用程序并访问http:// localhost:8081上下文时,我们会看到一个访问安全页面的链接。单击该链接将显示登录页面。正如所料,我们看到了额外的域名字段
3.5.总结
在我们的第一个例子中,我们能够通过“伪造”用户名字段来重用DaoAuthenticationProvider和UsernamePasswordAuthenticationToken。
因此,我们能够使用最少量的配置和其他代码添加对额外登录字段的支持。
4.自定义项目设置
我们的第二种方法与第一种方法非常相似,但可能更适合于非平凡用例。
我们的第二种方法的关键组成部分包括:
- CustomAuthenticationFilter - UsernamePasswordAuthenticationFilter的扩展
- CustomUserDetailsService - 声明loadUserbyUsernameAndDomain方法的自定义接口
- CustomUserDetailsServiceImpl - CustomUserDetailsService的实现
- CustomUserDetailsAuthenticationProvider - AbstractUserDetailsAuthenticationProvider的扩展
- CustomAuthenticationToken - UsernamePasswordAuthenticationToken的扩展
- User - Spring Security提供的User类的扩展,它声明了我们的额外域字段
- SecurityConfig - 我们的Spring Security配置,它将CustomAuthenticationFilter插入到过滤器链中,声明安全规则并连接依赖项
- login.html - 收集用户名,密码和域的登录页面
4.1.自定义验证过滤器
在我们的CustomAuthenticationFilter中,我们从请求中提取用户名,密码和域字段。这些值用于创建CustomAuthenticationToken的实例,该实例将传递给AuthenticationProvider进行身份验证:
public class CustomAuthenticationFilter
  extends UsernamePasswordAuthenticationFilter {

    public static final String SPRING_SECURITY_FORM_DOMAIN_KEY = "domain";

    @Override
    public Authentication attemptAuthentication(
        HttpServletRequest request,
        HttpServletResponse response)
          throws AuthenticationException {

        // ...

        CustomAuthenticationToken authRequest = getAuthRequest(request);
        setDetails(request, authRequest);
        return this.getAuthenticationManager().authenticate(authRequest);
    }

    private CustomAuthenticationToken getAuthRequest(HttpServletRequest request) {
        String username = obtainUsername(request);
        String password = obtainPassword(request);
        String domain = obtainDomain(request);

        // ...

        return new CustomAuthenticationToken(username, password, domain);
    }
4.2.自定义UserDetails服务
我们的CustomUserDetailsService合约定义了一个名为loadUserByUsernameAndDomain的方法。
我们创建的CustomUserDetailsServiceImpl类只是实现并委托我们的CustomUserRepository来获取用户:
public UserDetails loadUserByUsernameAndDomain(String username, String domain)
    throws UsernameNotFoundException {
    if (StringUtils.isAnyBlank(username, domain)) {
        throw new UsernameNotFoundException("Username and domain must be provided");
    }
    User user = userRepository.findUser(username, domain);
    if (user == null) {
        throw new UsernameNotFoundException(
          String.format("Username not found for domain, username=%s, domain=%s",
            username, domain));
    }
    return user;
}
4.3.自定义UserDetailsAuthenticationProvider
我们的CustomUserDetailsAuthenticationProvider将AbstractUserDetailsAuthenticationProvider和委托扩展到我们的CustomUserDetailService以检索用户。这个类最重要的特性是retrieveUser方法的实现。
请注意,我们必须将身份验证令牌强制转换为CustomAuthenticationToken才能访问我们的自定义字段:
@Override
protected UserDetails retrieveUser(String username,
  UsernamePasswordAuthenticationToken authentication)
    throws AuthenticationException {

    CustomAuthenticationToken auth = (CustomAuthenticationToken) authentication;
    UserDetails loadedUser;

    try {
        loadedUser = this.userDetailsService
          .loadUserByUsernameAndDomain(auth.getPrincipal()
            .toString(), auth.getDomain());
    } catch (UsernameNotFoundException notFound) {

        if (authentication.getCredentials() != null) {
            String presentedPassword = authentication.getCredentials()
              .toString();
            passwordEncoder.matches(presentedPassword, userNotFoundEncodedPassword);
        }
        throw notFound;
    } catch (Exception repositoryProblem) {

        throw new InternalAuthenticationServiceException(
          repositoryProblem.getMessage(), repositoryProblem);
    }

    // ...

    return loadedUser;
}
4.4.总结
我们的第二种方法几乎与我们首先提出的简单方法相同。通过实现我们自己的AuthenticationProvider和CustomAuthenticationToken,我们避免了需要使用自定义解析逻辑来调整我们的用户名字段。
5.结论
在本文中,我们在Spring Security中实现了一个使用额外登录字段的表单登录。我们以两种不同的方式做到了这一点
- 在我们简单的方法中,我们最小化了我们需要编写的代码量。通过使用自定义解析逻辑调整用户名,我们能够重用DaoAuthenticationProvider和UsernamePasswordAuthentication
- 在我们更加个性化的方法中,我们通过扩展AbstractUserDetailsAuthenticationProvider并使用CustomAuthenticationToken提供我们自己的CustomUserDetailsService来提供自定义字段支持。
与往常一样,所有源代码都可以在GitHub上找到。
欢迎关注微信或公众号!!!


出处: https://www.cnblogs.com/xjknight/
本文版权归作者和博客园共有,欢迎转载,但未经作者同意必须保留此段声明,且在文章页面明显位置给出原文连接,否则保留追究法律责任的权利。

 浙公网安备 33010602011771号