《SpringMVC从入门到放肆》七、模型与视图ModelAndView
 上一篇我们了解了开发一个Controller的4种方法,如果不记得的朋友可以看看上一篇博文,今天我们来继续了解SpringMVC的模型与视图ModelAndView。
一、什么是Model?
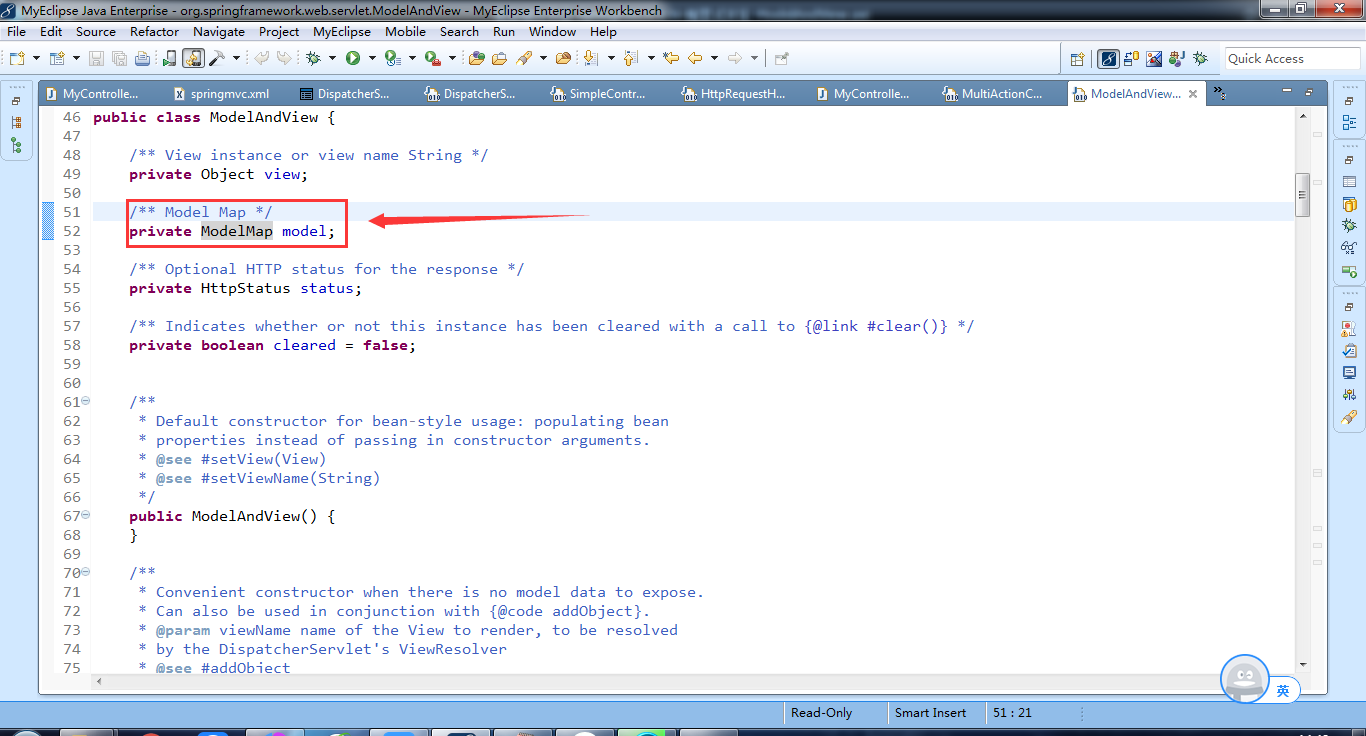
ModelAndView即模型与视图,通过addObject()方法向模型中添加数据,通过setViewName()方法来指定视图名称。查看源码,可以看到ModelAndView类中的模型model其实是个ModelMap,继续跟踪ModelMap,可以发现其实是继承自LinkedHashMap类的。而LinkedHashMap类正是一个双向的链表。如下:
上一篇我们了解了开发一个Controller的4种方法,如果不记得的朋友可以看看上一篇博文,今天我们来继续了解SpringMVC的模型与视图ModelAndView。
一、什么是Model?
ModelAndView即模型与视图,通过addObject()方法向模型中添加数据,通过setViewName()方法来指定视图名称。查看源码,可以看到ModelAndView类中的模型model其实是个ModelMap,继续跟踪ModelMap,可以发现其实是继承自LinkedHashMap类的。而LinkedHashMap类正是一个双向的链表。如下:
上一篇我们了解了开发一个Controller的4种方法,如果不记得的朋友可以看看上一篇博文,今天我们来继续了解SpringMVC的模型与视图ModelAndView。
一、什么是Model?
ModelAndView即模型与视图,通过addObject()方法向模型中添加数据,通过setViewName()方法来指定视图名称。查看源码,可以看到ModelAndView类中的模型model其实是个ModelMap,继续跟踪ModelMap,可以发现其实是继承自LinkedHashMap类的。而LinkedHashMap类正是一个双向的链表。如下:
@SuppressWarnings("serial")

public class ModelMap extends LinkedHashMap<String, Object> {

    //...

}
二、视图解析器
视图解析器ViewResolver接口负责将处理结果生成view视图,常用的实现类有4种。
1:内部资源解析器(InternalResourceViewResolver)
该解析器用于完成对当前Web应用内部的资源进行封装与跳转,查找规则是将ModelAndView中指定的视图名称与解析器的前缀与后缀进行拼接,拼接成一个内部路径。(前缀 + 视图名称 + 后缀)SpringMVC默认的视图解析器就是InternalResourceViewResolver。
<!-- 注册视图解析器 -->

<bean class="org.springframework.web.servlet.view.InternalResourceViewResolver">

    <property name="prefix" value="/WEB-INF/jsp/" />

    <property name="suffix" value=".jsp" />

</bean>
2:Bean名称视图解析器(BeanNameViewResolver)
该视图解析器顾名思义就是将资源封装为“Spring容器注册的Bean实例”,ModelAndView通过设置视图名称为该Bean的ID属性值来完成对该资源的访问。先来了解一下RedirectView和JstlView。
RedirectView:定义外部资源视图对象
JstlView:定义内部资源视图对象
具体的配置方式:
在springmvc.xml中按如下配置方式来进行配置:
<?xml version="1.0" encoding="UTF-8"?>
<beans xmlns="http://www.springframework.org/schema/beans"
    xmlns:xsi="http://www.w3.org/2001/XMLSchema-instance"
    xmlns:context="http://www.springframework.org/schema/context"
    xmlns:aop="http://www.springframework.org/schema/aop"
    xmlns:tx="http://www.springframework.org/schema/tx"
    xmlns:mvc="http://www.springframework.org/schema/mvc"
    xsi:schemaLocation="http://www.springframework.org/schema/beans    http://www.springframework.org/schema/beans/spring-beans.xsd
    http://www.springframework.org/schema/context http://www.springframework.org/schema/context/spring-context.xsd
    http://www.springframework.org/schema/aop http://www.springframework.org/schema/aop/spring-aop.xsd
    http://www.springframework.org/schema/tx http://www.springframework.org/schema/tx/spring-tx.xsd
    http://www.springframework.org/schema/mvc http://www.springframework.org/schema/mvc/spring-mvc.xsd">

    <!-- 注册视图解析器 -->
    <bean class="org.springframework.web.servlet.view.BeanNameViewResolver"></bean>

    <!-- 外部资源视图,以百度为例 -->
    <bean id="baidu" class="org.springframework.web.servlet.view.RedirectView">
        <property name="url" value="http://www.baidu.com" />
    </bean>

    <!-- 内部资源视图 -->
    <bean id="welcome" class="org.springframework.web.servlet.view.JstlView">
        <property name="url" value="/WEB-INF/jsp/welcome.jsp" />
    </bean>

    <!-- 注册SpringMVC处理器 -->
    <bean id="/my.do" class="cn.wechatbao.controller.MyController"></bean>
</beans>
Controller代码如下:
public class MyController implements Controller {

    @Override
    public ModelAndView handleRequest(HttpServletRequest request,
        HttpServletResponse response) throws Exception {
        return new ModelAndView("baidu");//这里的名称就是springmvc.xml中配置的bean的id属性
    }

}
注意:该种方法的缺点在于,如果配置的视图很多的情况下,会使springmvc.xml文件变的特别臃肿。
3:xml文件视图解析器(XmlViewResolver)
和上一种方式基本一样,只是为了解决springmvc.xml文件的臃肿的问题,这里XmlViewResolver视图解析器,将视图与配置进行分离。在src目录下,增加springviews.xml,内容如下:
<?xml version="1.0" encoding="UTF-8"?>
<beans xmlns="http://www.springframework.org/schema/beans"
    xmlns:xsi="http://www.w3.org/2001/XMLSchema-instance"
    xmlns:context="http://www.springframework.org/schema/context"
    xmlns:aop="http://www.springframework.org/schema/aop"
    xmlns:tx="http://www.springframework.org/schema/tx"
    xmlns:mvc="http://www.springframework.org/schema/mvc"
    xsi:schemaLocation="http://www.springframework.org/schema/beans
    http://www.springframework.org/schema/beans/spring-beans.xsd
    http://www.springframework.org/schema/context http://www.springframework.org/schema/context/spring-context.xsd
    http://www.springframework.org/schema/aop http://www.springframework.org/schema/aop/spring-aop.xsd
    http://www.springframework.org/schema/tx http://www.springframework.org/schema/tx/spring-tx.xsd
    http://www.springframework.org/schema/mvc http://www.springframework.org/schema/mvc/spring-mvc.xsd">

    <!-- 外部资源视图,以百度为例 -->
    <bean id="baidu" class="org.springframework.web.servlet.view.RedirectView">
        <property name="url" value="http://www.baidu.com" />
    </bean>

    <!-- 内部资源视图 -->
    <bean id="welcome" class="org.springframework.web.servlet.view.JstlView">
        <property name="url" value="/WEB-INF/jsp/welcome.jsp" />
    </bean>
</beans>
springmvc.xml文件修改如下:
<?xml version="1.0" encoding="UTF-8"?>
<beans xmlns="http://www.springframework.org/schema/beans"
    xmlns:xsi="http://www.w3.org/2001/XMLSchema-instance"
    xmlns:context="http://www.springframework.org/schema/context"
    xmlns:aop="http://www.springframework.org/schema/aop"
    xmlns:tx="http://www.springframework.org/schema/tx"
    xmlns:mvc="http://www.springframework.org/schema/mvc"
    xsi:schemaLocation="http://www.springframework.org/schema/beans
    http://www.springframework.org/schema/beans/spring-beans.xsd
    http://www.springframework.org/schema/context http://www.springframework.org/schema/context/spring-context.xsd
    http://www.springframework.org/schema/aop http://www.springframework.org/schema/aop/spring-aop.xsd
    http://www.springframework.org/schema/tx http://www.springframework.org/schema/tx/spring-tx.xsd
    http://www.springframework.org/schema/mvc http://www.springframework.org/schema/mvc/spring-mvc.xsd">

    <!-- 注册视图解析器 -->
    <bean class="org.springframework.web.servlet.view.XmlViewResolver">
        <property name="location" value="classpath:springviews.xml" />
    </bean>

    <!-- 注册SpringMVC处理器 -->
    <bean id="/my.do" class="cn.wechatbao.controller.MyController"></bean>

</beans>
Controller保持不变,这样即实现了和上一种方法一样的结果。
4:资源文件绑定视图解析器(ResourceBundleViewResolver)
和上一种方式一样,在src目录下创建springviews.properties,内容如下:
baidu.(class)=org.springframework.web.servlet.view.RedirectView

baidu.url=http://www.baidu.com

welcome.(class)=org.springframework.web.servlet.view.JstlView
baidu.url=/WEB-INF/jsp/welcome.jsp
springmvc.xml文件修改为如下内容:
<?xml version="1.0" encoding="UTF-8"?>
<beans xmlns="http://www.springframework.org/schema/beans"
    xmlns:xsi="http://www.w3.org/2001/XMLSchema-instance"
    xmlns:context="http://www.springframework.org/schema/context"
    xmlns:aop="http://www.springframework.org/schema/aop"
    xmlns:tx="http://www.springframework.org/schema/tx"
    xmlns:mvc="http://www.springframework.org/schema/mvc"
    xsi:schemaLocation="http://www.springframework.org/schema/beans
    http://www.springframework.org/schema/beans/spring-beans.xsd
    http://www.springframework.org/schema/context http://www.springframework.org/schema/context/spring-context.xsd
    http://www.springframework.org/schema/aop http://www.springframework.org/schema/aop/spring-aop.xsd
    http://www.springframework.org/schema/tx http://www.springframework.org/schema/tx/spring-tx.xsd
    http://www.springframework.org/schema/mvc http://www.springframework.org/schema/mvc/spring-mvc.xsd">

    <!-- 注册视图解析器 -->
    <bean class="org.springframework.web.servlet.view.ResourceBundleViewResolver">
        <property name="basename" value="springviews" />
    </bean>

    <!-- 注册SpringMVC处理器 -->
    <bean id="/my.do" class="cn.wechatbao.controller.MyController"></bean>

</beans>
注意:只是将视图解析器修改成了ResourceBundleViewResolver,注入属性变成了basename,value是properties文件的名称,不包含后缀名。
三、视图解析器的优先级
在某些时候,我们项目中需要配置多个视图解析器,而这多个视图解析器都要启用,并且多个视图解析器中都对相同的资源进行了配置,那么就涉及到了优先级的问题了。
默认情况下,优先级顺序是按在springmvc.xml中配置的视图解析器的顺序来决定的,先加载优先级高,后加载优先级低。但是也可以手动进行设置,如下
<!-- 注册视图解析器 -->
<bean class="org.springframework.web.servlet.view.ResourceBundleViewResolver">
    <property name="basename" value="springviews" />
    <property name="order" value="3" />
</bean>
<!-- 注册视图解析器 -->
<bean class="org.springframework.web.servlet.view.XmlViewResolver">
    <property name="location" value="classpath:springviews.xml" />
    <property name="order" value="1" />
</bean>
注意:在进行注册视图解析器的时候,可以指定order属性,该属性值越小,代表优先级越高。

 浙公网安备 33010602011771号