本地环境搭建Virtualbox+Vagrant
环境准备
virtualbox是免费,不必要费劲去找破解,下载就可以用。 使用virtualbox每次安装虚拟机,需要你去下载iso,然后设置虚拟机硬件配置,使用iso创建虚拟器。一系列的手工操作,如果你只创建一两个虚拟机练练手,是足够的。 如果需要创建10个虚拟机,就需要重复10次。这时候,vagrant就派上用场了。
Vagrant基于配置文件,一键创建N台设备。
1)Virtualbox
下载:https://www.virtualbox.org/wiki/Downloads
根据自己的环境选择下载不同的软件版本
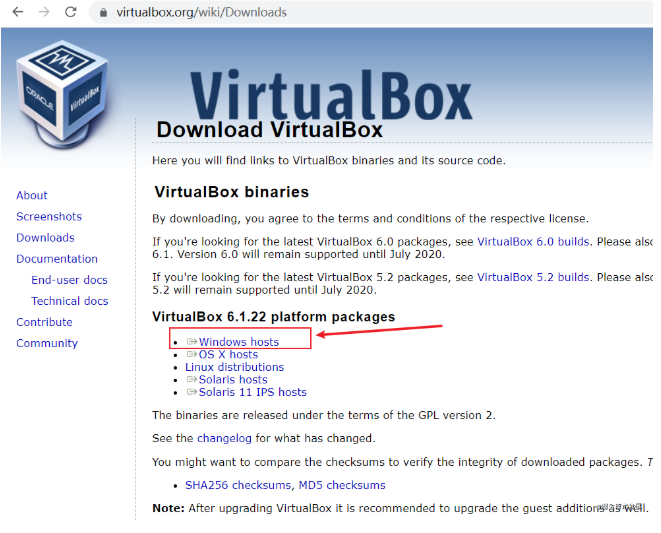
下载之后的安装:

2)vagrant(官网)
下载:https://www.vagrantup.com/downloads
根据本地环境选择需要的版本进行下载
安装成功之后:

3)vagrant使用
概念:
box:虚拟机镜像
provider:虚拟服务提供者, 例如virtualbox,VMware
box获取:
在官网镜像库检索

直接配置所需要的box名称即可,当启动虚拟机时候, 会从官网镜像库下载镜像后创建虚拟机
但是一般box包默认都是走的国外的地址, 速度真的是感人,于是我们使用国内镜像
国内镜像:mirrors.ustc.edu.cn/
vagrant镜像一般在vagrant目录下的box文件,例如centos的一般路径:https://mirrors.ustc.edu.cn/centos-cloud/centos/7/vagrant/x86_64/images/
a)
box下载之后, 添加到本地的box库
vagrant box add centos7  F:/CentOS-7.box

前面的参数:是应用的名称
后面的参数:是需要使用的具体box(具体路径)
b)初始化项目
vagrant init
在目录下会初始化一个VagrantFile文件
修改配置如下:
# -*- mode: ruby -*-
# vi: set ft=ruby :

# All Vagrant configuration is done below. The "2" in Vagrant.configure
# configures the configuration version (we support older styles for
# backwards compatibility). Please don't change it unless you know what
# you're doing.
Vagrant.configure("2") do |config|
  # The most common configuration options are documented and commented below.
  # For a complete reference, please see the online documentation at
  # https://docs.vagrantup.com.

  # Every Vagrant development environment requires a box. You can search for
  # boxes at https://vagrantcloud.com/search.
  config.vm.box = "centos7"

  config.vm.define "web1" do |web|
    web.vm.hostname = "web1"
    web.vm.box = "centos7"
    web.vm.network "private_network", ip: "192.168.56.10"
  end

  config.vm.define "web2" do |web|
    web.vm.hostname = "web2"
    web.vm.box = "centos7"
    web.vm.network "private_network", ip: "192.168.56.11"
  end
end
该配置文件, 使用centos7配置了两个虚拟机,ip分别是:192.168.56.10,192.168.56.11
c)启动虚拟机
vagrant up
如果想单独启动一个服务
vagrant up web1
    or
vagrant up web2
服务启动之后 初始化了root和vagrant用户, 密码都是vagrant, 默认不允许使用密码进行登录
d)进入虚拟机
vagrant ssh web1
登录之后, 默认是vagrant用户, 使用su root可切换到root用户, 密码是vagrant
当然也可以使用ssh连接工具进行链接登录, 用户名使用vagrant,publicKey的方式进行登录,可查看公钥地址
vagrant ssh-config web1
   or
vagrant ssh-config web2


如果要看全部的
vagrant ssh-config
e)文件同步
默认vagrant将当前vagrant工程目录(VagrantFile文件所在目录)映射到/vagrant目录
当时这种映射并不是实时的, 在虚拟机启动的时候 会进行一次同步操作,如果要在虚拟机运行期间进行文件的同步, 需要执行命令:
vagrant rsync
最佳实践
可以使用Provision,为每一个虚拟机配置一套初始化脚本,来加强虚拟机的初始化。
VagrantFile放到开发工程中,提交到git,其他开发小伙伴也可以下载后,一键启动虚拟机环境,就可以和你拥有一样的虚拟机环境。
扩展:
1.更换yum源
cd /etc/yum.repos.d 目录下,CentOS-Base.repo为全局镜像源配置,将其进行更换
mv CentOS-Base.repo CentOS-Base.repo.bak


# 查看centos版本
[root@localhost yum.repos.d]# cat /etc/redhat-release
CentOS Linux release 7.6.1810 (Core)

# 配置为阿里镜像源
wget -O /etc/yum.repos.d/CentOS-Base.repo http://mirrors.aliyun.com/repo/Centos-7.repo

# 设置缓存
yum makecache

# 更新镜像配置,可以看到阿里镜像源
[root@localhost yum.repos.d]# yum -y update
Loaded plugins: fastestmirror
Loading mirror speeds from cached hostfile
 * base: mirrors.aliyun.com
 * epel: mirrors.njupt.edu.cn
 * extras: mirrors.aliyun.com
 * updates: mirrors.aliyun.com
2.如果想要文件同步需要进行配置
config.vm.define "web1" do |web|
    web.vm.hostname = "web1"
    web.vm.box = "centos7"
    web.vm.network "private_network", ip: "192.168.56.10"
    web.vm.synced_folder "web1", "/vagrant_data"
    # web.ssh.insert_key = false
    # web.ssh.username = "vagrant"
    # web.ssh.password = "vagrant"
  end

  config.vm.define "web2" do |web|
    web.vm.hostname = "web2"
    web.vm.box = "centos7"
    web.vm.network "private_network", ip: "192.168.56.11"
    web.vm.synced_folder "web2", "/vagrant_data"
    # web.ssh.insert_key = false
    # web.ssh.username = "vagrant"
    # web.ssh.password = "vagrant"
  end
synced_folder
常见问题:
1.虚拟机中出现一个命令无法使用 No package xxx available
原因:
软件包默认不在yum仓库中,因此需要配置epel仓库
1.配置阿里云网络源
wget -O /etc/yum.repos.d/CentOS-Base.repo http://mirrors.aliyun.com/repo/Centos-7.repo

或者使用curl
curl -o /etc/yum.repos.d/CentOS-Base.repo http://mirrors.aliyun.com/repo/Centos-7.repo
配置epel源
yum install -y epel-release
说明: Centos-7.repo提供了centos7官方发行版提供的软件包, epel源提供了除了官网之外的软件包
2.无法挂载目录Vagrant挂载目录失败mount: unknown filesystem type ‘vboxsf’
可以安装插件:http://download.virtualbox.org/virtualbox/6.1.24/VBoxGuestAdditions_6.1.24.iso
使用命令安装:
vagrant plugin install vagrant-vbguest


如果太慢的话
vagrant plugin install 插件名称 --plugin-clean-sources --plugin-source https://gems.ruby-china.com/


vagrant plugin install vagrant-vbguest --plugin-clean-sources --plugin-source https://gems.ruby-china.com/
如果还是报错, 尝试使用其他版本:
  config.vm.box = “centos/7” to –> config.vm.box = “generic/centos7” and uninstall the plugin using this command “vagrant plugin uninstall vagrant-vbguest” after that run command “vagrant up”

  vagrant plugin uninstall vagrant-vbguest
vagrant plugin install vagrant-vbguest --plugin-version 0.21
或者虚拟系统中需要安装依赖:
uname -r
yum install kernel-devel-x.x.x
yum install kernel-devel-3.10.0


centos  yum install kernel-devel-xxx

debian  apt-get install kernel-headers-xxx

 浙公网安备 33010602011771号