线程锁(四)
前面篇幅讲了很多理论及原理性东西,今天想了想,来点现实场景的东西把前面的内容串一串
一. 死锁产生的原因
1) 系统资源的竞争
通常系统中拥有的不可剥夺资源,其数量不足以满足多个进程运行的需要,使得进程在 运行过程中,会因争夺资源而陷入僵局,如磁带机、打印机等。只有对不可剥夺资源的竞争 才可能产生死锁,对可剥夺资源的竞争是不会引起死锁的。
2) 进程推进顺序非法
进程在运行过程中,请求和释放资源的顺序不当,也同样会导致死锁。例如,并发进程 P1、P2分别保持了资源R1、R2,而进程P1申请资源R2,进程P2申请资源R1时,两者都 会因为所需资源被占用而阻塞。
信号量使用不当也会造成死锁。进程间彼此相互等待对方发来的消息,结果也会使得这 些进程间无法继续向前推进。例如,进程A等待进程B发的消息,进程B又在等待进程A 发的消息,可以看出进程A和B不是因为竞争同一资源,而是在等待对方的资源导致死锁。
3) 死锁产生的必要条件
产生死锁必须同时满足以下四个条件,只要其中任一条件不成立,死锁就不会发生。
- 互斥,共享资源 X 和 Y 只能被一个线程占用;
- 占有且等待,线程 T1 已经取得共享资源 X,在等待共享资源 Y 的时候,不释放共享资源 X;
- 不可抢占,其他线程不能强行抢占线程 T1 占有的资源;
- 循环等待,线程 T1 等待线程 T2 占有的资源,线程 T2 等待线程 T1 占有的资源,就是循环等待
下面就定义来演示一个死锁场景的例子:
public class Transfer {
    private String accountName;
    private int balance;

    public Transfer(String accountName, int balance) {
        this.accountName = accountName;
        this.balance = balance;
    }

    public void debit(int amount){ //更新转出方的余额
        this.balance-=amount;
    }

    public void credit(int amount){ //更新转入方的余额
        this.balance+=amount;
    }

    public String getAccountName() {
        return accountName;
    }

    public void setAccountName(String accountName) {
        this.accountName = accountName;
    }

    public int getBalance() {
        return balance;
    }

    public void setBalance(int balance) {
        this.balance = balance;
    }
}
public class Deadlock  implements  Runnable{

    private Transfer fromAccount; //转出账户
    private Transfer toAccount; //转入账户
    private int amount;  //转入金额

    public Deadlock(Transfer fromAccount, Transfer toAccount, int amount) {
        this.fromAccount = fromAccount;
        this.toAccount = toAccount;
        this.amount = amount;

    }
    @Override
    public void run() {
        while(true){
            try {
                Thread.sleep(2000);
            } catch (InterruptedException e) {
                e.printStackTrace();
            }
            synchronized (fromAccount) {
                synchronized (toAccount) {
                    if (fromAccount.getBalance() >= amount) {
                        fromAccount.debit(amount);
                        toAccount.credit(amount);
                    }
                }
            }
            //转出账户的余额
            System.out.println(fromAccount.getAccountName() + "->" + fromAccount.getBalance());
            //转入账户的余额
            System.out.println(toAccount.getAccountName() + "-->" + toAccount.getBalance());

        }

    }

    public static void main(String[] args) throws InterruptedException {
        Transfer fromAccount=new Transfer("用户A",100000);
        Transfer toAccount=new Transfer("用户B",300000);

        Thread a =new Thread(new Deadlock(fromAccount,toAccount,10));
        Thread b=new Thread(new Deadlock(toAccount,fromAccount,30));

        a.start();
        b.start();
    }
}
如下图,死锁条件产生了,下面死锁产生的条件就是互斥产生的,想要破坏死锁只用破坏死锁的四大条件的其中一个就可以,下面我们就上面代码优化下,破坏占有且等待这个条件来破坏。

我们增加一个类,专门用来分配资源
public class Allocator {

    private List<Object> list=new ArrayList<>();
    //保证互斥,只有一个线程能进入此方法
    synchronized  boolean apply(Object from,Object to){
        if(list.contains(from)||list.contains(to)){
            return false;
        }
        list.add(from);
        list.add(to);
        return true;
    }

    synchronized void free(Object from,Object to){
        list.remove(from);
        list.remove(to);
    }


}
修改原有的Deadlock类
public class Deadlock  implements  Runnable{

    private Transfer fromAccount; //转出账户
    private Transfer toAccount; //转入账户
    private int amount;  //转入金额
    Allocator allocator;

    public Deadlock(Transfer fromAccount, Transfer toAccount, int amount,Allocator allocator) {
        this.fromAccount = fromAccount;
        this.toAccount = toAccount;
        this.amount = amount;
        this.allocator=allocator;
    }
    @Override
    public void run() {
        while(true){
          //锁力度调大,在if层面
          if (allocator.apply(fromAccount,toAccount)) {
              synchronized (fromAccount) {
                  synchronized (toAccount) {
                      if (fromAccount.getBalance() >= amount) {
                          fromAccount.debit(amount);
                          toAccount.credit(amount);
                      }
                  }
              }
          }
            //转出账户的余额
            System.out.println(fromAccount.getAccountName() + "->" + fromAccount.getBalance());
            //转入账户的余额
            System.out.println(toAccount.getAccountName() + "-->" + toAccount.getBalance());

        }

    }

    public static void main(String[] args) throws InterruptedException {
        Transfer fromAccount=new Transfer("用户A",100000);
        Transfer toAccount=new Transfer("用户B",300000);

        Allocator allocator=new Allocator();
        Thread a =new Thread(new Deadlock(fromAccount,toAccount,10,allocator));
        Thread b=new Thread(new Deadlock(toAccount,fromAccount,30,allocator));

        a.start();
        b.start();
    }
}
自己运行下会发现死锁解决了,上面我们是破坏了占有且等待这个条件解决了死锁,下面我们就不可抢占这个条件来解决死锁问题,我们利用Lock的属性来破坏,将Deadlock代码再修改一次(Lock我想在下个篇幅中具体讲)
public class Deadlock1 implements  Runnable{

    private Transfer fromAccount; //转出账户
    private Transfer toAccount; //转入账户
    private int amount;  //转入金额

    Lock fromLock=new ReentrantLock();
    Lock toLock=new ReentrantLock();

    public Deadlock1(Transfer fromAccount, Transfer toAccount, int amount) {
        this.fromAccount = fromAccount;
        this.toAccount = toAccount;
        this.amount = amount;
    }
    @Override
    public void run() {
        while(true){

              if (fromLock.tryLock()) {
                  if (toLock.tryLock()) {
                      if (fromAccount.getBalance() >= amount) {
                          fromAccount.debit(amount);
                          toAccount.credit(amount);
                      }
                  }
              }

            //转出账户的余额
            System.out.println(fromAccount.getAccountName() + "->" + fromAccount.getBalance());
            //转入账户的余额
            System.out.println(toAccount.getAccountName() + "-->" + toAccount.getBalance());

        }

    }

    public static void main(String[] args) throws InterruptedException {
        Transfer fromAccount=new Transfer("用户A",100000);
        Transfer toAccount=new Transfer("用户B",300000);

        Thread a =new Thread(new Deadlock1(fromAccount,toAccount,10));
        Thread b=new Thread(new Deadlock1(toAccount,fromAccount,30));

        a.start();
        b.start();
    }
}
最后我们再循环等待条件破坏死锁
public class Deadlock2  implements  Runnable{

    private Transfer fromAccount; //转出账户
    private Transfer toAccount; //转入账户
    private int amount;  //转入金额


    public Deadlock2(Transfer fromAccount, Transfer toAccount, int amount ) {
        this.fromAccount = fromAccount;
        this.toAccount = toAccount;
        this.amount = amount;

    }
    @Override
    public void run() {
        Transfer left=null;
        Transfer right=null;
        //控制加锁顺序
        if (fromAccount.hashCode()>toAccount.hashCode()){
            left=toAccount;
            right=fromAccount;
        }
        while(true){
                synchronized (left) {
                    synchronized (right) {
                        if (fromAccount.getBalance() >= amount) {
                            fromAccount.debit(amount);
                            toAccount.credit(amount);
                        }
                    }
                }

            //转出账户的余额
            System.out.println(fromAccount.getAccountName() + "->" + fromAccount.getBalance());
            //转入账户的余额
            System.out.println(toAccount.getAccountName() + "-->" + toAccount.getBalance());

        }

    }

    public static void main(String[] args) throws InterruptedException {
        Transfer fromAccount=new Transfer("用户A",100000);
        Transfer toAccount=new Transfer("用户B",300000);

        Allocator allocator=new Allocator();
        Thread a =new Thread(new Deadlock(fromAccount,toAccount,10,allocator));
        Thread b=new Thread(new Deadlock(toAccount,fromAccount,30,allocator));

        a.start();
        b.start();
    }
}
二.Thread.join

如果我们想要线程的结果对主线程可见我们可以用join,看下图结果我们一定有问题,为啥加了join就对主线程可见,下面我们就join的原理讲解下

我们点击t.join();看下join方法做了什么事情,看到下面源码我们发现一个关健字wait,如果看过我前面写的文章朋友应该很快想到他的原理就是阻塞,想到了阻塞那就一定有唤醒,那我们想,唤醒阻塞代码的地方会在哪里呢。
//首先源码中方法中加了锁
public final synchronized void join(long millis)
    throws InterruptedException {
        long base = System.currentTimeMillis();
        long now = 0;

        if (millis < 0) {
            throw new IllegalArgumentException("timeout value is negative");
        }

        if (millis == 0) {
            while (isAlive()) {
                wait(0);
            }
        } else {
            while (isAlive()) {
                long delay = millis - now;
                if (delay <= 0) {
                    break;
                }
                wait(delay);
                now = System.currentTimeMillis() - base;
            }
        }
    }
一个线程在run方法执行结束时就代表一个线程的终止,线程终止会调用C的javaThread:: exit方法;在这个方法里面会有个清理的方法叫ensure_join(this);这个方法会唤醒阻塞方法下的线程;
三.ThreadLocal
ThreadLocal为解决多线程程序的并发问题提供了一种新的思路。使用这个工具类可以很简洁地编写出优美的多线程程序。说白点就是实际上一种线程隔离机制,也是为了保证在多线程环境下对于共享变量的访问的安全性。下面我们就一个例子说明下
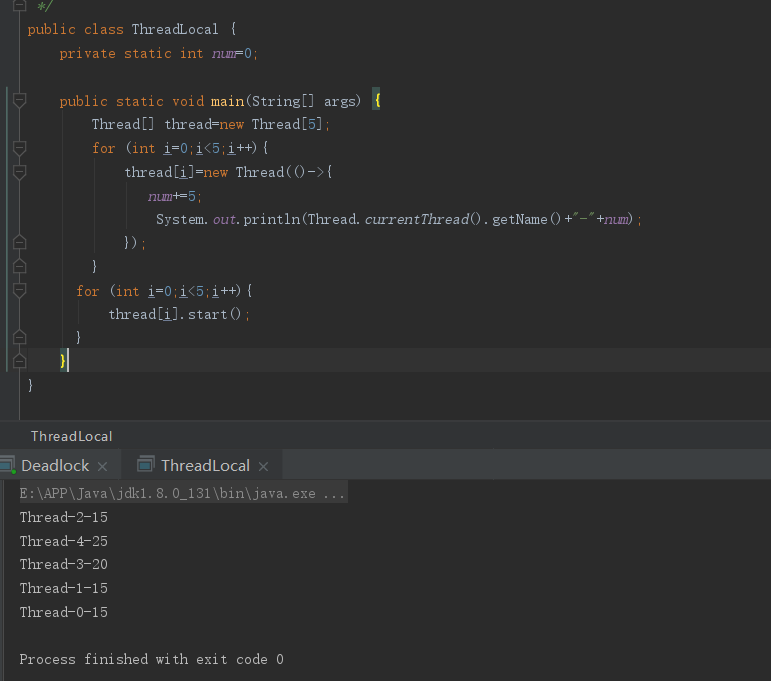
上面的例子我们发现每个线程间存在干扰问题,而且有的线程取的值还是相同的,如果我们想做到线程问的隔离,那我们就可以用到ThreadLocal,下图结果我们发现做到线程的隔离
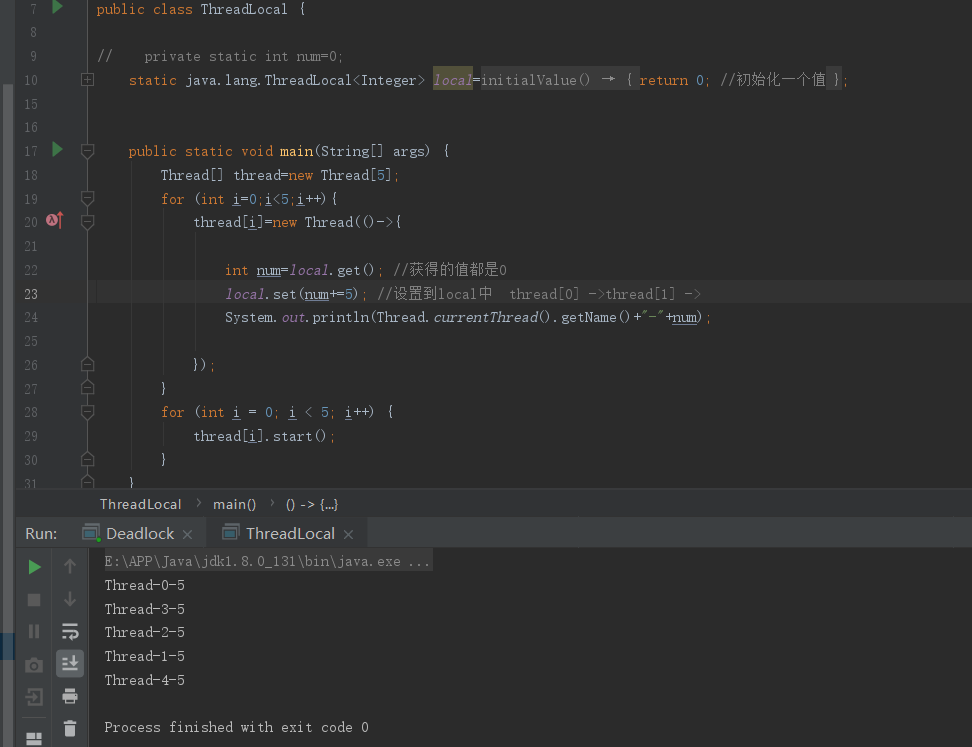
下面我们就ThreadLocal是如何实现的,我们进入源码
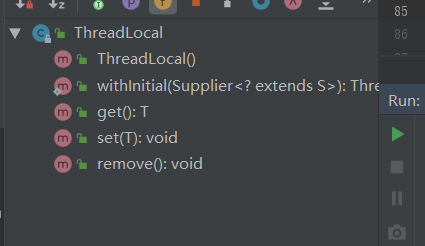
在源码的set方法
 public void set(T value) {
     //获取当前线程
        Thread t = Thread.currentThread();
        //有Map最先想到的是存储,我们点进去看下
        ThreadLocalMap map = getMap(t);
        if (map != null)
            map.set(this, value);
        else
            createMap(t, value);
    }
点进去好像也没有啥东西
ThreadLocalMap getMap(Thread t) {
        return t.threadLocals;
//ThreadLocal.ThreadLocalMap threadLocals = null;
}
那我们就行先暂时跳过,我们走if逻辑,我们第一次进来map是空的所有走createMap
    void createMap(Thread t, T firstValue) {
        t.threadLocals = new ThreadLocalMap(this, firstValue);
    }
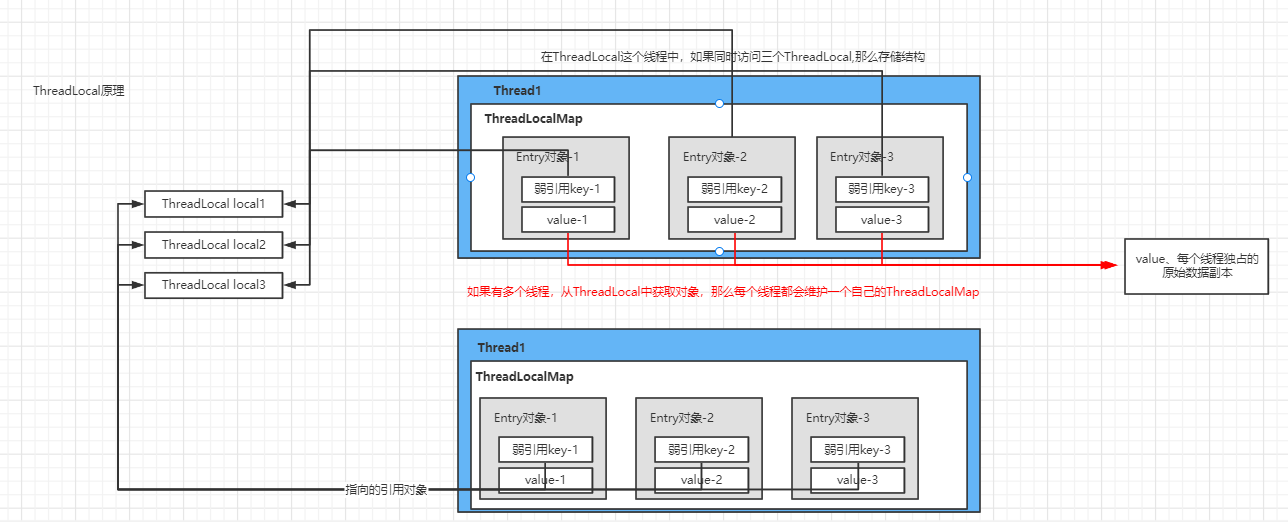
下面这段代码对每个线程都会创建一个存储,这就做到了线程间的隔离,而且下面源码中用到了hash计算及线性探测,如果我要全写完的话要化更多的时间,而且跟我要讲的线程主题偏远了,后面如果有时间,我再单独就这块内容的线性探测深入讲解下
   ThreadLocalMap(ThreadLocal<?> firstKey, Object firstValue) {
           //有兴趣可以点进看下Entry;这一步是初始化一个长度
            table = new Entry[INITIAL_CAPACITY];
           //这里面i的值其实就是一个下标,这里里其实就是用hash计算出下标位置,然后将数据存储起来
            int i = firstKey.threadLocalHashCode & (INITIAL_CAPACITY - 1);
            table[i] = new Entry(firstKey, firstValue);
            size = 1;
            setThreshold(INITIAL_CAPACITY);
        }

 浙公网安备 33010602011771号