

用Zebra打印机制作一个节日贺卡
写在前面
今天的主题就是用Zebra斑马打印机打印一个贺卡标签。
Zebra介绍
既然是贺卡,应该是非常漂亮的,但是这个Zebra打印机好像只能打印黑白的,所以就简单制作了一下。
工业上在批量打印商品标签时,一般都要加上条码或图片,一般使用Zebra斑马打印机比较多。而C#调用斑马打印机的方式也有很多种,包括串口COM、以太网TCP、并口LPT以及USB等,对于设计标签的方式也有很多种方式,比如Zebra提供了一个设计软件Zebra Designer,还可以使用第三方软件如Bartender,当然我们还可以自己通过GDI+技术进行绘制。
本例采用的方式是利用GDI+进行绘制,然后将图像转换成字节,通过DG和XG指令发送给打印机,通信使用的是打印机自带的USB接口。
图像绘制
首先通过GDI+绘制一张图像,图像的大小要根据实际标签大小进行调试,绘制内容可以是图像、字符串等,或者是条形码、二维码都可以,其实条形码及二维码也是属于图像。
private void btn_Paint_Click(object sender, EventArgs e)
{
//开始绘制图片
int imageWidth = 900;
int imageHeight = 600;
bitmap = new Bitmap(imageWidth, imageHeight);
//创建Graphics
Graphics graphics = Graphics.FromImage(bitmap);
//呈现质量
graphics.SmoothingMode = SmoothingMode.AntiAlias;
//背景色
graphics.Clear(Color.White);
//字体
Font myFont = new Font("楷体", 32, FontStyle.Bold);
//文字颜色
Brush brush = new SolidBrush(Color.Black);
//调整间距
int start = 145;
int gap = 80;
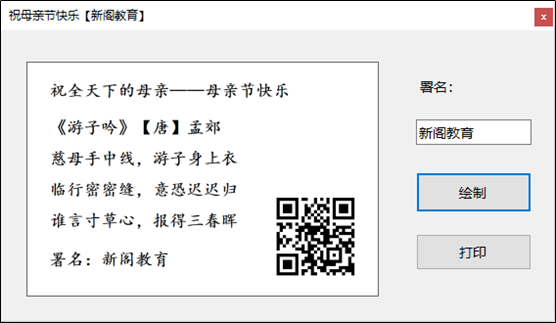
graphics.DrawString("祝全天下的母亲——母亲节快乐", myFont, brush, 50, 50);
graphics.DrawString("《游子吟》【唐】孟郊", myFont, brush, 50, start);
graphics.DrawString("慈母手中线,游子身上衣", myFont, brush, 50, start + gap);
graphics.DrawString("临行密密缝,意恐迟迟归", myFont, brush, 50, start + gap * 2);
graphics.DrawString("谁言寸草心,报得三春晖", myFont, brush, 50, start + gap * 3);
graphics.DrawString("署名:" + this.txt_Name.Text.Trim(), myFont, brush, 50, start + gap * 4 + 20);
//生成二维码
Image codeImage = BarCodeHelper.GenerateQRCode("https://ke.qq.com/course/301616", 220, 220);
Bitmap pbitmap = new Bitmap(codeImage);
pbitmap.MakeTransparent(Color.Transparent);
graphics.DrawImage(pbitmap, 630, 338, 220, 220);
//显示图形
this.mainPic.Image = bitmap;
}
编写好代码之后,将图像用一个PictureBox控件显示出来,结果如下:
图像处理
生成图像之后,接着将图像转换成字节数组或者字符串,便于后续直接发送给打印机,这里的代码是在网上找的,
    public static string BitmapToHex(Image sourceBmp, out int totalBytes, out int rowBytes)
        {
            // 转成单色图
            Bitmap grayBmp = ConvertToGrayscale(sourceBmp as Bitmap);
            // 锁定位图数据
            Rectangle rect = new Rectangle(0, 0, grayBmp.Width, grayBmp.Height);
            BitmapData bmpData = grayBmp.LockBits(rect, ImageLockMode.ReadWrite, grayBmp.PixelFormat);
            // 获取位图数据第一行的起始地址
            IntPtr ptr = bmpData.Scan0;
            // 定义数组以存放位图的字节流数据
            // 处理像素宽对应的字节数,如不为8的倍数,则对最后一个字节补0
            int width = (int)Math.Ceiling(grayBmp.Width / 8.0);
            // 获取位图实际的字节宽,这个值因为要考虑4的倍数关系,可能大于width
            int stride = Math.Abs(bmpData.Stride);
            // 计算位图数据实际所占的字节数,并定义数组
            int bitmapDataLength = stride * grayBmp.Height;
            byte[] ImgData = new byte[bitmapDataLength];
            // 从位图文件复制图像数据到数组,从实际图像数据的第一行开始;因ptr指针而无需再考虑行倒序存储的处理
            System.Runtime.InteropServices.Marshal.Copy(ptr, ImgData, 0, bitmapDataLength);
            // 计算异或操作数,以处理包含图像数据但又有补0操作的那个字节
            byte mask = 0xFF;
            // 计算这个字节补0的个数
            //int offset = 8 * width - grayBmp.Width;
            int offset = 8 - (grayBmp.Width % 8);
            //offset %= 8;
            offset = offset % 8;
            // 按补0个数对0xFF做相应位数的左移位操作
            mask <<= (byte)offset;
            // 图像反色处理
            for (int j = 0; j < grayBmp.Height; j++)
            {
                for (int i = 0; i < stride; i++)
                {
                    if (i < width - 1) //无补0的图像数据
                    {
                        ImgData[j * stride + i] ^= 0xFF;
                    }
                    else if (i == width - 1) //有像素的最后一个字节,可能有补0
                    {
                        ImgData[j * stride + i] ^= mask;
                    }
                    else  //为满足行字节宽为4的倍数而最后补的字节
                    {
                        ImgData[j * stride + i] ^= 0x00;
                    }
                }
            }
            // 将位图数据转换为16进制的ASCII字符
            string zplString = BitConverter.ToString(ImgData);
            zplString = CompressLZ77(zplString.Replace("-", string.Empty));
            totalBytes = bitmapDataLength;
            rowBytes = stride;
            return zplString;
        }
调用打印机
调用打印机使用的是winspool.drv,这个库里提供了很多操作打印机的方法。
            [DllImport("winspool.Drv", EntryPoint = "OpenPrinterA", SetLastError = true, CharSet = CharSet.Ansi, ExactSpelling = true, CallingConvention = CallingConvention.StdCall)]
            public static extern bool OpenPrinter([MarshalAs(UnmanagedType.LPStr)] string szPrinter, out IntPtr hPrinter, IntPtr pd);
            [DllImport("winspool.Drv", EntryPoint = "ClosePrinter", SetLastError = true, ExactSpelling = true, CallingConvention = CallingConvention.StdCall)]
            public static extern bool ClosePrinter(IntPtr hPrinter);
            [DllImport("winspool.Drv", EntryPoint = "StartDocPrinterA", SetLastError = true, CharSet = CharSet.Ansi, ExactSpelling = true, CallingConvention = CallingConvention.StdCall)]
            public static extern bool StartDocPrinter(IntPtr hPrinter, Int32 level, [In, MarshalAs(UnmanagedType.LPStruct)] DOCINFOA di);
            [DllImport("winspool.Drv", EntryPoint = "EndDocPrinter", SetLastError = true, ExactSpelling = true, CallingConvention = CallingConvention.StdCall)]
            public static extern bool EndDocPrinter(IntPtr hPrinter);
            [DllImport("winspool.Drv", EntryPoint = "StartPagePrinter", SetLastError = true, ExactSpelling = true, CallingConvention = CallingConvention.StdCall)]
            public static extern bool StartPagePrinter(IntPtr hPrinter);
            [DllImport("winspool.Drv", EntryPoint = "EndPagePrinter", SetLastError = true, ExactSpelling = true, CallingConvention = CallingConvention.StdCall)]
            public static extern bool EndPagePrinter(IntPtr hPrinter);
            [DllImport("winspool.Drv", EntryPoint = "WritePrinter", SetLastError = true, ExactSpelling = true, CallingConvention = CallingConvention.StdCall)]
            public static extern bool WritePrinter(IntPtr hPrinter, IntPtr pBytes, Int32 dwCount, out Int32 dwWritten);
基于这些方法,封装一个将字符串发送给打印机的方法:
            public  bool SendStringToPrinter(string szPrinterName, string szString)
            {
                try
                {
                    IntPtr pBytes;
                    Int32 dwCount;
                    // 获取字符串长度
                    dwCount = szString.Length;
                    // 将字符串复制到非托管 COM 任务分配的内存非托管内存块,并转换为 ANSI 文本
                    pBytes = Marshal.StringToCoTaskMemAnsi(szString);
                    // 将已转换的 ANSI 字符串发送到打印机
                    bool res = SendBytesToPrinter(szPrinterName, pBytes, dwCount);
                    // 释放先前分配的非托管内存
                    Marshal.FreeCoTaskMem(pBytes);
                    return res;
                }
                catch (Win32Exception ex)
                {
                    WriteLog(ex.Message);
                    return false;
                }
            }
最后在打印按钮下,组织相关命令,调用这个方法即可:
        private void btn_Print_Click(object sender, EventArgs e)
        {
            int total = 0;
            int row = 0;
            string hex = ZebraUnity.BitmapToHex(bitmap, out total, out row);
            string modecmd = "~DGR:ZLOGO.GRF," + total.ToString() + "," + row.ToString() + "," + hex;//将图片生成模板指令
            ZebraGesigner.PrintCode.SendStringToPrinter("ZDesigner ZT210", modecmd);
            string cmd = "^XA^FO0,0^XGR:ZLOGO.GRF,1,1^FS^XZ";//调用该模板指令
            ZebraGesigner.PrintCode.SendStringToPrinter("ZDesigner ZT210", cmd);//发送调用模板指令
        }
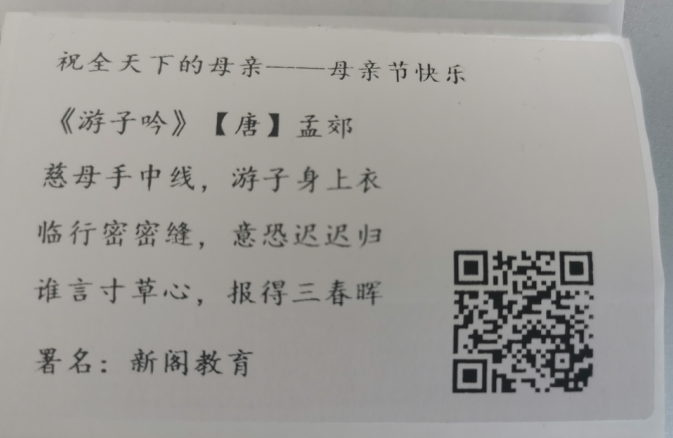
最终结果
下面这个就是最终打印的结果:
小彩蛋:你们扫扫二维码看看是什么呢?


 浙公网安备 33010602011771号