Ansible
Ansible
- 批管理工具,python 开发
- 组织架构
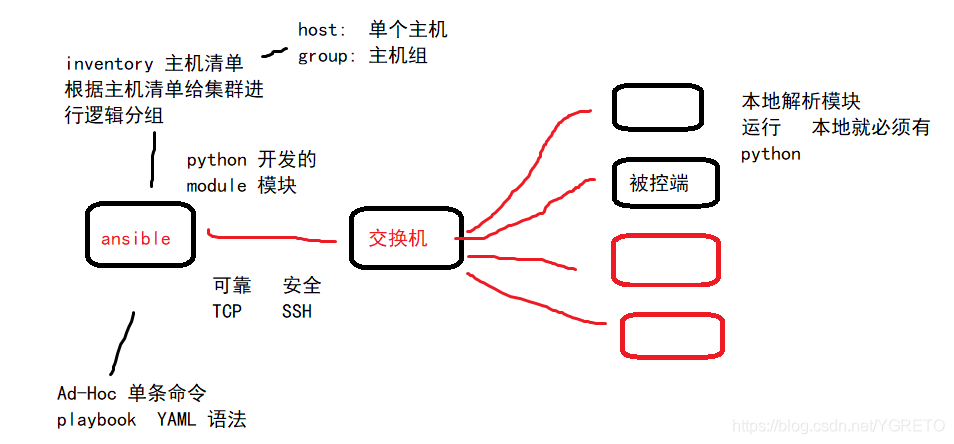
1. 免密互联
- 多台主机之间实现批量管理,需要免密码,免交互
#!/bin/bash
. /etc/init.d/functions

for ip in {5,6,7,8,9,31,41,51,71,81}
do
sshpass -p123456 ssh-copy-id -i ~/.ssh/id_rsa.pub root@172.16.1.$ip -o StrictHostKeyChecking=no &>/dev/null
if [ $? -eq 0 ]
  then
     action  "主机172.16.1.$ip"   /bin/true
     echo ""
  else
     action  "主机172.16.1.$ip"   /bin/false
     echo ""
fi
done
2. 安装使用
1. 安装
yum install ansible -y
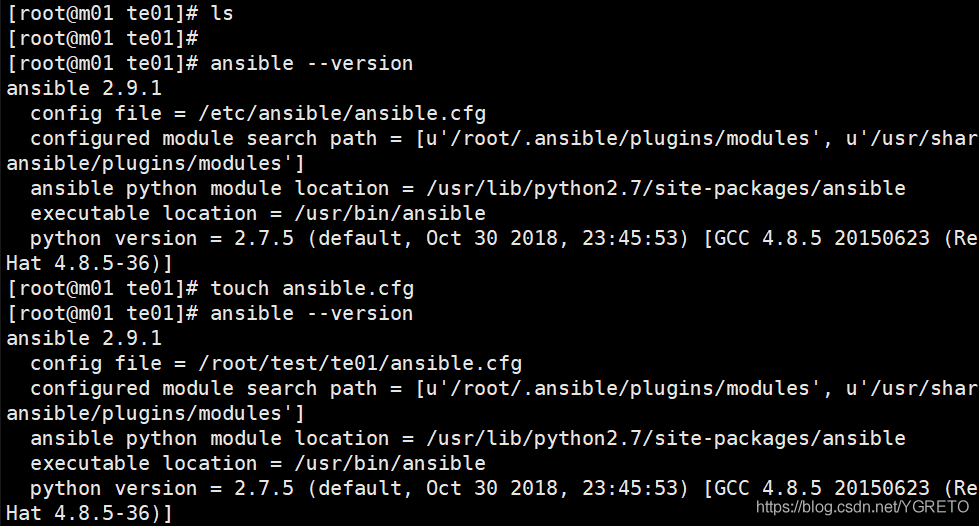
[root@salt01 ~]# ansible --version
ansible 2.9.13
  config file = /etc/ansible/ansible.cfg
  configured module search path = [u'/root/.ansible/plugins/modules', u'/usr/share/ansible/plugins/modules']
  ansible python module location = /usr/lib/python2.7/site-packages/ansible
  executable location = /usr/bin/ansible
  python version = 2.7.5 (default, Apr  2 2020, 13:16:51) [GCC 4.8.5 20150623 (Red Hat 4.8.5-39)]


ansible 的具体使用可以根据他的配置文件来定义,从而实现多项目之间的"隔离"
- ansible 配置文件查找优先级
| 1. ANSIBLE_CONFIG | 是个变量 |
| 2. ~/ansible.cfg | |
| 3. ~/.ansible.cfg | 不常用 |
| 4. /etc/ansible/ansible.cfg | 优先级最低 |
2. 使用
- 隔离
1. 项目之间 以目录间隔,通过修改 ansible.cfg 文件,使隔离
mkdir 项目{1..4} -p
cp /etc/ansible/ansible.cfg  项目1/
cp /etc/ansible/ansible.cfg  项目2/

vim ansible.cfg
inventory      = ./hosts
- 定义主机清单
cat hosts
[web]
10.0.0.1
10.0.0.2
ansible  web  -m ping -i /etc/ansible/hosts
不写hosts文件就 -i指定 hosts文件位置
ansible   web -m command  -a  "df -h"
3. Ad-Hoc
- 即:具体某一模块的playbook的书写方法
- 例:
ansible-doc yum:搜索/EX - 最初的 playbook的书写版本:
- hosts: all
  vars:
    file_name: xxx
  tasks:
    - name:
      shell:
4. yaml 书写格式
缩进: [强制缩进2空格]
冒号: 以冒号结尾的除外,其他所有冒号后面所有的必须有空格
短横线
- hosts: all   [ play 阶段 ]
- tasks:        [tasks 阶段]
4.1 常用模块
- 模块:
https://blog.csdn.net/YGRETO/article/details/103575410
5. 剧本的执行原则
检查语法:
ansible-playbook --syntax-check main.yml
模拟执行执行剧本:
ansible-playbook -C main.yml
执行剧本:
ansible-playbook  main.yml

建议写一段,执行一段
6. Variables 变量
- 变量有三种:
- 定义变量
- fact变量
- 变量注册
1. 优先级
1.extra

2.playbook
2.1) vars_files
2.2) vars

3.inventory
3.1) host_vars
3.2) group_vars
3.3) group_all
2. 定义变量
- 通过var进行定义变量 [ 只能用在一个主机 ]
- host: web
  vars:
    - xxx: XXXXX  <--与全局定义 也可以在某任务定义
  tasks:
  .....
- 通过vars_ files来进行定义变量 [ 文件里定义变量,多个主机共享文件,各自调用需要的变量 ]
- hosts: web
  vars_files: var.yml    <--定义变量的文件
  tasks:
   - name: touch new files
     file:
       path: "/tmp/{{ play_var1 }}"
       state: touch

----------------------------------
在同一目录下 创建 var.yml 文件 格式如下:
play_var1: play_var1_sb1
- 通过inventory主机清单 [ hosts文件 ] 进行变量定义
用的少
vim ~/hosts

[web]
172.16.1.7
172.16.1.8
[web:vars]
xxx=XXX   --->  定义的变量
- 通过host_ vars对主机进行定义
mkdir host_vars
vim host_vars/172.16.1.7  (或域名) [ 只针对 7 这台主机生效 ]
bianliang: XXX
vim host_vars/172.16.1.8  [ 只针对 8 这台主机生效 ]
bianliang: xxx1

因此可以应用于: keepalived : 一个变量名,不同的变量值
- 通过group_ vars对主机组进行定义
针对hosts的 web 这个组的  所有主机
mkdir group_vars
主机组:
vim  group_vars/web
bianliangming: xxx

特殊的: 针对所有的主机组
vim group_vars/all
bianliangming: xxx
- 通过执行playbook时使用-e参数指定变量
剧本中写的变量(没有被定义的),在执行命令的时候定义
在命令行执行
ansible-playbook  play.yml  -e "XXX=xxx"   [ xxx ]:被赋予的值
3. 注册变量
- 注册变量:register
- 当执行剧本的时候,里面有 命令的使用 ,只会显示 change 不会显示具体的内容 ,需要通过变量注册 把命令显示的内容赋值给 register ,然后把 register 打印出来
- 例:
- hosts: web
 tasks:
   - name:
     shell: netstat -lnp
     register: System_state

   - name: Get System_state
     debug: msg={{ System_state }}

将netstat-lnp 赋予 system_state 的 变量名
debug 打印出值
4. fact变量
- ansible 的内置变量
- 全部facts 变量
ansible localhost -m setup
例子:redis 的使用:
配置文件的监听内网的ip地址
bind 172.0.0.1 {{ ansible_eth1.ipv4.address }}
- 常用的facts变量:
https://blog.csdn.net/YGRETO/article/details/103611697 - 全部的facts变量:
https://blog.csdn.net/YGRETO/article/details/104807813
7. 循环
    - name: Copy Rsync Configure
      copy:
        src: "{{ item.src }}"  【src: 变量名】
        dest: "{{ item.dest }}"  【dest: 变量名】
        mode: "{{ item.mode }}"  【mode: 变量名】
      loop:  【下边是字典】
        - { src: ./rsyncd.conf.j2 , dest: /etc/rsyncd.conf , mode: '0644' }
        【此处src 是 引用上层的变量】
        - { src: ./rsync.passwd.j2  , dest: /etc/rsync.passwd , mode: '0600' }
      notify: Restart Rsync Server


    - name: Systemd Httpd Server
      systemd:
        name: "{{ item }}"
        state: started
        enabled: yes
      loop: 【下边是列表】
        - httpd
        - firewalld
8. 判断
1.根据不同的操作系统,安装不同的软件
[root@manager ~/ansible_variables]# cat play_14.yml
- hosts: all
  tasks:
    - name: Installed Httpd Server Centos
      yum:
        name: httpd
        state: present
      when: ( ansible_distribution == "Ubuntu" )


[root@manager ~/ansible_variables]# cat play_14.yml
- hosts: all
  tasks:
    - name: Installed Httpd Server Centos
      yum:
        name: httpd
        state: present
      when: ( ansible_distribution == "CentOS" ) and
	        ( ansible_distribution_major_version == "7")

    - name: Installed Httpd Server Centos
      yum:
        name: httpd2
        state: present
      when: ( ansible_distribution == "CentOS" ) or
	        ( ansible_distribution_major_version != "6")


	2.根据不同的主机名称,配置不同的源     all-->   web--->nginx_repo
[root@manager ~/ansible_variables]# cat play_15.yml
- hosts: all
  tasks:
    - name: This is when repo
      yum_repository:
        name: oldxu
        description: oldxu
        baseurl: http://nginx.org/packages/centos/$releasever/$basearch/
        gpgcheck: no
      when: ( not ansible_hostname is match ("web*") )
9. Handlers
- 触发器 Handlers :
- 特殊Tasks
- 不会被正常的TASKS调用。
- 当有 notify 调用时,才会被执行。
- 无论Handlers被调用多少次,最终只会在正常的Tasks结束后,才执行
- 当遇到多次调用 handlers , handlers 也只执行一次,
当前几个调用的 handlers成功 ,最后一个失败了 ,handlers 也不会触发,[当然也可以强制触发[错误处理里]]
task 文件
- name: config conf
  copy:
    src:
    dest:
  notify: restart nginx server [名字一致]
handlers 文件
- name: restart nginx server  [名字一致]
  systemd:
    name: nginx
    state: restarted
错误处理
通常 task失败, play 中止,任何在前面被tasks notify的 handlers 都不会执行,
如果 在play中设置了 `force_handlers: yes` handlers 就会强制执行
- hosts: all
  force_handlers: yes
  tasks:
    - name:
   。。。。。。。。
10.Tag
- 可以将 tasks 与标签捆绑 --> 可以针对指定的tag 执行
- 可以 tasks 对应一个tag标签 也可以多个 tag标签
例子:[tasks 文件]
- hosts: all
  tasks:
    - name:  install
      yum:
        name: nginx
        state: present
      tag: installed
使用:tasks较多时,可以针对 指定的tasks 调试
1. 指定 这个标签执行:ansible-playbook main.yml  -t  installed
2. 指定 除了这个标签都执行:ansible-playbook main.yml --skip-tags  installed
11. include 包含
应用: 多个tasks 任务遇到一个相同的任务
注意: 要包含的这个文件是tasks 任务 没有play 主机
例子:
要包含的文件

vim restart_nginx.yml
- name: restart nginx
  service: name=nginx state=restarted

tasks 任务:
- hosts:
  tasks:
    - name:
      command:
    - name: restart nginx
      include: restart_nginx.yml
12. Ignore_errors 忽略错误
- 应用: 当有tasks 执行失败 ,后续的task 也无法执行,可以 忽略错误 继续执行下面的 task
- hosts:
  tasks:
    - name:
      command:
      Ignore_errors: yes
13. change_when
- 没写
14. jianja2
jianja 循环
原先:
upstream cloud {
	server 172.16.1.7:80
	server 172.16.1.8:80
}
现在: 循环循的是 hosts文件 的web 组
upstream {{ cloud }} {
{% for host in groups['web'] %}    本质也是 for 循环
	server {{ host }}:80;
{% endfor %}
}
server {
	listen 80;
	server_name {{ cloud }};
	location / {
		proxy_pass http://{{ cloud }}
	}
}
可以在 group/all 里定义变量 cloud: cloud.zhang.com
jianja 判断
- keepalived
global_defs {
         router_id {{ ansible_hostname }}
  }

  vrrp_instance VIP_1 {
{% if ansible_hostname == "lb01" %}
     state MASTER
      priority 150
{% elif ansible_hostname == "lb02" %}
     state BACKUP
      priority 100
{% endif %}
      interface eth0
      virtual_router_id 1
      advert_int 1
      authentication {
          auth_type PASS
          auth_pass 1111
      }
      virtual_ipaddress {
                10.0.0.3
      }
  }
15. Role角色
- 有目录结构的规划 ( 必须的 )
- 大型项目一律 role
- playbook 的 ”规范“
目录结构:
文件一般自己创建
命令获得: ansible-galaxy init nginx
nginx:  [ 叫角色 ]
		tasks					-- tasks 任务
		 	main.yml
		handlers				--  触发器
		 	main.yml
		vars					--  变量
		 	main.yml
		templates			    --   模板文件
		 	main.yml
		meta					--  依赖关系
		files					--  文件 tar | zip
ansible.cfg 角色/ hosts top.yml group/all
vim top.yml
- hosts: web
  roles:
    - role: 顶层角色 [依赖着nginx 和php 就只写这一个角色就行]

- hosts: lb
- roles:
    - role: a
16.模板
- 上面有Keepalived的模板
- nginx_万能模板 :
https://blog.csdn.net/YGRETO/article/details/103672398 - 基础环境的模板
- 包含了:系统的基础优化和ssh 优化
- 见下:
目录结构;
base:
      tasks
            main.yml
      templates
            sshd_config.j2

main.yml : base基础优化:`https://blog.csdn.net/YGRETO/article/details/104821207`
sshd_config.j2	:  https://blog.csdn.net/YGRETO/article/details/104821569

 浙公网安备 33010602011771号