ImageSharp源码详解之JPEG编码原理(2)采样
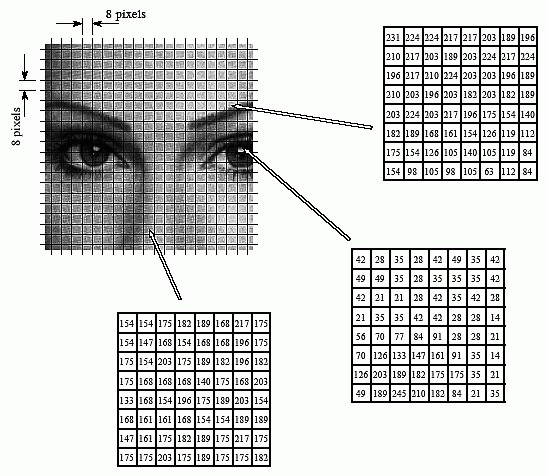
JPEG编码中的采样过程其实就是一个图像数据转换成若干个8*8数据块的过程,如下图将原始图像分成8*8个小块(block),每个block中有64个像素:
ImageSharp源码中关于采样有有两种选择,一种叫JpegSubsample.Ratio444,一种叫JpegSubsample.Ratio420。这两种选择就是对于JPEG图像的两种采样方法,就是我们常说的YUV采样。
1. 什么是YUV
与我们熟知的RGB类似,YUV也是一种颜色编码方法,主要用于电视系统以及模拟视频领域,它将亮度信息(Y)与色彩信息(UV)分离,没有UV信息一样可以显示完整的图像,只不过是黑白的,下图就是我用ImageSharp源码做的实验,只保留Y通道,UV通道设成0:

原图 Ratio420只留Y通道,159KB

Ratio444只留Y通道,181KB
YUV不像RGB那样要求三个独立的视频信号同时传输,所以用YUV方式传送占用极少的频宽。YUV码流的存储格式其实与其采样的方式密切相关,主流的采样方式有三种,YUV4:4:4,YUV4:2:2,YUV4:2:0。现在的YUV是通常用于计算机领域用来表示使用YCbCr编码的文件。可以粗浅地视YUV为YCbCr,我们后面也换成这种叫法。
一般看到这里,会出现一个概念,叫做MCU。不是单片机更不是漫威,它中文意思是最小的编码单元(Minimum Coded Unit),它是图像中一个正方矩阵像素的数据,对于不同的采样,MCU的像素也不一样:
1.YCbCr 4:4:4(其他资料可能叫1:1:1)
这种是最简单的采样方式,这种方式里面,数据流存放数据顺序就是YCbCr ,每个MCU代表着8*8个像素块。
2.YCbCr 4:2:2

这种方式下数据流存放顺序如图所示,每个MCU代表着16x8个像素,Y0和Y1分别指向两个8*8像素块,这两个像素块共用一个Cb和Cr通道。
3.YCbCr 4:2:0(其他资料可能叫4:1:1)

这种方式下每个MCU代表着16x16个像素,Y0和Y1分别指向4个8*8像素块,这4个像素块共用一个Cb和Cr通道。
2. YUV采样源码分析
回到ImageSharp源码中,我们可以看到两种采样方法,分别是4:4:4和4:2:0,我们看一下他们的方法,先是4:4:4。


 1         /// <summary>
 2         /// Encodes the image with no subsampling.
 3         /// </summary>
 4         /// <typeparam name="TPixel">The pixel format.</typeparam>
 5         /// <param name="pixels">The pixel accessor providing access to the image pixels.</param>
 6         private void Encode444<TPixel>(Image<TPixel> pixels)
 7             where TPixel : struct, IPixel<TPixel>
 8         {
 9             // TODO: Need a JpegScanEncoder<TPixel> class or struct that encapsulates the scan-encoding implementation. (Similar to JpegScanDecoder.)
10             // (Partially done with YCbCrForwardConverter<TPixel>)
11             Block8x8F temp1 = default;
12             Block8x8F temp2 = default;
13
14             Block8x8F onStackLuminanceQuantTable = this.luminanceQuantTable;
15             Block8x8F onStackChrominanceQuantTable = this.chrominanceQuantTable;
16
17             var unzig = ZigZag.CreateUnzigTable();
18
19             // ReSharper disable once InconsistentNaming
20             int prevDCY = 0, prevDCCb = 0, prevDCCr = 0;
21
22             var pixelConverter = YCbCrForwardConverter<TPixel>.Create();
23
24             for (int y = 0; y < pixels.Height; y += 8)
25             {
26                 for (int x = 0; x < pixels.Width; x += 8)
27                 {
28                     pixelConverter.Convert(pixels.Frames.RootFrame, x, y);
29
30                     prevDCY = this.WriteBlock(
31                         QuantIndex.Luminance,
32                         prevDCY,
33                         &pixelConverter.Y,
34                         &temp1,
35                         &temp2,
36                         &onStackLuminanceQuantTable,
37                         unzig.Data);
38                     prevDCCb = this.WriteBlock(
39                         QuantIndex.Chrominance,
40                         prevDCCb,
41                         &pixelConverter.Cb,
42                         &temp1,
43                         &temp2,
44                         &onStackChrominanceQuantTable,
45                         unzig.Data);
46                     prevDCCr = this.WriteBlock(
47                         QuantIndex.Chrominance,
48                         prevDCCr,
49                         &pixelConverter.Cr,
50                         &temp1,
51                         &temp2,
52                         &onStackChrominanceQuantTable,
53                         unzig.Data);
54                 }
55             }
56         }
首先对图像长宽进行两次for循环,不难看出每次for循环就是一个8*8的行程,然后通过pixelConverter.Convert方法将RGB转换为YCbCr,最后依次写入这8*8个像素的Y,Cb,Cr通道数据。
再看4:2:0的源码:
 1          /// <summary>
 2         /// Encodes the image with subsampling. The Cb and Cr components are each subsampled
 3         /// at a factor of 2 both horizontally and vertically.
 4         /// </summary>
 5         /// <typeparam name="TPixel">The pixel format.</typeparam>
 6         /// <param name="pixels">The pixel accessor providing access to the image pixels.</param>
 7         private void Encode420<TPixel>(Image<TPixel> pixels)
 8             where TPixel : struct, IPixel<TPixel>
 9         {
10             // TODO: Need a JpegScanEncoder<TPixel> class or struct that encapsulates the scan-encoding implementation. (Similar to JpegScanDecoder.)
11             Block8x8F b = default;
12
13             BlockQuad cb = default;
14             BlockQuad cr = default;
15             var cbPtr = (Block8x8F*)cb.Data;
16             var crPtr = (Block8x8F*)cr.Data;
17
18             Block8x8F temp1 = default;
19             Block8x8F temp2 = default;
20
21             Block8x8F onStackLuminanceQuantTable = this.luminanceQuantTable;
22             Block8x8F onStackChrominanceQuantTable = this.chrominanceQuantTable;
23
24             var unzig = ZigZag.CreateUnzigTable();
25
26             var pixelConverter = YCbCrForwardConverter<TPixel>.Create();
27
28             // ReSharper disable once InconsistentNaming
29             int prevDCY = 0, prevDCCb = 0, prevDCCr = 0;
30
31             for (int y = 0; y < pixels.Height; y += 16)
32             {
33                 for (int x = 0; x < pixels.Width; x += 16)
34                 {
35                     for (int i = 0; i < 4; i++)
36                     {
37                         int xOff = (i & 1) * 8;
38                         int yOff = (i & 2) * 4;
39
40                         pixelConverter.Convert(pixels.Frames.RootFrame, x + xOff, y + yOff);
41
42                         cbPtr[i] = pixelConverter.Cb;
43                         crPtr[i] = pixelConverter.Cr;
44
45                         prevDCY = this.WriteBlock(
46                             QuantIndex.Luminance,
47                             prevDCY,
48                             &pixelConverter.Y,
49                             &temp1,
50                             &temp2,
51                             &onStackLuminanceQuantTable,
52                             unzig.Data);
53                     }
54
55                     Block8x8F.Scale16X16To8X8(&b, cbPtr);
56                     prevDCCb = this.WriteBlock(
57                         QuantIndex.Chrominance,
58                         prevDCCb,
59                         &b,
60                         &temp1,
61                         &temp2,
62                         &onStackChrominanceQuantTable,
63                         unzig.Data);
64
65                     Block8x8F.Scale16X16To8X8(&b, crPtr);
66                     prevDCCr = this.WriteBlock(
67                         QuantIndex.Chrominance,
68                         prevDCCr,
69                         &b,
70                         &temp1,
71                         &temp2,
72                         &onStackChrominanceQuantTable,
73                         unzig.Data);
74                 }
75             }
76         }
这里先对图像进行16*16行程的遍历,然后在for循环内部,再单独对Y通道进行4*4的遍历,每次遍历都写入依次Y通道的编码,最后再写入Cb和Cr的编码,这样一来,就使得每4个Y通道共用一个Cb和Cr通道,我们根据这个采样规则也不难得出结论:4:2:0采样的图像存储大小肯定比4:4:4的少。我们从上面那个实验也可以证明这个结论。
注意这里的WriteBlock这个方法,这个方法就包含后面要说的DCT变换、量化和熵编码。
 1     /// <summary>
 2         /// Writes a block of pixel data using the given quantization table,
 3         /// returning the post-quantized DC value of the DCT-transformed block.
 4         /// The block is in natural (not zig-zag) order.
 5         /// </summary>
 6         /// <param name="index">The quantization table index.</param>
 7         /// <param name="prevDC">The previous DC value.</param>
 8         /// <param name="src">Source block</param>
 9         /// <param name="tempDest1">Temporal block to be used as FDCT Destination</param>
10         /// <param name="tempDest2">Temporal block 2</param>
11         /// <param name="quant">Quantization table</param>
12         /// <param name="unzigPtr">The 8x8 Unzig block pointer</param>
13         /// <returns>
14         /// The <see cref="int"/>
15         /// </returns>
16         private int WriteBlock(
17             QuantIndex index,
18             int prevDC,
19             Block8x8F* src,
20             Block8x8F* tempDest1,
21             Block8x8F* tempDest2,
22             Block8x8F* quant,
23             byte* unzigPtr)
24         {
25             //1.DCT变换
26             FastFloatingPointDCT.TransformFDCT(ref *src, ref *tempDest1, ref *tempDest2);
27             //2.量化
28             Block8x8F.Quantize(tempDest1, tempDest2, quant, unzigPtr);
29             float* unziggedDestPtr = (float*)tempDest2;
30             //JTEST:如果是色度的话,全部舍去
31             if (index== QuantIndex.Chrominance)
32             {
33                 for (int i = 0; i < 64; i++)
34                 {
35                     unziggedDestPtr[i] = 0;
36                 }
37             }
38             int dc = (int)unziggedDestPtr[0];
39             //3.熵编码写入DC分量
40             // Emit the DC delta.
41             this.EmitHuffRLE((HuffIndex)((2 * (int)index) + 0), 0, dc - prevDC);
42             //4.熵编码写入AC分量
43             // Emit the AC components.
44             var h = (HuffIndex)((2 * (int)index) + 1);
45             int runLength = 0;
46
47             for (int zig = 1; zig < Block8x8F.Size; zig++)
48             {
49                 int ac = (int)unziggedDestPtr[zig];
50                 //JTEST:这里将ac分量变成0  zig>0 zig>1 zig>2... zig>64
51                 //if (zig>0)
52                 //{
53                 //    ac = 0;
54                 //}
55                 if (ac == 0)
56                 {
57                     runLength++;
58                 }
59                 else
60                 {
61                     while (runLength > 15)
62                     {
63                         this.EmitHuff(h, 0xf0);
64                         runLength -= 16;
65                     }
66
67                     this.EmitHuffRLE(h, runLength, ac);
68                     runLength = 0;
69                 }
70             }
71
72             if (runLength > 0)
73             {
74                 this.EmitHuff(h, 0x00);
75             }
76
77             return dc;
78         }
这个WriteBlock方法将是后面文章分析重点。
3. 采样因子
我们怎么确定一张JPEG图像是用那种采样方式呢,这个信息可以在标记为SOF0中获取到,这个标记中有一个颜色分类信息通常为9个字节,里面就包含了 水平/垂直采样因子 ,我们根据采样因子就能知道是用4:4:4、4:2:2还是4:2:0。
4. 总结
这一章算是JPEG编码\解码过程中的头一场戏,请大家记住我们在这个过程中输入的是一张图像数据,输出的是若干个8*8数据块,8*8数据块这个概念将会一直伴随我们JPEG整个编码。后面章节我们将重点分析上文出现的WriteBlock这个方法,这个方法里包含DCT变换、量化和熵编码。
系列目录:
ImageSharp源码详解之JPEG编码原理(1)JPEG介绍
ImageSharp源码详解之JPEG压缩原理(3)DCT变换
ImageSharp源码详解之JPEG压缩原理(4)量化
ImageSharp源码详解之JPEG压缩原理(6)C#源码解析及调试技巧

 浙公网安备 33010602011771号