

批量装机工具cobbler简介及其安装使用
前言:如果仅有几台机器的话,使用U盘或者光盘装起来还不是很费事,一旦数量到了一定程度,使用手动方法就是一件费时费力的事,PXE+kistart就可以解决这个问题,降低难度,加快速度,而cobbler更优于PXE+kistart的解决方案,难度甚至降到普通的修补匠都可以胜任的工作(cobbler的英译意思,夸张了),总的来说,降低工作中的复杂度是一件非常有意义的事情,它相比它的前辈,它的优越之处在哪里呢?它的功能是如何实现的呢?下面我们来简单的介绍一下:
Cobbler是一个Linux服务器安装的服务,可以通过网络启动(PXE)的方式来快速安装、重装物理服务器和虚拟机,同时还可以管理DHCP,DNS等。Cobbler可以使用命令行方式管理,也提供了基于Web的界面管理工具(cobbler-web),还提供了API接口,可以方便二次开发使用。Cobbler是较早前的kickstart的升级版,优点是比较容易配置,还自带web界面比较易于管理。
在搭建过程中借鉴了CSDN惨绿少年、linux公社Masuri、博客园linuxliu等同仁的技术文章,在此表示感谢!基于其各自的表达内容所长与不足,撰文对cobbler的搭建与使用进行介绍,如有不足,欢迎指正:
一、基本环境准备:
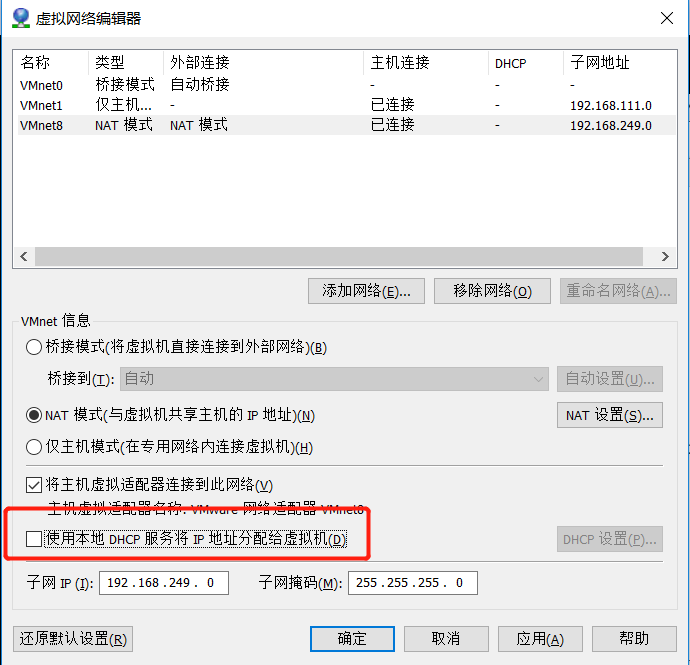
1.测试平台:vmware workstation之上的linux系统,配置如下图,值得注意的是,我选择了NAT的网络模式。在同仁的文章中,有使用主机模式来进行测试的,这样做也可以,但安装软件包的时候,就需要修改网卡配置和更换虚拟机的网络模式,是非常麻烦的。

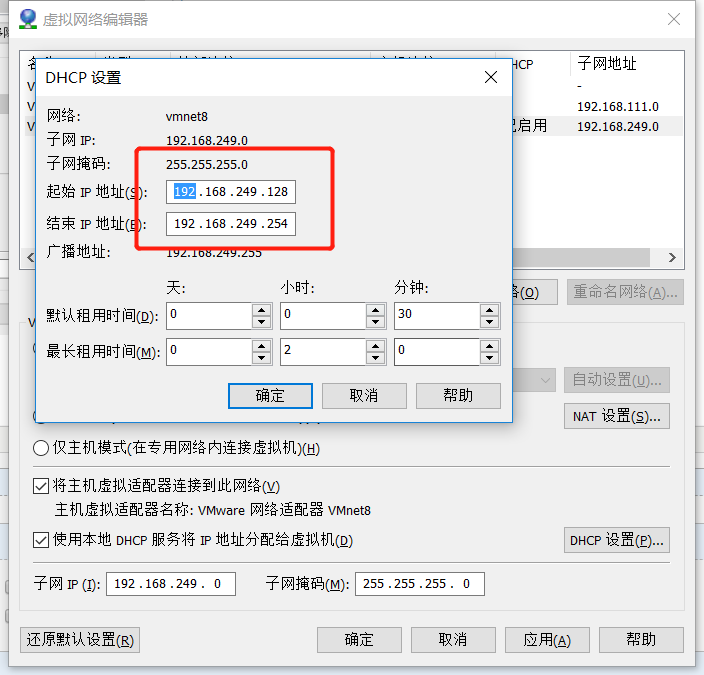
2.修改NAT网络模式的dhcp服务,将其关闭,自己搭建的dhcp服务器的ip地址池与NAT模式的网段相同,这样既可以完成测试,也不需要进行ip的更换等操作,网关与DNS也可以由虚拟网络编辑器来承担,非常的方便。我的NAT网络是网关与DNS为192.168.249.2,虚拟网络编辑器的地址池为192.168.249.128-192.168.249.254,所以本地的dhcp配置可以避开这个范围。
关闭虚拟网络编辑器的dhcp功能,虚拟网络编辑器的地址池如图:
3.系统环境准备:
[root@localhost ~]# cat /etc/redhat-release
CentOS Linux release 7.6.1810 (Core)
[root@localhost ~]# uname -r
3.10.0-957.21.3.el7.x86_64
[root@localhost ~]# systemctl stop firewalld
[root@localhost ~]# systemctl stop NetworkManager
[root@localhost ~]# ifconfig ens33 | awk 'NR==2 {print $2}' 192.168.249.10
[root@localhost ~]# cat /etc/selinux/config | awk 'NR==7'
SELINUX=disabled
[root@localhost ~]# cat /etc/sysconfig/network-scripts/ifcfg-ens33
TYPE=Ethernet
PROXY_METHOD=none
BROWSER_ONLY=no
BOOTPROTO=static
DEFROUTE=yes
IPV4_FAILURE_FATAL=no
IPV6INIT=yes
IPV6_AUTOCONF=yes
IPV6_DEFROUTE=yes
IPV6_FAILURE_FATAL=no
IPV6_ADDR_GEN_MODE=stable-privacy
NAME=ens33
UUID=a76470a8-756d-4726-b527-aa321f621586
DEVICE=ens33
ONBOOT=yes
IPADDR=192.168.249.10
NETMASK=255.255.255.0
GATEWAY=192.168.249.2
4.更换yum源为阿里源
[root@localhost ~]# cd /etc/yum.repos.d/
[root@localhost yum.repos.d]# rm -rf *
[root@localhost yum.repos.d]# wget  http://mirrors.aliyun.com/repo/Centos-7.repo
[root@localhost yum.repos.d]# yum makecache
ok,到此环境基本准备完成!
二、组件安装:
1.安装基本的工具:
[root@localhost ~]# yum -y install wget net-tools curl epel-release
2.安装功能组件:
[root@localhost ~]# yum install cobbler cobbler-web dhcp tftp-server pykickstart httpd rsync xinetd -y #安装完成了检查一下,这些包一个都不能少
3.修改cobbler主配置文件:
[root@localhost ~]# sed -i 's/^server: 127.0.0.1/server: 192.168.249.10/' /etc/cobbler/settings    #修改server的IP为本地的IP
[root@localhost ~]# sed -i 's/^next_server: 127.0.0.1/next_server: 192.168.249.10/' /etc/cobbler/settings    #修改tftp的ip为本地的IP
[root@localhost ~]# sed -i 's/manage_dhcp: 0/manage_dhcp: 1/' /etc/cobbler/settings    #启用dhcp
[root@localhost ~]# sed -i 's#yes#no#' /etc/xinetd.d/tftp    #启用tftp

[root@localhost ~]# sed -i 's/pxe_just_once: 0/pxe_just_once: 1/' /etc/cobbler/settings  #修改参数,防止系统循环安装
4.先启动http与cobbler:
[root@localhost ~]# systemctl start httpd cobblerd
5.生成通过cobbler服务安装系统的默认root密码,并替换(会出现一串加密字符,把字符添加到cobbler主配置文件相应的位置):
[root@localhost ~]# openssl passwd -1 -salt '123456' '123456'
$1$123456$wOSEtcyiP2N/IfIl15W6Z0

6.下载cobbler引导操作系统的必须文件:
[root@localhost ~]# cobbler get-loaders
task started: 2019-09-02_220712_get_loaders
task started (id=Download Bootloader Content, time=Mon Sep  2 22:07:12 2019)
downloading https://cobbler.github.io/loaders/README to /var/lib/cobbler/loaders/README
downloading https://cobbler.github.io/loaders/COPYING.elilo to /var/lib/cobbler/loaders/COPYING.elilo
downloading https://cobbler.github.io/loaders/COPYING.yaboot to /var/lib/cobbler/loaders/COPYING.yaboot
downloading https://cobbler.github.io/loaders/COPYING.syslinux to /var/lib/cobbler/loaders/COPYING.syslinux
downloading https://cobbler.github.io/loaders/elilo-3.8-ia64.efi to /var/lib/cobbler/loaders/elilo-ia64.efi
downloading https://cobbler.github.io/loaders/yaboot-1.3.17 to /var/lib/cobbler/loaders/yaboot
downloading https://cobbler.github.io/loaders/pxelinux.0-3.86 to /var/lib/cobbler/loaders/pxelinux.0
downloading https://cobbler.github.io/loaders/menu.c32-3.86 to /var/lib/cobbler/loaders/menu.c32
downloading https://cobbler.github.io/loaders/grub-0.97-x86.efi to /var/lib/cobbler/loaders/grub-x86.efi
downloading https://cobbler.github.io/loaders/grub-0.97-x86_64.efi to /var/lib/cobbler/loaders/grub-x86_64.efi
*** TASK COMPLETE ***
PS:我在做的时候,这一步报错了,说是python文件不完整,实际上呢,根本原因是第三步修改/etc/cobbler/settings时,server与next-server对应的IP不是本地ens33网卡的IP,这一步只要网络没有问题,IP地址没有问题,是不会报错的。
7.修改dhcp文件,配置本地dhcp地址池。
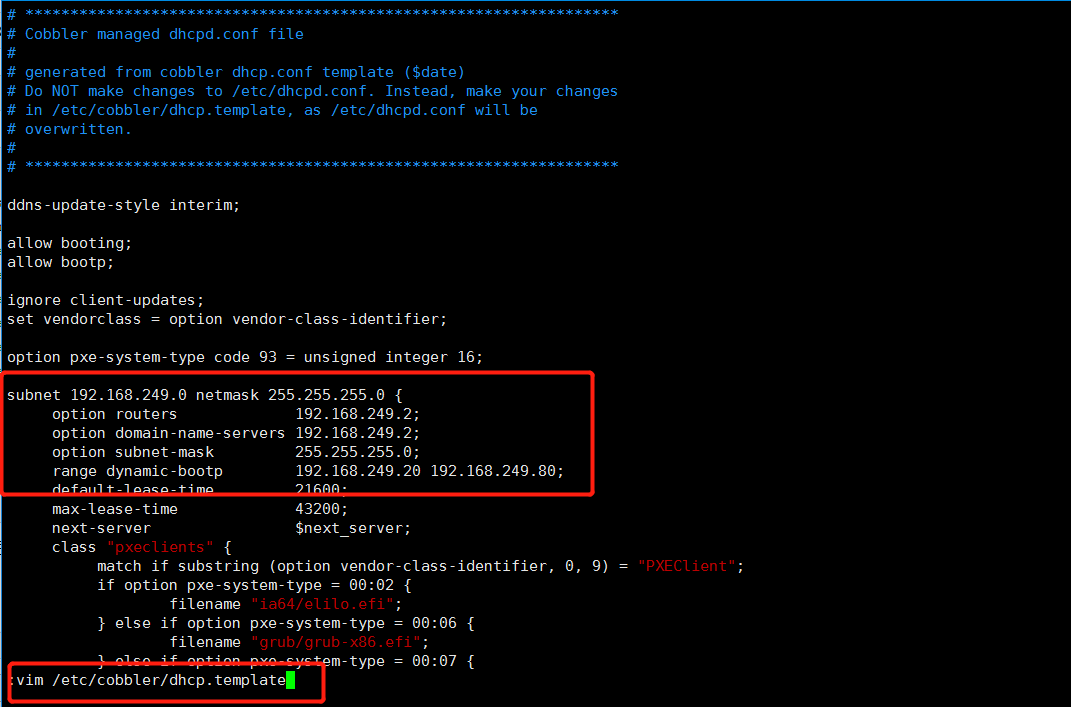
这一步呢,基本上没有问题,但一般出问题就在这里,启动之后status查看dhcp服务的状态,如果错误那么就需要排查,先关闭networkmanager服务,且一般网卡/网口只留一个,dhcp服务的网关与dns由虚拟网络编辑器来提供,子网掩码也是正常的24/0,虚拟网络编辑器的地址池为192.168.249.128-192.168.249.254,所以我们避开这个网段。
8.同步cobbler的配置到dhcp服务。
[root@localhost ~]# cobbler sync
task started: 2019-09-02_221653_sync
task started (id=Sync, time=Mon Sep  2 22:16:53 2019)
running pre-sync triggers
cleaning trees
removing: /var/lib/tftpboot/grub/images
copying bootloaders
trying hardlink /var/lib/cobbler/loaders/pxelinux.0 -> /var/lib/tftpboot/pxelinux.0
trying hardlink /var/lib/cobbler/loaders/menu.c32 -> /var/lib/tftpboot/menu.c32
trying hardlink /var/lib/cobbler/loaders/yaboot -> /var/lib/tftpboot/yaboot
trying hardlink /usr/share/syslinux/memdisk -> /var/lib/tftpboot/memdisk
trying hardlink /var/lib/cobbler/loaders/grub-x86.efi -> /var/lib/tftpboot/grub/grub-x86.efi
trying hardlink /var/lib/cobbler/loaders/grub-x86_64.efi -> /var/lib/tftpboot/grub/grub-x86_64.efi
copying distros to tftpboot
copying images
generating PXE configuration files
generating PXE menu structure
rendering DHCP files
generating /etc/dhcp/dhcpd.conf
rendering TFTPD files
generating /etc/xinetd.d/tftp
cleaning link caches
running post-sync triggers
running python triggers from /var/lib/cobbler/triggers/sync/post/*
running python trigger cobbler.modules.sync_post_restart_services
running: dhcpd -t -q
received on stdout:
received on stderr:
running: service dhcpd restart
received on stdout:
received on stderr: Redirecting to /bin/systemctl restart dhcpd.service

running shell triggers from /var/lib/cobbler/triggers/sync/post/*
running python triggers from /var/lib/cobbler/triggers/change/*
running python trigger cobbler.modules.manage_genders
running python trigger cobbler.modules.scm_track
running shell triggers from /var/lib/cobbler/triggers/change/*
*** TASK COMPLETE ***
9.基本的配置就是这些,然后重启下这些组件服务,并配置开机启动,然后使用cobbler自带的工具命令检查一下配置。
[root@localhost ~]# systemctl restart httpd cobblerd xinetd rsyncd tftp dhcpd
[root@localhost ~]# systemctl enable httpd cobblerd xinetd rsyncd tftp dhcpd
Created symlink from /etc/systemd/system/multi-user.target.wants/httpd.service to /usr/lib/systemd/system/httpd.service.
Created symlink from /etc/systemd/system/multi-user.target.wants/cobblerd.service to /usr/lib/systemd/system/cobblerd.service.
Created symlink from /etc/systemd/system/multi-user.target.wants/rsyncd.service to /usr/lib/systemd/system/rsyncd.service.
Created symlink from /etc/systemd/system/sockets.target.wants/tftp.socket to /usr/lib/systemd/system/tftp.socket.
Created symlink from /etc/systemd/system/multi-user.target.wants/dhcpd.service to /usr/lib/systemd/system/dhcpd.service.
[root@localhost ~]# cobbler check
The following are potential configuration items that you may want to fix:
1 : debmirror package is not installed, it will be required to manage debian deployments and repositories
2 : fencing tools were not found, and are required to use the (optional) power management features. install cman or fence-agents to use them
Restart cobblerd and then run 'cobbler sync' to apply changes.
#这两个问题:1是debian系统,2是fence系统,说明我们的配置没有问题
10.挂载镜像,之前呢,我们已经将镜像挂载到了系统本地,现在先把镜像挂载到/mnt目录下,然后再将mnt目录导入cobbler的目录位置:
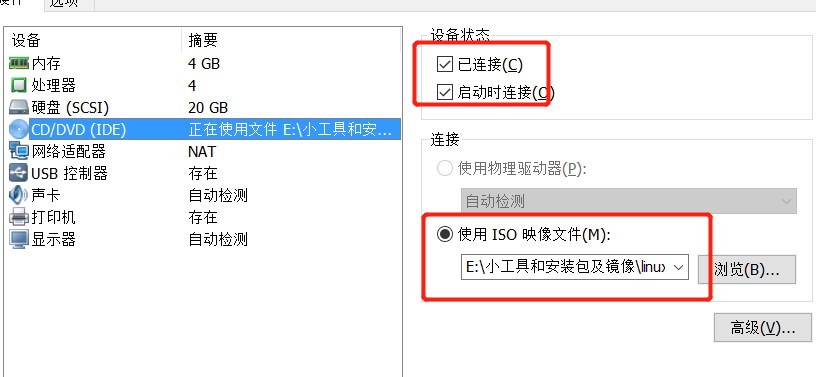
[root@localhost ~]# mount /dev/cdrom /mnt
mount: /dev/sr0 is write-protected, mounting read-only
[root@localhost ~]# cobbler import --path=/mnt/ --name=CentOS-7.6-1810-x86_64 --arch=x86_64
task started: 2019-09-02_222411_import
task started (id=Media import, time=Mon Sep  2 22:24:11 2019)
#因为镜像文件比较大,所以需要较长的时间。
# --path 镜像路径# --name 为安装源定义一个名字# --arch 指定安装源是32位、64位、ia64, 目前支持的选项有: x86│x86_64│ia64# 安装源的唯一标示就是根据name参数来定义,本例导入成功后,安装源的唯一标示就是:CentOS-7.1-x86_64,如果重复,系统会提示导入失败
11.检查一下镜像:
[root@localhost ~]# cobbler list
distros:
   CentOS-7.6-1810-x86_64

profiles:
   CentOS-7.6-1810-x86_64

systems:

repos:

images:

mgmtclasses:

packages:

files:
ok,镜像也没有问题,然后呢,我们就可以使用cobbler来进行无人值守安装。
12.检测结果:

PS:这个界面的内容我们是可以手动调整的,配置文件为/etc/cobbler/pxe/pxedefault.template
ok,没有问题,同一网络模式下可以看到centos的镜像,并且也从dhcp服务中获取到了ip地址,选择镜像安装的话,就没有问题了,安装好之后的密码就是我们之前设置的123456。这个虚拟机,我们可以保留着,如果需要进行批量装机的话,我们可以选择网络模式为桥接,然后将本地虚拟机的IP修改为192.168.249.2即可,网关服务由本地网卡来承担,dns的话,就没有办法了,毕竟我们只是想装系统而已。
三、使用KS进行定制化安装。
1.在安装系统的时候,像分区,安装基础软件包这些个工作量也不小,但我们可以使用ks文件来进行定制化的安装,在导入第一个镜像的时候,在/var/lib/cobbler/kickstarts/目录下会生成sample_end.ks文件,这个文件就是安装系统时的默认配置文件,我们可以进行修改,来完成自己的个性化配置,配置文件详解如下:
| 关键字 | 含义 |
|---|---|
install |
告知安装程序,这是一次全新安装,而不是升级upgrade。 |
url --url=" " |
通过FTP或HTTP从远程服务器上的安装树中安装。url --url="http://10.0.0.7/CentOS-6.7/"url --url ftp://<username>:<password>@<server>/<dir> |
nfs |
从指定的NFS服务器安装。nfs --server=nfsserver.example.com --dir=/tmp/install-tree |
text|graphical |
tesxt:使用文本模式安装。 graphical:在图形模式下根据kickstart执行安装,默认该选项 |
lang |
设置在安装过程中使用的语言以及系统的缺省语言。lang en_US.UTF-8 |
keyboard |
设置系统键盘类型。keyboard us |
zerombr |
清除mbr引导信息。 |
bootloader |
系统引导相关配置。bootloader --location=mbr --driveorder=sda --append="crashkernel=auto rhgb quiet"--location=,指定引导记录被写入的位置.有效的值如下:mbr(缺省),partition(在包含内核的分区的第一个扇区安装引导装载程序)或none(不安装引导装载程序)。--driveorder,指定在BIOS引导顺序中居首的驱动器。--append=,指定内核参数.要指定多个参数,使用空格分隔它们。 |
network |
为通过网络的kickstart安装以及所安装的系统配置联网信息。network --bootproto=dhcp --device=eth0 --onboot=yes --noipv6 --hostname=CentOS6--bootproto=[dhcp/bootp/static]中的一种,缺省值是dhcp。bootp和dhcp被认为是相同的。static方法要求在kickstart文件里输入所有的网络信息。network --bootproto=static --ip=10.0.0.100 --netmask=255.255.255.0 --gateway=10.0.0.2 --nameserver=10.0.0.2请注意所有配置信息都必须在一行上指定,不能使用反斜线来换行。 --ip=,要安装的机器的IP地址.--gateway=,IP地址格式的默认网关.--netmask=,安装的系统的子网掩码.--hostname=,安装的系统的主机名.--onboot=,是否在引导时启用该设备.--noipv6=,禁用此设备的IPv6.--nameserver=,配置dns解析. |
timezone |
设置系统时区。timezone --utc Asia/Shanghai |
authconfig |
系统认证信息。authconfig --enableshadow --passalgo=sha512设置密码加密方式为 sha512 启用shadow文件。 |
rootpw |
root密码 |
clearpart |
清空分区。clearpart --all --initlabel--all 从系统中清除所有分区,--initlable 初始化磁盘标签 |
part |
磁盘分区。 --ondisk,指明使用的磁盘 |
firstboot |
负责协助配置redhat一些重要的信息。firstboot --disable |
selinux |
关闭selinux。selinux --disabled |
firewall |
关闭防火墙。firewall --disabled |
logging |
设置日志级别。logging --level=info |
reboot |
设定安装完成后重启,此选项必须存在,不然kickstart显示一条消息,并等待用户按任意键后才重新引导,也可以选择halt关机。 |
以一个ks.cfg 文件为例
- install
- url --url="http://10.0.0.7/CentOS-6.7/"
- text
- lang en_US.UTF-
- keyboard us
- zerombr
- bootloader --location=mbr --driveorder=sda --append="crashkernel=auto rhgb quiet"
- network --bootproto=dhcp --device=eth0 --onboot=yes --noipv6 --hostname=CentOS6
- timezone --utc Asia/Shanghai
- authconfig --enableshadow --passalgo=sha512
- rootpw --iscrypted $$X20eRtuZhkHznTb4$dK0BJByOSAWSDD8jccLVFz0CscijS9ldMWwpoCw/ZEjYw2BTQYGWlgKsn945fFTjRC658UXjuocwJbAjVI5D6/
- clearpart --all --initlabel
- part /boot --fstype=ext4 --asprimary --size=
- part swap --size=
- part / --fstype=ext4 --grow --asprimary --size=
- firstboot --disable
- selinux --disabled
- firewall --disabled
- logging --level=info
- reboot
- %packages
- @base
- @compat-libraries
- @debugging
- @development
- tree
- nmap
- sysstat
- lrzsz
- dos2unix
- telnet
- %post
- wget -O /tmp/optimization.sh http://*.*.*.*/ks_config/optimization.sh &>/dev/null
- /bin/sh /tmp/optimization.sh
- %end
配置文件中的%packages指的是安装系统时,安装的软件包,截止到%end,%post指的是系统安装完成后执行的命令,一般的命令或者脚本都是在这个范围里,有的ks文件还会有%pre,它的意思是在系统安装前执行的命令,因为系统尚未安装,所以能够执行的命令也是非常少的,所以呢基本的命令或者脚本都是放在%post这个区间来做。
这里再给大家介绍两个命令:
[root@localhost kickstarts]# cobbler profile report    #查看镜像对应的ks配置文件
Name                           : CentOS-7.6-1810-x86_64
TFTP Boot Files                : {}
Comment                        :
DHCP Tag                       : default
Distribution                   : CentOS-7.6-1810-x86_64
Enable gPXE?                   : 0
Enable PXE Menu?               : 1
Fetchable Files                : {}
Kernel Options                 : {}
Kernel Options (Post Install)  : {}
Kickstart                      : /var/lib/cobbler/kickstarts/sample_end.ks
Kickstart Metadata             : {}
Management Classes             : []
Management Parameters          : <<inherit>>
Name Servers                   : []
Name Servers Search Path       : []
Owners                         : ['admin']
Parent Profile                 :
Internal proxy                 :
Red Hat Management Key         : <<inherit>>
Red Hat Management Server      : <<inherit>>
Repos                          : []
Server Override                : <<inherit>>
Template Files                 : {}
Virt Auto Boot                 : 1
Virt Bridge                    : xenbr0
Virt CPUs                      : 1
Virt Disk Driver Type          : raw
Virt File Size(GB)             : 5
Virt Path                      :
Virt RAM (MB)                  : 512
Virt Type                      : kvm
[root@localhost kickstarts]# cobbler profile edit --name=CentOS-7.6-1810-x86_64 --kickstart=/var/lib/cobbler/kickstarts/ks.cfg    #为镜像配置默认的ks文件
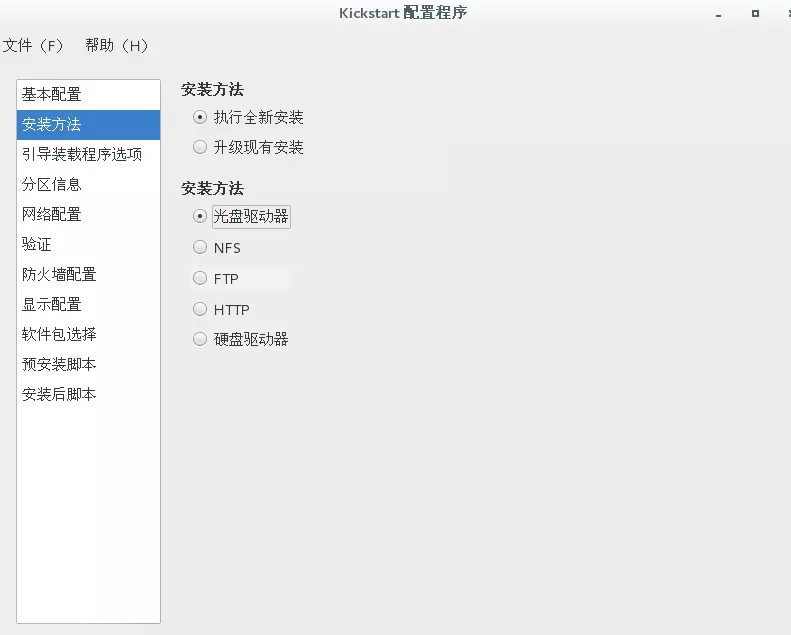
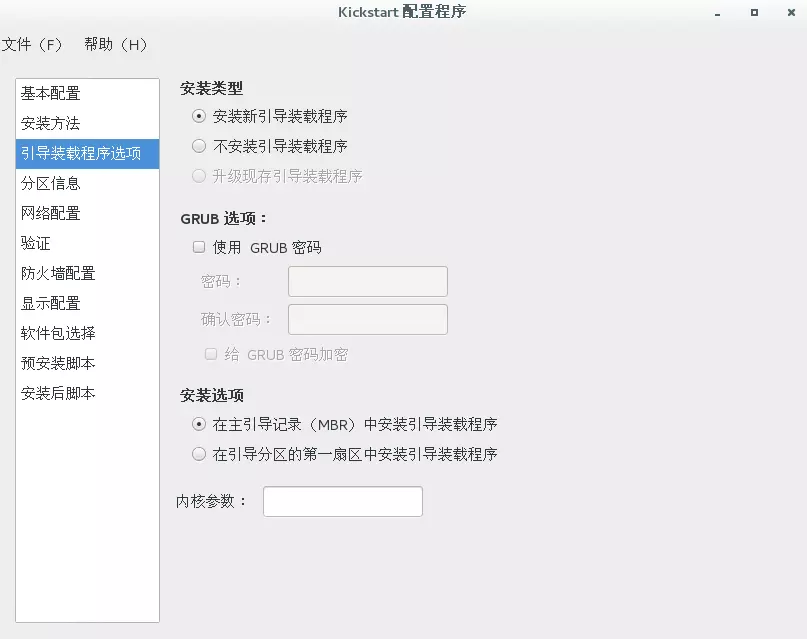
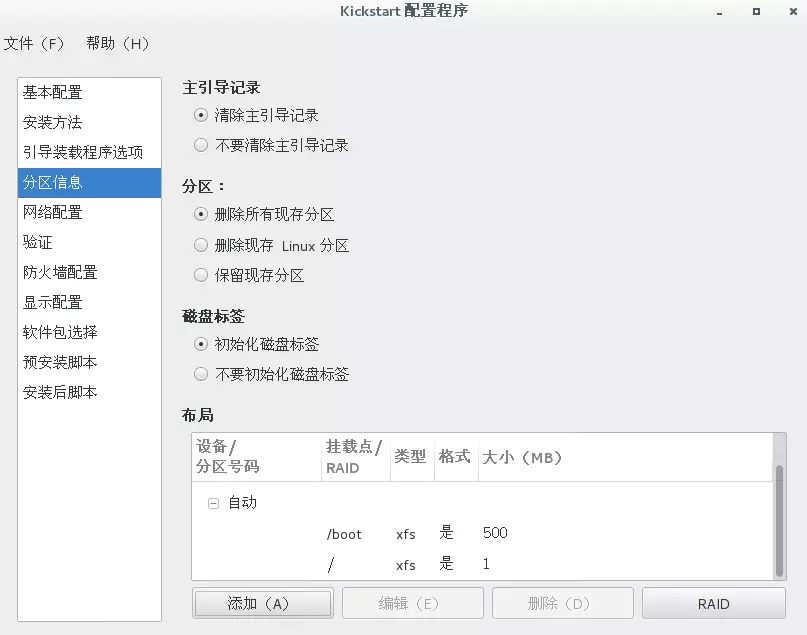
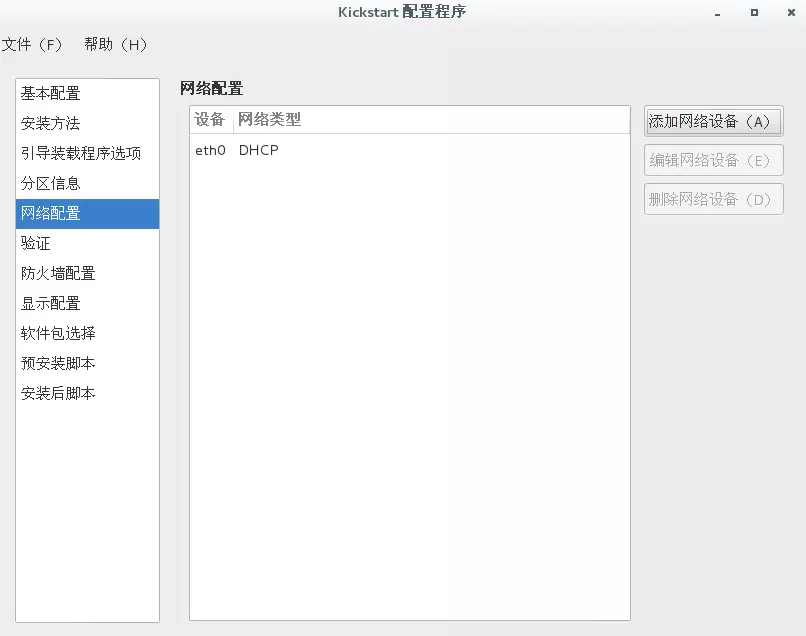
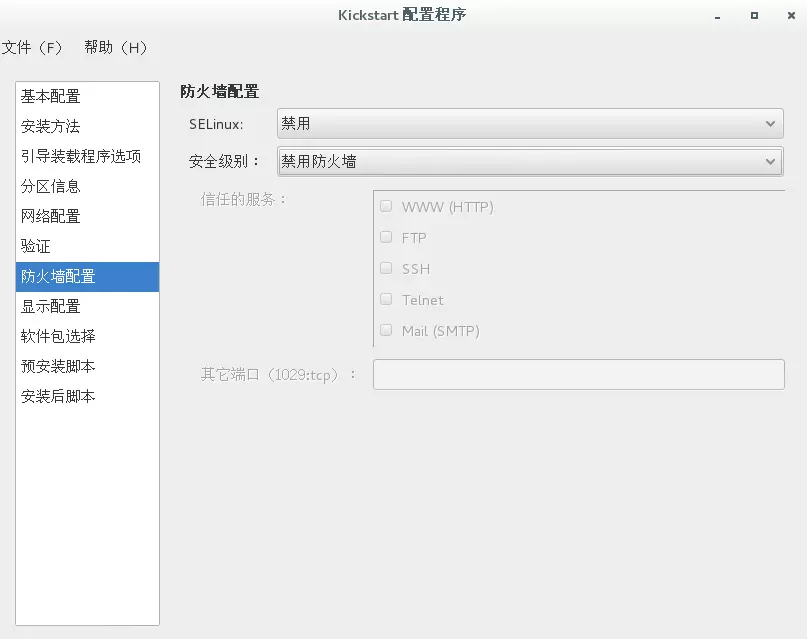
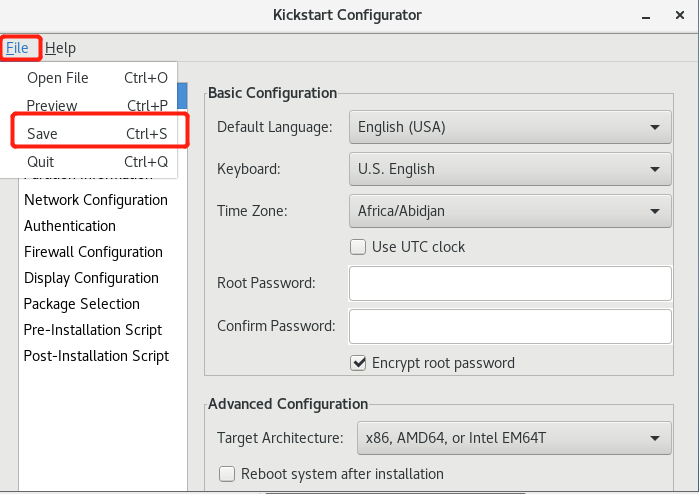
至于ks文件,可以使用kickstart的图形化工具来生成,工具安装命令如下:
[root@localhost ~]# yum install system-config-kickstart
使用教程如下,在图形化界面输入system-config-kickstart:
PS:使用cobbler安装的机器,内存不能少于2G,否则就会报错,至于其他的配置,如果是虚拟情况,也尽量配置高点。


四、Cobbler-web配置管理与报错解决:
1.先说报错吧,安装后web访问https://192.168.249.10/cobbler_web,结果出现了报错,如下:
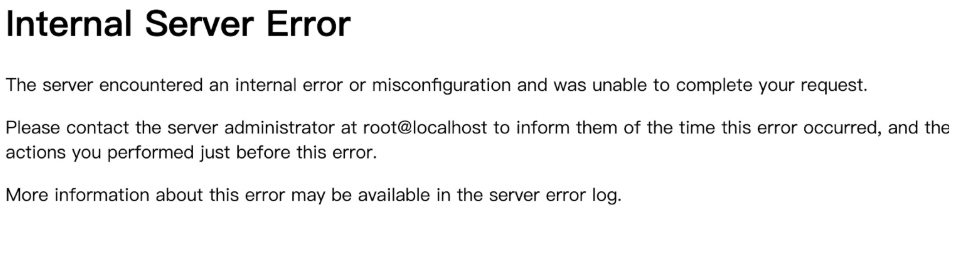
2.在网上找了下,果然不止我一个人遇到了这个问题,解决方法如下:
[root@localhost ~]# wget https://bootstrap.pypa.io/get-pip.py
[root@localhost ~]# python get-pip.py
DEPRECATION: Python 2.7 will reach the end of its life on January 1st, 2020. Please upgrade your Python as Python 2.7 won'of pip will drop support for Python 2.7. More details about Python 2 support in pip, can be found at https://pip.pypa.io/eport
Collecting pip
  Downloading https://files.pythonhosted.org/packages/30/db/9e38760b32e3e7f40cce46dd5fb107b8c73840df38f0046d8e6514e675a1/p
     |████████████████████████████████| 1.4MB 57kB/s
Collecting wheel
  Downloading https://files.pythonhosted.org/packages/00/83/b4a77d044e78ad1a45610eb88f745be2fd2c6d658f9798a15e384b7d57c9/wheel-0.33.6-py2.py3-none-any.whl
Installing collected packages: pip, wheel
Successfully installed pip-19.2.3 wheel-0.33.6
[root@localhost ~]# pip install Django==1.8.9
DEPRECATION: Python 2.7 will reach the end of its life on January 1st, 2020. Please upgrade your Python as Python 2.7 won't be maintained after that date. A future version of pip will drop support for Python 2.7. More details about Python 2 support in pip, can be found at https://pip.pypa.io/en/latest/development/release-process/#python-2-support
Collecting Django==1.8.9
  Downloading https://files.pythonhosted.org/packages/a7/a2/f4e7926062f5c61d98e87b9d0365ca1a0fab6be599dbea90ce2fab27f395/Django-1.8.9-py2.py3-none-any.whl (6.2MB)
     |████████████████████████████████| 6.2MB 56kB/s
Installing collected packages: Django
  Found existing installation: Django 1.11.23
    Uninstalling Django-1.11.23:
      Successfully uninstalled Django-1.11.23
Successfully installed Django-1.8.9
[root@localhost ~]# systemctl restart httpd cobblerd
ok,果然解决了问题,在此感谢51CTO JasonMingHao 博主:

访问的账号密码为:cobbler/cobbler(没错,账号密码都一样)
3.管理选项详解:
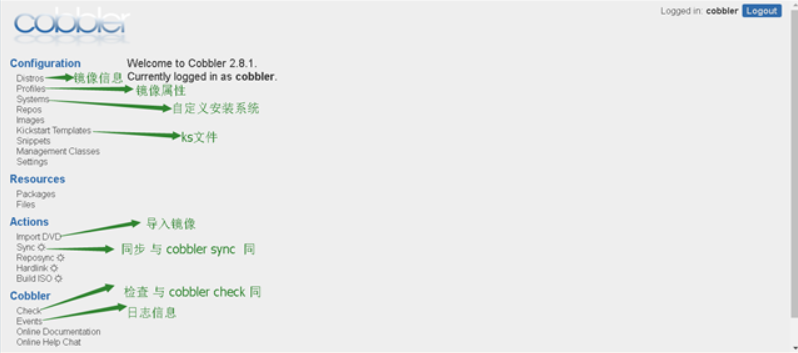
咳咳,坦白了,这张图是我盗来的,再次感谢CSDN惨绿少年博主,具体的操作功能和命令行的操作实际上是一致的,具体的操作使用web端感觉也就那样子,都习惯命令行了,ok,cobbler教程到此结束,如有不足,欢迎私信,一起进步!
最后:附上文章的参考链接
https://www.linuxidc.com/Linux/2018-03/151347.htm
https://www.linuxidc.com/Linux/2019-05/158647.htm
https://www.cnblogs.com/linuxliu/p/7668048.html
https://blog.csdn.net/admin_root1/article/details/78911718

 浙公网安备 33010602011771号