
1、VMware修改硬盘大小
关闭客户机
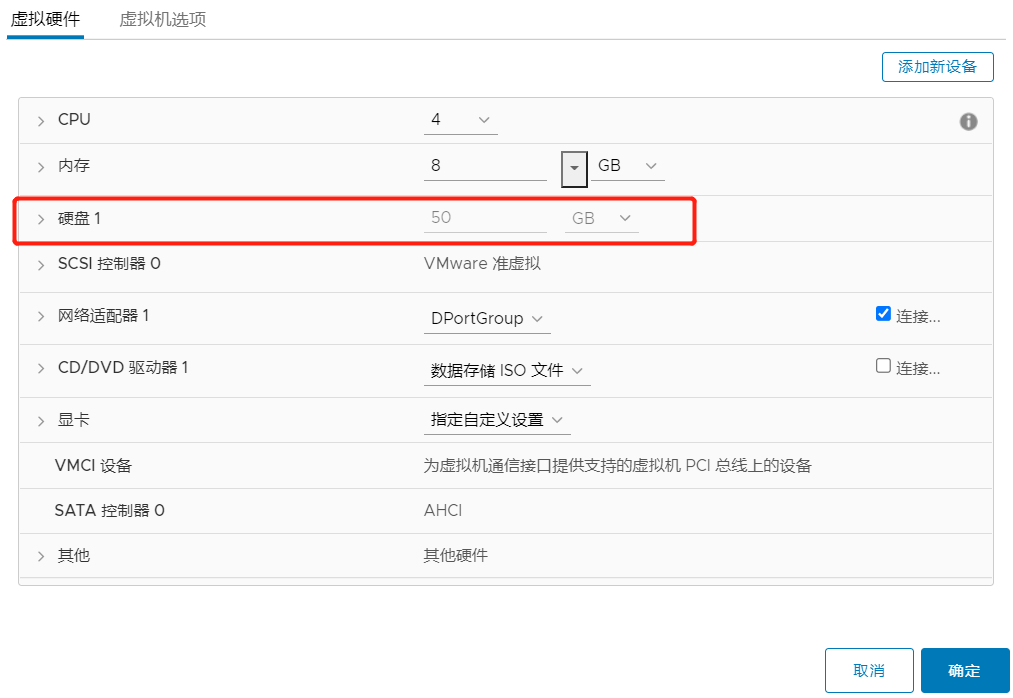
右键需要扩容的服务器——编辑——磁盘 修改大小
2、确认状态
# fdisk -l
可以看到“Disk /dev/sda: 400 GB”,已经扩展了300G空间。
ESXI修改完磁盘大小后,增加的磁盘空间表现为当前磁盘剩余未分配空间,需要使用剩余未分配空间新建分区
1. 创建新分区
# fdisk /dev/sda
n       (新建分区)
p       (选择分区类型主分区或扩展分区)
3       (选择分区编号)
回车
回车
t    (修改分区类型)
3    (选择分区)
8e    (Changed type of partition 'Linux' to 'Linux LVM',修改成LVM类型)
w    (写分区表退出)
The partition table has been altered!
Calling ioctl() to re-read partition table.
WARNING: Re-reading the partition table failed with error 16: 设备或资源忙.
The kernel still uses the old table. The new table will be used at
the next reboot or after you run partprobe(8) or kpartx(8)
正在同步磁盘。
使用命令重新读取分区表,或者重启机器
# partprobe
Warning: Unable to open /dev/sr0 read-write (Read-only file system).  /dev/sr0 has been opened read-only.
格式化新磁盘分区
xfs文件系统
# mkfs.xfs /dev/sda3       (此处分区格式要与已有的LVM卷中分区格式一致)
EXT4文件系统
# mkfs.ext4 /dev/sda3

查看分区格式
cat /etc/fstab
2. 添加新LVM分区到已有的LVM组,实现扩容
[root@jason_test ~]# lvm
lvm> pvcreate /dev/sda3
WARNING: ext4 signature detected on /dev/sda3 at offset 1080. Wipe it? [y/n]: y
  Wiping ext4 signature on /dev/sda3.
  Physical volume "/dev/sda3" successfully created.
lvm> vgdisplay
  --- Volume group ---
  VG Name               centos
  System ID
  Format                lvm2
  Metadata Areas        1
  Metadata Sequence No  3
  VG Access             read/write
  VG Status             resizable
  MAX LV                0
  Cur LV                2
  Open LV               2
  Max PV                0
  Cur PV                1
  Act PV                1
  VG Size               <15.00 GiB
  PE Size               4.00 MiB
  Total PE              3839
  Alloc PE / Size       3839 / <15.00 GiB
  Free  PE / Size       0 / 0
  VG UUID               Dw2t3d-lOmX-GwB8-r7z2-X2S2-2vzf-gn1ncn

lvm> vgextend centos /dev/sda3
  Volume group "centos" successfully extended
lvm> vgdisplay
  --- Volume group ---
  VG Name               centos
  System ID
  Format                lvm2
  Metadata Areas        2
  Metadata Sequence No  4
  VG Access             read/write
  VG Status             resizable
  MAX LV                0
  Cur LV                2
  Open LV               2
  Max PV                0
  Cur PV                2
  Act PV                2
  VG Size               98.99 GiB
  PE Size               4.00 MiB
  Total PE              25342
  Alloc PE / Size       3839 / <15.00 GiB
  Free  PE / Size       21503 / <84.00 GiB
  VG UUID               Dw2t3d-lOmX-GwB8-r7z2-X2S2-2vzf-gn1ncn

lvm> lvextend -l +21503 /dev/mapper/centos-root  (想要扩容的分区)
  Size of logical volume centos/root changed from 13.39 GiB (3429 extents) to 97.39 GiB (24932 extents).
  Logical volume centos/root successfully resized.
lvm> pvdisplay
  --- Physical volume ---
  PV Name               /dev/sda2
  VG Name               centos
  PV Size               <15.00 GiB / not usable 3.00 MiB
  Allocatable           yes (but full)
  PE Size               4.00 MiB
  Total PE              3839
  Free PE               0
  Allocated PE          3839
  PV UUID               0khpbf-D1I8-hdt0-U78f-ELax-V2xR-eOL8g9

  --- Physical volume ---
  PV Name               /dev/sda3
  VG Name               centos
  PV Size               84.00 GiB / not usable 4.00 MiB
  Allocatable           yes (but full)
  PE Size               4.00 MiB
  Total PE              21503
  Free PE               0
  Allocated PE          21503
  PV UUID               lCHa3l-XXpa-B1OY-6gEq-CBAl-2NxS-CzrCn2

lvm> quit
3. 文件系统扩容
xfs文件系统
[root@jason_test ~]# xfs_growfs /dev/mapper/centos-root
meta-data=/dev/mapper/centos-root isize=512 agcount=4, agsize=877824 blks
= sectsz=512 attr=2, projid32bit=1
= crc=1 finobt=0 spinodes=0
data = bsize=4096 blocks=3511296, imaxpct=25
= sunit=0 swidth=0 blks
naming =version 2 bsize=4096 ascii-ci=0 ftype=1
log =internal bsize=4096 blocks=2560, version=2
= sectsz=512 sunit=0 blks, lazy-count=1
realtime =none extsz=4096 blocks=0, rtextents=0
data blocks changed from 3511296 to 25530368
EXT4文件系统
resize2fs /dev/mapper/centos-root
[root@jason_test ~]# df -h
Filesystem               Size  Used Avail Use% Mounted on
/dev/mapper/centos-root   98G   11G   87G  11% /
devtmpfs                 7.8G     0  7.8G   0% /dev
tmpfs                    7.8G     0  7.8G   0% /dev/shm
tmpfs                    7.8G  9.3M  7.8G   1% /run
tmpfs                    7.8G     0  7.8G   0% /sys/fs/cgroup
/dev/sda1               1014M  182M  833M  18% /boot
tmpfs                    1.6G     0  1.6G   0% /run/user/0
参考: https://www.lucissfer.com/2018/06/12/ESXI虚拟机磁盘在线扩容/
https://www.cnblogs.com/zengming/p/11498322.html
https://blog.csdn.net/linmengmeng_1314/article/details/124848863
ESXI编辑设置硬盘为灰色无法修改大小
解决办法:这是由于当前虚拟机存在快照,从而锁定了磁盘空间容量,删除快照即可解决此问题
esxi5.5、esxi6.0 更改磁盘大小,需要关闭虚拟机再操作(否则报错:failed to extend disk)
![]()
lvextend(选项)(参数)
-L:指定逻辑卷的大小,单位为“kKmMgGtT”字节;
-l:指定逻辑卷的大小(LE数)
lvextend -L +100G  增加100G容量
lvextend -L 100G   扩展至100G容量

Esxi虚拟机磁盘扩容失败 提示“设备“3”的操作无效”的问题解决

解决:
删除该服务器的所有快照


Ubuntu系统以下是针对 ESXi 6.7 虚拟机中 Ubuntu 25 系统 扩展 /dev/mapper/ubuntu--vg-ubuntu--lv 逻辑卷的完整操作步骤:
一、ESXi 层面扩展虚拟磁盘

1. 关闭虚拟机
   在 vSphere Client 中确认虚拟机处于关机状态。

2. 扩展虚拟磁盘容量
   • 右键虚拟机 → 编辑设置 → 选择现有磁盘 → 修改 磁盘容量 为更大值(如从 20GB 扩容至 40GB)→ 勾选 “立即分配所有空间” → 确认保存。

3. 启动虚拟机
   完成扩容后启动虚拟机,进入 Ubuntu 系统。

二、Ubuntu 系统内操作

1. 确认新磁盘空间已识别

lsblk  # 查看磁盘列表,确认新增空间(如 /dev/sda 新增未分配区域)
fdisk -l  # 检查磁盘总容量是否匹配 ESXi 设置

xunianbing@xunianbing:~$ sudo -i
xunianbing@xunianbing:~$ sudo fdisk -l
GPT PMBR size mismatch (209715199 != 419430399) will be corrected by write.
The backup GPT table is not on the end of the device.
Disk /dev/sda: 200 GiB, 214748364800 bytes, 419430400 sectors
Disk model: Virtual disk
Units: sectors of 1 * 512 = 512 bytes
Sector size (logical/physical): 512 bytes / 512 bytes
I/O size (minimum/optimal): 512 bytes / 512 bytes
Disklabel type: gpt
Disk identifier: E0259FA2-D339-4DE2-9BF0-704A211F15AC
Device Start End Sectors Size Type
/dev/sda1 2048 4095 2048 1M BIOS boot
/dev/sda2 4096 4198399 4194304 2G Linux filesystem
/dev/sda3 4198400 209715166 205516767 98G Linux filesystem
xunianbing@xunianbing:~$ sudo fdisk /dev/sda
Welcome to fdisk (util-linux 2.40.2).
Changes will remain in memory only, until you decide to write them.
Be careful before using the write command.
GPT PMBR size mismatch (209715199 != 419430399) will be corrected by write.
The backup GPT table is not on the end of the device. This problem will be corrected by write.
This disk is currently in use - repartitioning is probably a bad idea.
It's recommended to umount all file systems, and swapoff all swap
partitions on this disk.
Command (m for help): n
Partition number (4-128, default 4): 4
First sector (209715167-419430366, default 209715200):
Last sector, +/-sectors or +/-size{K,M,G,T,P} (209715200-419430366, default 419428351):
Created a new partition 4 of type 'Linux filesystem' and of size 100 GiB.
Command (m for help): t
Partition number (1-4, default 4): 4
Partition type or alias (type L to list all): 8e
Type of partition 4 is unchanged: Linux filesystem.
Command (m for help): w
The partition table has been altered.
Syncing disks.
xunianbing@xunianbing:~$ cat /etc/fstab
# /etc/fstab: static file system information.
#
# Use 'blkid' to print the universally unique identifier for a
# device; this may be used with UUID= as a more robust way to name devices
# that works even if disks are added and removed. See fstab(5).
#
# <file system> <mount point> <type> <options> <dump> <pass>
# / was on /dev/ubuntu-vg/ubuntu-lv during curtin installation
/dev/disk/by-id/dm-uuid-LVM-VXFZlGtu0C64M5c6QGkifDVUqtSBFLicsdwaJMPE3Y6WwstcofKDOAPb8i2W5seW / ext4 defaults 0 1
# /boot was on /dev/sda2 during curtin installation
/dev/disk/by-uuid/a594677d-d446-4b3c-a96e-9c3703fbd636 /boot ext4 defaults 0 1
/swap.img none swap sw 0 0
root@xunianbing:~# sudo fdisk -l
Disk /dev/sda: 200 GiB, 214748364800 bytes, 419430400 sectors
Disk model: Virtual disk
Units: sectors of 1 * 512 = 512 bytes
Sector size (logical/physical): 512 bytes / 512 bytes
I/O size (minimum/optimal): 512 bytes / 512 bytes
Disklabel type: gpt
Disk identifier: E0259FA2-D339-4DE2-9BF0-704A211F15AC
Device Start End Sectors Size Type
/dev/sda1 2048 4095 2048 1M BIOS boot
/dev/sda2 4096 4198399 4194304 2G Linux filesystem
/dev/sda3 4198400 209715166 205516767 98G Linux filesystem
/dev/sda4 209715200 419428351 209713152 100G Linux filesystem
Disk /dev/mapper/ubuntu--vg-ubuntu--lv: 98 GiB, 105222504448 bytes, 205512704 sectors
Units: sectors of 1 * 512 = 512 bytes
Sector size (logical/physical): 512 bytes / 512 bytes
I/O size (minimum/optimal): 512 bytes / 512 bytes
root@xunianbing:~# sudo lvm
lvm> pvcreate /dev/sda4
Physical volume "/dev/sda4" successfully created.
lvm> vgdisplay
--- Volume group ---
VG Name ubuntu-vg
System ID
Format lvm2
Metadata Areas 1
Metadata Sequence No 4
VG Access read/write
VG Status resizable
MAX LV 0
Cur LV 1
Open LV 1
Max PV 0
Cur PV 1
Act PV 1
VG Size <98.00 GiB
PE Size 4.00 MiB
Total PE 25087
Alloc PE / Size 25087 / <98.00 GiB
Free PE / Size 0 / 0
VG UUID VXFZlG-tu0C-64M5-c6QG-kifD-VUqt-SBFLic
lvm> vgextend ubuntu-vg /dev/sda4
Volume group "ubuntu-vg" successfully extended
lvm> vgdisplay
--- Volume group ---
VG Name ubuntu-vg
System ID
Format lvm2
Metadata Areas 2
Metadata Sequence No 5
VG Access read/write
VG Status resizable
MAX LV 0
Cur LV 1
Open LV 1
Max PV 0
Cur PV 2
Act PV 2
VG Size 197.99 GiB
PE Size 4.00 MiB
Total PE 50686
Alloc PE / Size 25087 / <98.00 GiB
Free PE / Size 25599 / <100.00 GiB
VG UUID VXFZlG-tu0C-64M5-c6QG-kifD-VUqt-SBFLic
lvm> lvextend -l +25599 /dev/mapper/ubuntu--vg-ubuntu--lv
Size of logical volume ubuntu-vg/ubuntu-lv changed from <98.00 GiB (25087 extents) to 197.99 GiB (50686 extents).
Logical volume ubuntu-vg/ubuntu-lv successfully resized.
lvm> pvdisplay
--- Physical volume ---
PV Name /dev/sda3
VG Name ubuntu-vg
PV Size <98.00 GiB / not usable 16.50 KiB
Allocatable yes (but full)
PE Size 4.00 MiB
Total PE 25087
Free PE 0
Allocated PE 25087
PV UUID uMBdjp-Fbe8-pvOD-nVFU-8x60-eP6B-sCrXZB
--- Physical volume ---
PV Name /dev/sda4
VG Name ubuntu-vg
PV Size <100.00 GiB / not usable 3.00 MiB
Allocatable yes (but full)
PE Size 4.00 MiB
Total PE 25599
Free PE 0
Allocated PE 25599
PV UUID ofeMyd-Ok0A-T2Nk-0tr6-prYO-kEBE-fDfuS1
lvm> quit
Exiting.
root@xunianbing:~# sudo resize2fs /dev/mapper/ubuntu--vg-ubuntu--lv
resize2fs 1.47.2 (1-Jan-2025)
Filesystem at /dev/mapper/ubuntu--vg-ubuntu--lv is mounted on /; on-line resizing required
old_desc_blocks = 13, new_desc_blocks = 25
The filesystem on /dev/mapper/ubuntu--vg-ubuntu--lv is now 51902464 (4k) blocks long.
root@xunianbing:~# sudo df -h
Filesystem Size Used Avail Use% Mounted on
tmpfs 2.3G 2.5M 2.3G 1% /run
/dev/mapper/ubuntu--vg-ubuntu--lv 195G 88G 100G 47% /
tmpfs 12G 0 12G 0% /dev/shm
tmpfs 1.0M 0 1.0M 0% /run/credentials/systemd-journald.service
tmpfs 5.0M 0 5.0M 0% /run/lock
tmpfs 12G 57M 12G 1% /tmp
tmpfs 1.0M 0 1.0M 0% /run/credentials/systemd-resolved.service
/dev/sda2 2.0G 214M 1.6G 12% /boot
tmpfs 1.0M 0 1.0M 0% /run/credentials/systemd-networkd.service
tmpfs 2.3G 16K 2.3G 1% /run/user/1000
tmpfs 1.0M 0 1.0M 0% /run/credentials/getty@tty1.service
overlay 195G 88G 100G 47% /var/lib/docker/overlay2/a016b51bdb1b98ce5bce3dfa1109d5ae65cb1459ef48e6804cbed416a7d28f0b/merged
overlay 195G 88G 100G 47% /var/lib/docker/overlay2/ad287ee4c41231565f692a14764596fea65697fa753304da071b7241cf47c4af/merged
overlay 195G 88G 100G 47% /var/lib/docker/overlay2/f7aa52bd54e15ddadbd5953fd3f751c7657448afd507ccc66c9510e8df5d9652/merged
overlay 195G 88G 100G 47% /var/lib/docker/overlay2/a66ba10782db7f5a47c6ec6ccc44bf1d387cf91d18fa3eda515650b7d3bcf159/merged
overlay 195G 88G 100G 47% /var/lib/docker/overlay2/5eb37bc4a28bb5fe251b186e59905750725898ac84525bcdea2bc9047fb37308/merged
overlay 195G 88G 100G 47% /var/lib/docker/overlay2/cad85bf116a6dde83ce36a32660fa1ab52f383a180dba0e357094446c222b3a6/merged
overlay 195G 88G 100G 47% /var/lib/docker/overlay2/51e3cad0781159ddfc654438cc43cd8b3168ab0af9b85301ada223062cb666e1/merged
overlay 195G 88G 100G 47% /var/lib/docker/overlay2/4857ddf29bbebdda57481b095a4f99332e1d6878df24538169baa99ffdb0bd40/merged
overlay 195G 88G 100G 47% /var/lib/docker/overlay2/c1175ba41c4efb0ccb83fe9677a3ccefcaef5f2ac26ef25f8c70493a45c79648/merged
overlay 195G 88G 100G 47% /var/lib/docker/overlay2/26e55aa75694de06c534545f5eb307c81378859762a74f966187938a44cb87c2/merged
overlay 195G 88G 100G 47% /var/lib/docker/overlay2/50333aa68362b3cbff6635607749ebb52fae47f0e831e03935a4172a572f6f25/merged
不是LVM格式的磁盘
gitlab@gitlab:~$ df -h
Filesystem      Size  Used Avail Use% Mounted on
tmpfs           1.6G  1.7M  1.6G   1% /run
/dev/sda3       177G  155G   13G  93% /
tmpfs           7.6G     0  7.6G   0% /dev/shm
tmpfs           5.0M     0  5.0M   0% /run/lock
tmpfs           1.0M     0  1.0M   0% /run/credentials/systemd-journald.service
tmpfs           1.0M     0  1.0M   0% /run/credentials/systemd-resolved.service
tmpfs           7.6G     0  7.6G   0% /tmp
/dev/sda2        20G  2.2M   19G   1% /home
tmpfs           1.0M     0  1.0M   0% /run/credentials/systemd-networkd.service
tmpfs           1.0M     0  1.0M   0% /run/credentials/getty@tty1.service
tmpfs           1.6G   12K  1.6G   1% /run/user/1000
gitlab@gitlab:~$ fdisk -l
fdisk: cannot open /dev/sda: Permission denied
gitlab@gitlab:~$ sudo fdksi -l
[sudo] password for gitlab:
sudo: fdksi: command not found
gitlab@gitlab:~$ sudo fdisk  -l
Disk /dev/sda: 500 GiB, 536870912000 bytes, 1048576000 sectors
Disk model: Virtual disk
Units: sectors of 1 * 512 = 512 bytes
Sector size (logical/physical): 512 bytes / 512 bytes
I/O size (minimum/optimal): 512 bytes / 512 bytes
Disklabel type: gpt
Disk identifier: 2E9C6B26-C68F-4E70-A306-46379D60B2D8

Device         Start        End   Sectors  Size Type
/dev/sda1       2048       4095      2048    1M BIOS boot
/dev/sda2       4096   41947135  41943040   20G Linux filesystem
/dev/sda3   41947136  419428351 377481216  180G Linux filesystem
/dev/sda4  419428352 1048573951 629145600  300G Linux LVM
gitlab@gitlab:~$
gitlab@gitlab:~$
gitlab@gitlab:~$
gitlab@gitlab:~$
gitlab@gitlab:~$
gitlab@gitlab:~$ sudo pvs
  PV         VG        Fmt  Attr PSize    PFree
  /dev/sda4  ubuntu-vg lvm2 a--  <300.00g <300.00g
gitlab@gitlab:~$ sudo vgs
  VG        #PV #LV #SN Attr   VSize    VFree
  ubuntu-vg   1   0   0 wz--n- <300.00g <300.00g
gitlab@gitlab:~$ sudo lvs
gitlab@gitlab:~$ sudo vgremove ubuntu-vg
  Volume group "ubuntu-vg" successfully removed
gitlab@gitlab:~$ sudo pvremove /dev/sda4
  Labels on physical volume "/dev/sda4" successfully wiped.
gitlab@gitlab:~$ sudo fdisk /dev/sda

Welcome to fdisk (util-linux 2.40.2).
Changes will remain in memory only, until you decide to write them.
Be careful before using the write command.

This disk is currently in use - repartitioning is probably a bad idea.
It's recommended to umount all file systems, and swapoff all swap
partitions on this disk.


Command (m for help): d
Partition number (1-4, default 4): 4

Partition 4 has been deleted.

Command (m for help): w
The partition table has been altered.
Syncing disks.

gitlab@gitlab:~$ sudo apt install cloud-guest-utils -y
cloud-guest-utils is already the newest version (0.33-1).
cloud-guest-utils set to manually installed.
The following package was automatically installed and is no longer required:
  libutempter0
Use 'sudo apt autoremove' to remove it.

Summary:
  Upgrading: 0, Installing: 0, Removing: 0, Not Upgrading: 0
gitlab@gitlab:~$ sudo growpart /dev/sda 3
CHANGED: partition=3 start=41947136 old: size=377481216 end=419428351 new: size=1006628831 end=1048575966
gitlab@gitlab:~$ sudo resize2fs /dev/sda3
resize2fs 1.47.2 (1-Jan-2025)
Filesystem at /dev/sda3 is mounted on /; on-line resizing required
old_desc_blocks = 23, new_desc_blocks = 60
The filesystem on /dev/sda3 is now 125828603 (4k) blocks long.

gitlab@gitlab:~$ sudo df -h
Filesystem      Size  Used Avail Use% Mounted on
tmpfs           1.6G  1.7M  1.6G   1% /run
/dev/sda3       472G  155G  296G  35% /
tmpfs           7.6G     0  7.6G   0% /dev/shm
tmpfs           5.0M     0  5.0M   0% /run/lock
tmpfs           1.0M     0  1.0M   0% /run/credentials/systemd-journald.service
tmpfs           1.0M     0  1.0M   0% /run/credentials/systemd-resolved.service
tmpfs           7.6G     0  7.6G   0% /tmp
/dev/sda2        20G  2.2M   19G   1% /home
tmpfs           1.0M     0  1.0M   0% /run/credentials/systemd-networkd.service
overlay         472G  155G  296G  35% /var/lib/docker/rootfs/overlayfs/d9c8209983171b46b49d5821c831b2399e08178cebfdfe423ee6463cd65ca511
tmpfs           1.0M     0  1.0M   0% /run/credentials/getty@tty1.service
tmpfs           1.6G   12K  1.6G   1% /run/user/1000

 浙公网安备 33010602011771号