
【HTML5 绘图与动画】 图形合成 1. 合成 globalCompositeOperation 2.裁切 clip
以下内容为学习下图这本书做的笔记,非原创。做笔记主要是为了实践一下看看结果加深记忆。
目录:
① globalCompositeOperation 的属性值不同,图形的绘制顺序也不同。
语句:
 1 <canvas id="canvas" width="200" height="200" style="border:solid 1px #999;"></canvas>
 2 <script>
 3     draw();
 4     function draw(){
 5         //使用document.getElementById() 方法, 根据 canvas 元素的 id 获取对 canvas 的引用
 6         var ctx = document.getElementById('canvas').getContext('2d');
 7         ctx.fillStyle = "red";
 8         //新建矩形
 9         ctx.fillRect(50, 25, 100, 100);
10         ctx.fillStyle = "green";
11         ctx.globalCompositeOperation = "source-over";   //默认值 : source-over
12         ctx.beginPath();
13         //新建圆
14         ctx.arc(150, 125, 20, 0, Math.PI*2, true);
15         ctx.closePath();
16         ctx.fill();
17     }
18 </script>
页面表现:
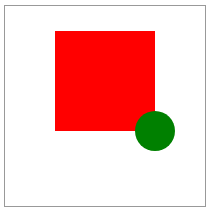
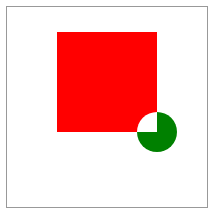
默认为新图形覆盖在原有内容之上。原有内容为 destination, 新图形为 source。
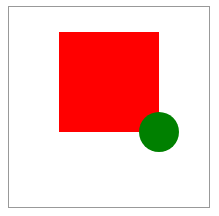
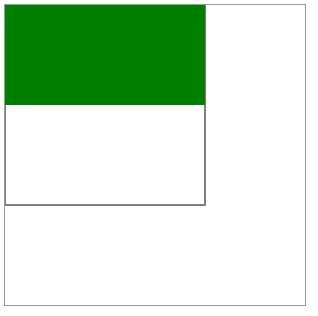
更改代码第 11 行为 :ctx.globalCompositeOperation = "destination-over";
页面表现为:
更改代码第 11 行为 :ctx.globalCompositeOperation = "source-atop";
页面表现为:
更改代码第 11 行为 :ctx.globalCompositeOperation = "destination-atop";
页面表现为:
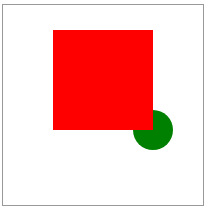
更改代码第 11 行为 :ctx.globalCompositeOperation = "source-over";
页面表现为:

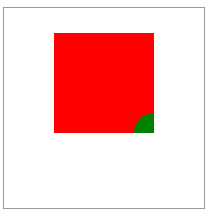
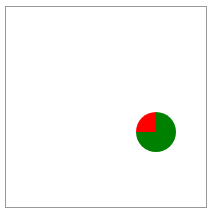
更改代码第 11 行为 :ctx.globalCompositeOperation = "destination-in";
页面表现为:

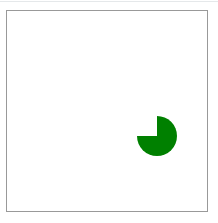
更改代码第 11 行为 :ctx.globalCompositeOperation ="source-out";
页面表现为:
更改代码第 11 行为 :ctx.globalCompositeOperation ="destination-out";
页面表现为:

更改代码第 11 行为 :ctx.globalCompositeOperation = "lighter";
页面表现为:

更改代码第 11 行为 :ctx.globalCompositeOperation = "darker";
页面表现为:
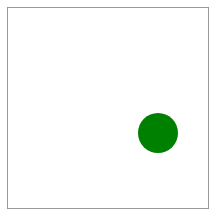
更改代码第 11 行为 :ctx.globalCompositeOperation = "copy";
页面表现为:
更改代码第 11 行为 :ctx.globalCompositeOperation = "xor";
页面表现为:
① 剪切一个区域,在这个区域内绘图
语句:
 1 <canvas id="canvas" width="300" height="300" style="border:solid 1px #999;"></canvas>
 2 <script>
 3     draw();
 4     function draw(){
 5         //使用document.getElementById() 方法, 根据 canvas 元素的 id 获取对 canvas 的引用
 6         var ctx = document.getElementById('canvas').getContext('2d');
 7         ctx.rect(0, 0, 200, 200);
 8         ctx.stroke();
 9         ctx.clip();
10         //使用clip()剪切出一个宽200高200的区域,之后的绘图都被现在在了这个区域内
11         ctx.fillStyle = "green";
12         ctx.fillRect(0,0,300,100);
13     }
14 </script>
页面表现:
② 绘制一个圆形,进行裁切,圆形之外的区域将不会绘制在 canvas 上。
语句:
 1 <canvas id="canvas" width="300" height="300" style="border:solid 1px #999;"></canvas>
 2 <script>
 3     draw();
 4     function draw(){
 5         //使用document.getElementById() 方法, 根据 canvas 元素的 id 获取对 canvas 的引用
 6         var ctx = document.getElementById('canvas').getContext('2d');
 7         //绘制背景
 8         ctx.fillStyle = "black";
 9         ctx.fillRect(0, 0, 300, 300);
10         ctx.fill();
11         //绘制圆形
12         ctx.beginPath();
13         ctx.arc(150, 150, 100, 0, Math.PI*2, true);
14         //裁剪路径
15         ctx.clip(); //clip()的作用是形成一个蒙版,没有被蒙版的区域会被隐蔽
16         for( var i=1; i<90; i++ ){
17             ctx.save();
18             ctx.transform(0.95,0,0,0.95,30,30);
19             ctx.rotate(Math.PI/12);
20             ctx.beginPath();
21             ctx.fillStyle="red";
22             ctx.globalAlpha="0.4";
23             ctx.arc(0,0,50,0,Math.PI*2,true);
24             ctx.closePath();
25             ctx.fill();
26         }
27     }
28 </script>
页面表现:


 浙公网安备 33010602011771号