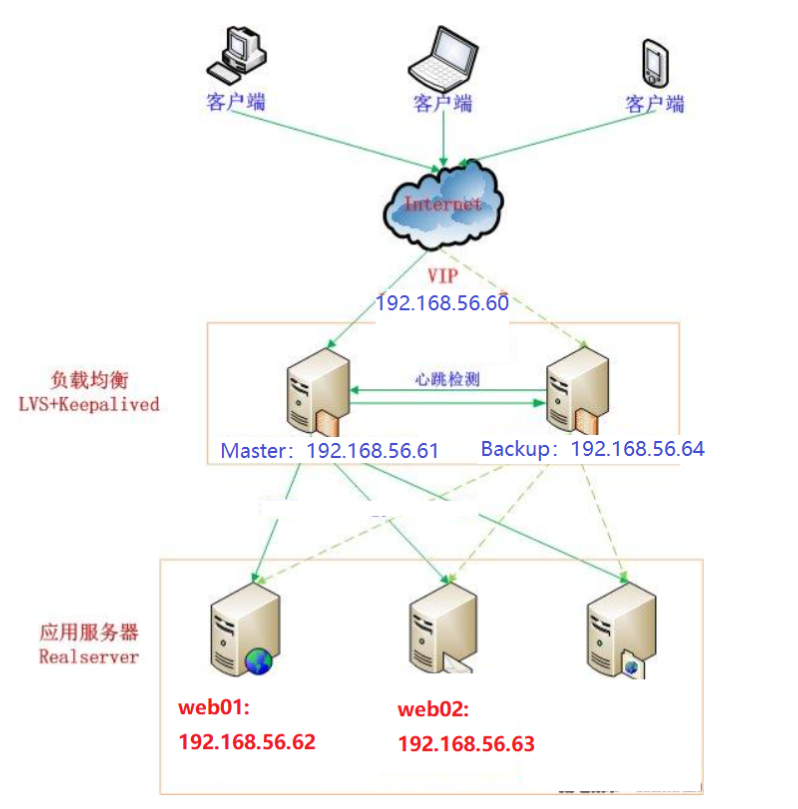
1.1 机器规划和架构图
| 角色 |
IP |
nginx反向代理+keepalive-master |
192.168.56.61 |
| web01 |
192.168.56.62 |
| web02 |
192.168.56.63 |
nginx反向代理+keepalive-slave |
192.168.56.64 |
![]()
1.2 部署nginx负载均衡
192.168.56.61(keepalive-master)
192.168.56.64(keepalive-slave)
1.2.1 配置nginx负载
安装nginx服务


[root@linux-node4 ~]# yum -y install nginx
配置反向代理


[root@lb-master ~]# vim /etc/nginx/nginx.conf
stream {
    log_format  main  '$remote_addr $upstream_addr - [$time_local] $status $upstream_bytes_sent';
    access_log  /var/log/nginx/django-access.log  main;
    upstream django-apiserver {
                server 192.168.56.62:80;
                server 192.168.56.63:80;
            }

    server {
       listen 88;
       proxy_pass django-apiserver;
    }
}
1.2.2 完整配置如下
看一下即可,都是nginx默认配置


[root@lb-master ~]# cat /etc/nginx/nginx.conf
user  nginx;
worker_processes  1;
error_log  /var/log/nginx/error.log warn;
pid        /var/run/nginx.pid;
events {
    worker_connections  1024;
}

stream {
    log_format  main  '$remote_addr $upstream_addr - [$time_local] $status $upstream_bytes_sent';
    access_log  /var/log/nginx/django-access.log  main;
    upstream django-apiserver {
                server 192.168.56.62:80;
                server 192.168.56.63:80;
            }

    server {
       listen 80;
       proxy_pass django-apiserver;
    }
}

http {
    include       /etc/nginx/mime.types;
    default_type  application/octet-stream;
    log_format  main  '$remote_addr - $remote_user [$time_local] "$request" '
                      '$status $body_bytes_sent "$http_referer" '
                      '"$http_user_agent" "$http_x_forwarded_for"';
    access_log  /var/log/nginx/access.log  main;
    sendfile        on;
    #tcp_nopush     on;
    keepalive_timeout  65;
    #gzip  on;
    include /etc/nginx/conf.d/*.conf;
}
1.2.3 测试反向代理可用性
测试集群可用性


http://192.168.56.62/        # web01
http://192.168.56.63/        # web02
# 可以停止一个nginx服务,测试可用性
服务管理


[root@lb-slave ~]# systemctl start nginx
[root@lb-slave ~]# systemctl enable nginx
2.3 keepalive安装与配置
2.3.1 安装keepalive
[root@lb-master ~]# yum -y install keepalived
2.3.2 keepalive-master配置修改
==注:默认的keepalived.conf配置太多,直接删除,用下面配置替换即可==
192.168.56.61


[root@lb-master ~]# vim /etc/keepalived/keepalived.conf

global_defs {
   notification_email {
     acassen@firewall.loc
     failover@firewall.loc
     sysadmin@firewall.loc
   }
   notification_email_from Alexandre.Cassen@firewall.loc
   smtp_server 127.0.0.1
   smtp_connect_timeout 30
   router_id NGINX_MASTER
}

# 健康监测nginx
vrrp_script check_nginx {
    script "/etc/keepalived/check_nginx.sh"      # 设置检查nginx是否存活的脚本位置
}

# keepalive热备组配置
vrrp_instance VI_1 {
    state MASTER            # 配置当前keepalive为master角色
    interface eth0           # 网卡名字,必须和实际网卡名称一致,默认是ens33
    virtual_router_id 51       # VRRP 路由 ID实例,每个实例是唯一的
    priority 100            # 优先级,备服务器设置 90
    advert_int 1            # 指定VRRP 心跳包通告间隔时间,默认1秒
    authentication {
        auth_type PASS
        auth_pass 1111       # 设置keepalive的master和slave之间简单的秘钥认证
    }
    virtual_ipaddress {
        192.168.56.60/24     # 设置keepalive虚拟IP地址
    }
    track_script {
        check_nginx
    }
}
2.3.3 keepalive-slave配置修改
==注:默认的keepalived.conf配置太多,直接删除,用下面配置替换即可==

192.168.56.64


[root@lb-master ~]# vim /etc/keepalived/keepalived.conf

global_defs {
   notification_email {
     acassen@firewall.loc
     failover@firewall.loc
     sysadmin@firewall.loc
   }
   notification_email_from Alexandre.Cassen@firewall.loc
   smtp_server 127.0.0.1
   smtp_connect_timeout 30
   router_id NGINX_BACKUP
}

vrrp_script check_nginx {
    script "/etc/keepalived/check_nginx.sh"
}

vrrp_instance VI_1 {
    state BACKUP            # 设置keepalive角色为backend
    interface eth0           # 设置虚拟网卡名称
    virtual_router_id 51       # VRRP 路由 ID实例,每个实例是唯一的,master和slave保持一致即可
    priority 90             # 优先级,备服务器设置 90
    advert_int 1            # 指定VRRP 心跳包通告间隔时间,默认1秒
    authentication {
        auth_type PASS
        auth_pass 1111
    }
    virtual_ipaddress {
        192.168.56.60/24     # 设置虚拟网卡地址
    }
    track_script {
        check_nginx
    }
}
2.3.4 添加nginx健康监测脚本
[root@lb-master keepalived]# vim /etc/keepalived/check_nginx.sh
#!/bin/bash
count=$(ps -ef |grep nginx |egrep -cv "grep|$$")

if [ "$count" -eq 0 ];then
    exit 1
else
    exit 0
fi
[root@lb-master keepalived]# chmod +x /etc/keepalived/check_nginx.sh         # 给脚本添加一个可执行权限
2.3.5 启动keepalive
root@lb-master ~]#  systemctl start keepalived
[root@lb-master ~]#  systemctl enable keepalived
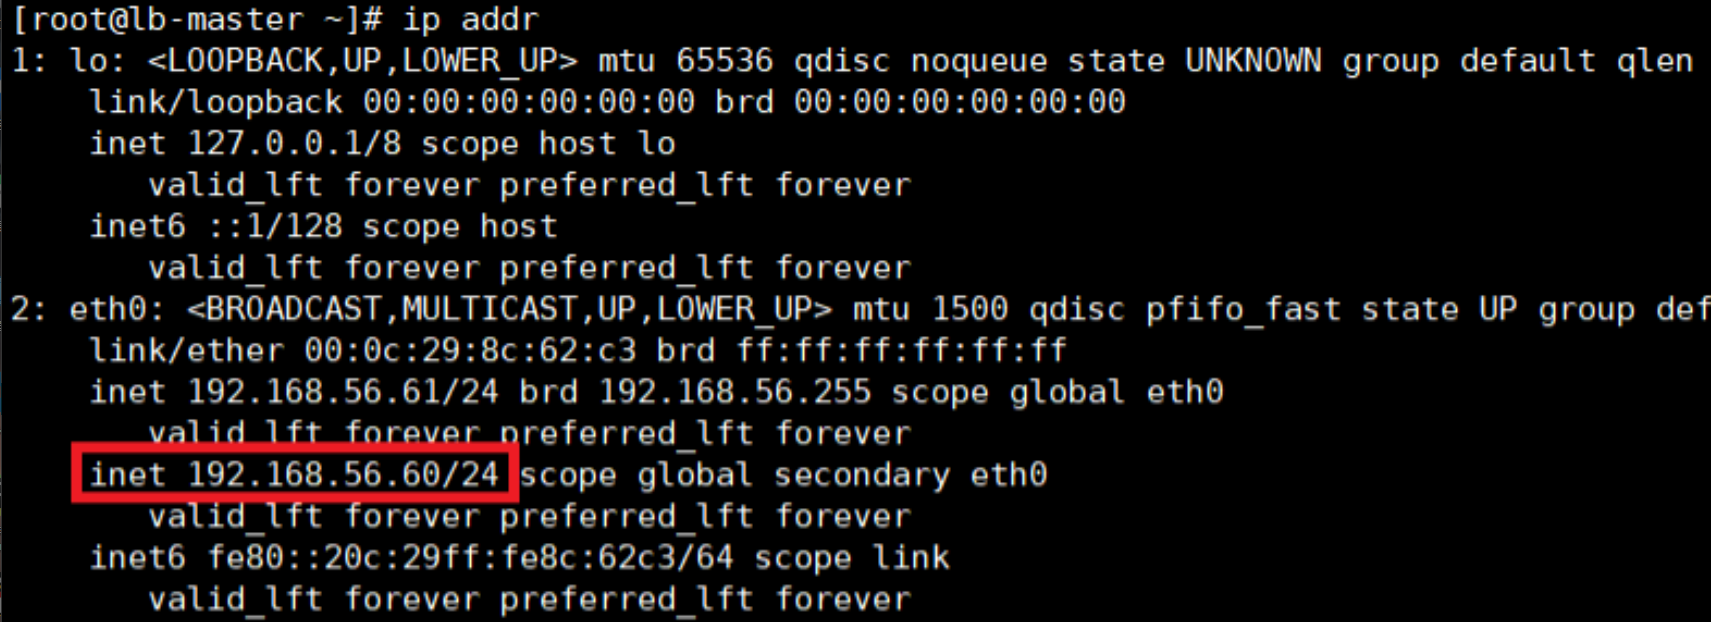
2.4 测试keepalive高可用
1、测试使用 http://192.168.56.60:88/ 虚拟IP访问
  在浏览器中访问: http://192.168.56.60 http://192.168.56.61 http://192.168.56.64 都可以访问web1和web2服务
2、关闭lb-master(192.168.56.61)的nginx测试VIP是否漂移到备节点
  在192.168.56.61中停止nginx服务(lb-master),lb-slave中可以接替master的服务
  依然可以使用 http://192.168.56.60:88/ 访问web01和web02服务
![]()


 浙公网安备 33010602011771号