javaweb 学习笔记 (2021.10.29~11.2)
JavaWeb
- JavaWeb
- 一、web基本概念
- 二、web服务器讲解
- 三、Tomcat详解
- 四、Http讲解
- 五、Maven环境搭建
- 六、IDEA中Maven的操作
- ☆可能的问题
- 八、HelloServlet
- 九、Servlet原理
- 十、SelvletContext对象
- 十一、SelvletContext应用
- 十二、Response下载文件
- 十三、Response验证码实现
- 十四、Response重定向
- 十五、Request应用
- 十六、Cookie讲解
- 十七、Session讲解(重点)
- 十八、JSP原理分析
- 十九、JSP基础语法和指令
- 二十、JSP内置对象及作用域
- 二十一、JSP、JSTL、标签、EL表达式
- 二十二、JavaBean
- 二十三、MVC三层架构
- 二十四、过滤器Filter(重点)
- 二十五、监听器Listener
- 二十六、监听器GUI中理解
- 二十七、Filter实现权限拦截
- 二十八、JDBC复习
- 二十九、JDBC事务
- 三十、smbms项目搭建
- 三十一、smbms登录实现流程
- 三十二、smbms注销及权限过滤
- 三十三、smbms密码修改实现
- 三十四、Ajax验证旧密码实现
- 三十五、smbms用户管理底层实现
- 三十六、smbms用户管理分页OK
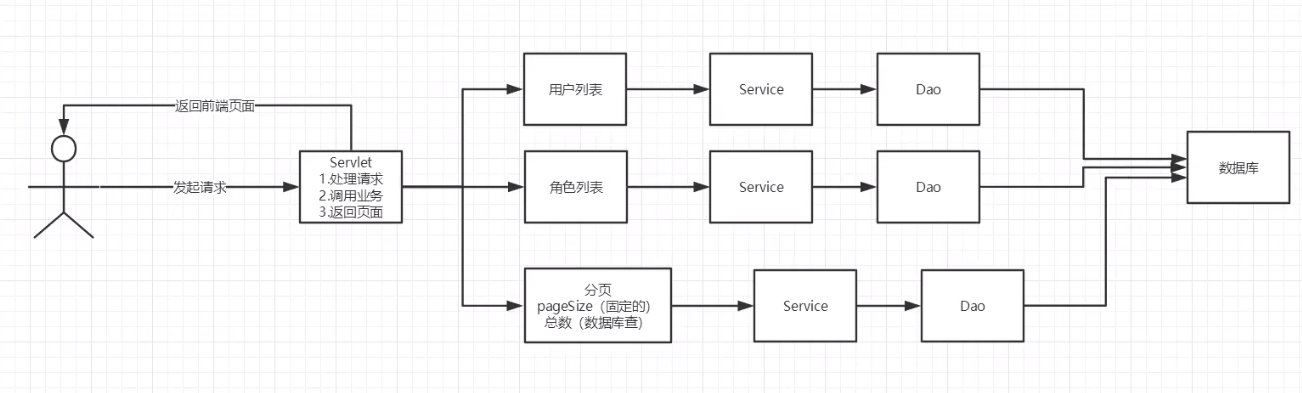
- 三十七、smbms架构分析及方法学习
- 三十八、文件上传
- 三九、邮件发送
一、web基本概念
Java web
1. 基本概念
web开发:
- web,网页的意思
- 静态web
- html,css
- 提供给所有人的数据不会有任何变化
- 动态web
- 提供给所有人的数据会有任何变化,人人看到的信息各不相同
- 几乎所有网站
- 技术栈:servlet/JSP、ASP,PHP
在Java中,动态web资源开发的技术统称为Javaweb。
2. web应用程序下
web应用程序:可以提供浏览器访问的程序;
-
a.html、b.html……多个web资源,这些可以被外部调用,然后可以提供服务
-
你们能访问到的任何一个页面或者资源,都存在这个世界上某个计算机上。
-
url
-
这个统一的web资源会被放在同一个文件夹下,web应用程序--->Tomcat:服务器
-
一个web应用由多个部分组成(静态web,动态web)
- html,css,js
- jsp,servlet
- java程序
- jar包
- 配置文件(Properties)
web应用程序编写完毕后,若想被外界访问,需要一个服务器统一管理
3. 静态web
-
.htm、.html,如果一个服务器上以制存有这些东西,我们就可以直接进行读取,通过网络。
-
-
静态web存在的缺点
- 无法动态更新,永远是同一个页面
- 轮播图:伪动态
- JavaScript(用的多)
- VBScript
- 无法和用户交互,数据无法持久化,用户无法交互
- 无法动态更新,永远是同一个页面
4. 动态web
页面会动态展示:Web展示的效果因人而异

缺点
- 假如动态资源出现错误,我们需要重新编写后台程序,重新发布
- 停机维护
优点
- 可以动态更新,不是是同一个页面
- 轮播图:伪动态
- JavaScript(用的多)
- VBScript
- 可以和数据库交互,数据持久化(持久化:注册,商品信息)
二、web服务器讲解
1. 技术讲解
ASP
- 微软:国内最早流行
- HTML中嵌入了VB脚本,ASP+COM
- 在ASP开发中,一个页面的业务代码庞杂而乱,不宜与维护,可能有几千行代码
- C#
- IIS
PHP
- 开发速度快,功能强大,跨平台,代码简单(70%)
- 无法承载大访问量情况(局限性)
JSP/Servlet
- sun公司主推的B/S架构
- 基于Java语言(大公司和开源组件都用Java)
- 承载高并发、高承载、高性能问题
- 语法向ASP
2. web服务器
服务器是被动操作,用来处理请求和返回响应信息
IIS
微软的;ASP...,Windows中自带的
Tomcat
面向百度编程
对初学者来说,是最佳选择,免费
工作3-5年后尝试手写Tomcat;
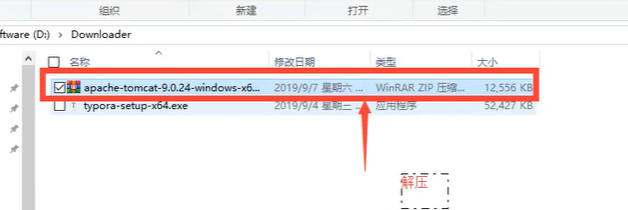
下载Tomcat:
- 安装或解压
- 了解配置文件及目录结构
- 连接这个东西的作用
三、Tomcat详解
1.安装解压

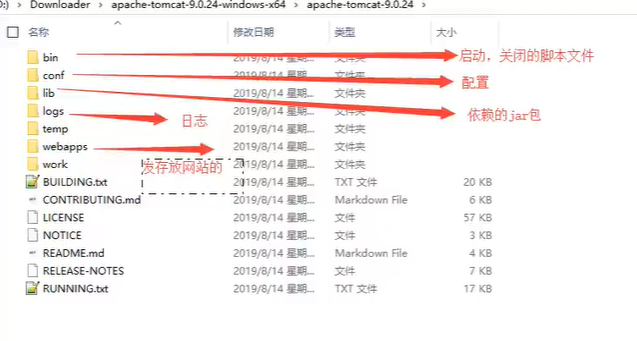
2. Tomcat的启动和配置
文件夹作用
启动关闭Tomcat
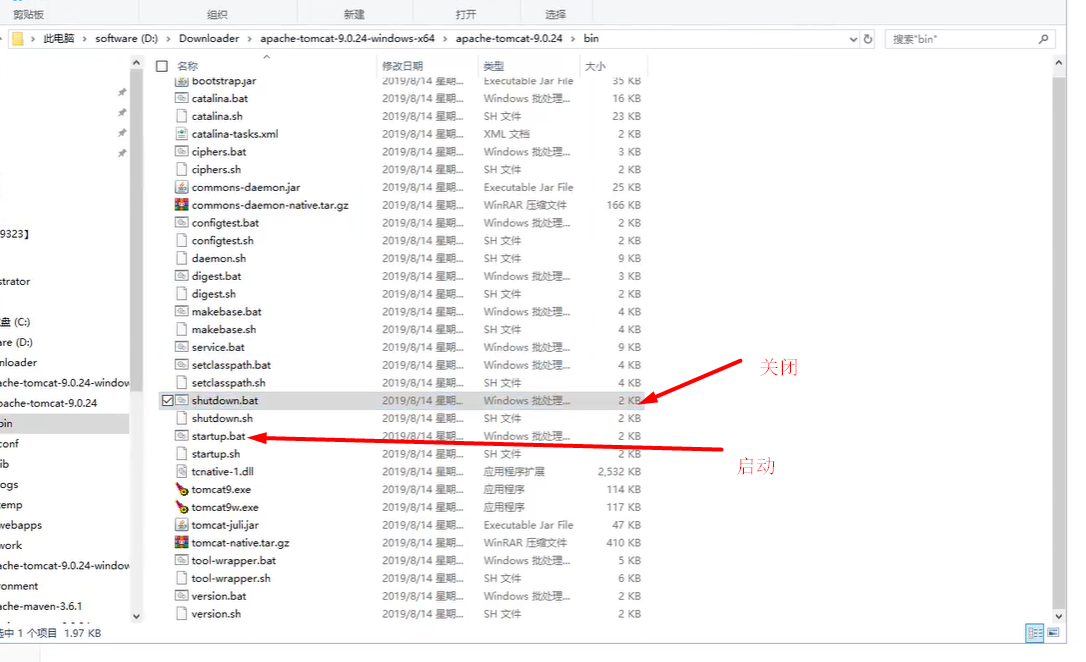
访问测试 127.0.0.1:8080
可能遇到问题
- java环境变量没配
- 闪退问题:配置兼容性
- 乱码问题:配置文件设置
服务器核心配置文件
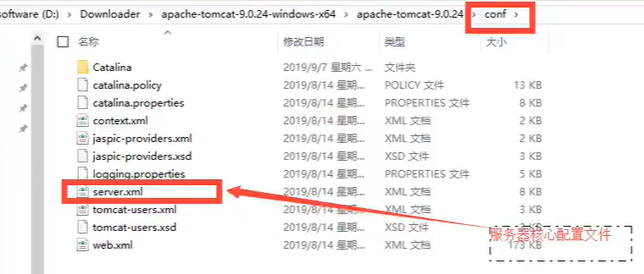
可以配置
-
启动端口号
<Connector port="8080" protocol="HTTP/1.1" connectionTimeout="20000" redirectPort="8443" /> -
主机名称
<Host name="localhost" appBase="webapps" unpackWARs="true" autoDeploy="true">- 默认主机名localhost->127.0.0.1
- 默认网站应用存放的位置为:webapps
-
高难度面试题
请你谈谈网站时如何进行网站的
-
输入域名;回车
-
检查本机hosts配置文件下有无域名配置
-
有:直接返回对应地址,这个地址中有我们要访问的web程序,如果可以直接访问,就访问
-
没有:到DNS服务器中找(全世界域名在这个服务器),找不到就返回找不到

-
-
-
可配置环境变量(可选)
3. 发布一个web网站
- 把自己的网页放到webapps文件夹下就可以访问了
网站应该有的结构
--webapps:tomcat服务器的web资源目录
    -root:默认目录
    -xiaowei:网站的目录名
    	-web-inf
    		-classes:Java程序
            -lib:web应用依赖的jar包
            -web.xml:网站配置文件
        -index.html 默认首页
        -static
            -css
            -js
            -img
        -...
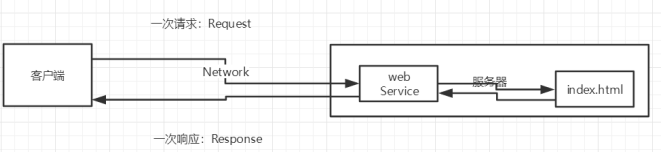
四、Http讲解
1. 什么是Http
超文本传输协议(Hyper Text Transfer Protocol,HTTP)是一个简单的请求-响应协议,它通常运行在TCP之上。
- 文本:html,字符串,……
- 超文本:图片、视频、音乐,……
- 80默认端口
Https:安全的
- 443
2. 两个时代
- http1.0
- http/1.0:客户端可以和web服务器连接后只能获取一个资源,断开连接
- http2.0
- http/1.1:客户端可以和web服务器连接后可获取多个资源。
3. http请求
客户端---发请求(request)---服务器
百度
Request URL: https://www.baidu.com/    //请求地址
Request Method: GET					// get方法/post方法
Status Code: 200 OK					//状态码:200
Remote Address: 183.232.231.172:443
Referrer Policy: strict-origin-when-cross-origin
Accept: text/html
Accept-Encoding: gzip, deflate, br
Accept-Language: zh-CN,zh;q=0.9		语言
Cache-Control: max-age=0
Connection: keep-alive
请求行
- 请求行中的请求方式:GET
- 请求方式:GET/POST/HEAD/DELETE/PUT/TRACT
- get:请求参数少,大小有限值,不安全但是高效
- post:请求参数无限制,大小无限值,安全但是不高效
消息头
Accept:高速浏览器,它所支持的类型
Accept-Encoding:支持哪种编码格式UTF-8 GBK
Accept-Language:告诉浏览器,它应该用的语言环境
Cache-Control:缓存控制
Connection:告诉浏览器,请求完成是断开还是保持连接
HOST:主机
    .....
4. http响应
服务器----给响应
百度
Cache-Control: private	缓存控制
Connection: keep-alive	连接
Content-Encoding: gzip	编码
Content-Type: text/html;charset=utf-8	类型
响应体
Accept:高速浏览器,它所支持的类型
Accept-Encoding:支持哪种编码格式UTF-8 GBK
Accept-Language:告诉浏览器,它应该用的语言环境
Cache-Control:缓存控制
Connection:告诉浏览器,请求完成是断开还是保持连接
HOST:主机
    .....
Reflush:刷新,告诉客户端多久刷新一次
Location:让网页重新定位
响应状态码(重点)
200:请求响应成功
3xx:请求重定向
- 你重新到我指定的新位置
4xx:找不到资源
5xx:服务器代码错误 500 502:网关错误
常见面试题:
当你的浏览器中地址栏输入地址并回车的一瞬间,到页面能展示回来,经历了什么
五、Maven环境搭建
我为什么要学习Maven?
-
在javaweb开发中需要使用大量jar包,需要手动导入
-
如何能够让一个东西帮我导入配置jar包。
由此,Maven诞生了!
1. Maven项目架构管理工具
我们目前用它来方便导入jar包的!
Maven的核心思想:约定大于配置
- 有约束就别区违反
Maven会规定好你如何区编写我们的Java代码,必须按照这个规定来!
2. 下载安装Maven
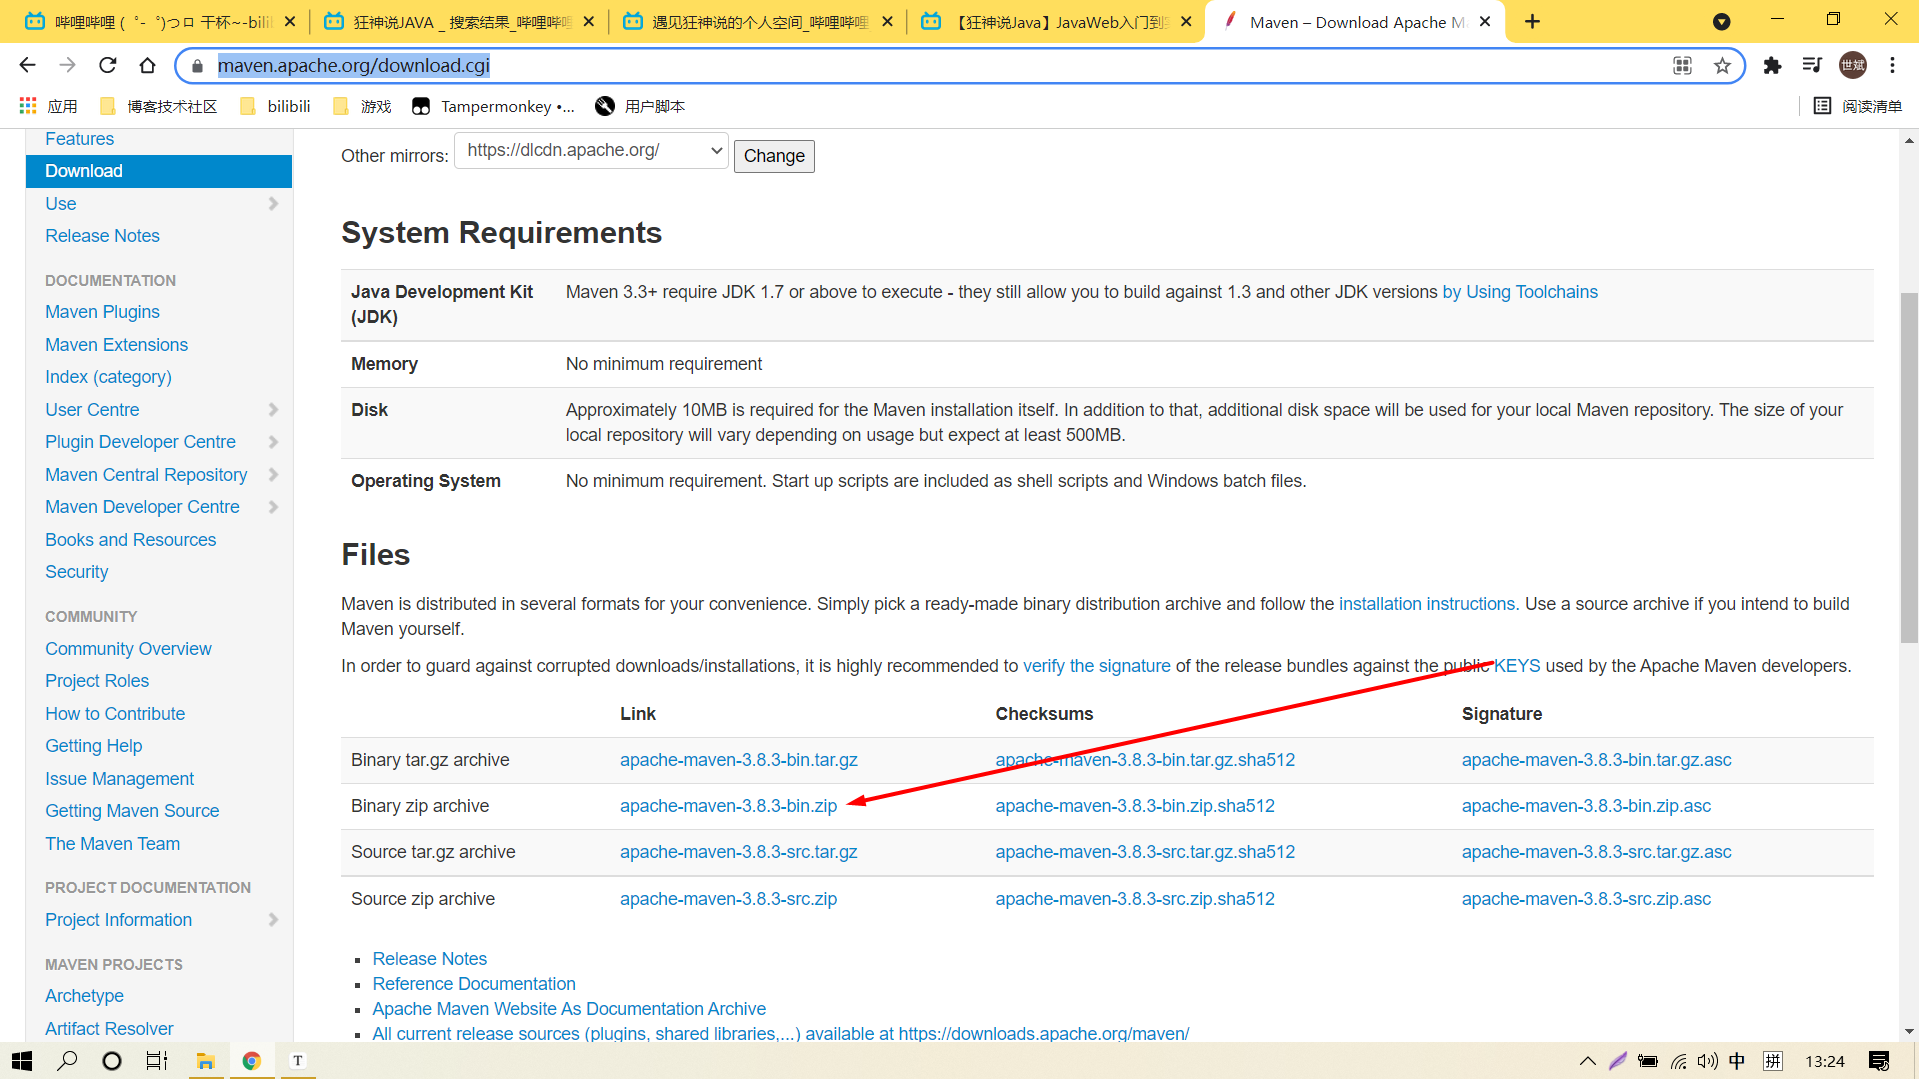
下载完解压(尽量自己弄个文件夹专门放这些东西)
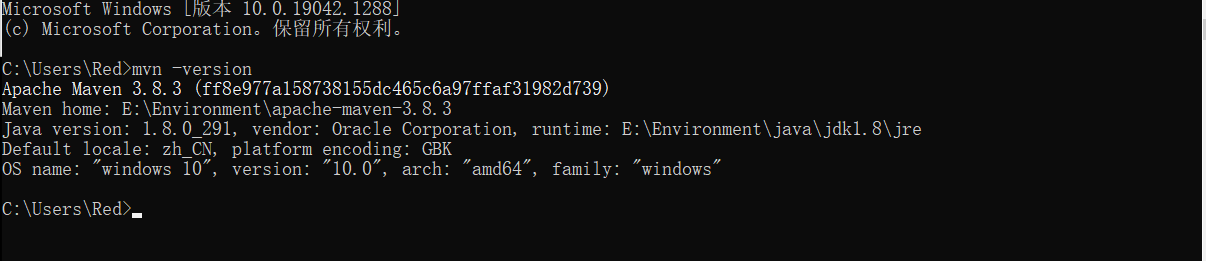
3. 配置环境变量
配置如下配置:
- M2_HOME :Maven的bin目录
- MAVEN_HOME:Maven目录
- 在系统Path中配置Maven目录 %MAVEN_HOME%\bin(多了个MAVEN_HOME的变量是因为之后的学习的框架会引用这个变量)
cmd中使用指令查看是否安装成功
mvn -version
4. 修改配置镜像
阿里云镜像:加速你的文件下载
<mirror>
    <id>nexus-aliyun</id>
    <mirrorOf>*,!jeecg,!jeecg-snapshots</mirrorOf>
    <name>Nexus aliyun</name>
    <url>http://maven.aliyun.com/nexus/content/groups/public</url>
</mirror>
5. 本地仓库
建立一个仓库(本地、远程)
建立本地仓库:localRepository
  <!-- localRepository
   | The path to the local repository maven will use to store artifacts.
   | 默认的地方↓
   | Default: ${user.home}/.m2/repository
  <localRepository>/path/to/local/repo</localRepository>
  -->
  <localRepository>E:\Environment\apache-maven-3.8.3\maven-repo</localRepository>
	<!--这里放你自己的指定仓库 -->
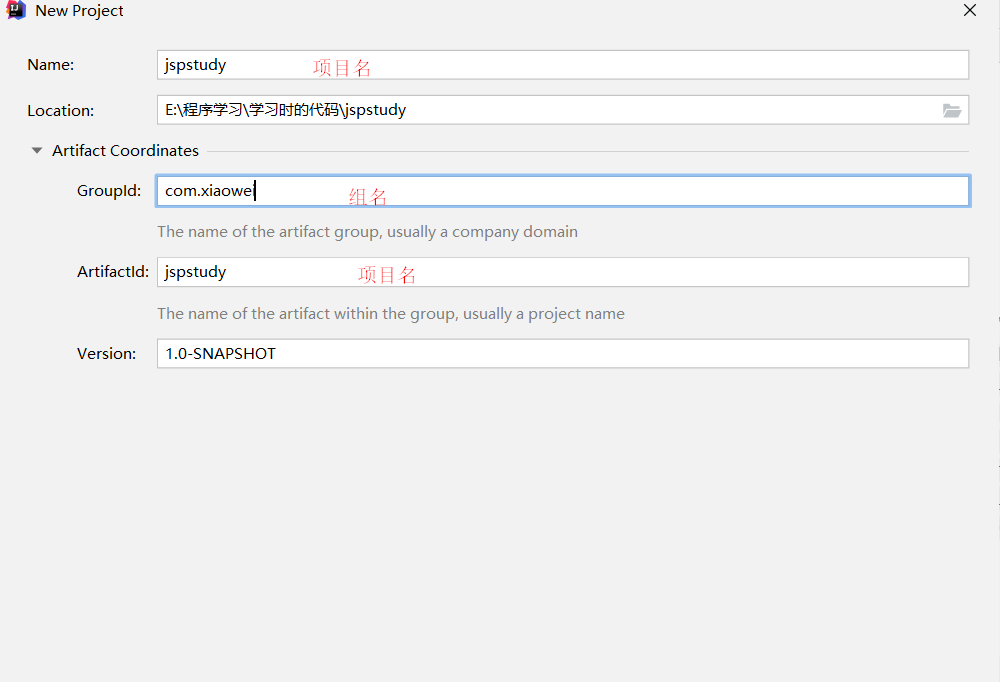
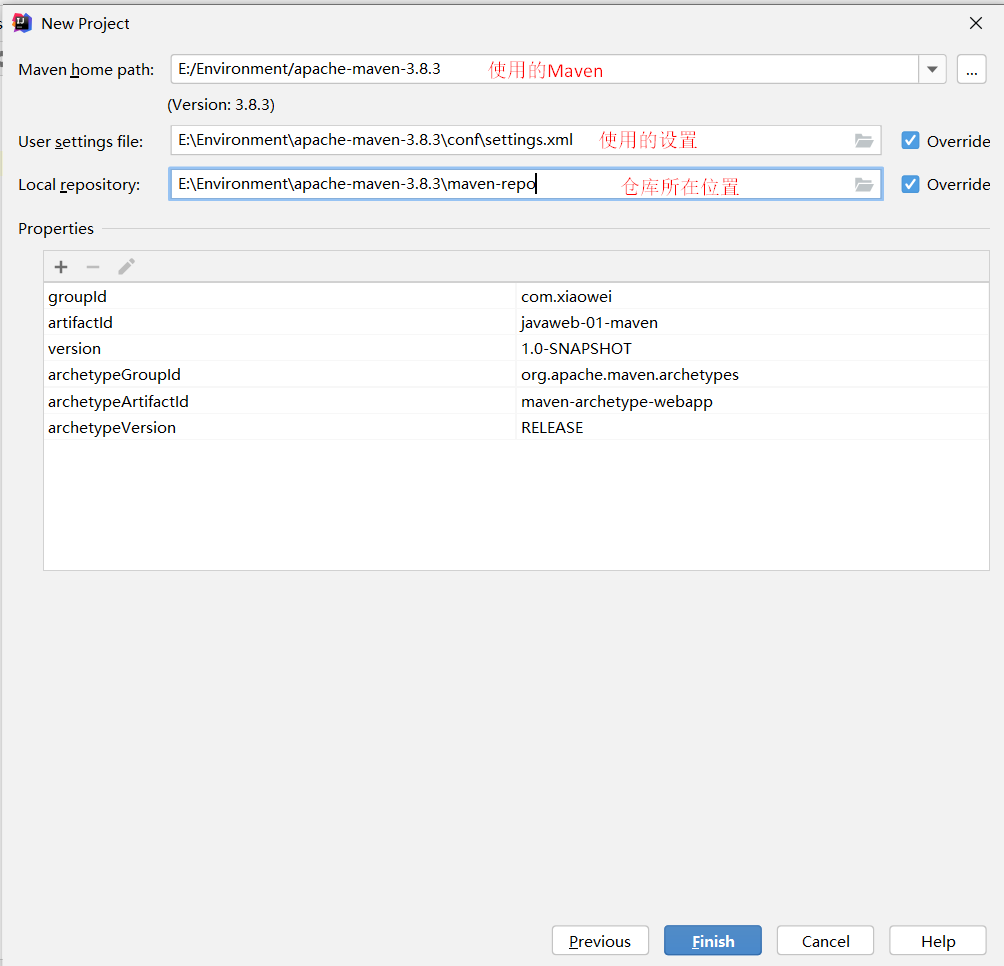
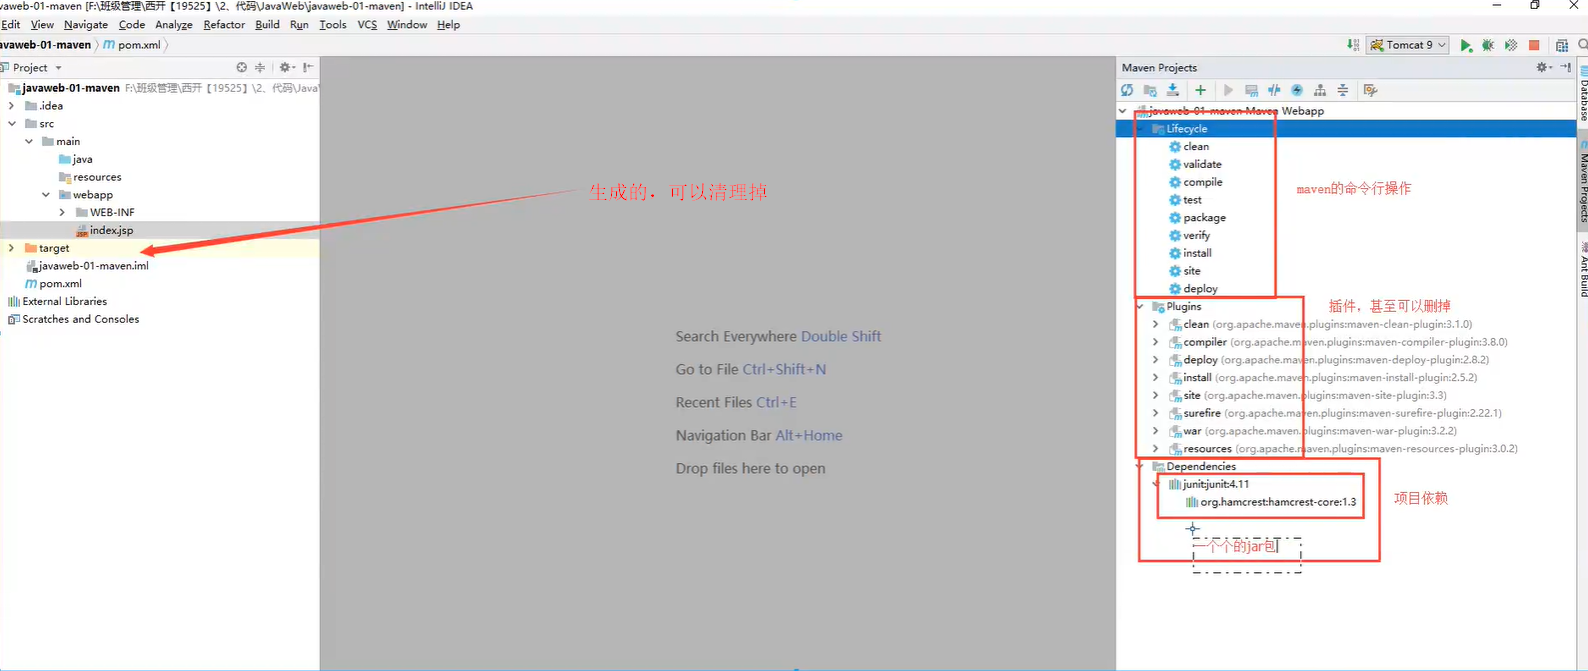
六、IDEA中Maven的操作
1. 配置Maven
-
启动IDEA
-
创建Maven项目
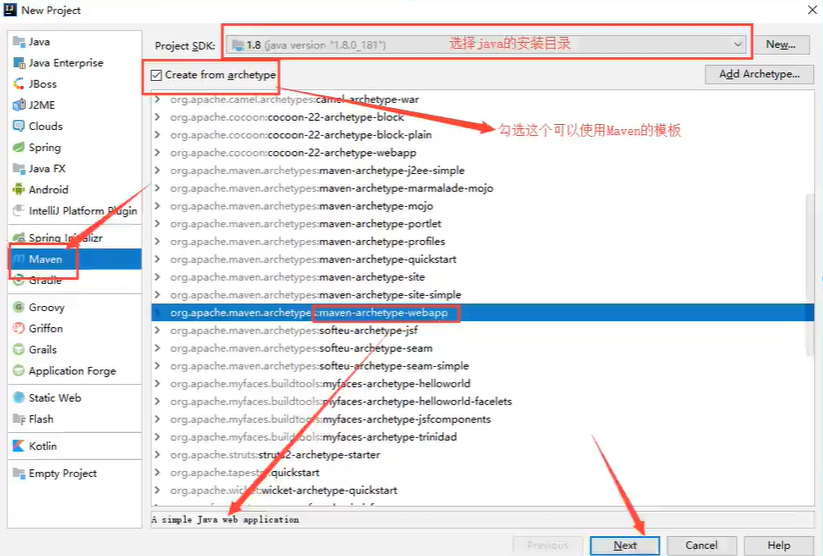
确定名字
确定配置和仓库
-
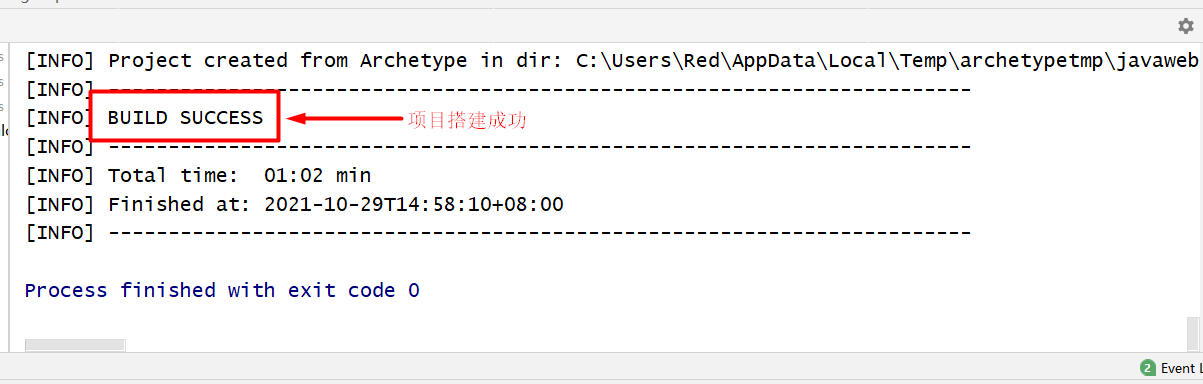
等待项目搭建
成功如图:
-
观察本地仓库中多了什么?
-
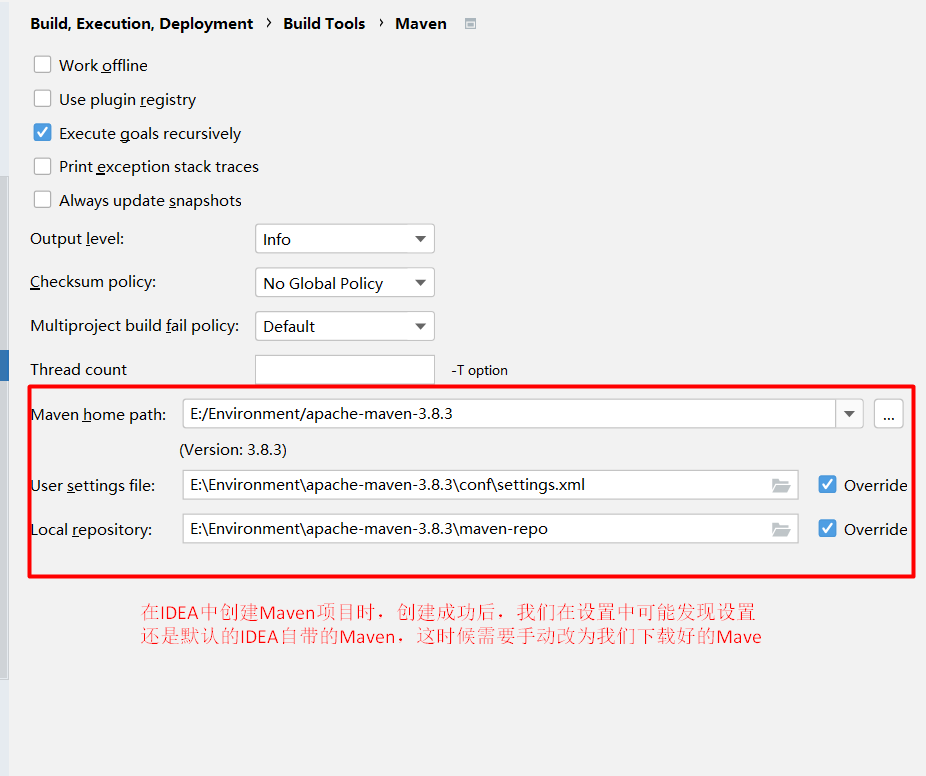
IDEA中的Maven设置
自动导入源码(可选)
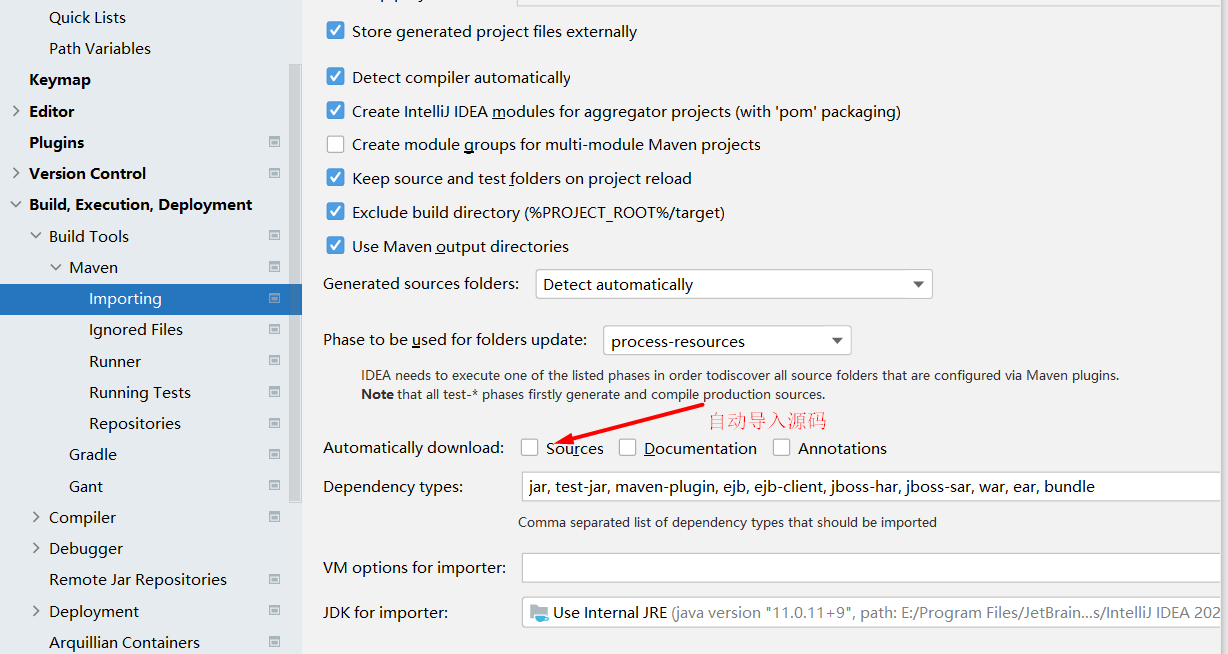
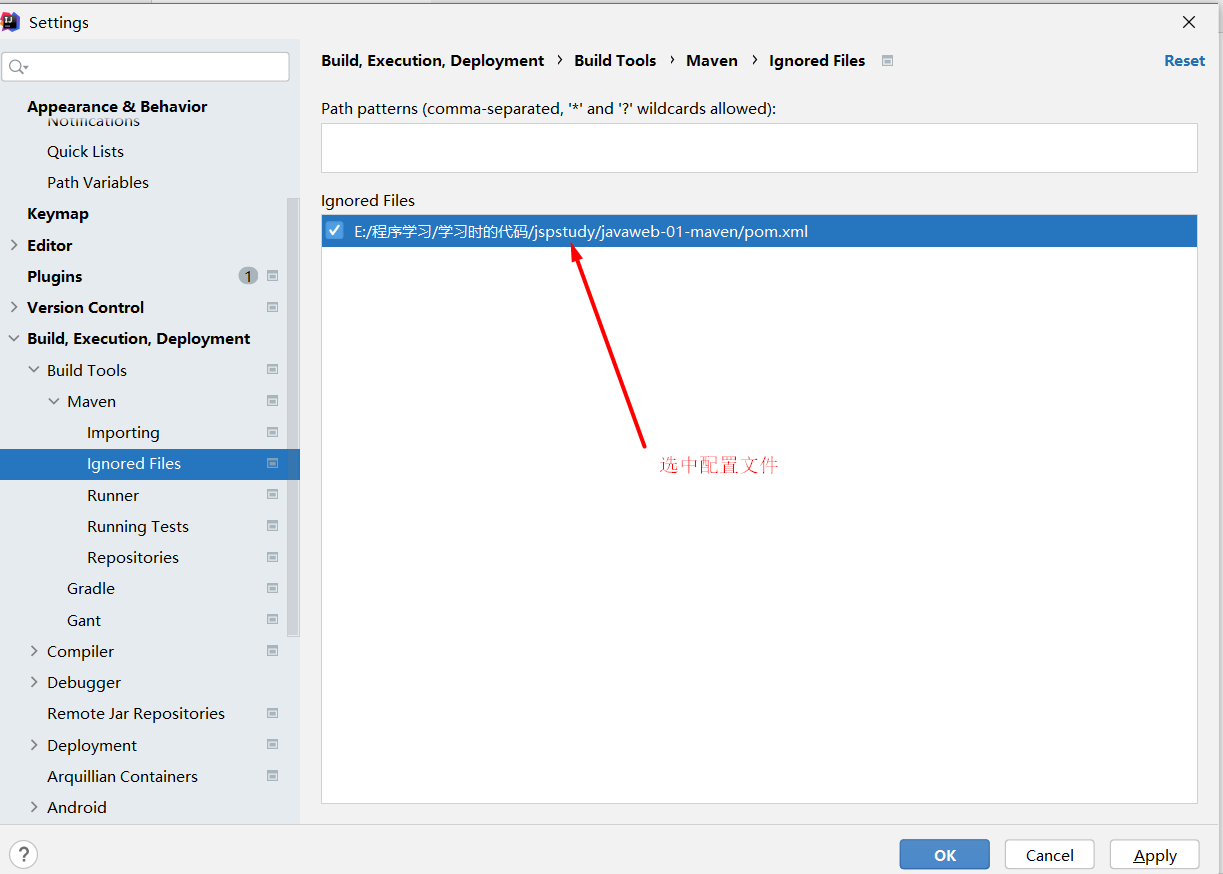
选中配置文件:也可以不选
-
到这里,Maven在IDEA的设置和配置就OK了
-
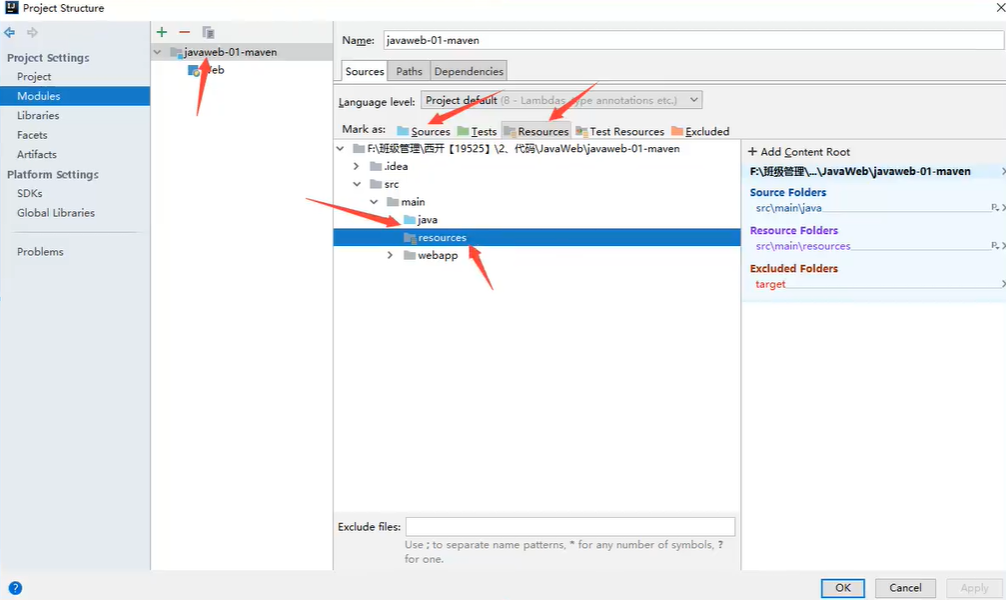
目录结构
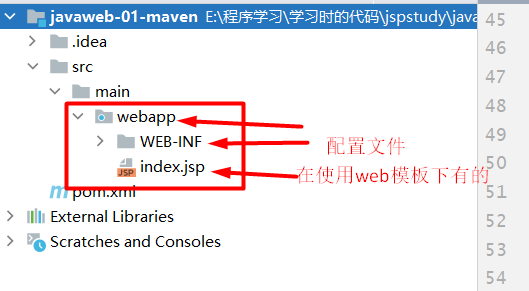
标记了目录才能新建响应文件:
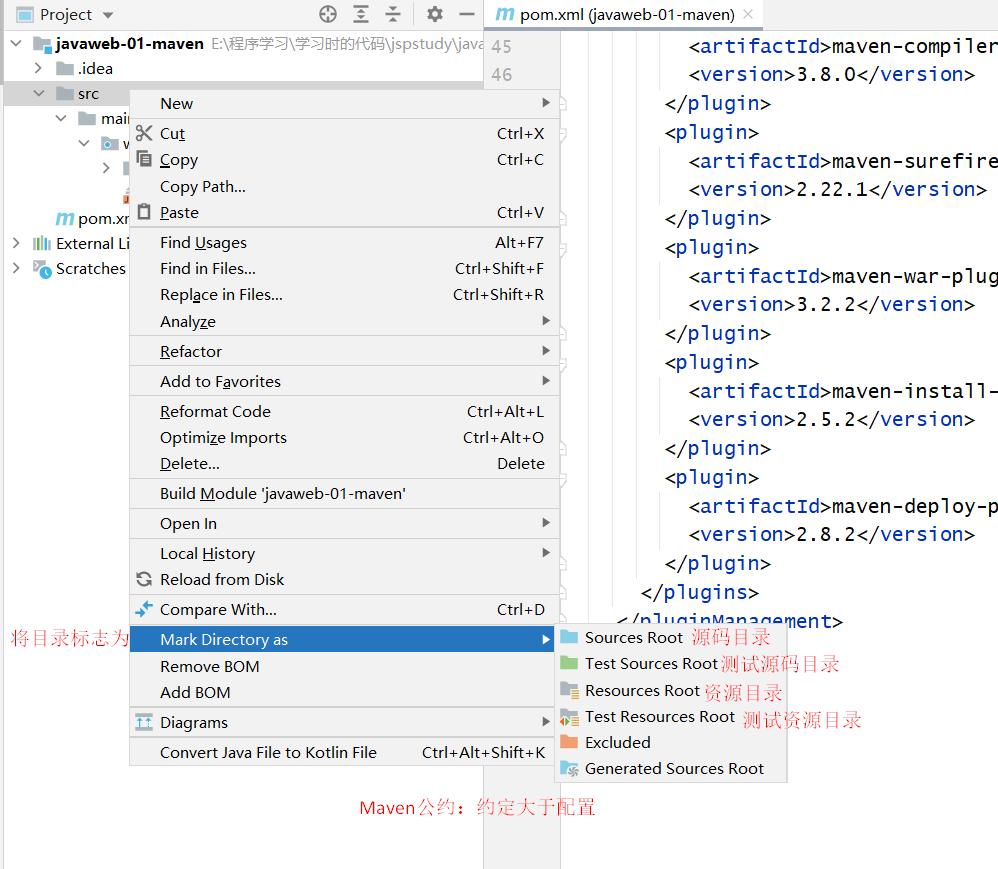
这样也可以标记目录
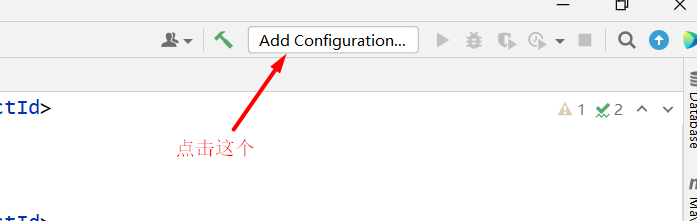
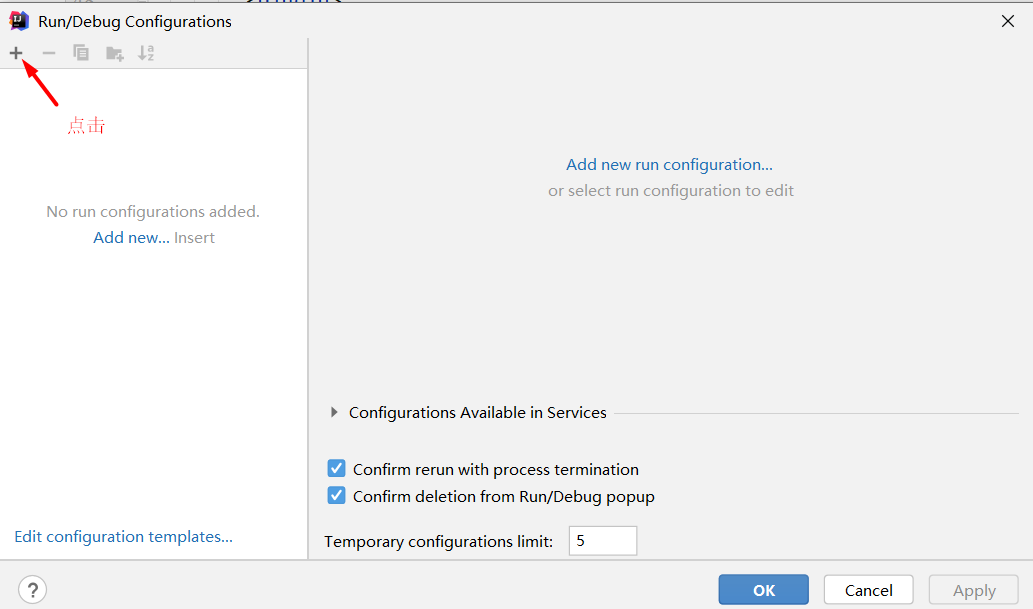
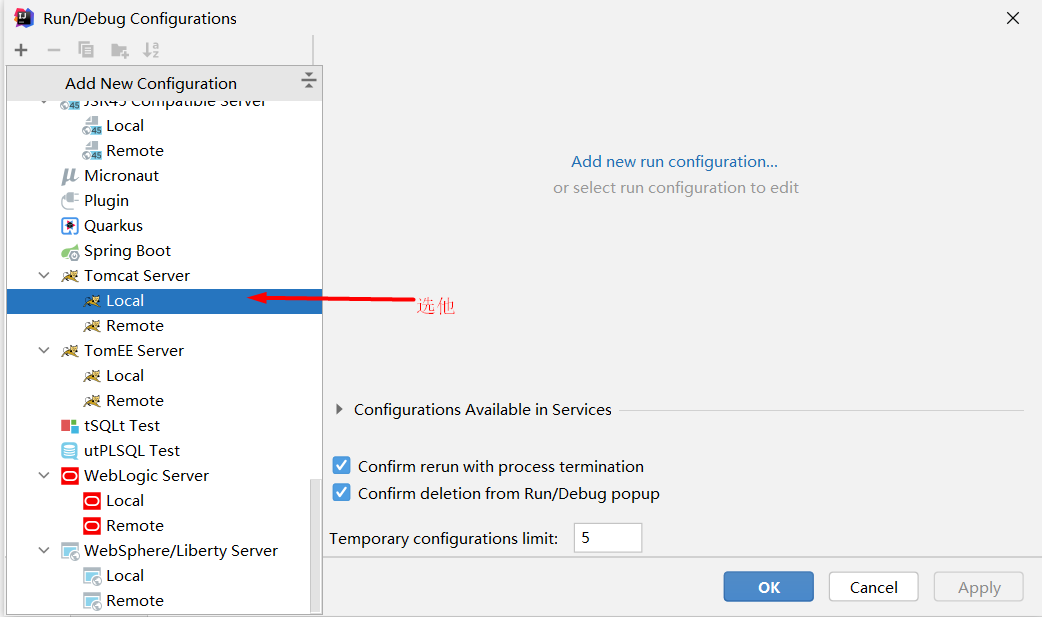
2. IDEA配置Tomcat
-
点击配置文件
-
点击加号
-
选中TomcatServer
-
Tomcat选项
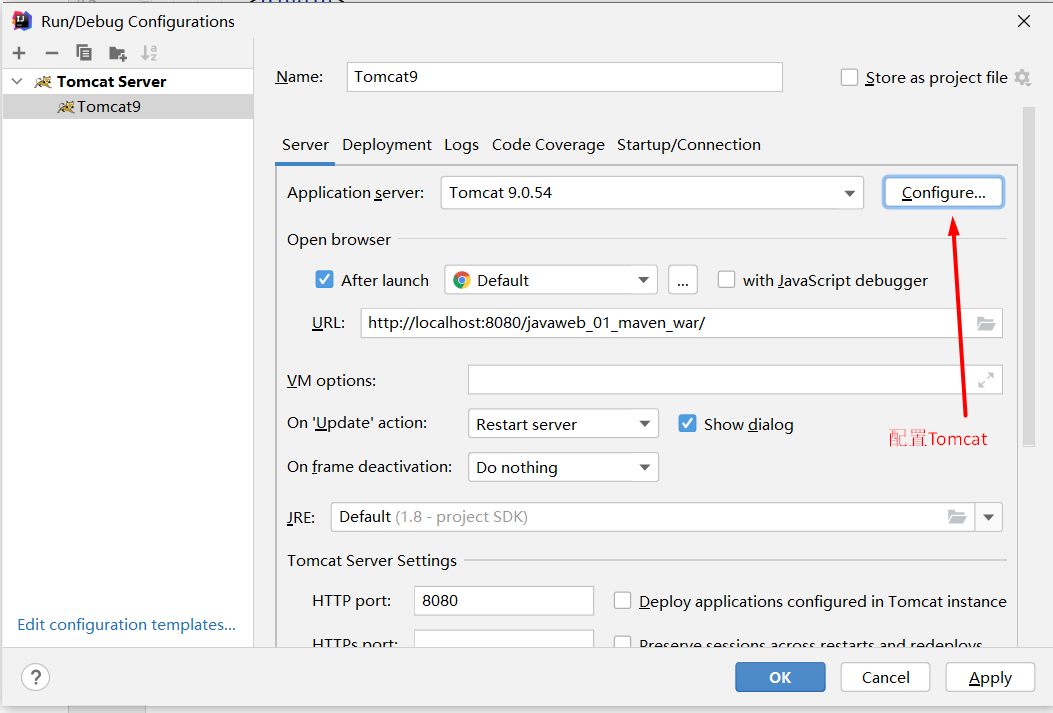
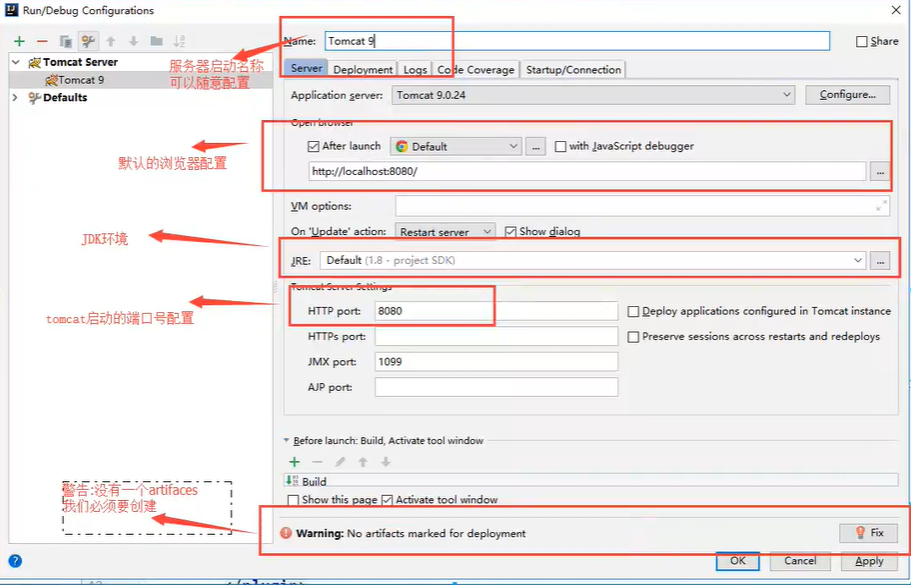
解决警告办法:
为什么会有这个问题:我们访问一个网站需要一个文件夹名字
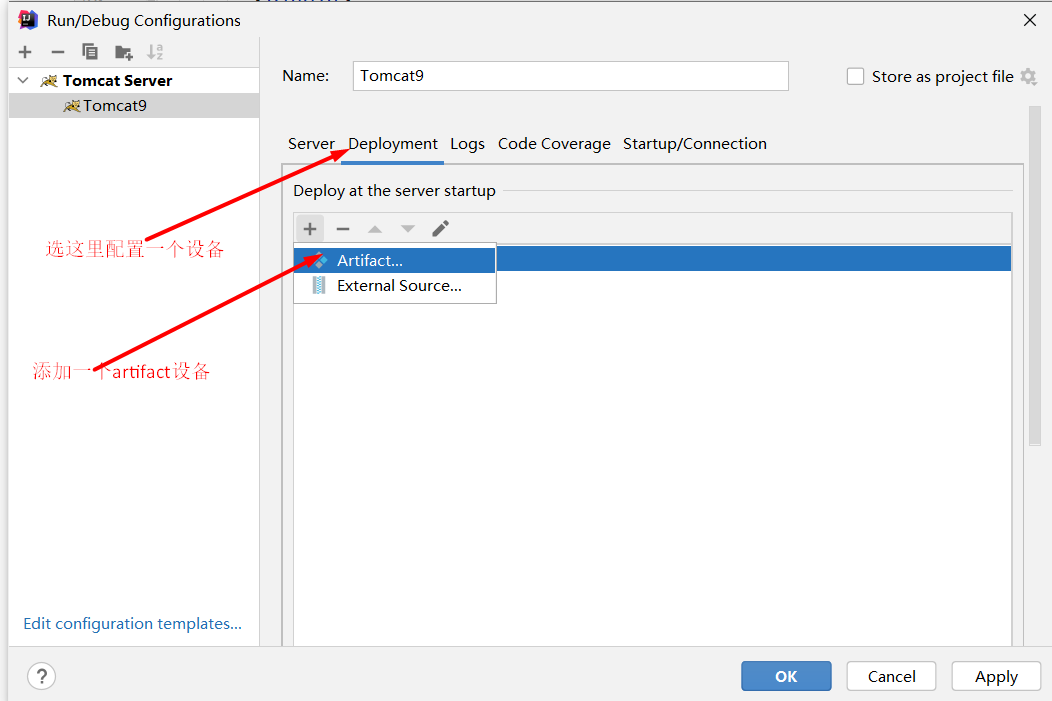
-
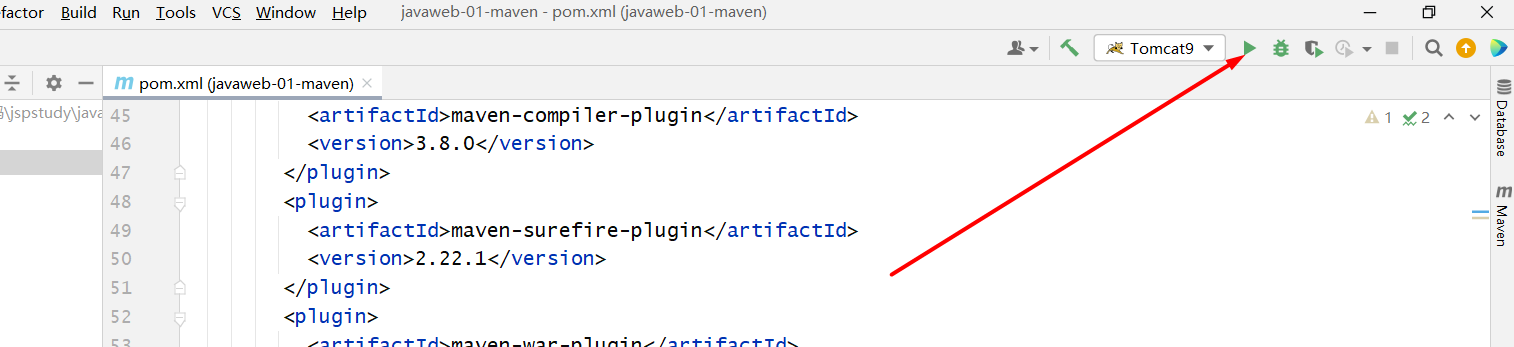
启动Tomcat
3. Maven目录结构
<?xml version="1.0" encoding="UTF-8"?>

<!--Maven版本和头文件-->
<project xmlns="http://maven.apache.org/POM/4.0.0" xmlns:xsi="http://www.w3.org/2001/XMLSchema-instance"
  xsi:schemaLocation="http://maven.apache.org/POM/4.0.0 http://maven.apache.org/xsd/maven-4.0.0.xsd">
  <modelVersion>4.0.0</modelVersion>

  <!--这里就是刚刚配置的GAV-->
  <groupId>com.xiaowei</groupId>
  <artifactId>javaweb-01-maven</artifactId>
  <version>1.0-SNAPSHOT</version>
  <!--packaging:项目的打包方式
  jar:Java应用
  war:Javaweb应用
  -->
  <packaging>war</packaging>

  <name>javaweb-01-maven Maven Webapp</name>
  <!-- FIXME change it to the project's website -->
  <url>http://www.example.com</url>

  <!--配置-->
  <properties>
    <!--项目默认的建构编码-->
    <project.build.sourceEncoding>UTF-8</project.build.sourceEncoding>
    <!--编码版本-->
    <maven.compiler.source>1.7</maven.compiler.source>
    <maven.compiler.target>1.7</maven.compiler.target>
  </properties>

  <!--项目依赖-->
  <dependencies>
    <!--具体依赖的jar包配置文件-->
    <dependency>
      <groupId>junit</groupId>
      <artifactId>junit</artifactId>
      <version>4.11</version>
      <scope>test</scope>
    </dependency>
  </dependencies>

  <!--项目构建用的东西-->
  <build>
    <finalName>javaweb-01-maven</finalName>
    <pluginManagement><!-- lock down plugins versions to avoid using Maven defaults (may be moved to parent pom) -->
      <plugins>
        <plugin>
          <artifactId>maven-clean-plugin</artifactId>
          <version>3.1.0</version>
        </plugin>
        <!-- see http://maven.apache.org/ref/current/maven-core/default-bindings.html#Plugin_bindings_for_war_packaging -->
        <plugin>
          <artifactId>maven-resources-plugin</artifactId>
          <version>3.0.2</version>
        </plugin>
        <plugin>
          <artifactId>maven-compiler-plugin</artifactId>
          <version>3.8.0</version>
        </plugin>
        <plugin>
          <artifactId>maven-surefire-plugin</artifactId>
          <version>2.22.1</version>
        </plugin>
        <plugin>
          <artifactId>maven-war-plugin</artifactId>
          <version>3.2.2</version>
        </plugin>
        <plugin>
          <artifactId>maven-install-plugin</artifactId>
          <version>2.5.2</version>
        </plugin>
        <plugin>
          <artifactId>maven-deploy-plugin</artifactId>
          <version>2.8.2</version>
        </plugin>
      </plugins>
    </pluginManagement>
  </build>
</project>
4. Maven功能与问题
功能
<?xml version="1.0" encoding="UTF-8"?>
<project xmlns="http://maven.apache.org/POM/4.0.0"
         xmlns:xsi="http://www.w3.org/2001/XMLSchema-instance"
         xsi:schemaLocation="http://maven.apache.org/POM/4.0.0 http://maven.apache.org/xsd/maven-4.0.0.xsd">
    <modelVersion>4.0.0</modelVersion>

    <groupId>com.xiaowei</groupId>
    <artifactId>javaweb-02-maven</artifactId>
    <version>1.0-SNAPSHOT</version>

    <properties>
        <maven.compiler.source>8</maven.compiler.source>
        <maven.compiler.target>8</maven.compiler.target>
    </properties>

    <dependencies>

        <!--Maven的高级之处在于帮助你导入这个jar所依赖的其他jar-->
        <!-- https://mvnrepository.com/artifact/org.springframework/spring-webmvc -->
        <dependency>
            <groupId>org.springframework</groupId>
            <artifactId>spring-webmvc</artifactId>
            <version>5.3.12</version>
        </dependency>

    </dependencies>

</project>
问题:
Maven由于他的约定大于配置,我们之后可能遇到我们写的配置文件,无法被导出或者生效的问题
解决方案
<build>
    <!--在build中配置resource,防止资源导出失败问题-->
    <resources>
        <resource>
            <directory>src/main/resources</directory>
            <excludes>
                <exclude>**/*.properties</exclude>
                <exclude>**/*.xml</exclude>
            </excludes>
            <filtering>false</filtering>
        </resource>
        <resource>
            <directory>src/main/java</directory>
            <includes>
                <include>**/*.properties</include>
                <include>**/*.xml</include>
            </includes>
            <filtering>false</filtering>
        </resource>
    </resources>

</build>
5. IDEA使用Maven的功能
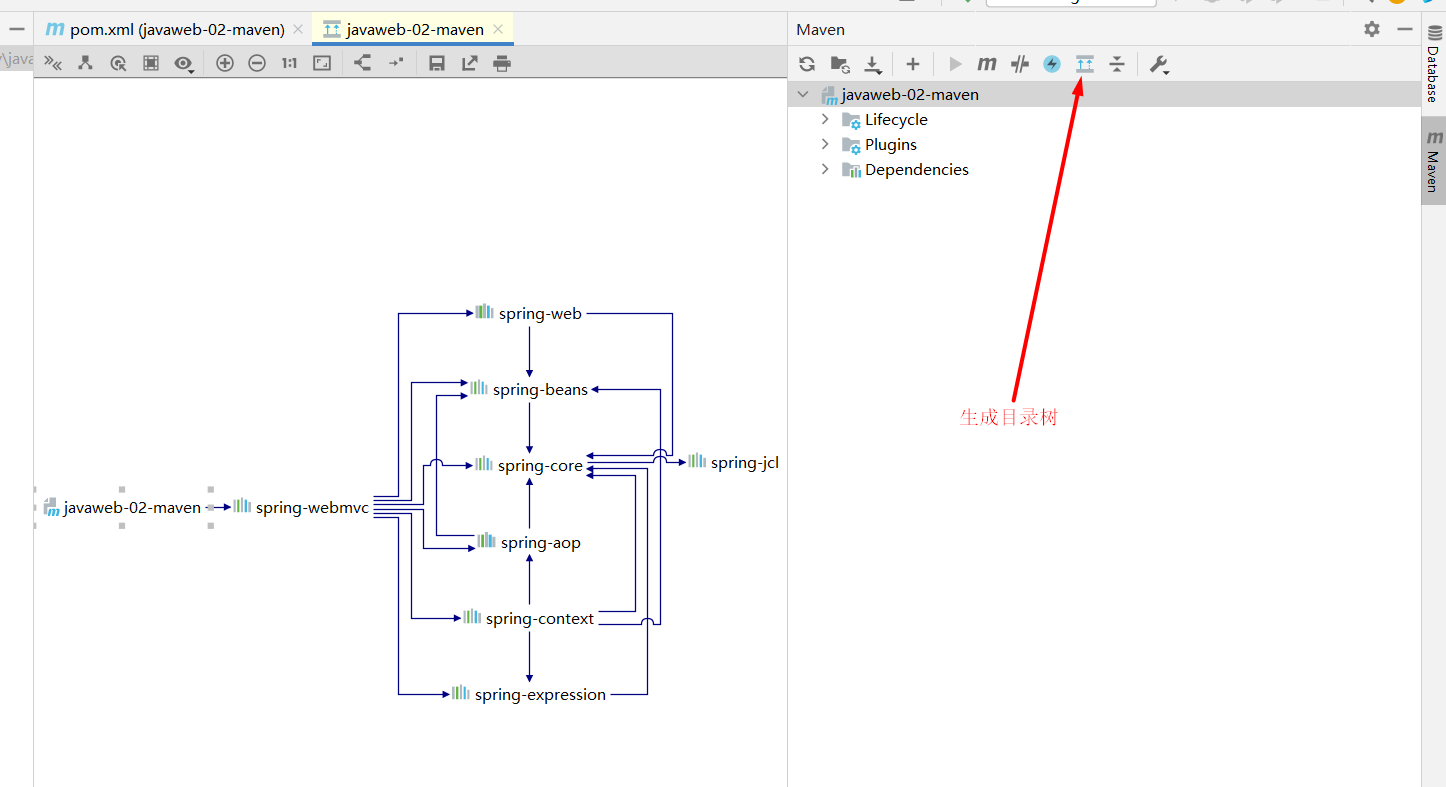
生成目录树:maven中jar包的依赖体系
☆可能的问题
https://www.bilibili.com/video/BV12J411M7Sj?p=7&spm_id_from=pageDriver
八、HelloServlet
1. 添加jar依赖
- 本地仓库没有,IDEA中也没有搜索到
- 去网上Maven仓库搜索HttpServlet也没找到
- 到tomcat的依赖jar包中找寻相关的jar包
- 发现一个servlet-app包
- 再次去网上Maven仓库搜索servlet-app包
- 找到人最多的,复制依赖xml
- 粘贴到pom.xml配置文件中
- 自动下载依赖
2. 配置web.xml和servlet类
web.xml:
<?xml version="1.0" encoding="UTF-8"?>

<web-app xmlns="http://xmlns.jcp.org/xml/ns/javaee"
         xmlns:xsi="http://www.w3.org/2001/XMLSchema-instance"
         xsi:schemaLocation="http://xmlns.jcp.org/xml/ns/javaee
                      http://xmlns.jcp.org/xml/ns/javaee/web-app_4_0.xsd"
         version="4.0"
         metadata-complete="true">

  <!--web.xml中是配置我们web的核心应用-->
  <!--注册servlet-->
  <servlet>
    <servlet-name>helloServlet</servlet-name>
    <servlet-class>com.xiaowei99.servlet.HelloServlet</servlet-class>
  </servlet>
  <!--一个servlet对应一个Mapping-->
  <servlet-mapping>
    <servlet-name>helloServlet</servlet-name>
    <!--请求路径-->
    <url-pattern>/xiaowei</url-pattern>
  </servlet-mapping>

</web-app>
servlet类:
package com.xiaowei99.servlet;

import javax.servlet.ServletException;
import javax.servlet.http.HttpServlet;
import javax.servlet.http.HttpServletRequest;
import javax.servlet.http.HttpServletResponse;
import java.io.IOException;
import java.io.PrintWriter;

public class HelloServlet extends HttpServlet {
    @Override
    protected void doGet(HttpServletRequest req, HttpServletResponse resp) throws ServletException, IOException {
        resp.setContentType("text/html");
        resp.setCharacterEncoding("utf-8"); //设置响应回去的编码
        PrintWriter out = resp.getWriter();
        out.println("<html>");
        out.println("<head>");
        out.println("<title>Hello World!</title>");
        out.println("</head>");
        out.println("<body>");
        out.println("<h1>你好</h1>");
        out.println("</body>");
        out.println("</html>");
    }

    @Override
    protected void doPost(HttpServletRequest req, HttpServletResponse resp) throws ServletException, IOException {
        doGet(req, resp);
    }
}
3. servlet简介
- sun公司用于开发动态web资源的技术
- sun在这些api中提供一个接口叫做Servlet,如果你想开发一个servlet程序,只需要完成两个步骤
- 编写一个类,实现servlet接口
- 把开发好的Java类部署到服务器中
把实现了Servlet接口的Java程序叫做Servlet。
4. HelloServlet
-
构建一个普通的Maven项目,删掉不必要的东西(src),以后我们学习就在这个项目里面新建Moudel,这个空的工程就是Maven的主工程
-
关于Maven父子工程的理解
父项目中有moudel标签
<modules>
    <module>servlet-01</module>
</modules>
子项目中有parent标签
<parent>
  <groupId>com.xiaowei</groupId>
  <artifactId>javaweb-04-servlet</artifactId>
  <version>1.0-SNAPSHOT</version>
</parent>
父项目中的jar子项目可用
-
Maven环境优化
- 修改web.xml为最新的
- 将maven的结构搭建完整
-
编写一个Servlet类
-
编写普通类继承于httpservlet继承于generalservlet类实现于servlet接口
-
实现servlet接口,直接继承HttpServle
package com.xiaowei99.servlet;


import javax.servlet.ServletException;
import javax.servlet.http.HttpServlet;
import javax.servlet.http.HttpServletRequest;
import javax.servlet.http.HttpServletResponse;
import java.io.IOException;
import java.io.PrintWriter;

public class MyServlet extends HttpServlet {
    @Override
    protected void doGet(HttpServletRequest req, HttpServletResponse resp) throws ServletException, IOException {
        resp.setContentType("text/html");
        resp.setCharacterEncoding("utf-8"); //设置响应回去的编码
        PrintWriter out = resp.getWriter();
        out.println("<html>");
        out.println("<head>");
        out.println("<title>Hello World!</title>");
        out.println("</head>");
        out.println("<body>");
        out.println("<h1>你好</h1>");
        out.println("</body>");
        out.println("</html>");
    }

    @Override
    protected void doPost(HttpServletRequest req, HttpServletResponse resp) throws ServletException, IOException {
        doGet(req, resp);
    }
}
-
-
编写Servlet映射
为什么要写映射?我们写的是Java程序,如果要通过浏览器访问,则需要连接web服务器,我们需要在web服务器中的配置文件中注册我们的Servlet,需要给浏览器一个路径。
-
配置Tomcat,设置项目名
-
启动项目
九、Servlet原理
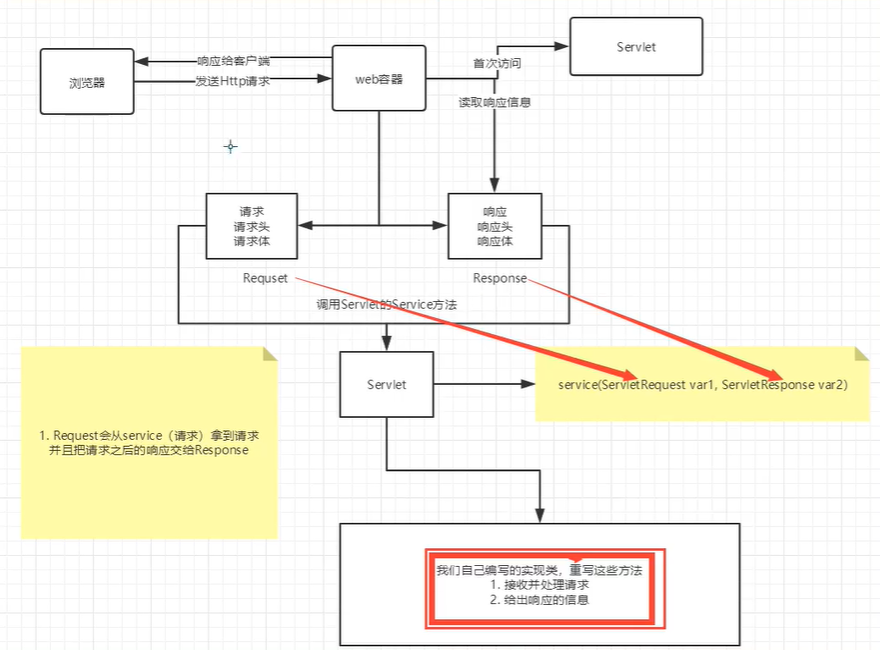
Servlet是由web服务器调用,web服务器在收到浏览器请求后会:
Mapping问题
- 一个Servlet可以指定一个映射路径
- 一个Servlet可以指定多个映射路径
- 一个Servlet可以指定通用映射路径
- 用过通配符*指定一些后缀或前缀等等....
- 优先级问题,指定了固定路径的映射优先级高,然后通配符*的路径优先级低
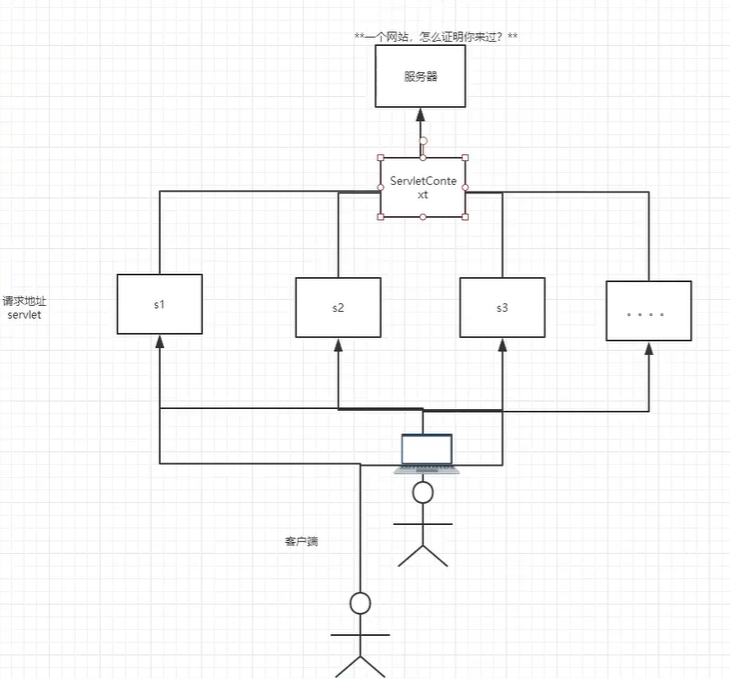
十、SelvletContext对象
web容器启动的时候,它会为web程序都创建一个对应的ServletContext对象,它代表了当前的web应用。
- 共享数据
放入数据:
package com.xiaowei.servlet;

import javax.servlet.ServletContext;
import javax.servlet.ServletException;
import javax.servlet.http.HttpServlet;
import javax.servlet.http.HttpServletRequest;
import javax.servlet.http.HttpServletResponse;
import java.io.IOException;

public class MyServlet extends HttpServlet {
    @Override
    protected void doGet(HttpServletRequest req, HttpServletResponse resp) throws ServletException, IOException {
        //this.getInitParameter() 初始化参数
//        this.getServletConfig() 获取Servlet配置
//        this.getServletContext() 获取Servlet上下文

        ServletContext servletContext = this.getServletContext();
        servletContext.setAttribute("username","xiaowei99"); //在上下文中放入username xiaowei99


    }

}
另一个servlet获得数据
package com.xiaowei.servlet;

import javax.servlet.ServletContext;
import javax.servlet.ServletException;
import javax.servlet.ServletOutputStream;
import javax.servlet.http.HttpServlet;
import javax.servlet.http.HttpServletRequest;
import javax.servlet.http.HttpServletResponse;
import java.io.IOException;
import java.io.PrintStream;
import java.io.PrintWriter;

public class GetServlet extends HttpServlet {
    @Override
    protected void doGet(HttpServletRequest req, HttpServletResponse resp) throws ServletException, IOException {
        ServletContext context = this.getServletContext();
        String username = (String) context.getAttribute("username");//获取上下文中的数据username

        resp.setContentType("text/html");
        resp.setCharacterEncoding("utf-8");
        resp.getWriter().print("名字"+username);
    }
}
web.xml
<?xml version="1.0" encoding="UTF-8"?>

<web-app xmlns="http://xmlns.jcp.org/xml/ns/javaee"
         xmlns:xsi="http://www.w3.org/2001/XMLSchema-instance"
         xsi:schemaLocation="http://xmlns.jcp.org/xml/ns/javaee
                      http://xmlns.jcp.org/xml/ns/javaee/web-app_4_0.xsd"
         version="4.0"
         metadata-complete="true">


  <servlet>
    <servlet-name>helloServlet</servlet-name>
    <servlet-class>com.xiaowei.servlet.MyServlet</servlet-class>
  </servlet>

  <servlet-mapping>
    <servlet-name>helloServlet</servlet-name>
    <url-pattern>/s2</url-pattern>
  </servlet-mapping>


  <servlet>
    <servlet-name>get</servlet-name>
    <servlet-class>com.xiaowei.servlet.GetServlet</servlet-class>
  </servlet>
  <servlet-mapping>
    <servlet-name>get</servlet-name>
    <url-pattern>/get</url-pattern>
  </servlet-mapping>

</web-app>
十一、SelvletContext应用
1. 获取初始化参数
web.xml:
<context-param>
  <param-name>connUrl</param-name>
  <param-value>jdbc:mysql://localhost:3306</param-value>
</context-param>
class:
ServletContext context = this.getServletContext();
String connUrl = context.getInitParameter("connUrl");
resp.getWriter().print(connUrl);
2. 请求转发Dispatcher
context.getRequestDispatcher("/gs").forward(req,resp);
请求转发和重定向的区别
请求转发是:当前页面请求转发至另一个页面的时候,本质上还在自己的页面,用的是自己的请求行请求头响应行响应头:因为抓包发现状态码还是200.
重定向是:本质已经是另一个页面了,request和respond都已经改变。
3. 读取资源文件
如果没有在Maven文件的build中配置resource,那么如果你的资源文件比如db.properties如果不在标记的resource文件夹下,启动服务器时你的类文件夹(classes)就不生成你的资源文件
protected void doGet(HttpServletRequest req, HttpServletResponse resp) throws ServletException, IOException {
    ServletContext context = this.getServletContext();
    InputStream resource = context.getResourceAsStream("/WEB-INF/classes/db.properties");
    Properties properties = new Properties();
    properties.load(resource);

    resp.getWriter().print(properties.getProperty("username"));
}
十二、Response下载文件
web服务器接收到客户端的http请求,针对这个请求,针对这个请求,就生成了request和response方法
- 获取客户端请求过来的参数,找request
- 返回给客户端的信息:response
发送给浏览器的方法:
PrintWriter getWriter() throws IOException;
ServletOutputStream getOutputStream() throws IOException;
发送给浏览器响应头的方法:
void setCharacterEncoding(String var1);

void setContentLength(int var1);

void setContentLengthLong(long var1);

void setContentType(String var1);

void setBufferSize(int var1);

void setLocale(Locale var1);

void setIntHeader(String var1, int var2);

void addIntHeader(String var1, int var2);

void setHeader(String var1, String var2);

void setDateHeader(String var1, long var2);

void setStatus(int var1);

void addDateHeader(String var1, long var2);
响应状态码
int SC_CONTINUE = 100;
int SC_SWITCHING_PROTOCOLS = 101;
int SC_OK = 200;
int SC_CREATED = 201;
int SC_ACCEPTED = 202;
int SC_NON_AUTHORITATIVE_INFORMATION = 203;
int SC_NO_CONTENT = 204;
int SC_RESET_CONTENT = 205;
int SC_PARTIAL_CONTENT = 206;
int SC_MULTIPLE_CHOICES = 300;
int SC_MOVED_PERMANENTLY = 301;
int SC_MOVED_TEMPORARILY = 302;
int SC_FOUND = 302;
int SC_SEE_OTHER = 303;
int SC_NOT_MODIFIED = 304;
int SC_USE_PROXY = 305;
int SC_TEMPORARY_REDIRECT = 307;
int SC_BAD_REQUEST = 400;
int SC_UNAUTHORIZED = 401;
int SC_PAYMENT_REQUIRED = 402;
int SC_FORBIDDEN = 403;
int SC_NOT_FOUND = 404;
int SC_METHOD_NOT_ALLOWED = 405;
int SC_NOT_ACCEPTABLE = 406;
int SC_PROXY_AUTHENTICATION_REQUIRED = 407;
int SC_REQUEST_TIMEOUT = 408;
int SC_CONFLICT = 409;
int SC_GONE = 410;
int SC_LENGTH_REQUIRED = 411;
int SC_PRECONDITION_FAILED = 412;
int SC_REQUEST_ENTITY_TOO_LARGE = 413;
int SC_REQUEST_URI_TOO_LONG = 414;
int SC_UNSUPPORTED_MEDIA_TYPE = 415;
int SC_REQUESTED_RANGE_NOT_SATISFIABLE = 416;
int SC_EXPECTATION_FAILED = 417;
int SC_INTERNAL_SERVER_ERROR = 500;
int SC_NOT_IMPLEMENTED = 501;
int SC_BAD_GATEWAY = 502;
int SC_SERVICE_UNAVAILABLE = 503;
int SC_GATEWAY_TIMEOUT = 504;
int SC_HTTP_VERSION_NOT_SUPPORTED = 505;
下载文件
package com.xiaowei.servlet;

import javax.servlet.ServletContext;
import javax.servlet.ServletException;
import javax.servlet.ServletOutputStream;
import javax.servlet.http.HttpServlet;
import javax.servlet.http.HttpServletRequest;
import javax.servlet.http.HttpServletResponse;
import java.io.FileInputStream;
import java.io.IOException;
import java.net.URLEncoder;
import java.util.Set;

public class ServlerDemo06 extends HttpServlet {
    @Override
    protected void doGet(HttpServletRequest req, HttpServletResponse resp) throws ServletException, IOException {

        String path = "E:\\程序学习\\学习时的代码\\jspstudy\\javaweb-04-servlet\\servlet_02\\src\\main\\resources\\1.jpg";
        String filename = path.substring(path.lastIndexOf("\\")+1);


        resp.setHeader("Content-disposition","attachment;filename="+ URLEncoder.encode(filename,"utf-8"));
        FileInputStream fin = new FileInputStream(path);
        ServletOutputStream os = resp.getOutputStream();
        byte[] buffer = new byte[1024];
        int len = 0;
        while((len = fin.read(buffer))>0){
            os.write(buffer,0,len);
        }
        os.close();
        fin.close();
    }

    @Override
    protected void doPost(HttpServletRequest req, HttpServletResponse resp) throws ServletException, IOException {
        doGet(req, resp);
    }
}
十三、Response验证码实现
- 前端实现
- 后端实现:使用java图片类
package com.xiaowei.servlet;

import javax.imageio.ImageIO;
import javax.imageio.stream.ImageInputStream;
import javax.imageio.stream.ImageOutputStreamImpl;
import javax.servlet.ServletException;
import javax.servlet.http.HttpServlet;
import javax.servlet.http.HttpServletRequest;
import javax.servlet.http.HttpServletResponse;
import java.awt.*;
import java.awt.image.BufferedImage;
import java.io.IOException;
import java.util.Random;

public class ServletDemo07 extends HttpServlet{
    @Override
    protected void doGet(HttpServletRequest req, HttpServletResponse resp) throws ServletException, IOException {
        resp.setHeader("refresh","3");
        BufferedImage image = new BufferedImage(200, 200, BufferedImage.TYPE_INT_RGB);
        Graphics graphics = image.getGraphics();
        graphics.drawString(getRandom(),20,20);

        resp.setDateHeader("expires",-1);
        resp.setHeader("Cache-Control","no-cache");
        resp.setHeader("Pragma","no-cache");

        ImageIO.write(image, "jpg", resp.getOutputStream());
    }

    public String getRandom(){
        Random random = new Random();
        String s = random.nextInt(999999)+ "";
        StringBuffer stringBuffer = new StringBuffer(s);
        for (int i = 0; i < 6-s.length(); i++) {
            stringBuffer.append("0");
        }
        return stringBuffer.toString();
    }

    @Override
    protected void doPost(HttpServletRequest req, HttpServletResponse resp) throws ServletException, IOException {
        doGet(req, resp);
    }
}
十四、Response重定向
常见场景:
- 用户登录,登陆成功跳转(重定向)
- .......
void sendRedirect(String var1) throws IOException;
重定向:
resp.sendRedirect("/servlet_02_war/sd7");
使用jsp:
接收请求servlet
package com.xiaowei99;

import javax.servlet.ServletException;
import javax.servlet.http.HttpServlet;
import javax.servlet.http.HttpServletRequest;
import javax.servlet.http.HttpServletResponse;
import java.io.IOException;

public class JspDemo01 extends HttpServlet {
    @Override
    protected void doGet(HttpServletRequest req, HttpServletResponse resp) throws ServletException, IOException {
        System.out.println("进入请求了");
        String username = req.getParameter("username");//获取请求中的参数
        String password = req.getParameter("password");
        System.out.println(username+":"+password);
        resp.sendRedirect("/servlet_03_war/success.jsp");//重定向
    }

    @Override
    protected void doPost(HttpServletRequest req, HttpServletResponse resp) throws ServletException, IOException {
        doGet(req, resp);
    }
}
发送请求jsp:
<%@ page contentType="text/html;charset=UTF-8" language="java" %>
<html>
<body>
<h2>Hello World!</h2>
<form action="${pageContext.request.contextPath}/login" method="get">
    <p>用户名: <input type="text" name="username"></p>
    <p>密码: <input type="password" name="password"></p>
    <input type="submit" value="确定">
</form>

</body>
</html>
十五、Request应用
Request代表客户端的请求,用户通过http协议访问服务器,请求的所有信息封装到request中,通过这个对象我们可以获得请求的所有信息
req.getParameterValues("hobbys");//获取多个参数,用于前端checks的
req.getParameter("password");//获取单个参数
//解决后台接收乱码:
req.setCharacterEncoding("utf-8");
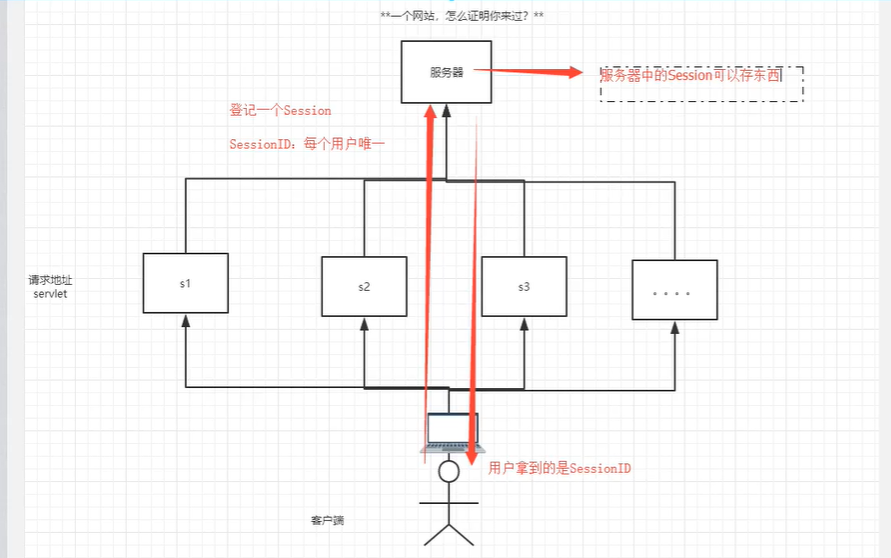
十六、Cookie讲解
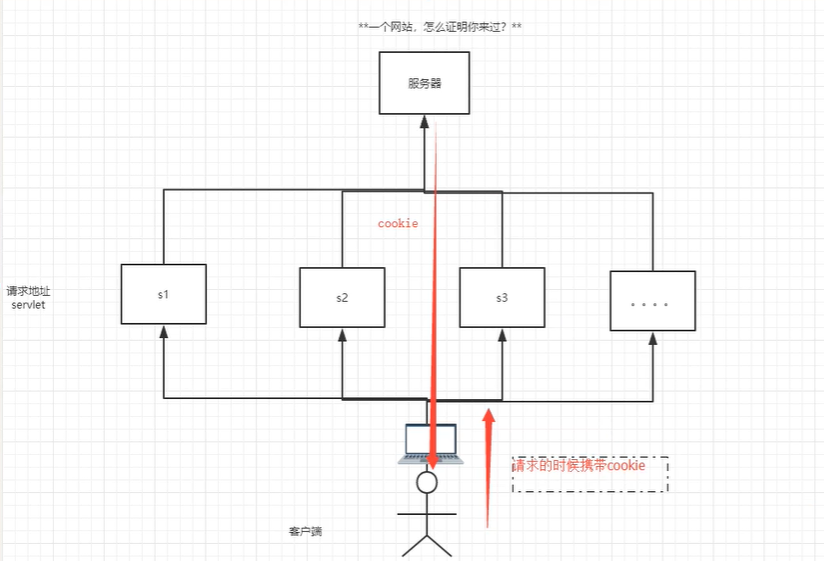
会话:打开浏览器,打开很多连接,访问了很多web资源,关闭浏览器,这个过程可以称之为会话
有状态会话:一个同学来过教室,下次再来就知道了,这一次来教室就是有状态会话
你能怎么证明你是你学校的学生?
- 交钱发票 学校给你的发票
- 学校登记花名册 学校标记你是学生
网站怎么证明你来过?
客户端 服务端
- 服务端给客户端一个信件,客户端下次带上信件就认得了(cookie)
- 服务端登记客户端,下次来直接就匹配保存的登记信息就好啦(session)
cookie
- 客户端技术(响应、请求)
session
- 服务器技术,利用这个技术,可以保存用户的会话信息。我们可以把信息或者数据放在session中。
登录后,一段时间就不需要登录你信息也在网页上!
基本方法
Cookie[] cookies = req.getCookies();//获得所有cookie
Cookie cookie = new Cookie();//新建cookie
resp.addCookie(cookie);//向客户端发送cookie
cookie.getName();//获得cookie的name
cookie.getValue();//获得cookie的value
cookie.setMaxAge(24*60*60);//存活时间,单位秒
使用
package com.xiaowei99.cookie;

import javax.servlet.ServletException;
import javax.servlet.ServletOutputStream;
import javax.servlet.http.Cookie;
import javax.servlet.http.HttpServlet;
import javax.servlet.http.HttpServletRequest;
import javax.servlet.http.HttpServletResponse;
import java.io.IOException;
import java.io.PrintWriter;
import java.util.Date;

public class Demo01 extends HttpServlet {
    @Override
    protected void doGet(HttpServletRequest req, HttpServletResponse resp) throws ServletException, IOException {
        req.setCharacterEncoding("GBK");
        resp.setCharacterEncoding("GBK");

        PrintWriter out = resp.getWriter();

        if (req.getCookies().length==4){
            out.print("这是你第一次访问");
        }else {
            out.print("你上一次访问的时间是:");
            Cookie[] cookies = req.getCookies();
            for (Cookie cookie : cookies) {
                if (cookie.getName().equals("lastLoginTime")){
                    String time = cookie.getValue();
                    long l = Long.parseLong(time);
                    Date date = new Date(l);
                    out.print(date.toLocaleString());
                }
            }
        }
        Cookie cookie = new Cookie("lastLoginTime", System.currentTimeMillis() + "");
        cookie.setMaxAge(24*60*60);//存活时间,单位秒
        resp.addCookie(cookie);


    }

    @Override
    protected void doPost(HttpServletRequest req, HttpServletResponse resp) throws ServletException, IOException {
        doGet(req, resp);
    }
}
cookie:一般会保存在本地目录下的用户文件夹中的appdata文件夹
cookie是否存在上限:
- 一个cookie只能保存一个信息
- 一个web站点可以给浏览器发送多个cookie,最多20个
- 大小限制4kb
- 浏览器最多有300个cookie
删除cookie:
- 不设置有效期,关掉浏览器自动失效
- 设置maxAge为0,存活时间为0
十七、Session讲解(重点)
什么是session:
- 服务器会给每一个用户(浏览器)创建一个Session
- 一个Session独占一个浏览器,只要浏览器没有关闭,这个Session就存在
- 用户登录后,整个网站都可以访问-->保存用户信息;保存购物车信息....
session和cookie区别
- cookie把用户的数据写给浏览器,浏览器保存(可以保存多个)
- session是把用户的数据写到服务器,服务端保存(保存重要的信息,减少资源的浪费)
- Session对象由服务器创建
使用场景:登录用户、购物车、整个网站中经常会使用的,我们放到Session中

基本使用
package com.xiaowei99.session;

import javax.servlet.ServletException;
import javax.servlet.http.*;
import java.io.IOException;

public class Demo01 extends HttpServlet {
    @Override
    protected void doGet(HttpServletRequest req, HttpServletResponse resp) throws ServletException, IOException {
        //解决乱码
        req.setCharacterEncoding("GBK");
        resp.setCharacterEncoding("GBK");
        resp.setContentType("text/html;charset=utf-8");

        //获得session
        HttpSession session = req.getSession();

        //给session中存东西
        session.setAttribute("name","xiaowei99");

        //获取session的id
        String id = session.getId();

        //判断是不是新分配session
        if(session.isNew()){
            resp.getWriter().print("session创建成功");
        }else {
            resp.getWriter().print("session已经创建,id:"+id);
        }

        //在创建session时做了什么
        //Cookie jsessionid = new Cookie("JSESSIONID", id);
        //resp.addCookie(jsessionid);


    }

    @Override
    protected void doPost(HttpServletRequest req, HttpServletResponse resp) throws ServletException, IOException {
        doGet(req, resp);
    }
}
获取数据
PrintWriter writer = resp.getWriter();
writer.print((String) session.getAttribute("name"));
remove相关
session.removeAttribute("name");//把结点删除
session.invalidate();//手动注销
context作用:统计不同用户
十八、JSP原理分析
1. 什么是服务器?
Java Server Pages:Java服务端页面,也和Servlet一样用于动态web技术。
特点:
- 写JSP就像再写HTML
- 区别:
- html只提供静态数据
- JSP页面中可以嵌入Java代码,为用户提供动态数据
2. JSP原理
思路:JSP怎么执行的
-
代码层面没有任何问题
-
服务器内部如何工作
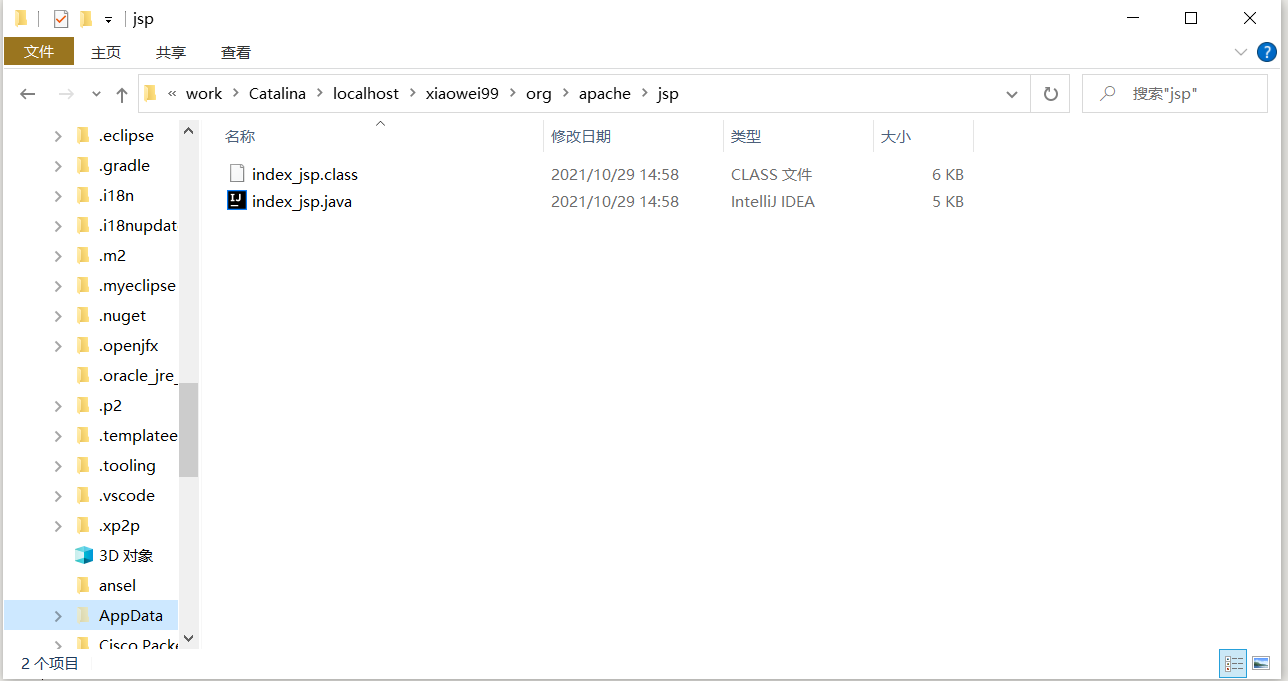
tomcat中有work目录:
IDEA中使用Tomcat会在IDEA的tomcat中生成一个work目录(C盘用户目录中)
C:\Users\Red\AppData\Local\JetBrains\IntelliJIdea2021.1\tomcat\9bb594c5-fed9-4bf9-ab65-40a15f0fcd72\work\Catalina\localhost\xiaowei99\org\apache\jsp
发现页面变成了Java程序~
浏览器向服务器发送请求,不管访问什么资源,其实都是在访问Servlet!
JSP最终变成Java类
JSP本质就是Servlet
public void _jspInit() {
}//初始化

public void _jspDestroy() {
}//销毁

//jspService
public void _jspService(final javax.servlet.http.HttpServletRequest request, final javax.servlet.http.HttpServletResponse response)
    throws java.io.IOException, javax.servlet.ServletException {}
-
判断请求
-
内置一些对象
final javax.servlet.jsp.PageContext pageContext;//页面上下文 javax.servlet.http.HttpSession session = null; //session final javax.servlet.ServletContext application; //applicationcontext final javax.servlet.ServletConfig config; //config javax.servlet.jsp.JspWriter out = null; //out final java.lang.Object page = this; //page:当前页 final javax.servlet.http.HttpServletRequest request; //请求 final javax.servlet.http.HttpServletResponse response //响应 -
输出页面前增加的代码
response.setContentType("text/html"); //设置相应的页面类型 pageContext = _jspxFactory.getPageContext(this, request, response, null, true, 8192, true); _jspx_page_context = pageContext; application = pageContext.getServletContext(); config = pageContext.getServletConfig(); session = pageContext.getSession(); out = pageContext.getOut(); _jspx_out = out; -
以上的这些个对象,我们可以在jsp页面中直接使用
-
流程

-
在JSP页面中,只要是Java代码就会被原封不动的执行,html就会被out.print()输出到前端
十九、JSP基础语法和指令
Maven依赖:
<?xml version="1.0" encoding="UTF-8"?>

<project xmlns="http://maven.apache.org/POM/4.0.0" xmlns:xsi="http://www.w3.org/2001/XMLSchema-instance"
  xsi:schemaLocation="http://maven.apache.org/POM/4.0.0 http://maven.apache.org/xsd/maven-4.0.0.xsd">
  <modelVersion>4.0.0</modelVersion>

  <groupId>com.xiaowei</groupId>
  <artifactId>javaweb-jsp</artifactId>
  <version>1.0-SNAPSHOT</version>
  <packaging>war</packaging>

  <dependencies>
    <!--Servlet-->
    <dependency>
      <groupId>javax.servlet.jsp</groupId>
      <artifactId>javax.servlet.jsp-api</artifactId>
      <version>2.3.3</version>
    </dependency>
    <!--JSP-->
    <dependency>
      <groupId>javax.servlet</groupId>
      <artifactId>javax.servlet-api</artifactId>
      <version>4.0.1</version>
    </dependency>
    <!--JSTL表达式的依赖-->
    <!-- https://mvnrepository.com/artifact/javax.servlet.jsp.jstl/jstl-api -->
    <dependency>
      <groupId>javax.servlet.jsp.jstl</groupId>
      <artifactId>jstl-api</artifactId>
      <version>1.2</version>
    </dependency>
    <!--standard标签库-->
    <!-- https://mvnrepository.com/artifact/taglibs/standard -->
    <dependency>
      <groupId>taglibs</groupId>
      <artifactId>standard</artifactId>
      <version>1.1.2</version>
    </dependency>

  </dependencies>
</project>
JSP可以使用任何Java语法,但是又有自己扩充的语法
表达式
<%--
JSP表达式:
    <%= var Object%>
    用来将程序变量输出到客户端
--%>
<%=new Date()%>
脚本片段
<%--
JSP脚本片段
--%>
<%
    int sum = 0;
    for (int i = 0; i < 10; i++) {
        sum+=i;
    }
    out.print("<h1>Sum="+sum+"</h1>");

%>
脚本片段再实现
<%--脚本片段再实现--%>

<%   for (int i = 0; i < 10; i++) {%>
    <h6>输出10次内容:第<%=i+1%>次</h6>
    <hr>
<%    }%>
定义java文件类下的变量,jsp声明,会被编译到类中,其他的都是在方法中
<%!
static {
    System.out.println("加载了Servlet");
}
public void aVoid(){
    System.out.println("定义了一个方法");
}
%>
EL表达式
${var};
JSP的注释不会再客户端显示,html的会!
指定错误页面
<%@page errorPage="error/404.jsp" %>//该页面的错误跳转至此

<%@page isErrorPage="true" %>//这是个显示错误的页面
指定错误页面二:再web.xml中配置
<error-page>
    <error-code>400</error-code>
    <location>/error/404.jsp</location>
</error-page>
嵌入jsp:将两个页面合二为一
<%@include file="error/500.jsp"%>
jsp标签:会导入文件作为静态资源
<jsp:include page="error/500.jsp"/>
二十、JSP内置对象及作用域
1. 九大对象
- PageContext 存东西
- Request 存东西
- Response
- Session 存东西
- Application(ServletContext)存东西
- Config(Servlet config)
- out
- page
- exception
2. 作用域
四个存东西的对象,作用域
找参数的时候:pageContext找不到---->request找不到---->session找不到---->application找不到--->null
pageContext.setAttribute("name1","xiaowei1");//只在一个页面中有效
request.setAttribute("name2","xiaowei2");//在一次请求中携带并有效
session.setAttribute("name3","xiaowei3");//在一次浏览器会话中有效
application.setAttribute("name4","xiaowei4");//服务器不重启都有效

pageContext.findAttribute("name1");
....
手动确定作用域,在pageContext可以用
public static final int PAGE_SCOPE = 1;
public static final int REQUEST_SCOPE = 2;
public static final int SESSION_SCOPE = 3;
public static final int APPLICATION_SCOPE = 4;

public void setAttribute(String name, Object attribute, int scope) {
    switch(scope) {
        case 1:
            this.mPage.put(name, attribute);
            break;
        case 2:
            this.mRequest.put(name, attribute);
            break;
        case 3:
            this.mSession.put(name, attribute);
            break;
        case 4:
            this.mApp.put(name, attribute);
            break;
        default:
            throw new IllegalArgumentException("Bad scope " + scope);
    }

}
3. 应用场景
request:用户用完就不用了,产生的数据需要丢掉:新闻...
session:用户用完还要用,产生的数据需要存一会:购物车...
application:用户用完了,其他用户可能还得用:统计数据、聊天数据...
二十一、JSP、JSTL、标签、EL表达式
<!--JSTL表达式的依赖-->
<!-- https://mvnrepository.com/artifact/javax.servlet.jsp.jstl/jstl-api -->
<dependency>
  <groupId>javax.servlet.jsp.jstl</groupId>
  <artifactId>jstl-api</artifactId>
  <version>1.2</version>
</dependency>
<!--standard标签库-->
<!-- https://mvnrepository.com/artifact/taglibs/standard -->
<dependency>
  <groupId>taglibs</groupId>
  <artifactId>standard</artifactId>
  <version>1.1.2</version>
</dependency>
1. EL表达式
- 获取数据
- 执行运算
- 获取web开发常用对象
- 格式${}
2. JSP标签
<%--jsp:include 包含页面--%>

<%--跳转页面--%>
<%--携带参数--%>
<jsp:forward page="jsptag2.jsp">
    <jsp:param name="name" value="xiaowei"/>
    <jsp:param name="age" value="22"/>
</jsp:forward>
3. JSTL标签
为了弥补HTML标签的内容功能的不足,自定义了许多标签可以供我们使用,标签的功能和Java代码一样
格式化标签
sql标签
XML标签
核心标签(掌握部分)
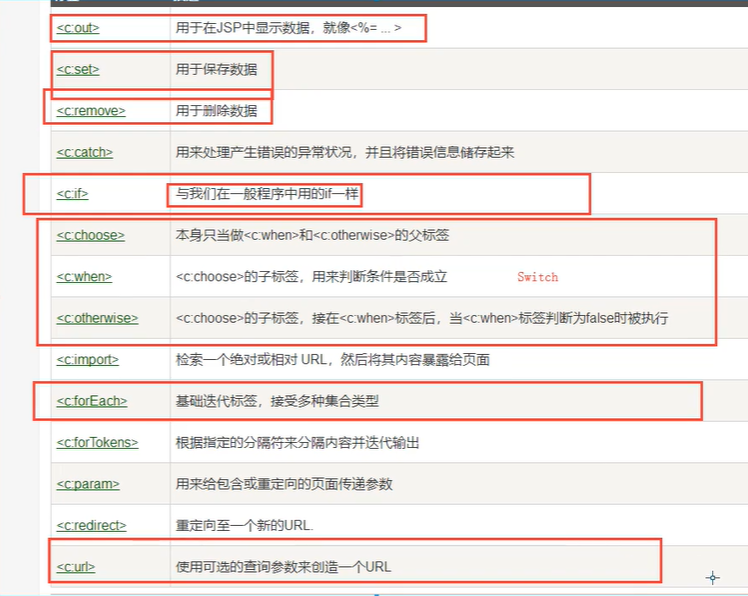
引入JSTL核心标签库:(还有其他的)
<%@ taglib prefix="c" uri="http://java.sun.com/jsp/jstl/core" %>
使用其中方法
<form action="JSTLtag.jsp" method="get">
    <%--EL表达式获取值
    ${param.var}
    --%>
    <input type="text" name="username" value="${param.username}">
        <input type="submit" value="登录">

</form>
<c:if test="${param.username=='admin'}" var="isAdmin">
    <c:out value="欢迎您${param.username}"></c:out>
</c:if>

<c:out value="${isAdmin}"></c:out>
选择标签:
<c:set var="score" value="${param.username}"></c:set>

<%--从上到下哪个先碰到就判断哪个,判断条件为真后,后面的条件不会再去判断--%>
<c:choose>
    <c:when test="${score>=90}">
        成绩优秀
    </c:when>
    <c:when test="${score>=80}">
        成绩良好
    </c:when>
    <c:when test="${score>=70}">
        成绩一般
    </c:when>
    <c:when test="${score>=60}">
        成绩及格
    </c:when>
</c:choose>
forEach:
<%
    ArrayList arrayList = new ArrayList();
    arrayList.add("张三");
    arrayList.add("李四");
    arrayList.add("王五");
    arrayList.add("赵六");
    arrayList.add("田七");
    request.setAttribute("peoples",arrayList);
%>

<%--var:进入了request的Attribute中,用于输出遍历出的值
    items:遍历的列表
    --%>
<c:forEach var="people" items="${peoples}">
    <c:out value="${people}"></c:out>
</c:forEach>
PS:标签中的var通常进入了request中的Attribute,EL表达式直接输入变量名可以获取,而如果是在request的Parameter中,EL表达式则需要${param.变量名}来获取
在Tomcat中也需要引入JSTL的jar包,否则会有JSTL引入错误
二十二、JavaBean
实体类
JavaBean有特定写法:
- 必须有无参构造
- 属性必须私有化
- 必须有对应的getset
一般用来和数据库字段做映射:ORM:对象 关系 映射
- 表-->类
- 字段-->属性
- 行记录-->对象
<%--创建一个
    类为com.xiaowei99.pojo.Person
    变量名为xiaowei
    有效范围是page
    的对象--%>
<jsp:useBean id="xiaowei" scope="page" class="com.xiaowei99.pojo.Person"></jsp:useBean>

<%--设置对象属性--%>
<jsp:setProperty name="xiaowei" property="id" value="1"></jsp:setProperty>
<jsp:setProperty name="xiaowei" property="name" value="xiaowei"></jsp:setProperty>
<jsp:setProperty name="xiaowei" property="age" value="22"></jsp:setProperty>

<%--获取对象属性--%>
<jsp:getProperty name="xiaowei" property="id"/>
<jsp:getProperty name="xiaowei" property="name"/>
<jsp:getProperty name="xiaowei" property="age"/>
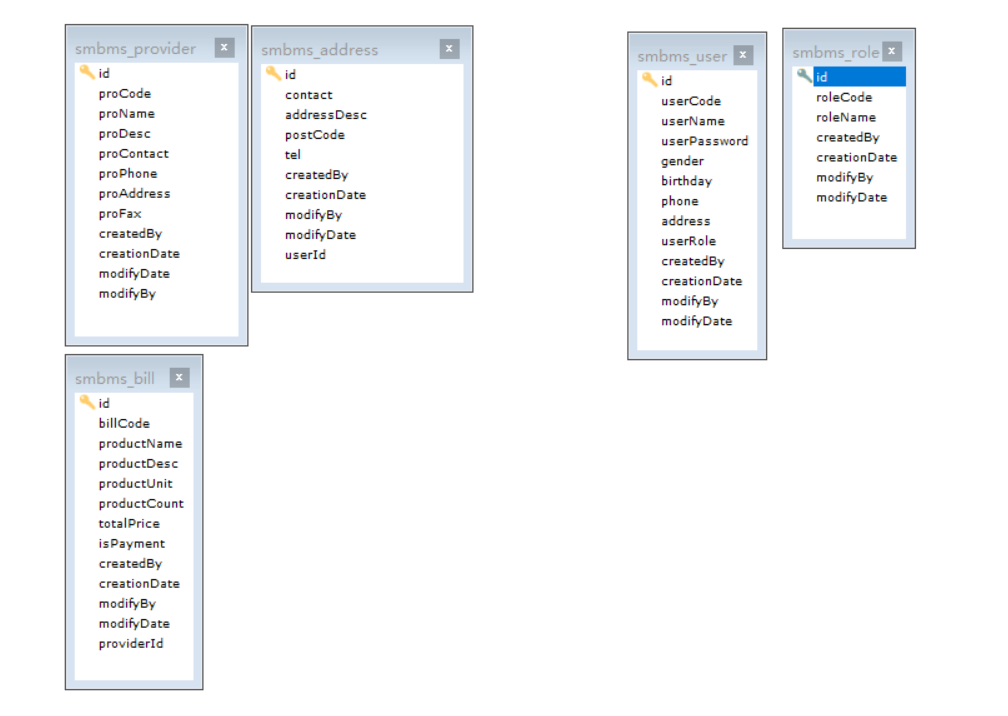
之后使用的数据库:https://github.com/WalterWen/smbms/blob/master/smbms.sql(好人一生平安)。
二十三、MVC三层架构
什么是MVC:Model View Controller
模型(实体类)
视图(JSP)
控制器(Servlet)
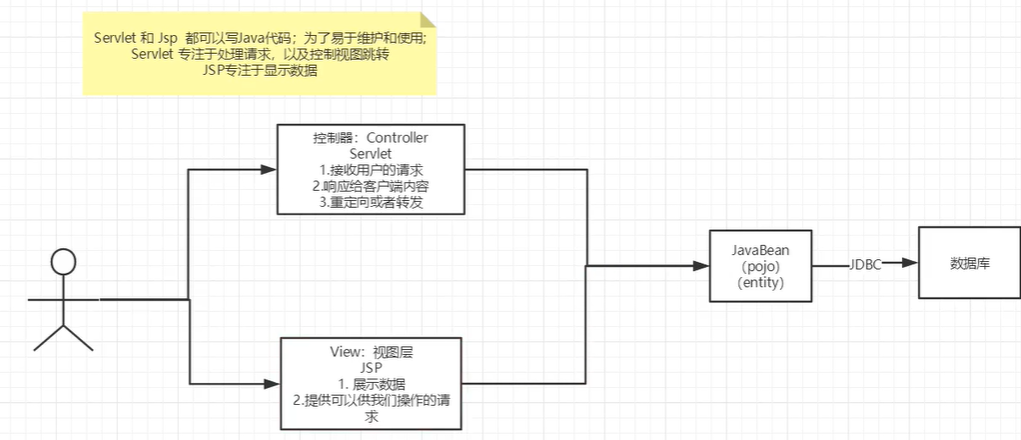
用户直接访问控制层,控制层直接操控数据库
servlet--->CRUD --->数据库
弊端:程序臃肿,不利于维护
servlet中:处理请求、响应、视图跳转、处理jdbc、处理业务代码、处理逻辑代码
架构:没有什么是加一层解决不了的
JDBC
Mysql、Oracle、Sql Server
演进 三层架构MVC
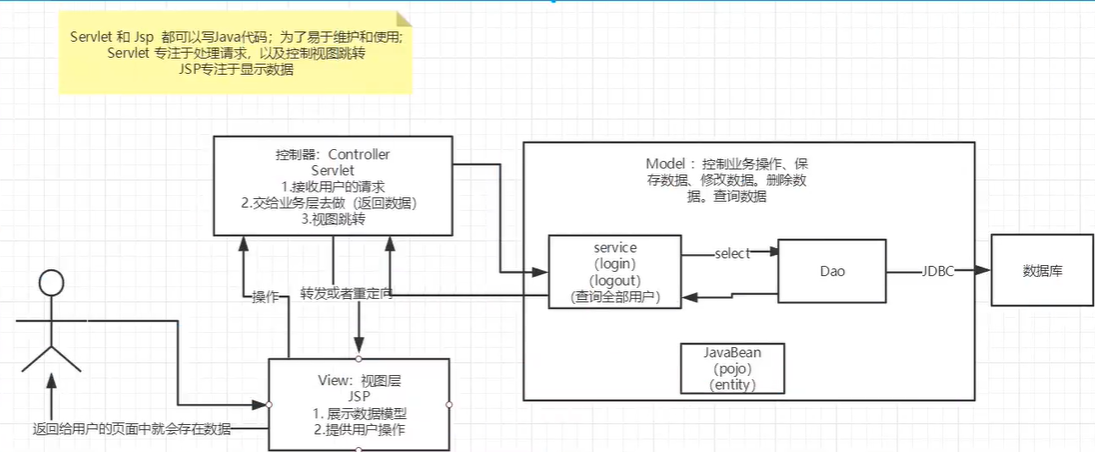
Model:
- 业务处理:业务逻辑(Service)
- 数据持久层(CRUD)DAO层
View:
- 展示数据
- 提供链接发起servlet请求
Controller(Servlet)
-
接受用户请求
-
交给业务层处理相应代码
-
控制视图跳转
登录--->接收用户请求--->处理用户请求(获取用户登录参数,username,password....)--->交给业务层登录业务(判断用户名密码是否正确:事务)--->DAO层查询用户名和密码是否正确--->数据库
二十四、过滤器Filter(重点)
用来过滤网站的数据
- 处理中文乱码
- 登录验证
- ....
开发步骤:
- 导包
- 编写过滤器
web.xml:
<filter>
    <filter-name>encoding</filter-name>
    <filter-class>com.xiaowei99.filter.CharacterEncodingFilter</filter-class>
</filter>
<filter-mapping>
    <filter-name>encoding</filter-name>
    <!--url-pattern指定的路径  servlet下的所有都过滤-->
    <url-pattern>/servlet/*</url-pattern>
    <!--servlet-name指定的已经注册了的servlet的名字-->
    <servlet-name>TestServlet</servlet-name>
</filter-mapping>
Filter:
package com.xiaowei99.filter;

import javax.servlet.*;
import java.io.IOException;

public class CharacterEncodingFilter implements Filter {//servlet下的Filter,不要加错了

    //初始化
    @Override
    public void init(FilterConfig filterConfig) throws ServletException {
        Filter.super.init(filterConfig);
        System.out.println("Filter初始化了");
    }

    @Override
    public void doFilter(ServletRequest servletRequest, ServletResponse servletResponse, FilterChain filterChain) throws IOException, ServletException {
        servletRequest.setCharacterEncoding("GBK");
        servletResponse.setCharacterEncoding("GBK");
        System.out.println("Filter执行前");
        filterChain.doFilter(servletRequest,servletResponse);
        //放行程序,不然程序就停止了,当有多个过滤器的时候,把请求和响应信息传递给下一个过滤器
        System.out.println("Filter执行后");
    }

    //销毁
    @Override
    public void destroy() {
        Filter.super.destroy();
        System.out.println("Filter销毁了");
    }
}
二十五、监听器Listener
实现一个监听器的接口,有很多种
编写监听器
package com.xiaowei99.listener;

import javax.servlet.ServletContext;
import javax.servlet.http.HttpSessionEvent;
import javax.servlet.http.HttpSessionListener;

//统计在线人数
public class OnlineCountListener implements HttpSessionListener {
    @Override
    public void sessionCreated(HttpSessionEvent se) {
        System.out.println(se.getSession().getId());
        ServletContext sc = se.getSession().getServletContext();
        Integer onlineCount = (Integer) sc.getAttribute("onlineCount");
        if (onlineCount==null){
            onlineCount = new Integer(1);
        }else {
            onlineCount+=1;
        }
        sc.setAttribute("onlineCount",onlineCount);
    }

    @Override
    public void sessionDestroyed(HttpSessionEvent se) {

        ServletContext sc = se.getSession().getServletContext();
        Integer onlineCount = (Integer) sc.getAttribute("onlineCount");
        if (onlineCount==null){
            onlineCount = new Integer(0);
        }else {
            onlineCount-=1;
        }

        sc.setAttribute("onlineCount",onlineCount);

        /*
        * Session销毁:
        * 手动销毁:se.getSession().invalidate();
        * 自动销毁:配置session-config
        * <session-config>
        * <session-timeout></session-timeout>
        * </session-config>
        * */
    }
}
配置web.xml
<listener>
    <listener-class>com.xiaowei99.listener.OnlineCountListener</listener-class>
</listener>
看情况是否使用
二十六、监听器GUI中理解
回顾GUI部分
二十七、Filter实现权限拦截
登录拦截
使用的常量:
package com.xiaowei99.util;

public class Constant {
    public final static String USER_SESSION = "USER_SESSION";
}
过滤器class:没有SessionID不能登录
package com.xiaowei99.filter;

import com.xiaowei99.util.Constant;

import javax.servlet.*;
import javax.servlet.http.HttpServletRequest;
import javax.servlet.http.HttpServletResponse;
import javax.servlet.http.HttpSession;
import java.io.IOException;

public class LoginFilter implements Filter {
    @Override
    public void init(FilterConfig filterConfig) throws ServletException {
        Filter.super.init(filterConfig);
    }

    @Override
    public void doFilter(ServletRequest request, ServletResponse response, FilterChain chain) throws IOException, ServletException {
        HttpServletRequest req = (HttpServletRequest) request;
        HttpServletResponse resp = (HttpServletResponse) response;

        if (req.getSession().getAttribute(Constant.USER_SESSION)==null){
            resp.sendRedirect("/index.jsp");
        }

        chain.doFilter(request,response);
    }

    @Override
    public void destroy() {
        Filter.super.destroy();
    }
}
web.xml中对主页注册过滤器:
<filter>
    <filter-name>loginfil</filter-name>
    <filter-class>com.xiaowei99.filter.LoginFilter</filter-class>
</filter>
<filter-mapping>
    <filter-name>loginfil</filter-name>
    <url-pattern>/sys/*</url-pattern>
</filter-mapping>
二十八、JDBC复习
Maven导入包,其他回顾MySQL数据库阶段
<dependency>
    <groupId>mysql</groupId>
    <artifactId>mysql-connector-java</artifactId>
    <version>5.1.47</version>
</dependency>
二十九、JDBC事务
测试方法,使用junit依赖
在方法上加入@Test注解即可执行
@Test
public void aVoid(){
    System.out.println("hello");
}
三十、smbms项目搭建
项目数据表结构
-
新建一个mavenweb项目
-
配置tomcat
-
测试项目是否能够跑起来
-
导入jar包(Maven依赖):JSP、Servlet、mysql、jstl、standard
-
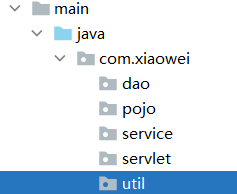
创建项目包结构
-
编写实体类
ORM
-
编写基础公共类
-
编写数据库配置文件
driver=com.mysql.jdbc.Driver url=jdbc:mysql://localhost:3306?useUnicode=true&characterEncoding=utf-8 username=root password=123456 -
编写数据库公共类
package com.xiaowei.dao; import java.io.IOException; import java.io.InputStream; import java.sql.*; import java.util.Properties; public class BaseDao { public static String driver; public static String url; public static String username; public static String password; static { //通过类加载器获得资源流 InputStream inputStream = BaseDao.class.getClassLoader().getResourceAsStream("db.properties"); Properties properties = new Properties(); try { properties.load(inputStream); } catch (IOException e) { e.printStackTrace(); } driver = properties.getProperty("driver"); url = properties.getProperty("url"); username = properties.getProperty("username"); password = properties.getProperty("password"); } //获取数据库链接 public static Connection getConnection(){ Connection conn = null; try { Class.forName(driver); conn = DriverManager.getConnection(url, username, password); } catch (Exception throwables) { throwables.printStackTrace(); } return conn; } //公共查询方法 public static ResultSet execute(Connection connection,String sql,Object[] params,ResultSet resultSet,PreparedStatement ps) throws SQLException { ps = connection.prepareStatement(sql); for (int i = 0; i < params.length; i++) { ps.setObject(i+1,params[i]); } resultSet = ps.executeQuery(); return resultSet; } //公共增删改方法 public static int execute(Connection connection,String sql,Object[] params,PreparedStatement ps) throws SQLException { ps = connection.prepareStatement(sql); for (int i = 0; i < params.length; i++) { ps.setObject(i+1,params[i]); } int i = ps.executeUpdate(); return i; } //释放资源 public static boolean release(Connection connection, PreparedStatement preparedStatement, ResultSet resultSet ){ boolean flag = true; if (connection!=null){ try { connection.close(); connection=null; } catch (SQLException throwables) { throwables.printStackTrace(); flag=false; } } if (preparedStatement!=null){ try { preparedStatement.close(); preparedStatement=null; } catch (SQLException throwables) { throwables.printStackTrace(); flag=false; } } if (resultSet!=null){ try { resultSet.close(); resultSet=null; } catch (SQLException throwables) { throwables.printStackTrace(); flag=false; } } return flag; } } -
编写字符过滤器
package com.xiaowei.filter; import javax.servlet.*; import java.io.IOException; public class CharacterEncodingFilter implements Filter { public void init(FilterConfig filterConfig) throws ServletException { } public void doFilter(ServletRequest request, ServletResponse response, FilterChain chain) throws IOException, ServletException { request.setCharacterEncoding("GBK"); response.setCharacterEncoding("GBK"); response.setContentType("text/html; charset=utf-8"); chain.doFilter(request,response); } public void destroy() { } } -
导入静态资源
链接: https://pan.baidu.com/s/1oJKGW3a0GfODguH75a8jeg 提取码: cvia
-
三十一、smbms登录实现流程
-
设置首页
<welcome-file-list> <welcome-file>login.jsp</welcome-file> </welcome-file-list> -
编写dao层获取登录用户接口
public interface UserDao { public User getLoginUser(Connection connection,String userCode,String userPassword) throws SQLException; } -
编写dao接口的实现类(接入数据库)
package com.xiaowei.dao.user; import com.mysql.jdbc.PreparedStatement; import com.xiaowei.dao.BaseDao; import com.xiaowei.pojo.User; import java.sql.Connection; import java.sql.ResultSet; import java.sql.SQLException; public class UserDaoImpl implements UserDao { public User getLoginUser(Connection connection, String userCode, String userPassword) throws SQLException { User user = new User(); if (connection != null) { String sql = "select * from smbms_user where userCode=? and userPassword=?"; PreparedStatement ps = null; ResultSet rs = null; Object[] params = {userCode,userPassword}; rs = BaseDao.execute(connection, sql, params, rs, ps); if (rs.next()) { user.setId(rs.getInt("id")); user.setUserCode(rs.getString("userCode")); user.setUserName(rs.getString("userName")); user.setUserPassword(rs.getString("userPassword")); user.setGender(rs.getInt("gender")); user.setBirthday(rs.getDate("birthday")); user.setPhone(rs.getString("phone")); user.setAddress(rs.getString("address")); user.setUserRole(rs.getInt("userRole")); user.setCreatedBy(rs.getInt("createdBy")); user.setCreationDate(rs.getDate("creationDate")); user.setModifyBy(rs.getInt("modifyBy")); user.setModifyDate(rs.getDate("modifyDate")); BaseDao.release(null,ps,rs); return user; } } return null; } } -
业务层接口及业务层实现类
public interface UserService {
    public User login(String userCode, String userPassword);
}
实现类(调用dao层)
package com.xiaowei.service.user; import com.xiaowei.dao.BaseDao; import com.xiaowei.dao.user.UserDaoImpl; import com.xiaowei.pojo.User; import org.junit.Test; import java.sql.Connection; import java.sql.SQLException; public class UserServiceImpl implements UserService{ //引入Dao层 public UserDaoImpl userDao; public UserServiceImpl(){ userDao = new UserDaoImpl(); } public User login( String userCode,String userPassword) { User user = null; Connection connection = BaseDao.getConnection(); try { //调用Dao层 user = userDao.getLoginUser(connection, userCode, userPassword); } catch (SQLException throwables) { throwables.printStackTrace(); }finally { BaseDao.release(connection,null,null); } return user; } } -
servlet编写(调用业务层)
package com.xiaowei.servlet.user;

import com.xiaowei.pojo.User;
import com.xiaowei.service.user.UserService;
import com.xiaowei.service.user.UserServiceImpl;
import com.xiaowei.util.Constant;

import javax.servlet.ServletException;
import javax.servlet.http.HttpServlet;
import javax.servlet.http.HttpServletRequest;
import javax.servlet.http.HttpServletResponse;
import java.io.IOException;

public class LoginServlet extends HttpServlet {
    @Override
    protected void doGet(HttpServletRequest req, HttpServletResponse resp) throws ServletException, IOException {
        UserService userService = new UserServiceImpl();
        String userCode = req.getParameter("userCode");
        String userPassword = req.getParameter("userPassword");
        User login = userService.login(userCode, userPassword);
        if (login==null){
            req.setAttribute("error","查无此人,用户名或密码错误");
            req.getRequestDispatcher("login.jsp").forward(req,resp);
        }else {
            req.getSession().setAttribute(Constant.USER_SESSION,login);
            resp.sendRedirect("jsp/frame.jsp");
        }
    }

    @Override
    protected void doPost(HttpServletRequest req, HttpServletResponse resp) throws ServletException, IOException {
        doGet(req, resp);
    }
}
三十二、smbms注销及权限过滤
注销:移除session,返回login.jsp页面只需要在servlet中完成即可
注销:记得在web.xml中注册servlet
package com.xiaowei.servlet.user;

import com.xiaowei.util.Constant;

import javax.servlet.ServletException;
import javax.servlet.http.HttpServlet;
import javax.servlet.http.HttpServletRequest;
import javax.servlet.http.HttpServletResponse;
import javax.servlet.http.HttpSession;
import java.io.IOException;

public class LogoutServlet extends HttpServlet {
    @Override
    protected void doGet(HttpServletRequest req, HttpServletResponse resp) throws ServletException, IOException {
        HttpSession session = req.getSession();
        session.removeAttribute(Constant.USER_SESSION);
        req.removeAttribute("error");
        System.out.println(req.getAttribute("error"));
        req.getRequestDispatcher("login.jsp").forward(req,resp);
    }

    @Override
    protected void doPost(HttpServletRequest req, HttpServletResponse resp) throws ServletException, IOException {
        doGet(req, resp);
    }
}
登录状态权限拦截:
package com.xiaowei.filter;

import com.xiaowei.util.Constant;

import javax.servlet.*;
import javax.servlet.http.HttpServletRequest;
import javax.servlet.http.HttpServletResponse;
import java.io.IOException;

public class LoginFilter implements Filter {
    public void init(FilterConfig filterConfig) throws ServletException {
    }

    public void doFilter(ServletRequest request, ServletResponse response, FilterChain chain) throws IOException, ServletException {
        HttpServletRequest req = (HttpServletRequest) request;
        HttpServletResponse resp = (HttpServletResponse) response;
        Object attribute = req.getSession().getAttribute(Constant.USER_SESSION);
        if (attribute==null){
            resp.sendRedirect(req.getContextPath()+"/error.jsp");
        }


        chain.doFilter(request, response);
    }

    public void destroy() {
    }
}
三十三、smbms密码修改实现
从底层往前端
Dao层:
public int updatePassword(Connection connection,int id,String newPassword) throws SQLException;
实现:
public int updatePassword(Connection connection, int id, String newPassword) throws SQLException {
    String sql ="update smbms_user set userPassword=? where id=?";
    PreparedStatement ps = null;
    Object[] params = {newPassword,id};
    int execute = 0;
    if (connection!=null){
        execute = BaseDao.execute(connection, sql, params, ps);
        BaseDao.release(null,ps,null);
    }
    return execute;

}
Service层:
public boolean updatePassword(int id,String newPassword);
实现:
public boolean updatePassword(int id, String newPassword) {
    Connection connection = null;
    boolean flag = false;

    try {
        connection = BaseDao.getConnection();
        int i = userDao.updatePassword(connection, id, newPassword);
        if (i>0){
            flag=true;
        }

    } catch (SQLException throwables) {
        throwables.printStackTrace();
    }finally {
        BaseDao.release(connection,null,null);
    }


    return flag;
}
Servlet层:
public void updatePwd(HttpServletRequest req, HttpServletResponse resp){
    Object o = req.getSession().getAttribute(Constant.USER_SESSION);

    String newpassword = req.getParameter("newpassword");
    if (o!=null&&newpassword!=null){
        UserService userService = new UserServiceImpl();
        boolean b = userService.updatePassword(((User) o).getId(), newpassword);
        if (b){
            req.setAttribute("message","修改密码成功,请重新登录!");
            //清除session
            req.getSession().removeAttribute(Constant.USER_SESSION);
            try {

                req.getRequestDispatcher("/jsp/pwdmodify.jsp").forward(req,resp);
                //resp.sendRedirect(req.getContextPath()+"/login.jsp");
                return;
            } catch (Exception e) {
                e.printStackTrace();
            }
        }else {
            req.setAttribute("message","密码修改失败");
        }
    }else {
        req.setAttribute("message","新密码出错!");
    }

    try {
        req.getRequestDispatcher("/jsp/pwdmodify.jsp").forward(req,resp);
    } catch (ServletException e) {
        e.printStackTrace();
    } catch (IOException e) {
        e.printStackTrace();
    }

}
三十四、Ajax验证旧密码实现
前端:
oldpassword.on("blur",function(){
   $.ajax({
      type:"GET",
      url:path+"/user/user.do",
      data:{method:"pwdmodify",oldpassword:oldpassword.val()},
         success:function(data){
         if(data.result == "true"){//旧密码正确
            validateTip(oldpassword.next(),{"color":"green"},imgYes,true);
         }else if(data.result == "false"){//旧密码输入不正确
            validateTip(oldpassword.next(),{"color":"red"},imgNo + " 原密码输入不正确",false);
         }else if(data.result == "sessionerror"){//当前用户session过期,请重新登录
            validateTip(oldpassword.next(),{"color":"red"},imgNo + " 当前用户session过期,请重新登录",false);
         }else if(data.result == "error"){//旧密码输入为空
            validateTip(oldpassword.next(),{"color":"red"},imgNo + " 请输入旧密码",false);
         }
      },
      error:function(data){
         //请求出错
         validateTip(oldpassword.next(),{"color":"red"},imgNo + " 请求错误",false);
      }
   });


}).on("focus",function(){
   validateTip(oldpassword.next(),{"color":"#666666"},"* 请输入原密码",false);
});
Ajax处理请求地址中的方法:(使用json传递数据)
public void pwdModify(HttpServletRequest req, HttpServletResponse resp){
    Object o = req.getSession().getAttribute(Constant.USER_SESSION);
    String oldpassword = req.getParameter("oldpassword");
    HashMap<String, String> resultMap = new HashMap<String, String>();

    if (o!=null && oldpassword!=null){
        User user = (User) o;
        if (user.getUserPassword().equals(oldpassword)){
            resultMap.put("result","true");
        }else if(!user.getUserPassword().equals(oldpassword)){
            resultMap.put("result","false");
        }
    }
    if (oldpassword==null){
        resultMap.put("result","error");
    }
    if (o==null){
        resultMap.put("result","sessionerror");
    }
    String jsonString = JSONArray.toJSONString(resultMap);


    PrintWriter writer = null;
    try {
        resp.setContentType("application/json");
        writer = resp.getWriter();
        writer.write(jsonString);
        writer.flush();
        writer.close();
    } catch (IOException e) {
        e.printStackTrace();
    }

}
三十五、smbms用户管理底层实现
这里只完成用户列表的分页和总数:接口就不写出来的了
用户列表+分页
Dao层:
public List<User> getUserList(Connection connection, String username, int userRole, int currentPageNo, int pageSize) throws SQLException {
    PreparedStatement ps = null;
    ResultSet rs = null;
    ArrayList<Object> params = new ArrayList<Object>();
    StringBuffer sql =null;
    int pageBegin = (currentPageNo-1)*pageSize;
    ArrayList<User> users = null;

    if(connection!=null){
        sql = new StringBuffer();
        sql.append("select * from smbms_user u ,smbms_role r " +
                "where u.userRole=r.id");
        if (!StringUtils.isNullOrEmpty(username)){
            sql.append(" and u.userName = ?");
            params.add(username);
        }
        if (userRole>0&&userRole<4){
            sql.append(" and u.userRole = ? ");
            params.add(userRole);
        }
        sql.append("order by u.creationDate asc " +
                "limit ?,?");
        params.add(pageBegin);
        params.add(pageSize);

    }
    System.out.println(sql.toString());
    rs = BaseDao.execute(connection, sql.toString(), params.toArray(), rs, ps);
    users = new ArrayList<User>();
    while (rs.next()){
        User user = new User();
        user.setId(rs.getInt("id"));
        user.setUserCode(rs.getString("userCode"));
        user.setUserName(rs.getString("userName"));
        user.setUserPassword(rs.getString("userPassword"));
        user.setGender(rs.getInt("gender"));
        user.setBirthday(rs.getDate("birthday"));
        user.setPhone(rs.getString("phone"));
        user.setAddress(rs.getString("address"));
        user.setUserRole(rs.getInt("userRole"));
        user.setCreatedBy(rs.getInt("createdBy"));
        user.setCreationDate(rs.getDate("creationDate"));
        user.setModifyBy(rs.getInt("modifyBy"));
        user.setModifyDate(rs.getDate("modifyDate"));
        users.add(user);
    }
    BaseDao.release(null,ps,rs);
    return users;
}
Service层:
public List<User> getUserList(String userName, int userRole, int currentPageNo, int pageSize) {
    Connection connection = BaseDao.getConnection();
    List<User> userList = null;
    try {
        userList = userDao.getUserList(connection, userName, userRole,currentPageNo,pageSize);
    } catch (SQLException throwables) {
        throwables.printStackTrace();
    }finally {
        BaseDao.release(connection,null,null);
    }
    return userList;
}
总数
Dao层:
public int getUserCount(Connection connection, String username, int userRole) throws SQLException {
    PreparedStatement ps = null;
    ResultSet rs = null;
    ArrayList<Object> params = new ArrayList<Object>();
    StringBuffer sql =null;
    int count = 0;

    if(connection!=null){
        sql = new StringBuffer();
        sql.append("select count(1) from smbms_user u ,smbms_role r " +
                "where u.userRole=r.id");
        if (!StringUtils.isNullOrEmpty(username)){
            sql.append(" and u.userName = ?");
            params.add(username);
        }
        if (userRole>0&&userRole<4){
            sql.append(" and u.userRole = ?");
            params.add(userRole);
        }
    }
    rs = BaseDao.execute(connection, sql.toString(), params.toArray(), rs, ps);
    if (rs.next()){
        count = rs.getInt(1);
    }
    BaseDao.release(null,ps,rs);
    return count;

}
Service层:
public int getUserCount(String userName, int userRole) {
    Connection connection = BaseDao.getConnection();
    int userCount = 0;
    try {
        userCount = userDao.getUserCount(connection, userName, userRole);
    } catch (SQLException throwables) {
        throwables.printStackTrace();
    }finally {
        BaseDao.release(connection,null,null);
    }
    return userCount;
}
三十六、smbms用户管理分页OK
分页!
分页底层是用户列表Service和角色列表Service支撑!
servlet方法!
private void query(HttpServletRequest req, HttpServletResponse resp) {
    //取数据
    String queryname = req.getParameter("queryname");
    String temp = req.getParameter("queryUserRole");
    String totalCount = req.getParameter("totalCount");
    String currentPageNo = req.getParameter("currentPageNo");
    String totalPageCount = req.getParameter("totalPageCount");
    String pageIndex = req.getParameter("pageIndex");
    int pageSize = 5;

    //第一次进入,我们没有数据如何做?
    int queryUserRole = 0;
    if (StringUtils.isNullOrEmpty(queryname)){
        queryname = "";
    }
    if (!StringUtils.isNullOrEmpty(temp)){
        queryUserRole=Integer.parseInt(temp);
    }
    UserServiceImpl userService = new UserServiceImpl();
    if (StringUtils.isNullOrEmpty(totalCount)){
        totalCount = userService.getUserCount(null,0)+"";
    }
    if (StringUtils.isNullOrEmpty(currentPageNo) ){
        currentPageNo = 1+"";
    }
    if (StringUtils.isNullOrEmpty(pageIndex)){
        pageIndex = 1+"";
    }
    if (StringUtils.isNullOrEmpty(totalPageCount)){
        totalPageCount = Double.valueOf(Math.ceil(Double.parseDouble(totalCount)/pageSize)).intValue()+"";
    }


    //去数据库数据
    List<User> userList = userService.getUserList(queryname, queryUserRole, Integer.parseInt(pageIndex), pageSize);
    RoleServiceImpl roleService = new RoleServiceImpl();
    List<Role> roleList = roleService.getRoleList();
    //存入数据,改变当前页
    currentPageNo=pageIndex;//前端传回现在的页,需要更新!
    req.setAttribute("queryUserName",queryname);
    req.setAttribute("roleList",roleList);
    req.setAttribute("userList",userList);
    req.setAttribute("queryUserRole",queryUserRole+"");
    req.setAttribute("totalCount",totalCount+"");
    req.setAttribute("currentPageNo",currentPageNo+"");
    req.setAttribute("totalPageCount",totalPageCount+"");
    req.setAttribute("pageIndex",pageIndex+"");


    try {
        req.getRequestDispatcher("/jsp/userlist.jsp").forward(req,resp);
    } catch (ServletException e) {
        e.printStackTrace();
    } catch (IOException e) {
        e.printStackTrace();
    }

}
下面这两个就是要做合格的CV工程师了属于是,拿来直接用,这两玩意真的yue
三十七、smbms架构分析及方法学习
一切的增删改操作都要处理事务
- connection.setAutoCommit(false)
- sql
- connection.commit()
- 如果失败:connection.rollback
三十八、文件上传
package com.xiaowei.servlet;

import org.apache.commons.fileupload.FileItem;
import org.apache.commons.fileupload.FileUploadException;
import org.apache.commons.fileupload.ProgressListener;
import org.apache.commons.fileupload.disk.DiskFileItemFactory;
import org.apache.commons.fileupload.servlet.ServletFileUpload;

import javax.servlet.ServletException;
import javax.servlet.http.HttpServlet;
import javax.servlet.http.HttpServletRequest;
import javax.servlet.http.HttpServletResponse;
import java.io.File;
import java.io.FileOutputStream;
import java.io.IOException;
import java.io.InputStream;
import java.util.List;
import java.util.UUID;

public class UploadServlet extends HttpServlet {
    private static final long serialVersionUID = 1L;

    /**
     * @see HttpServlet#doGet(HttpServletRequest request, HttpServletResponse
     *      response)
     */
    protected void doGet(HttpServletRequest request, HttpServletResponse response)
            throws ServletException, IOException {


        // 判断上传的文件普通表单还是带文件的表单
        if (!ServletFileUpload.isMultipartContent(request)) {
            return;//终止方法运行,说明这是一个普通的表单,直接返回
        }

        //创建上传文件的保存路径,建议在WEB-INF路径下,安全,用户无法直接访间上传的文件;
        String uploadPath =this.getServletContext().getRealPath("/WEB-INF/upload");
        File uploadFile = new File(uploadPath);
        if (!uploadFile.exists()){
            uploadFile.mkdir(); //创建这个月录
        }

        // 创建上传文件的保存路径,建议在WEB-INF路径下,安全,用户无法直接访问上传的文件
        String tmpPath = this.getServletContext().getRealPath("/WEB-INF/tmp");
        File file = new File(tmpPath);
        if (!file.exists()) {
            file.mkdir();//创建临时目录
        }

        // 处理上传的文件,一般都需要通过流来获取,我们可以使用 request, getInputstream(),原生态的文件上传流获取,十分麻烦
        // 但是我们都建议使用 Apache的文件上传组件来实现, common-fileupload,它需要旅 commons-io组件;
        try {
            //1、创建DiskFileItemFactory对象,处理文件路径或者大小限制(对接磁盘获得工厂)
            DiskFileItemFactory factory = getDiskFileItemFactory(file);
            /*
             * 通过这个工厂设置一个缓冲区,当上传的文件大于这个缓冲区的时候,
             * 将他放到临时文件 factory.setSizeThreshold(1024 *1024);
             * 缓存区大小为1M factory.setRepository (file);
             * 临时目录的保存目录,需要一个File
             */

            // 2、获取ServletFileUpload(通过工厂过的上传对象)
            ServletFileUpload upload = getServletFileUpload(factory);

            // 3、处理上传文件(上传!)
            // 把前端请求解析,封装成FileItem对象,需要从ServletFileUpload对象中获取
            String msg = uploadParseRequest(upload, request, uploadPath);

            // Servlet请求转发消息
            System.out.println(msg);
            if(msg == "文件上传成功!") {
                // Servlet请求转发消息
                request.setAttribute("msg",msg);
                request.getRequestDispatcher("info.jsp").forward(request, response);
            }else {
                msg ="请上传文件";
                request.setAttribute("msg",msg);
                request.getRequestDispatcher("info.jsp").forward(request, response);
            }

        } catch (FileUploadException e) {
            // TODO 自动生成的 catch 块
            e.printStackTrace();
        }
    }

    public static DiskFileItemFactory getDiskFileItemFactory(File file) {
        DiskFileItemFactory factory = new DiskFileItemFactory();
        // 通过这个工厂设置一个缓冲区,当上传的文件大于这个缓冲区的时候,将他放到临时文件中;
        factory.setSizeThreshold(1024 * 1024);// 缓冲区大小为1M
        factory.setRepository(file);// 临时目录的保存目录,需要一个file
        return factory;
    }

    public static ServletFileUpload getServletFileUpload(DiskFileItemFactory factory) {
        ServletFileUpload upload = new ServletFileUpload(factory);
        // 监听长传进度
        upload.setProgressListener(new ProgressListener() {

            // pBYtesRead:已读取到的文件大小
            // pContextLength:文件大小
            public void update(long pBytesRead, long pContentLength, int pItems) {
                System.out.println("总大小:" + pContentLength + "已上传:" + pBytesRead);
            }
        });

        // 处理乱码问题
        upload.setHeaderEncoding("UTF-8");
        // 设置单个文件的最大值
        upload.setFileSizeMax(1024 * 1024 * 10);
        // 设置总共能够上传文件的大小
        // 1024 = 1kb * 1024 = 1M * 10 = 10м

        return upload;
    }

    public static String uploadParseRequest(ServletFileUpload upload, HttpServletRequest request, String uploadPath)
            throws FileUploadException, IOException {

        String msg = "";

        // 把前端请求解析,封装成FileItem对象
        List<FileItem> fileItems = upload.parseRequest(request);
        for (FileItem fileItem : fileItems) {
            if (fileItem.isFormField()) {// 如果是表单
                // getFieldName指的是前端表单控件的name属性;
                String name = fileItem.getFieldName();
                String value = fileItem.getString("UTF-8"); // 处理乱码
                System.out.println(name + ": " + value);
            } else {// 判断它是上传的文件

                // ============处理文件==============

                String uploadFileName = fileItem.getName();// 拿到文件名
                System.out.println("上传的文件名: " + uploadFileName);
                if (uploadFileName.trim().equals("") || uploadFileName == null) {
                    continue;
                }

                // 获得上传的文件名/images/girl/paojie.png
                String fileName = uploadFileName.substring(uploadFileName.lastIndexOf("/") + 1);
                // 获得文件的后缀名
                String fileExtName = uploadFileName.substring(uploadFileName.lastIndexOf(".") + 1);

                /*
                 * 如果文件后缀名fileExtName不是我们所需要的 就直按return.不处理,告诉用户文件类型不对。
                 */

                System.out.println("文件信息[件名: " + fileName + " ---文件类型" + fileExtName + "]");
                // 可以使用UID(唯一识别的通用码),保证文件名唯
                // 0UID. randomUUID(),随机生一个唯一识别的通用码;
                String uuidPath = UUID.randomUUID().toString();

                // ================处理文件完毕==============

                // 存到哪? uploadPath
                // 文件真实存在的路径realPath
                String realPath = uploadPath + "/" + uuidPath;
                // 给每个文件创建一个对应的文件夹
                File realPathFile = new File(realPath);
                if (!realPathFile.exists()) {
                    realPathFile.mkdir();
                }
                // ==============存放地址完毕==============


                // 获得文件上传的流
                InputStream inputStream = fileItem.getInputStream();//获得文件
                // 创建一个文件输出流
                // realPath =真实的文件夹;
                // 差了一个文件;加上翰出文件的名产"/"+uuidFileName
                FileOutputStream fos = new FileOutputStream(realPath + "/" + fileName);

                //写文件
                byte[] buffer = new byte[1024 * 1024];
                int len = 0;
                while ((len = inputStream.read(buffer)) > 0) {
                    fos.write(buffer, 0, len);
                }
                // 关闭流
                fos.close();
                inputStream.close();

                msg = "文件上传成功!";
                fileItem.delete(); // 上传成功,清除临时文件
                //=============文件传输完成=============
            }
        }
        return msg;

    }

    @Override
    protected void doPost(HttpServletRequest req, HttpServletResponse resp) throws ServletException, IOException {
        doGet(req, resp);
    }
}
三九、邮件发送
纯文本邮件
- 设置服务器
- 设置SSL加密
- Session.getDefaultInstance
- session.getTransport();
- 指定邮件内容MimeMessage.*
- 发邮件
- 关transport
package com.xiaowei.test;

import com.sun.mail.util.MailSSLSocketFactory;

import javax.mail.*;
import javax.mail.internet.InternetAddress;
import javax.mail.internet.MimeMessage;
import java.util.Properties;

public class MailDemo01 {
    public static void main(String[] args) throws Exception {
        Properties prop=new Properties();
        prop.setProperty("mail.host","smtp.qq.com");///设置QQ邮件服务器
        prop.setProperty("mail.transport.protocol","smtp");///邮件发送协议
        prop.setProperty("mail.smtp.auth","true");//需要验证用户密码
        //QQ邮箱需要设置SSL加密
        MailSSLSocketFactory sf=new MailSSLSocketFactory();
        sf.setTrustAllHosts(true);
        prop.put("mail.smtp.ssl.enable","true");
        prop.put("mail.smtp.ssl.socketFactory",sf);

        //使用javaMail发送邮件的5个步骤
        //1.创建定义整个应用程序所需要的环境信息的session对象
        Session session=Session.getDefaultInstance(prop, new Authenticator() {
            @Override
            protected PasswordAuthentication getPasswordAuthentication() {
                return new PasswordAuthentication("XXXX@qq.com","授权码");
            }
        });
        //开启session的debug模式,这样可以查看到程序发送Email的运行状态
        session.setDebug(true);
        //2.通过session得到transport对象
        Transport ts=session.getTransport();
        //3.使用邮箱的用户名和授权码连上邮件服务器
        ts.connect("smtp.qq.com","XXXX@qq.com","授权码");
        //4.创建邮件:写文件
        //注意需要传递session
        MimeMessage message=new MimeMessage(session);
        //指明邮件的发件人
        message.setFrom(new InternetAddress("XXXX@qq.com"));
        //指明邮件的收件人
        message.setRecipient(Message.RecipientType.TO,new InternetAddress("XXXX@qq.com"));
        //邮件标题
        message.setSubject("发送的标题");
        //邮件的文本内容
        message.setContent("内容","text/html;charset=UTF-8");
        //5.发送邮件
        ts.sendMessage(message,message.getAllRecipients());

        //6.关闭连接
        ts.close();

    }
}
图片邮件:本质还是文本,但是,img标签中的源需要处理
- 设置服务器
- 设置SSL加密
- Session.getDefaultInstance
- session.getTransport();
- 指定邮件内容MimeMessage.*
- 准备图片数据
- image=new MimeBodyPart();
- dh=new DataHandler(new FileDataSource("D:\Bert\1594126632(1).jpg"));
- image.setDataHandler(dh);
- image.setContentID("bz.jpg");
- 描写数据关系
- MimeMultipart mm=new MimeMultipart();
- mm.addBodyPart(text);
- mm.addBodyPart(image);
- mm.setSubType("related");
- 发邮件
- 关transport
package com.xiaowei.test;

import com.sun.mail.util.MailSSLSocketFactory;

import javax.activation.DataHandler;
import javax.activation.FileDataSource;
import javax.mail.*;
import javax.mail.internet.InternetAddress;
import javax.mail.internet.MimeBodyPart;
import javax.mail.internet.MimeMessage;
import javax.mail.internet.MimeMultipart;
import java.util.Properties;

public class MailDemo02 {
    public static void main(String[] args) throws Exception {
        Properties prop=new Properties();
        prop.setProperty("mail.host","smtp.qq.com");///设置QQ邮件服务器
        prop.setProperty("mail.transport.protocol","smtp");///邮件发送协议
        prop.setProperty("mail.smtp.auth","true");//需要验证用户密码
        //QQ邮箱需要设置SSL加密
        MailSSLSocketFactory sf=new MailSSLSocketFactory();
        sf.setTrustAllHosts(true);
        prop.put("mail.smtp.ssl.enable","true");
        prop.put("mail.smtp.ssl.socketFactory",sf);

        //使用javaMail发送邮件的5个步骤
        //1.创建定义整个应用程序所需要的环境信息的session对象
        Session session=Session.getDefaultInstance(prop, new Authenticator() {
            @Override
            protected PasswordAuthentication getPasswordAuthentication() {
                return new PasswordAuthentication("11927XXX@qq.com","授权码");
            }
        });
        //开启session的debug模式,这样可以查看到程序发送Email的运行状态
        session.setDebug(true);
        //2.通过session得到transport对象
        Transport ts=session.getTransport();
        //3.使用邮箱的用户名和授权码连上邮件服务器
        ts.connect("smtp.qq.com","11927XXX@qq.com","授权码");
        //4.创建邮件:写文件
        //注意需要传递session
        MimeMessage message=new MimeMessage(session);
        //指明邮件的发件人
        message.setFrom(new InternetAddress("11927XXX@qq.com"));
        //指明邮件的收件人
        message.setRecipient(Message.RecipientType.TO,new InternetAddress("11927XXX@qq.com"));
        //邮件标题
        message.setSubject("java发出");

        //邮件的文本内容
        //=================================准备图片数据=======================================
        MimeBodyPart image=new MimeBodyPart();
        //图片需要经过数据化的处理
        DataHandler dh=new DataHandler(new FileDataSource("D:\\Bert\\1594126632(1).jpg"));
        //在part中放入这个处理过图片的数据
        image.setDataHandler(dh);
        //给这个part设置一个ID名字
        image.setContentID("bz.jpg");

        //准备正文的数据
        MimeBodyPart text=new MimeBodyPart();
        text.setContent("这是一张正文<img src='cid:bz.jpg'>","text/html;charset=UTF-8");

        //描述数据关系
        MimeMultipart mm=new MimeMultipart();
        mm.addBodyPart(text);
        mm.addBodyPart(image);
        mm.setSubType("related");

        //设置到消息中,保存修改
        message.setContent(mm);
        message.saveChanges();
        //5.发送邮件
        ts.sendMessage(message,message.getAllRecipients());

        //6.关闭连接
        ts.close();

    }
}
附件邮件:
- 设置服务器
- 设置SSL加密
- Session.getDefaultInstance
- session.getTransport();
- 指定邮件内容MimeMessage.*
- 准备图片数据
- image=new MimeBodyPart();
- dh=new DataHandler(new FileDataSource("D:\Bert\1594126632(1).jpg"));
- image.setDataHandler(dh);
- image.setContentID("bz.jpg");
- 准备附件数据
- MimeBodyPart body1= new MimeBodyPart();
- body1.setDataHandler(new DataHandler(new FileDataSource("D:\Bert\cmd.txt")));
- body1.setFileName("1.txt");
- 描写数据关系
- MimeMultipart mm=new MimeMultipart();
- mm.addBodyPart(body1);
- mm.addBodyPart(text);
- mm.addBodyPart(image);
- mm.setSubType("mixed");
- 发邮件
- 关transport
package com.xiaowei.test;

import com.sun.mail.util.MailSSLSocketFactory;

import javax.activation.DataHandler;
import javax.activation.FileDataSource;
import javax.mail.*;
import javax.mail.internet.*;
import java.util.Properties;

public class MailDemo03 {
    public static void main(String[] args) throws Exception {
        Properties prop=new Properties();
        prop.setProperty("mail.host","smtp.qq.com");///设置QQ邮件服务器
        prop.setProperty("mail.transport.protocol","smtp");///邮件发送协议
        prop.setProperty("mail.smtp.auth","true");//需要验证用户密码
        //QQ邮箱需要设置SSL加密
        MailSSLSocketFactory sf=new MailSSLSocketFactory();
        sf.setTrustAllHosts(true);
        prop.put("mail.smtp.ssl.enable","true");
        prop.put("mail.smtp.ssl.socketFactory",sf);

        //使用javaMail发送邮件的5个步骤
        //1.创建定义整个应用程序所需要的环境信息的session对象
        Session session=Session.getDefaultInstance(prop, new Authenticator() {
            @Override
            protected PasswordAuthentication getPasswordAuthentication() {
                return new PasswordAuthentication("1192XXXX@qq.com","授权码");
            }
        });
        //开启session的debug模式,这样可以查看到程序发送Email的运行状态
        session.setDebug(true);
        //2.通过session得到transport对象
        Transport ts=session.getTransport();
        //3.使用邮箱的用户名和授权码连上邮件服务器
        ts.connect("smtp.qq.com","1192XXXX@qq.com","授权码");
        //4.创建邮件:写文件
        //注意需要传递session
        MimeMessage message=new MimeMessage(session);
        //指明邮件的发件人
        message.setFrom(new InternetAddress("1192XXXX@qq.com"));
        //指明邮件的收件人
        message.setRecipient(Message.RecipientType.TO,new InternetAddress("1192XXXX@qq.com"));
        //邮件标题
        message.setSubject("java发出");

        //邮件的文本内容
        //=================================准备图片数据
        MimeBodyPart image=new MimeBodyPart();
        //图片需要经过数据化的处理
        DataHandler dh=new DataHandler(new FileDataSource("D:\\Bert\\1594126632(1).jpg"));
        //在part中放入这个处理过图片的数据
        image.setDataHandler(dh);
        //给这个part设置一个ID名字
        image.setContentID("bz.jpg");

        //=================================准备正文数据
        MimeBodyPart text=new MimeBodyPart();
        text.setContent("这是一张正文<img src='cid:bz.jpg'>","text/html;charset=UTF-8");

        //=================================准备附件数据
        MimeBodyPart body1= new MimeBodyPart();
        body1.setDataHandler(new DataHandler(new FileDataSource("D:\\Bert\\cmd.txt")));
        body1.setFileName("1.txt");

        //描述数据关系
        MimeMultipart mm=new MimeMultipart();
        mm.addBodyPart(body1);
        mm.addBodyPart(text);
        mm.addBodyPart(image);
        mm.setSubType("mixed");

        //设置到消息中,保存修改
        message.setContent(mm);
        message.saveChanges();
        //5.发送邮件
        ts.sendMessage(message,message.getAllRecipients());

        //6.关闭连接
        ts.close();

    }
}

 浙公网安备 33010602011771号