文件上传之TUSD-基于HTTP的可断点续传的开放式协议
基于HTTP的可断点续传的开放式协议-TUS
1. 前言
人们每天分享越来越多的照片和视频。然而,移动网络仍然脆弱。平台 API 也常常很混乱,每个项目都构建自己的文件上传器。当我们需要的只是一个真正的项目时,有一千个为期一周的项目几乎不起作用。
我们是要正确做好这件事的人。我们的目标是一劳永逸地解决文件上传不可靠的问题。TUS 是一种基于 HTTP 构建的新的 可断点续传开放协议 。它为客户端和服务器提供简单、廉价且可重用的堆栈。它支持任何语言、任何平台和任何网络。
2. 特点
- 基于HTTP
TUS作为流行 HTTP 协议之上的一层构建,可以轻松集成到使用现有库、代理和防火墙的应用程序中,并且可以直接从任何网站使用。 - 面向生产的
TUS已准备好用于生产。 - 开源
- 简约设计
该规范只需要客户端和服务器实现非常小的一组功能。TUS为每个人提供简单、快速的开发和迭代速度。 - 可扩展的
尽管如此,TUS仍具有大量扩展,这些扩展引入了附加功能,例如并行上传或校验和和过期。所有这些都可以根据您的喜好来实施。
3. 支持多种客户端
- TUS-android-客户端
- TUS-java-客户端
- TUS-js-客户端
- 其他客户端
4. 功能详解
4.1. 安装部署
4.1.1 基于源码编译
> git clone https://github.com/tus/tusd.git
> cd tusd

> go build -o tusd cmd/tusd/main.go
4.1.2 基于Kubernetes安装
helm repo add skm https://charts.sagikazarmark.dev
helm install --generate-name --wait skm/tusd
最低要求:
- Helm 3+
- Kubernetes 1.16+
4.2 运行TUSD
运行TUSD非常简单,只需要简单执行以下命令即可:
$ tusd -upload-dir=./data
[tusd] 2019/09/29 21:10:50 Using './data' as directory storage.
[tusd] 2019/09/29 21:10:50 Using 0.00MB as maximum size.
[tusd] 2019/09/29 21:10:50 Using 0.0.0.0:8080 as address to listen.
[tusd] 2019/09/29 21:10:50 Using /files/ as the base path.
[tusd] 2019/09/29 21:10:50 Using /metrics as the metrics path.
[tusd] 2019/09/29 21:10:50 Supported tus extensions: creation,creation-with-upload,termination,concatenation,creation-defer-length
[tusd] 2019/09/29 21:10:50 You can now upload files to: http://0.0.0.0:8080/files/
另外TUSD还支持多种文件存储格式,上面是将文件存储在本地磁盘,它还可以将文件存储在基于S3协议的AWS,MINIO等存储系统中,如下为存储在AWS中的示例:
$ export AWS_ACCESS_KEY_ID=xxxxx
$ export AWS_SECRET_ACCESS_KEY=xxxxx
$ export AWS_REGION=eu-west-1
$ tusd -s3-bucket=my-test-bucket.com
[tusd] 2019/09/29 21:11:23 Using 's3://my-test-bucket.com' as S3 bucket for storage.
[tusd] 2019/09/29 21:11:23 Using 0.00MB as maximum size.
[tusd] 2019/09/29 21:11:23 Using 0.0.0.0:8080 as address to listen.
[tusd] 2019/09/29 21:11:23 Using /files/ as the base path.
[tusd] 2019/09/29 21:11:23 Using /metrics as the metrics path.
[tusd] 2019/09/29 21:11:23 Supported tus extensions: creation,creation-with-upload,termination,concatenation,creation-defer-length
[tusd] 2019/09/29 21:11:23 You can now upload files to: http://0.0.0.0:8080/files/
TUSD还支持非常丰富的配置参数,下面列举一些常用的参数(不限于下列参数):
- -expose-metrics
TUS对外暴露的数据监控接口 - -port
指定配置端口 - -timeout
指定超时时间 - -upload-dir
指定文件的上传目录
这里就不一一列举了。
5. 客户端详解
5.1 JAVA客户端
如下为JAVA客户端连接TUS的示例代码:
// Create a new TusClient instance
TusClient client = new TusClient();

// Configure tus HTTP endpoint. This URL will be used for creating new uploads
// using the Creation extension
client.setUploadCreationURL(new URL("https://tusd.tusdemo.net/files"));

// Enable resumable uploads by storing the upload URL in memory
client.enableResuming(new TusURLMemoryStore());

// Open a file using which we will then create a TusUpload. If you do not have
// a File object, you can manually construct a TusUpload using an InputStream.
// See the documentation for more information.
File file = new File("./cute_kitten.png");
final TusUpload upload = new TusUpload(file);

System.out.println("Starting upload...");

// We wrap our uploading code in the TusExecutor class which will automatically catch
// exceptions and issue retries with small delays between them and take fully
// advantage of tus' resumability to offer more reliability.
// This step is optional but highly recommended.
TusExecutor executor = new TusExecutor() {
    @Override
    protected void makeAttempt() throws ProtocolException, IOException {
        // First try to resume an upload. If that's not possible we will create a new
        // upload and get a TusUploader in return. This class is responsible for opening
        // a connection to the remote server and doing the uploading.
        TusUploader uploader = client.resumeOrCreateUpload(upload);

        // Alternatively, if your tus server does not support the Creation extension
        // and you obtained an upload URL from another service, you can instruct
        // tus-java-client to upload to a specific URL. Please note that this is usually
        // _not_ necessary and only if the tus server does not support the Creation
        // extension. The Vimeo API would be an example where this method is needed.
        // TusUploader uploader = client.beginOrResumeUploadFromURL(upload, new URL("https://tus.server.net/files/my_file"));

        // Upload the file in chunks of 1KB sizes.
        uploader.setChunkSize(1024);

        // Upload the file as long as data is available. Once the
        // file has been fully uploaded the method will return -1
        do {
            // Calculate the progress using the total size of the uploading file and
            // the current offset.
            long totalBytes = upload.getSize();
            long bytesUploaded = uploader.getOffset();
            double progress = (double) bytesUploaded / totalBytes * 100;

            System.out.printf("Upload at %06.2f%%.\n", progress);
        } while(uploader.uploadChunk() > -1);

        // Allow the HTTP connection to be closed and cleaned up
        uploader.finish();

        System.out.println("Upload finished.");
        System.out.format("Upload available at: %s", uploader.getUploadURL().toString());
    }
};
executor.makeAttempts();
JAR引用
Gradle:
implementation 'io.tus.java.client:tus-java-client:0.5.0'
Maven:
<dependency>
  <groupId>io.tus.java.client</groupId>
  <artifactId>tus-java-client</artifactId>
  <version>0.5.0</version>
</dependency>
5.2 JS客户端
const options = {
    endpoint,
    chunkSize,
    retryDelays: [0, 1000, 3000, 5000],
    parallelUploads,
    metadata: {
      filename: file.name,
      filetype: file.type,
    },
    onError(error) {
      if (error.originalRequest) {
        if (window.confirm(`Failed because: ${error}\nDo you want to retry?`)) {
          upload.start()
          uploadIsRunning = true
          return
        }
      } else {
        window.alert(`Failed because: ${error}`)
      }

      reset()
    },
    onProgress(bytesUploaded, bytesTotal) {
      const percentage = ((bytesUploaded / bytesTotal) * 100).toFixed(2)
      progressBar.style.width = `${percentage}%`
      console.log(bytesUploaded, bytesTotal, `${percentage}%`)
    },
    onSuccess() {
      const anchor = document.createElement('a')
      anchor.textContent = `Download ${upload.file.name} (${upload.file.size} bytes)`
      anchor.href = upload.url
      anchor.className = 'btn btn-success'
      uploadList.appendChild(anchor)

      reset()
    },
  }
这里详细介绍几个常用的参数,这几个参数在生产环境中经常会用到,也很容易被忽视。
- chunkSize
块大小,默认值为:Infinity。
表示TUS-js-client将尝试在一次请求中上传整个文件。如果输入文件是读取器或者可读流时,需要设置此值。
1)设置过小,对于相同的文件,则意味着需要更多的HTTP请求来传输此文件,所有这些HTTP请求都会增加上传过程的开销。
2)设置过大,当使用读取器或可读流作为输入文件时,TUS-js-client将创建一个大小为chunkSize的内存缓冲区,该缓冲区用于在上传中断时恢复上传。在这种情况下,较大的块意味着更大的内存使用量。选择一个号的值取决于应用程序,并且是可用内存和上传性能之间的权衡。
这里可以推荐为可用内存的60%。 - parallelUploads
并行上传的文件个数,默认值为1。
顾名思义,如果该值为1,则在上传过程中,文件不会被分开上传;如果该值大于1,则文件会被分开为parallelUploads个数的文件上传。那么问题来了,一个文件被分开为多个文件上传,那么在服务端是如何合并的呢?服务端concatenation extension可以将分开的文件合并为1个文件。如下图所示:
![]()
如上图所示,该次请求中做了如下参数配置:
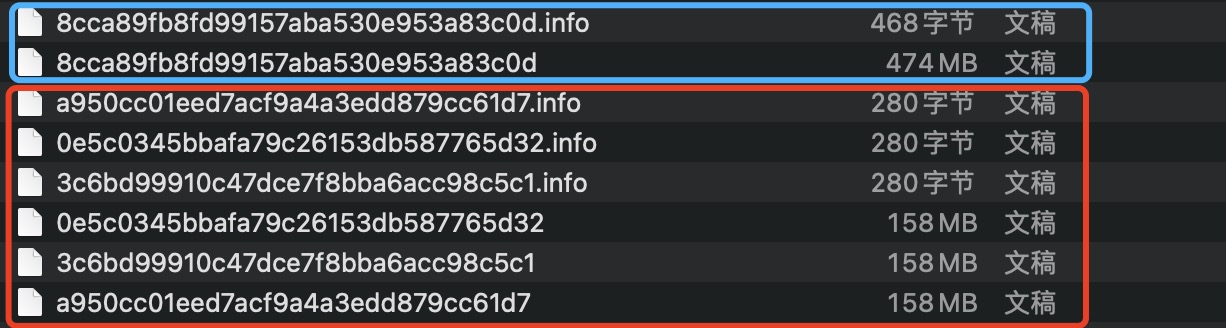
parallelUploads: 3
一个文件被拆分为3个文件(如红色框内的文件),在全部上传完成后,合并成了一个文件(如蓝色框内的文件)。可以看到完整文件的ID为8cca89fb8fd99157aba530e953a83c0d,但是在上传过程中获取的3个被拆分文件的ID,0e5c0345bbafa79c26153db587765d32,3c6bd99910c47dce7f8bba6acc98c5c1,a950cc01eed7acf9a4a3edd879cc61d7,仔细观察可以发现,在3个文件传完之后,还有一个请求,如下图所示:
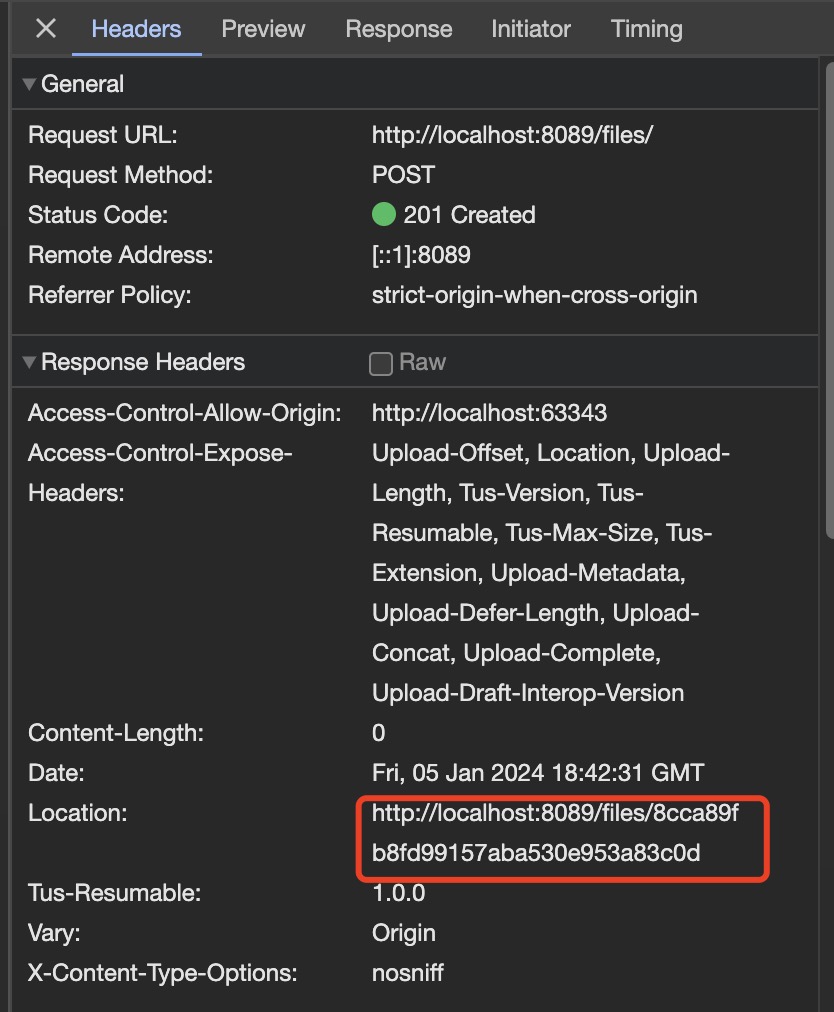
在response的Location中有其完整文件的ID值。
- parallelUploadBoundaries
与parallelUploads搭配使用,正常情况下,一个文件被分成若干个文件上传,每个文件是均等的,这个值可以配置每个部分的大小,其长度和parallelUploads的值相等,表示方式为:
parallelUploadBoundaries: [{ start: 0, end: 1 }, { start: 1, end: 11 }]
6. 常见问题
6.1 进度回退
进度回退现象:文件上传进度突然100%,然后回退到5%或者其他一个数值。
原因分析:
经过大量测试,发现在上传较大文件时,如果网络断开或者网络抖动时,则之前上传的一部分文件会刷新到磁盘,未刷新到磁盘的文件则丢失,那么为什么会回退到任意一个进度呢?这其实不是任意的,文件刷新到磁盘之后,会在response中返回offset,所以回退的进度是与数据丢失多少相关的。
解决办法:
可以通过配置chunkSize来影响此问题带来的影响,因为文件每次以chunkSize大小刷新到磁盘,那么即使在传输过程中,出现网络波动,那数据丢失也不会太多,可以减小此问题带来的影响。
6.2 文件传输太慢
原因分析:
排除掉带宽的影响,单文件上传,导致文件上传过慢。
解决办法:
可以通过配置parallelUploads来解决这个问题,通过增加上传文件的并发量,可以提高文件上传的速度。

 浙公网安备 33010602011771号