

RESTful风格开发案例
1.RESTful的实现
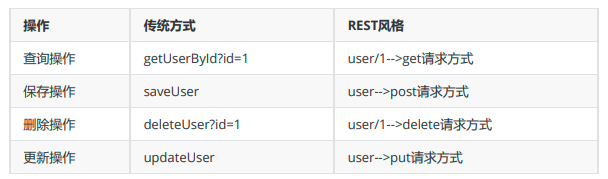
具体说,就是 HTTP 协议里面,四个表示操作方式的动词:GET、POST、PUT、DELETE。
它们分别对应四种基本操作:GET 用来获取资源,POST 用来新建资源,PUT 用来更新资源,DELETE用来删除资源。
REST风格提倡URL地址使用统一的风格设计从前到后各个单词使用斜杠分开,不使用问号键值对方式携带请求参数而是将要发送给服务器的数据作为URL地址的一部分,以保证整体风格的一致性。
2.HiddenHttpMethodFilter
由于浏览器只支持发送get和post方式的请求,那么该如何发送put和delete请求呢?
SpringMVC 提供了 HiddenHttpMethodFilter 帮助我们将 POST 请求转换为 DELETE 或 PUT 请求
HiddenHttpMethodFilter 处理put和delete请求的条件:
a>当前请求的请求方式必须为post
b>当前请求必须传输请求参数_method
满足以上条件,HiddenHttpMethodFilter 过滤器就会将当前请求的请求方式转换为请求参数_method的值,因此请求参数_method的值才是最终的请求方式
例如,前端发起如下的请求,并且我们配置了HiddenHttpMethodFilter,一个post请求就会被转换为put请求:

在web.xml中注册HiddenHttpMethodFilter
<!--web的提交请求方式只有get和post两种,我们需要用这个过滤器把请求分为四种,才符合RESTful风格-->
    <filter>
        <filter-name>HiddenHttpMethodFilter</filter-name>
        <filter-class>org.springframework.web.filter.HiddenHttpMethodFilter</filter-class>
    </filter>
    <filter-mapping>
        <filter-name>HiddenHttpMethodFilter</filter-name>
        <url-pattern>/*</url-pattern>
    </filter-mapping>
需要注意的点:
一般我们都会在SpringMVC中配置CharacterEncodingFilter来设置全局的编码格式:
 <!--配置Spring提供的字符编码过滤器,这个过滤器必须在别的过滤器之前-->
    <filter>
        <filter-name>CharacterEncodingFilter</filter-name>
        <filter-class>org.springframework.web.filter.CharacterEncodingFilter</filter-class>
    <init-param>
        <param-name>encoding</param-name>
        <param-value>UTF-8</param-value>
    </init-param>
    <init-param>
        <param-name>forceEncoding</param-name>
        <param-value>true</param-value>
    </init-param>
    </filter>
    <filter-mapping>
        <filter-name>CharacterEncodingFilter</filter-name>
        <url-pattern>/*</url-pattern>
    </filter-mapping>
但是设置编码的前提条件是,在这之前,没有后端进行任何参数的请求,否则设置编码会失效,所以我们的CharacterEncodingFilter必须配置在web.xml所有filter最前面
3.RESTful风格开发案例
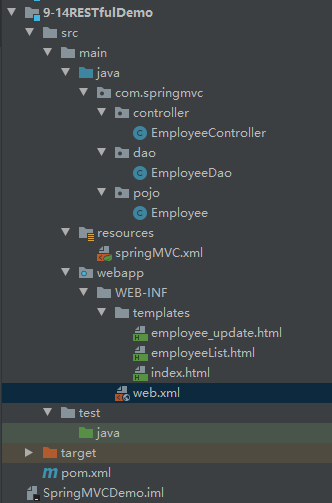
先附上项目格式
①导入依赖,也就是SpringMVC需要的依赖
    <packaging>war</packaging>

    <dependencies>
        <!-- SpringMVC -->
        <dependency>
            <groupId>org.springframework</groupId>
            <artifactId>spring-webmvc</artifactId>
            <version>5.3.1</version>
        </dependency>
        <!-- 日志 -->
        <dependency>
            <groupId>ch.qos.logback</groupId>
            <artifactId>logback-classic</artifactId>
            <version>1.2.3</version>
        </dependency>
        <!-- ServletAPI -->
        <dependency>
            <groupId>javax.servlet</groupId>
            <artifactId>javax.servlet-api</artifactId>
            <version>3.1.0</version>
            <scope>provided</scope>
        </dependency>
        <!-- Spring5和Thymeleaf整合包 -->
        <dependency>
            <groupId>org.thymeleaf</groupId>
            <artifactId>thymeleaf-spring5</artifactId>
            <version>3.0.12.RELEASE</version>
        </dependency>
    </dependencies>
②加入web.xml文件
<?xml version="1.0" encoding="UTF-8"?>
<web-app xmlns="http://xmlns.jcp.org/xml/ns/javaee"
         xmlns:xsi="http://www.w3.org/2001/XMLSchema-instance"
         xsi:schemaLocation="http://xmlns.jcp.org/xml/ns/javaee http://xmlns.jcp.org/xml/ns/javaee/web-app_4_0.xsd"
         version="4.0">


    <!--配置Spring提供的字符编码过滤器,这个过滤器必须在别的过滤器之前-->
    <filter>
        <filter-name>CharacterEncodingFilter</filter-name>
        <filter-class>org.springframework.web.filter.CharacterEncodingFilter</filter-class>
    <init-param>
        <param-name>encoding</param-name>
        <param-value>UTF-8</param-value>
    </init-param>
    <init-param>
        <param-name>forceEncoding</param-name>
        <param-value>true</param-value>
    </init-param>
    </filter>
    <filter-mapping>
        <filter-name>CharacterEncodingFilter</filter-name>
        <url-pattern>/*</url-pattern>
    </filter-mapping>

    <!--web的提交请求方式只有get和post两种,我们需要用这个过滤器把请求分为四种,才符合RESTful风格-->
    <filter>
        <filter-name>HiddenHttpMethodFilter</filter-name>
        <filter-class>org.springframework.web.filter.HiddenHttpMethodFilter</filter-class>
    </filter>
    <filter-mapping>
        <filter-name>HiddenHttpMethodFilter</filter-name>
        <url-pattern>/*</url-pattern>
    </filter-mapping>


    <!--配置前端控制器,DispatcherServlet-->
    <servlet>
        <servlet-name>SpringMVC</servlet-name>
        <servlet-class>org.springframework.web.servlet.DispatcherServlet</servlet-class>
        <!-- 通过初始化参数指定SpringMVC配置文件的位置和名称 -->
        <init-param>
            <!-- contextConfigLocation为固定值 -->
            <param-name>contextConfigLocation</param-name>
            <!-- 使用classpath:表示从类路径查找配置文件,例如maven工程中的
            src/main/resources -->
            <param-value>classpath:springMVC.xml</param-value>
        </init-param>
        <!--
        作为框架的核心组件,在启动过程中有大量的初始化操作要做
        而这些操作放在第一次请求时才执行会严重影响访问速度
        因此需要通过此标签将启动控制DispatcherServlet的初始化时间提前到服务器启动时
        -->
        <load-on-startup>1</load-on-startup>
    </servlet>
    <servlet-mapping>
        <servlet-name>SpringMVC</servlet-name>
        <url-pattern>/</url-pattern>
    </servlet-mapping>

</web-app>
③配置Tomcat(上一篇文章都有,不再赘诉)
④配置SpringMVC的文件
踩坑点:mvc的注解驱动标签有几个,要选择最后面是mvc的那个

<?xml version="1.0" encoding="UTF-8"?>
<beans xmlns="http://www.springframework.org/schema/beans"
       xmlns:xsi="http://www.w3.org/2001/XMLSchema-instance"
       xmlns:context="http://www.springframework.org/schema/context"
       xmlns:mvc="http://www.springframework.org/schema/mvc"
       xsi:schemaLocation="http://www.springframework.org/schema/beans http://www.springframework.org/schema/beans/spring-beans.xsd http://www.springframework.org/schema/context https://www.springframework.org/schema/context/spring-context.xsd http://www.springframework.org/schema/mvc https://www.springframework.org/schema/mvc/spring-mvc.xsd">

    <!-- 自动扫描包 -->
    <context:component-scan base-package="com.springmvc"/>
    <!-- 配置Thymeleaf视图解析器 -->
    <bean id="viewResolver"
          class="org.thymeleaf.spring5.view.ThymeleafViewResolver">
        <property name="order" value="1"/>
        <property name="characterEncoding" value="UTF-8"/>
        <property name="templateEngine">
            <bean class="org.thymeleaf.spring5.SpringTemplateEngine">
                <property name="templateResolver">
                    <bean
                            class="org.thymeleaf.spring5.templateresolver.SpringResourceTemplateResolver">
                        <!-- 视图前缀 -->
                        <property name="prefix" value="/WEB-INF/templates/"/>
                        <!-- 视图后缀 -->
                        <property name="suffix" value=".html"/>
                        <property name="templateMode" value="HTML5"/>
                        <property name="characterEncoding" value="UTF-8" />
                    </bean>
                </property>
            </bean>
        </property>
    </bean>

    <!--
    当SpringMVC中设置任何一个view-controller时,其他控制器中的请求映射将全部失效,
    此时需要在SpringMVC的核心配置文件中设置开启mvc注解驱动的标签
    -->
    <mvc:annotation-driven/>
    <!--
    配置首页的view-controller,可以直接访问主页,而不用去写跳转方法了
    path:设置处理的请求地址
    view-name:设置请求地址所对应的视图名称
    -->
    <mvc:view-controller path="/" view-name="index"/>


</beans>
⑤在webapp\WEB-INF下创建templates文件夹放html文件
写个index.html主页,测试一下,现在应该通了,因为我们上一步配置了view-controller,所以不用写控制器响应index
⑥准备工作
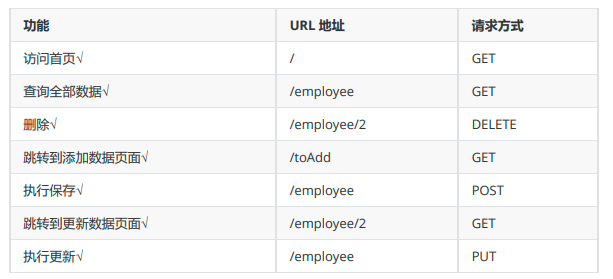
要实现对员工信息的增删改查功能
实体类
package com.springmvc.pojo;

public class Employee {
    private Integer id;
    private String lastName;
    private String email;
    //1 male, 0 female
    private Integer gender;

    public Employee() {
    }

    public Employee(Integer id, String lastName, String email, Integer gender) {
        this.id = id;
        this.lastName = lastName;
        this.email = email;
        this.gender = gender;
    }

    public Integer getId() {
        return id;
    }

    public void setId(Integer id) {
        this.id = id;
    }

    public String getLastName() {
        return lastName;
    }

    public void setLastName(String lastName) {
        this.lastName = lastName;
    }

    public String getEmail() {
        return email;
    }

    public void setEmail(String email) {
        this.email = email;
    }

    public Integer getGender() {
        return gender;
    }

    public void setGender(Integer gender) {
        this.gender = gender;
    }

    @Override
    public String toString() {
        return "Employee{" +
                "id=" + id +
                ", lastName='" + lastName + '\'' +
                ", email='" + email + '\'' +
                ", gender=" + gender +
                '}';
    }
}
准备dao层模拟数据,已经准备好初始数据和增删改查方法
package com.springmvc.dao;

import com.springmvc.pojo.Employee;
import org.springframework.stereotype.Repository;

import java.util.Collection;
import java.util.HashMap;
import java.util.Map;

@Repository
public class EmployeeDao {
    private static Map<Integer, Employee> employees = null;
    static{
        employees = new HashMap<Integer, Employee>();
        employees.put(1001, new Employee(1001, "E-AA", "aa@163.com", 1));
        employees.put(1002, new Employee(1002, "E-BB", "bb@163.com", 1));
        employees.put(1003, new Employee(1003, "E-CC", "cc@163.com", 0));
        employees.put(1004, new Employee(1004, "E-DD", "dd@163.com", 0));
        employees.put(1005, new Employee(1005, "E-EE", "ee@163.com", 1));
    }
    private static Integer initId = 1006;
    public void save(Employee employee){
        if(employee.getId() == null){
            employee.setId(initId++);
        }
        employees.put(employee.getId(), employee);
    }
    public Collection<Employee> getAll(){
        return employees.values();
    }
    public Employee get(Integer id){
        return employees.get(id);
    }
    public void delete(Integer id){
        employees.remove(id);
    }

}
⑦功能开发
实现首页访问和页面跳转功能功能
还是那句话,我们在springMVC中配置了view-controller,所以不用写主页的controller映射,注意开启mvc注解驱动mvc:annotation-driven/
index.html
<!DOCTYPE html>
<html lang="en" xmlns:th="http://www.thymeleaf.org">
<head>
<meta charset="UTF-8">
<title>首页</title>
</head>
<body style="text-align: center">
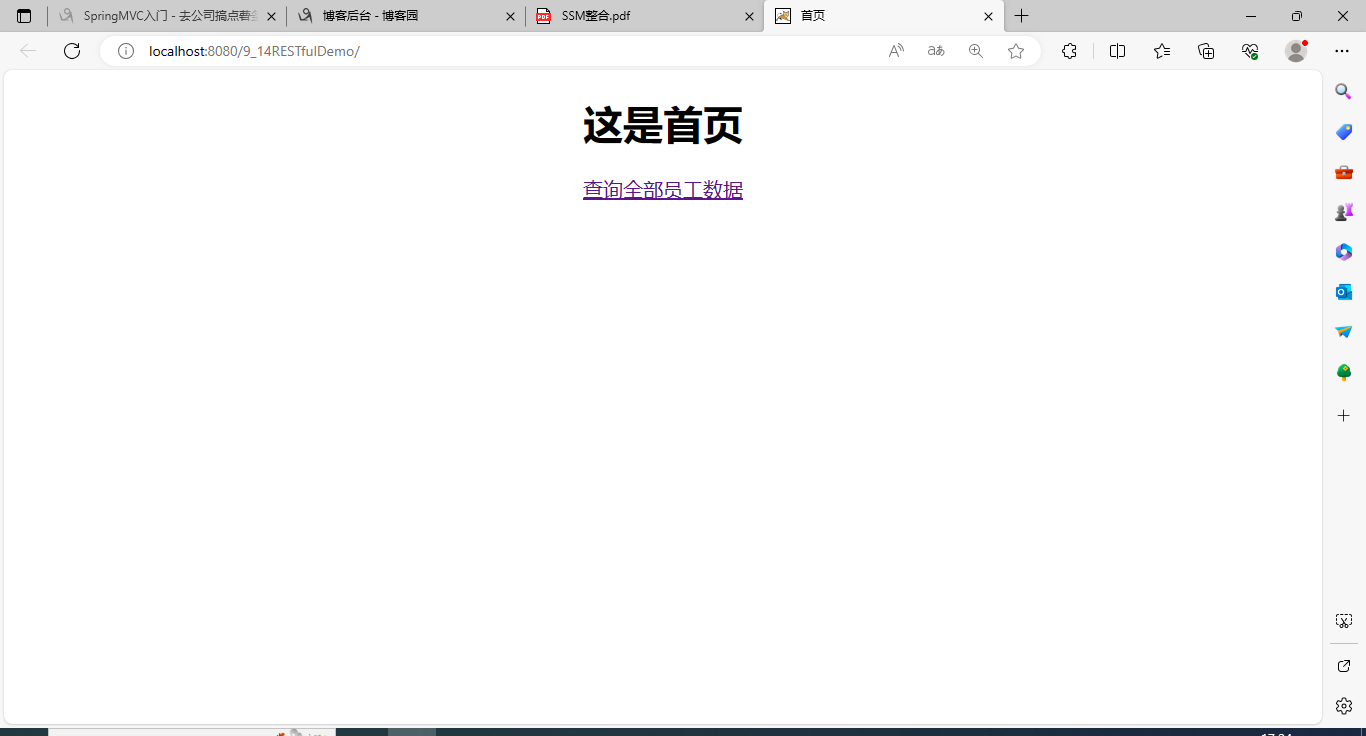
<h1>这是首页</h1>
<a th:href="@{/employee}">查询全部员工数据</a>
</body>
</html>
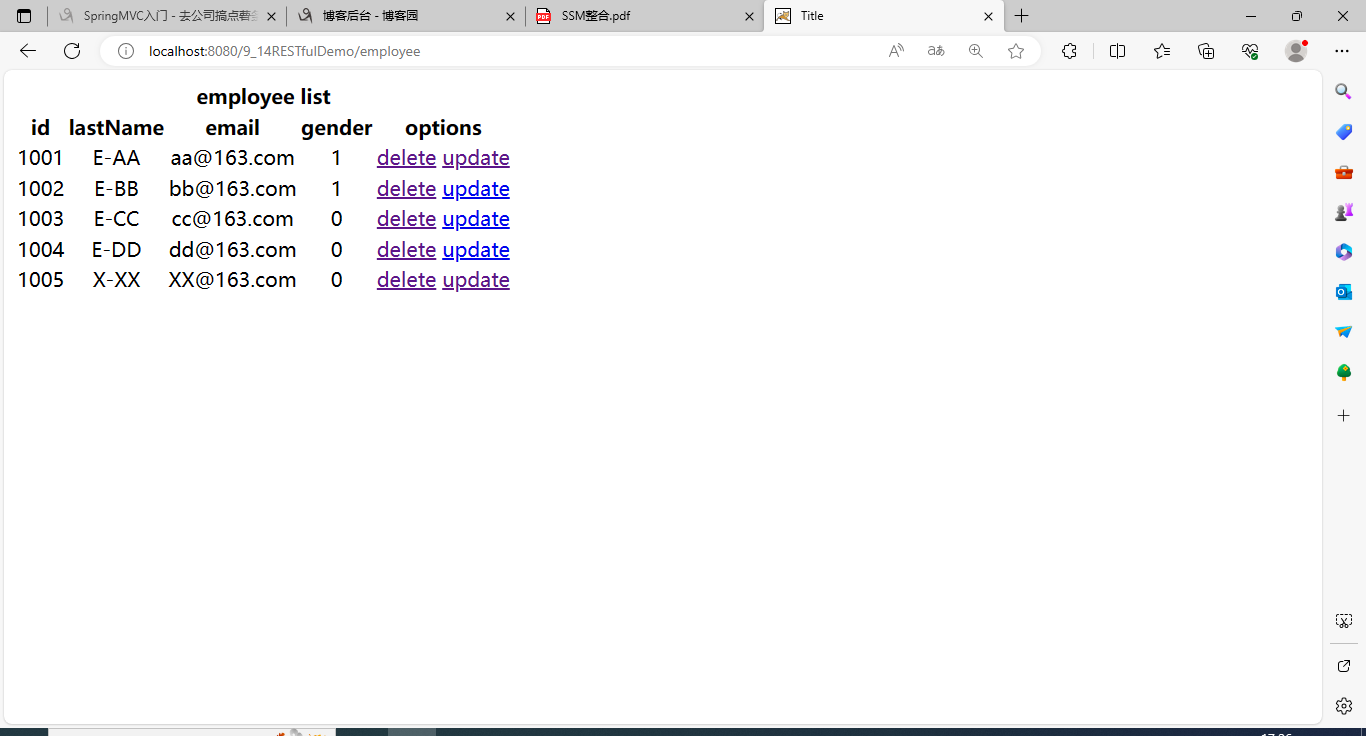
实现查询全部信息功能
employeeList.html
<!DOCTYPE html>
<html lang="en" xmlns:th="http://www.thymeleaf.org">
<head>
    <meta charset="UTF-8">
    <title>Title</title>
</head>
<body style="text-align: center">
<table>
    <tr>
        <th colspan="5">employee list</th>
    </tr>
    <tr>
        <th>id</th>
        <th>lastName</th>
        <th>email</th>
        <th>gender</th>
        <th>options</th>
    </tr>
    <tr th:each="employee : ${allEmployee}">
        <td th:text="${employee.id}"></td>
        <td th:text="${employee.lastName}"></td>
        <td th:text="${employee.email}"></td>
        <td th:text="${employee.gender}"></td>
        <td>
            <a href="">delete</a>
            <a th:href="@{'/employee/'+ ${employee.id} }">update</a>
        </td>
    </tr>
</table>
</body>
</html>
响应
EmployeeController,记得加@Controller标签
    @Autowired
    private EmployeeDao dao;

    @RequestMapping(value = "/employee",method = RequestMethod.GET)
    public String selectAllEmployee(Model model){
        Collection<Employee> allEmployee = dao.getAll();
        model.addAttribute("allEmployee",allEmployee);
        return "employeeList";
    }

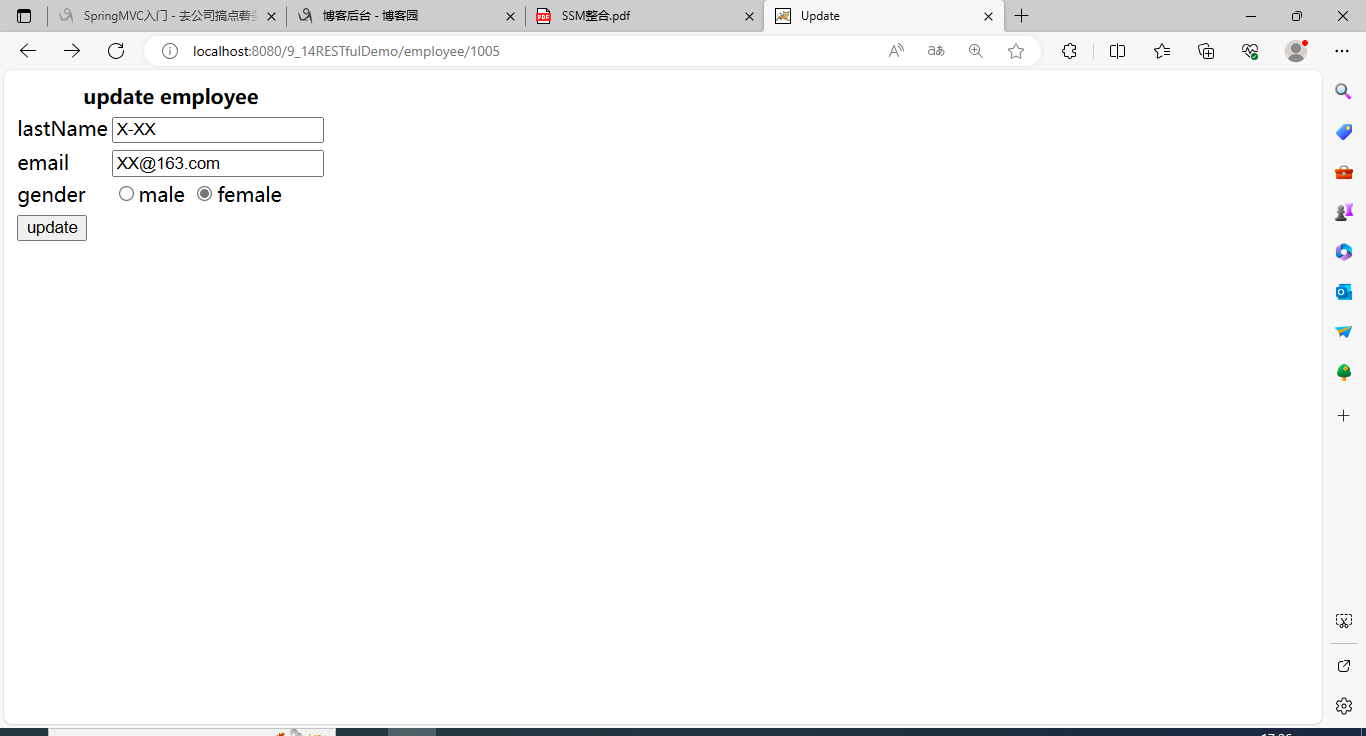
实现用户修改功能
思路:在全部员工信息页employeeList.html点击某个信息update按钮→→→跳转到更新信息页employee_update.html→→→要对具体的员工信息进行回显→→→用户修改信息后提交→→→此时调用dao层更新信息
踩坑点1:thymeleaf的超链接标签格式update,必须用字符串拼接跳转地址 ,如果直接写/employee/${employee.id}会被认定为一个字符串,而不是动态数据
踩坑点2:对于input输入框中的回显数据不能直接用value="${employee.id}",而是要用thymeleaf的格式th:value="${employee.id}"
employee_update.html
<!DOCTYPE html>
<html lang="en" xmlns:th="http://www.thymeleaf.org">
<head>
    <meta charset="UTF-8">
    <title>Update</title>
</head>
<body>
<form th:action="@{/employee}" method="post">
    <input type="hidden" name="_method" value="put">
    <input type="hidden" name="id" th:value="${employee.id}">
    <table>
        <tr>
            <th colspan="2">update employee</th>
        </tr>
        <tr>
            <td>lastName</td>
            <td>
                <input type="text" name="lastName" th:value="${employee.lastName}">
            </td>
        </tr>
        <tr>
            <td>email</td>
            <td>
                <input type="text" name="email" th:value="${employee.email}">
            </td>
        </tr>
        <tr>
            <td>gender</td>
            <td>
                <input type="radio" name="gender" value="1" th:field="${employee.gender}">male
                <input type="radio" name="gender" value="0" th:field="${employee.gender}">female
            </td>
        </tr>
        <tr>
            <td colspan="2">
                <input type="submit" value="update">
            </td>
        </tr>

    </table>
</form>
</body>
</html>
EmployeeController,一个用来跳转到信息回显页,一个方法用来处理员工信息更新请求
    @RequestMapping(value = "/employee/{id}",method = RequestMethod.GET)
    public String deleteById(@PathVariable("id")Integer id,Model model){
        Employee employee = dao.get(id);
        model.addAttribute("employee",employee);
        return "employee_update";
    }

    @RequestMapping(value = "/employee",method = RequestMethod.PUT)
    public String updateEmployee(Employee employee){
        dao.save(employee);
        return "redirect:/employee";
    }


 浙公网安备 33010602011771号