spring复习
spring复习
1.依赖
    <dependencies>
        <!-- https://mvnrepository.com/artifact/org.springframework/spring-webmvc -->
        <dependency>
            <groupId>org.springframework</groupId>
            <artifactId>spring-webmvc</artifactId>
            <version>5.2.7.RELEASE</version>
        </dependency>
    </dependencies>
2.入门
Spring是一个轻量级的控制反转(IOC)和面向切面(AOP)的容器(框架)。
关于IOC的理解可以看下面的博客
ioc理解
ioc原理
demo
Dog.java
public class Dog {
    private String name;

    public void shot(){
        System.out.println(this.name + ":汪汪汪");
    }
}
beeans.xml
<?xml version="1.0" encoding="UTF-8"?>
<beans xmlns="http://www.springframework.org/schema/beans"
       xmlns:xsi="http://www.w3.org/2001/XMLSchema-instance"
       xsi:schemaLocation="http://www.springframework.org/schema/beans
        https://www.springframework.org/schema/beans/spring-beans.xsd">


    <bean id="dog" class="com.wang.entity.Dog" >
        <property name="name" value="西西"/>
    </bean>


</beans>
id = 对象名,class = 全类名,通过反射创建对象,一定要有无参构造,注入属性时要有set方法并且<property name="xxx" value="yyy"/> 对应setXxx("yyy");方法.
注意:对象在xml文件中注册后就创建了,放在容器中。默认是调用无参构造,如果有参,可以用
  <bean id="dog2" class="com.wang.entity.Dog">
        <constructor-arg name="name" value="小西"/>
    </bean>
Test.java
  @Test
    public void dogTest(){
        ApplicationContext context = new ClassPathXmlApplicationContext("dogbeans.xml");
        Dog dog = context.getBean("dog", Dog.class);
        dog.shot();
    }
3.spring配置
-
别名
alias 设置别名 , 为bean设置别名 , 可以设置多个别名<alias name="dog" alias="dog3"/> -
bean的配置
id,class
name可以设置多个别名,可以用逗号,分号,空格隔开
<bean id="dog" class="com.wang.entity.Dog" name="dog1,dog2;dog3"> -
import
团队的合作通过import来实现
<import resource="studentBeans"/> -
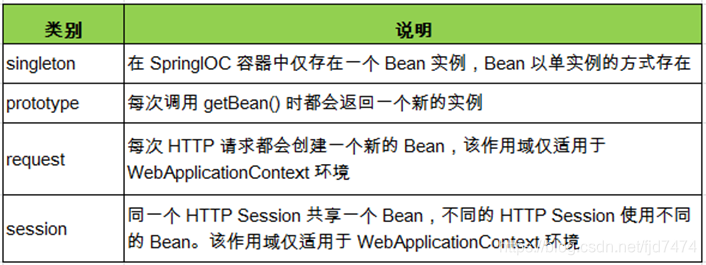
crope
作用域
< bean id="dog" class="com.wang.entity.Dog" scope="singleton" >
4.属性注入
4.1手动注入
4.1.1基于xml的装配
- set注入
要被set注入必须有set方法
 <bean id="address" class="com.wang.entity.Address">
        <property name="address" value="湖北黄冈"/>
  </bean>
- bean注入
注意点:这里的值是一个引用,ref
<bean id="addr" class="com.wang.entity.Address">
 	 <property name="address" value="黄冈 "/>
</bean>

<bean id="student" class="com.wang.entity.Student">
		<property name="name" value="小明 "/>
		<property name="address" ref="addr"/>  <!--此处引用类型addr-->
</bean>
- 数组注入
  		<property name="books">
            <array value-type="java.lang.String">
                <value>红楼梦</value>
                <value>西游记</value>
                <value>水浒传</value>
                <value>三国</value>
            </array>
        </property>
- list注入
	 <property name="hobbies">
            <list value-type="java.lang.String">
                <value>听歌</value>
                <value>敲代码</value>
            </list>
  	 </property>
- map注入
	 <property name="card">
            <map>
                <entry key="身份证" value="1235156"/>
                <entry key="银行卡" value="5154565"/>
            </map>
     </property>
- null注入
	 <property name="wife">
       	   <null/>
     </property>
- properties注入
 <property name="info">
            <props>
                <prop key="学号">18170000</prop>
                <prop key="性别">男</prop>
                <prop key="姓名">小明</prop>
            </props>
   </property>
-
拓展的p命名空间
导入约束:xmlns:p="http://www.springframework.org/schema/p"<beanid="user"class="com.wang.entity.User"p:name="小王"p:age="20"/>
4.1.2 基于注解的装配
( 1)配置
<?xml version="1.0" encoding="UTF-8"?>
<beans xmlns="http://www.springframework.org/schema/beans"
       xmlns:xsi="http://www.w3.org/2001/XMLSchema-instance"
       xmlns:context="http://www.springframework.org/schema/context"
       xsi:schemaLocation="http://www.springframework.org/schema/beans
        https://www.springframework.org/schema/beans/spring-beans.xsd
        http://www.springframework.org/schema/context
        https://www.springframework.org/schema/context/spring-context.xsd">

    <!-- 指定要扫描的包,这个包下的注解才会生效 -->
    <context:component-scan base-package="com.wang.entity"/>
    <!--    开启注解的支持-->
    <context:annotation-config/>

</beans>
(2)类型
1.@Component 取代 < bean class="">
@Component("id") 取代 <bean id="" class="">
2.web开发,提供3个 @Component 衍生注解(功能一样)取代 <bean class="">
@Repository:dao 层
@Service:service 层
@Controller:web 层
3.依赖注入,给私有字段设置,也可以给 setter 方法设置
普通值:@Value("") //可以在类中的成员变量上面也可以在set方法上面
引用值(了解即可)
方式1:按照【类型】注入
@Autowired
方式2:按照【名称】注入1
@Autowired
@Qualifier("名称")
@Autowired是根据类型自动装配的,加上@Qualifier则可以根据byName的方式自动装配
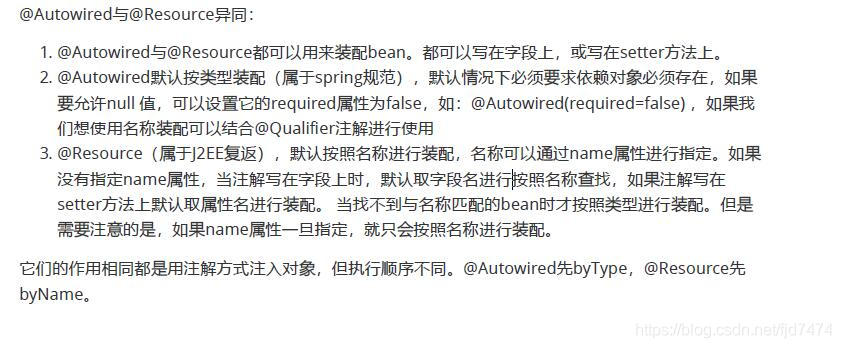
方式3:按照【名称】注入2
@Resource("名称")
@Resource如有指定的name属性,先按该属性进行byName方式查找装配;其次再进行默认的byName方式进行装配;
如果以上都不成功,则按byType的方式自动装配。都不成功,则报异常。
4 作用域
@Scope("")
xml与注解整合开发:推荐最佳实践
- xml管理Bean 注解完成属性注入
- 使用过程中,可以不用扫描,扫描是为了类上的注解
4.2自动注入
@Autowired:自动装配,通过类型。名字
如果Autowired不能唯一自动装配上属性,则需要加上@Qualifier(value=“xxx”)
@Resource:自动装配,通过名字。类型
5.AOP
5.1 AOP概述
5.1.1 定义
AOP(Aspect-Oriented Programming,面向切面编程):是对传统OOP的补充。
AOP编程操作的主要对象是切面(aspect),通过预编译方式和运行期动态代理实现程序功能的统一维护的一种技术。
5.1.2 优点
利用AOP可以对业务逻辑的各个部分进行隔离,从而使得业务逻辑各部分之间的耦合度降低,提高程序的可重用性,同时提高了开发的效率。
5.1.3 底层原理
动态代理机制进行实现
关于代理机制可以看之前的文章 代理模式
5.1.4 AOP名词解释
- 横切关注点,从每个方法中抽取出来的同一类非核心业务(例如日志功能),放在切面中叫通知
- target:目标类,需要被代理的类。
- Joinpoint:连接点,就是spring允许你使用通知的地方,例如方法执行的前后或者抛出异常时
- PointCut:切入点,已经被增强的连接点。(例如高速路上每一个出口都是连接点而自己走的那个出接口就是切入点)
- advice: 通知/增强,增强代码。例如前置通知,后置通知等
- weaving:织入,是指把 advice 应用到 target 来创建代理对象的过程。
- proxy: 代理类
- Aspect: 切面,是切入点 pointcut 和通知 advice 的结合,例如MyLogger类
一个线是一个特殊的面。
一个切入点和一个通知,组成成一个特殊的面
5.2 AspectJ
5.2.1简介
- AspectJ:Java社区里最完整最流行的AOP框架。
- 在Spring2.0以上版本中,可以使用基于AspectJ注解或基于XML配置的AOP。
5.2.2 相关配置
- 使用前导入相关依赖和引入aop名称空间。
- 开启aspectj自动代理功能
< aop:aspectj-autoproxy/>
5.2.3 简单例子
Calculator.class
public interface Calculator {

    int add(int i, int j);
    int sub(int i, int j);
    int mul(int i, int j);
    int div(int i, int j);
}
CalculatorImpl.class
@Component
public class CalculatorImpl implements Calculator{

    @Override
    public int add(int i, int j) {
        return i + j;
    }

    @Override
    public int sub(int i, int j) {
        return i - j;
    }

    @Override
    public int mul(int i, int j) {
        return i * j;
    }

    @Override
    public int div(int i, int j) {
        return i / j;
    }
}
MyLoggerAspect.class
@Component
@Aspect    //标注当前类为切面
public class MyloggerAspect {

    /**
     *  @Before:将方法指定为前置通知
     * 必须设置value,其值为切入点表达式
     */
    @Before(value = "execution(public int com.wang.CalculatorImpl.add(int,int))")
    public void beforeMethod(JoinPoint joinPoint){

        Object[] args = joinPoint.getArgs();  //获取方法的参数
        String methedName = joinPoint.getSignature().getName();//获取方法名
        System.out.println("方法执行前");
        System.out.println(methedName );
        System.out.println(Arrays.toString(args));

    }

}
applicationContext
<?xml version="1.0" encoding="UTF-8"?>
<beans xmlns="http://www.springframework.org/schema/beans"
       xmlns:xsi="http://www.w3.org/2001/XMLSchema-instance"
       xmlns:aop="http://www.springframework.org/schema/aop"
       xmlns:context="http://www.springframework.org/schema/context"
       xsi:schemaLocation="http://www.springframework.org/schema/beans
        https://www.springframework.org/schema/beans/spring-beans.xsd
        http://www.springframework.org/schema/aop
        https://www.springframework.org/schema/aop/spring-aop.xsd
        http://www.springframework.org/schema/context
        https://www.springframework.org/schema/context/spring-context.xsd">
    <!--   开启aspectj自动代理功能 -->
    <aop:aspectj-autoproxy/>

    <context:component-scan base-package="com.wang"/>
</beans>
execution() 用于描述方法
语法:execution(修饰符 返回值 包.类.方法名(参数) throws异常) (throws可以省略)
5.2.4 切入点表达式
在5.2.3中写的下面代码可以进行修改
@Before(value = "execution(public int com.wang.CalculatorImpl.add(int,int))")
- 把add换为*,表示不管是什么方法都会通过切面作用到
@Before(value = "execution(public int com.wang.CalculatorImpl.*(int,int))")
- 把public int 换为 * ,表示不管什么方法,什么返回值,什么修饰符都会通过切面作用到
@Before(value = "execution(* com.wang.CalculatorImpl.*(int,int))") - 把CalcukatorImpl换为 * ,表示不管什么方法,什么返回值,什么修饰符,什么类都会通过切面作用到
@Before(value = "execution(* com.wang.*.*(int,int))") - 把(int,int)改为(…) ,表示任意参数列表
@Before(value = "execution(* com.wang.*.*(..)")
5.2.5 AspectJ支持5种类型的通知注解
① @Before:前置通知,在方法执行之前执行
② @After:后置通知,作用于finally语句块里面,即不管有没有异常在方法执行之后都会执行
③ @AfterRunning:返回通知,在方法返回结果之后执行,有异常不执行
可通过returning设置接收方法返回值的变量名,要想在方法中使用必须在方法的形参设置和变量名相同的参数名的参数
 @AfterReturning(value = "execution(* com.wang.*.*(..))",returning = "result")
    public void afterReturningMethod(JoinPoint joinPoint,Object result){


        System.out.println("返回通知:"+result);

    }
④ @AfterThrowing:异常通知,在方法抛出异常之后执行
可通过Exception获取异常
    //throwing="ex" ,ex可以捕获异常信息,然后赋值给Exception(所有异常父类)  ,可以处理指定异常,即Exception换为其他的异常类型
    @AfterThrowing(value = "execution(* com.wang.*.*(..))",throwing = "ex")
    public void afterThrowingMethod(Exception ex){
        System.out.println("有异常了,"+ex);

    }
⑤ @Around:环绕通知,围绕着方法执行 (用的较少)
- 对于环绕通知来说,连接点的参数类型必须是
ProceedingJoinPoint。它是JoinPoint的子接口,允许控制何时执行,是否执行连接点。 - 在环绕通知中需要明确调用
ProceedingJoinPoint的proceed()方法来执行被代理的方法。如果忘记这样做就会导致通知被执行了,但目标方法没有被执行。 - 环绕通知的方法需要返回目标方法执行之后的结果,即调用
joinPoint.proceed();的返回值,否则会出现空指针异常。
@Around(value = "execution(* com.wang.*.*(..))")
    public Object aroundMethod(ProceedingJoinPoint proceedingJoinPoint)  {

        Object result = null;
        try {

            //前置通知
            System.out.println("前置通知");
            result = proceedingJoinPoint.proceed();    //执行方法,相当于method.invoke(),要try..catch
            //后置返回通知
            System.out.println("返回通知");
            return result;
        } catch (Throwable throwable) {
            throwable.printStackTrace();
            System.out.println("异常通知");
            //异常通知
        }finally {
            //后置通知
            System.out.println("后置通知");
        }

        return -1;

    }
5.2.6 公共切入点(切入点重用)
- 在编写AspectJ切面时,可以直接在通知注解中书写切入点表达式。但同一个切点表达式可能会在多个通知中重复出现。,
- 可以通过
@Pointcut注解将一个切入点声明成简单的方法。切入点的方法体通常是空的,因为将切入点定义与应用程序逻辑混在一起是不合理的。 - 其他通知可以通过方法名称引入该切入点
例子
public class MyloggerAspect {

    @Pointcut(value = "execution(* com.wang.*.*(..))")
    public void test(){}

    //使用test方法所定义的切入点
    @Before("test()")

    public void beforeMethod(JoinPoint joinPoint){

        Object[] args = joinPoint.getArgs();  //获取方法的参数
        String methedName = joinPoint.getSignature().getName();//获取方法名
        System.out.println("方法执行前");
        System.out.println(methedName );
        System.out.println(Arrays.toString(args));

    }
	@AfterThrowing(value = "test()",throwing = "ex")
    public void afterThrowingMethod(Exception ex){
        System.out.println("有异常了,"+ex);

    }
}
5.2.7 切面的优先级
- 在同一个连接点上应用不止一个切面时,除非明确指定,否则它们的优先级是不确定的。
- 切面的优先级可以通过实现
Ordered接口或利用@Order注解指定。 - 实现
Ordered接口,getOrder()方法的返回值越小,优先级越高。例:@Order(0)和@Order(1) - 若使用
@Order注解,序号出现在注解中
5.2.8 xml配置aop
@Aspect ,@Before,@Pointcut 注解改为xml配置
<aop:config>
        <aop:aspect ref="mylogger">
            <aop:before method="beforeMethod" pointcut="execution(* com.wang.*.*(..))"/>
        </aop:aspect>
    </aop:config>
遇到的坑
test代码写CalculatorImpl calculator = context.getBean("calculatorImpl",CalculatorImpl.class);时报如下错误
org.springframework.beans.factory.BeanNotOfRequiredTypeException: Bean named ‘calculatorImpl’ is expected to be of type ‘com.wang.CalculatorImpl’ but was actually of type 'com.sun.proxy.$Proxy10’
改为如下代码就好了
Calculator calculator = (Calculator) context.getBean("calculatorImpl");
6 spring和数据库
6.1 spring整合mybatis
详见之前写的文章 spring整合mybatis
6.2 spring和事务
- 当我们想让数据库操作都成功才成功,有一个失败,就都失败,我们就应该需要事务!
- 以前我们都需要自己手动管理事务,十分麻烦!
- 但是Spring给我们提供了事务管理,我们只需要配置即可;
- Spring支持编程式事务管理和声明式的事务管理。
在spring-dao中配置如下
 <!--    配置声明式事务-->
    <bean id="transactionManager" class="org.springframework.jdbc.datasource.DataSourceTransactionManager">
        <constructor-arg ref="dataSource" />
    </bean>

    <!--  结合AOP实现事物的植入  -->
    <!--  配置事物通知:spring帮我们写好了 -->
    <tx:advice id="txAdvice" transaction-manager="transactionManager">
        <!--   给哪些方法配置事务     -->
        <!--    配置事物的传播特性  增删改:propagation="REQUIRED"  spring默认,不写也没事
                                    查:read-only="true"  意思是查询时只读,不能修改
        -->
        <tx:attributes>
            <tx:method name="add" propagation="REQUIRED"/>
            <tx:method name="delete" propagation="REQUIRED"/>
            <tx:method name="update" propagation="REQUIRED"/>
            <tx:method name="query" read-only="true"/>
            <!-- 或者  <tx:method name="*" propagation="REQUIRED"/>  -->
        </tx:attributes>
    </tx:advice>

    <!--配置事务切入-->
    <aop:config>
        <aop:pointcut id="txPointCut" expression="execution(* com.wang.mapper.*.*(..))"/>
        <aop:advisor advice-ref="txAdvice" pointcut-ref="txPointCut"/>
    </aop:config>


 浙公网安备 33010602011771号