
Android UI系列-----EditText和AutoCompleteTextView
在这篇随笔里将主要讲解一下EditText和AutoCompleteTextView这个控件
1.EditText
首先我们先简单来说说EditText这个控件,这个就相当于我们平常web开发中的文本输入框,我们如果要使用EditText,可以在布局文件中声明一个<EditText>这个元素即可,下面就是一个简单的EditText的控件声明:
<EditText
        android:id="@+id/username"
        android:layout_width="match_parent"
        android:layout_height="wrap_content"
        android:hint="username"/>
对于EditText来说,其最重要的一个属性是 android:inputType,这个属性不仅可以指定键盘的显示类型,还能控制一些其他的操作,具体可以参考android的官方API,其默认属性是 android:inputType="text",也就是普通的键盘框,如果我们设置其属性为以下这些,那么其键盘的类型会有所不同:
<EditText
        android:id="@+id/password"
        android:layout_width="match_parent"
        android:layout_height="wrap_content"
        android:hint="password"
        android:inputType="textPassword"/>  这个是我们的密码框

    <EditText
        android:id="@+id/email"
        android:layout_width="match_parent"
        android:layout_height="wrap_content"
        android:hint="email"
        android:inputType="textEmailAddress"/>  当设置为textEmailAddress时,键盘会多出来一个 @ 符号

    <EditText
        android:id="@+id/blog"
        android:layout_width="match_parent"
        android:layout_height="wrap_content"
        android:hint="blog url"
        android:inputType="textUri"/>  设置为textUri时,键盘会多出一个 / 符号

    <EditText
        android:id="@+id/phone"
        android:layout_width="match_parent"
        android:layout_height="wrap_content"
        android:hint="phone"
        android:inputType="phone"/>  设置为phone时,键盘就会变成一个打电话时的键盘

    <EditText
        android:id="@+id/counts"
        android:layout_width="match_parent"
        android:layout_height="wrap_content"
        android:hint="counts"
        android:inputType="number"/>  设置为number时,键盘上全部都是数字键
对于输入框来说,我们通常都要对其输入的数据进行判断,inputType这个属性不会对我们输入的内容进行校验,如果我们要对输入的内容进行校验,我们需要在Activity里面进行操作
EditText有一个setError的方法,当调用这个方法时,则表示输入的数据不合法,我们来看看官方的API对该方法的解释:
void android.widget.TextView.setError(CharSequence error)

Sets the right-hand compound drawable of the TextView to the "error" icon and sets an error message that will be displayed in a popup when the TextView has focus. The icon and error message will be reset to null when any key events cause changes to the TextView's text. If the error is null, the error message and icon will be cleared.
这个方法会给我们一个错误的小图标以及弹出的一段错误提示信息,当我们的这个EditText控件获得焦点的时候,当我们在文本框中输入了任何的值后,这个icon和message都会消失,例如:

EditText还有许多其他的方法,这个在以后实际用的的时候再阐述。
2.AutoCompleteTextView
AutoCompleteTextView这个是一个自动提示内容的文本框,其是EditText的一个子类,
An editable text view that shows completion suggestions automatically while the user is typing. The list of suggestions is displayed in a drop down menu from which the user can choose an item to replace the content of the edit box with.

The drop down can be dismissed at any time by pressing the back key or, if no item is selected in the drop down, by pressing the enter/dpad center key.
我们通常都是自己定义了一组数据集合,可以是array,可以是list,还可以是网络传过来的数据,这组数据是以下拉菜单的方式根据我们输入的关键字来匹配我们数据集合中满足条件的数据项,通过下拉菜单,我们可以enter来选中我们需要的数据,而为AutoCompleteTextView这个控件提供内容的就是我们的 Adapter ,这个叫做适配器,Adapter这个类的作用就是在我们的Data和我们的View之间架设一座桥梁,我们将我们的数据放置到一个Adapter当中,然后通过指定我们对这些数据的布局方式,再将这个Adapter赋给我们的View。
Adapter是一个接口,其拥有许多的实现类,例如:
android.widget.Adapter

Known Indirect Subclasses:

ArrayAdapter<T>, BaseAdapter, CursorAdapter, HeaderViewListAdapter, ListAdapter, ResourceCursorAdapter, SimpleAdapter, SimpleCursorAdapter, SpinnerAdapter, WrapperListAdapter
我们看到,Android为我们提供了许多的Adapter,这是因为我们的数据可能来自不同的途径,而且对于一些特殊的控件,例如Spinner,我们也要有指定的SpinnerAdapter才行,接下来我们就通过一个例子来实现我们的 AutoCompleteTextView 文本提示功能:
首先我们在我们的布局文件中定义一个 <AutoCompleteTextView>标签,例如:
<?xml version="1.0" encoding="utf-8"?>
<RelativeLayout xmlns:android="http://schemas.android.com/apk/res/android"
    android:layout_width="match_parent"
    android:layout_height="match_parent" >

    <TextView
        android:id="@+id/country"
        android:layout_width="wrap_content"
        android:layout_height="wrap_content"
        android:text="所在国家:" />

    <AutoCompleteTextView
        android:id="@+id/auto"
        android:layout_width="match_parent"
        android:layout_height="wrap_content"
        android:layout_toRightOf="@id/country"/>

</RelativeLayout>
接下来我们看看Activity里面的内容:
public class AutoCompleteActivity extends Activity
{
    private AutoCompleteTextView auto;

    @Override
    protected void onCreate(Bundle savedInstanceState)
    {
        super.onCreate(savedInstanceState);
        setContentView(R.layout.auto_complete);

        auto = (AutoCompleteTextView)findViewById(R.id.auto);

        List<String> countries = new ArrayList<String>();
        countries.add("Afghanistan");
        countries.add("Albania");
        countries.add("Algeria");
        countries.add("American");
        countries.add("Andorra");
        countries.add("Anguilla");
        countries.add("Angola");
        countries.add("Antarctica");
        countries.add("China");

        ArrayAdapter<String> adapter = new ArrayAdapter<String>(this, android.R.layout.simple_list_item_1, countries);

        auto.setAdapter(adapter);

    }
}
我们看到,在Activity里面我们定义了一个ArrayAdapter这个类,其有许多的构造方法,我们来看看我们用的这个:
public ArrayAdapter (Context context, int resource, List<T> objects)

Parameters
context    The current context.
resource    The resource ID for a layout file containing a TextView to use when instantiating views.
objects    The objects to represent in the ListView.
第一个参数Context类型的对象,是我们的上下文对象,我们的Activity是Context类的子类,所以可以将当前的这个Activity传进去,第二个参数是一个包含了TextView控件的布局文件的ID,当Adapter加载的时候,就会将我们的数据集合的每一个数据(item)绑定为我们这个布局文件中的每一个TextView控件上,android系统本身给我们提供了许多的默认的布局文件,我们这里使用的是 android.R.layout.simple_list_item_1 这个布局文件(this is a layout provided by Android that provides a standard appearance for text in a list),第三个参数就是我们的数据集合,这里我们传入一个List进去,最后通过setAdapter(adapter)方法将其绑定到我们的AutoCompleteTextView控件上即可。
对于我们的数据集,我们除了可以在Activity中声明一个List或者是Array以为,我们还可以写在android的资源文件中,通过资源文件来得到我们的数据集,例如,我们在
res-->values-->strings.xml 这个文件中指定我们的数据集:
<?xml version="1.0" encoding="utf-8"?>
<resources>

    <string name="app_name">Android_01</string>
    <string name="action_settings">Settings</string>
    <string name="hello_world">Hello world!</string>

    <string-array name="countries">
        <item>Bahrain</item>
        <item>Bangladesh</item>
        <item>Belarus</item>
        <item>Belize</item>
        <item>Brazil</item>
        <item>Cameroon</item>
        <item>Japan</item>
        <item>Hongkong</item>
        <item>Greece</item>
        <item>Germany</item>
        <item>France</item>
        <item>Djibouti</item>
        <item>Denmark</item>
        <item>Canada</item>
    </string-array>

</resources>
然后在代码中,我们可以通过下面这种方式来创建我们的Adapter对象:
String[] countries2 = getResources().getStringArray(R.array.countries);
ArrayAdapter<String> adapter = new ArrayAdapter<String>(this, android.R.layout.simple_list_item_1, countries2);
最后我们来看看效果图:
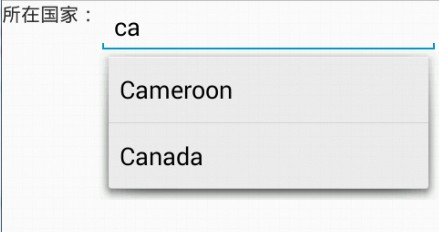
当我们输入两个字母时,就会有内容提示了,我们可以选择我们需要的选项,点击enter即可。

 浙公网安备 33010602011771号