集合
集合
集合的特点
- 可以动态保存任意多个对象,使用方便
- 集合提供了一系列方便操作对象的方法
- 使用集合操作代码简洁明了
集合体系
单列集合
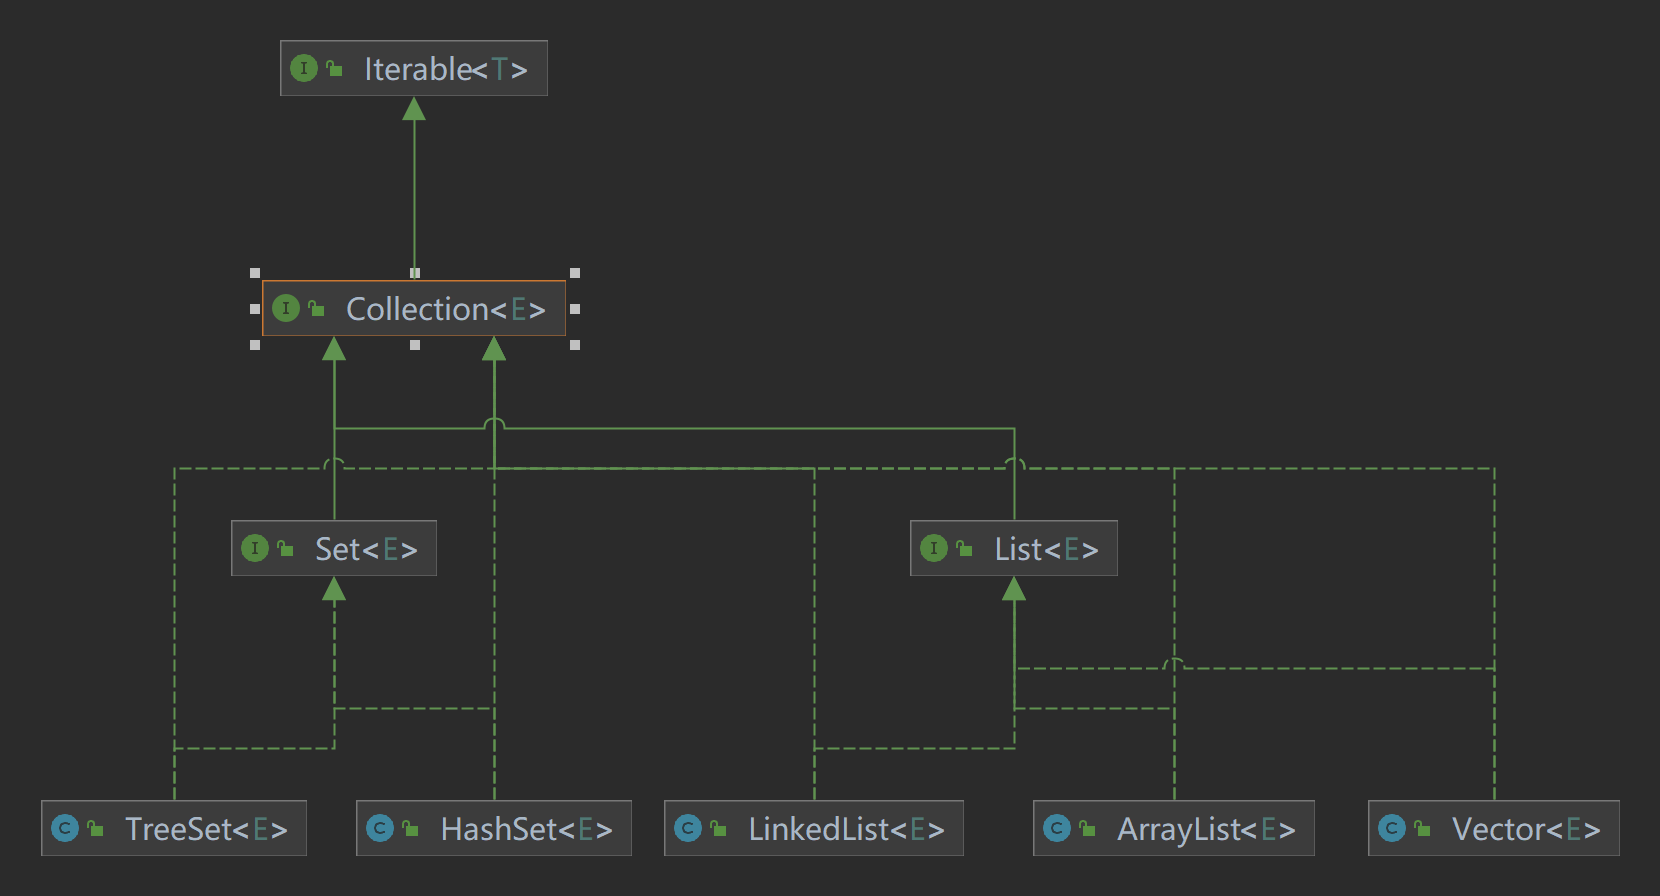
双列集合

集合迭代器
package com.collection;

import java.util.ArrayList;
import java.util.Collection;
import java.util.Iterator;

public class CollectionIterator {
    public static void main(String[] args) {
        Collection col = new ArrayList();

        col.add(new Book("三国演义", "罗贯中", 18.5));
        col.add(new Book("红楼梦", "曹雪芹", 22));
        col.add(new Book("小李飞刀", "古龙", 9.9));
        col.add("测试用例");

        //System.out.println(col);

        //遍历集合
        //1、先得到集合对应的迭代器
        Iterator iterator = col.iterator();

        //2、使用while循环遍历集合(快捷键:itit+回车)
        //Ctrl + J 查看快捷键设置
        while (iterator.hasNext()) {//判断集合中是否还有数据
            System.out.println(iterator.next());
        }

        //3、当退出while循环的时候,这是我们的迭代器指向最后的元素,再继续取值操作会抛出异常
        //4、如果需要再次遍历,需要重置我们的迭代器
        iterator = col.iterator();//重置操作


    }
}


class Book {
    private String name;
    private String author;
    private double price;

    public Book(String name, String author, double price) {
        this.name = name;
        this.author = author;
        this.price = price;
    }

    public String getName() {
        return name;
    }

    public void setName(String name) {
        this.name = name;
    }

    public String getAuthor() {
        return author;
    }

    public void setAuthor(String author) {
        this.author = author;
    }

    public double getPrice() {
        return price;
    }

    public void setPrice(double price) {
        this.price = price;
    }

    @Override
    public String toString() {
        return "Book{" +
                "name='" + name + '\'' +
                ", author='" + author + '\'' +
                ", price=" + price +
                '}';
    }
}
集合遍历的三种方式:
- 使用迭代器
- 使用增强for循环
- 使用普通佛瑞循环
ArrayList的扩容机制
- ArrayList中维护了一个Object类型的数组elementData,
- 当创建ArrayList对象时,如果使用的是无参构造器,则elementData容量为0,第一次添加,容量扩容为10,再次扩容,则为1.5倍
- 如果指定大小,后续扩容按1.5倍进行扩容
当对一个新建的为空的ArrayList进行add操作的时候,首先会检查内部容量
    public boolean add(E e) {
        ensureCapacityInternal(size + 1);  // Increments modCount!!
        elementData[size++] = e;
        return true;
    }
private void ensureCapacityInternal(int minCapacity) {
    ensureExplicitCapacity(calculateCapacity(elementData, minCapacity));
}
private static int calculateCapacity(Object[] elementData, int minCapacity) {
    if (elementData == DEFAULTCAPACITY_EMPTY_ELEMENTDATA) {
        return Math.max(DEFAULT_CAPACITY, minCapacity);
    }
    return minCapacity;
}
上方这个方法会将新建的ArrayList的minCapacity属性修改到10,因为在ArrayList类中的DEFAULT_CAPACITY默认为10
private void ensureExplicitCapacity(int minCapacity) {
    modCount++;

    // overflow-conscious code
    if (minCapacity - elementData.length > 0)
        grow(minCapacity);
}
如果容量不足,就进行grow的扩容操作
private void grow(int minCapacity) {
    // overflow-conscious code
    int oldCapacity = elementData.length;
    int newCapacity = oldCapacity + (oldCapacity >> 1);
    if (newCapacity - minCapacity < 0)
        newCapacity = minCapacity;//第一次扩容时minCapacity为10,后续才是1.5倍
    if (newCapacity - MAX_ARRAY_SIZE > 0)
        newCapacity = hugeCapacity(minCapacity);
    // minCapacity is usually close to size, so this is a win:
    elementData = Arrays.copyOf(elementData, newCapacity);
}
按照1.5倍的大小进行扩容
Vector
-
Vector底层也是一个对象数组
-
Vector的操作方法有加synchronized,所以是线程安全的
Vector的扩容机制
Vector的初始默认容量大小为10
扩容倍数为2倍
public static Integer valueOf(int i) {
    if (i >= IntegerCache.low && i <= IntegerCache.high)
        return IntegerCache.cache[i + (-IntegerCache.low)];
    return new Integer(i);
}
public synchronized boolean add(E e) {
    modCount++;
    ensureCapacityHelper(elementCount + 1);
    elementData[elementCount++] = e;
    return true;
}
private void ensureCapacityHelper(int minCapacity) {
    // overflow-conscious code
    if (minCapacity - elementData.length > 0)
        grow(minCapacity);
}
扩容代码
private void grow(int minCapacity) {
    // overflow-conscious code
    int oldCapacity = elementData.length;
    int newCapacity = oldCapacity + ((capacityIncrement > 0) ?
                                     capacityIncrement : oldCapacity);
    if (newCapacity - minCapacity < 0)
        newCapacity = minCapacity;
    if (newCapacity - MAX_ARRAY_SIZE > 0)
        newCapacity = hugeCapacity(minCapacity);
    elementData = Arrays.copyOf(elementData, newCapacity);
}
LinkedList
- LinkedList底层实现了双向链表和双端队列
- 可以添加任意元素(重复或者null)
- 线程不安全
LinkedList底层机制
- 底层维护的是一个双向链表
- LinkedList中维护了两个属性first和last分别指向首节点和尾节点
- 每个节点维护了prev、next、item三个属性,其中prev指向前一个节点,next指向后一个节点
- LinkedList的元素的添加和删除,不是通过数组完成的,相对效率较高
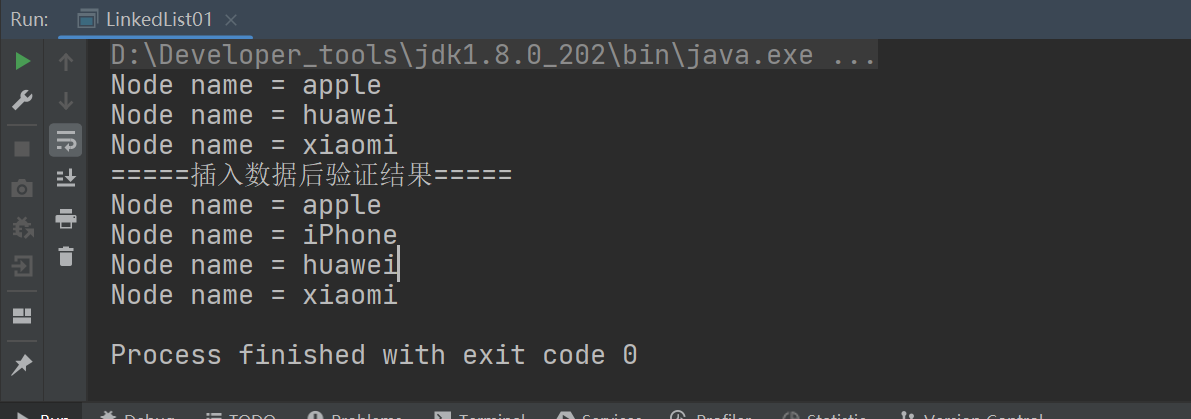
LinkedList例子解析
package com.list;

import java.util.LinkedList;

public class LinkedList01 {
    public static void main(String[] args) {

        //模拟一个简单的双向链表
        Node apple = new Node("apple");
        Node huawei = new Node("huawei");
        Node xiaomi = new Node("xiaomi");

        //连接三个节点,形成链表
        //apple -> huawei -> xiaomi
        apple.next = huawei;
        huawei.next = xiaomi;

        xiaomi.pre = huawei;
        huawei.pre = apple;

        Node first = apple;//first指向头节点
        Node last = xiaomi;//last指向尾节点

        //对双向链表进行遍历,从头到尾
        while (true) {
            if (first == null) {
                break;
            } else {
                System.out.println(first);
                first = first.next;
            }
        }

        //添加数据方便
        //例如,在apple和huawei中添加一个iPhone

        //1、先创建一个iPhone节点
        Node iPhone = new Node("iPhone");
        //2、将创建的节点加入链表
        apple.next = iPhone;
        iPhone.next = huawei;
        huawei.pre = iPhone;
        iPhone.pre = apple;
        //进行遍历,验证结果
        System.out.println("=====插入数据后验证结果=====");
        first = apple;
        while (true) {
            if (first == null) {
                break;
            } else {
                System.out.println(first);
                first = first.next;
            }
        }
    }
}

//定义一个Node类,表示双向链表的节点
class Node {
    public Object item;//真正存放数据的地方
    public Node pre;//指向上一个节点
    public Node next;//指向下一个节点

    public Node(Object item) {
        this.item = item;
    }

    @Override
    public String toString() {
        return "Node name = " + item;
    }
}
LinkedList底层代码
package com.list;

import java.util.Iterator;
import java.util.LinkedList;

public class LinkedListCRUD {
    public static void main(String[] args) {
        LinkedList linkedList = new LinkedList();
        linkedList.add(1);
        linkedList.add(2);
        linkedList.add(3);
        System.out.println("LinkedList = " + linkedList);


        //删除节点
        linkedList.remove();//无参默认删除第一个节点

        //使用迭代器对LinkedList进行遍历
        Iterator iterator = linkedList.iterator();
        while (iterator.hasNext()) {
            Object next = iterator.next();
            System.out.println("LinkedList = " + next);
        }

    }
}
public boolean add(E e) {
    linkLast(e);
    return true;
}
void linkLast(E e) {
    final Node<E> l = last;
    final Node<E> newNode = new Node<>(l, e, null);
    last = newNode;
    if (l == null)
        first = newNode;
    else
        l.next = newNode;
    size++;
    modCount++;
}
LinkedList增加节点方法
public E remove() {
    return removeFirst();
}
public E removeFirst() {
    final Node<E> f = first;
    if (f == null)
        throw new NoSuchElementException();
    return unlinkFirst(f);
}
删除节点前判断是否为空链表,为空的话抛出异常
private E unlinkFirst(Node<E> f) {
    // assert f == first && f != null;
    final E element = f.item;
    final Node<E> next = f.next;
    f.item = null;
    f.next = null; // help GC
    first = next;
    if (next == null)
        last = null;
    else
        next.prev = null;
    size--;
    modCount++;
    return element;
}
LinkedList删除节点方法
Set
- Set接口是无序的,没有索引
- Set集合的取出的顺序是固定的,但是与存入的顺序无关,因为底层保存是一个数组加链表的组合
- 不允许存在重复元素,所以最多包含一个null
- 遍历方式:可以使用迭代器和增强for,不能使用索引的方式来获取
package com.collection.set;

import java.util.HashSet;
import java.util.Set;

public class HashSet_ {
    public static void main(String[] args) {

        Set hashSet = new HashSet();
        System.out.println("set = " + hashSet);

        System.out.println("=========测试1===========");

        hashSet.add("apple");//成功
        hashSet.add("apple");//失败
        hashSet.add(new Phone("13"));//成功
        hashSet.add(new Phone("13"));//成功

        System.out.println("set = " + hashSet);

        System.out.println("==========测试new String==========");

        hashSet = new HashSet();

        hashSet.add(new String("test"));//成功
        hashSet.add(new String("test"));//失败

        System.out.println("set = " + hashSet);

    }
}


class Phone{
    private String name;

    public Phone(String name) {
        this.name = name;
    }

    @Override
    public String toString() {
        return "Phone{" +
                "name='" + name + '\'' +
                '}';
    }
}
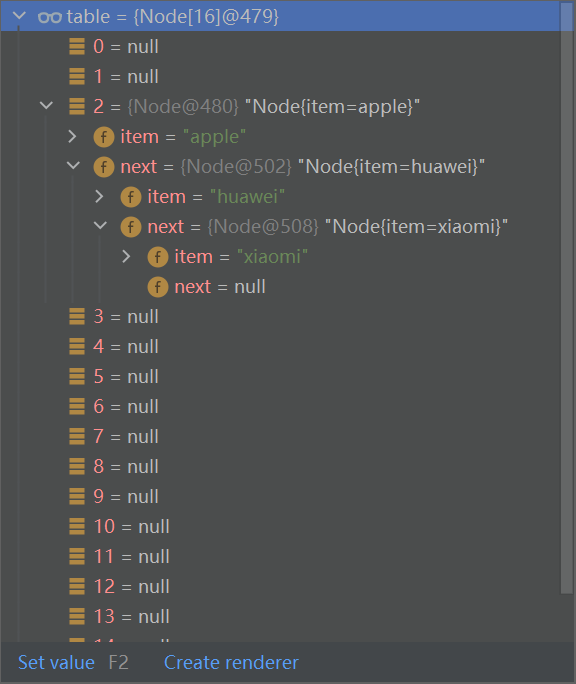
数组链表模拟
package com.collection.set;

import com.sun.corba.se.impl.oa.poa.AOMEntry;

public class HashSetStructure {
    public static void main(String[] args) {
        //模拟一个HashMap底层结构

        //1、创建一个数组,类型为Node[]
        Node[] table = new Node[16];
        System.out.println("table = " + table);

        //2、创建节点
        Node apple = new Node("apple", null);

        table[2] = apple;

        Node huawei = new Node("huawei", null);

        apple.next = huawei;

        Node xiaomi = new Node("xiaomi", null);

        huawei.next = xiaomi;

        System.out.println("table = " + table);


    }
}

class Node {//节点,可以存储数据,指向下一个节点

    Object item;//存储数据

    Node next;//指向下一个节点

    public Node(Object item, Node next) {
        this.item = item;
        this.next = next;
    }

    @Override
    public String toString() {
        return "Node{" +
                "item=" + item +
                '}';
    }
}
HashSet底层机制
结论:
- HashSet底层是HashMap
- 添加一个元素时,先得到hash值,再转成索引值
- 找到存储数据表,看这个索引的位置是否已经存放元素了
- 如果没有,直接添加元素
- 如果有,调用equals比较,如果相同,就放弃添加,如果不相同,就添加到最后
- 在java8中,如果一个链表的元素个数超过(大于等于)TREEIFY_THRESHOLD(默认值:8),并且table的大小>=MIN_TREEIFY_CAPACITY(默认值:64 ),就会转化为红黑树
分析:
-
执行HashSet构造器
public HashSet() { map = new HashMap<>(); } -
执行add方法
public boolean add(E e) { return map.put(e, PRESENT)==null; } //private static final Object PRESENT = new Object(); -
执行put方法,该方法会执行hash(key),得到key对应的hash值
public V put(K key, V value) {
    return putVal(hash(key), key, value, false, true);
}
对hash值进行运算
static final int hash(Object key) { int h; return (key == null) ? 0 : (h = key.hashCode()) ^ (h >>> 16); } -
执行putVal方法
            final V putVal(int hash, K key, V value, boolean onlyIfAbsent,
                   boolean evict) {
        Node<K,V>[] tab; Node<K,V> p; int n, i;//定义了辅助变量
        //table就是HashMap的一个数组,类型是Node[]
        //if语句表示如果当前的table是null,或者大小=0
        //就是第一次扩容,到16个空间
        if ((tab = table) == null || (n = tab.length) == 0)
            n = (tab = resize()).length;

        //(1)根据Key得到Hash,去计算Key该存到table表的哪个索引位置
        //并把这个位置的对象,赋值给 p
        //(2)判断p是否为null
        //(2.1)如果 p 为null,表示还没有存放元素,就创建一个Node()
        //(2.2)就放在该位置 tab[i] = newNode(hash, key, value, null)
        if ((p = tab[i = (n - 1) & hash]) == null)
            tab[i] = newNode(hash, key, value, null);
        else {
            //在需要局部变量的时候再去创建
            Node<K,V> e; K k;//

            //如果当前索引位置链表的第一个元素和准备添加的Key的hash值一样
            //并且满足下面两个条件之一
            //(1)准备加入的 Key 和 p 指向的Node节点的的Key是同一个对象
            //(2)p 指向的Node节点的 Key 的equals()和准备加入的Key比较后相同
            //就不能加入
            if (p.hash == hash &&
                ((k = p.key) == key || (key != null && key.equals(k))))
                e = p;

            //再判断 p 是不是一颗红黑树
            //如果是一棵红黑树,就调用 putTreeVal 来进行添加
            else if (p instanceof TreeNode)
                e = ((TreeNode<K,V>)p).putTreeVal(this, tab, hash, key, value);

            //如果table对应的索引位置,已经是一个链表,
            //(1)依次和该链表的每一个元素比较后,都不相同的话,则加入该链表的最后
            //  注意:在把元素添加到链表后,立即判断,这个链表是否已经达到8个节点
            //  到达8个节点,就调用treeifyBin()对当前这个链表进行树化(转成红黑树)
            //  注意,在转成红黑树时,要进行判断,判断条件如下
            //          if (tab == null || (n = tab.length) < MIN_TREEIFY_CAPACITY)
            //            resize();
            //  条件成立,先将table扩容
            //  条件不成立,转化成红黑树
            //(2)依次和该链表的每一个元素比较过程中,如果有相同的情况,就break推出
            else {
                for (int binCount = 0; ; ++binCount) {
                    if ((e = p.next) == null) {
                        p.next = newNode(hash, key, value, null);
                        if (binCount >= TREEIFY_THRESHOLD - 1) // -1 for 1st
                            treeifyBin(tab, hash);
                        break;
                    }
                    if (e.hash == hash &&
                        ((k = e.key) == key || (key != null && key.equals(k))))
                        break;
                    p = e;
                }
            }
            if (e != null) { // existing mapping for key
                V oldValue = e.value;
                if (!onlyIfAbsent || oldValue == null)
                    e.value = value;
                afterNodeAccess(e);
                return oldValue;
            }
        }
        ++modCount;
        if (++size > threshold)
            resize();
        afterNodeInsertion(evict);
        return null;
    }
HashSet扩容机制
HashSet底层是HashMap,第一次添加时,table数组扩容到16,临界值(threshold)是16 * 加载因子(loadFactor,0.75)=12,如果table数组的使用达到了临界值12,就会扩容到16 * 2 =32,新的临界值就是32 * 0.75 = 24
LinkedHashSet
- LinkedHashSet是HashSet的子类
- LinkedHashSet底层是一个LinkedHashMap,底层维护的是一个数组+双向链表
- LinkedHashSet根据元素的hashCode值来决定元素的存储位置,同时使用链表维护元素的次序,这使元素看起来像是以插入顺序保存的
- LinkedHashSet不允许添加重复元素
TreeSet
if (cpr != null) {
    do {
        parent = t;
        cmp = cpr.compare(key, t.key);
        if (cmp < 0)
            t = t.left;
        else if (cmp > 0)
            t = t.right;
        else
            return t.setValue(value);
    } while (t != null);
}
Map
package com.collection.map;

import java.util.HashMap;

public class Map {
    public static void main(String[] args) {

        //1、Map 与 Collection 并列存在。用于保存具有映射关系的数据:Key-Value
        //2、Map 中的 Key 和 Value 可以是任何引用类型的数据,会封装到 HashMap$Node 对象中
        //3、Map 中的 Key 不允许重复,原因和 HashSet 一样
        //4、Map 中的 Value 可以重复
        //5、Map 中的 Key 可以为 null,Value 也可以为 null,Key 为 null 只能有一个
        //6、常用 String 类作为 Map 的 Key
        //7、Key 和 Value 之间存在单向一对一关系,通过指定 Key 总能找到对应的 Value

        HashMap hashMap = new HashMap();
        hashMap.put(001, "apple");
        hashMap.put(002, "xiaomi");
        hashMap.put(001, "huawei");

        System.out.println(hashMap.get(001));
        System.out.println(hashMap);
    }
}
package com.collection.map;

import java.util.Collection;
import java.util.HashMap;
import java.util.Map;
import java.util.Set;

public class MapSource {
    public static void main(String[] args) {
        HashMap hashMap = new HashMap();
        hashMap.put(001, "apple");
        hashMap.put(002, "xiaomi");

        //1、k-v 最后是HashMap$Node node = new Node(hash, key, value, null)
        //2、k-v 为了方便程序员的遍历,还会创建EntrySet集合,该集合存放的元素类型为Entry,而
        //  一个Entry对象就有k,v EntrySet$<Entry<k,v>>
        //3、EntrySet中,定义的类型是Map.Entry,但实际上存放的还是HashMap$Node
        //  这是因为static class Node<K,V> implements Map.Entry<K,V>
        //4、当把 HashMap$Node 对象存放到 EntrySet 就方便我们的遍历,因为Map.Entry提供了重要方法
        //  K getKey(); V getValue()

        Set set = hashMap.entrySet();
        System.out.println(set.getClass());

        for (Object obj : set) {

            //为了从HashMap$Node 取出k-v
            //先做一个向下的转型
            Map.Entry entry = (Map.Entry) obj;
            System.out.println(entry.getKey() + "-" + entry.getValue());
        }

        Set set1 = hashMap.keySet();
        System.out.println(set1.getClass());

        Collection values = hashMap.values();
        System.out.println(values.getClass());
    }
}
Map接口的遍历方式
- containsKey:查找键是否存在
- keySet:获取所有的键
- entrySet:获取所有关系
- values:获取所有的值
package com.collection.map;

import java.util.*;

public class MapFor {
    public static void main(String[] args) {
        Map map = new HashMap();
        map.put("邓超", "孙俪");
        map.put("王宝强", "马蓉");
        map.put("宋喆", "马蓉");
        map.put("刘令博", null);
        map.put(null, "刘亦菲");
        map.put("鹿晗", "关晓彤");


        //第一组,先取出所有的key,通过key取出对应的value
        Set keySet = map.keySet();
        //1、增强for循环
        System.out.println("-----增强for循环-----");
        for (Object key : keySet) {
            System.out.println(key + "-" + map.get(key));
        }
        //2、迭代器
        System.out.println("-----迭代器-----");
        Iterator iterator = keySet.iterator();
        while (iterator.hasNext()) {
            Object next = iterator.next();
            System.out.println(next + "-" + map.get(next));
        }


        //第二组,把所有的value值取出来
        Collection values = map.values();
        System.out.println("=====取出所有的value=====");
        //这里可以使用所有的Collections使用的遍历方法
        //1、增强for
        System.out.println("-----增强for-----");
        for (Object obj : values) {
            System.out.println(obj);
        }
        //2、迭代器
        System.out.println("-----迭代器-----");
        Iterator iterator1 = values.iterator();
        while (iterator1.hasNext()) {
            System.out.println(iterator1.next());
        }


        //第三组,通过EntrySet来获取 k-v
        System.out.println("=====通过EntrySet方式=====");
        Set entrySet = map.entrySet();
        //1、增强for
        System.out.println("-----增强for-----");
        for (Object entry : entrySet) {
            Map.Entry m = (Map.Entry) entry;
            System.out.println(m.getKey() + "-" + m.getValue());
        }
        //2、迭代器
        System.out.println("-----迭代器-----");
        Iterator iterator2 = entrySet.iterator();
        while (iterator2.hasNext()) {
            Object next = iterator2.next();
            //System.out.println(next.getClass());//class java.util.HashMap$Node
            //转型成Entry类型,利用Entry类型里的getKey()和getValue()方法
            Map.Entry m = (Map.Entry) next;
            System.out.println(m.getKey() + "-" + m.getValue());
        }


    }
}
Map接口小结
-
Map接口常用实现类:HashMap、HashTable和Properties
-
HashMap是Map接口使用频率最高的实现类
-
HashMap是以key-value对的方式来存储数据(HashMap$Node类型)
-
Key不能重复,但是Value可以重复,允许存在null
-
如果添加相同的Key,则会覆盖原来的Key-Value
-
与HashSet一样,不能保证映射的顺序,因为底层是以hash表的方式来存储的
-
HashMap没有实现同步,因此是线程不安全的,方法没有做同步互斥的操作
-
HashMap源码中
-
static class Node<K,V> implements Map.Entry<K,V> {
    final int hash;
    final K key;
    V value;
    Node<K,V> next;
存储数据节点的Node实现了Map.Entry接口
-
HashMap的扩容机制与HashSet一致
Hashtable
Hashtable的基本情况
- 存放的元素是键值对:k-v
- Hashtable的键和值都不能为null,否则会抛出NullPointerException
- Hashtable的使用方法基本上和HashMap一样
- Hashtable是线程安全的,HashMap是线程不安全的
- 底层有数组Hashtable$Entry[] 初始化大小为11
- 临界值 threshold 8 = 11 * 0.75
- 扩容:按照自己的扩容机制来扩容的:2 n + 1
Properties
- Properties可以用于从xxx.properties文件中,加载数据到Properties类对象。并进行读取和修改
- xxx.properties文件通常作为配置文件
TreeMap
package com.collection.map;

import java.util.Comparator;
import java.util.TreeMap;

public class TreeMap_ {
    public static void main(String[] args) {

        //TreeMap treeMap = new TreeMap();
        TreeMap treeMap = new TreeMap(new Comparator() {
            //按传入的key的string的大小来排序
            @Override
            public int compare(Object o1, Object o2) {
                return ((String) o2).compareTo((String) o1);
            }
        });

        treeMap.put("apple", "苹果");
        treeMap.put("huawei", "华为");
        treeMap.put("xiaomi", "小米");
        treeMap.put("hotpot", "火锅");

        System.out.println(treeMap);

        //1、构造器把传入的比较器对象,赋值给了TreeSet底层的TreeMap的属性this.Comparator
        //      public Comparator<? super K> comparator() {
        //         return comparator;
        //      }

        //2、调用put方法
        //2.1、第一次添加,把k-v封装到
/*        TreeMap.Entry<K,V> t = root;
        if (t == null) {
            compare(key, key); // type (and possibly null) check

            root = new TreeMap.Entry<>(key, value, null);
            size = 1;
            modCount++;
            return null;
        }*/
        //2.2以后添加
/*        Comparator<? super K> cpr = comparator;
        if (cpr != null) {
            do {//遍历所有的Key,给当前的Key找位置
                parent = t;
                cmp = cpr.compare(key, t.key);
                if (cmp < 0)
                    t = t.left;
                else if (cmp > 0)
                    t = t.right;
                else
                    return t.setValue(value);
            } while (t != null);
        }*/


    }
}
集合选型
- 先判断存储的类型(一组对象(单列)或者一组键值对(双列))
- 一组对象(单列):Collections接口
- 允许重复:List
- 增删多:LinkedList(底层是一个双向链表)
- 改查多:ArrayList(底层是一个Object类型的数组)
- 不允许重复:Set
- 无序:HashSet(底层是HashMap,维护了一个Hash表)
- 排序:TreeSet
- 插入和取出顺序一致:LinkedHashSet,(底层是数组+双向链表)
- 允许重复:List
- 一组键值对(双列):Map接口
- 键无序:HashMap(底层是Hash表)
- 键排序:TreeMap
- 键插入和取出顺序一致:LinkedHashMap
- 读取文件:Properties

 浙公网安备 33010602011771号