Spring总结与感悟
Spring重点总结
<?xml version="1.0" encoding="UTF-8"?>
<beans xmlns="http://www.springframework.org/schema/beans"
    xmlns:xsi="http://www.w3.org/2001/XMLSchema-instance"
    xsi:schemaLocation="http://www.springframework.org/schema/beans
        https://www.springframework.org/schema/beans/spring-beans.xsd">

    <bean id="address" class="pojo.Address">
        <property name="address" value="address你好" />
    </bean>

    <bean id="student" class="pojo.Student">
        <!--第一种,普通值注入 -->
        <property name="name" value="name你好" />
        <!--第二种,ref注入 -->
        <property name="address" ref="address" />

        <!--数组注入 -->
        <property name="books">
            <array>
                <value>三国</value>
                <value>西游</value>
                <value>水浒</value>
            </array>
        </property>

        <!--list列表注入 -->
        <property name="hobbies">
            <list>
                <value>唱</value>
                <value>跳</value>
                <value>rap</value>
                <value>篮球</value>
            </list>
        </property>

        <!--map键值对注入 -->
        <property name="card">
            <map>
                <entry key="username" value="root" />
                <entry key="password" value="root" />
            </map>
        </property>

        <!--set(可去重)注入 -->
        <property name="game">
            <set>
                <value>wangzhe</value>
                <value>lol</value>
                <value>galname</value>
            </set>
        </property>

        <!--空指针null注入 -->
        <property name="wife">
            <null></null>
        </property>

        <!--properties常量注入 -->
        <property name="infor">
            <props>
                <prop key="id">20200802</prop>
                <prop key="name">cbh</prop>
            </props>
        </property>
    </bean>
</beans>
使用p和c命名空间需要导入xml约束
<!--p命名空间注入/set注入,可以直接注入属性的值-》property-->
    <bean id="user" class="pojo.User" p:name="cxk" p:id="20" >
    </bean>

    <!--c命名空间,通过构造器注入,需要写入有参和无参构造方法-》construct-args-->
    <bean id="user2" class="pojo.User" c:name="cbh" c:id="22"></bean>
在Spring中有三种装配的方式
-
在xml中显示配置
-
在java中显示配置
-
隐式的自动装配bean 【重要】
-
保证所有的class唯一(类为全局唯一)
-
byName自动装配:byName会自动查找,和自己对象set对应的值对应的id
package com.xlf.pojo;

import org.apache.ibatis.annotations.CacheNamespace;
import org.springframework.beans.factory.annotation.Autowired;
import org.springframework.beans.factory.annotation.Qualifier;

import javax.annotation.Resource;

public class People {

    @Resource
    private Cat cat;
    @Resource
//    @Qualifier(value = "dog222")
    private Dog dog;
    private String name;

    @Override
    public String toString() {
        return "People{" +
                "cat=" + cat +
                ", dog=" + dog +
                ", name='" + name + '\'' +
                '}';
    }

    public Cat getCat() {
        return cat;
    }

    public void setCat(Cat cat) {
        this.cat = cat;
    }

    public Dog getDog() {
        return dog;
    }

    public void setDog(Dog dog) {
        this.dog = dog;
    }

    public String getName() {
        return name;
    }

    public void setName(String name) {
        this.name = name;
    }
}
 <bean id="cat" class="pojo.Cat"/>
    <bean id="dog" class="pojo.Dog"/>

    <!--byType会在容器自动查找,和自己对象属性相同的bean
        例如,Dog dog; 那么就会查找pojo的Dog类,再进行自动装配
    -->
    <bean id="people" class="pojo.People" autowire="byType">
        <property name="name" value="xlf"></property>
    </bean>
xml配置 -> byName 自动装配
<bean id="cat" class="pojo.Cat"/>
<bean id="dog" class="pojo.Dog"/>
<!--byname会在容器自动查找,和自己对象set方法的set后面的值对应的id
  例如:setDog(),取set后面的字符作为id,则要id = dog 才可以进行自动装配

 -->
<bean id="people" class="pojo.People" autowire="byName">
    <property name="name" value="xlf"></property>
</bean>
xmlns:context="http://www.springframework.org/schema/context"
2.配置注解的支持:< context:annotation-config/>
默认是byType方式,如果匹配不上,就会byName
public class People {
    @Autowired
    private Cat cat;
    @Autowired
    private Dog dog;
    private String name;
}
默认是byName方式,如果匹配不上,就会byType
public class People {
    Resource(name="cat")
    private Cat cat;
    Resource(name="dog")
    private Dog dog;
    private String name;
}
@Nullable:字段标记了这个注解,说明该字段可以为空
区别:
@Resource和@Autowired的区别:
-
都是用来自动装配的,都可以放在属性字段上
-
@Autowired通过byType的方式实现,而且必须要求这个对象存在!【常用】
-
@Resource默认通过byname的方式实现,如果找不到名字,则通过byType实现!如果两个都找不到的情况下,就报错!【常用】
-
执行顺序不同:@Autowired通过byType的方式实现。@Resource默认通过byname的方式实现
<?xml version="1.0" encoding="UTF-8"?>
<beans xmlns="http://www.springframework.org/schema/beans"
    xmlns:xsi="http://www.w3.org/2001/XMLSchema-instance"
    xmlns:context="http://www.springframework.org/schema/context"
    xsi:schemaLocation="http://www.springframework.org/schema/beans
        https://www.springframework.org/schema/beans/spring-beans.xsd
        http://www.springframework.org/schema/context
        https://www.springframework.org/schema/context/spring-context.xsd">

    <context:annotation-config/>

</beans>
<!--指定要扫描的包,这个包下面的注解才会生效
    别只扫一个com.kuang.pojo包-->
<context:component-scan base-package="com.kuang"/>
<context:annotation-config/>
//@Component 组件
//等价于<bean id="user" classs"pojo.User"/>
@Component
public class User {
     public String name ="xlf";
}
@Component
public class User {
    //相当于<property name="name" value="xlf"/>
    @value("xlf")
    public String name;

    //也可以放在set方法上面
    //@value("xlf")
    public void setName(String name) {
        this.name = name;
    }
}
原型模式prototype,单例模式singleton
scope("prototype")相当于<bean scope="prototype"></bean>
AOP在Spring中的使用
提供声明式事务,允许用户自定义切面
-
横切关注点:跨越应用程序多个模块的方法或功能。即是,与我们业务逻辑无关的,但是我们需要关注的部分,就是横切关注点。如日志,安全,缓存,事务等等…
-
切面(Aspect):横切关注点 被模块化的特殊对象。即,它是一个类。(Log类)
-
通知(Advice):切面必须要完成的工作。即,它是类中的一个方法。(Log类中的方法)
-
目标(Target):被通知对象。(生成的代理类)
-
代理(Proxy):向目标对象应用通知之后创建的对象。(生成的代理类)
-
切入点(PointCut):切面通知执行的”地点”的定义。(最后两点:在哪个地方执行,比如:method.invoke())
-
连接点(JointPoint):与切入点匹配的执行点。
<dependency>
    <groupId>org.aspectj</groupId>
    <artifactId>aspectjweaver</artifactId>
    <version>1.9.4</version>
</dependency>
<?xml version="1.0" encoding="UTF-8"?>
<beans xmlns="http://www.springframework.org/schema/beans"
      xmlns:xsi="http://www.w3.org/2001/XMLSchema-instance"
      xmlns:aop="http://www.springframework.org/schema/aop"
      xsi:schemaLocation="http://www.springframework.org/schema/beans
       https://www.springframework.org/schema/beans/spring-beans.xsd
       http://www.springframework.org/schema/aop
       https://www.springframework.org/schema/aop/spring-aop.xsd">

   <!--注册bean-->
   <bean id="userservice" class="service.UserServiceImpl"/>
   <bean id="log" class="log.Log"/>
   <bean id="afterLog" class="log.AfterLog"/>
   <!-- 方式二,自定义 -->
   <bean id="diy" class="diy.DiyPointcut"/>
   <aop:config>
       <!--自定义切面-->
       <aop:aspect ref="diy">
           <!--切入点-->
           <aop:pointcut id="point" expression="execution(* service.UserServiceImpl.*(..))"/>
           <aop:before method="before" pointcut-ref="point"/>
           <aop:after method="after" pointcut-ref="point"/>
       </aop:aspect>
   </aop:config>

</beans>
<?xml version="1.0" encoding="UTF-8"?>
<beans xmlns="http://www.springframework.org/schema/beans"
       xmlns:xsi="http://www.w3.org/2001/XMLSchema-instance"
       xmlns:aop="http://www.springframework.org/schema/aop"
       xsi:schemaLocation="http://www.springframework.org/schema/beans
        https://www.springframework.org/schema/beans/spring-beans.xsd
        http://www.springframework.org/schema/aop
        https://www.springframework.org/schema/aop/spring-aop.xsd">

    <!-- 注册 -->
    <bean id="userservice" class="service.UserServiceImpl"/>
    <!--方式三,使用注解实现-->
    <bean id="diyAnnotation" class="diy.DiyAnnotation"></bean>

    <!-- 开启自动代理
        实现方式:默认JDK (proxy-targer-class="fasle")
                 cgbin (proxy-targer-class="true")-->
    <aop:aspectj-autoproxy/>

</beans>
package diy;
import org.aspectj.lang.ProceedingJoinPoint;
import org.aspectj.lang.annotation.After;
import org.aspectj.lang.annotation.Around;
import org.aspectj.lang.annotation.Aspect;
import org.aspectj.lang.annotation.Before;
@Aspect //标注这个类是一个切面
public class DiyAnnotation {
@Before("execution(* service.UserServiceImpl.*(..))")
public void before(){
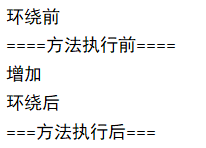
System.out.println("=====方法执行前=====");
}
@After("execution(* service.UserServiceImpl.*(..))")
public void after(){
System.out.println("=====方法执行后=====");
}
//在环绕增强中,我们可以给地暖管一个参数,代表我们要获取切入的点
@Around("execution(* service.UserServiceImpl.*(..))")
public void around(ProceedingJoinPoint joinPoint) throws Throwable {
System.out.println("环绕前");
Object proceed = joinPoint.proceed();
System.out.println("环绕后");
}
}
测试:
public class MyTest5 {
    public static void main(String[] args) {
        ApplicationContext context = new ClassPathXmlApplicationContext("applicationContext.xml");
        //注意:动态代理代理的是接口
        UserService userService = (UserService) context.getBean("userservice");
        userService.add();
    }
}
输出:
Spring中的事务管理
-
声明式事务:AOP
-
编程式事务:需要再代码中,进行事务管理
<!--声明式事务-->
    <bean id="transactionManager" class="org.springframework.jdbc.datasource.DataSourceTransactionManager">
        <constructor-arg ref="datasource" />
    </bean>

    <!--结合aop实现事务织入-->
    <!--配置事务的通知类-->
    <tx:advice id="txAdvice" transaction-manager="transactionManager">
        <!--给哪些方法配置事务-->
        <!--新东西:配置事务的传播特性 propagation-->
        <tx:attributes>
            <tx:method name="add" propagation="REQUIRED"/>
            <tx:method name="delete" propagation="REQUIRED"/>
            <tx:method name="update" propagation="REQUIRED"/>
            <tx:method name="query" read-only="true"/>
            <!-- *号包含上面4个方法:
            <tx:method name="*" propagation="REQUIRED"/> -->
        </tx:attributes>
    </tx:advice>

    <!--配置事务切入-->
    <aop:config>
        <aop:pointcut id="txpointcut" expression="execution(* mapper.*.*(..))"/>
        <aop:advisor advice-ref="txAdvice" pointcut-ref="txpointcut"/>
    </aop:config>
REQUIRED--支持当前事务,如果当前没有事务,就新建一个事务。这是最常见的选择。
NESTED--如果当前存在事务,则在嵌套事务内执行。如果当前没有事务,则进行与REQUIRED类似的操作。
声明事务的本质是:当一个事务发生错误时,可以及时的回滚,而不是一部分执行,错误的不执行。
感悟
spring的重点三大部分:
<?xml version="1.0" encoding="UTF-8"?><beans xmlns="http://www.springframework.org/schema/beans"xmlns:xsi="http://www.w3.org/2001/XMLSchema-instance"xsi:schemaLocation="http://www.springframework.org/schema/beans https://www.springframework.org/schema/beans/spring-beans.xsd">
<bean id="address" class="pojo.Address"><property name="address" value="address你好" /></bean>
<bean id="student" class="pojo.Student"><!--第一种,普通值注入 --><property name="name" value="name你好" /><!--第二种,ref注入 --><property name="address" ref="address" />
<!--数组注入 --><property name="books"><array><value>三国</value><value>西游</value><value>水浒</value></array></property>
<!--list列表注入 --><property name="hobbies"><list><value>唱</value><value>跳</value><value>rap</value><value>篮球</value></list></property>
<!--map键值对注入 --><property name="card"><map><entry key="username" value="root" /><entry key="password" value="root" /></map></property>
<!--set(可去重)注入 --><property name="game"><set><value>wangzhe</value><value>lol</value><value>galname</value></set></property>
<!--空指针null注入 --><property name="wife"><null></null></property>
<!--properties常量注入 --><property name="infor"><props><prop key="id">20200802</prop><prop key="name">cbh</prop></props></property></bean></beans>

 浙公网安备 33010602011771号