
nginx网站服务器,可以支持高并发访问量
第一步:源码编译安装nginx
[root@x101 nginx-1.14.2]# yum install -y pcre-devel zlib-devel openssl
[root@x101 nginx-1.14.2]# ./configure --prefix=/usr/local/nginx --user=nginx --group=nginx
[root@x101 nginx-1.14.2]# make && make install
第二步: 修改主配置文件
[root@x101 conf]# vim nginx.conf
#user nobody;
worker_processes 1;
events {
worker_connections 4096;
}
http {
include mime.types;
default_type application/octet-stream;
sendfile on;
keepalive_timeout 65;
include vhost/*.conf;
}
[root@x101 conf]# mkdir -p /abc{1..2}
[root@x101 conf]# vim vhost/abc1.conf
server {
listen 80;
server_name www.abc1.com;
charset utf8;
location / {
root html/abc1;
index index.html index.htm;
}
}
[root@x101 conf]# vim vhost/abc2.conf
server {
listen 80;
server_name www.abc2.com;
charset utf8;
location / {
root html/abc2;
index index.html index.htm;
}
}
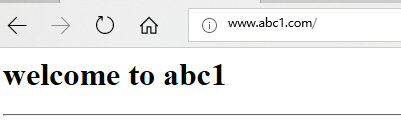
[root@x101 conf]# vim ../html/abc1/index.html
<h1>welcome to abc1</h1>
<hr>
[root@x101 conf]# vim ../html/abc2/index.html
<h1>welcome to abc2</h1>
<hr>
第二步: 添加本地解析,客户端访问测试
修改c:\Windows\System32\drivers\etc\hosts,添加ip地址到域名的解析
192.168.0.155 www.abc1.com
192.168.0.155 www.abc2.com

第四步:添加反向代理
[root@x101 conf]# vim nginx.conf
#user  nobody;
worker_processes  1;

events {
    worker_connections  4096;
}

http {
upstream webserver {
        server 192.168.0.63:80;
        server 192.168.0.64:80;
}

    include       mime.types;
    default_type  application/octet-stream;


    sendfile        on;
    keepalive_timeout  65;
    include  vhost/*.conf;
}
[root@x101 conf]# vim vhost/abc1.conf
   server {
       listen       80;
       server_name  www.abc1.com;

       charset utf8;

       location / {
           root   html/abc1;
           index  index.html index.htm;
       proxy_pass http://webserver;
       }

   }
[root@x101 conf]# vim vhost/abc2.conf
    server {
        listen       80;
        server_name  www.abc2.com;

        charset utf8;

        location / {
            root   html/abc2;
            index  index.html index.htm;
        proxy_pass http://webserver;
        }

    }
[root@x101 conf]# ../sbin/nginx -t
[root@x101 conf]# ../sbin/nginx -s reload
为者常成,行者常至
Give me five~!

 浙公网安备 33010602011771号