自动化运维工具 ~puppet~
 一、简介
puppet是一种Linux、Unix、windows平台的集中配置管理系统,使用自有的puppet描述语言,可管理配置文件、用户、cron任务、软件包、系统服务等。puppet把这些系统实体称之为资源,puppet的设计目标是简化对这些资源的管理以及妥善处理资源间的依赖关系。
puppet采用C/S星状的结构,所有的客户端和一个或几个服务器交互。每个客户端周期的(默认半个小时)向服务器发送请求,获得其最新的配置信息,保证和该配置信息同步。每个puppet客户端每半小时(可以设置)连接一次服务器端, 下载最新的配置文件,并且严格按照配置文件来配置服务器. 配置完成以后,puppet客户端可以反馈给服务器端一个消息. 如果出错,也会给服务器端反馈一个消息.
一、简介
puppet是一种Linux、Unix、windows平台的集中配置管理系统,使用自有的puppet描述语言,可管理配置文件、用户、cron任务、软件包、系统服务等。puppet把这些系统实体称之为资源,puppet的设计目标是简化对这些资源的管理以及妥善处理资源间的依赖关系。
puppet采用C/S星状的结构,所有的客户端和一个或几个服务器交互。每个客户端周期的(默认半个小时)向服务器发送请求,获得其最新的配置信息,保证和该配置信息同步。每个puppet客户端每半小时(可以设置)连接一次服务器端, 下载最新的配置文件,并且严格按照配置文件来配置服务器. 配置完成以后,puppet客户端可以反馈给服务器端一个消息. 如果出错,也会给服务器端反馈一个消息.
一、模板的应用
到目前为止,资源申报、定义类、声明类等所有功能都只能一个manifest文件中实现,但这却非有效的基于puppet管理IT资源架构的方式。实践 中,一般需要把manifest文件分解成易于理解的结构,例如将类文件、配置文件甚至包括后面讲提到的模板文件等分类存放,并且通过某种机制在必要时将 他们整合起来。这种机制即成为“模板”,它有助于结构化、层次化的方式使用puppet,而puppet则基于“模块自动装载器”完成模块装载
从另一个角度来说,模板实际上就是一个按约定的、预定义的机构存放了多个文件或子目录的目录,目录里的这些文件或子目录必须遵循其命名规范。 puppet会按照这种规范在特定位置查找所需的模块文件,不过,这些特定目录页可以通过puppet的配置参数modulepath定义
只要在某模块中定于了一个类,就可以在任何manifest文件中使用它,puppet会自动去查找并装载包含了这个类的定义的manifest文件任 意使用它们。于是,基于模块机制的puppet的主manifest文件就可以变得很小,也更易懂并能基于策略进行定制 注释:控制节点;master 与 slave 时间需要同步;
模块目录的结构
在puppet中,模块本身用一个目录来表示,其需要存放于puppet的modulepath参数所定义的目录中,如/etc/puppet/modules。模块目录名称必须与模块名称相同,需要遵循特定的组织结构
MODULE NAME
manifests
init.pp
files
templates
lib
tests
spec
MODULE NAME:模块名称,也即模块目录名称:模块只能以小写字母开头,可以包含小写字母、数字和下划线,但不能使用“main”和“settings”作为模块名
manifests目录:包含当前模块的所有manifest文件:每个manifest文件包含了一个类或一个定义的类型,此文件访问路径格式为“Modulename::[SubDirectoryName::]ManifestFileName”。
init.pp:只能包含一个单独的类定义,且类的名称必须与模块名称相同
files目录:包含了一组静态的文件,这些文件可被站点下载使用:每个文件的访问路径都遵循puppet:///modules/MODELE_NAME/filename路径格式
lib目录:插件目录,常用于自定义fact及自定义资源类型等
templates目录:存储了manifest用到的模板文件,其访问路径遵循template(‘ModulesName/TemplateName’)格式,后缀名应该为.erb,关于模板文件详细信息,后文有介绍
tests目录:当前模板的使用帮助或使用范例文件,类似如何声明当前模板中的类及定义的类型等
spec目录:类似于tests目录的功能,只不过,其是为lib目录定义的各插件提供使用范例的
[root@node1 ~]# mkdir -p /etc/puppet/modules/nginx/{manifests,files,templates,lib}
[root@node1 ~]# cd /etc/puppet/modules/nginx/
[root@node1 nginx]# cd manifests/
[root@node1 manifests]# vi init.pp
class nginx {
        package {'nginx':
                ensure => installed,
                name  => nginx,
        }
}
[root@node1 manifests]# vi web.pp
class nginx::web inherits nginx {
        service {'nginx':
                ensure => true,
                enable => true,
                name   => nginx,
                require => Package['nginx'],
        }
        file{'web.conf':
                ensure =>file,
                source => "puppet:///modules/nginx/web.conf",
                path   => '/etc/nginx/nginx.conf',
                notify => Service['nginx'],
                require => Package['nginx']
        }
}
[root@node1 manifests]# puppet apply -e 'include nginx::web'
notice: /Stage[main]/Nginx/Package[nginx]/ensure: created
notice: /Stage[main]/Nginx::Web/File[web.conf]/content: content changed '{md5}d9dfc198c249bb4ac341198a752b9458' to '{md5}33d2119b71f717ef4b981e9364530a39'
notice: /Stage[main]/Nginx::Web/Service[nginx]/ensure: ensure changed 'stopped' to 'running'
notice: Finished catalog run in 8.07 seconds
[root@node1 manifests]# grep work /etc/nginx/nginx.conf
worker_processes  2;
准备nginx配置文件,并有意修改nginx的配置文件
[root@node1 ~]# cp /etc/nginx/nginx.conf /etc/puppet/modules/nginx/files/web.conf
[root@node1 ~]# grep worker_processes /etc/puppet/modules/nginx/files/web.conf
worker_processes  2;
可以看到我们的配置执行成功
使用模板配置文件
语法:<%= Ruby Expression %>:替代为表达式的值,在使用表达式时应该使用@引用
<% ruby code %>:仅执行代码,不做任何替换,常用于条件判断或循环语句、设定变量以及在输出之前对数据进行处理
<%# commit %>:注释信息
<%%: 输出<%
%%>:输出%>
如上面的案例,在使用模板后
[root@node1 manifests]# cp /etc/puppet/modules/nginx/files/web.conf /etc/puppet/modules/nginx/templates/conf.erb
[root@node1 manifests]# grep work /etc/puppet/modules/nginx/templates/conf.erb
worker_processes  <%= @processorcount %>;
表示nginx的线程数按照cpu的个数来启动
类应该改为如下所示
class nginx::web inherits nginx {
        service {'nginx':
                ensure => true,
                enable => true,
                name   => nginx,
                require => Package['nginx'],
        }
        file{'web.conf':
                ensure =>file,
                content =>template('nginx/conf.erb'),
                path   => '/etc/nginx/nginx.conf',
                notify => Service['nginx'],
                require => Package['nginx']
        }
}
[root@node1 manifests]# puppet apply -e 'include nginx::web'
notice: /Stage[main]/Nginx/Package[nginx]/ensure: created
notice: /Stage[main]/Nginx::Web/Service[nginx]/ensure: ensure changed 'stopped' to 'running'
notice: Finished catalog run in 8.25 seconds
[root@node1 manifests]# grep work /etc/nginx/nginx.conf
worker_processes  1;
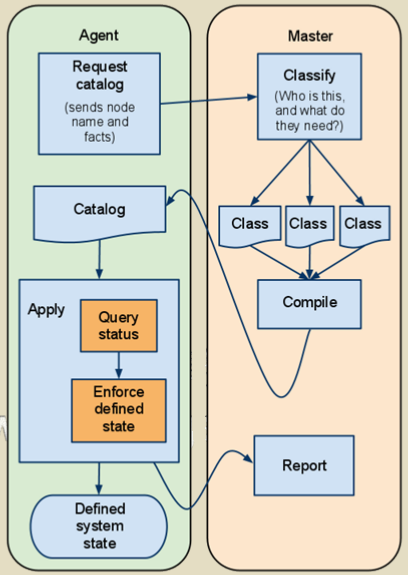
二、master/agent
应用场景:
统一资源管理软件
统一配置系统优化参数
定期检测服务器是否运行
主机上的软件配置合理的属性
1.安装
前提:配置实用epel的yum源,而后使用yum命令安装即可
环境规划
192.168.1.201 puppet-server端
192.168.1.202 puppet-agent端
安装部署puppet服务器端
[root@node1 manifests]# yum install puppet-server
安装部署puppet客户端
[root@node2 ~]# yum install puppet -y
2.解析双方主机
解析双方主机,可以使用DNS和hosts文件,由于本处实验的缘故,故使用的为/etc/hosts文件来解析双方主机
建议的主机命名方式:
角色名-运营商-机房名-机器ip.域名
[root@node1 manifests]# cat /etc/hosts
127.0.0.1   localhost localhost.localdomain localhost4 localhost4.localdomain4
::1         localhost localhost.localdomain localhost6 localhost6.localdomain6
172.16.0.1  server.magelinux.com server
192.168.1.201 node1.firefox.com node1
192.168.1.202 node2.firefox.com node2
192.168.1.203 node3.firefox.com node3
192.168.1.204 node4.firefox.com node4
3.启动
1)启动puppet服务器端
收起启动puppet守护进程时,其会自动进行运行环境的初始化,例如创建一个本地CA及服务器端相关的证书和密钥等。初始化操作完成后,puppet 就会监听指定的套接字并等待客户端的连接请求。默认情况下,其证书和密钥等文件位于/var/lib/puppet/ssl目录中
出于调试的目的,建议首次启动puppet服务进程可以以非守护进程方式进行,并让其输出详细信息以便于观察初始化过程,如下所示,其逐步展示了创建本 地主叫向CA申请证书、获得证书以及CA移除证书签署请求的过程等,而后启动服务进程并准备接受各agent端的连接请求
使用puppet master --genconfig可以查看服务器端的配置信息,建议将其输出到/etc/puppet/puppet.conf中
[root@node1 ~]# puppet master --genconfig >> /etc/puppet/puppet.conf
注意:如果此前曾以其主机名或各种原因启动过puppet客户端过程并完成过初始化,其证书文件将无法符合本次启动的需要:此时,需要先情况/var/lib/puppet/ssl目录方可完成后续的初始化操作
如上述的测试启动没有问题,可终止当前的启动后将其以守护进程方式启动
# 安装puppet-server程序包
yum localinstall facter-1.7.3-1.el6.x86_64.rpm puppet-2.7.25-1.el6.noarch.rpm puppet-server-2.7.25-1.el6.noarch.rpm
# 生成master配置文件:
puppet master --genconfig >> /etc/puppet/puppet.conf
# 启动puppetmaster服务
puppetmasterd -v -d --no-daemonize # 前台测试启动
service puppetmaster start # 正式启动服务
# 服务验证:ss -antupl |grep 8140
2)启动puppet客户端
puppet agent在首次启动时,会想起指定的puppet server申请证书,并完成后续连接请求,同样的理由,处于测试的目的,接入当前puppet集群中的首个agent节点可以以非守护进程的方式运行,以观察其初始化过程
[root@node2 ~]# puppet agent --server=node1.firefox.com --no-daemonize --debug
info: Creating a new SSL key for node2.firefox.com
info: Caching certificate for ca
info: Creating a new SSL certificate request for node2.firefox.com
info: Certificate Request fingerprint (md5): BC:B2:36:9F:B5:78:CD:60:1E:72:9A:D5:88:DE:4B:57
此时,在puppet服务器端使用puppet cert命令管理客户端的证书请求,其--list选项能够查看等待签署证书的客户端列表,而--sign选项可用于为指定节点签署证书,如果要一次性地多个节点证书申请进行签署可以使用--all选项
[root@node1 ~]# puppet cert --list
  "node2.firefox.com" (BC:B2:36:9F:B5:78:CD:60:1E:72:9A:D5:88:DE:4B:57)
[root@node1 ~]# puppet cert --sign node2.firefox.com
notice: Signed certificate request for node2.firefox.com
notice: Removing file Puppet::SSL::CertificateRequest node2.firefox.com at '/var/lib/puppet/ssl/ca/requests/node2.firefox.com.pem
一旦agent节点收到签署过的证书,其将会显示如下信息
info: Caching certificate for node2.firefox.com
notice: Starting Puppet client version 2.7.25
确保上述agent相关操作不存在问题后,便可以将--server选项指定的信息存储与agent的配置文件中,并以服务的方式启动puppet agent了。其配置文件为/etc/puppet/puppet.conf,配置完整既可以期待能够puppet
[root@node2 ~]# echo "server=node1.firefox.com" >> /etc/puppet/puppet.conf
[root@node2 ~]# service puppet start
Starting puppet:                                           [  OK  ]
[root@node2 ~]# chkconfig puppet on
agent配置
# 安装puppet程序包
yum localinstall facter-1.7.3-1.el6.x86_64.rpm puppet-2.7.25-1.el6.noarch.rpm
# 编辑配置文件
vi /ect/puppet/puppet.conf # 在[agent]段添加server=Puppetmaster_Hostname,如
    server = master.lamp.com
# 启动puppet服务
puppet agent --server mem.lamp.com -v -d --noop --test # 测试启动,不实际应用配置
service puppet start # 正式启动agent服务
chkconfig puppet on # 配置开启启动
master签署证书
# 手动签发:
puppet cert list # 显示待签发节点的证书请求
puppet cert sign Node_Name # 签署某一agent的请求
puppet cert sign --all # 一次性签署全部请求
# 自动签发:
cat > /etc/puppet/autosign.conf <<EOF
*.firefox.com
EOF # 会对所有来自firefox.com的主机请求都自动签发
# 注:master端的任何修改,都要重新装载puppetmaster服务,即执行如下命令即可
service puppetmaster reload
4.授权访问
在puppet服务器端的/etc/puppet/manifests/中创建site.pp,在master/agent时,所有节点清单文件入口文件为site.pp
[root@node1 manifests]# pwd
/etc/puppet/manifests
[root@node1 manifests]# ls
node2.mysql.com.pp site.pp
[root@node1 manifests]# cat node2.firefox.com.pp
node 'node2.firefox.com' {
include nginx::web
}
[root@node1 manifests]# cat site.pp
import "*.forefox.com.pp"
建议:一类节点使用一个清单文件,所有清单文件都在site.pp中使用improt包含进来,清单文件修改后应重启文件
5.自动签发证书
可以设置master自动签发所有的证书,我们只需要在/etc/puppet目录下创建autosign.conf文件即可
[root@node1 ~]# echo "*.firefox.com" > /etc/puppet/autosign.con
这样就会对所有来自magedu.conf的机器的请求自动签署证书
6.puppet kick功能实现
puppet客户端默认每30分钟很服务器通讯一次,但是有时,我们希望服务器能够给客户端紧急推送一些人物,于是就有了puppet kick(puppet 2.6以前叫puppetrun)
1)编辑客户端配置文件/etc/puppet/puppet.conf在[agent]端中添加如下
[root@node2 ~]# echo "listen=true" >> /etc/puppet/puppet.conf
[root@node2 puppet]# ss -tnl
State       Recv-Q Send-Q             Local Address:Port               Peer Address:Port
LISTEN      0      5                              *:8139                          *:*
2)在客户端编辑或创建新文件/etc/puppet/namespaceauth.conf,包含下面内容
[puppetrunner]
allow *.firefox.com
3)在客户端编辑文件auth.conf,添加如下内容
path    /run
  method  save
  auth    any
  allow   *.firefox.com
4)推送方法,在服务器端运行命令
[root@node1 puppet]# puppet kick -p 10 node2.firefox.com
Triggering node2.firefox.com
Getting status
status is success
node2.firefox.com finished with exit code 0
Finished
查看node2
[root@node2 puppet]# rpm -q nginx
nginx-1.0.15-5.el6.x86_64
[root@node2 puppet]# grep work /etc/nginx/nginx.conf
worker_processes  1;
错误信息,惨痛的教训,客户端一致在报这个错误
err: Could not retrieve catalog from remote server: SSL_connect returned=1 errno=0 state=SSLv3 read server certificate B: certificate verify failed: [certificate is not yet valid for /CN=Puppet CA: node1.firefox.com]
warning: Not using cache on failed catalog
err: Could not retrieve catalog; skipping run
debug: report supports formats: b64_zlib_yaml pson raw yaml; using pson
err: Could not send report: SSL_connect returned=1 errno=0 state=SSLv3 read server certificate B: certificate verify failed: [certificate is not yet valid for /CN=Puppet CA: node1.firefox.com]
解决方法:
两台服务器需要时间同步
7.安装配置puppet-dashboard
1)安装
[root@node1 puppet]# rpm -ivh http://yum.puppetlabs.com/puppetlabs-release-el-6.noarch.rpm //安装官方通过的yum仓库
[root@node1 puppet]# yum install puppet-dashboard -y
[root@node1 puppet]# yum install mysql-server mysql -y
2)数据库授权
mysql> create database dashboard character set utf8;
Query OK, 1 row affected (0.00 sec)
mysql> grant all on dashboard.* to 'dbuser'@'192.168.1.%' identified by 'firefox';
Query OK, 0 rows affected (0.00 sec)
mysql> flush privileges;
Query OK, 0 rows affected (0.00 sec)
3)修改配置文件,dashboard的配置文件为/usr/share/puppet-dashboard/config/database.yml,修改如下参数
production:
  host:192.168.1.201
  database: dashboard
  username: dbuser
  password:firefox
  encoding: utf8
  adapter: mysql
为dashboard导入依赖的数据表
[root@node1 config]# gem install rake
[root@node1 puppet]# cd /usr/share/puppet-dashboard/config
[root@node1 config]# rake gems::refresh_specs
[root@node1 config]# rake RAILS_ENV=production db:migrate
启动服务
[root@node1 config]# service puppet-dashboard start
Starting Puppet Dashboard: => Booting WEBrick
=> Rails 2.3.17 application starting on http://0.0.0.0:3000
                                                           [  OK  ]
4)配置puppet服务器和客户端
服务器端配置
在puppetmaster的配置文件中添加如下内容
 reports = store, http
    reporturl = http://192.168.1.201:3000/reports/upload
在[master]中添加
客户端配置
report=true
在[agent]中添加
配置完成后重启puppet
5)测试

还可以在页面中添加节点和类文件
终于完成了,一个时间不同步弄了2小时才找出错误。

 浙公网安备 33010602011771号