uni-app x开发商城系统,社区图片,左侧结构样式,数据渲染,点击高亮
一、概述
上一篇文章,已经实现了联系我们,地图显示,拨打电话。
接下来,实现社区图片,左侧结构样式,效果如下:
二、scroll-view
可滚动视图区域。用于区域滚动。
官方文档:https://uniapp.dcloud.net.cn/component/scroll-view.html
修改 pages/pics/pics.uvue文件,增加view
完整代码如下:
<template>
    <view class="pics">
        <!-- 左侧分类 -->
        <scroll-view class="left" style="width: 200rpx;height: 100vh;border-right: 1px solid #eee;" scroll-y="true">
            <view v-for="index in 20" :key="index" :class="index==1?'active':''">
                家居生活 {{index}}
            </view>
        </scroll-view>
    </view>
</template>

<script>
    export default {
        data() {
            return {

            }
        },
        methods: {

        }
    }
</script>

<style lang="scss">
    page {
        display: flex;
        height: 100%;
    }

    .pics {
        height: 100%;
        display: flex;

        .left {
            view {
                height: 60px;
                line-height: 60px;
                color: #333;
                text-align: center;
                font-size: 30rpx;
                border-top: 1px solid #eee;
            }

            .active {
                background: $shop-color;
                color: #fff;
            }
        }
    }
</style>
说明:
scroll-y="true",允许纵向滚动
view做了一下for循环,模拟2个分类。
:class="index==1?'active':''",表示第一个高亮显示。
编译运行,效果如下:
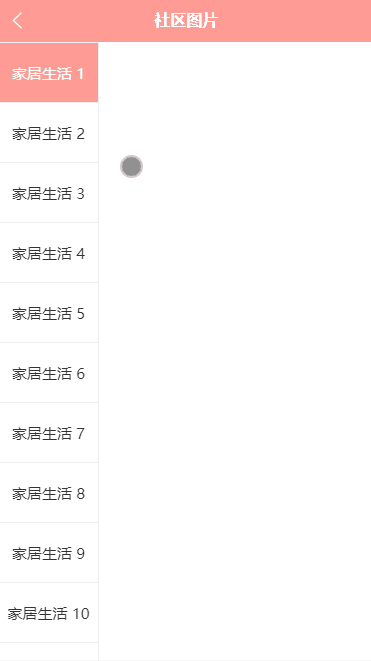
可以看到左侧区域,能上下滑动。
三、数据渲染
左侧展示的分类是固定的,接下来需要调用api接口,渲染数据
修改 pages/pics/pics.uvue文件,调用api
完整代码如下:
<template>
<view class="pics">
<!-- 左侧分类 -->
<scroll-view class="left" style="width: 200rpx;height: 100vh;border-right: 1px solid #eee;" scroll-y="true">
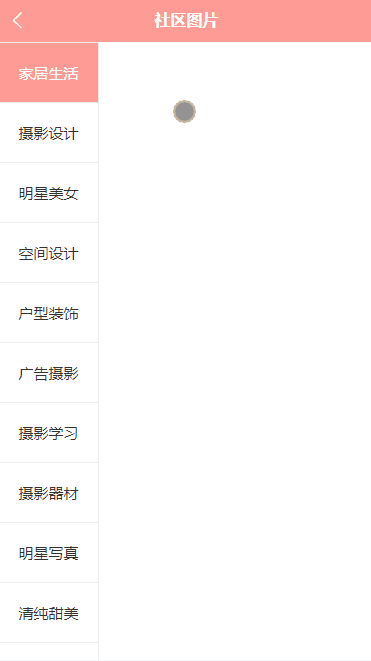
<view v-for="(item,index) in picCates" :key="item.id" :class="index==1?'active':''">
{{item.title}}
</view>
</scroll-view>
</view>
</template>
<script>
export default {
data() {
return {
picCates: [],
}
},
onLoad() {
this.getPicsList()
},
methods: {
// 获取图片分类
async getPicsList() {
try {
const res = await this.$http.get('/api/getimgcategory', {})
// console.log("分类列表数据", res.message);
// 分类数据回显
this.picCates = res.message;
} catch (err : any) {
console.log("err", err)
uni.showToast({
title: '获取图片分类失败' + err.statusCode,
});
}
},
}
}
</script>
<style lang="scss">
page {
display: flex;
height: 100%;
}
.pics {
height: 100%;
display: flex;
.left {
view {
height: 60px;
line-height: 60px;
color: #333;
text-align: center;
font-size: 30rpx;
border-top: 1px solid #eee;
}
.active {
background: $shop-color;
color: #fff;
}
}
}
</style>
说明:
这里定义了一个方法getPicsList,获取图片分类数据,然后使用for循环遍历。
编译运行,效果如下:

四、 点击高亮
接下来需要实现,点击哪个分类,就高亮显示。
修改 pages/pics/pics.uvue文件,增加点击事件,class动态判断
<template>
    <view class="pics">
        <!-- 左侧分类 -->
        <scroll-view class="left" style="width: 200rpx;height: 100vh;border-right: 1px solid #eee;" scroll-y="true">
            <view v-for="(item,index) in picCates" :key="item.id" :class="active==index?'active':''"
                @click="leftCliclActive(index,item.id)">
                {{item.title}}
            </view>
        </scroll-view>
    </view>
</template>

<script>
    export default {
        data() {
            return {
                //分类数据
                picCates: [],
                //选中高亮 默认0,判断+1
                active: 0,
            }
        },
        onLoad() {
            this.getPicsList()
        },
        methods: {
            // 获取图片分类
            async getPicsList() {
                try {
                    const res = await this.$http.get('/api/getimgcategory', {})
                    // console.log("分类列表数据", res.message);
                    // 分类数据回显
                    this.picCates = res.message;
                } catch (err : any) {
                    console.log("err", err)
                    uni.showToast({
                        title: '获取图片分类失败' + err.statusCode,
                    });
                }
            },
            //点击分类设置为active
            async leftCliclActive(index, id) {
                console.log("点击的分类下标:", index, "id:", id);
                this.active = index;
            },
        }
    }
</script>

<style lang="scss">
    page {
        display: flex;
        height: 100%;
    }

    .pics {
        height: 100%;
        display: flex;

        .left {
            view {
                height: 60px;
                line-height: 60px;
                color: #333;
                text-align: center;
                font-size: 30rpx;
                border-top: 1px solid #eee;
            }

            .active {
                background: $shop-color;
                color: #fff;
            }
        }
    }
</style>
说明:
leftCliclActive,点击分类设置为active,需要传递2个参数
active,这个是在data里面定义的,用来判断是否高亮显示。
:class="active==index?'active':'',根据点击的索引值进行判断,是否增加高亮显示的样式。
编译运行,效果如下:

 浙公网安备 33010602011771号