ElasticSearch 6.x head插件安装
一、Head插件简介
ElasticSearch-head是一个H5编写的ElasticSearch集群操作和管理工具,可以对集群进行傻瓜式操作。
- 显示集群的拓扑,并且能够执行索引和节点级别操作
- 搜索接口能够查询集群中原始json或表格格式的检索数据
- 能够快速访问并显示集群的状态
- 有一个输入窗口,允许任意调用RESTful API。这个接口包含几个选项,可以组合在一起以产生有趣的结果;
- 5.0版本之前可以通过plugin名安装,5.0之后可以独立运行。
二、基于docker安装
这里主要介绍2种操作系统的安装方法
centos镜像
新建目录/opt/elasticsearch-head-centos
mkdir /opt/elasticsearch-head-centos
cd /opt/elasticsearch-head-centos
dockerfile
编辑dockerfile文件
FROM centos
# 安装
RUN yum install -y bzip2.x86_64 unzip wget && yum clean all && \
  cd /etc/yum.repos.d/ && \
  wget http://mirrors.163.com/.help/CentOS7-Base-163.repo && \
  rm -rf /etc/yum.repos.d/CentOS-Base.repo && \
  yum clean all && yum makecache && \
  yum install -y epel-release.noarch && \
  yum install -y nodejs && \
  npm install -g cnpm --registry=https://registry.npm.taobao.org && \
  npm install -g grunt && \
  npm install -g grunt-cli --registry=https://registry.npm.taobao.org --no-proxy && \
  cd / && wget https://github.com/mobz/elasticsearch-head/archive/master.zip && \
  unzip master.zip -d / && rm -rf master.zip && cd /elasticsearch-head-master && \
  npm install -g cnpm --registry=https://registry.npm.taobao.org && \
  cnpm install

EXPOSE 9100
# 工作目录
WORKDIR /elasticsearch-head-master
# 启动脚本
RUN echo '#!/bin/sh'>/run.sh && echo 'grunt server'>>/run.sh && chmod +x /run.sh
ENTRYPOINT [ "/run.sh"]
这里选用的镜像是centos,版本是centos 7
注意:node版本必须大于6.0,使用yum安装就是大于6.0的版本!
很多人都不知道ENTRYPOINT这个参数是干啥的?我重新声明一下,在启动镜像的时候,它会自动调用ENTRYPOINT定义的命令。
所以在dockerfile里面的RUN中,没有必要去启动服务!
生成镜像
docker build -t elasticsearch-head-centos /opt/elasticsearch-head-centos
启动容器
docker run -d -it --restart=always -p 9100:9100 elasticsearch-head-centos
访问页面
http://192.168.91.128:9100/
效果如下:
ubuntu镜像
新建目录/opt/elasticsearch-head-ubuntu
mkdir /opt/elasticsearch-head-ubuntu
cd /opt/elasticsearch-head-ubuntu
在此目录下,新建文件sources.list
vim sources.list
内容如下:
deb http://mirrors.aliyun.com/ubuntu/ xenial main
deb-src http://mirrors.aliyun.com/ubuntu/ xenial main

deb http://mirrors.aliyun.com/ubuntu/ xenial-updates main
deb-src http://mirrors.aliyun.com/ubuntu/ xenial-updates main

deb http://mirrors.aliyun.com/ubuntu/ xenial universe
deb-src http://mirrors.aliyun.com/ubuntu/ xenial universe
deb http://mirrors.aliyun.com/ubuntu/ xenial-updates universe
deb-src http://mirrors.aliyun.com/ubuntu/ xenial-updates universe

deb http://mirrors.aliyun.com/ubuntu/ xenial-security main
deb-src http://mirrors.aliyun.com/ubuntu/ xenial-security main
deb http://mirrors.aliyun.com/ubuntu/ xenial-security universe
deb-src http://mirrors.aliyun.com/ubuntu/ xenial-security universe
dockerfile
编辑dockerfile文件
FROM ubuntu:16.04
# 修改更新源为阿里云
ADD sources.list /etc/apt/sources.list
# 安装jdk和elasticsearch
RUN apt-get update && apt install -y npm curl && \
  npm install -y npm@latest -g && \
  npm install -g n && \
  n latest && \
  npm install -g cnpm --registry=https://registry.npm.taobao.org && \
  npm install -g grunt && \
  npm install -g grunt-cli --registry=https://registry.npm.taobao.org --no-proxy && \
  apt-get install -y wget unzip && apt-get clean all && \
  wget https://github.com/mobz/elasticsearch-head/archive/master.zip && \
  unzip master.zip -d / && rm -rf master.zip && \
  cd /elasticsearch-head-master/ && \
  npm install && \
  cnpm install

EXPOSE 9100
# 工作目录
WORKDIR /elasticsearch-head-master
# 添加启动脚本
RUN echo '#!/bin/sh'>/run.sh && echo 'grunt server'>>/run.sh && chmod +x /run.sh
ENTRYPOINT [ "/run.sh"]
注意:这里选用的镜像,版本必须是ubuntu:16.04。最新版本安装可能有问题
下面这几行命令,表示安装最新版的npm。因为默认的npm版本是4.x,无法符合head插件的要求!
npm install -y npm@latest -g
npm install -g n
n latest
生成镜像
docker build -t elasticsearch-head-ubuntu /opt/elasticsearch-head-ubuntu
启动容器
注意:这一步,可不需要执行。因为上面已经映射了9100端口,这里再执行会报错!
docker run -d -it --restart=always -p 9100:9100 elasticsearch-head-ubuntu
三、head插件连接elasticsearch
在这篇博客中,链接如下:
https://www.cnblogs.com/xiao987334176/p/9957879.html#autoid-3-6-0
已经介绍了elasticsearch的安装,直接启动镜像即可!
访问elasticsearch页面
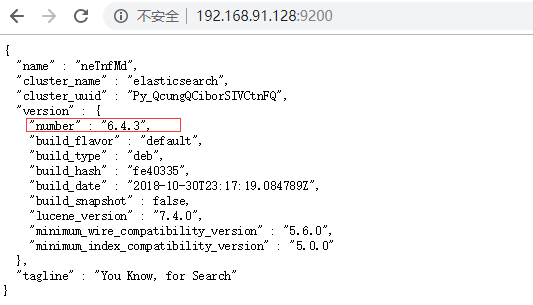
可以发现,版本是6.4.3
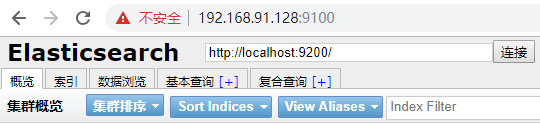
打开head插件的页面,输入elasticsearch访问地址,点击连接

咦,怎么点击,网页下方就是没有反应。为什么呢?
打开elasticsearch-head的github地址
https://github.com/mobz/elasticsearch-head
这里面有介绍
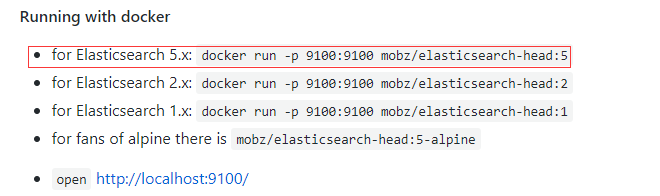
它只说了,能连接到5.x。那么6.x能不能连接呢?不知道!
那么因此,我们可能会得出结论,head插件,确实不支持6.x啊,我点击了半天,确实没有反应啊!
要是head插件不能连接6.x,那我写这篇文章,岂不打脸吗?此处省略一万字.....
连接6.x解决方案
其实问题的关键点,不在于head插件,而是在于elasticsearch。
elasticsearch还漏了2行关键的配置参数
http.cors.enabled: true
http.cors.allow-origin: "*"
登录elasticsearch所在的服务器,进入目录/opt/elasticsearch,编辑run.sh
增加2行配置
#!/bin/bash
set -e

# 添加时区
TZ=Asia/Shanghai
ln -snf /usr/share/zoneinfo/$TZ /etc/localtime && echo $TZ > /etc/timezone

# 设置权限
chown -R elasticsearch:elasticsearch /etc/elasticsearch

# 判断目录是否存在,否则创建
if [ ! -d /var/lib/elasticsearch/data ];then
  mkdir -p /var/lib/elasticsearch/data
  chown -R elasticsearch:elasticsearch /var/lib/elasticsearch/data
fi
if [ ! -d /var/log/elasticsearch/logs ];then
  mkdir -p /var/log/elasticsearch/logs
  chown -R elasticsearch:elasticsearch /var/log/elasticsearch/logs
fi

# 修改数据和日志目录
sed -i '33s@/var/lib/elasticsearch@/var/lib/elasticsearch/data@g' /etc/elasticsearch/elasticsearch.yml
sed -i '37s@/var/log/elasticsearch@/var/log/elasticsearch/logs@g' /etc/elasticsearch/elasticsearch.yml

# 修改绑定ip和端口
sed -i '55s@#network.host: 192.168.0.1@network.host: 0.0.0.0@g' /etc/elasticsearch/elasticsearch.yml
sed -i '59s@#http.port: 9200@http.port: 9200@g' /etc/elasticsearch/elasticsearch.yml

# 允许head插件可以访问es
echo 'http.cors.enabled: true' >> /etc/elasticsearch/elasticsearch.yml
echo 'http.cors.allow-origin: "*"'  >>/etc/elasticsearch/elasticsearch.yml


# 修改启动文件,去掉-d参数,避免后台运行
sed -i 72's@-d -p $PID_FILE@-p $PID_FILE@g' /etc/init.d/elasticsearch

# 启动elasticsearch,要hold住,否则容器启动就退出了!
/etc/init.d/elasticsearch start
root@xiao:/opt/elasticsearch# cat run.sh
#!/bin/bash
set -e

# 添加时区
TZ=Asia/Shanghai
ln -snf /usr/share/zoneinfo/$TZ /etc/localtime && echo $TZ > /etc/timezone

# 设置权限
chown -R elasticsearch:elasticsearch /etc/elasticsearch

# 判断目录是否存在,否则创建
if [ ! -d /var/lib/elasticsearch/data ];then
  mkdir -p /var/lib/elasticsearch/data
  chown -R elasticsearch:elasticsearch /var/lib/elasticsearch/data
fi
if [ ! -d /var/log/elasticsearch/logs ];then
  mkdir -p /var/log/elasticsearch/logs
  chown -R elasticsearch:elasticsearch /var/log/elasticsearch/logs
fi

# 修改数据和日志目录
sed -i '33s@/var/lib/elasticsearch@/var/lib/elasticsearch/data@g' /etc/elasticsearch/elasticsearch.yml
sed -i '37s@/var/log/elasticsearch@/var/log/elasticsearch/logs@g' /etc/elasticsearch/elasticsearch.yml

# 修改绑定ip和端口
sed -i '55s@#network.host: 192.168.0.1@network.host: 0.0.0.0@g' /etc/elasticsearch/elasticsearch.yml
sed -i '59s@#http.port: 9200@http.port: 9200@g' /etc/elasticsearch/elasticsearch.yml

# 允许head插件可以访问es
echo 'http.cors.enabled: true' >> /etc/elasticsearch/elasticsearch.yml
echo 'http.cors.allow-origin: "*"'  >>/etc/elasticsearch/elasticsearch.yml


# 修改启动文件,去掉-d参数,避免后台运行
sed -i 72's@-d -p $PID_FILE@-p $PID_FILE@g' /etc/init.d/elasticsearch

# 启动elasticsearch,要hold住,否则容器启动就退出了!
/etc/init.d/elasticsearch start
重新生成elasticsearch镜像
docker build -t elasticsearch-6.4.3 /opt/elasticsearch
杀掉elasticsearch进程
docker rm aee7068b2c4e -f
重新启动elasticsearch
docker run -d -it --restart=always -p 9200:9200 elasticsearch-6.4.3
等待几分钟,访问elasticsearch页面
访问elasticsearch页面
再次使用head插件页面连接
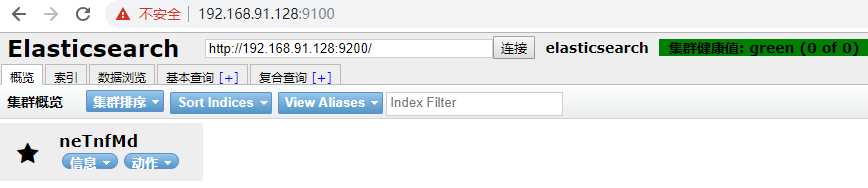
这样,就连接成功了!!!
本文参考链接:
https://blog.csdn.net/chengyuqiang/article/details/78838175

 浙公网安备 33010602011771号