
Modelsim联合Matlab搭建FPGA图像仿真平台
一、原理
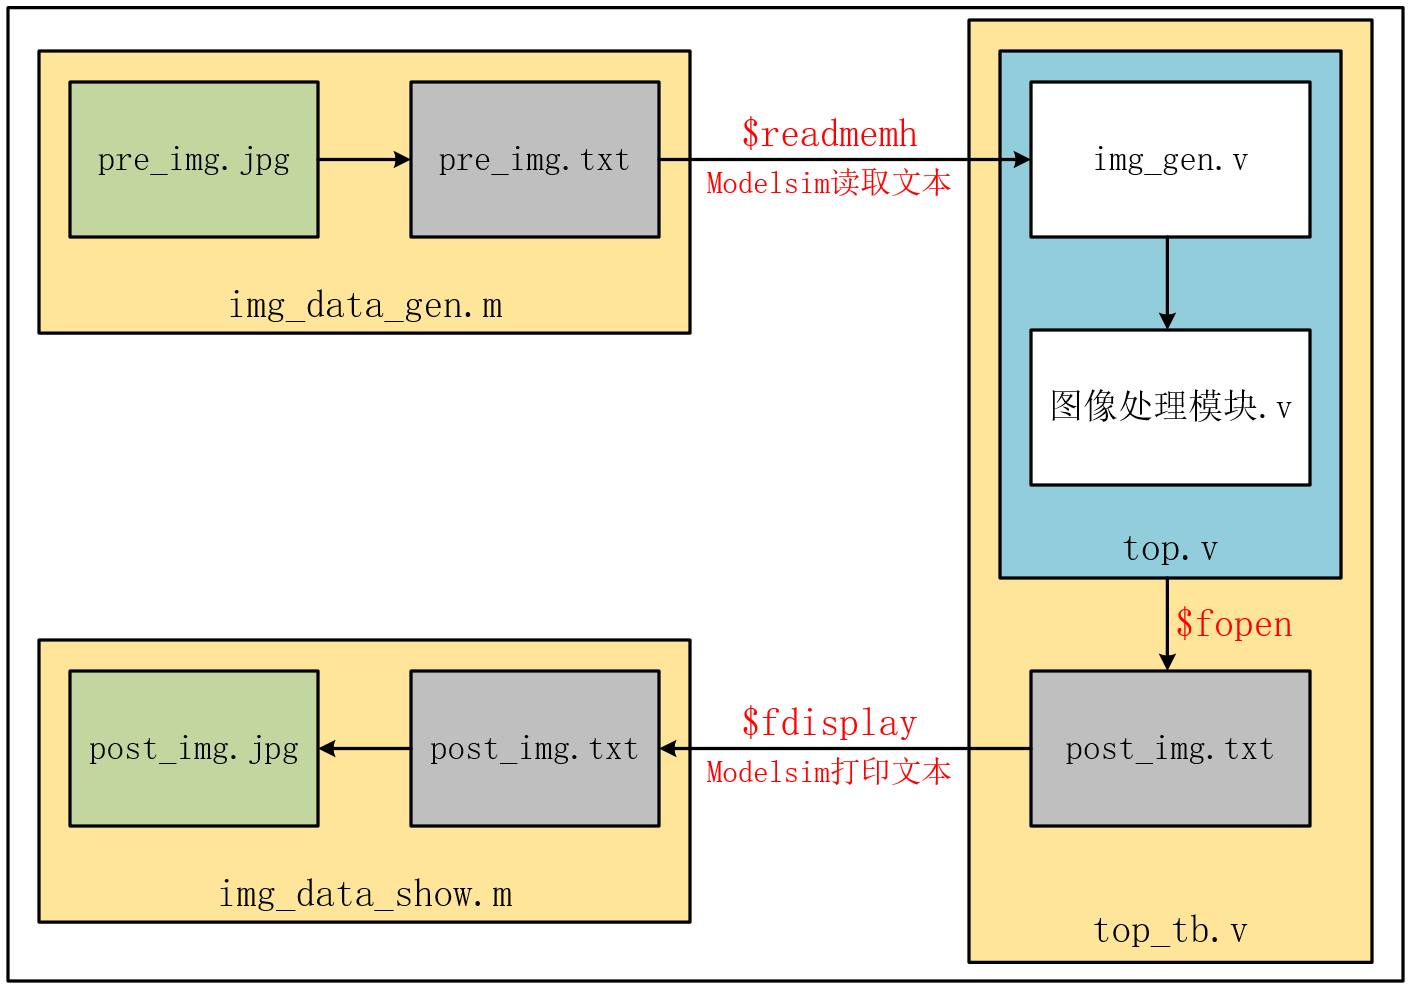
1、Matlab程序img_data_gen.m将要处理的pre_img.jpg图片转为pre_img.txt文本。
2、Verilog程序img_gen.v读取该pre_img_txt文本,并进行一系列的图像处理。
3、图像处理后的结果用Verilog程序top_tb.v输出为另一个post_img.txt文本。
4、matlab程序img_data_show.m读取该post_img.txt文本,转为post_img.jpg图片
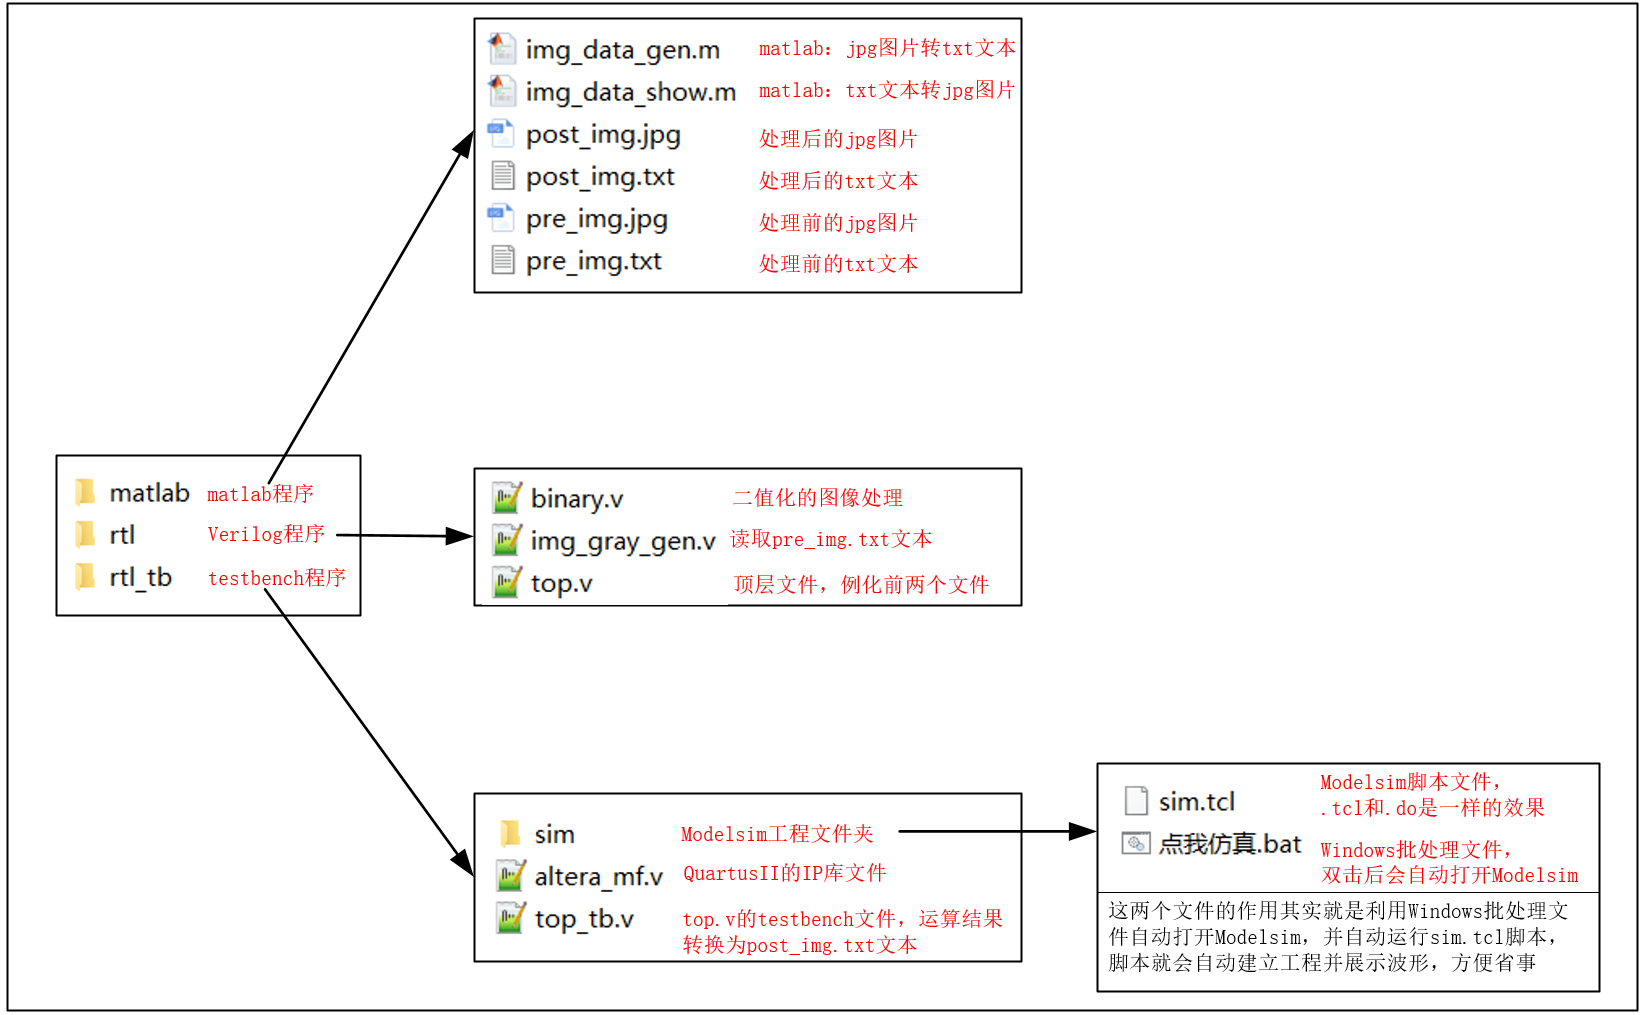
二、文件说明
三、操作步骤
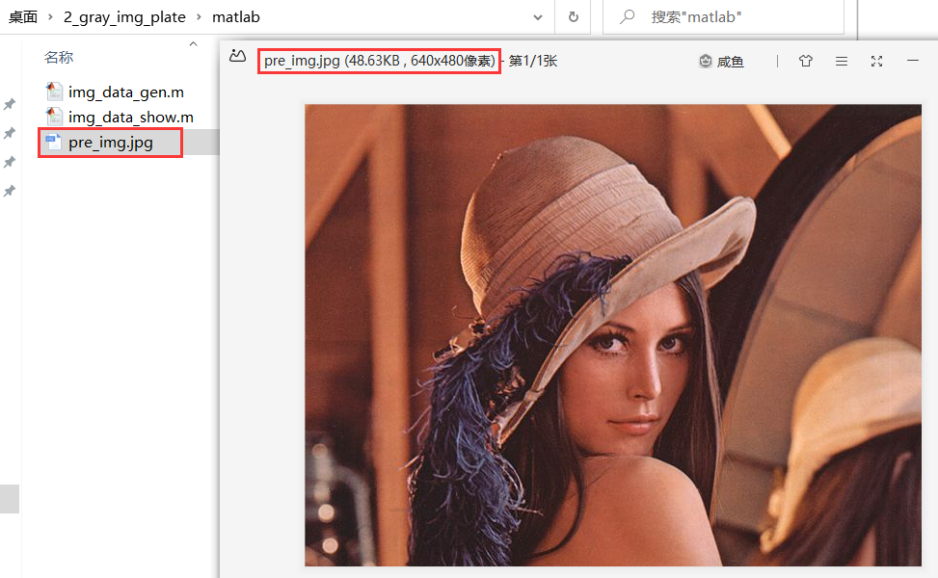
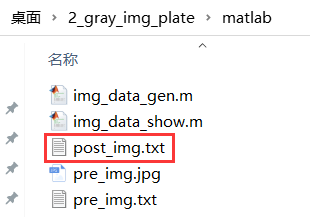
1、要处理的图片的分辨率调为640x480,命名为pre_img.jpg,放入matlab文件夹中。
2、双击打开matlab程序img_data_gen.m,点击运行。
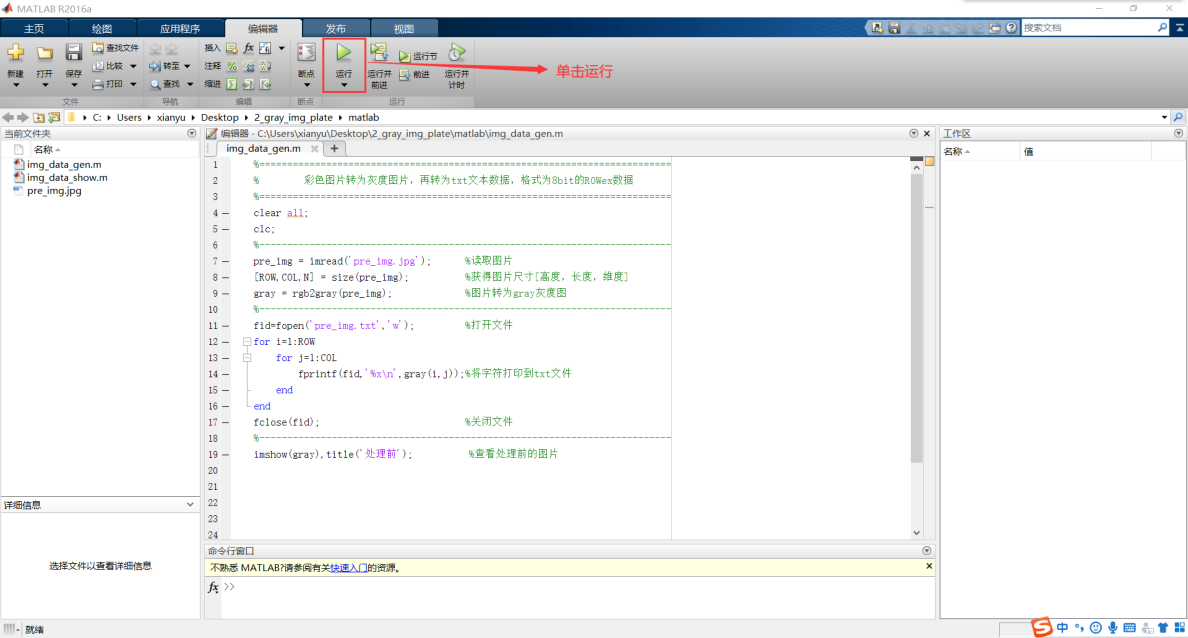
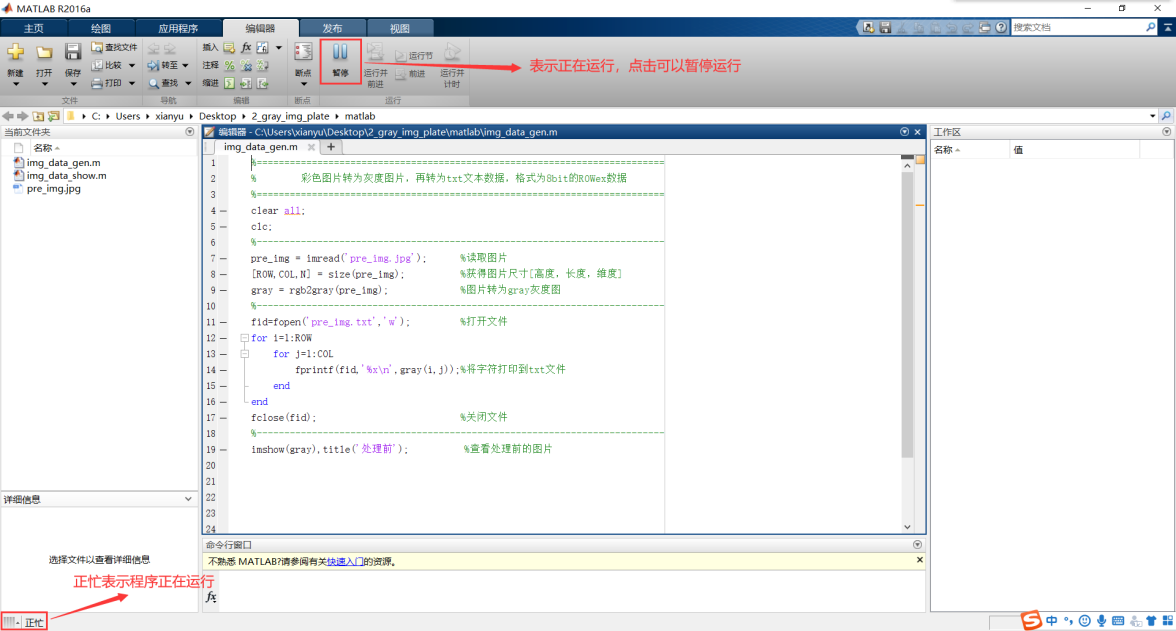
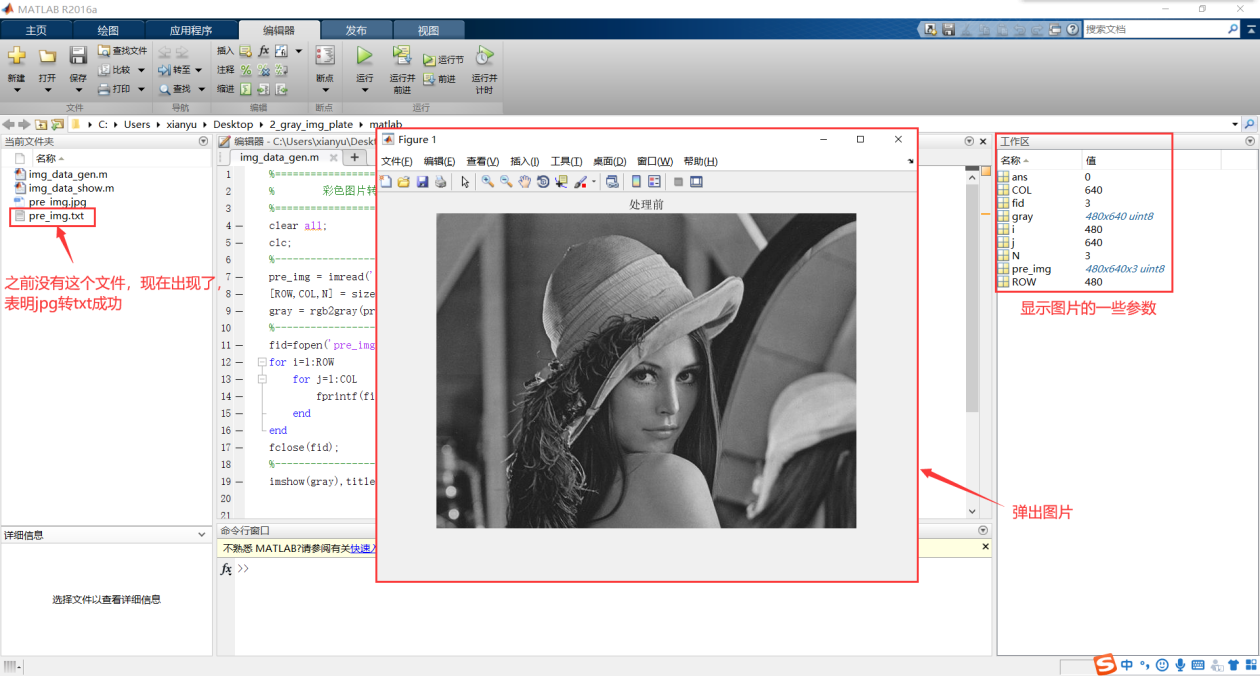
3、运行结束后,matlab会自动弹出这张图片,同时发现已经生成了pre_img.txt文本。
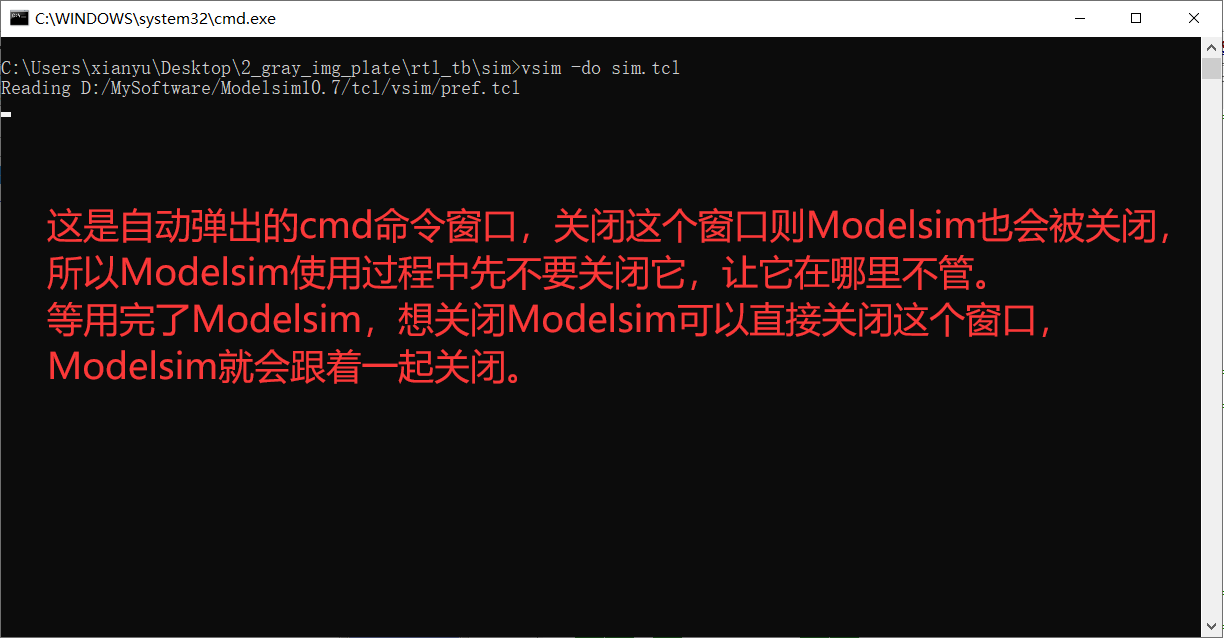
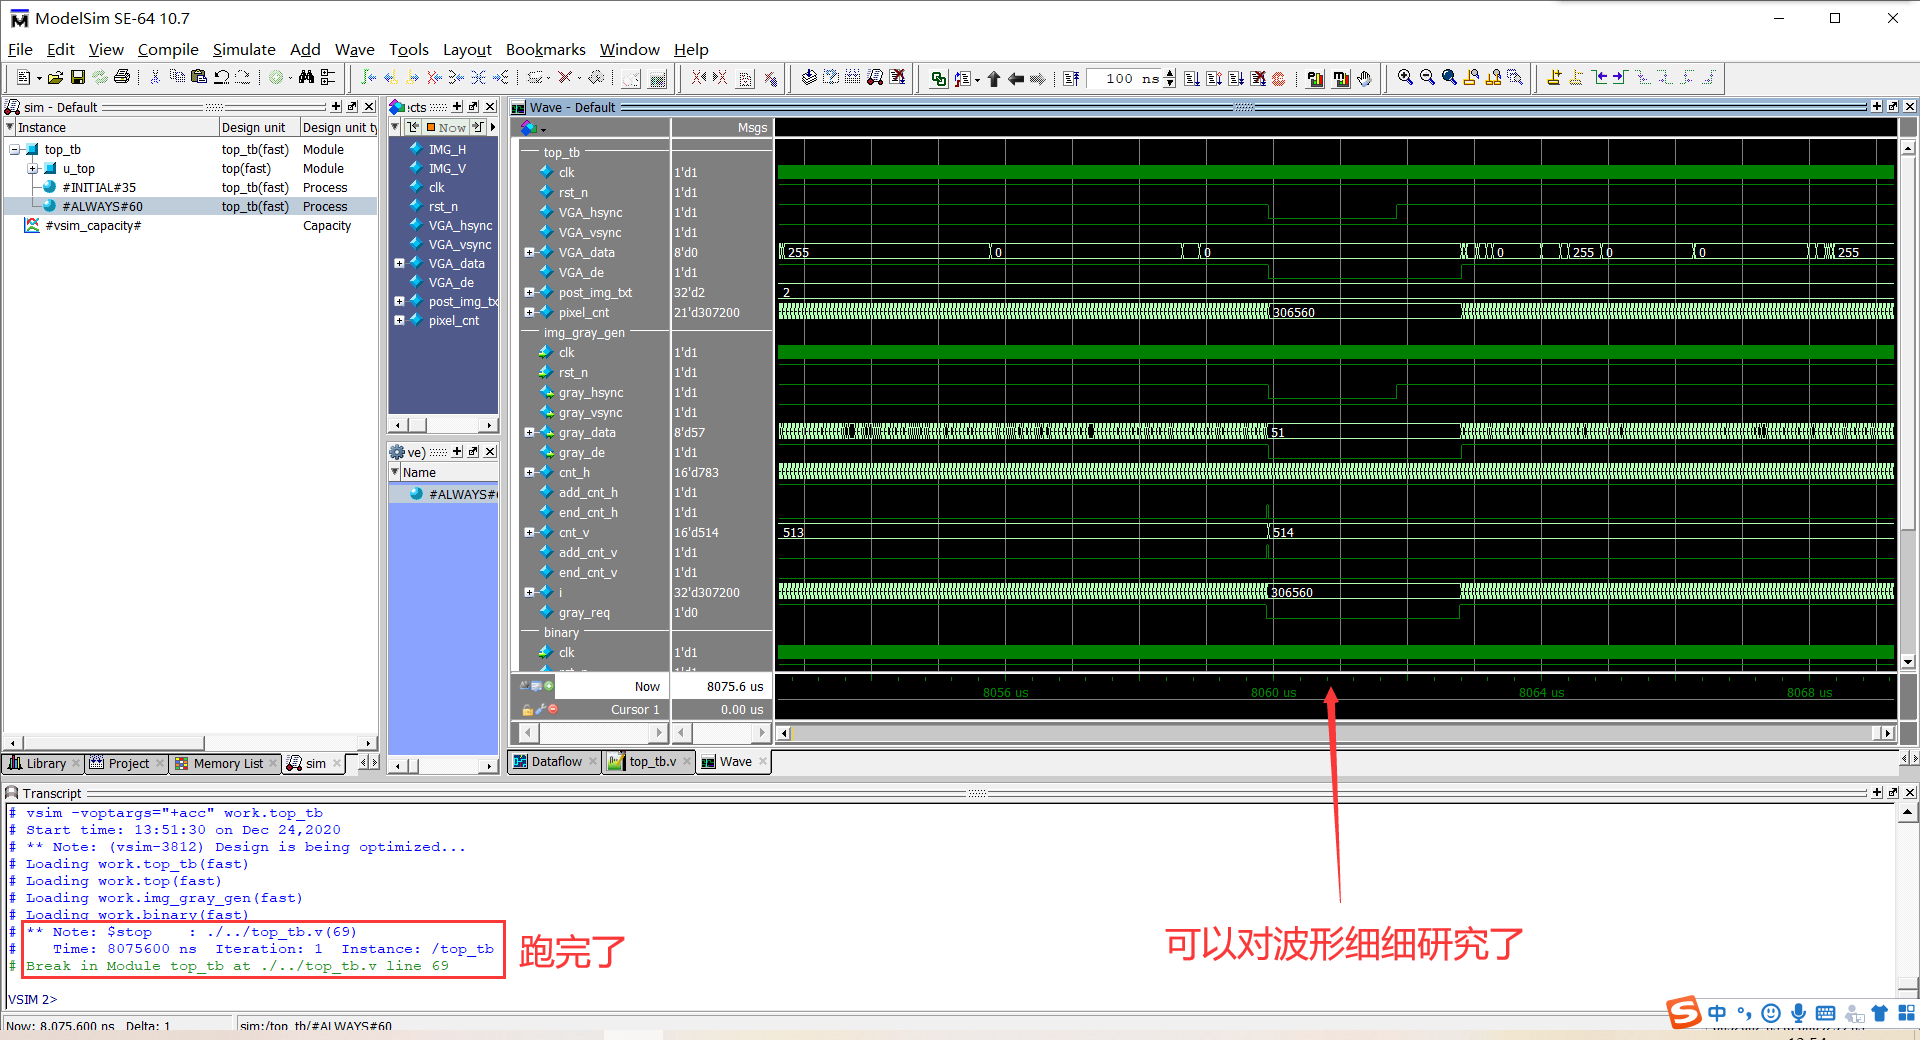
4、双击rtl_tb---sim---点我仿真.bat文件,电脑自动打开Modelsim并运行波形。
5、回到matlab文件夹,发现多了一个Modelsim写成的post_img.txt文件。
6、双击打开matlab程序img_data_show.m,点击运行。
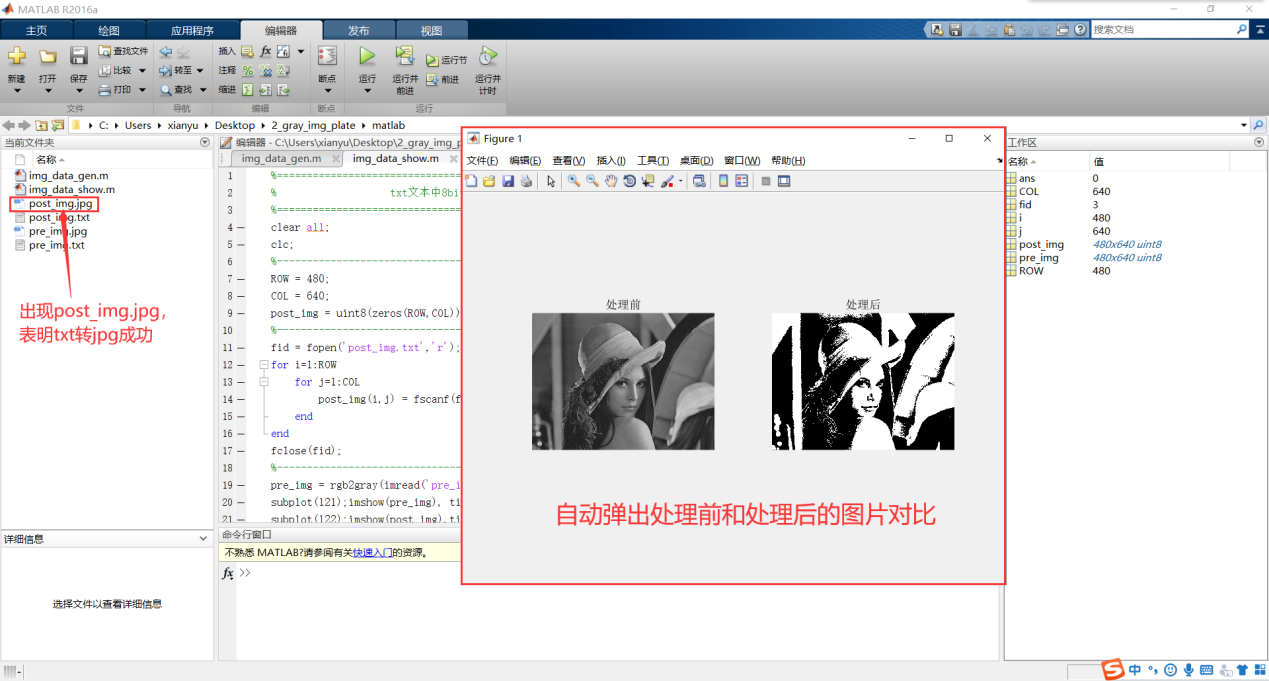
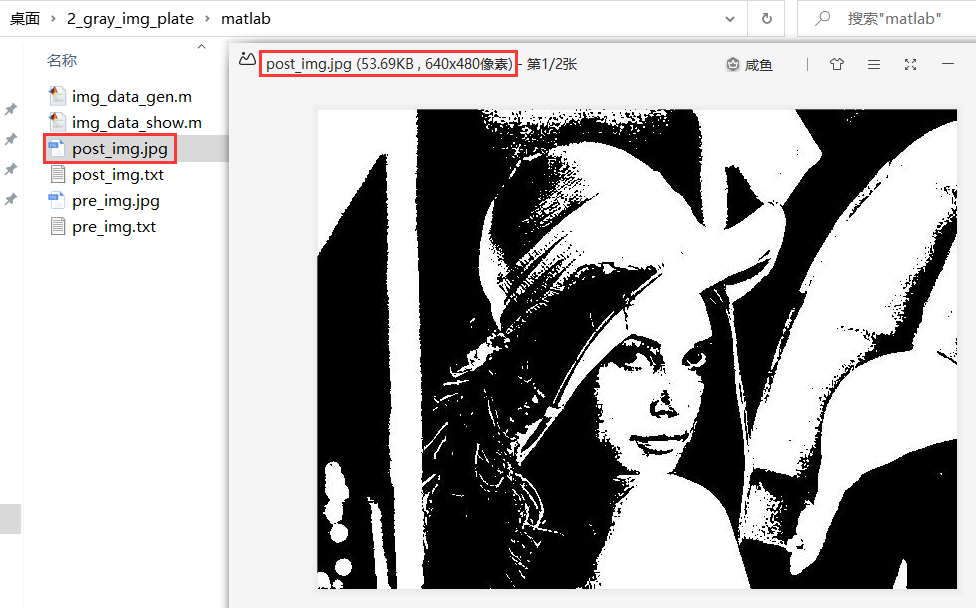
7、回到matlab文件夹,可以看到post_img.jpg,处理后的图片出现了。
四、代码展示
4.1 color_img_plate
(1)matlab

- 文件:img_data_gen.m
- 描述:jpg图片转换成txt文本
%==========================================================================
%                 彩色图片转为txt文本,格式为24bit的hex数据
%==========================================================================
clc;
clear all;
%--------------------------------------------------------------------------
pre_img = imread('pre_img.jpg');      %读取处理前图片
[IMG_V,IMG_H,N] = size(pre_img);      %获得图片尺寸[高度,宽度,维度]
RGB_ij = uint64(zeros(IMG_V,IMG_H));  %定义32位宽的RGB变量
%--------------------------------------------------------------------------
fid = fopen('pre_img.txt','w'); %打开文件
for i = 1:IMG_V
    for j = 1:IMG_H
        R = double(pre_img(i,j,1));
        G = double(pre_img(i,j,2));
        B = double(pre_img(i,j,3));
        %-------------------------------------
        RGB          = R*(2^16) + G*(2^8) + B;
        RGB_ij(i,j)  = RGB;
        RGB_hex      = dec2hex(RGB);
        %-------------------------------------
        fprintf(fid,'%s\n',RGB_hex); %将字符打印到txt文件
    end
end
fclose(fid); %关闭文件
%--------------------------------------------------------------------------
imshow(pre_img),title('处理前'); %查看处理前的图片- 文件:img_data_show.m
- 描述:txt文本转换成jpg图片
%==========================================================================
%                txt文本中24bit的数据还原为彩色图片
%==========================================================================
clear all;
clc;
%--------------------------------------------------------------------------
pre_img = imread('pre_img.jpg');        %读取处理前图片
[IMG_V,IMG_H,N] = size(pre_img);        %获得图片尺寸[高度,宽度,维度]
post_img = uint8(zeros(IMG_V,IMG_H,N));
%--------------------------------------------------------------------------
fid = fopen('post_img.txt','r'); %打开文件
for i = 1:IMG_V
    for j = 1:IMG_H
        value = fscanf(fid,'%s',1);
        %--------------------------------------------
        post_img(i,j,1) = uint8(hex2dec(value(1:2)));
        post_img(i,j,2) = uint8(hex2dec(value(3:4)));
        post_img(i,j,3) = uint8(hex2dec(value(5:6)));
    end
end
fclose(fid); %关闭文件
%--------------------------------------------------------------------------
subplot(121);imshow(pre_img), title('处理前');
subplot(122);imshow(post_img),title('处理后');
%--------------------------------------------------------------------------
imwrite(post_img,'post_img.jpg'); %处理后的图片输出为jpg格式
(2)rtl

- 文件:top.v
- 描述:工程的顶层模块
`timescale 1 ns/1 ns
//**************************************************************************
// *** 名称 : top.v
// *** 作者 : xianyu_FPGA
// *** 博客 : https://www.cnblogs.com/xianyufpga/
// *** 日期 : 2020年11月
// *** 描述 : 工程的顶层模块
//**************************************************************************
module top
//========================< 参数 >==========================================
#(
parameter                   H_DISP = 640            ,   //图像宽度
parameter                   V_DISP = 480                //图像高度
)
//========================< 端口 >==========================================
(
input   wire                clk                     ,   //时钟
input   wire                rst_n                   ,   //复位
//---------------------------------------------------
output  wire                VGA_hsync               ,   //VGA行同步
output  wire                VGA_vsync               ,   //VGA场同步
output  wire    [23:0]      VGA_data                ,   //VGA数据
output  wire                VGA_de                      //VGA数据使能
);
//========================< 信号 >==========================================
wire                        RGB_hsync               ;   //RGB行同步
wire                        RGB_vsync               ;   //RGB场同步
wire    [23:0]              RGB_data                ;   //RGB数据
wire                        RGB_de                  ;   //RGB数据使能
//==========================================================================
//==                        图像数据产生
//==========================================================================
img_gen
#(
    .H_DISP                 (H_DISP                 ),  //图像宽度
    .V_DISP                 (V_DISP                 )   //图像高度
)
u_img_gen
(
    .clk                    (clk                    ),  //时钟
    .rst_n                  (rst_n                  ),  //复位
    //-----------------------------------------------
    .img_hsync              (RGB_hsync              ),  //RGB行同步
    .img_vsync              (RGB_vsync              ),  //RGB场同步
    .img_data               (RGB_data               ),  //RGB数据
    .img_de                 (RGB_de                 )   //RGB数据使能
);
//==========================================================================
//==                        转Gray灰度图
//==========================================================================
RGB_Gray u_RGB_Gray
(
    .clk                    (clk                    ),  //时钟
    .rst_n                  (rst_n                  ),  //复位
    //RGB -------------------------------------------
    .RGB_hsync              (RGB_hsync              ),  //RGB行同步
    .RGB_vsync              (RGB_vsync              ),  //RGB场同步
    .RGB_data               (RGB_data               ),  //RGB数据
    .RGB_de                 (RGB_de                 ),  //RGB数据使能
    //gray ------------------------------------------
    .gray_hsync             (VGA_hsync              ),  //gray行同步
    .gray_vsync             (VGA_vsync              ),  //gray场同步
    .gray_data              (VGA_data               ),  //gray数据
    .gray_de                (VGA_de                 )   //gray数据使能
);


endmodule- 文件:img_gen.v
- 描述:图像产生模块,输出24bit的RGB888格式的像素
`timescale 1 ns/1 ns
//**************************************************************************
// *** 名称 : img_gen.v
// *** 作者 : xianyu_FPGA
// *** 博客 : https://www.cnblogs.com/xianyufpga/
// *** 日期 : 2019-06-26
// *** 描述 : 图像产生模块,输出24bit的RGB888格式的像素
//**************************************************************************
module img_gen
//========================< 参数 >==========================================
#(
//640x480 @60 25Mhz ---------------------------------
parameter H_SYNC            = 96                    ,   //行同步信号
parameter H_BACK            = 48                    ,   //行显示后沿
parameter H_DISP            = 640                   ,   //行有效数据
parameter H_FRONT           = 16                    ,   //行显示前沿
parameter H_TOTAL           = 800                   ,   //行扫描周期
//---------------------------------------------------
parameter V_SYNC            = 2                     ,   //场同步信号
parameter V_BACK            = 33                    ,   //场显示后沿
parameter V_DISP            = 480                   ,   //场有效数据
parameter V_FRONT           = 10                    ,   //场显示前沿
parameter V_TOTAL           = 525                       //场扫描周期
)
//========================< 端口 >==========================================
(
//system --------------------------------------------
input   wire                clk                     ,   //时钟
input   wire                rst_n                   ,   //复位,低电平有效
//img output ----------------------------------------
output  wire                img_hsync               ,   //img行同步
output  wire                img_vsync               ,   //img场同步
output  reg     [23:0]      img_data                ,   //img数据
output  reg                 img_de                      //img数据使能
);
//========================< 信号 >==========================================
reg     [15:0]              cnt_h                   ;
wire                        add_cnt_h               ;
wire                        end_cnt_h               ;
reg     [15:0]              cnt_v                   ;
wire                        add_cnt_v               ;
wire                        end_cnt_v               ;
//---------------------------------------------------
reg     [23:0]              ram [H_DISP*V_DISP-1:0] ;
reg     [31:0]              i                       ;
//==========================================================================
//==    行、场计数
//==========================================================================
always @(posedge clk or negedge rst_n) begin
    if(!rst_n)
        cnt_h <= 0;
    else if(add_cnt_h) begin
        if(end_cnt_h)
            cnt_h <= 0;
        else
            cnt_h <= cnt_h + 1;
    end
end

assign add_cnt_h = 1;
assign end_cnt_h = add_cnt_h && cnt_h==H_TOTAL-1;
//---------------------------------------------------
always @(posedge clk or negedge rst_n) begin
    if(!rst_n)
        cnt_v <= 0;
    else if(add_cnt_v) begin
        if(end_cnt_v)
            cnt_v <= 0;
        else
            cnt_v <= cnt_v + 1;
    end
end

assign add_cnt_v = end_cnt_h;
assign end_cnt_v = add_cnt_v && cnt_v==V_TOTAL-1;
//==========================================================================
//==    输出
//==========================================================================
//行场同步
//---------------------------------------------------
assign img_hsync = (cnt_h < H_SYNC) ? 1'b0 : 1'b1;
assign img_vsync = (cnt_v < V_SYNC) ? 1'b0 : 1'b1;

//数据请求
assign img_req = (cnt_h >= H_SYNC + H_BACK - 1) && (cnt_h < H_SYNC + H_BACK + H_DISP - 1) &&
                 (cnt_v >= V_SYNC + V_BACK    ) && (cnt_v < V_SYNC + V_BACK + V_DISP    );

//读取txt文件到raw数组中,格式为16进制
//---------------------------------------------------
initial begin
    $readmemh("./../../matlab/pre_img.txt", ram);
end

//数据输出
//---------------------------------------------------
always@(posedge clk or negedge rst_n) begin
    if(!rst_n)begin
        img_data <= 24'd0;
        i <= 0;
    end
    else if(img_req) begin
        img_data <= ram[i];
        i <= i + 1;
    end
    else if(i==H_DISP*V_DISP) begin
        img_data <= 24'd0;
        i <= 0;
    end
end

//数据使能
always @(posedge clk) begin
    img_de <= img_req;
end


endmodule- 文件:RGB_gray.v
- 描述:RGB分量转Gray灰度图
//**************************************************************************
// *** 名称 : RGB_Gray.v
// *** 作者 : xianyu_FPGA
// *** 博客 : https://www.cnblogs.com/xianyufpga/
// *** 日期 : 2020年3月
// *** 描述 : RGB分量转Gray灰度图
//**************************************************************************

module RGB_Gray
//========================< 端口 >==========================================
(
input   wire                clk                     ,   //时钟
input   wire                rst_n                   ,   //复位
//原图 ----------------------------------------------
input   wire                RGB_hsync               ,   //原图行同步
input   wire                RGB_vsync               ,   //原图场同步
input   wire    [23:0]      RGB_data                ,   //原图数据
input   wire                RGB_de                  ,   //原图数据使能
//灰度 ----------------------------------------------
output  wire                gray_hsync              ,   //灰度图行同步
output  wire                gray_vsync              ,   //灰度图场同步
output  wire    [23:0]      gray_data               ,   //灰度图数据
output  wire                gray_de                     //灰度图数据使能
);

//==========================================================================
//==                        代码
//==========================================================================
assign gray_hsync   =   RGB_hsync;
assign gray_vsync   =   RGB_vsync;
assign gray_de      =   RGB_de;

//红色分量灰度图
//assign gray_data = {RGB_data[23:16],RGB_data[23:16],RGB_data[23:16]};

//绿色分量灰度图
assign gray_data = {RGB_data[15:8],RGB_data[15:8],RGB_data[15:8]};

//蓝色分量灰度图
//assign gray_data = {RGB_data[7:0],RGB_data[7:0],RGB_data[7:0]};


endmodule
(3)rtl_tb

- 文件:altera_mf.v
- 描述:Altera仿真库文件,到Altera安装目录下找
文件:altera_mf.v
作用:Altera仿真库文件,到Altera安装目录下找- 文件:top_tb.v
- 描述:testbanch文件
`timescale 1ns/1ns  //时间精度
`define    Clock 20 //时钟周期

module top_tb;
//========================< 参数 >==========================================
parameter                   H_DISP = 640            ;   //图像宽度
parameter                   V_DISP = 480            ;   //图像高度
//========================< 信号 >==========================================
reg                         clk                     ;   //系统时钟
reg                         rst_n                   ;   //系统复位
//---------------------------------------------------
wire                        VGA_hsync               ;   //VGA行同步
wire                        VGA_vsync               ;   //VGA场同步
wire    [23:0]              VGA_data                ;   //VGA数据
wire                        VGA_de                  ;   //VGA数据使能
//==========================================================================
//==    模块例化
//==========================================================================
top
#(
    .H_DISP                 (H_DISP                 ),  //图像宽度
    .V_DISP                 (V_DISP                 )   //图像高度
)
u_top
(
    .clk                    (clk                    ),  //时钟
    .rst_n                  (rst_n                  ),  //复位
    //-----------------------------------------------
    .VGA_hsync              (VGA_hsync              ),  //VGA行同步
    .VGA_vsync              (VGA_vsync              ),  //VGA场同步
    .VGA_data               (VGA_data               ),  //VGA数据
    .VGA_de                 (VGA_de                 )   //VGA数据使能
);
//==========================================================================
//==    时钟信号和复位信号
//==========================================================================
initial begin
    clk = 1;
    forever
        #(`Clock/2) clk = ~clk;
end

initial begin
    rst_n = 0; #(`Clock*20+1);
    rst_n = 1;
end
//==========================================================================
//==    图像数据转变为txt文本
//==========================================================================
//打开post_img.txt文件
//---------------------------------------------------
integer post_img_txt;

initial begin
    post_img_txt = $fopen("./../../matlab/post_img.txt");
end

//像素写入到txt中
//---------------------------------------------------
reg [20:0] pixel_cnt;

always @(posedge clk) begin
    if(!rst_n) begin
        pixel_cnt <= 0;
    end
    else if(VGA_de) begin
        pixel_cnt = pixel_cnt + 1;
        $fdisplay(post_img_txt,"%h",VGA_data);

        if(pixel_cnt == H_DISP*V_DISP)
            $stop;
    end
end


endmodule- 文件:sim/sim.tcl
- 描述:modelsim自动仿真脚本
# ========================< 清空软件残留信息 >==============================

# 退出之前仿真
quit -sim

# 清空信息
.main clear

# =========================< 建立工程并仿真 >===============================

# 建立新的工程库
vlib work

# 映射逻辑库到物理目录
vmap work work

# 编译文件
vlog ./../../rtl/*.v
vlog ./../*.v

# 启动仿真:10.7之前版本的仿真请将"-voptargs=+acc换成-novopt"
vsim -voptargs=+acc work.top_tb

# ============================< 加载波形 >==================================

# 添加标签和波形
add wave -divider {RGB_Gray}
add wave /top_tb/u_top/u_RGB_Gray/*

# 跑完
run -all- 文件:sim/点我仿真.bat
- 描述:windows脚本,自动打开modelsim并执行sim.tcl脚本
::打开Modelsim并执行do sim.tcl
vsim -do sim.tcl
4.2 gray_img_plate
(1)matlab

- 文件:img_data_gen.m
- 描述:jpg图片转换成txt文本
%==========================================================================
%        彩色图片转为灰度图片,再转为txt文本数据,格式为8bit的hex数据
%==========================================================================
clear all;
clc;
%--------------------------------------------------------------------------
pre_img = imread('pre_img.jpg');    %读取图片
[IMG_V,IMG_H,N] = size(pre_img);    %获得图片尺寸[高度,宽度,维度]
gray_img = rgb2gray(pre_img);       %图片转为gray灰度图
%--------------------------------------------------------------------------
fid=fopen('pre_img.txt','w'); %打开文件
for i=1:IMG_V
    for j=1:IMG_H
        fprintf(fid,'%x\n',gray_img(i,j));%将字符打印到txt文件
    end
end
fclose(fid); %关闭文件
%--------------------------------------------------------------------------
imshow(gray_img),title('处理前'); %查看处理前的图片- 文件:img_data_show
- 描述:txt文本转换成jpg图片
%==========================================================================
%                   txt文本中8bit的数据还原为图片
%==========================================================================
clear all;
clc;
%--------------------------------------------------------------------------
pre_img = imread('pre_img.jpg');      %读取图片
gray_img = rgb2gray(pre_img);         %图片转为gray灰度图
[IMG_V,IMG_H] = size(gray_img);       %获得图片尺寸[高度,宽度]
post_img = uint8(zeros(IMG_V,IMG_H));
%--------------------------------------------------------------------------
fid = fopen('post_img.txt','r'); %打开文件
for i=1:IMG_V
    for j=1:IMG_H
        post_img(i,j) = fscanf(fid,'%d',1);
    end
end
fclose(fid); %关闭文件
%--------------------------------------------------------------------------
subplot(121);imshow(gray_img),title('处理前')
subplot(122);imshow(post_img),title('处理后')
%--------------------------------------------------------------------------
imwrite(post_img,'post_img.jpg'); %处理后的图片输出为jpg格式
(2)rtl

- 文件:top.v
- 描述:工程的顶层模块
`timescale 1 ns/1 ns
//**************************************************************************
// *** 名称 : top.v
// *** 作者 : xianyu_FPGA
// *** 博客 : https://www.cnblogs.com/xianyufpga/
// *** 日期 : 2020年11月
// *** 描述 : 工程的顶层模块
//**************************************************************************
module top
//========================< 参数 >==========================================
#(
parameter                   H_DISP = 640            ,   //图像宽度
parameter                   V_DISP = 480                //图像高度
)
//========================< 端口 >==========================================
(
input   wire                clk                     ,   //时钟
input   wire                rst_n                   ,   //复位
//---------------------------------------------------
output  wire                VGA_hsync               ,   //VGA行同步
output  wire                VGA_vsync               ,   //VGA场同步
output  wire    [ 7:0]      VGA_data                ,   //VGA数据
output  wire                VGA_de                      //VGA数据使能
);
//========================< 信号 >==========================================
wire                        gray_hsync              ;   //gray行同步
wire                        gray_vsync              ;   //gray场同步
wire    [ 7:0]              gray_data               ;   //gray数据
wire                        gray_de                 ;   //gray数据使能
//==========================================================================
//==                        图像数据产生
//==========================================================================
img_gray_gen
#(
    .H_DISP                 (H_DISP                 ),  //图像宽度
    .V_DISP                 (V_DISP                 )   //图像高度
)
u_img_gray_gen
(
    .clk                    (clk                    ),  //时钟
    .rst_n                  (rst_n                  ),  //复位
    //-----------------------------------------------
    .gray_hsync             (gray_hsync             ),  //gray行同步
    .gray_vsync             (gray_vsync             ),  //gray场同步
    .gray_data              (gray_data              ),  //gray数据
    .gray_de                (gray_de                )   //gray数据使能
);
//==========================================================================
//==                        灰度图转二值图
//==========================================================================
binary u_binary
(
    .clk                    (clk                    ),  //时钟
    .rst_n                  (rst_n                  ),  //复位
    //Y分量 -----------------------------------------
    .Y_hsync                (gray_hsync             ),  //Y分量行同步
    .Y_vsync                (gray_vsync             ),  //Y分量场同步
    .Y_data                 (gray_data              ),  //Y分量数据
    .Y_de                   (gray_de                ),  //Y分量数据使能
    //阈值 ------------------------------------------
    .value                  (8'd90                  ),  //阈值
    //bina ------------------------------------------
    .bina_hsync             (VGA_hsync              ),  //bina行同步
    .bina_vsync             (VGA_vsync              ),  //bina场同步
    .bina_data              (VGA_data               ),  //bina数据
    .bina_de                (VGA_de                 )   //bina数据使能
);


endmodule- 文件:img_gray_gen.v
- 作用:图像产生模块,输出8bit的灰度像素
`timescale 1 ns/1 ns
//**************************************************************************
// *** 名称 : img_gray_gen.v
// *** 作者 : xianyu_FPGA
// *** 博客 : https://www.cnblogs.com/xianyufpga/
// *** 日期 : 2019-06-26
// *** 描述 : 图像产生模块,输出8bit的灰度像素
//**************************************************************************
module img_gray_gen
//========================< 参数 >==========================================
#(
//640x480 @60 25Mhz ---------------------------------
parameter H_SYNC            = 96                    ,   //行同步信号
parameter H_BACK            = 48                    ,   //行显示后沿
parameter H_DISP            = 640                   ,   //行有效数据
parameter H_FRONT           = 16                    ,   //行显示前沿
parameter H_TOTAL           = 800                   ,   //行扫描周期
//---------------------------------------------------
parameter V_SYNC            = 2                     ,   //场同步信号
parameter V_BACK            = 33                    ,   //场显示后沿
parameter V_DISP            = 480                   ,   //场有效数据
parameter V_FRONT           = 10                    ,   //场显示前沿
parameter V_TOTAL           = 525                       //场扫描周期
)
//========================< 端口 >==========================================
(
//system --------------------------------------------
input   wire                clk                     ,   //时钟
input   wire                rst_n                   ,   //复位,低电平有效
//gray output ----------------------------------------
output  wire                gray_hsync              ,   //gray行同步
output  wire                gray_vsync              ,   //gray场同步
output  reg   [ 7:0]        gray_data               ,   //gray数据
output  reg                 gray_de                     //gray数据使能
);
//========================< 信号 >==========================================
reg     [15:0]              cnt_h                   ;
wire                        add_cnt_h               ;
wire                        end_cnt_h               ;
reg     [15:0]              cnt_v                   ;
wire                        add_cnt_v               ;
wire                        end_cnt_v               ;
//---------------------------------------------------
reg     [ 7:0]              ram [H_DISP*V_DISP-1:0] ;
reg     [31:0]              i                       ;
//==========================================================================
//==    行、场计数
//==========================================================================
always @(posedge clk or negedge rst_n) begin
    if(!rst_n)
        cnt_h <= 0;
    else if(add_cnt_h) begin
        if(end_cnt_h)
            cnt_h <= 0;
        else
            cnt_h <= cnt_h + 1;
    end
end

assign add_cnt_h = 1;
assign end_cnt_h = add_cnt_h && cnt_h==H_TOTAL-1;
//---------------------------------------------------
always @(posedge clk or negedge rst_n) begin
    if(!rst_n)
        cnt_v <= 0;
    else if(add_cnt_v) begin
        if(end_cnt_v)
            cnt_v <= 0;
        else
            cnt_v <= cnt_v + 1;
    end
end

assign add_cnt_v = end_cnt_h;
assign end_cnt_v = add_cnt_v && cnt_v==V_TOTAL-1;
//==========================================================================
//==    行场
//==========================================================================
//行场同步
//---------------------------------------------------
assign gray_hsync = (cnt_h < H_SYNC - 1) ? 1'b0 : 1'b1;
assign gray_vsync = (cnt_v < V_SYNC - 1) ? 1'b0 : 1'b1;

//数据请求
assign gray_req = (cnt_h >= H_SYNC + H_BACK - 1) && (cnt_h < H_SYNC + H_BACK + H_DISP - 1) &&
                  (cnt_v >= V_SYNC + V_BACK    ) && (cnt_v < V_SYNC + V_BACK + V_DISP    );

//读取txt文件到raw数组中,格式为16进制
//---------------------------------------------------
initial begin
    $readmemh("./../../matlab/pre_img.txt", ram);
end

//数据输出
//---------------------------------------------------
always@(posedge clk or negedge rst_n) begin
    if(!rst_n)begin
        gray_data <= 8'd0;
        i <= 0;
    end
    else if(gray_req) begin
        gray_data <= ram[i];
        i <= i + 1;
    end
    else if(i==H_DISP*V_DISP) begin
        gray_data <= 8'd0;
        i <= 0;
    end
end

//数据使能
always @(posedge clk) begin
    gray_de <= gray_req;
end


endmodule- 文件:binary.v
- 作用:Gray灰度图转二值图
//**************************************************************************
// *** 名称 : binary.v
// *** 作者 : xianyu_FPGA
// *** 博客 : https://www.cnblogs.com/xianyufpga/
// *** 日期 : 2020年3月
// *** 描述 : Gray灰度图转二值图
//**************************************************************************
module binary
//========================< 端口 >==========================================
(
input   wire                clk                     ,   //时钟
input   wire                rst_n                   ,   //复位
//原图 ----------------------------------------------
input   wire                Y_hsync                 ,   //Y分量行同步
input   wire                Y_vsync                 ,   //Y分量场同步
input   wire    [ 7:0]      Y_data                  ,   //Y分量数据
input   wire                Y_de                    ,   //Y分量数据使能
//value ---------------------------------------------
input   wire    [ 7:0]      value                   ,   //阈值
//灰度 ----------------------------------------------
output  wire                bina_hsync              ,   //二值行同步
output  wire                bina_vsync              ,   //二值场同步
output  wire    [ 7:0]      bina_data               ,   //二值数据
output  wire                bina_de                     //二值数据使能
);
//==========================================================================
//==                        代码
//==========================================================================
assign bina_hsync = Y_hsync;
assign bina_vsync = Y_vsync;
assign bina_de    = Y_de;
assign bina_data  = (Y_data > value) ? 8'hff : 8'h00;


endmodule
(3)rtl_tb
- 文件:altera_mf.v
- 描述:Altera仿真库文件,到Altera安装目录下找
文件:altera_mf.v
作用:Altera仿真库文件,到Altera安装目录下找- 文件:top_tb.v
- 描述:testbanch文件
`timescale 1ns/1ns  //时间精度
`define    Clock 20 //时钟周期

module top_tb;
//========================< 参数 >==========================================
parameter                   H_DISP = 640            ;   //图像宽度
parameter                   V_DISP = 480            ;   //图像高度
//========================< 信号 >==========================================
reg                         clk                     ;   //系统时钟
reg                         rst_n                   ;   //系统复位
//---------------------------------------------------
wire                        VGA_hsync               ;   //VGA行同步
wire                        VGA_vsync               ;   //VGA场同步
wire    [ 7:0]              VGA_data                ;   //VGA数据
wire                        VGA_de                  ;   //VGA数据使能
//==========================================================================
//==    模块例化
//==========================================================================
top
#(
    .H_DISP                 (H_DISP                 ),  //图像宽度
    .V_DISP                 (V_DISP                 )   //图像高度
)
u_top
(
    .clk                    (clk                    ),  //时钟
    .rst_n                  (rst_n                  ),  //复位
    //-----------------------------------------------
    .VGA_hsync              (VGA_hsync              ),  //VGA行同步
    .VGA_vsync              (VGA_vsync              ),  //VGA场同步
    .VGA_data               (VGA_data               ),  //VGA数据
    .VGA_de                 (VGA_de                 )   //VGA数据使能
);
//==========================================================================
//==    时钟信号和复位信号
//==========================================================================
initial begin
    clk = 1;
    forever
        #(`Clock/2) clk = ~clk;
end

initial begin
    rst_n = 0; #(`Clock*20+1);
    rst_n = 1;
end
//==========================================================================
//==    图像数据转变为txt文本
//==========================================================================
//打开post_img.txt文件
//---------------------------------------------------
integer post_img_txt;

initial begin
    post_img_txt = $fopen("./../../matlab/post_img.txt");
end

//像素写入到txt中
//---------------------------------------------------
reg [20:0] pixel_cnt;

always @(posedge clk) begin
    if(!rst_n) begin
        pixel_cnt <= 0;
    end
    else if(VGA_de) begin
        pixel_cnt = pixel_cnt + 1;
        $fdisplay(post_img_txt,"%d",VGA_data);

        if(pixel_cnt == H_DISP*V_DISP)
            $stop;
    end
end


endmodule- 文件:sim/sim.tcl
- 描述:modelsim自动仿真脚本
# ========================< 清空软件残留信息 >==============================

# 退出之前仿真
quit -sim

# 清空信息
.main clear

# =========================< 建立工程并仿真 >===============================

# 建立新的工程库
vlib work

# 映射逻辑库到物理目录
vmap work work

# 编译文件
vlog ./../../rtl/*.v
vlog ./../*.v

# 启动仿真:10.7之前版本的仿真请将"-voptargs=+acc换成-novopt"
vsim -voptargs=+acc work.top_tb

# ============================< 加载波形 >==================================

# 添加标签和波形
add wave -divider {binary}
add wave /top_tb/u_top/u_binary/*

# 跑完
run -all- 文件:sim/点我仿真.bat
- 作用:windows脚本,自动打开modelsim并执行sim.tcl脚本
::打开Modelsim并执行do sim.tcl
vsim -do sim.tcl
五、操作演示

 浙公网安备 33010602011771号