

Windows环境下面搭建Object C开发环境[转]
1、安装编译器
Objective-C的编译器有很多,其中LLVM属于从GCC发展出来的,主要使用在苹果的平台中,GNU可以使用GnuStep,网址是http://wwwmain.gnustep.org/,从这里可以下载Windows版本的gcc编译器,配合codeblocks可以编译调试object c程序。

进入下载页面,下载上面3个软件包,安装,例如安装到D:\GNUstep,
2、安装CodeBlocks IDE环境
下载地址:http://www.codeblocks.org/
3、配置编译器
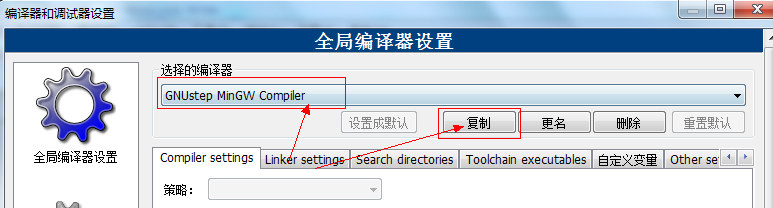
安装好codeblocks之后,进入Settings->Compiler and debugger...,选择GNU GCC Compiler编译器,复制重新命名为“GNUstep MinGW Compiler“配置
编译其他选项录入:-fconstant-string-class=NSConstantString -std=c99

同时指定搜索目录:
》编译器的搜索目录是D:\GNUstep\GNUstep\System\Library\Headers
》linker的搜索目录设置为D:\GNUstep\GNUstep\System\Library\Libraries,同时设置linker的参数:-lobjc -lgnustep-base
或者可以在linker选项中加入D:\GNUstep\GNUstep\System\Library\Libraries下面的2个文件libgnustep-base.dll.a,libobjc.dll.a


设置编译器、连接器的搜索目录

4、配置语法、文件类型,关键字等
添加文件类型支持
1) 进入Settings->Environment...
2) 选择 Files extension handling 添加*.m
3) 进入 Project->Project tree->Edit file types & categories...
4) 在Sources, 下面添加 *.m到文件类型列表中.

添加语法高亮支持
1) 进入 Settings->Editor...
2) 选择 Syntax highlighting 进入Filemasks.... 添加*.m 到文件类型列表中.
3) 进入 Keywords... (紧靠Filemasks...) 添加下面的关键字到列表中
| @interface @implementation @end @class @selector @protocol @public @protected @private id BOOL YES NO SEL nil NULL self |
语法高亮中,加入*.m扩展名


5、代码测试
新建一个工程,修改main.c为main.m,录入下面代码
#import <Foundation/Foundation.h>

int main (int argc, const char *argv[])
{
    NSAutoreleasePool *pool = [[NSAutoreleasePool alloc] init];
    NSLog(@"%@",@"hello world");
    [pool drain];
    return 0;
}
编译运行效果如下:
|
2012-03-07 17:33:49.711 objc1[6080] hello world Process returned 0 (0x0) execution time : 0.220 s |

 浙公网安备 33010602011771号