
asp.net core使用identity+jwt保护你的webapi(一)——identity基础配置
前言
用户模块几乎是每个系统必备的基础功能,如果每次开发一个新项目时都要做个用户模块,确实非常无聊。好在asp.net core给我们提供了Identity,使用起来也是比较方便,如果对用户这块需求不是非常个性化的话,identity是一个不错的选择。
ASP.NET Core Identity:
是一个 API,它支持用户 登录功能(UI界面) 。
管理用户、密码、配置文件数据、角色、声明、令牌、电子邮件确认等。
Web API中集成Identity
identity是支持UI界面的,如果不是前后端分离项目,可以直接集成identity UI模块,因为我这里使用Web API,就忽略掉identity UI部分。
安装相关包
下面介绍以最小化方式引入identity。
首先创建一个Web API空项目,NuGet安装identity、efcore、jwt相关包,数据库我这里就使用Sqlite:
<PackageReference Include="Microsoft.EntityFrameworkCore.Relational" Version="5.0.10" />
<PackageReference Include="Microsoft.EntityFrameworkCore.Sqlite" Version="5.0.10" />
<PackageReference Include="Microsoft.EntityFrameworkCore.Design" Version="5.0.10" />
<PackageReference Include="Microsoft.AspNetCore.Identity.EntityFrameworkCore" Version="5.0.10" />
自定义User,Context
创建自己的User实体,继承IdentityUser,IdentityUser中已经有一些基础字段,你可以在你的AppUser中额外定义一些自己需要的字段,比如Address:
public class AppUser : IdentityUser
{
    [Required]
    [StringLength(128)]
    public string Address { get; set; }
}
创建自己的DbContext,继承IdentityDbContext<>,泛型传入自己的AppUser:
public class AppDbContext : IdentityDbContext<AppUser>
{
    public AppDbContext(DbContextOptions<AppDbContext> options)
        : base(options)
    {
    }
}
在Startup中配置服务:
public void ConfigureServices(IServiceCollection services)
{
    services.AddControllers();

    services.AddDbContext<AppDbContext>(options =>
        options.UseSqlite(Configuration.GetConnectionString("DefaultConnection")));

    services.AddIdentityCore<AppUser>().AddEntityFrameworkStores<AppDbContext>();
}
appsettings.json:
"ConnectionStrings": {
  "DefaultConnection": "DataSource=app.db; Cache=Shared"
}
这样一个最简单的自定义配置就完成了。
数据库迁移
使用dotnet ef命令迁移:
dotnet ef migrations add AppDbContext_Initial

dotnet ef database update
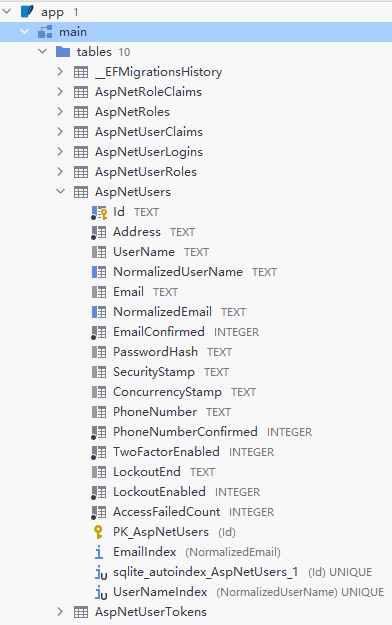
执行完成后已经生成了identity相关表:
修改主键类型/表名
identity用户,角色表的主键默认类型是string,默认值是Guid.NewGuid().ToString(),数据量不大时无所谓,否则可能存在性能问题。identity支持主键类型的修改;想要修改表名,修改字段长度等等,也是非常容易:
public class AppUser : IdentityUser<int>
{
    [Required]
    [StringLength(128)]
    public string Address { get; set; }
}
public class AppDbContext : IdentityDbContext<AppUser, IdentityRole<int>, int>
{
    public AppDbContext(DbContextOptions<AppDbContext> options)
        : base(options)
    {
    }
    protected override void OnModelCreating(ModelBuilder builder)
    {
        base.OnModelCreating(builder);

        builder.Entity<AppUser>(b => { b.ToTable("AppUsers"); });
        builder.Entity<IdentityUserClaim<int>>(b => { b.ToTable("AppUserClaims"); });
        builder.Entity<IdentityUserLogin<int>>(b => { b.ToTable("AppUserLogins"); });
        builder.Entity<IdentityUserToken<int>>(b => { b.ToTable("AppUserTokens"); });
        builder.Entity<IdentityRole<int>>(b => { b.ToTable("AppRoles"); });
        builder.Entity<IdentityRoleClaim<int>>(b => { b.ToTable("AppRoleClaims"); });
        builder.Entity<IdentityUserRole<int>>(b => { b.ToTable("AppUserRoles"); });
    }
}
修改完成后更新数据库:
dotnet ef migrations add AppDbContext_Modify_PK_Type

dotnet ef database update
查看主键,表名已成功修改:

最后
本篇完成了identity的基本配置,下一篇将介绍如何使用identity完成用户注册登录,以及获取jwt token。
参考:
——本文使用【Typora】+【EasyBlogImageForTypora】编辑
欢迎关注我的公众号,一起学习。
如果本文对您有所帮助,您可以点击右下方的【推荐】按钮支持一下;文中如有不妥之处,还望指正,非常感谢!!!

作者:xhznl
出处:http://www.cnblogs.com/xhznl/
文章可以转载,但请注明出处

 浙公网安备 33010602011771号