

devops --kubernates
一、k8s介绍
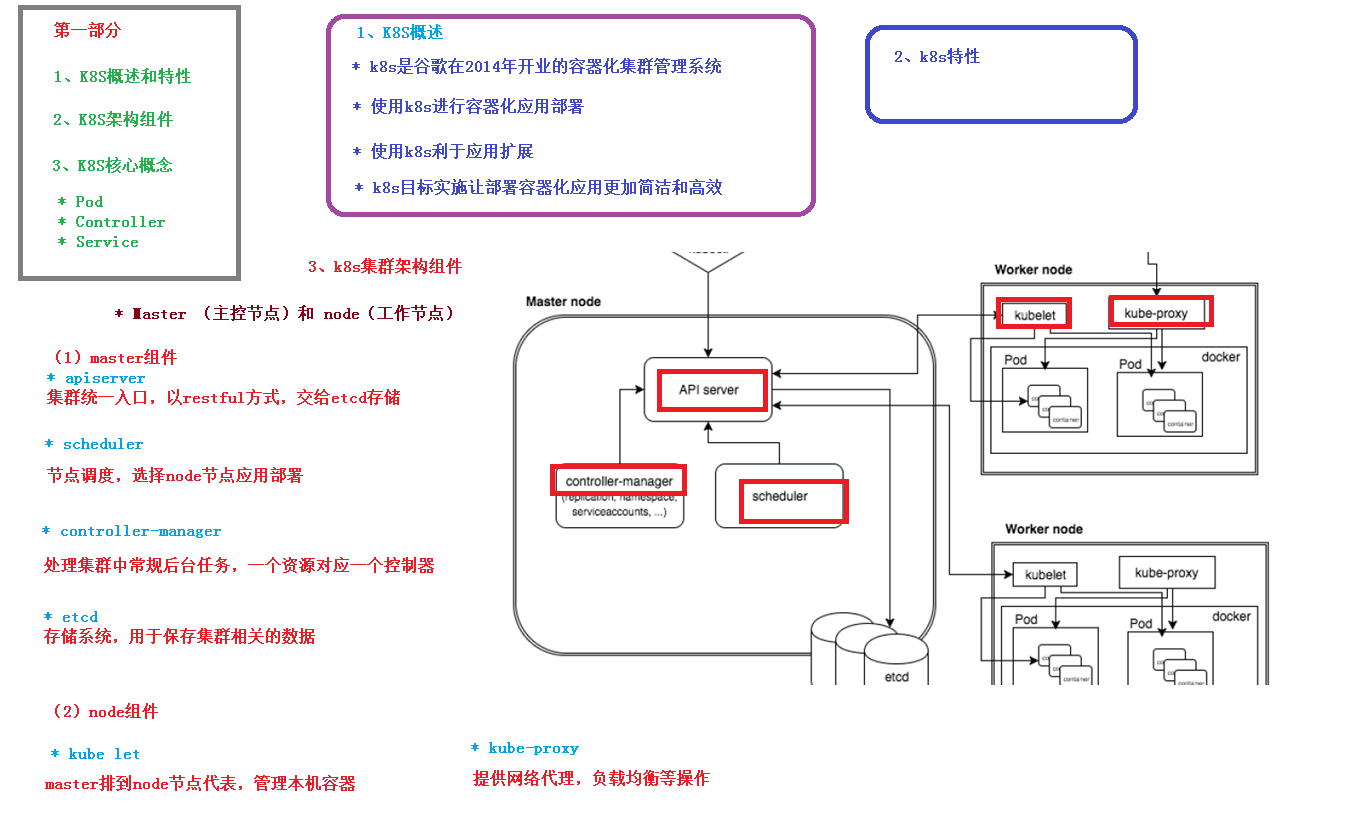

通过service提供统一入口给网布访问,通过controller控制创建pod
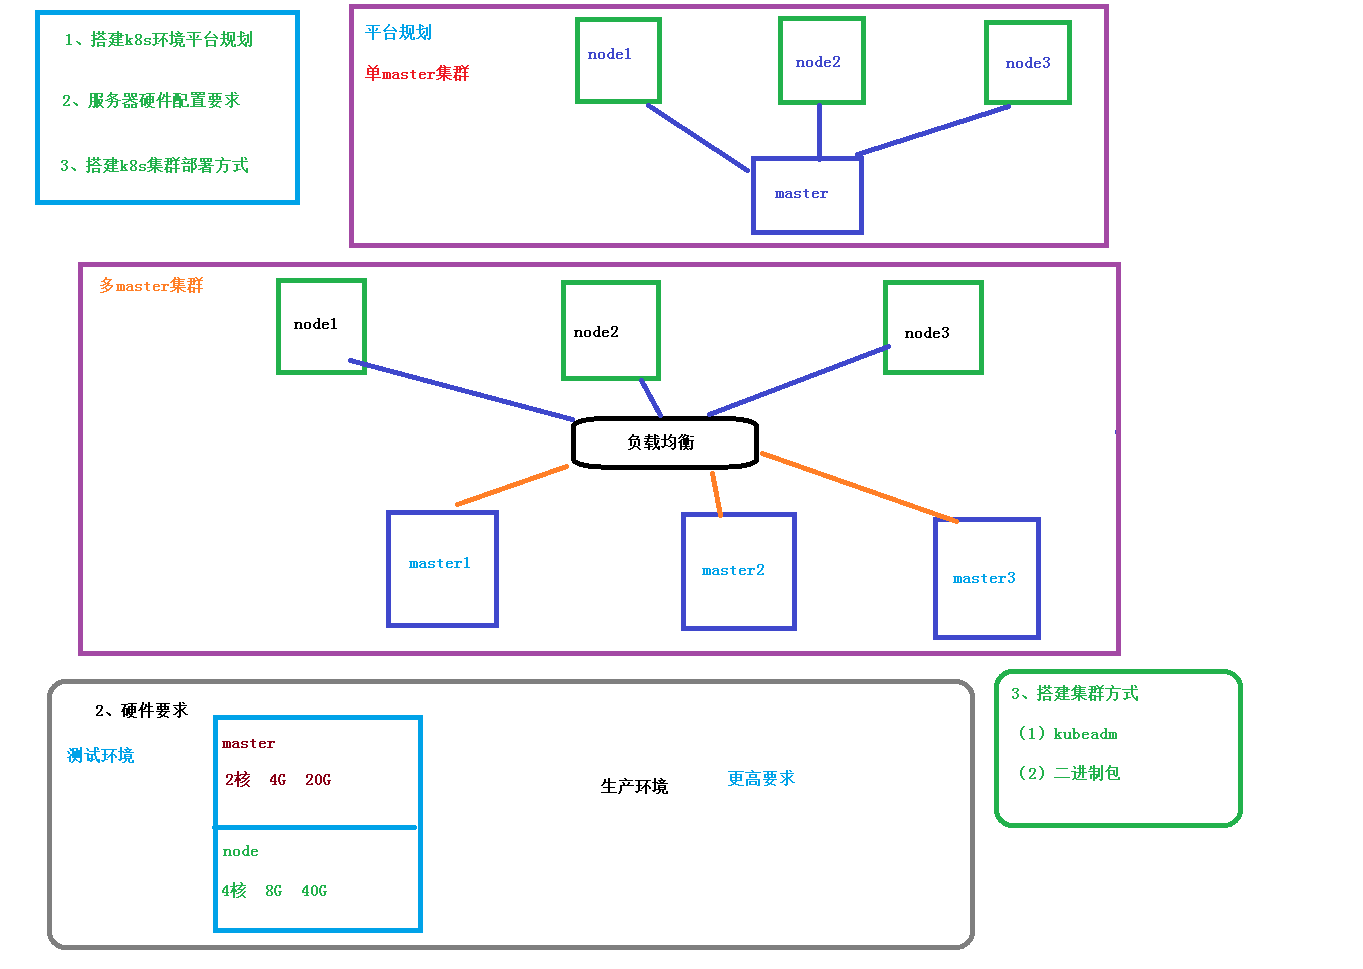
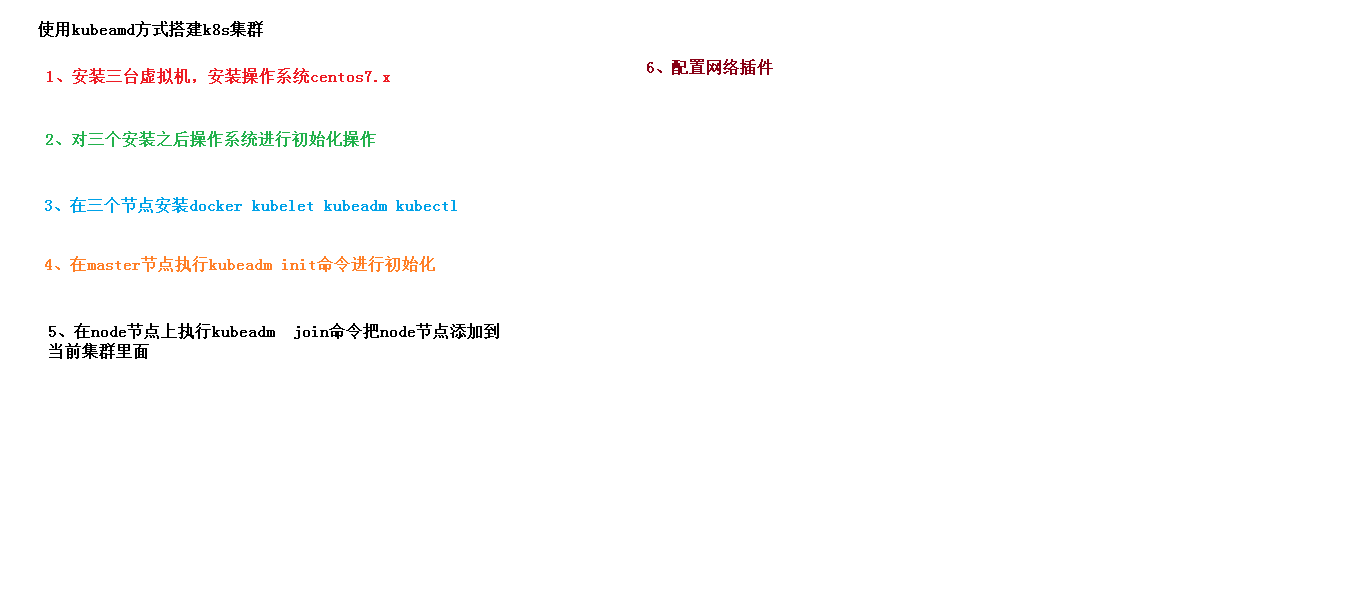
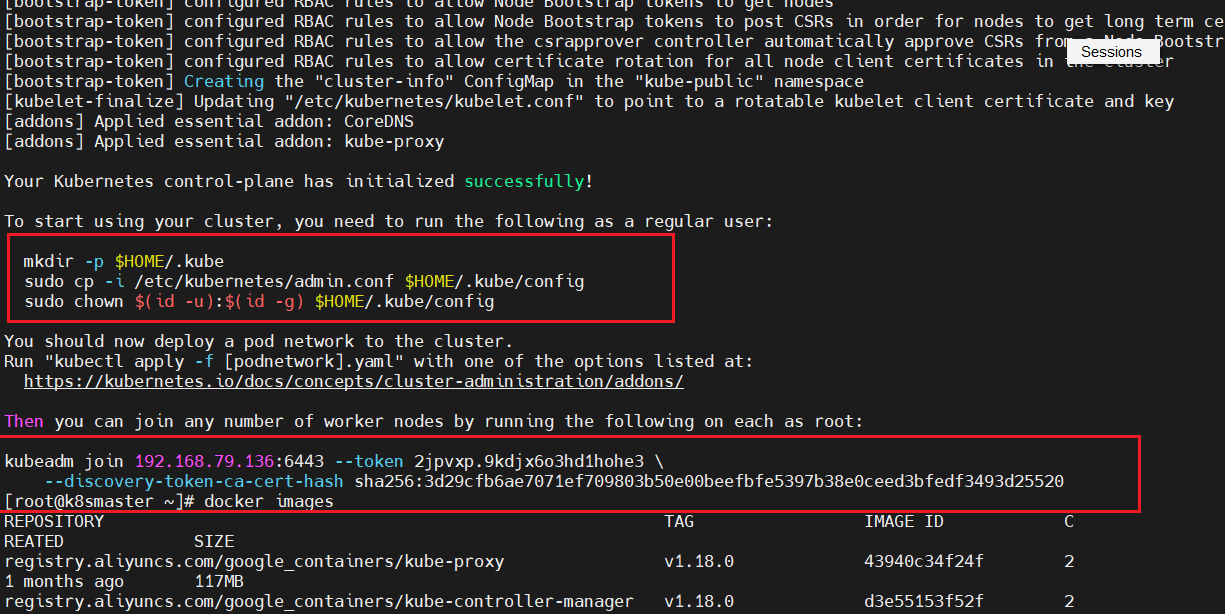
二、搭建k8s集群 kubeadm
ntp 时间同步报错:
Jan 11:01:43 ntpdate[8258]: no server suitable for synchronization found
https://blog.csdn.net/qq_27754983/article/details/69386408
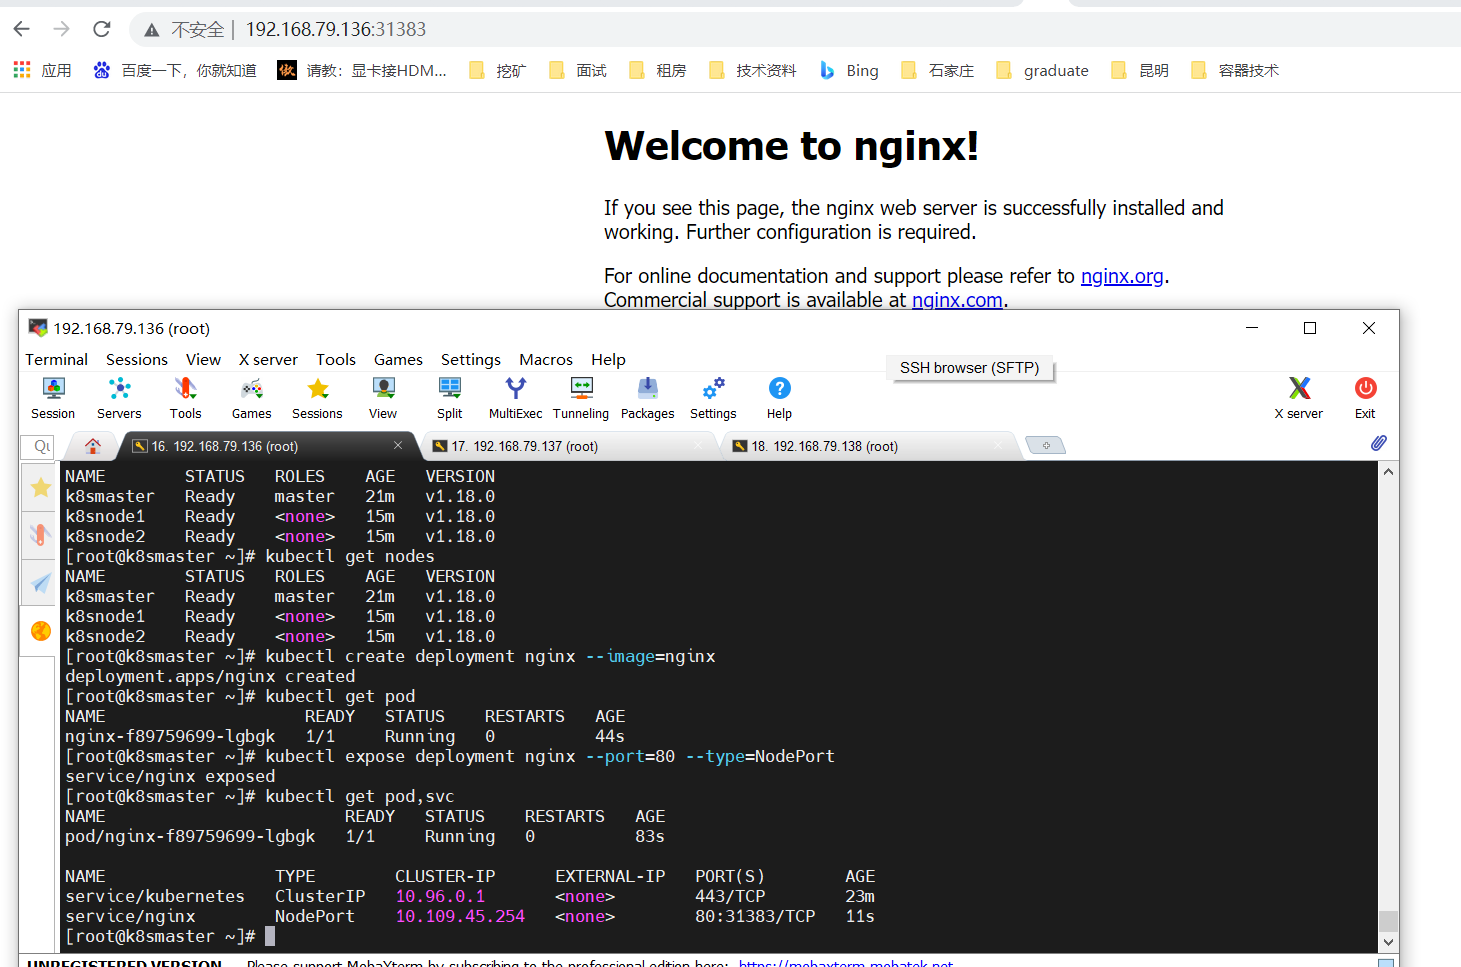
1-master 2 nodes k8s集群使用kubeadm快速部署,master init 后的命令 master执行提示,node加到集群的执行提示
测试访问nginx成功
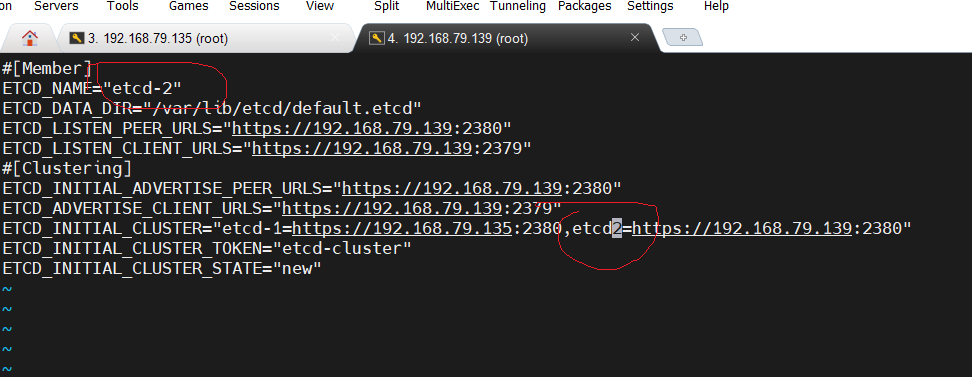
etcd 需要适当对应修改
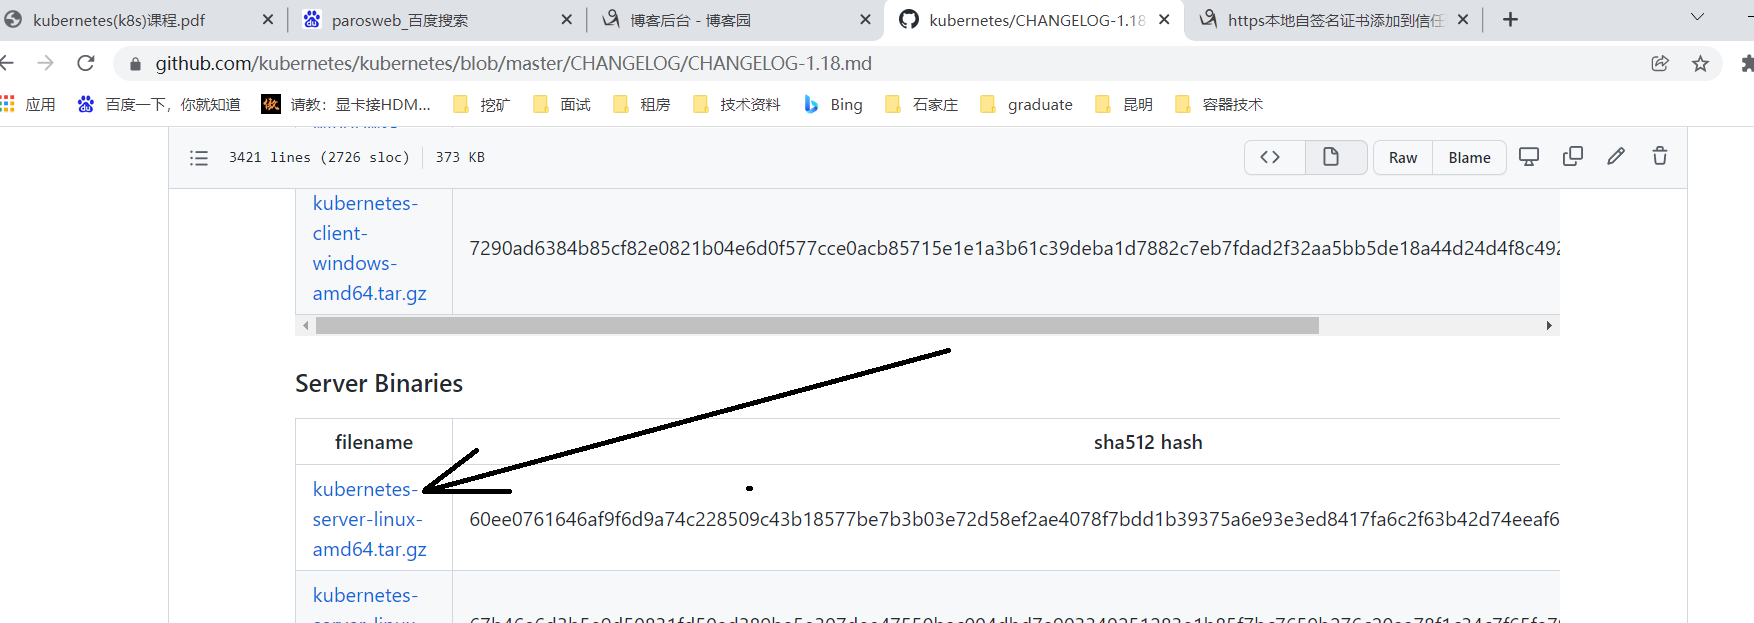
下载k8s二进制包
批量开启开机启动

-bash-4.2# grep 192 cfg/*
cfg/bootstrap.kubeconfig:KUBE_APISERVER="https://192.168.79.135:6443" # apiserver IP:PORT
cfg/kube-proxy.kubeconfig:KUBE_APISERVER="https://192.168.79.135:6443"


/opt/kubernetes/logs 下边查看日志
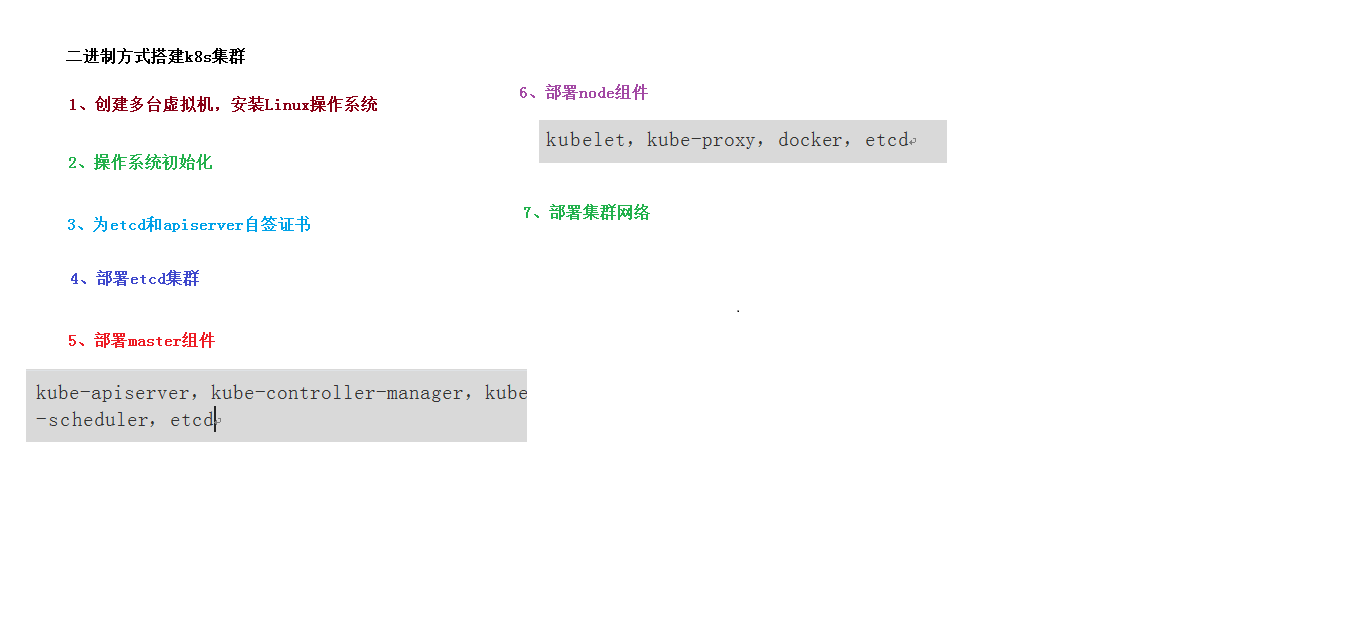
二进制部署k8s
https://www.jianshu.com/p/19e2d7cc94d6
在部署kubelet时,启动kubelet报错误:【kubelet failed to run Kubelet: cannot create certificate signing reques】
注意:
启动kubelet报错误:【kubelet failed to run Kubelet: cannot create certificate signing reques】
https://blog.csdn.net/weixin_39608791/article/details/108881130
https://blog.csdn.net/IvyXYW/article/details/115710665
【kubectl delete clusterrolebindings kubelet-bootstrap】
【kubectl create clusterrolebinding kubelet-bootstrap --clusterrole=system:node-bootstrapper --user=kubelet-bootstrap】
vmware虚拟机Cento7配置静态ip,连接互联网
https://blog.csdn.net/gaokcl/article/details/82834925
vi /etc/sysconfig/network-scripts/ifcfg-ens33
BOOTPROTO=static
IPADDR=192.168.79.140
NETMASK=255.255.255.0
GATEWAY=192.168.79.2 # 对应虚拟机虚拟网络管理 NAT的网关
DNS1=114.114.114.114
DNS2=8.8.8.8
centos7 设置时区:
timedatectl set-timezone Asia/Shanghai (这里是设置亚洲上海上海)
yum install -y ntpdate ##安装时间同步工具
ntpdate ntp.ntsc.ac.cn
查找
[root@localhost ~]# grep 192 /opt/etcd/cfg/*
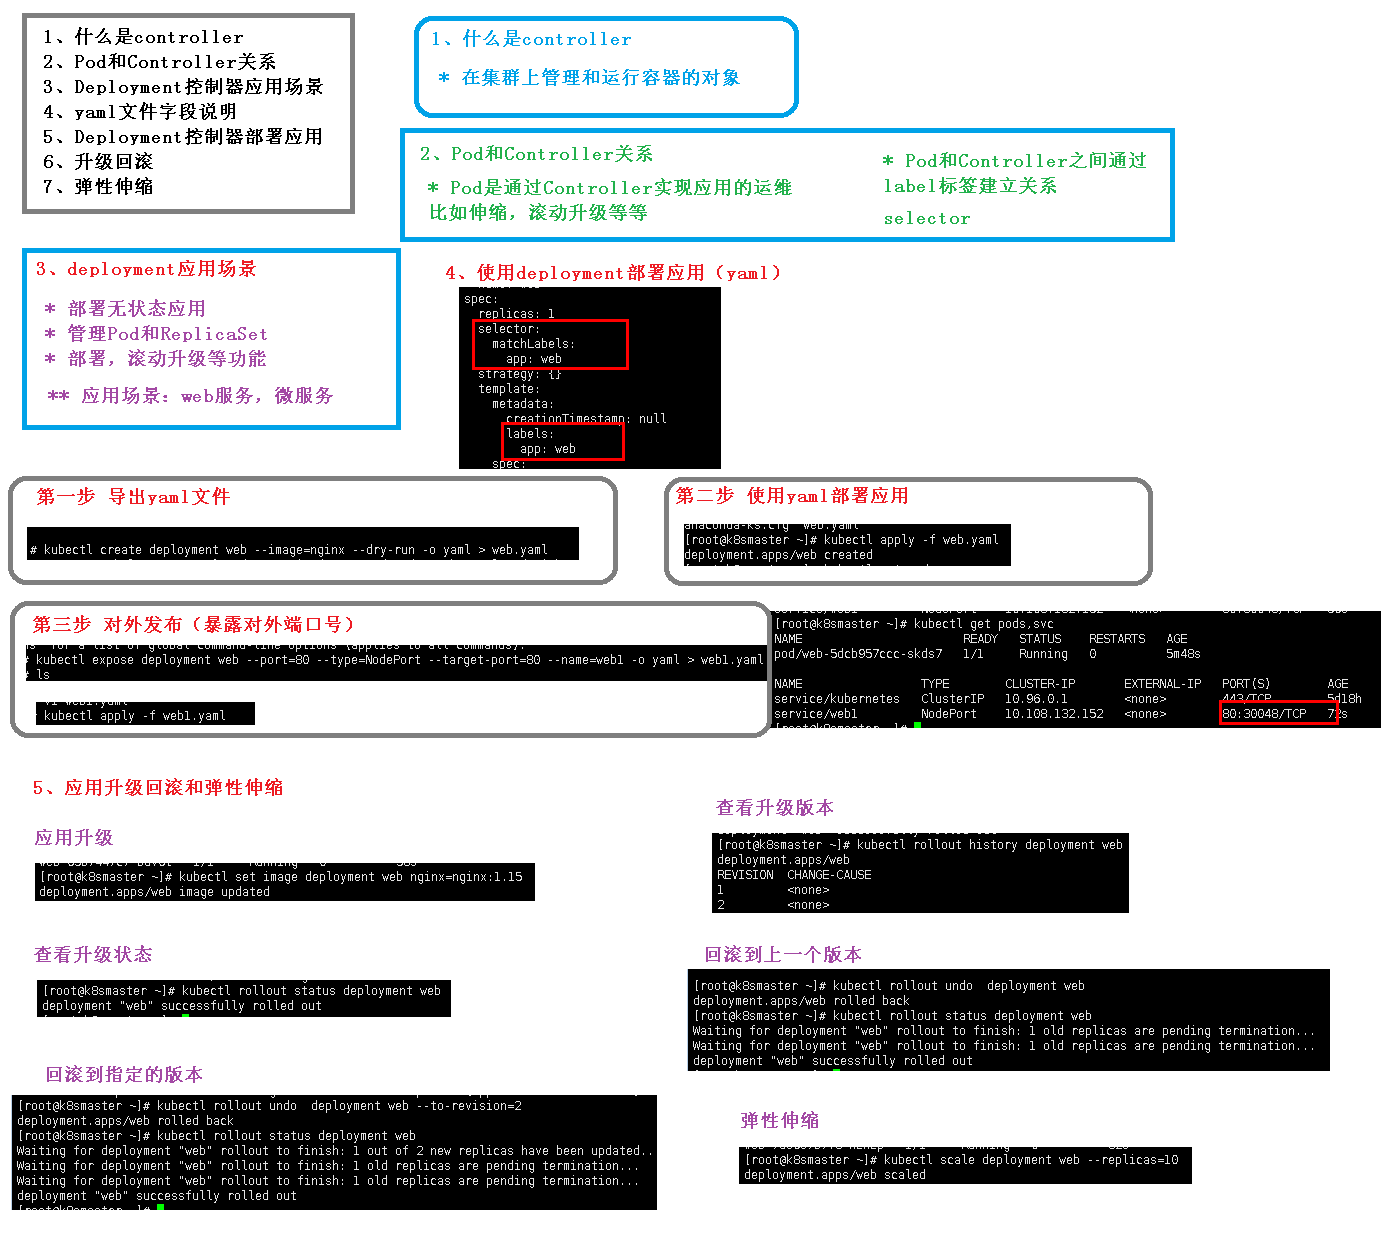
kubectl常用命令

kubectl get node
kubectl get node k8s-node1
kubectl --help
kubectl get --help

kubectl apply -f kube-flannel.yml

kubectl create deployment nginx --image=nginx
kubectl expose deployment nginx --port=80 --type=NodePort
kubectl get pod,svc

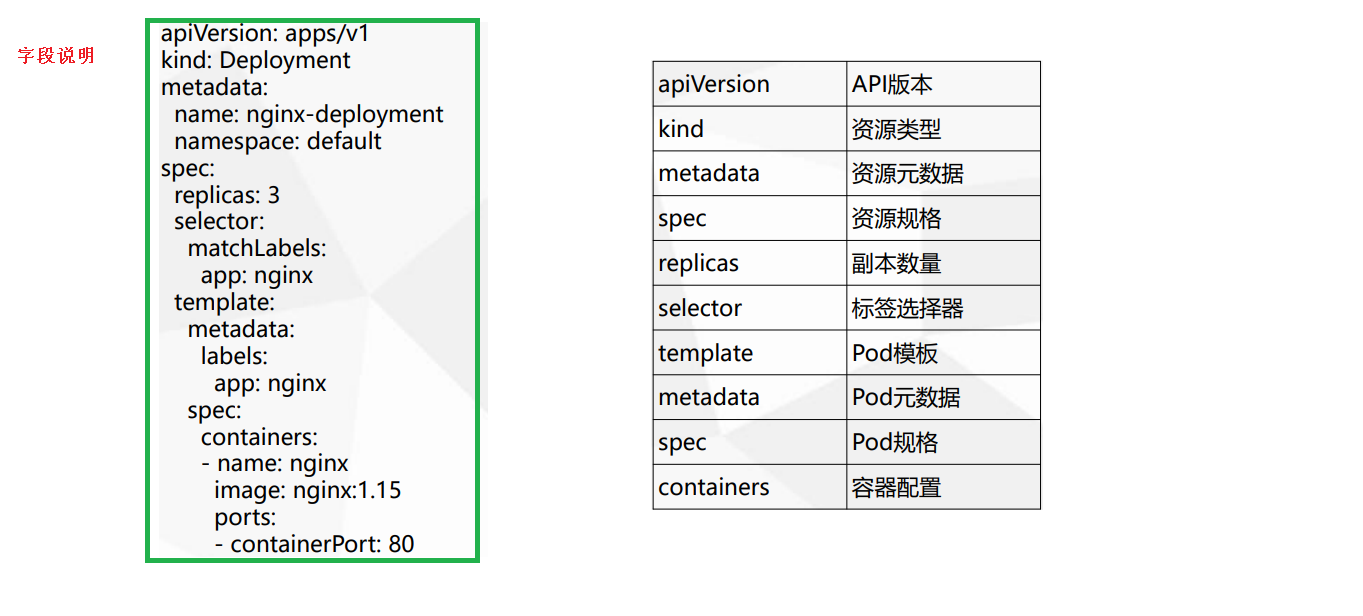
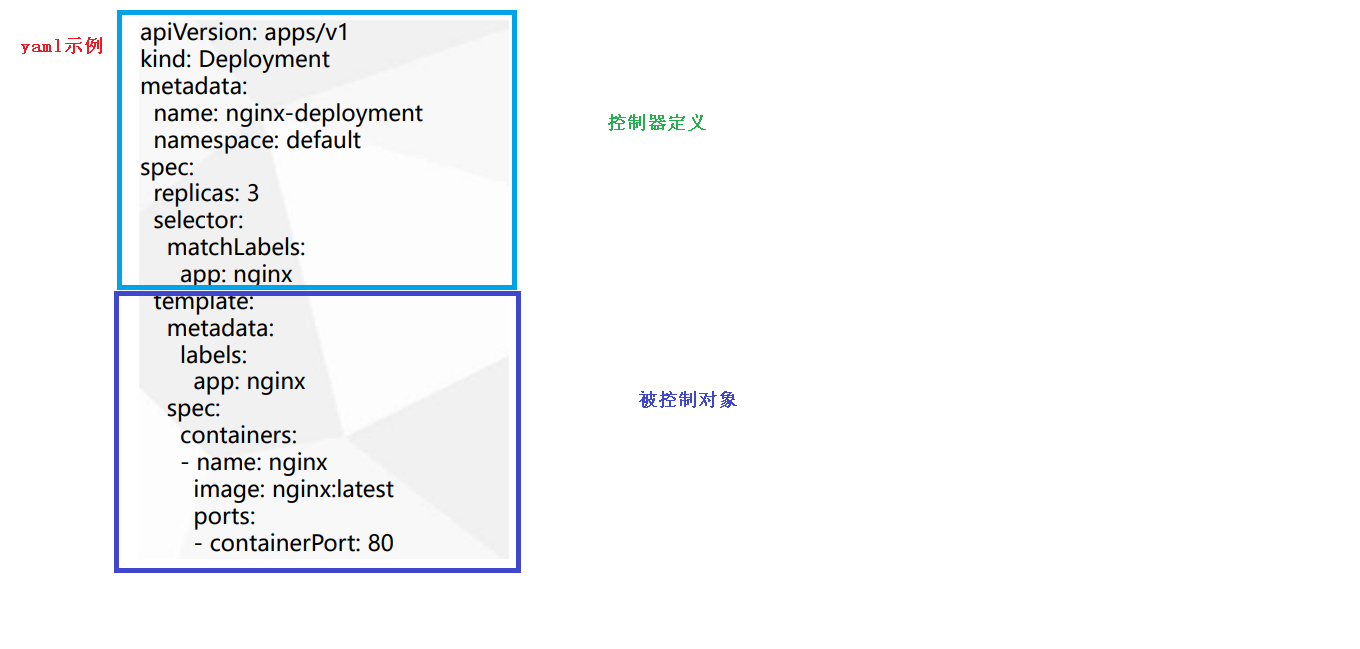
yml 文件成为资源清单文件或资源编排文件
 kubectl create deployment web --image=nginx -o yaml --dry-run
 kubectl create deployment web --image=nginx -o yaml --dry-run > m1.yaml

 kubectl get deploy nginx -o=yaml --export > m2.yaml


echo $? 检查上一句是否执行成功;

[root@master ~]# kubectl get pods -o wide

给node打标签
[root@master ~]# kubectl label node k8s-node1 env_role=dev
node/k8s-node1 labeled
[root@master ~]# kubectl get nodes k8s-node1 --show-labels
NAME        STATUS   ROLES    AGE    VERSION   LABELS
k8s-node1   Ready    <none>   3d1h   v1.18.3   beta.kubernetes

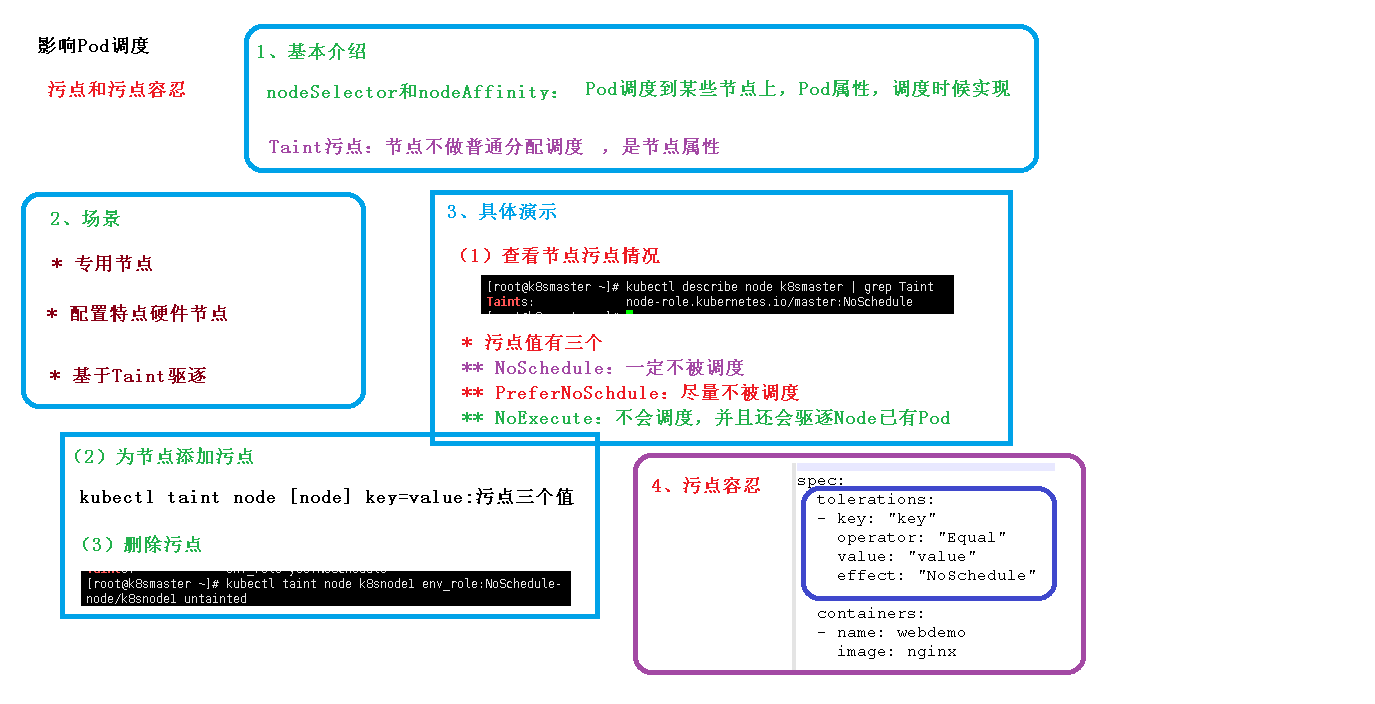
污点操作
kubectl describe node k8s-master | grep Taint
  kubectl get pods
  kubectl get pods -w wide
  kubectl get pods -o wide
  kubectl scale deployment --replicas=5
  kubectl scale deployment nginx --replicas=5
  kubectl get pods -o wide
  kubectl  delete deployment nginx
  kubectl get pods
  clear
  kubectl taint node k8s-node1 env_role=yes:NoSchedule
  kubectl describe node k8s-node1 | grep Taint
  kubectl create deployment web --image=nginx
  kubectl get pods -o wide
  kubectl scale deployment nginx --replicas=5
  kubectl scale deployment web --replicas=5
  kubectl get pods -o wide
  kubectl describe node k8s-node1 | grep Taint
  kubectl taint node k8s-node1 env_rocle:NoSchedule

https://www.cnblogs.com/amhk/p/15721679.html 删除污点
删除污点后,pod散列到各个node上
[root@master ~]# kubectl describe node k8s-node1 | grep Taint
Taints:             env_role:NoSchedule
[root@master ~]# kubectl describe node k8s-node1 | grep Taint
Taints:             env_role:NoSchedule
[root@master ~]# kubectl describe node k8s-node1 | grep Taint^C
[root@master ~]# kubectl taint node k8s-node1 env_role-
node/k8s-node1 untainted
[root@master ~]# kubectl describe node k8s-node1 | grep Taint
Taints:             <none>
[root@master ~]# kubectl scale deployment web --replicas=5
deployment.apps/web scaled
[root@master ~]# kubectl get pods -o wide
NAME                   READY   STATUS              RESTARTS   AGE     IP            NODE         NOMINATED NODE   READINESS GATES
web-7d9697b7f8-pb8r9   1/1     Running             0          6s      10.244.0.86   k8s-master   <none>           <none>
web-7d9697b7f8-qr8fk   0/1     ContainerCreating   0          6s      <none>        k8s-node1    <none>           <none>
web-7d9697b7f8-rgf6l   1/1     Running             0          8m24s   10.244.0.39   k8s-master   <none>           <none>
web-7d9697b7f8-srprs   0/1     ContainerCreating   0          6s      <none>        k8s-node1    <none>           <none>
web-7d9697b7f8-whcdl   1/1     Running             0          36m     10.244.0.19   k8s-master   <none>           <none>
使用deployment部署程序
kubectl create deployment web --image=nginx --dry-run -o yaml > web.yaml
kubectl apply -f web.yaml
kubectl get pods
kubectl expose deployment web --port=80 --type=NodePort --target-port=80 --name=web2 -o yaml >web2.yaml
cat web2.yaml
kubectl apply -f web2.yaml
kubectl get pod,svc
部署成功后,访问任何一个节点的端口号都可以访问nginx
http://192.168.79.140:32290/
http://192.168.79.141:32290/
应用的升级回滚和弹性伸缩
 kubectl apply -f web.yaml
 kubectl get pods
 kubectl delete deployment web
 vi web.yaml   # 修改为1.14
 kubectl apply -f web.yaml
 kubectl get pods
 kubectl set image deployment web nginx=nginx:1.15 # 版本升级
 cat web.yaml
 kubectl get pods
 kubectl rollout deployment status
 kubectl rollout status deployment web
 kubectl rollout history deployment web
 kubectl rollout undo deployment web
 kubectl rollout undo --help
 kubectl rollout undo deployment --to-revision=2  # 回滚
 kubectl get pods
 kubectl scale deployment web --replicas=10   # 弹性伸缩
 kubectl get pods
[root@master ~]# kubectl get svc
NAME         TYPE        CLUSTER-IP   EXTERNAL-IP   PORT(S)        AGE
kubernetes   ClusterIP   10.0.0.1     <none>        443/TCP        4d6h
nginx        NodePort    10.0.0.4     <none>        80:31254/TCP   4d2h
[root@master ~]# kubectl delete svc/nginx   # 删除server
service "nginx" deleted

[root@master ~]# kubectl get svc
NAME         TYPE        CLUSTER-IP   EXTERNAL-IP   PORT(S)   AGE
kubernetes   ClusterIP   10.0.0.1     <none>        443/TCP   4d7h
nginx        ClusterIP   None         <none>        80/TCP    32m
[root@master ~]# kubectl delete svc nginx


[root@master ~]# kubectl exec -it ds-test-5vm6x bash
kubectl exec [POD] [COMMAND] is DEPRECATED and will be removed in a future version. Use kubectl kubectl exec [POD] -- [COMMAND] instead.
error: unable to upgrade connection: Forbidden (user=kubernetes, verb=create, resource=nodes, subresource=proxy)
[root@master ~]# kubectl create clusterrolebinding kube-apiserver:kubelet-apis --clusterrole=system:kubelet-api-admin --user kubernetes
Error from server (AlreadyExists): clusterrolebindings.rbac.authorization.k8s.io "kube-apiserver:kubelet-apis" already exists
[root@master ~]# kubectl delete clusterrolebinding kube-apiserver:kubelet-apis
clusterrolebinding.rbac.authorization.k8s.io "kube-apiserver:kubelet-apis" deleted
[root@master ~]# kubectl create clusterrolebinding kube-apiserver:kubelet-apis --clusterrole=system:kubelet-api-admin --user kubernetes
clusterrolebinding.rbac.authorization.k8s.io/kube-apiserver:kubelet-apis created
[root@master ~]# kubectl exec -it ds-test-5vm6x bash
kubectl exec [POD] [COMMAND] is DEPRECATED and will be removed in a future version. Use kubectl kubectl exec [POD] -- [COMMAND] instead.
root@ds-test-5vm6x:/#
[root@master ~]# kubectl get jobs
NAME   COMPLETIONS   DURATION   AGE
pi     1/1           16m        22h
[root@master ~]# kubectl delete job pi

[root@master ~]# kubectl delete -f cronjob.yaml

[root@master ~]# echo -n 'admin' | base64
YWRtaW4=

[root@master ~]# kubectl delete -f secret-val.yaml
pod "mypod" deleted
[root@master ~]# vi secret-vol.yaml
[root@master ~]# kubectl apply -f secret-vol.yaml
pod/mypod created
[root@master ~]# kubectl get pods
NAME    READY   STATUS              RESTARTS   AGE
mypod   0/1     ContainerCreating   0          8s
[root@master ~]# kubectl get pods
NAME    READY   STATUS    RESTARTS   AGE
mypod   1/1     Running   0          23s
[root@master ~]# kubectl exec -it mypod bash
kubectl exec [POD] [COMMAND] is DEPRECATED and will be removed in a future version. Use kubectl kubectl exec [POD] -- [COMMAND] instead.
root@mypod:/# ls /etc/foo
password  username
root@mypod:/# cat /etc/foo/password
root@mypod:/# cat /etc/foo/username
adminroot@mypod:/# cat /etc/foo/password
1f2d1e2e67dfroot@mypod:/#
[root@master ~]# kubectl get pods
NAME    READY   STATUS    RESTARTS   AGE
mypod   1/1     Running   0          6m10s
[root@master ~]# kubectl delete secret --all
secret "default-token-ldss8" deleted
secret "mysecret" deleted
[root@master ~]# kubectl get pods
NAME    READY   STATUS    RESTARTS   AGE
mypod   1/1     Running   0          6m30s
[root@master ~]# kubectl delete Pod --all
pod "mypod" deleted


[root@master ~]# vi redis.properties
[root@master ~]# kubectl create configmap redis-config --from-file=redis.properties
configmap/redis-config created
[root@master ~]# kubectl get cm
NAME           DATA   AGE
redis-config   1      6s
[root@master ~]# kubectl describe cm redis-config
Name:         redis-config
Namespace:    default
Labels:       <none>
Annotations:  <none>

Data
====
redis.properties:
----
redis.host=127.0.0.1
redis.port=6379
redis.password=123456


Events:  <none>
[root@master ~]# vi cm.yaml
[root@master ~]# kubectl apply -f cm.yaml
pod/mypod created
[root@master ~]# kubectl get pods
NAME    READY   STATUS      RESTARTS   AGE
mypod   0/1     Completed   0          6s
[root@master ~]# kubectl logs mypod
redis.host=127.0.0.1
redis.port=6379
redis.password=123456


[root@master ~]# vi myconfig.yaml
[root@master ~]# kubectl apply -f myconfig.yaml
configmap/myconfig created
[root@master ~]# kubectl  get pods
No resources found in default namespace.
[root@master ~]# kubectl  get  cm
NAME           DATA   AGE
myconfig       2      23s
redis-config   1      5m16s
[root@master ~]# vi config-val.yaml
[root@master ~]# kubectl apply -f config-val.yaml
pod/mypod created
[root@master ~]# kubectl get pods
NAME    READY   STATUS              RESTARTS   AGE
mypod   0/1     ContainerCreating   0          13s
[root@master ~]# kubectl logs mypod
info hello
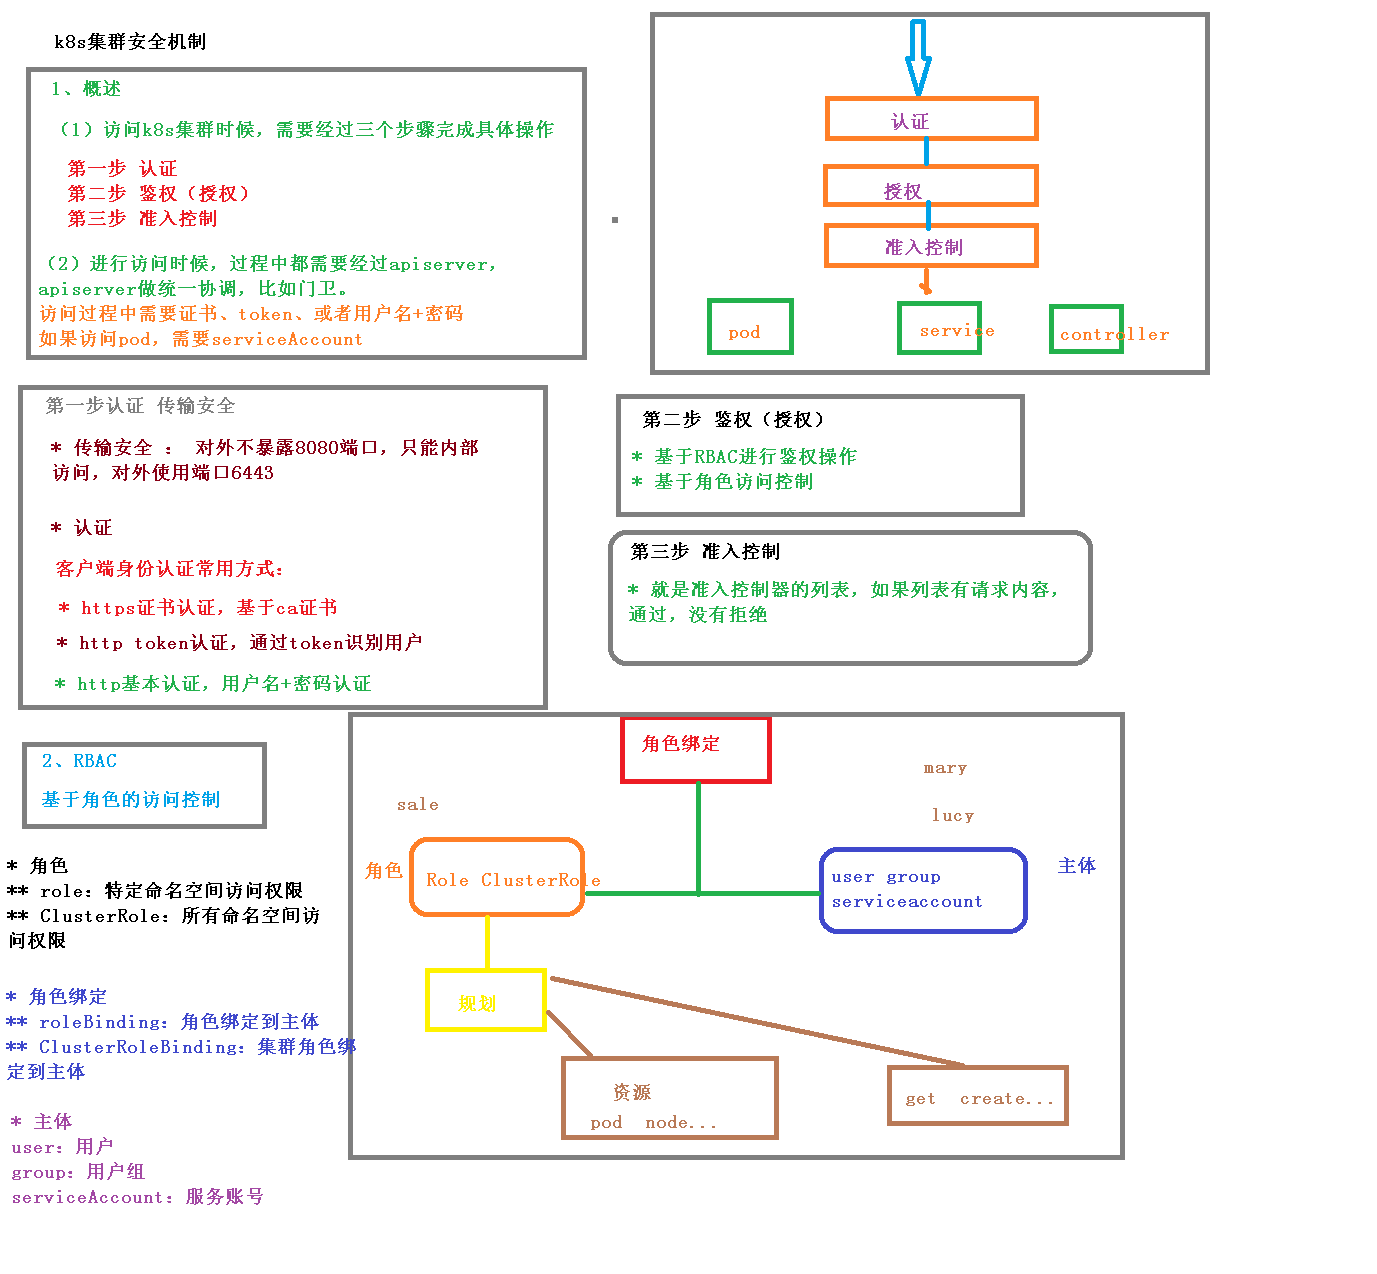
 vi rbac-role.yaml
 kubectl get pods -n roledemo
 kubectl apply -f rbac-role.yaml
 vi rbac-role.yaml
 kubectl apply -f rbac-role.yaml
 kubectl get role -n roledemo
 vi rbac-rolebing.yaml
 kubectl apply -f rbac-rolebing.yaml
 kubectl get rolebinding -n roledemo
 kubectl get role,rolebinding -n roledemo
 mkdir mary
 cd m
 cd mary/
 ls
 vi rbac-user.sh
 vi rbac-user.sh
 cp /root/TLS/k8s/ca* ./
 bash rbac-user.sh
 cat mary-kubeconfig
 kubectl get pods -r roledemo
 kubectl get pods -n roledemo


 kubectl create deployment web --image=nginx
 kubectl expose deployment web --port=80 --target-port=80 --type=NodePort
 kubectl get pods,svc
 vi ingress-contorller.yaml
 kubectl apply -f ingress-contorller.yaml
 kubectl get pods -n ingress-nginx
 vi ingress-http.yaml
 kubectl apply -f ingress-http.yaml
 kubectl get pods -n ingress-nginx -o wide
 kubectl get svc
 kubectl get ing

 编辑window的 C:\Windows\System32\drivers\etc\hosts文件
tar zxvf helm-v3.4.2-linux-amd64.tar.gz
cd linux-amd64/
mv helm /usr/bin

 helm repo add stable http://mirror.azure.cn/kubernetes/charts/
 helm repo list
 helm repo add aliyun https://kubernetes.oss-cn-hangzhou.aliyuncs.com/charts
 helm repo list
 helm repo remove aliyun
 helm repo update

helm search repo weave
helm install ui stable/weave-scope
helm list
helm status ui

[root@master linux-amd64]# kubectl get svc
NAME             TYPE        CLUSTER-IP   EXTERNAL-IP   PORT(S)        AGE
kubernetes       ClusterIP   10.0.0.1     <none>        443/TCP        2d17h
ui-weave-scope   ClusterIP   10.0.0.38    <none>        80/TCP         106s
web              NodePort    10.0.0.227   <none>        80:30486/TCP   120m
[root@master linux-amd64]# kubectl edit svc ui-weave-scope  # type=NodePort
service/ui-weave-scope edited
[root@master linux-amd64]# kubectl get svc
NAME             TYPE        CLUSTER-IP   EXTERNAL-IP   PORT(S)        AGE
kubernetes       ClusterIP   10.0.0.1     <none>        443/TCP        2d17h
ui-weave-scope   NodePort    10.0.0.38    <none>        80:30641/TCP   2m44s
web              NodePort    10.0.0.227   <none>        80:30486/TCP   121m


# 自己创建chart,完成部署

helm create mychart
cd mychart/
vi Chart.yaml
cd templates/
rm -rf *
cd mychart/templates/
kubectl create deployment web1 --image=nginx --dry-run -o yaml > deployment.yaml
kubectl create deployment web1 --image=nginx
kubectl get pods
kubectl expose deployment web1 --port=80 --target-port=80 --type=NodePort --dry-run -o yaml > service.yaml
cat service.yaml
kubectl delete deployment web1
[root@master ~]# ls mychart/templates/
deployment.yaml  service.yaml


helm install web1 mychart/
kubectl get pods
kubectl get svc
# 应用升级
helm upgrade web1 mychart/

# helm实现对yaml高效复用,动态获取参数值

vi values.yaml  # 定义变量
image: nginx
tag: 1.16
label: nginx
port: 80

vi templates/deployment.yaml
 # 取值
     app: {{ .Values.label}}
  name: {{ .Release.Name}}-deploy

 vi templates/service.yaml
 vi templates/deployment.yaml
 cd
 cat mychart/values.yaml
 helm install --dry-run web2 mychart
 helm install  web2 mychart
 kubectl get pods
 kubectl get svc

## nfs持久化存储
# 另一台主机安装nfs,每个k8s node安装nfs,
yum install -y nfs-utils
[root@localhost nfs]# cat /etc/exports
/data/nfs *(rw,no_root_squash)

mkdir -p /data/nfs
 cd /data/nfs/
 vi index.html  # hello hfs

master上操作
kubectl apply -f nfs-nginx.yaml
kubectl get svc,pods
kubectl describe pod nginx-dep1-68f88f4d59-xfgbw
kubectl get pods
kubectl exec -it nginx-dep1-68f88f4d59-xfgbw bash

[root@master pv]# kubectl exec -it nginx-dep1-68f88f4d59-xfgbw bash
kubectl exec [POD] [COMMAND] is DEPRECATED and will be removed in a future version. Use kubectl kubectl exec [POD] --                                                                   [COMMAND] instead.
root@nginx-dep1-68f88f4d59-xfgbw:/# ls /usr/share/nginx/html
index.html
root@nginx-dep1-68f88f4d59-xfgbw:/# cat /usr/share/nginx/html/index.html
hello hfs
root@nginx-dep1-68f88f4d59-xfgbw:/# exit
exit

kubectl expose deployment nginx-dep1 --port=80 --target-port=80 --type=NodePort
kubectl get svc
浏览器访问
http://192.168.79.140:31675/
 kubectl create -f node-exporter.yaml
 # 报错的话修改apiVersion: apps/v1
 #  selector:
    matchLabels:
      app: node-exporter

  vi node-exporter.yaml
  kubectl create -f node-exporter.yaml
  # kubectl delete -f node-exporter.yaml 根据情况删除
  kubectl create -f node-exporter.yaml
  cd prometheus/
  ls
  kubectl ceate -f rbac-setup.yaml
  kubectl create -f rbac-setup.yaml
  kubectl create -f configmap.yaml
  kubectl create -f prometheus.deploy.yml
  # # 报错的话修改apiVersion: apps/v1 #  selector:
  vi prometheus.deploy.yml
  kubectl create -f prometheus.deploy.yml
  kubectl create -f prometheus.svc.yml
  clear
  kubectl get -n ns kube-system
  kubectl get node -n  kube-system
  kubectl get pods -n  kube-system

  cd grafana/
  kubectl create -f grafana-deploy.yaml
  vi  grafana-deploy.yaml

[root@master grafana]# kubectl create -f grafana-deploy.yaml
error: unable to recognize "grafana-deploy.yaml": no matches for kind "Deployment" in version "extensions/v1beta1"
    # 报错的话,修改apiVersion: apps/v1
	#   selector:
			matchLabels:
			  app: grafana
			  component: core

  kubectl create -f grafana-deploy.yaml
  vi  grafana-deploy.yaml
  kubectl create -f grafana-deploy.yaml
  vi  grafana-deploy.yaml
  kubectl create -f grafana-deploy.yaml
  vi  grafana-deploy.yaml
  kubectl create -f grafana-deploy.yaml
  kubectl create -f grafana-svc.yaml
  kubectl create -f grafana-ing.yaml
  kubectl get nods -n kube-system
  kubectl get svc -n kube-system
  kubectl get svc -n kube-system -o wide

http://192.168.79.140:31455/login  grafana默认用户名和密码是admin admin
添加数据源时,注意ip地址填写如下:

左上角导入dashboard模板
官网这个模板:https://grafana.com/grafana/dashboards/3119
高可用k8s搭建
keepalived 配置虚拟ip,检查状态的作用
haproxy 是负载均衡

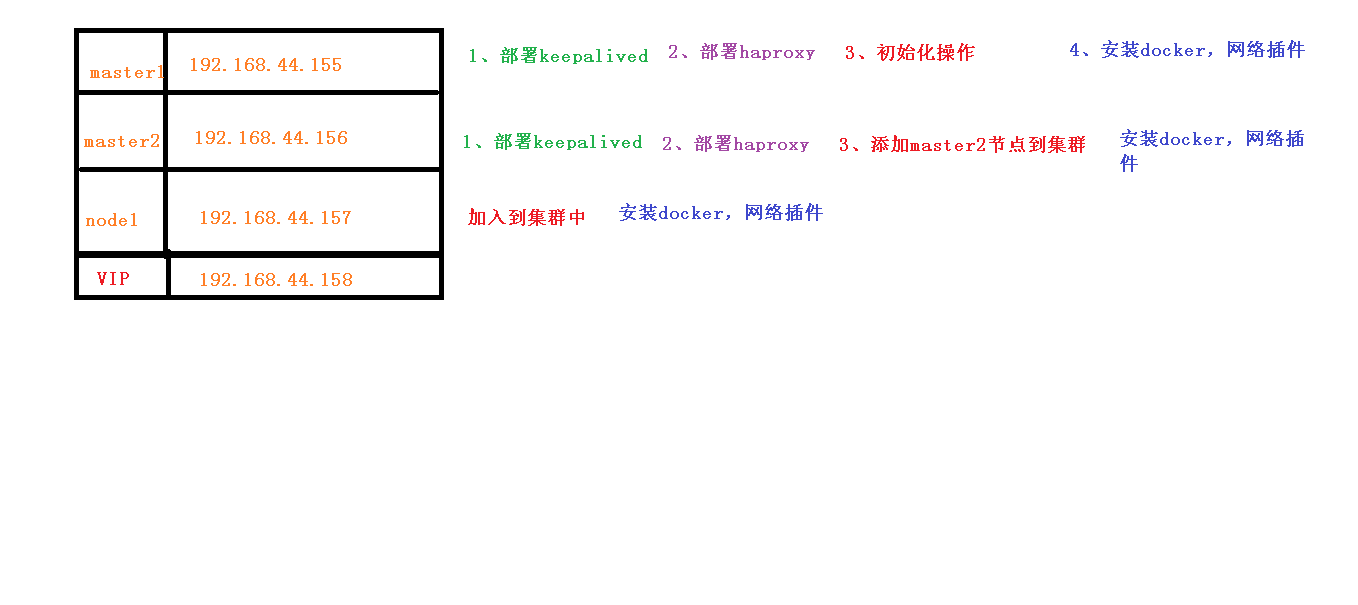
规划:
master1 192.168.79.155
master2 192.168.79.156
node1  192.168.79.157
vip  192.168.79.158
systemctl stop firewalld
systemctl disable firewalld

sed -i 's/enforcing/disabled/' /etc/selinux/config
setenforce 0

swapoff -a #临时
sed -ri 's/.*swap.*/#&/' /etc/fstab # 永久


hostnamectl set-hostname master1
hostnamectl set-hostname master2
hostnamectl set-hostname node1


cat >> /etc/hosts << EOF
192.168.79.158  master.k8s.io   k8s-vip
192.168.79.155  master01.k8s.io master1
192.168.79.156  master02.k8s.io master2
192.168.79.157  node01.k8s.io   node1
EOF


cat > /etc/sysctl.d/k8s.conf << EOF
net.bridge.bridge-nf-call-ip6tables = 1
net.bridge.bridge-nf-call-iptables = 1
EOF

sysctl --system

yum install ntpdate -y

timedatectl set-timezone Asia/Shanghai

ntpdate ntp.ntsc.ac.cn

master1,2
yum install -y conntrack-tools libseccomp libtool-ltdl
yum install -y keepalived

cat > /etc/keepalived/keepalived.conf <<EOF
! Configuration File for keepalived

global_defs {
   router_id k8s
}

vrrp_script check_haproxy {
    script "killall -0 haproxy"
    interval 3
    weight -2
    fall 10
    rise 2
}

vrrp_instance VI_1 {
    state MASTER
    interface ens33
    virtual_router_id 51
    priority 250
    advert_int 1
    authentication {
        auth_type PASS
        auth_pass ceb1b3ec013d66163d6ab
    }
    virtual_ipaddress {
        192.168.79.158
    }
    track_script {
        check_haproxy
    }

}
EOF


# 启动keepalived
$ systemctl start keepalived.service
设置开机启动
$ systemctl enable keepalived.service
# 查看启动状态
$ systemctl status keepalived.service

两台master上

yum install -y haproxy

cat > /etc/haproxy/haproxy.cfg << EOF
#---------------------------------------------------------------------
# Global settings
#---------------------------------------------------------------------
global
    # to have these messages end up in /var/log/haproxy.log you will
    # need to:
    # 1) configure syslog to accept network log events.  This is done
    #    by adding the '-r' option to the SYSLOGD_OPTIONS in
    #    /etc/sysconfig/syslog
    # 2) configure local2 events to go to the /var/log/haproxy.log
    #   file. A line like the following can be added to
    #   /etc/sysconfig/syslog
    #
    #    local2.*                       /var/log/haproxy.log
    #
    log         127.0.0.1 local2

    chroot      /var/lib/haproxy
    pidfile     /var/run/haproxy.pid
    maxconn     4000
    user        haproxy
    group       haproxy
    daemon

    # turn on stats unix socket
    stats socket /var/lib/haproxy/stats
#---------------------------------------------------------------------
# common defaults that all the 'listen' and 'backend' sections will
# use if not designated in their block
#---------------------------------------------------------------------
defaults
    mode                    http
    log                     global
    option                  httplog
    option                  dontlognull
    option http-server-close
    option forwardfor       except 127.0.0.0/8
    option                  redispatch
    retries                 3
    timeout http-request    10s
    timeout queue           1m
    timeout connect         10s
    timeout client          1m
    timeout server          1m
    timeout http-keep-alive 10s
    timeout check           10s
    maxconn                 3000
#---------------------------------------------------------------------
# kubernetes apiserver frontend which proxys to the backends
#---------------------------------------------------------------------
frontend kubernetes-apiserver
    mode                 tcp
    bind                 *:16443
    option               tcplog
    default_backend      kubernetes-apiserver
#---------------------------------------------------------------------
# round robin balancing between the various backends
#---------------------------------------------------------------------
backend kubernetes-apiserver
    mode        tcp
    balance     roundrobin
    server      master01.k8s.io   192.168.79.155:6443 check
    server      master02.k8s.io   192.168.79.156:6443 check
#---------------------------------------------------------------------
# collection haproxy statistics message
#---------------------------------------------------------------------
listen stats
    bind                 *:1080
    stats auth           admin:awesomePassword
    stats refresh        5s
    stats realm          HAProxy\ Statistics
    stats uri            /admin?stats
EOF

# 设置开机启动
$ systemctl enable haproxy
# 开启haproxy
$ systemctl start haproxy
# 查看启动状态
$ systemctl status haproxy

netstat -lntup|grep haproxy

剩余内容可以参考:使用kubeadm搭建高可用的K8s集群.md


 浙公网安备 33010602011771号