Raspberry Pi 设置开机登录后自启动脚本 All In One
Raspberry Pi 设置开机登录后自启动脚本 All In One

dd-robot-notice
https://github.com/xgqfrms/Raspberry-Pi/issues/5
https://github.com/xgqfrms/dd-robot-notice/blob/main/raspberry-pi/dd-ip-notice-robot.sh
6 种修改系统文件来实现开机自启动的方法
file:///Users/xgqfrms-mm/Desktop/boot.pdf
https://cdn.xgqfrms.xyz/Linux/Raspberry-Pi/login-boot.pdf
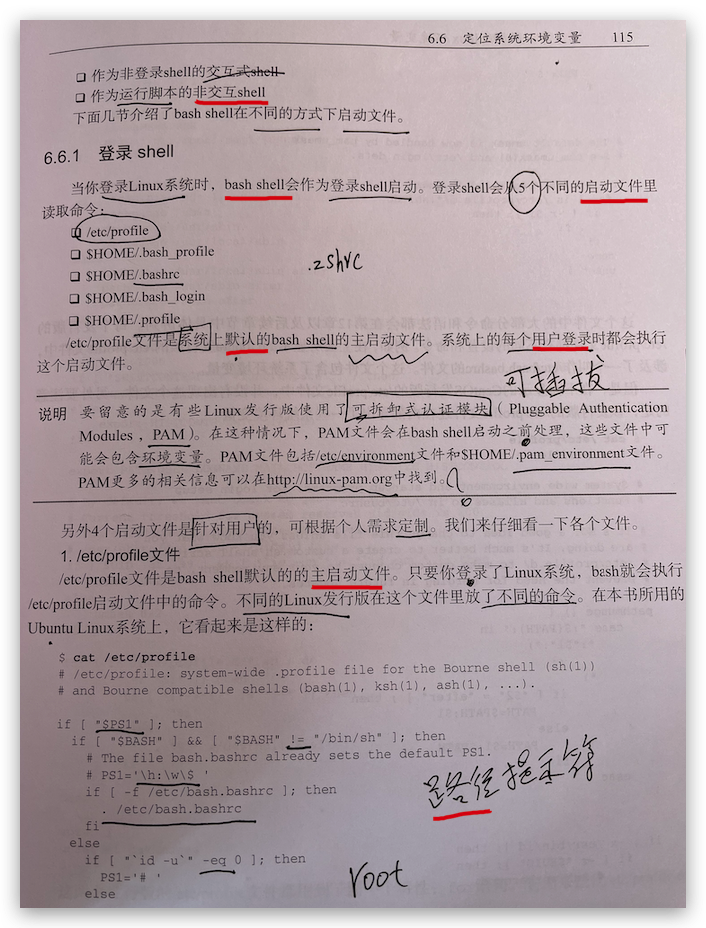
.profile 用户级启动配置文件
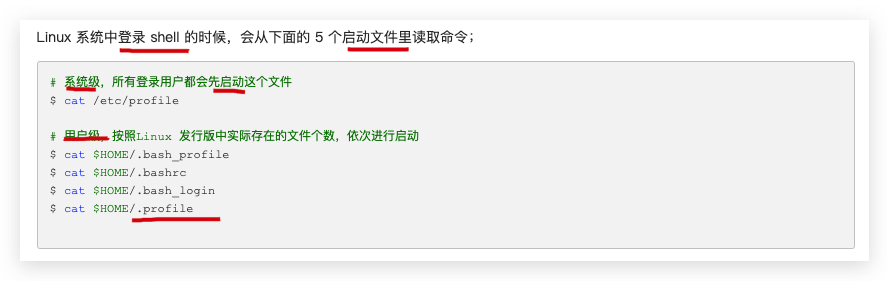
Linux 系统中登录 shell 的时候,会从下面的 5 个启动文件里读取命令;
# 系统级,所有登录用户都会先启动这个文件
$ cat /etc/profile

# 用户级,按照Linux 发行版中实际存在的文件个数,依次进行启动
$ cat $HOME/.bash_profile
$ cat $HOME/.bashrc
$ cat $HOME/.bash_login
$ cat $HOME/.profile
# 系统级 ??? Raspberry Pi
$ cat /etc/rc.local
https://www.cnblogs.com/xgqfrms/p/17343088.html
Solutions
2 种
修改系统配置文件来实现开机登录后自动执行自定义shell 脚本的方案
.profile
# ~ 用户家目录
$ cat ~/.profile

# $HOME 用户家目录
$ cat $HOME/.profile

# 等价于
$ pwd
/home/pi/
$ cat /home/pi/.profile
$ sudo nano /home/pi/.profile
# 等价于
$ sudo nano ~/.profile

$ sudo vim /home/pi/.profile
# 等价于
$ sudo vim ~/.profile
$ sudo vim $HOME/.profile

# 默认 pi $HOME
$ cat .profile
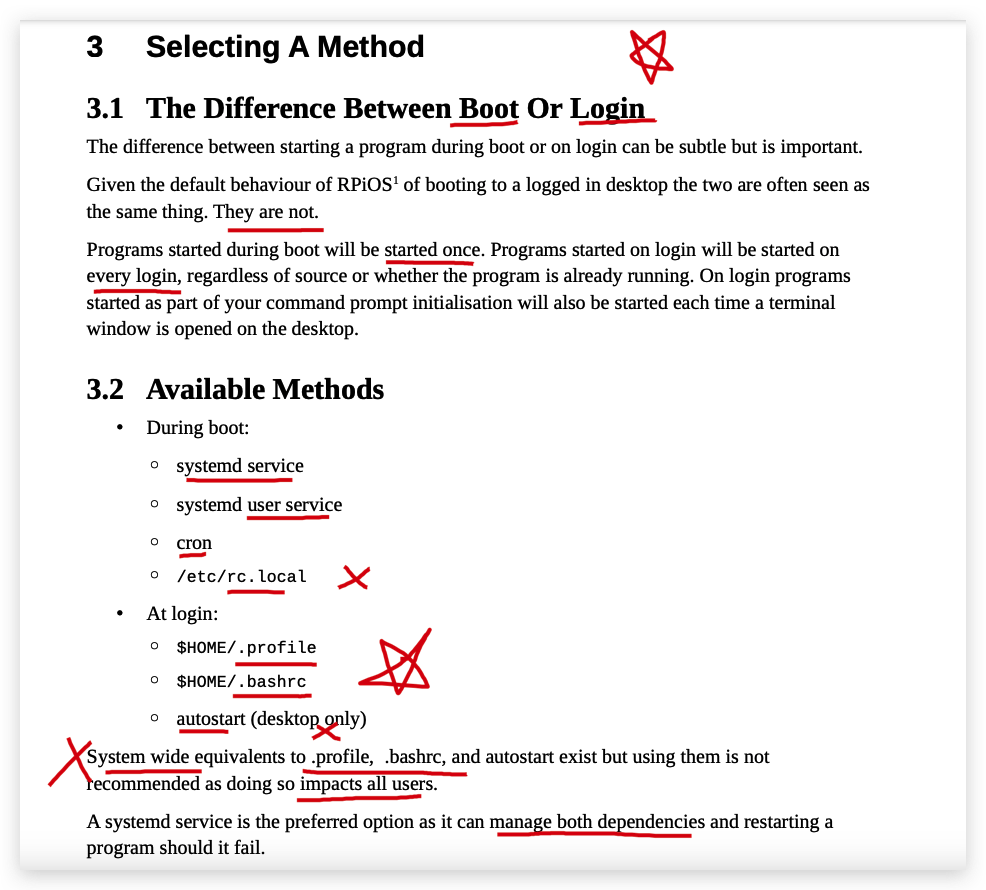
the difference between boot or login
Running A Program At Start UP A Beginner's Guide.pdf / login-boot.pdf
https://github.com/xgqfrms/cdn/blob/gh-pages/Linux/login-boot.pdf
$ sudo vim ~/.profile

$ source ~/.profile

$ cat ~/.profile
$ sudo vim ~/.profile
$ source ~/.profile
$ cat ~/.profile
# ~/.profile: executed by the command interpreter for login shells.
# This file is not read by bash(1), if ~/.bash_profile or ~/.bash_login
# exists.
# see /usr/share/doc/bash/examples/startup-files for examples.
# the files are located in the bash-doc package.
# the default umask is set in /etc/profile; for setting the umask
# for ssh logins, install and configure the libpam-umask package.
#umask 022
# if running bash
if [ -n "$BASH_VERSION" ]; then
# include .bashrc if it exists
if [ -f "$HOME/.bashrc" ]; then
. "$HOME/.bashrc"
fi
fi
# set PATH so it includes user's private bin if it exists
if [ -d "$HOME/bin" ] ; then
PATH="$HOME/bin:$PATH"
fi
# set PATH so it includes user's private bin if it exists
if [ -d "$HOME/.local/bin" ] ; then
PATH="$HOME/.local/bin:$PATH"
fi
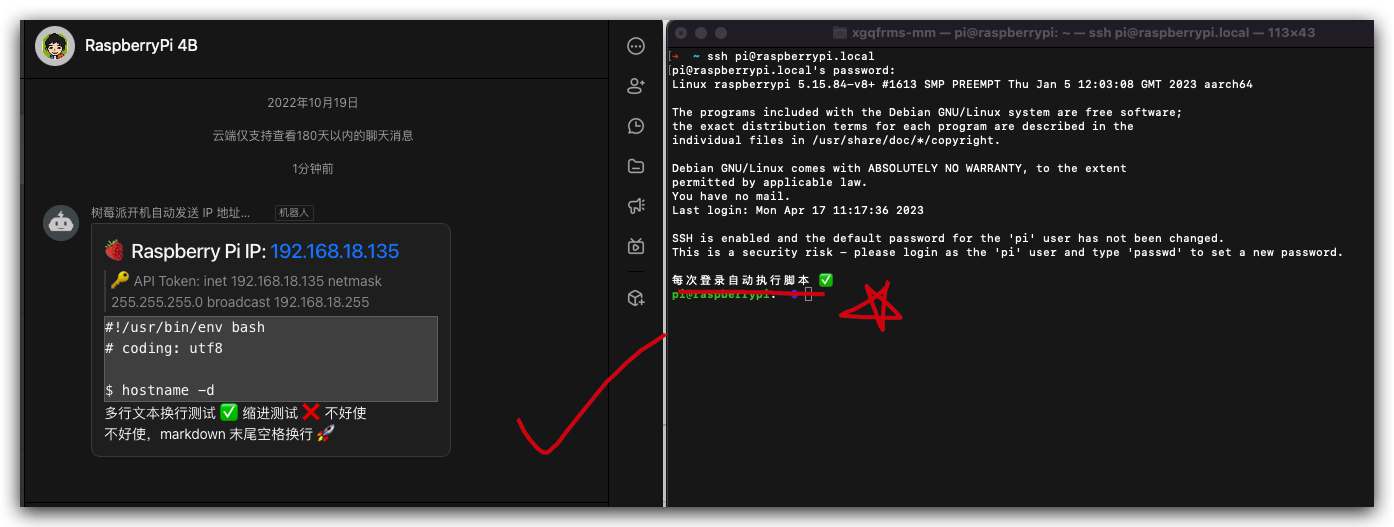
echo "每次登录自动执行脚本 ✅"
bash /home/pi/Desktop/ip-program.sh
.bashrc
$ sudo nano /home/pi/.bashrc

$ sudo vim /home/pi/.bashrc
init.dtab
# ip-notice-robot.py 让树莓派开机自动发送 IP 地址消息通知
$ sudo cp /home/pi/ip-notice-robot.py /etc/init.d/
systemd❌
$ sudo nano /lib/systemd/system/ip-notice-robot.service

$ sudo vim /lib/systemd/system/ip-notice-robot.service
crontab定时器/定时任务
$ crontab -l
$ crontab -e
rc.local❌
$ sudo nano /etc/rc.local

$ sudo vim /etc/rc.local
$ cat /etc/rc.local
$ cat /etc/rc.local
#!/bin/sh -e
#
# rc.local
#
# This script is executed at the end of each multiuser runlevel.
# Make sure that the script will "exit 0" on success or any other
# value on error.
#
# In order to enable or disable this script just change the execution
# bits.
#
# By default this script does nothing.

# Print the IP address
_IP=$(hostname -I) || true
if [ "$_IP" ]; then
  printf "My IP address is %s\n" "$_IP"
fi

# 禁用电源关闭
iwconfig wlan0 power off

# Raspberry PI 设置开机自启动脚本
# 自动发送 IP 地址到钉钉群消息 🚀
su pi -c "exec /home/pi/dd-ip-notice-robot.sh"

exit 0
docs
raspi-config
$ sudo raspi-config
https://www.raspberrypi.com/documentation/computers/configuration.html#raspi-config
config.txt
$ cat /boot/config.txt
$ sudo nano /boot/config.txt
$ sudo vim /boot/config.txt
https://www.raspberrypi.com/documentation/computers/config_txt.html
BIOS
https://en.wikipedia.org/wiki/BIOS
example file:
# Enable audio (loads snd_bcm2835)
dtparam=audio=on

# Automatically load overlays for detected cameras
camera_auto_detect=1

# Automatically load overlays for detected DSI displays
display_auto_detect=1

# Enable DRM VC4 V3D driver
dtoverlay=vc4-kms-v3d
max_framebuffers=2

# Disable compensation for displays with overscan
disable_overscan=1
include extraconfig.txt
autoboot.txt
[all]
tryboot_a_b=1
boot_partition=2
[tryboot]
boot_partition=3
[all]
tryboot_a_b=1
boot_partition=3
[tryboot]
boot_partition=2
Display
hdmi_enable_4kp60
# Raspberry Pi 4 Only
By default, when connected to a 4K monitor, the Raspberry Pi 4B, 400 and CM4 will select a 30Hz refresh rate. Use this option to allow selection of 60Hz refresh rates.
IMPORTANT
It is not possible to output 4Kp60 on both micro HDMI ports simultaneously.
WARNING
Setting hdmi_enable_4kp60 will increase power consumption and the temperature of your Raspberry Pi.
https://www.raspberrypi.com/documentation/computers/config_txt.html#common-display-options
demos
- 让 Raspberry Pi 说出自己的 IP 地址
无显示器 SSH 远程访问 树莓派
# SSH
$ ssh pi@raspberrypi.local

$ ssh pi@192.168.18.135
https://www.cnblogs.com/xgqfrms/p/17323303.html
(🐞 反爬虫测试!打击盗版⚠️)如果你看到这个信息, 说明这是一篇剽窃的文章,请访问 https://www.cnblogs.com/xgqfrms/ 查看原创文章!
Raspberry Pi 设置开机自动启动 SSH
手动创建一个userconf.txt 配置文件
boot folder
https://www.raspberrypi.com/documentation/computers/configuration.html#boot-folder-contents
手动创建一个ssh 无扩展名 ✅ 或 ssh.txt 空文件 ❌
When this file is present, SSH will be enabled on boot.
The contents don’t matter, it can be empty.
SSH is otherwise disabled
https://www.raspberrypi.com/documentation/computers/configuration.html#ssh-or-ssh-txt
config.txt
https://www.raspberrypi.com/documentation/computers/configuration.html#config-txt
https://www.raspberrypi.com/documentation/computers/config_txt.html
wpa_supplicant.conf
https://www.raspberrypi.com/documentation/computers/configuration.html#wpa_supplicant-conf
https://www.raspberrypi.com/documentation/computers/configuration.html#configuring-networking-2
userconf.txt 配置文件boot folder
ssh 无扩展名 ✅ 或 ssh.txt 空文件 ❌The contents don’t matter, it can be empty.
SSH is otherwise disabled
config.txtwpa_supplicant.confThe utilization of quotes around the ssid - psk can help avoid any oddities if your network ssid or password has special chars (! @ # $ etc)
ctrl_interface=DIR=/var/run/wpa_supplicant GROUP=netdev
country=<Insert 2 letter ISO 3166-1 country code here>
update_config=1

network={
  ssid="<Name of your wireless LAN>"
  psk="<Password for your wireless LAN>"
}
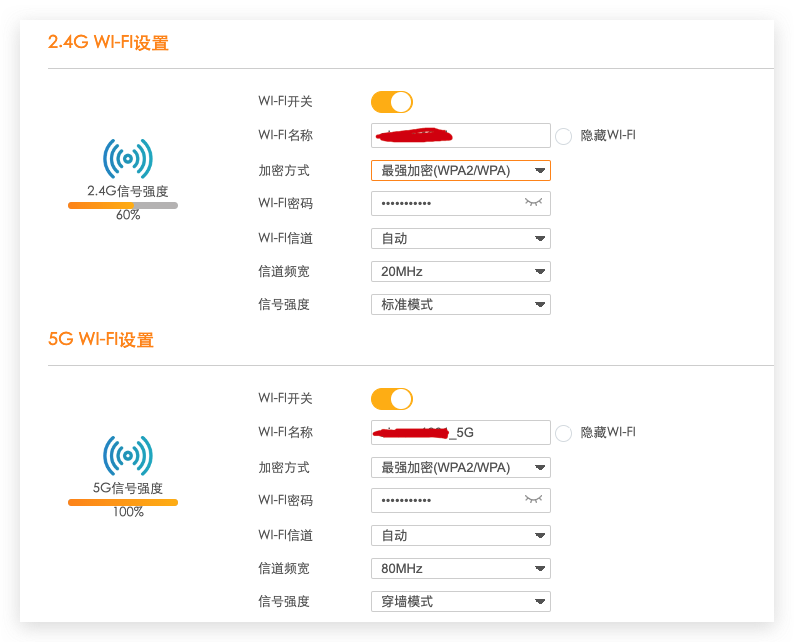
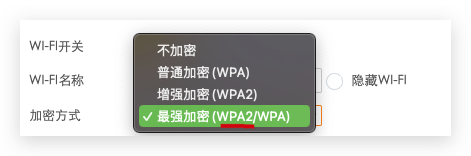
WPA2 personal networks
2.4Ghz / 5Ghz
ctrl_interface=DIR=/var/run/wpa_supplicant GROUP=netdev
update_config=1
country=<Insert 2 letter ISO 3166-1 country code here>

network={
  scan_ssid=1
  ssid="<Name of your wireless LAN>"
  psk="<Password for your wireless LAN>"
  proto=RSN
  key_mgmt=WPA-PSK
  pairwise=CCMP
  auth_alg=OPEN
}
network={
    ssid="HomeOneSSID"
    psk="passwordOne"
    priority=1
    id_str="homeOne"
}

network={
    ssid="HomeTwoSSID"
    psk="passwordTwo"
    priority=2
    id_str="homeTwo"
}
wpa_supplicant.confdemo
- 只有一个 2.4GHz 的 Wi-Fi, 并开启了 WPA2 加密, 配置如下
ctrl_interface=DIR=/var/run/wpa_supplicant GROUP=netdev
update_config=1
country=CN

network={
  scan_ssid=1
  ssid="wifi_name"
  psk="pwd_1234567890"
  proto=RSN
  key_mgmt=WPA-PSK
  pairwise=CCMP
  auth_alg=OPEN
}
- 同时具有两个 2.4GHz 和 5GHz 的Wi-Fi, 并开启了 WPA2 加密, 配置如下
ctrl_interface=DIR=/var/run/wpa_supplicant GROUP=netdev
update_config=1
country=CN

network={
  scan_ssid=1
  ssid="wifi_name"
  psk="pwd_1234567890"
  proto=RSN
  key_mgmt=WPA-PSK
  pairwise=CCMP
  auth_alg=OPEN
  priority=1
  id_str="2.4G"
}

network={
  scan_ssid=1
  ssid="wifi_name"
  psk="pwd_1234567890"
  proto=RSN
  key_mgmt=WPA-PSK
  pairwise=CCMP
  auth_alg=OPEN
  priority=2
  id_str="5G"
}
With no keyboard or monitor, you will need some way of remotely accessing your headless Raspberry Pi. For headless setup, SSH can be enabled by placing a file named ssh, without any extension, onto the boot folder of the SD Card. For more information see the section on setting up an SSH server.
https://www.raspberrypi.com/documentation/computers/remote-access.html
https://www.raspberrypi.com/documentation/computers/remote-access.html#ssh
For headless setup in addition to the ssh file you need a userconf.txt file, which contains a string username:encryptedpassword.
Please refer to the section on configuring a user in the discussions around headless setup of a Raspberry Pi.
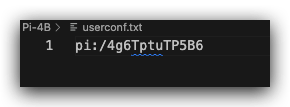
userconf.txt&pi:raspberry
pi:/4g6TptuTP5B6
https://www.raspberrypi.com/documentation/computers/configuration.html#configuring-a-user
To generate the encrypted password, the easiest way is to use OpenSSL on a Raspberry Pi that is already running – open a terminal window and enter:
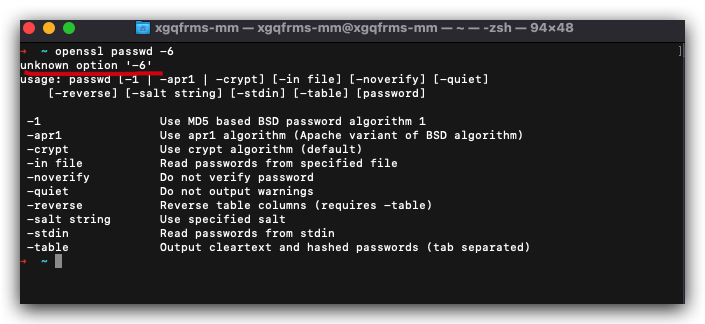
$ openssl passwd -6
# macOS
$ openssl passwd -6
# unknown option '-6'
usage: passwd [-1 | -apr1 | -crypt] [-in file] [-noverify] [-quiet]
    [-reverse] [-salt string] [-stdin] [-table] [password]

 -1                 Use MD5 based BSD password algorithm 1
 -apr1              Use apr1 algorithm (Apache variant of BSD algorithm)
 -crypt             Use crypt algorithm (default)
 -in file           Read passwords from specified file
 -noverify          Do not verify password
 -quiet             Do not output warnings
 -reverse           Reverse table columns (requires -table)
 -salt string       Use specified salt
 -stdin             Read passwords from stdin
 -table             Output cleartext and hashed passwords (tab separated)
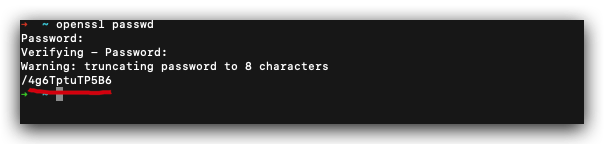
# 跳过二次验证
$ openssl passwd -noverify

$ openssl passwd
Password:
Verifying - Password:
Warning: truncating password to 8 characters
/4g6TptuTP5B6
Linux shell wifi scan
iwlist
# scanning for wireless networks
$ sudo iwlist wlan0 scan

$ sudo iwlist wlan0 scan > wifi-scan.md

$ cat ./wifi-scan.md | grep ESSID

$ ifconfig wlan0 | grep inet
$ ifconfig wlan0 | grep "inet "

$ ifconfig | grep "inet "
$ cat /etc/wpa_supplicant/wpa_supplicant.conf

$ sudo nano /etc/wpa_supplicant/wpa_supplicant.conf

$ sudo vim /etc/wpa_supplicant/wpa_supplicant.conf
https://www.w3schools.com/nodejs/nodejs_raspberrypi.asp
raspi-config
# GUI 交互式命令行界面
$ sudo raspi-config
在本质上还是直接修改 /boot/config.txt 配置文件
https://www.raspberrypi.com/documentation/computers/configuration.html#the-raspi-config-tool
refs
running a
shell programatstart up- A Beginner's Guide ✅
https://forums.raspberrypi.com/viewtopic.php?t=332899
https://forums.raspberrypi.com/viewtopic.php?t=314455
~~https://github.com/thagrol/Guides/ ~~
https://github.com/thagrol/Guides/blob/main/boot.pdf
login-boot.pdf
https://cdn.xgqfrms.xyz/Linux/Raspberry-Pi/login-boot.pdf
https://www.cnblogs.com/xgqfrms/p/17322420.html
How to use SSH to access the Raspberry Pi without know the Wi-Fi IP address All In One
如何在不知道 Wi-Fi IP 地址的情况下使用 SSH 访问树莓派
https://www.cnblogs.com/xgqfrms/p/17322254.html
如何解决树莓派开机后无法获取到 Wi-Fi IP 问题 All In One
https://www.cnblogs.com/xgqfrms/p/17278676.html
©xgqfrms 2012-2021
www.cnblogs.com/xgqfrms 发布文章使用:只允许注册用户才可以访问!
原创文章,版权所有©️xgqfrms, 禁止转载 🈲️,侵权必究⚠️!
本文首发于博客园,作者:xgqfrms,原文链接:https://www.cnblogs.com/xgqfrms/p/17323041.html
未经授权禁止转载,违者必究!

 浙公网安备 33010602011771号