
react学习教程入门七(react的组件生命周期)
前言
react中的组件从创建到销毁的整个过程就是组件的生命周期过程,不同的生命周期阶段会有对应的钩子函数,这些函数被称为生命周期函数或者生命钩子函数,他们的存在为在组件的某个周期过程中需要做业务逻辑处理提供了方法。实际上在react的16.3版本,周期函数发生过变动,react官方不建议我们使用部分不常用的周期函数,另外又加了其他的周期函数,在这里,我们会每种都进行讲解;
旧版生命周期函数
比如这样一个需求,在组件创建后,组件中的文字有个渐进的样式由清晰到模糊的过程,那我们就需要在组件挂载户调用生命周期函数componentDidMount(这个钩子函数是在组件挂载完成之后会调用的函数),在这个函数里写个定时器,定时器里写个样式渐变的方法即可,然后如果要销毁组件之前,就通过生命周期函数componentWillUnmount(这个函数在组件将要卸载之前会调用的钩子函数)进行清理定时器,以上两个周期生命函数是react中最常用的两个,示例代码如下:
<!DOCTYPE html>
<html lang="en">
<head>
    <meta charset="UTF-8">
    <title>1_引出生命周期</title>
</head>
<body>
    <!-- 准备好一个“容器” -->
    <div id="test"></div>

    <!-- 引入react核心库 -->
    <script type="text/javascript" src="../js/react.development.js"></script>
    <!-- 引入react-dom,用于支持react操作DOM -->
    <script type="text/javascript" src="../js/react-dom.development.js"></script>
    <!-- 引入babel,用于将jsx转为js -->
    <script type="text/javascript" src="../js/babel.min.js"></script>

    <script type="text/babel">
        //创建组件
        class Life extends React.Component{

            state = {opacity:1}

            death = ()=>{
                //卸载组件
                ReactDOM.unmountComponentAtNode(document.getElementById('test'))
            }

            //组件挂完毕
            componentDidMount(){
                console.log('componentDidMount');
                this.timer = setInterval(() => {
                    //获取原状态
                    let {opacity} = this.state
                    //减小0.1
                    opacity -= 0.1
                    if(opacity <= 0) opacity = 1
                    //设置新的透明度
                    this.setState({opacity})
                }, 200);
            }

            //组件将要卸载
            componentWillUnmount(){
                //清除定时器
                clearInterval(this.timer)
            }

            //初始化渲染、状态更新之后
            render(){
                console.log('render');
                return(
                    <div>
                        <h2 style={{opacity:this.state.opacity}}>React学不会怎么办?</h2>
                        <button onClick={this.death}>不活了,卸载组件</button>
                    </div>
                )
            }
        }
        //渲染组件
        ReactDOM.render(<Life/>,document.getElementById('test'))
    </script>
</body>
</html>
以上是最常用的两个生命钩子的示例,实际上官网给出了旧版的生命周期函数有以下的这些函数,执行顺序如下图所示:
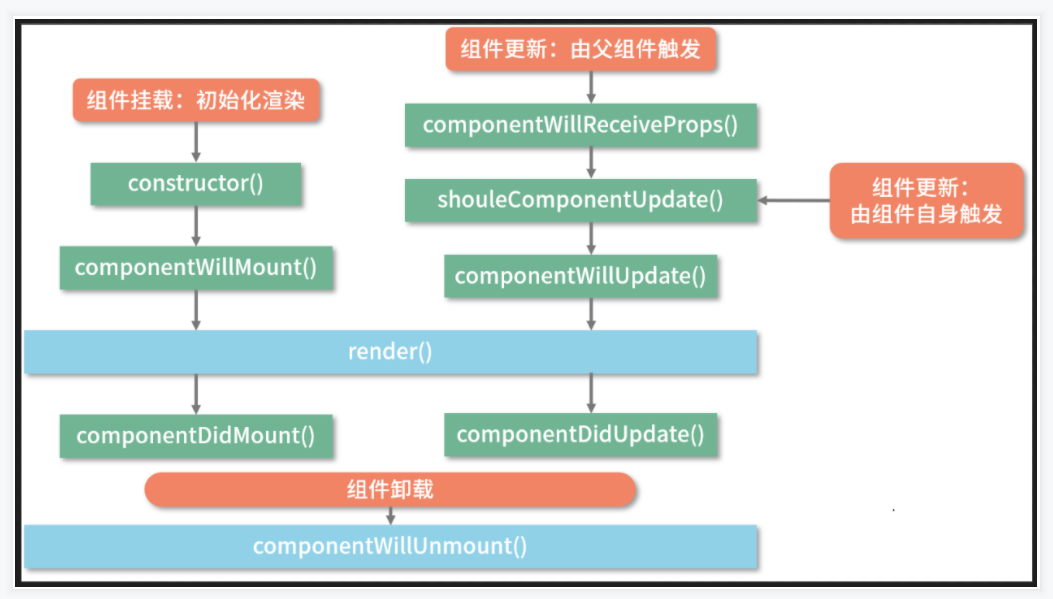
由图可知,当不看父组件部分时,组件是在ReactDOM.render()触发的初次渲染挂载的过程中会按这样的顺序执行,constructor==》componentWillMount==》render==》componentDidMount 挂载出来,而更新组件操作才会触发componentWillReceiveProps,shouldComponentUpdate,componentWillUpdate,componentDidUpdate这几个生命钩子函数,其中componentWillReceiveProps函数还必须是由父组件才会触发,如下示例中,A组件是父组件,B组件是子组件,在B组件中打印了初次渲染挂载的日志,用来观察初次渲染过程生命钩子函数的执行顺序;然后在A组件(父)中做了触发更新组件的操作,可以看到在更新过程中A和B组件的生命钩子函数的调用过程,示例代码:
<!DOCTYPE html>
<html lang="en">
<head>
    <meta charset="UTF-8">
    <title>2_react生命周期(16.3版本之前的)</title>
</head>
<body>
    <!-- 准备好一个“容器” -->
    <div id="test"></div>

    <!-- 引入react核心库 -->
    <script type="text/javascript" src="../js/react.development.js"></script>
    <!-- 引入react-dom,用于支持react操作DOM -->
    <script type="text/javascript" src="../js/react-dom.development.js"></script>
    <!-- 引入babel,用于将jsx转为js -->
    <script type="text/javascript" src="../js/babel.min.js"></script>

    <script type="text/babel">
        /*
                1. 初始化阶段: 由ReactDOM.render()触发---初次渲染
                                    1.    constructor()
                                    2.    componentWillMount()
                                    3.    render()
                                    4.    componentDidMount() =====> 常用
                                                    一般在这个钩子中做一些初始化的事,例如:开启定时器、发送网络请求、订阅消息
                2. 更新阶段: 由组件内部this.setSate()或父组件render触发
                                    1.    shouldComponentUpdate()
                                    2.    componentWillUpdate()
                                    3.    render() =====> 必须使用的一个
                                    4.    componentDidUpdate()
                3. 卸载组件: 由ReactDOM.unmountComponentAtNode()触发
                                    1.    componentWillUnmount()  =====> 常用
                                                    一般在这个钩子中做一些收尾的事,例如:关闭定时器、取消订阅消息
        */

        //父组件A
        class A extends React.Component{
            //初始化状态
            state = {carName:'奔驰'}

            changeCar = ()=>{
                this.setState({carName:'奥拓'})
            }

            //组件将要卸载的钩子
            componentWillUnmount(){
                console.log('A---componentWillUnmount');
            }

            //组件将要更新的钩子
            componentWillUpdate(){
                console.log('A---componentWillUpdate');
            }

            //组件更新完毕的钩子
            componentDidUpdate(){
                console.log('A---componentDidUpdate');
            }

            //卸载组件按钮的回调
            death = ()=>{
                console.info("卸载组件");
                ReactDOM.unmountComponentAtNode(document.getElementById('test'))
            }
            render(){
                return(
                    <div>
                        <div>我是A组件</div>
                        <button onClick={this.changeCar}>换车</button>
                        <B carName={this.state.carName}/>
                        <button onClick={this.death}>卸载组件</button>
                    </div>
                )
            }
        }

        //子组件B
        class B extends React.Component{

            //构造器
            constructor(props){
                console.log('B---constructor');
                super(props)
            }
            //组件将要挂载的钩子
            componentWillMount(){
                console.log('B---componentWillMount');
            }

            //组件挂载完毕的钩子
            componentDidMount(){
                console.log('B---componentDidMount');
            }

            //组件将要接收新的props的钩子
            componentWillReceiveProps(props){
                console.log('B---componentWillReceiveProps',props);
            }

            //控制组件更新的“阀门”
            shouldComponentUpdate(){
                console.log('B---shouldComponentUpdate');
                return true
            }
            //组件将要更新的钩子
            componentWillUpdate(){
                console.log('B---componentWillUpdate');
            }

            //组件更新完毕的钩子
            componentDidUpdate(){
                console.log('B---componentDidUpdate');
            }

            //组件将要卸载的钩子
            componentWillUnmount(){
                console.log('B---componentWillUnmount');
            }


            render(){
                console.log('B---render');
                return(
                    <div>我是B组件,接收到的车是:{this.props.carName}</div>
                )
            }
        }

        //渲染组件
        ReactDOM.render(<A/>,document.getElementById('test'))
    </script>
</body>
</html>
新版周期函数
但在16.3版本之后,react官方更改了组件的生命周期的部分钩子函数,其中标识了componentWillReceiveProps,componentWillMount,componentWillUpdate为过时方法,并新增了getDerivedStateFromProps和getSnapshotBeforeUpdate两个钩子函数。组件生命周期的图示也改成了这样:
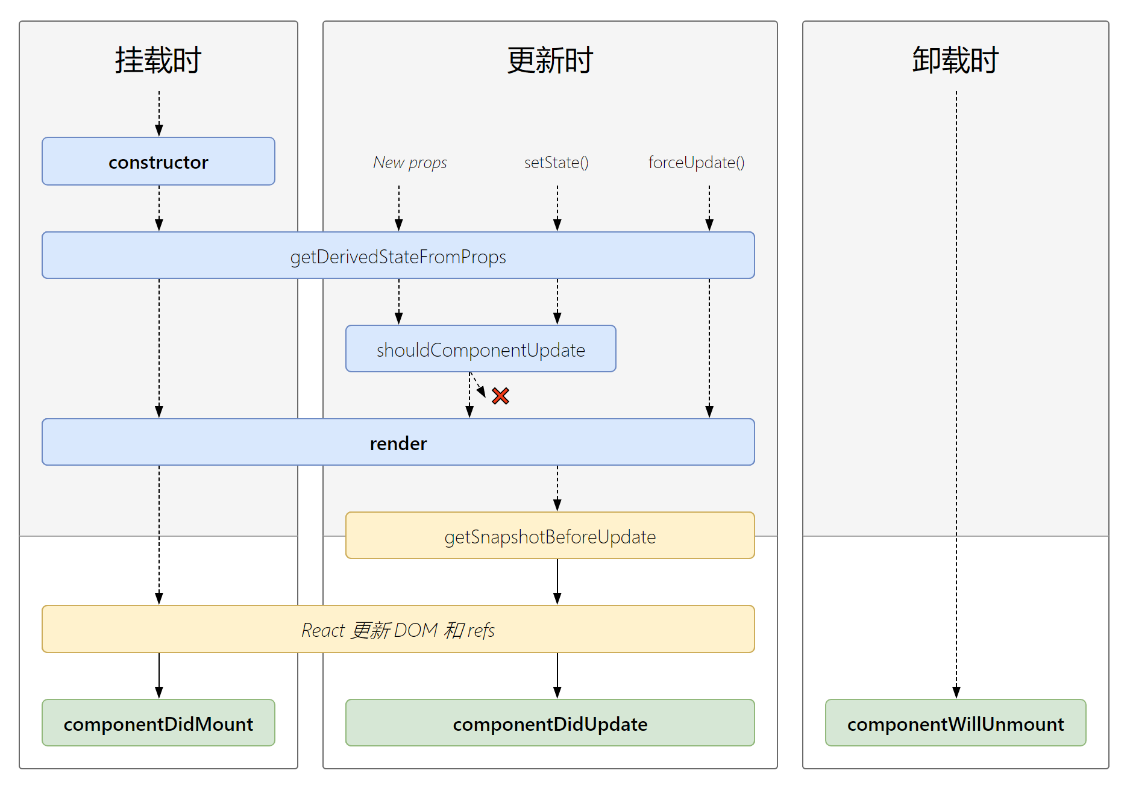
由上图可知,组件在ReactDOM.render()挂载渲染的过程中变成了constructor==》getDerivedStateFromProps ==》render==》componentDidMount这样的顺序。而更新组件状态时的执行顺序则是getDerivedStateFromProps ==》shouldComponentUpdate==》render==》getSnapshotBeforeUpdate==》componentDidUpdate ,这两个新增的生命钩子函数中,其中getDerivedStateFromProps的使用场景是若state的值在任何时候都取决于props,那么可以使用getDerivedStateFromProps来控制,而getSnapshotBeforeUpdate则是在组件更新之前获取组件的快照,以便在更新组件后还能找到更新前的数据。相关的示例代码如下:
<!DOCTYPE html>
<html lang="en">
<head>
    <meta charset="UTF-8">
    <title>3_react生命周期(新)</title>
</head>
<body>
    <!-- 准备好一个“容器” -->
    <div id="test"></div>

    <!-- 引入react核心库 -->
    <script type="text/javascript" src="../js/17.0.1/react.development.js"></script>
    <!-- 引入react-dom,用于支持react操作DOM -->
    <script type="text/javascript" src="../js/17.0.1/react-dom.development.js"></script>
    <!-- 引入babel,用于将jsx转为js -->
    <script type="text/javascript" src="../js/17.0.1/babel.min.js"></script>

    <script type="text/babel">
        //创建组件
        class Count extends React.Component{
            /*
                1. 初始化阶段: 由ReactDOM.render()触发---初次渲染
                                1.    constructor()
                                2.    getDerivedStateFromProps
                                3.    render()
                                4.    componentDidMount() =====> 常用
                                            一般在这个钩子中做一些初始化的事,例如:开启定时器、发送网络请求、订阅消息
                2. 更新阶段: 由组件内部this.setSate()或父组件重新render触发
                                1.    getDerivedStateFromProps
                                2.    shouldComponentUpdate()
                                3.    render()
                                4.    getSnapshotBeforeUpdate
                                5.    componentDidUpdate()
                3. 卸载组件: 由ReactDOM.unmountComponentAtNode()触发
                                1.    componentWillUnmount()  =====> 常用
                                            一般在这个钩子中做一些收尾的事,例如:关闭定时器、取消订阅消息
            */
            //构造器
            constructor(props){
                console.log('Count---constructor');
                super(props)
                //初始化状态
                this.state = {count:0}
            }

            //加1按钮的回调
            add = ()=>{
                //获取原状态
                const {count} = this.state
                //更新状态
                this.setState({count:count+1})
            }

            //卸载组件按钮的回调
            death = ()=>{
                ReactDOM.unmountComponentAtNode(document.getElementById('test'))
            }

            //强制更新按钮的回调
            force = ()=>{
                this.forceUpdate()
            }

            //若state的值在任何时候都取决于props,那么可以使用getDerivedStateFromProps
            static getDerivedStateFromProps(props,state){
                console.log('getDerivedStateFromProps',props,state);
                return null
            }

            //在更新之前获取快照
            getSnapshotBeforeUpdate(){
                console.log('getSnapshotBeforeUpdate');
                return 'ok'
            }

            //组件挂载完毕的钩子
            componentDidMount(){
                console.log('Count---componentDidMount');
            }

            //组件将要卸载的钩子
            componentWillUnmount(){
                console.log('Count---componentWillUnmount');
            }

            //控制组件更新的“阀门”
            shouldComponentUpdate(){
                console.log('Count---shouldComponentUpdate');
                return true
            }

            //组件更新完毕的钩子
            componentDidUpdate(preProps,preState,snapshotValue){
                console.log('Count---componentDidUpdate',preProps,preState,snapshotValue);
            }

            render(){
                console.log('Count---render');
                const {count} = this.state
                return(
                    <div>
                        <h2>当前求和为:{count}</h2>
                        <button onClick={this.add}>点我+1</button>
                        <button onClick={this.death}>卸载组件</button>
                        <button onClick={this.force}>不更改任何状态中的数据,强制更新一下</button>
                    </div>
                )
            }
        }

        //渲染组件
        ReactDOM.render(<Count count={199}/>,document.getElementById('test'))
    </script>
</body>
</html>
另: 如果你使用新版的react,现在react官方不建议时候的那三个旧版的生命钩子函数是通过在函数前面加上前缀UNSAFE_来消除控制台的警告,比如componentWillReceiveProps 改成UNSAFE_componentWillReceiveProps

 浙公网安备 33010602011771号