
WPF中加载图片时,不同的DPI能够按正确的DPI显示
WPF中加载的图片,都是按96 DPI去显示。如果图片本身的DPI不是96的话,图片并不会按照图片本身的分辨率去显示,而是可能会被放大或缩小了。
借助TransformedBitmap能够很好地解决这个问题。
示例代码:
var bitmap = BitmapFrame.Create(new Uri(fileName), BitmapCreateOptions.None, BitmapCacheOption.OnLoad);
var dpiBitmap = new TransformedBitmap(bitmap, new ScaleTransform(bitmap.DpiX / 96.0, bitmap.DpiY / 96.0));
完整示例
前台代码
<Window
    x:Class="WpfApp1.MainWindow"
    xmlns="http://schemas.microsoft.com/winfx/2006/xaml/presentation"
    xmlns:x="http://schemas.microsoft.com/winfx/2006/xaml"
    xmlns:d="http://schemas.microsoft.com/expression/blend/2008"
    xmlns:local="clr-namespace:WpfApp1"
    xmlns:mc="http://schemas.openxmlformats.org/markup-compatibility/2006"
    Title="MainWindow"
    Width="800"
    Height="450"
    mc:Ignorable="d">
    <StackPanel>
        <Image x:Name="image1" Stretch="None" />
        <Image x:Name="image2" Stretch="None" />
        <Image x:Name="image3" Stretch="None" />
        <Image x:Name="image4" Stretch="None" />
    </StackPanel>
</Window>
后台代码
using System.IO;
using System.Windows;
using System.Windows.Media;
using System.Windows.Media.Imaging;

namespace WpfApp1;

public partial class MainWindow : Window
{
    public MainWindow()
    {
        InitializeComponent();

        {
            var fileName = Path.GetFullPath("test1.png");
            var bitmap = BitmapFrame.Create(new Uri(fileName), BitmapCreateOptions.None, BitmapCacheOption.OnLoad);
            var dpiBitmap = new TransformedBitmap(bitmap, new ScaleTransform(bitmap.DpiX / 96.0, bitmap.DpiY / 96.0));
            image1.Source = bitmap;
            image2.Source = dpiBitmap;
        }

        {
            var fileName = Path.GetFullPath("test2.png");
            var bitmap = BitmapFrame.Create(new Uri(fileName), BitmapCreateOptions.None, BitmapCacheOption.OnLoad);
            var dpiBitmap = new TransformedBitmap(bitmap, new ScaleTransform(bitmap.DpiX / 96.0, bitmap.DpiY / 96.0));
            image3.Source = bitmap;
            image4.Source = dpiBitmap;
        }
    }
}
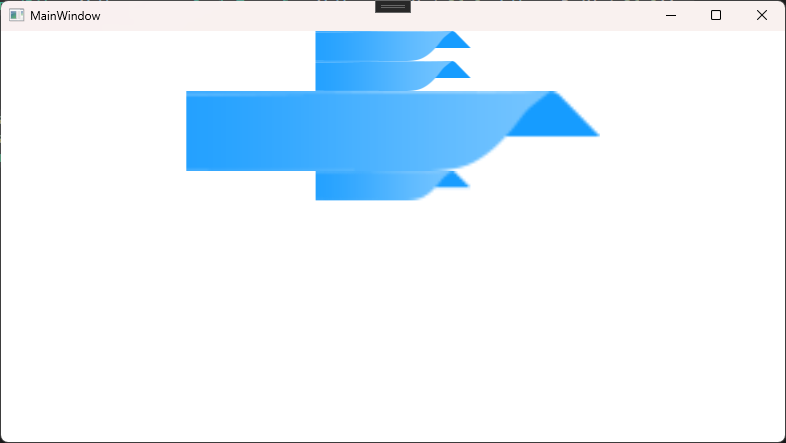
这里面用的图片test1.png的DPI是96的,test2.png我是改成了32。两张图片的分辨率都是155x30。
test1.png两种显示方式的效果好像基本一样。实际显示的尺寸也都是155x30。
test2.png不进行转换的话,直接加载到图片控件中显示,实际显示的时候会被放大。
放大后的图片,其实是会有一点不清晰,锯齿出来了,就跟我们平常把小分辨率的图片放大了显示一样。
用了TransformedBitmap转换以后,显示的尺寸跟DPI 96的是一样,实际显示分辨率是155x30。
但发现一个问题,用这种方式显示的图片,虽然显示尺寸缩小了,但图片变模糊了,跟上面的图片一样,也有锯齿了。
最终的显示效果如下图。

 浙公网安备 33010602011771号