

实验三
实验任务1
源代码 button.hpp
 1 #pragma once
 2
 3 #include <iostream>
 4 #include <string>
 5
 6 class Button {
 7 public:
 8     Button(const std::string& label_);
 9     const std::string& get_label() const;
10     void click();
11
12 private:
13     std::string label;
14 };
15
16 Button::Button(const std::string& label_) : label{ label_ } {
17 }
18
19 inline const std::string& Button::get_label() const {
20     return label;
21 }
22
23 inline void Button::click() {
24     std::cout << "Button '" << label << "' clicked\n";
25 }
源代码 window.hpp
 1 #pragma once
 2
 3 #include <iostream>
 4 #include <vector>
 5 #include <algorithm>
 6 #include "button.hpp"
 7
 8 // 窗口类
 9 class Window {
10 public:
11     Window(const std::string& title_);
12     void display() const;
13     void close();
14     void add_button(const std::string& label);
15     void click_button(const std::string& label);
16
17 private:
18     bool has_button(const std::string& label) const;
19
20 private:
21     std::string title;
22     std::vector<Button> buttons;
23 };
24
25 Window::Window(const std::string& title_) : title{ title_ } {
26     buttons.push_back(Button("close"));
27 }
28
29 inline void Window::display() const {
30     std::string s(40, '*');
31     std::cout << s << std::endl;
32     std::cout << "window : " << title << std::endl;
33     int cnt = 0;
34     for (const auto& button : buttons)
35         std::cout << ++cnt << ". " << button.get_label() << std::endl;
36     std::cout << s << std::endl;
37 }
38
39 inline void Window::close() {
40     std::cout << "close window '" << title << "'" << std::endl;
41     click_button("close");
42 }
43
44 inline bool Window::has_button(const std::string& label) const {
45     for (const auto& button : buttons)
46         if (button.get_label() == label)
47             return true;
48
49     return false;
50 }
51
52 inline void Window::add_button(const std::string& label) {
53     if (has_button(label))
54         std::cout << "button " << label << " already exists!\n";
55     else
56         buttons.push_back(Button(label));
57 }
58
59 inline void Window::click_button(const std::string& label) {
60     for (auto& button : buttons)
61         if (button.get_label() == label) {
62             button.click();
63             return;
64         }
65
66     std::cout << "no button: " << label << std::endl;
67 }
源代码 task1.cpp
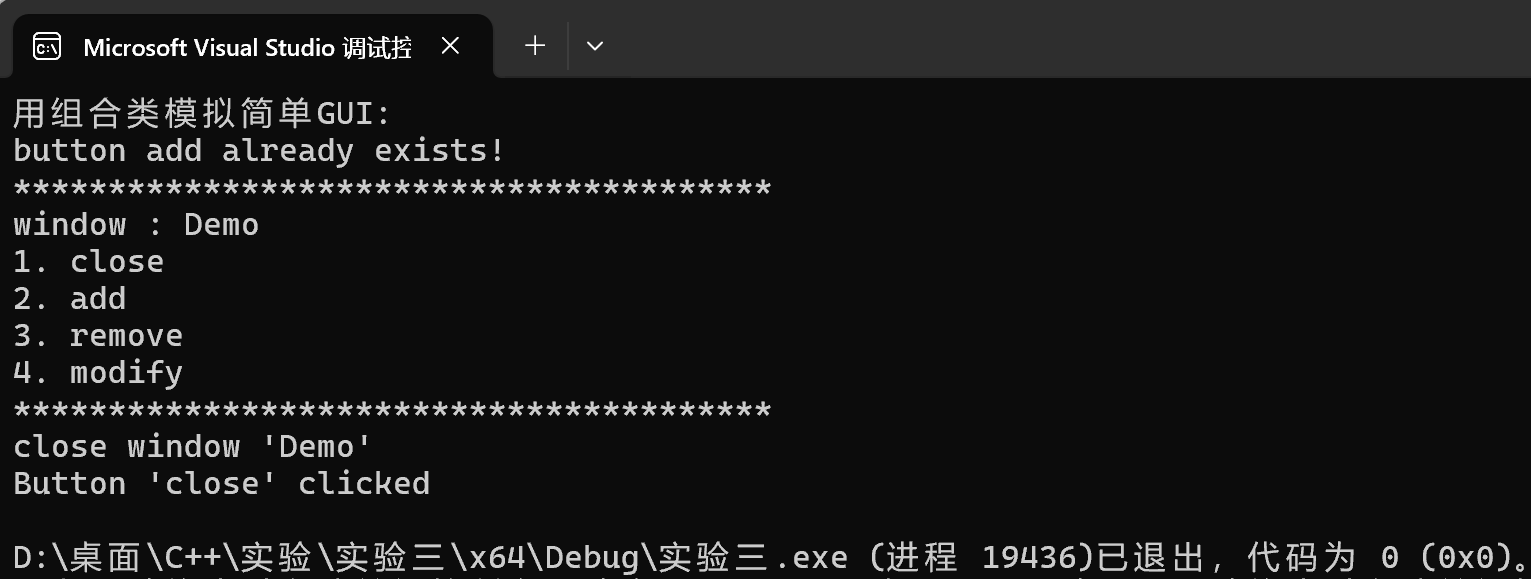
 1 #include "window.hpp"
 2 #include <iostream>
 3
 4 void test() {
 5     Window w("Demo");
 6     w.add_button("add");
 7     w.add_button("remove");
 8     w.add_button("modify");
 9     w.add_button("add");
10     w.display();
11     w.close();
12 }
13
14 int main() {
15     std::cout << "用组合类模拟简单GUI:\n";
16     test();
17 }
运行测试结果截图
问题2: bool has_button(const std::string &label) const; 被设计为私有。 思考并回答:
(1)若将其改为公有接口,有何优点或风险?(2)设计类时,如何判断一个成员函数应为 public 还是 private?(可从“用户是否需要”、“是否仅为内部实现细节”、“是否易破坏对象状态”等角度分析。)
答:(1)将 has_button 改为公有接口的优点是方便外部用户查询按钮是否存在,使外部逻辑更灵活。主要风险是违反封装性。它向外部暴露了按钮管理机制(通过标签查询)这一内部实现细节。如果未来窗口内部逻辑改变,这个公有接口必须随之改变,从而增加了外部依赖和维护难度。
(2)判断一个成员函数应为 public 还是 private,本质上是界定类的边界与职责,核心原则是:尽可能减少对外暴露的接口,只将那些为完成类所宣称的职责所必需的功能设为公有。
具体可以从以下几个角度分析:
1、用户是否需要(职责导向)
Public:是类提供的核心服务,用户需直接调用以完成主要功能(如display, click_button)。
Private:仅为辅助公有方法而存在的内部工具,用户无需关心(如has_button)。
2、是否仅为内部细节(封装性)
将实现细节隐藏为 private,可保护内部结构不被外部随意依赖或破坏,使得类的设计者可以自由地修改内部实现而不会影响到使用这个类的代码。
3、是否易破坏对象状态(安全性)
如果一个函数的执行可能使对象陷入无效、不一致或不安全的状态,那么它绝对不应该被公开。
接口 2 (const std::string): 安全性较高,因为它返回一个独立的副本,消除了悬空引用的风险。但会产生额外的性能开销,因为它必须执行一次完整的字符串拷贝。

push_back 当使用 buttons.push_back(Button("close")); 时:首先,C++ 会调用 Button 的构造函数,在函数外部的内存中创建一个临时的 Button 对象。然后,push_back 函数将这个临时对象移动或拷贝(在现代 C++ 中通常是移动)到 vector 内部为新元素分配的存储空间。
emplace_back 当你使用 buttons.emplace_back("close"); 时:emplace_back 接收参数 "close",然后它使用这个参数直接在 vector 内部的最终存储位置上调用 Button 的构造函数,原地构造对象。这消除了创建临时对象以及随后的移动/拷贝操作。
对于容器中存储的复杂对象,emplace_back 通常是更高效的选择,因为它通过原地构造减少了不必要的对象创建和转移开销。
实验任务二
源代码 task2.cpp
 1 #include <iostream>
 2 #include <vector>
 3 void test1();
 4 void test2();
 5 void output1(const std::vector<int>& v);
 6 void output2(const std::vector<int>& v);
 7 void output3(const std::vector<std::vector<int>>& v);
 8 int main() {
 9     std::cout << "深复制验证1: 标准库vector<int>\n";
10     test1();
11     std::cout << "\n深复制验证2: 标准库vector<int>嵌套使用\n";
12     test2();
13 }
14 void test1() {
15     std::vector<int> v1(5, 42);
16     const std::vector<int> v2(v1);
17     std::cout << "**********拷贝构造后**********\n";
18     std::cout << "v1: "; output1(v1);
19     std::cout << "v2: "; output1(v2);
20     v1.at(0) = -1;
21     std::cout << "**********修改v1[0]后**********\n";
22     std::cout << "v1: "; output1(v1);
23     std::cout << "v2: "; output1(v2);
24 }
25 void test2() {
26     std::vector<std::vector<int>> v1{ {1, 2, 3}, {4, 5, 6, 7} };
27     const std::vector<std::vector<int>> v2(v1);
28     std::cout << "**********拷贝构造后**********\n";
29     std::cout << "v1: "; output3(v1);
30     std::cout << "v2: "; output3(v2);
31     v1.at(0).push_back(-1);
32     std::cout << "**********修改v1[0]后**********\n";
33     std::cout << "v1: \n"; output3(v1);
34     std::cout << "v2: \n"; output3(v2);
35 }
36 // 使用xx.at()+循环输出vector<int>数据项
37 void output1(const std::vector<int>& v) {
38     if (v.size() == 0) {
39         std::cout << '\n';
40         return;
41     }
42     std::cout << v.at(0);
43     for (auto i = 1; i < v.size(); ++i)
44         std::cout << ", " << v.at(i);
45     std::cout << '\n';
46 }
47 // 使用迭代器+循环输出vector<int>数据项
48 void output2(const std::vector<int>& v) {
49     if (v.size() == 0) {
50         std::cout << '\n';
51         return;
52     }
53     auto it = v.begin();
54     std::cout << *it;
55     for (it = v.begin() + 1; it != v.end(); ++it)
56         std::cout << ", " << *it;
57     std::cout << '\n';
58 }
59 // 使用auto for分行输出vector<vector<int>>数据项
60 void output3(const std::vector<std::vector<int>>& v) {
61     if (v.size() == 0) {
62         std::cout << '\n';
63         return;
64     }
65     for (auto& i : v)
66         output2(i);
67 }
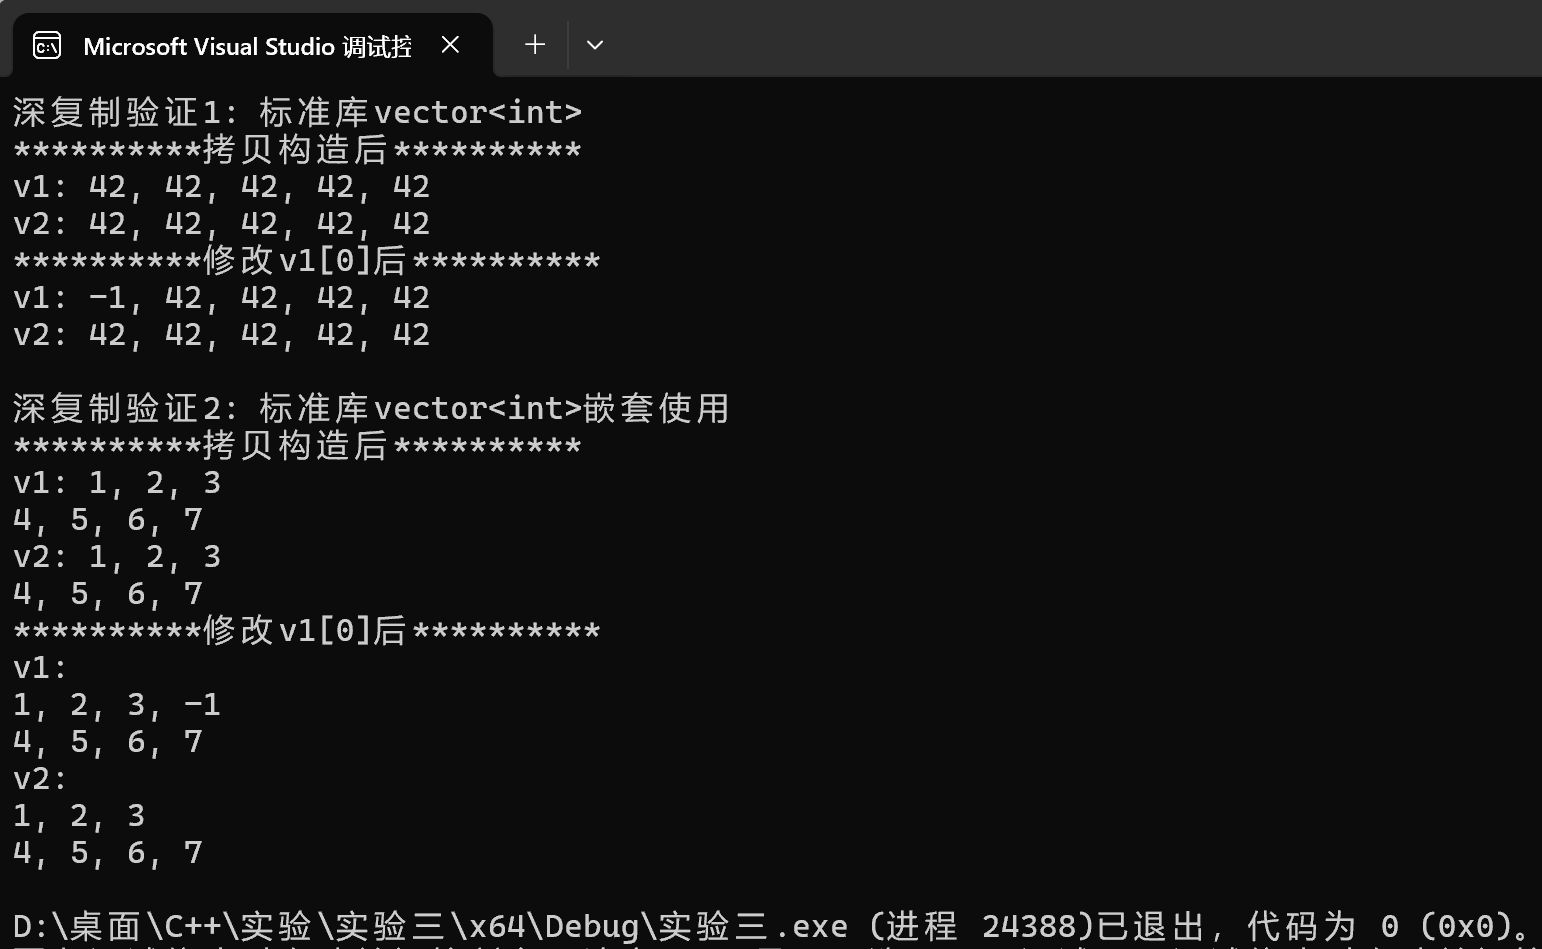
运行结果测试截图
std::vector<int> v1(5, 42);
const std::vector<int> v2(v1);
答:std::vector<int> v1(5, 42); 使用了 std::vector 的填充构造函数,创建了一个包含 5 个元素(值均为 42)的 v1 对象。
const std::vector<int> v2(v1); 则使用了 std::vector 的拷贝构造函数,通过深复制 v1 的内容来初始化 v2。
因此,在拷贝构造完成后,v1 和 v2 都分别包含 5 个值为 42 的数据项。
std::vector<std::vector<int>> v1{ {1, 2, 3}, {4, 5, 6, 7} };
const std::vector<std::vector<int>> v2(v1);
答:v1.size() 的值为 2,因为 v1 是一个二维向量,它包含两个子向量。
v2.size() 的值同样为 2,因为 v2 是通过拷贝 v1 构造的,所以其外层向量的尺寸与 v1 完全相同。
v1[0].size() 的值为 3,因为 v1 的第一个子向量包含三个整数元素:1、2 和 3。
std::vector<int>& r = v1.at(0);
std::cout << r.at(r.size() - 1);
(2)r定义成用 const & 类型接收返回值,在内存使用上有何优势?有何限制?
答:(1)使用提供的两行代码能够成功输出 -1。第一行代码 std::vector<int>& r = v1.at(0); 创建了一个对 v1 中第一个子向量的引用 r。当执行 v1.at(0).push_back(-1); 后,数字 -1 被添加到了这个子向量的末 尾。第二行代码 std::cout << r.at(r.size() - 1); 通过引用 r 访问该子向量,并使用 at() 方法安全地获取最后一个元素(索引为 r.size() - 1),这个元素正是刚刚添加的 -1,因此能够正确输出。
(2)内存使用优势:避免了不必要的对象拷贝,与按值返回相比节省了内存分配和复制开销。仍然通过引用直接访问原对象,内存效率高
限制:
只读访问:通过 const 引用无法修改所引用的向量,不能调用任何非 const 成员函数(如 push_back()、pop_back() 等)
依赖原对象生命周期:引用的有效性完全依赖于 v1.at(0) 返回的向量的生命周期,如果原向量被销毁或修改,引用将失效
 1 #pragma once
 2 #include <iostream>
 3 // 动态int数组对象类
 4 class vectorInt {
 5 public:
 6     vectorInt();
 7     vectorInt(int n_);
 8     vectorInt(int n_, int value);
 9     vectorInt(const vectorInt& vi);
10     ~vectorInt();
11     int size() const;
12     int& at(int index);
13     const int& at(int index) const;
14     vectorInt& assign(const vectorInt& vi);
15     int* begin();
16     int* end();
17     const int* begin() const;
18     const int* end() const;
19 private:
20     int n; // 当前数据项个数
21     int* ptr; // 数据区
22 };
23 vectorInt::vectorInt() :n{ 0 }, ptr{ nullptr } {
24 }
25 vectorInt::vectorInt(int n_) : n{ n_ }, ptr{ new int[n] } {
26 }
27 vectorInt::vectorInt(int n_, int value) : n{ n_ }, ptr{ new int[n_] } {
28     for (auto i = 0; i < n; ++i)
29         ptr[i] = value;
30 }
31 vectorInt::vectorInt(const vectorInt& vi) : n{ vi.n }, ptr{ new int[n] } {
32     for (auto i = 0; i < n; ++i)
33         ptr[i] = vi.ptr[i];
34 }
35 vectorInt::~vectorInt() {
36     delete[] ptr;
37 }
38
39 int vectorInt::size() const {
40     return n;
41 }
42 const int& vectorInt::at(int index) const {
43     if (index < 0 || index >= n) {
44         std::cerr << "IndexError: index out of range\n";
45         std::exit(1);
46     }
47     return ptr[index];
48 }
49 int& vectorInt::at(int index) {
50     if (index < 0 || index >= n) {
51         std::cerr << "IndexError: index out of range\n";
52         std::exit(1);
53     }
54     return ptr[index];
55 }
56 vectorInt& vectorInt::assign(const vectorInt& vi) {
57     if (this == &vi)
58         return *this;
59     int* ptr_tmp;
60     ptr_tmp = new int[vi.n];
61     for (int i = 0; i < vi.n; ++i)
62         ptr_tmp[i] = vi.ptr[i];
63     delete[] ptr;
64     n = vi.n;
65     ptr = ptr_tmp;
66     return *this;
67 }
68 int* vectorInt::begin() {
69     return ptr;
70 }
71 int* vectorInt::end() {
72     return ptr + n;
73 }
74 const int* vectorInt::begin() const {
75     return ptr;
76 }
77 const int* vectorInt::end() const {
78     return ptr + n;
79 }
源代码 task3.cpp
 1 #include "vectorInt.hpp"
 2 #include <iostream>
 3 void test1();
 4 void test2();
 5 void output1(const vectorInt& vi);
 6 void output2(const vectorInt& vi);
 7 int main() {
 8     std::cout << "测试1: \n";
 9     test1();
10     std::cout << "\n测试2: \n";
11     test2();
12 }
13 void test1() {
14     int n;
15     std::cout << "Enter n: ";
16     std::cin >> n;
17     vectorInt x1(n);
18     for (auto i = 0; i < n; ++i)
19         x1.at(i) = (i + 1) * 10;
20     std::cout << "x1: "; output1(x1);
21     vectorInt x2(n, 42);
22     vectorInt x3(x2);
23     x2.at(0) = -1;
24     std::cout << "x2: "; output1(x2);
25     std::cout << "x3: "; output1(x3);
26 }
27 void test2() {
28     const vectorInt x(5, 42);
29     vectorInt y;
30     y.assign(x);
31     std::cout << "x: "; output2(x);
32     std::cout << "y: "; output2(y);
33 }
34 // 使用xx.at()+循环输出vectorInt对象数据项
35 void output1(const vectorInt& vi) {
36     if (vi.size() == 0) {
37         std::cout << '\n';
38         return;
39     }
40     std::cout << vi.at(0);
41     for (auto i = 1; i < vi.size(); ++i)
42         std::cout << ", " << vi.at(i);
43     std::cout << '\n';
44 }
45 // 使用迭代器+循环输出vectorInt对象数据项
46 void output2(const vectorInt& vi) {
47     if (vi.size() == 0) {
48         std::cout << '\n';
49         return;
50     }
51     auto it = vi.begin();
52     std::cout << *it;
53     for (it = vi.begin() + 1; it != vi.end(); ++it)
54         std::cout << ", " << *it;
55     std::cout << '\n';
56 }
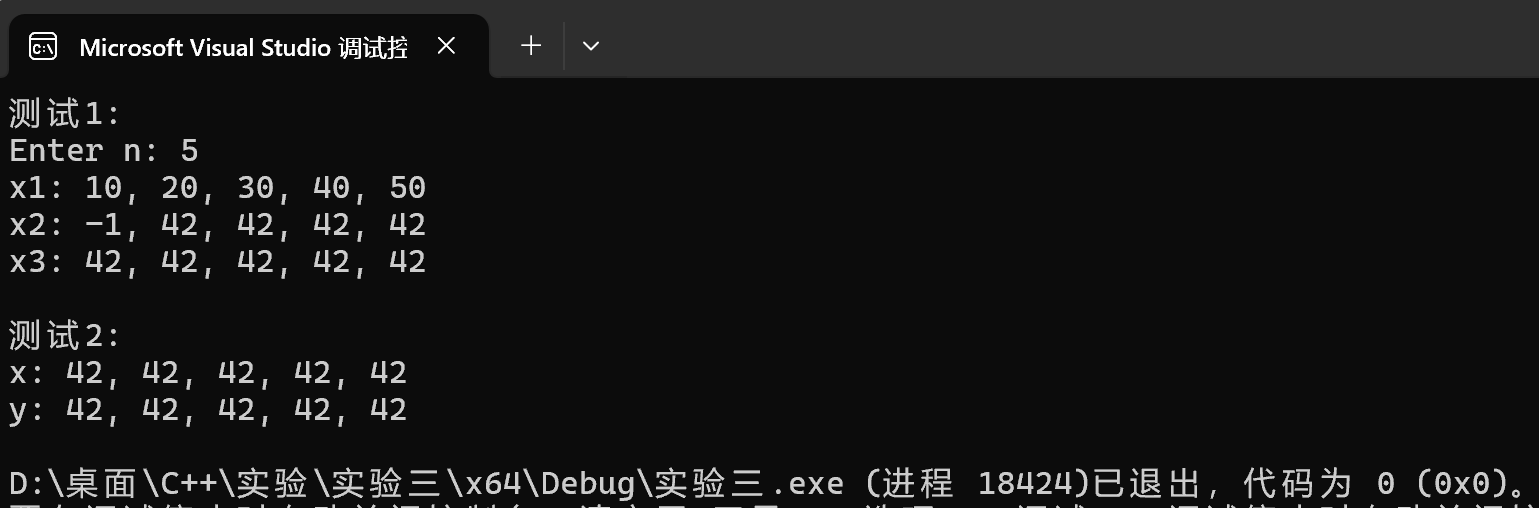
运行结果测试截图
1 // 版本2
2 vectorInt& vectorInt::assign(const vectorInt &vi) {
3 delete[] ptr;
4 n = vi.n;
5 ptr = new int[n];
6 for(int i = 0; i < n; ++i)
7 ptr[i] = vi.ptr[i];
8 return *this;
9 }
答:1、缺少自赋值检查
if (this == &vi)
    return *this;
风险:如果发生自赋值 (x.assign(x)),第3行 delete[] ptr 会立即释放当前对象的内存,导致第5-7行访问已释放的 vi.ptr(实质是同一个 ptr),引发未定义行为(内存访问违规)。
2、破坏强异常安全保证
delete[] ptr;  // 第3行:先释放原有资源
ptr = new int[n];  // 第5行:再申请新资源
风险:如果在第5行 new 操作中发生异常(如内存不足),对象将处于无效状态——ptr 已被释放但未指向新内存,n 已更新为新值。后续任何操作都会访问已释放的内存。
int& vectorInt::at(int index) {
return const_cast<int&>(static_cast<const vectorInt*>(this)->at(index));
}
作用: 将当前的 this 指针(非 const 版本)安全地转换为指向 const 对象的指针。
转换前 this 的类型: vectorInt* (指向非 const vectorInt 对象的指针)。
转换后 this 的类型: const vectorInt* (指向 const vectorInt 对象的指针)。
转换目的: 目的是利用这个 const vectorInt* 指针来调用 vectorInt 类中已实现的 const 版本的 at(int index) 成员函数。通过这种方式,非 const 版本可以复用 const 版本中的边界检查逻辑,避免代码重复,实现“最小化接口”原则。
(2)const_cast<int&>
作用: 移除引用类型中的 const 限定符。
转换前的返回类型: const int& (这是 const 版本的 at 函数的返回值)。
转换后的返回类型: int& (这是非 const 版本的 at 函数所要求的返回值)。
转换目的: 由于非 const 版本的 at 函数需要返回一个允许修改的引用 (int&),但它调用的 const 版本 at 返回的是一个不允许修改的引用 (const int&)。因此,需要使用 const_cast 来暂时解除返回值的 const 限制,使得外部代码可以通过这个引用来修改元素的值。
1 vectorInt v1(5);
2 const vectorInt v2(5);
3 auto it1 = v1.begin(); // 调用哪个版本?
4 auto it2 = v2.begin(); // 调用哪个版本?
auto it2 = v2.begin(); 调用 const版本 const int* begin() const。因为 v2 是const对象,只能调用const成员函数
使用场景适配:
非const版本:适配需要修改容器内容的场景,返回的迭代器允许通过解引用修改元素值
const版本:适配只读访问场景,返回的迭代器只允许读取元素值,保证对象的常量性不被破坏
(2) vectorInt 直接返回原始指针作为迭代器,揭示了迭代器的核心本质——提供统一的元素访问接口,抽象化底层数据结构。即使像指针这样简单的类型,只要支持 *(解引用)、++(前进)等操作, 就能作为迭代器使用。这说明了迭代器不一定是复杂对象,关键是行为约定。标准库算法的威力在于基于迭代器接口编程,而不关心具体实现。即使是原始指针,只要满足迭代器的概念要求,就能无缝融入 STL生态系统。这种设计让我理解到,迭代器更多是一种概念和约定,而非特定的类层次结构。
 1 vectorInt::vectorInt(int n_, int value): n{n_}, ptr{new int[n_]} {
 2 std::fill_n(ptr, n, value); // 更新
 3 }
 4 vectorInt::vectorInt(const vectorInt &vi): n{vi.n}, ptr{new int[n]} {
 5 std::copy_n(vi.ptr, vi.n, ptr); // 更新
 6 }
 7 vectorInt& vectorInt::assign(const vectorInt &vi) {
 8 if(this == &vi)
 9 return *this;
10 int *ptr_tmp;
11 ptr_tmp = new int[vi.n];
12 std::copy_n(vi.ptr, vi.n, ptr_tmp); // 更新
13 delete[] ptr;
14 n = vi.n;
15 ptr = ptr_tmp;
16 return *this;
17 }
答:使用 <algorithm> 库中的 std::fill_n 和 std::copy_n 来替换原有的循环是完全可行的,三行更新代码的功能如下:
std::fill_n(ptr, n, value);
功能:从 ptr 指向的内存地址开始,将连续的 n 个元素都设置为指定的 value 值
std::copy_n(vi.ptr, vi.n, ptr);(在拷贝构造函数中)
功能:从源地址 vi.ptr 开始,精确复制 vi.n 个元素到目标地址 ptr
std::copy_n(vi.ptr, vi.n, ptr_tmp);(在 assign 方法中)
功能:与上述相同,从 vi.ptr 复制 vi.n 个元素到临时缓冲区 ptr_tmp
实验任务4
源代码matrix.hpp
 1 #pragma once
 2 // 类Matrix声明
 3 class Matrix {
 4 public:
 5     Matrix(int rows_, int cols_, double value = 0); // 构造rows_*cols_矩阵对象, 初值value
 6     Matrix(int rows_, double value = 0); // 构造rows_*rows_方阵对象, 初值value
 7     Matrix(const Matrix& x); // 深复制
 8     ~Matrix();
 9     void set(const double* pvalue, int size); // 按行复制pvalue指向的数据,要求size = rows * cols, 否则报错退出
10     void clear(); // 矩阵对象数据项置0
11     const double& at(int i, int j) const; // 返回矩阵对象索引(i,j)对应的数据项const引用(越界则报错后退出)
12     double& at(int i, int j); // 返回矩阵对象索引(i,j)对应的数据项引用(越界则报错后退出)
13     int rows() const; // 返回矩阵对象行数
14     int cols() const; // 返回矩阵对象列数
15     void print() const; // 按行打印数据
16 private:
17     int n_rows; // 矩阵对象内元素行数
18     int n_cols; // 矩阵对象内元素列数
19     double* ptr; // 数据区
20 };
源代码matrix.cpp
 1 #include"matrix.hpp"
 2 #include<iostream>
 3 Matrix::Matrix(int rows_, int cols_, double value):n_rows(rows_),n_cols(cols_),ptr(new double[rows_*cols_]) {
 4     for (int i = 0; i < rows_ * cols_; i++)
 5         ptr[i] = value;
 6 }
 7
 8 Matrix::Matrix(int rows_, double value):n_rows(rows_),n_cols(rows_),ptr(new double[rows_*rows_]) {
 9     for (int i = 0; i < rows_ * rows_; i++)
10         ptr[i] = value;
11 }
12
13 Matrix::Matrix(const Matrix& x):n_rows(x.n_rows),n_cols(x.n_cols),ptr(new double[x.n_rows* x.n_cols]) {
14     for (int i = 0; i < x.n_rows * x.n_cols; i++)
15         ptr[i] = x.ptr[i];
16 }
17
18 Matrix::~Matrix() {
19     delete[] ptr;
20 }
21
22 void Matrix::set(const double* pvalue, int size) {
23     if (size != n_rows * n_cols) {
24         std::cout << "SizeError\n";
25         return;
26     }
27     for (int i = 0; i < size; i++)
28         ptr[i] = pvalue[i];
29 }
30
31 void Matrix::clear() {
32     for (int i = 0; i < n_rows * n_cols; ++i) {
33         ptr[i] = 0.0;
34     }
35 }
36
37 const double& Matrix::at(int i, int j) const {
38     if (i < 0 || i >= n_rows || j < 0 || j >= n_cols) {
39         std::cout << "IndexError\n";
40         std::exit(1);
41     }
42     return ptr[i * n_cols + j];
43 }
44
45 double& Matrix::at(int i, int j) {
46     if (i < 0 || i >= n_rows || j < 0 || j >= n_cols) {
47         std::cout << "IndexError\n";
48         std::exit(1);
49     }
50     return ptr[i * n_cols + j];
51 }
52
53 int Matrix::rows() const {
54     return n_rows;
55 }
56
57 int Matrix::cols() const {
58     return n_cols;
59 }
60
61 void Matrix::print() const {
62     for (int i = 0; i < n_rows; ++i) {
63         std::cout << at(i, 0);
64         for (int j = 1; j < n_cols; ++j) {
65             std::cout << ", " << at(i, j);
66         }
67         std::cout << '\n';
68     }
69 }
源代码task4.cpp
 1 #include <iostream>
 2 #include <cstdlib>
 3 #include "matrix.hpp"
 4 void test1();
 5 void test2();
 6 void output(const Matrix& m, int row_index);
 7 int main() {
 8     std::cout << "测试1: \n";
 9     test1();
10     std::cout << "\n测试2: \n";
11     test2();
12 }
13 void test1() {
14     double x[1000] = { 1, 2, 3, 4, 5, 6, 7, 8, 9, 10 };
15     int n, m;
16     std::cout << "Enter n and m: ";
17     std::cin >> n >> m;
18     Matrix m1(n, m); // 创建矩阵对象m1, 大小n×m
19     m1.set(x, n * m); // 用一维数组x的值按行为矩阵m1赋值
20     Matrix m2(m, n); // 创建矩阵对象m2, 大小m×n
21     m2.set(x, m * n); // 用一维数组x的值按行为矩阵m1赋值
22     Matrix m3(n); // 创建一个n×n方阵对象
23     m3.set(x, n * n); // 用一维数组x的值按行为矩阵m3赋值
24     std::cout << "矩阵对象m1: \n"; m1.print();
25     std::cout << "矩阵对象m2: \n"; m2.print();
26     std::cout << "矩阵对象m3: \n"; m3.print();
27 }
28 void test2() {
29     Matrix m1(2, 3, -1);
30     const Matrix m2(m1);
31     std::cout << "矩阵对象m1: \n"; m1.print();
32     std::cout << "矩阵对象m2: \n"; m2.print();
33     m1.clear();
34     m1.at(0, 0) = 1;
35     std::cout << "m1更新后: \n";
36     std::cout << "矩阵对象m1第0行 "; output(m1, 0);
37     std::cout << "矩阵对象m2第0行: "; output(m2, 0);
38 }
39 // 输出矩阵对象row_index行所有元素
40 void output(const Matrix& m, int row_index) {
41     if (row_index < 0 || row_index > m.rows()) {
42         std::cerr << "IndexError: row index out of range\n";
43         std::exit(1);
44     }
45     std::cout << m.at(row_index, 0);
46     for (int j = 1; j < m.cols(); ++j)
47         std::cout << ", " << m.at(row_index, j);
48     std::cout << '\n';
49 }
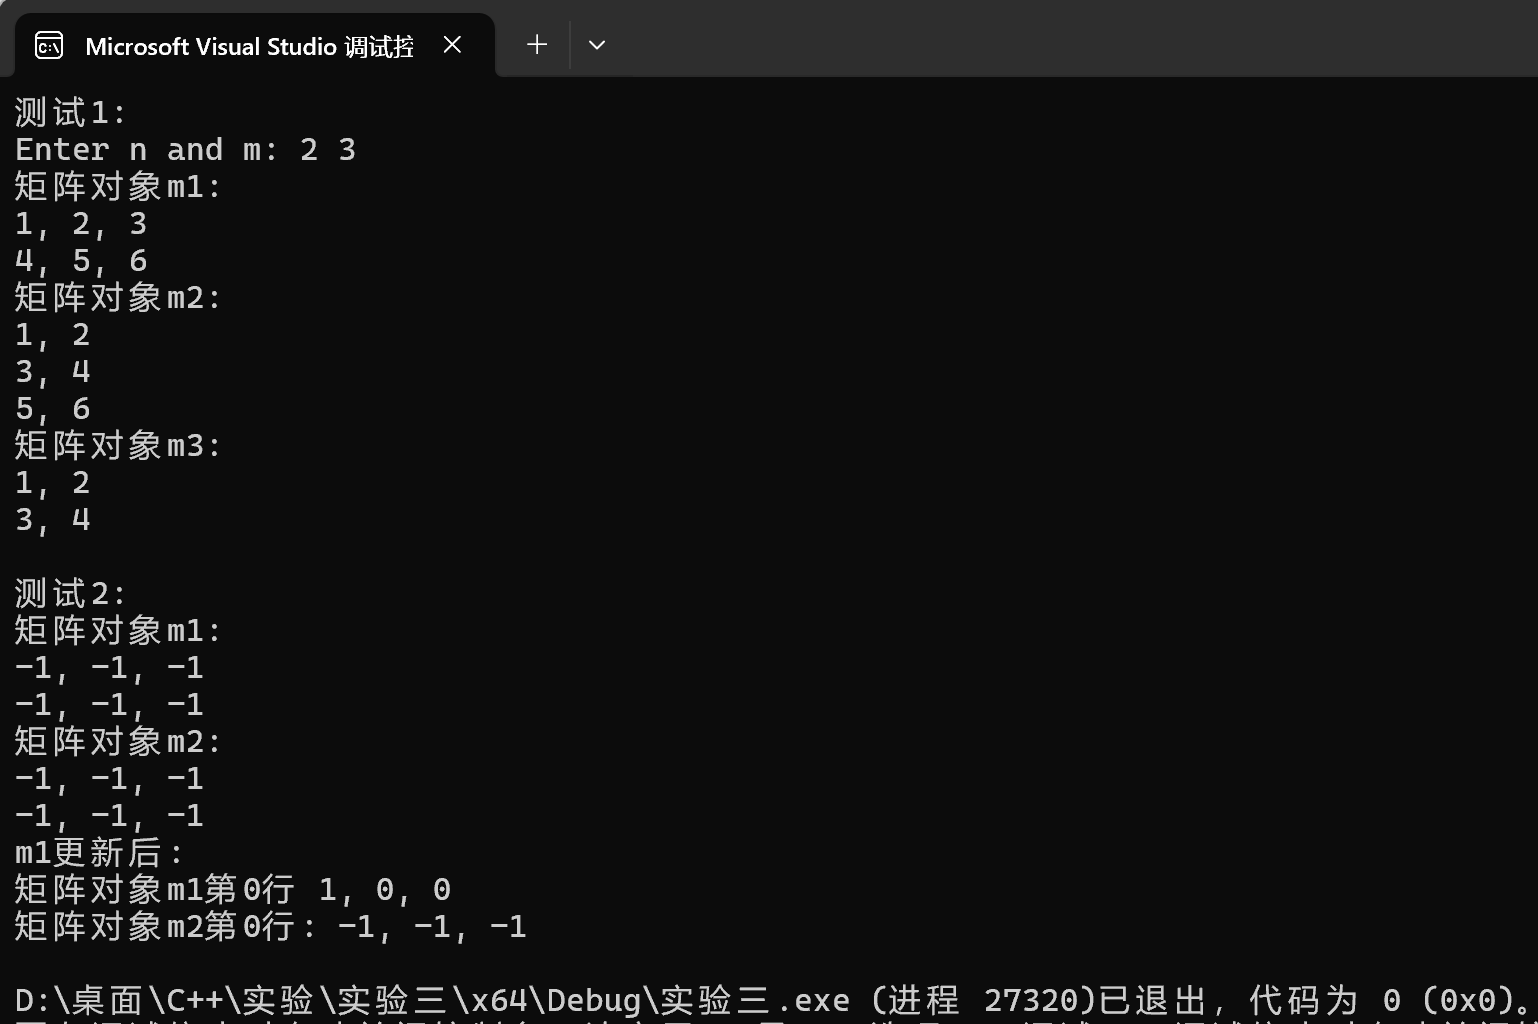
运行结果测试截图
拓展思考 :若把内部存储 double *ptr; 换成 std::vector<double> 并保持原接口: 无需手写复制构造/析构等,自动获得 RAII 与异常安全 ,仍保持连续内存,性能无损,代码量精简 。对比两种实现,体会“零成本抽象”
使用 std::vector<double> 替代原始指针 double* ptr 来重新实现 Matrix 类,能够显著提升代码的健壮性和可维护性,同时完美体现了 C++ 的“零成本抽象”原则。这一改进使得类自动获得了 RAII(资源获取即初始化)特性,编译器将为类生成默认的拷贝构造函数、赋值运算符和析构函数,从而彻底消除了手动内存管理可能带来的资源泄漏和错误风险。尽管底层实现从指针切换为了标准库容器,但由于 std::vector 同样保证元素在内存中的连续布局,因此在访问性能上没有任何损失。对比两种实现可以清晰地看到,新的实现代码量大幅精简,但却更加安全可靠,这正是“零成本抽象”的典范——我们无需为所获得的自动化管理与安全性支付额外的运行时性能代价。
实验任务5
源代码contact.hpp
 1 #pragma once
 2 #include <iostream>
 3 #include <string>
 4 // 联系人类
 5 class Contact {
 6 public:
 7     Contact(const std::string& name_, const std::string& phone_);
 8     const std::string& get_name() const;
 9     const std::string& get_phone() const;
10     void display() const;
11 private:
12     std::string name; // 必填项
13     std::string phone; // 必填项
14 };
15 Contact::Contact(const std::string& name_, const std::string& phone_) :name{ name_ },
16 phone{ phone_ } {
17 }
18 const std::string& Contact::get_name() const {
19     return name;
20 }
21 const std::string& Contact::get_phone() const {
22     return phone;
23 }
24 void Contact::display() const {
25     std::cout << name << ", " << phone;
26 }
源代码contactBook.hpp
 1 # pragma once
 2 #include <iostream>
 3 #include <string>
 4 #include <vector>
 5 #include <algorithm>
 6 #include "contact.hpp"
 7 // 通讯录类
 8 class ContactBook {
 9 public:
10     void add(const std::string& name, const std::string& phone); // 添加联系人
11     void remove(const std::string& name); // 移除联系人
12     void find(const std::string& name) const; // 查找联系人
13     void display() const; // 显示所有联系人
14     size_t size() const;
15 private:
16     int index(const std::string& name) const; // 返回联系人在contacts内索引,如不存在,返回 - 1
17     void sort(); // 按姓名字典序升序排序通讯录
18 private:
19     std::vector<Contact> contacts;
20 };
21 void ContactBook::add(const std::string& name, const std::string& phone) {
22     if (index(name) == -1) {
23         contacts.push_back(Contact(name, phone));
24         std::cout << name << " add successfully.\n";
25         sort();
26         return;
27     }
28     std::cout << name << " already exists. fail to add!\n";
29 }
30 void ContactBook::remove(const std::string& name) {
31     int i = index(name);
32     if (i == -1) {
33         std::cout << name << " not found, fail to remove!\n";
34         return;
35     }
36     contacts.erase(contacts.begin() + i);
37     std::cout << name << " remove successfully.\n";
38 }
39 void ContactBook::find(const std::string& name) const {
40     int i = index(name);
41     if (i == -1) {
42         std::cout << name << " not found!\n";
43         return;
44     }
45     contacts[i].display();
46     std::cout << '\n';
47 }
48 void ContactBook::display() const {
49     for (auto& c : contacts) {
50         c.display();
51         std::cout << '\n';
52     }
53 }
54 size_t ContactBook::size() const {
55     return contacts.size();
56 }
57
58 // 返回联系人在contacts内索引; 如不存在,返回-1
59 int ContactBook::index(const std::string& name) const {
60     for (size_t i = 0; i < contacts.size(); i++)
61         if (name == contacts[i].get_name())
62             return static_cast<int>(i);
63     return -1;
64 }
65
66 // 按姓名字典序升序排序通讯录
67 void ContactBook::sort() {
68     std::sort(contacts.begin(), contacts.end(), [](const Contact& a, const Contact& b) {return a.get_name() < b.get_name(); });
69 }
源代码task5.cpp
 1 #include "contactBook.hpp"
 2 void test() {
 3     ContactBook contactbook;
 4     std::cout << "1. add contacts\n";
 5     contactbook.add("Bob", "18199357253");
 6     contactbook.add("Alice", "17300886371");
 7     contactbook.add("Linda", "18184538072");
 8     contactbook.add("Alice", "17300886371");
 9     std::cout << "\n2. display contacts\n";
10     std::cout << "There are " << contactbook.size() << " contacts.\n";
11     contactbook.display();
12     std::cout << "\n3. find contacts\n";
13     contactbook.find("Bob");
14     contactbook.find("David");
15     std::cout << "\n4. remove contact\n";
16     contactbook.remove("Bob");
17     contactbook.remove("David");
18 }
19 int main() {
20     test();
21 }
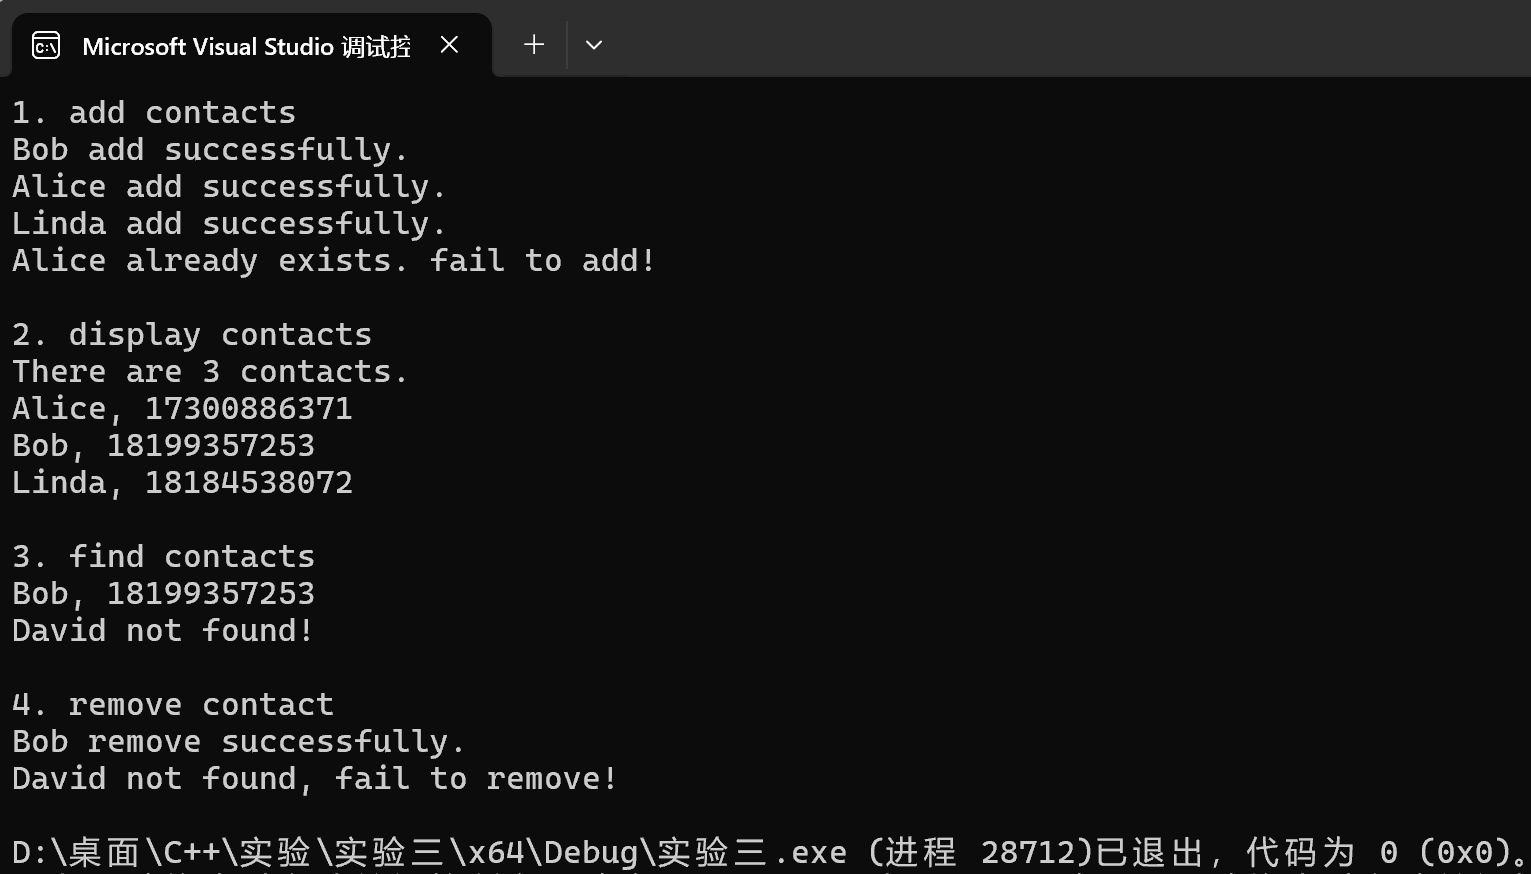
运行结果测试截图

 浙公网安备 33010602011771号