Nginx初级--基本使用
                <svg xmlns="http://www.w3.org/2000/svg" style="display: none;">
                    <path stroke-linecap="round" d="M5,0 0,2.5 5,5z" id="raphael-marker-block" style="-webkit-tap-highlight-color: rgba(0, 0, 0, 0);"></path>
                </svg>
                <p></p>
目录
前言
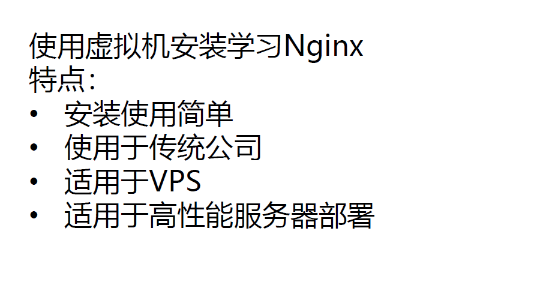
本篇文章主要介绍Nginx的相关初级使用。
课程建议:
- 初中级程序员,只需要学习初级部分。
- 架构师、资深研发工程师或者希望向架构师方向努力,需要学习完 本套全部课程。
所以这篇文章是一个初级部分的学习。
1 Nginx概述
1.1 是什么
Nginx (engine x) 是一个高性能的HTTP和反向代理web服务器,同时也提供了IMAP/POP3/SMTP服务。Nginx是由伊戈尔·赛索耶夫为俄罗斯访问量第二的Rambler.ru站点(俄文:Рамблер)开发的,第一个公开版本0.1.0发布于2004年10月4日。
其将源代码以类BSD许可证的形式发布,因它的稳定性、丰富的功能集、简单的配置文件和低系统资源的消耗而闻名。2011年6月1日,nginx 1.0.4发布。Nginx是一款轻量级的Web 服务器/反向代理服务器及电子邮(IMAP/POP3)代理服务器,在BSD-like 协议下发行。其特点是占有内存少,并发能力强,事实上nginx的并发能力在同类型的网页服务器中表现较好,中国大陆使用nginx网站用户有:百度、京东、新浪、网易、腾讯、淘宝等。
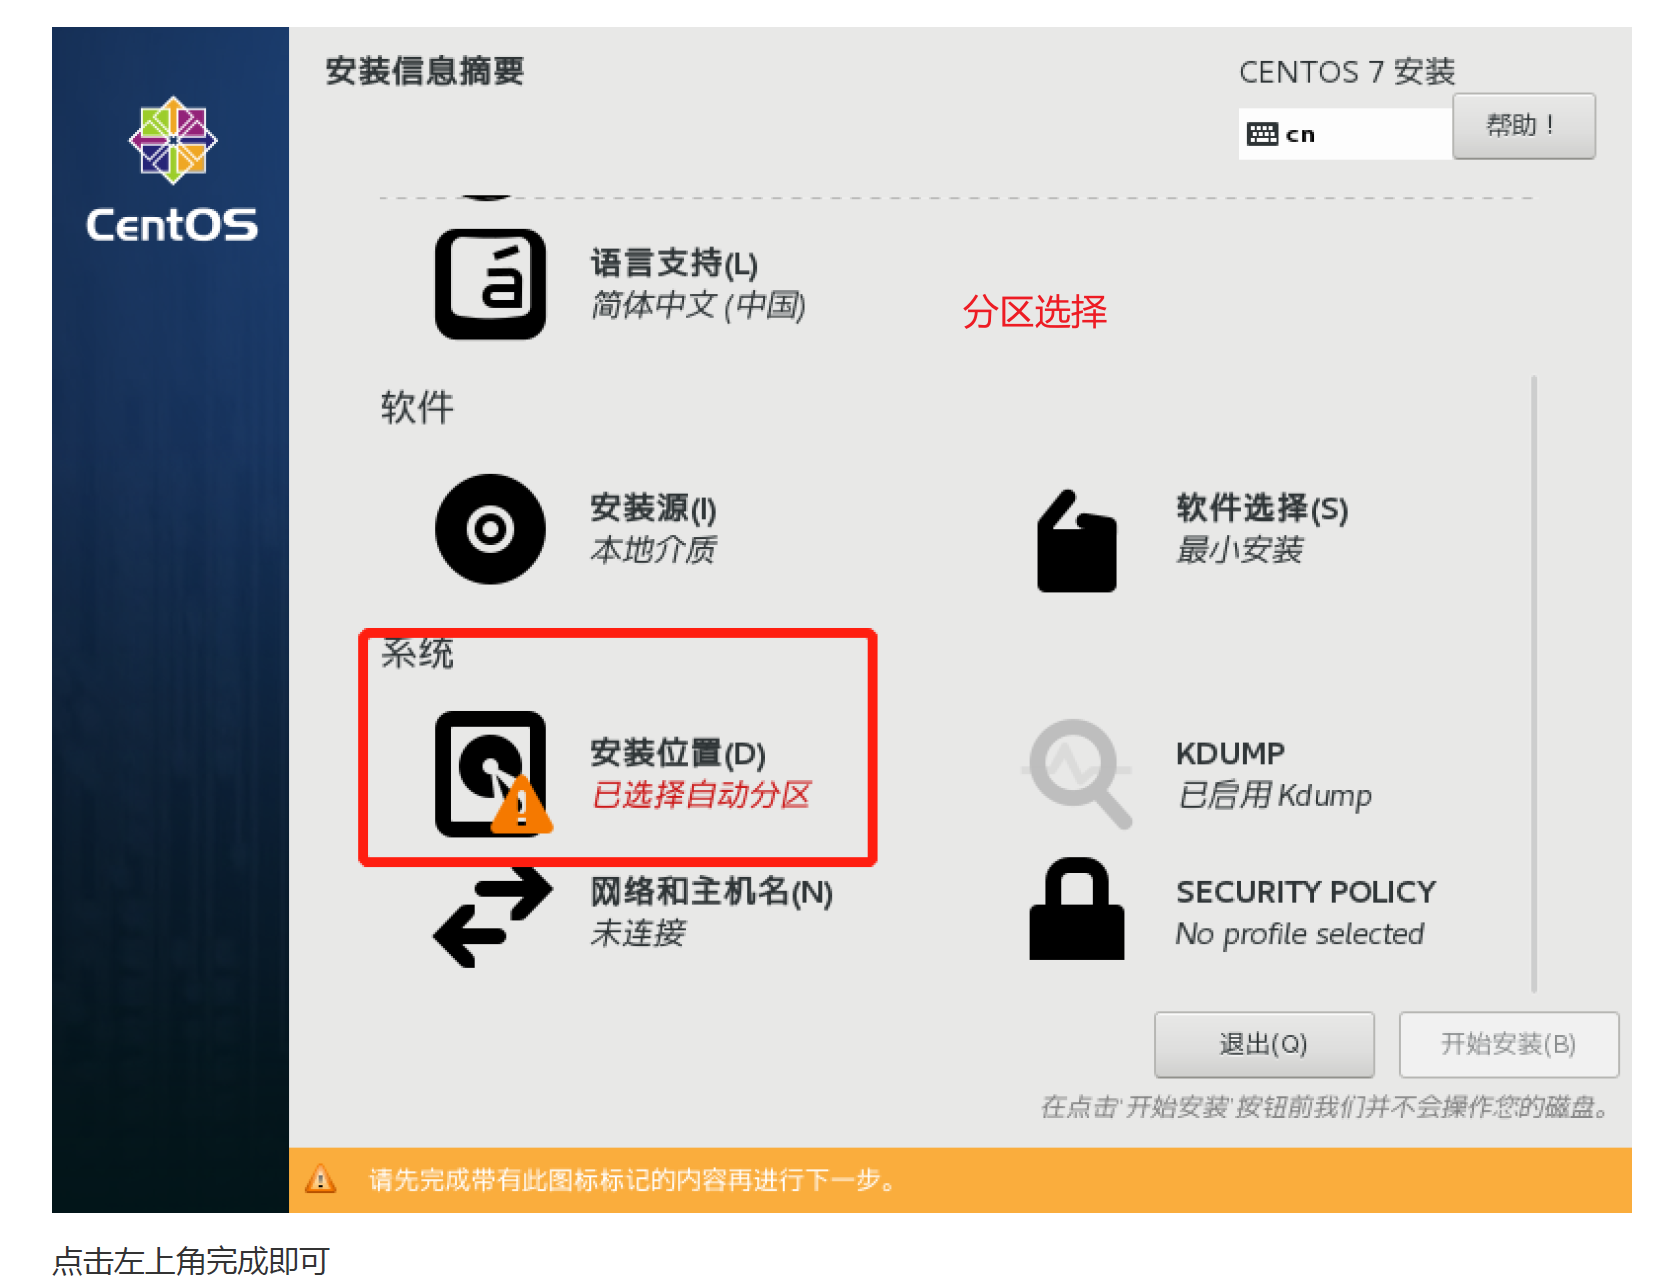
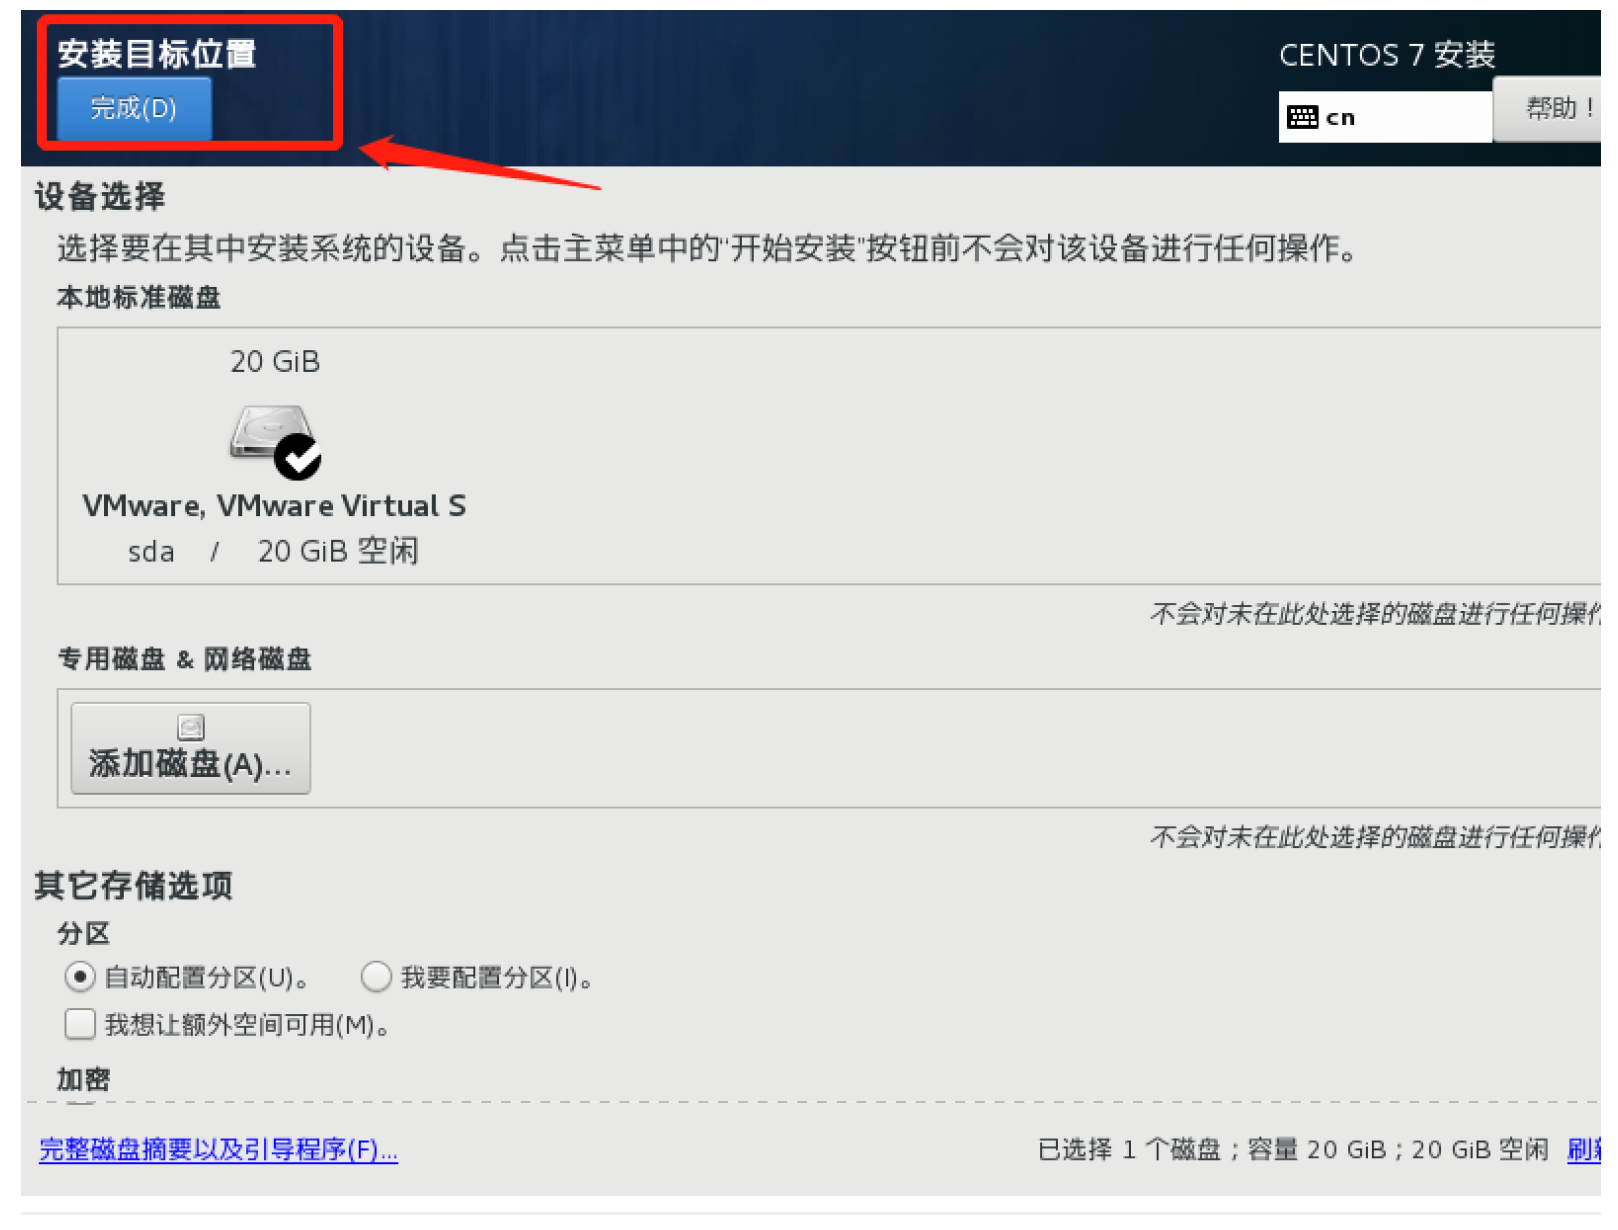
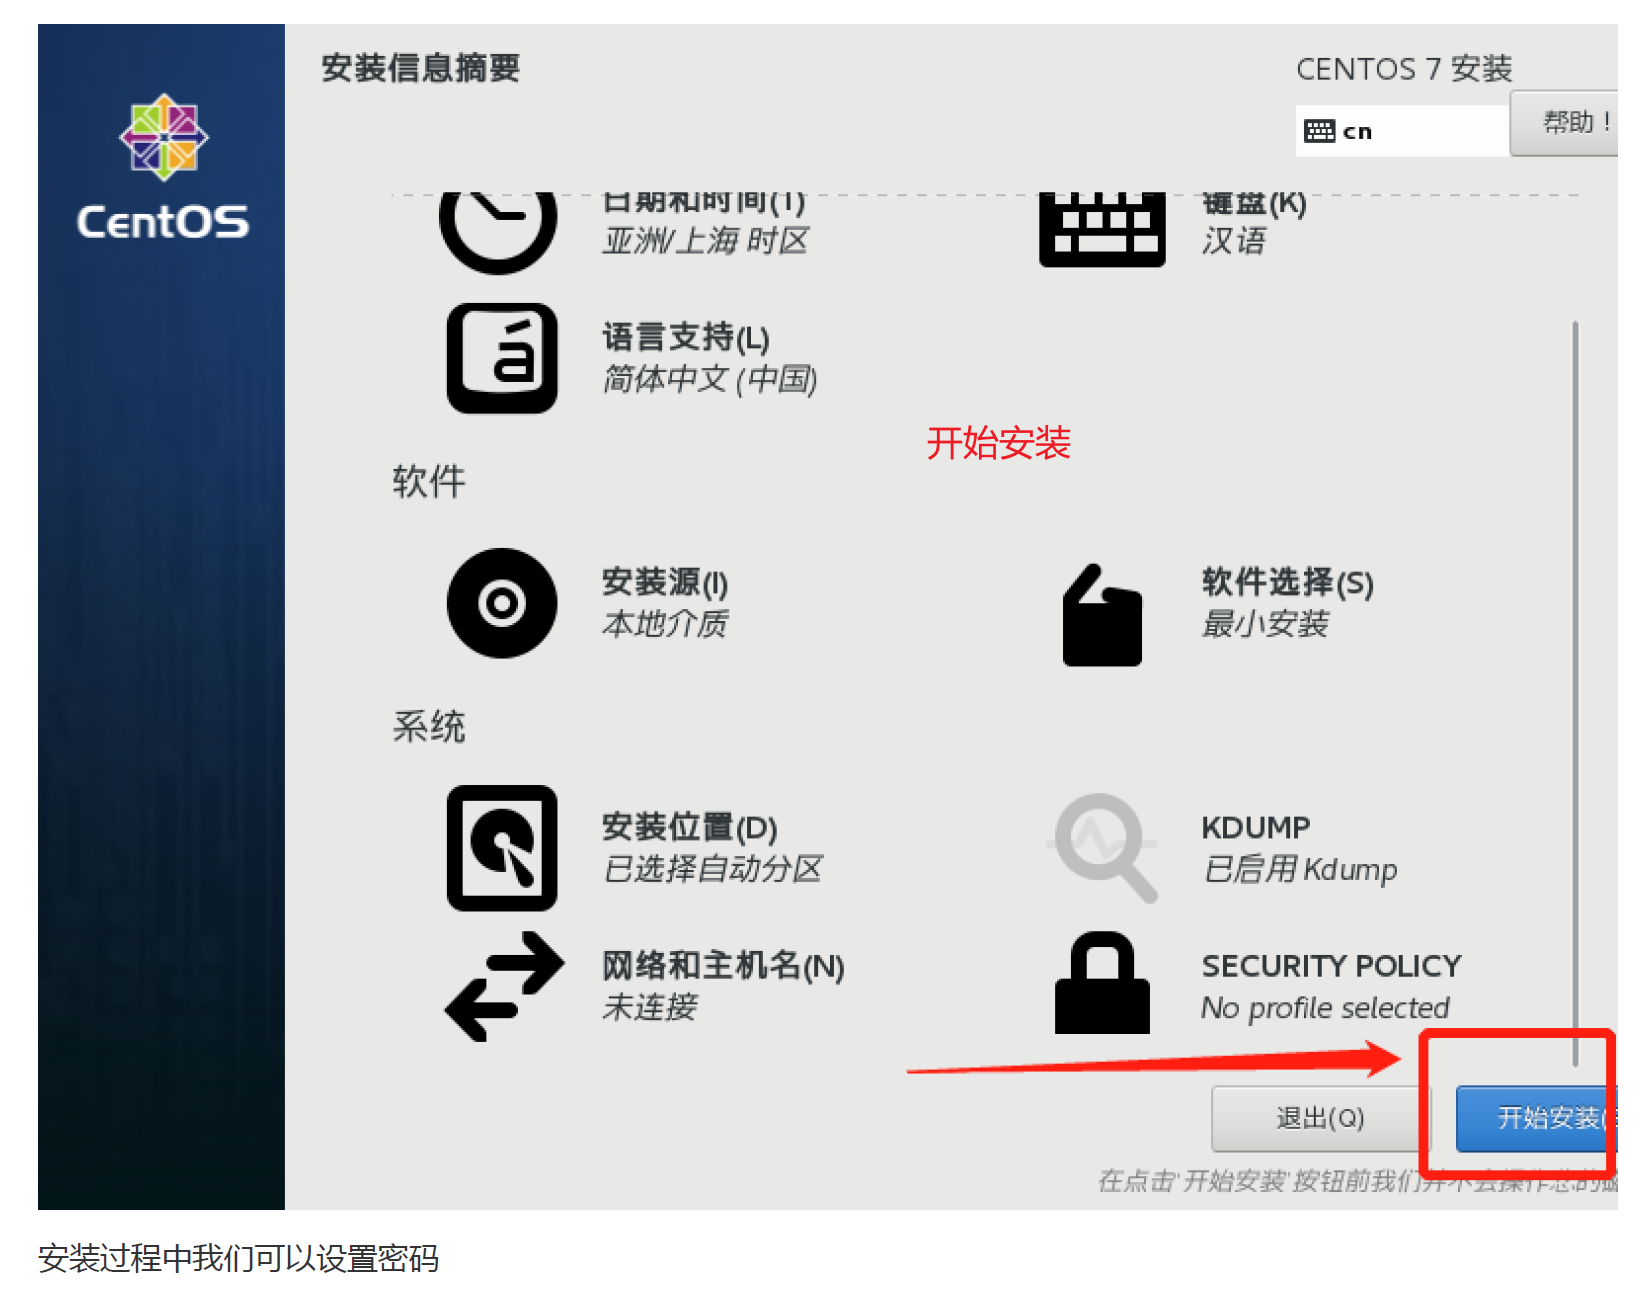
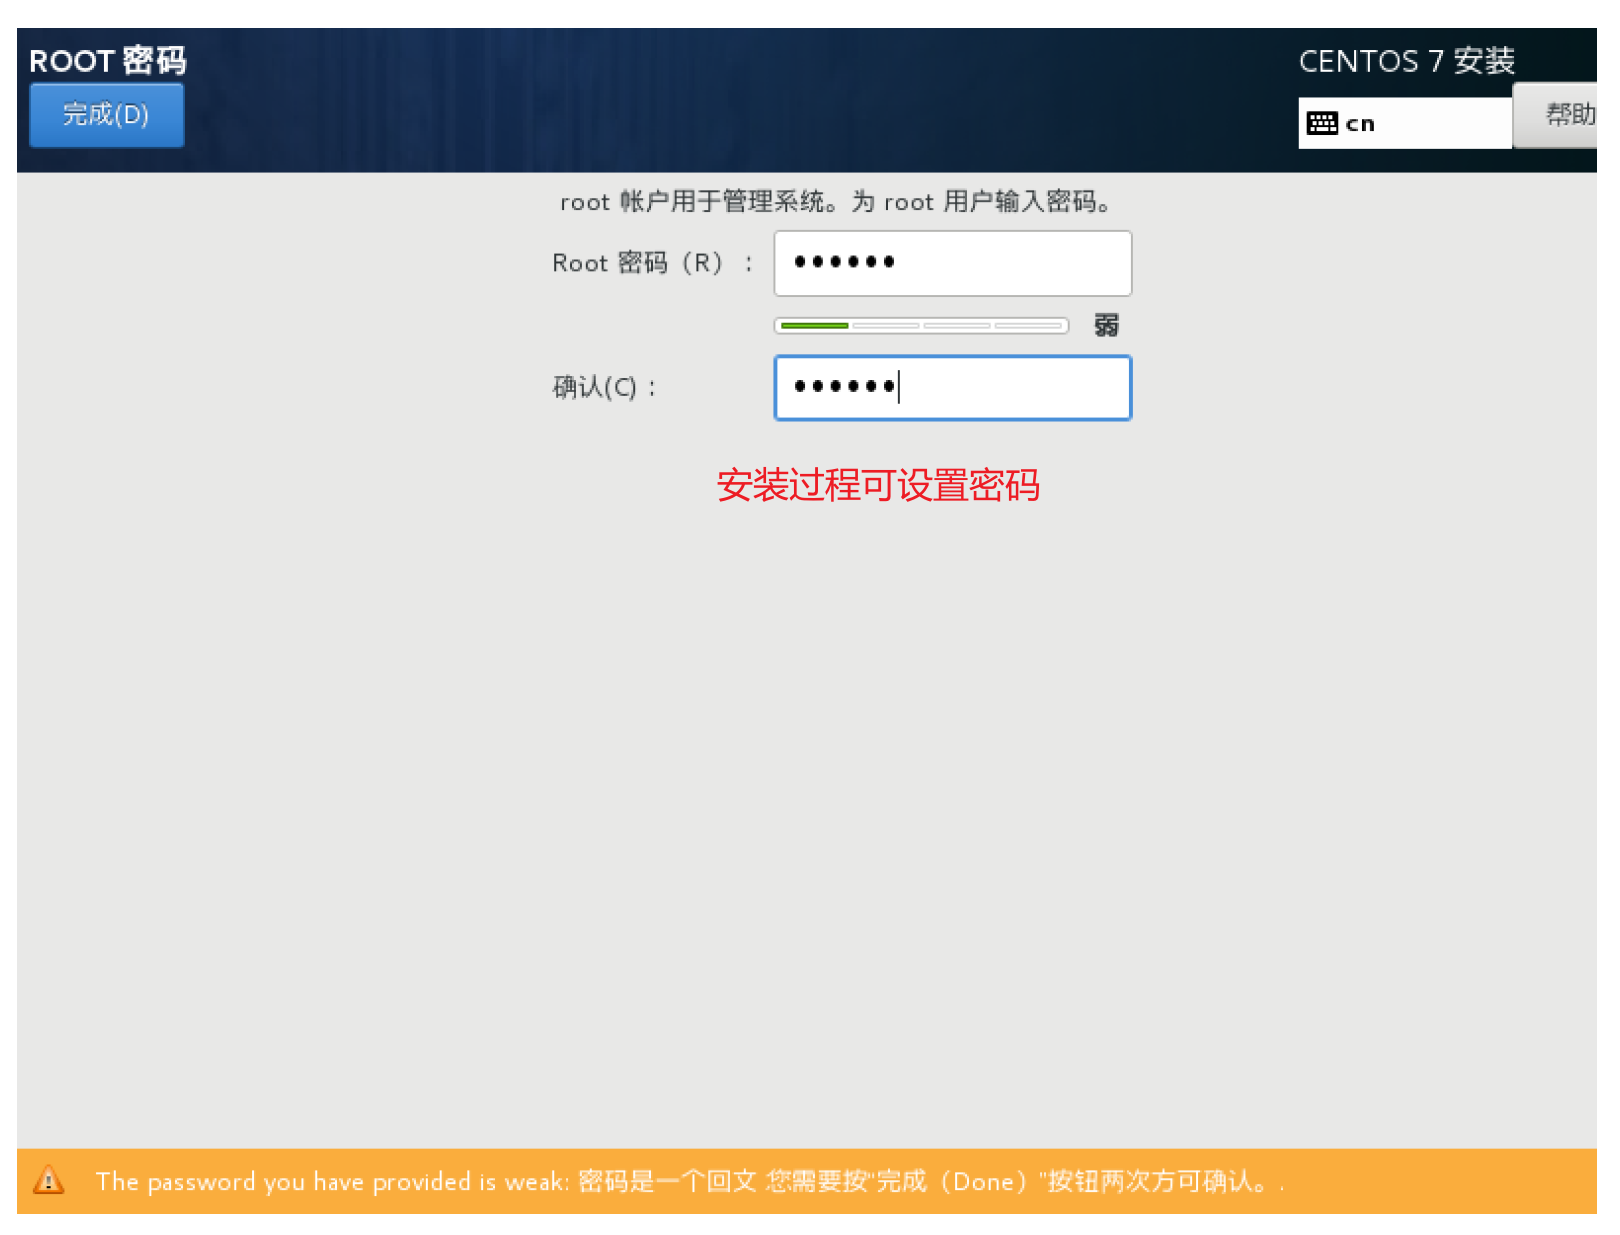
2 Nginx开源版安装
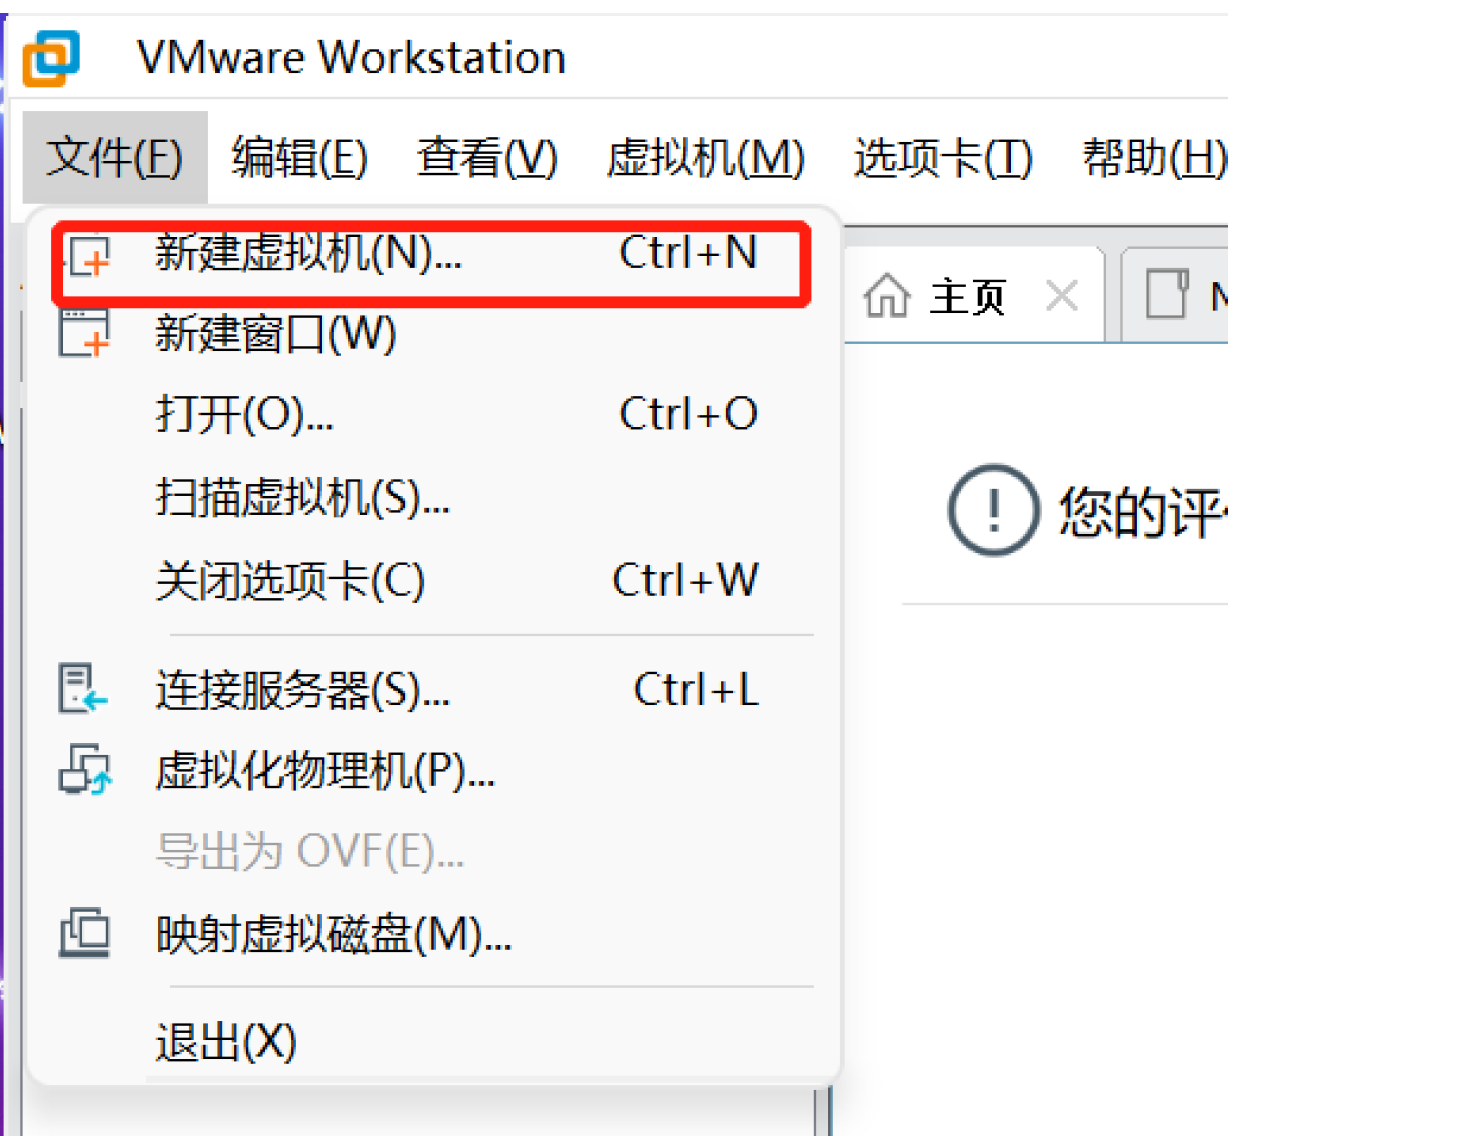
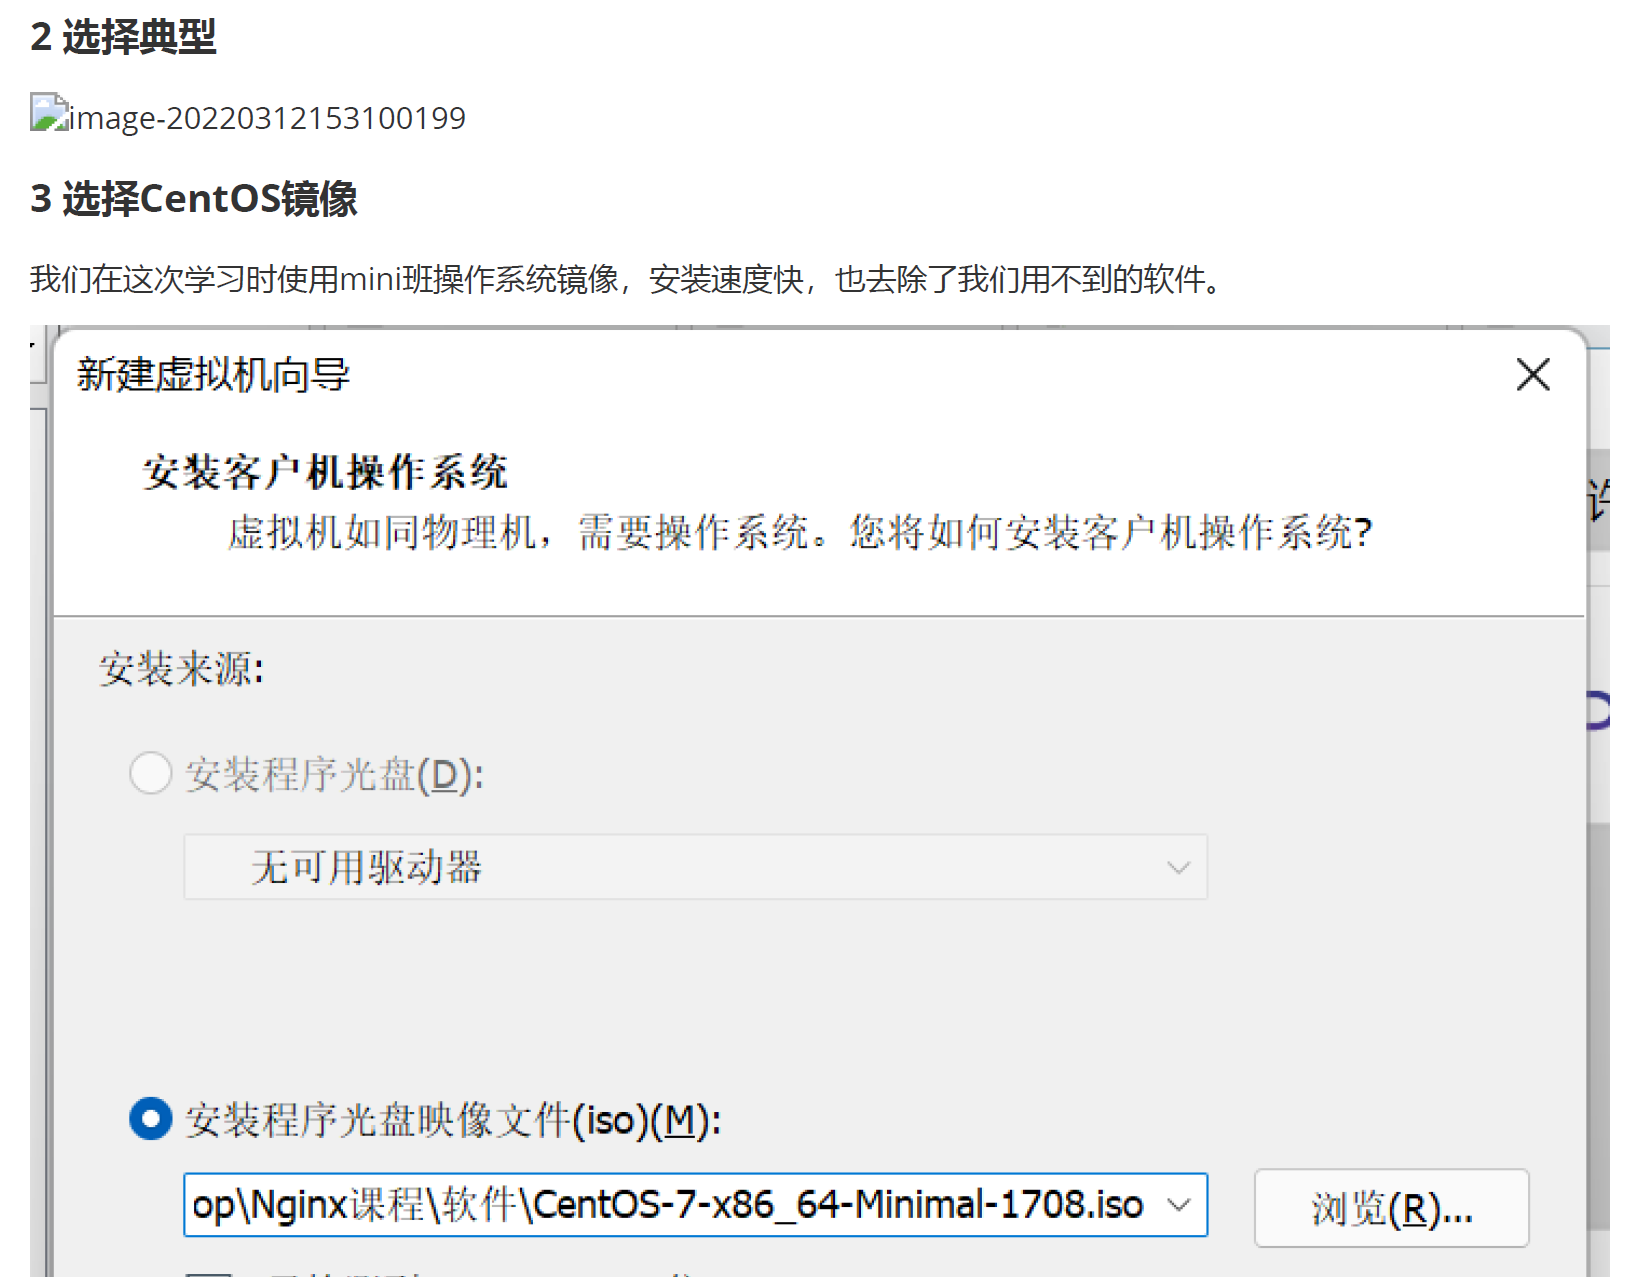
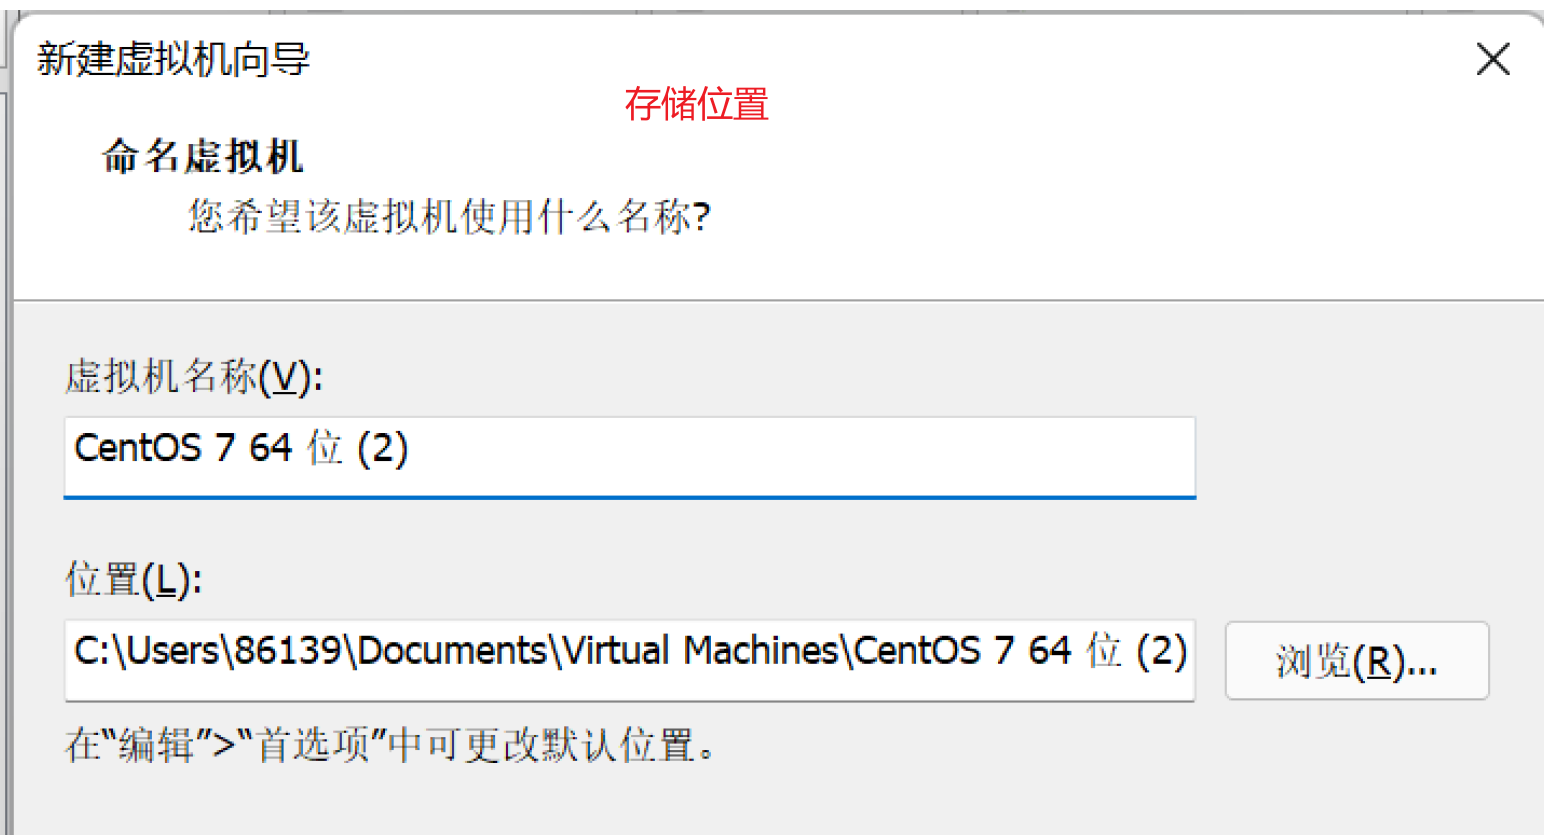
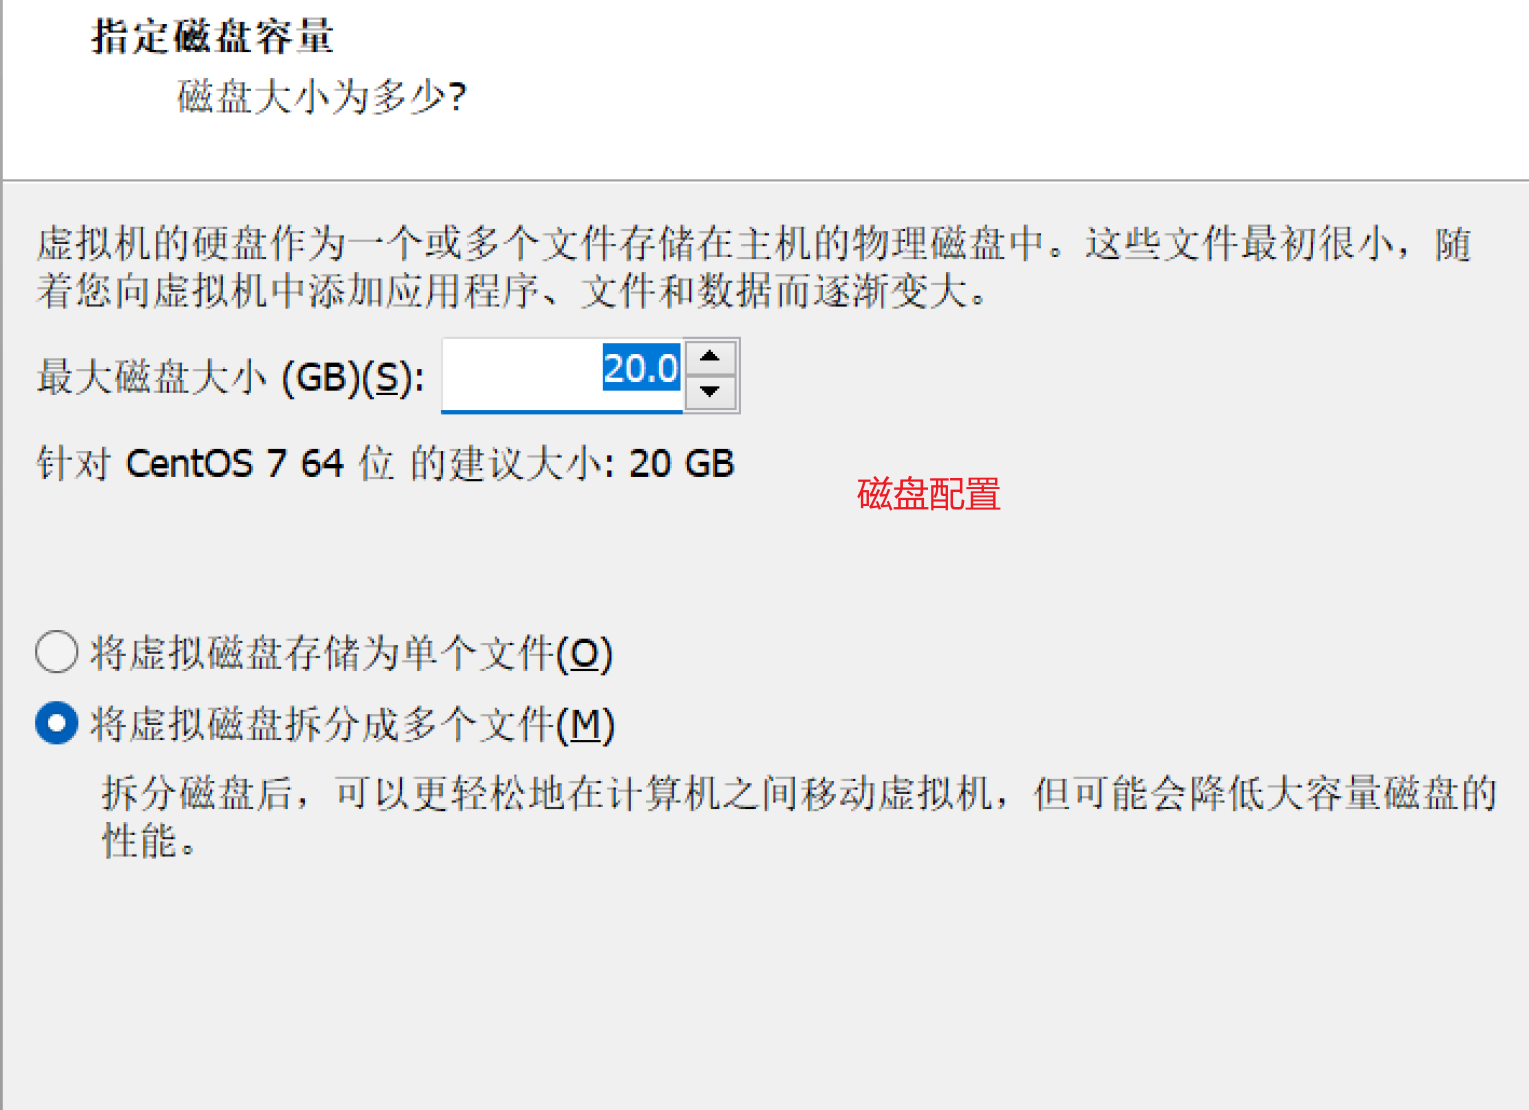
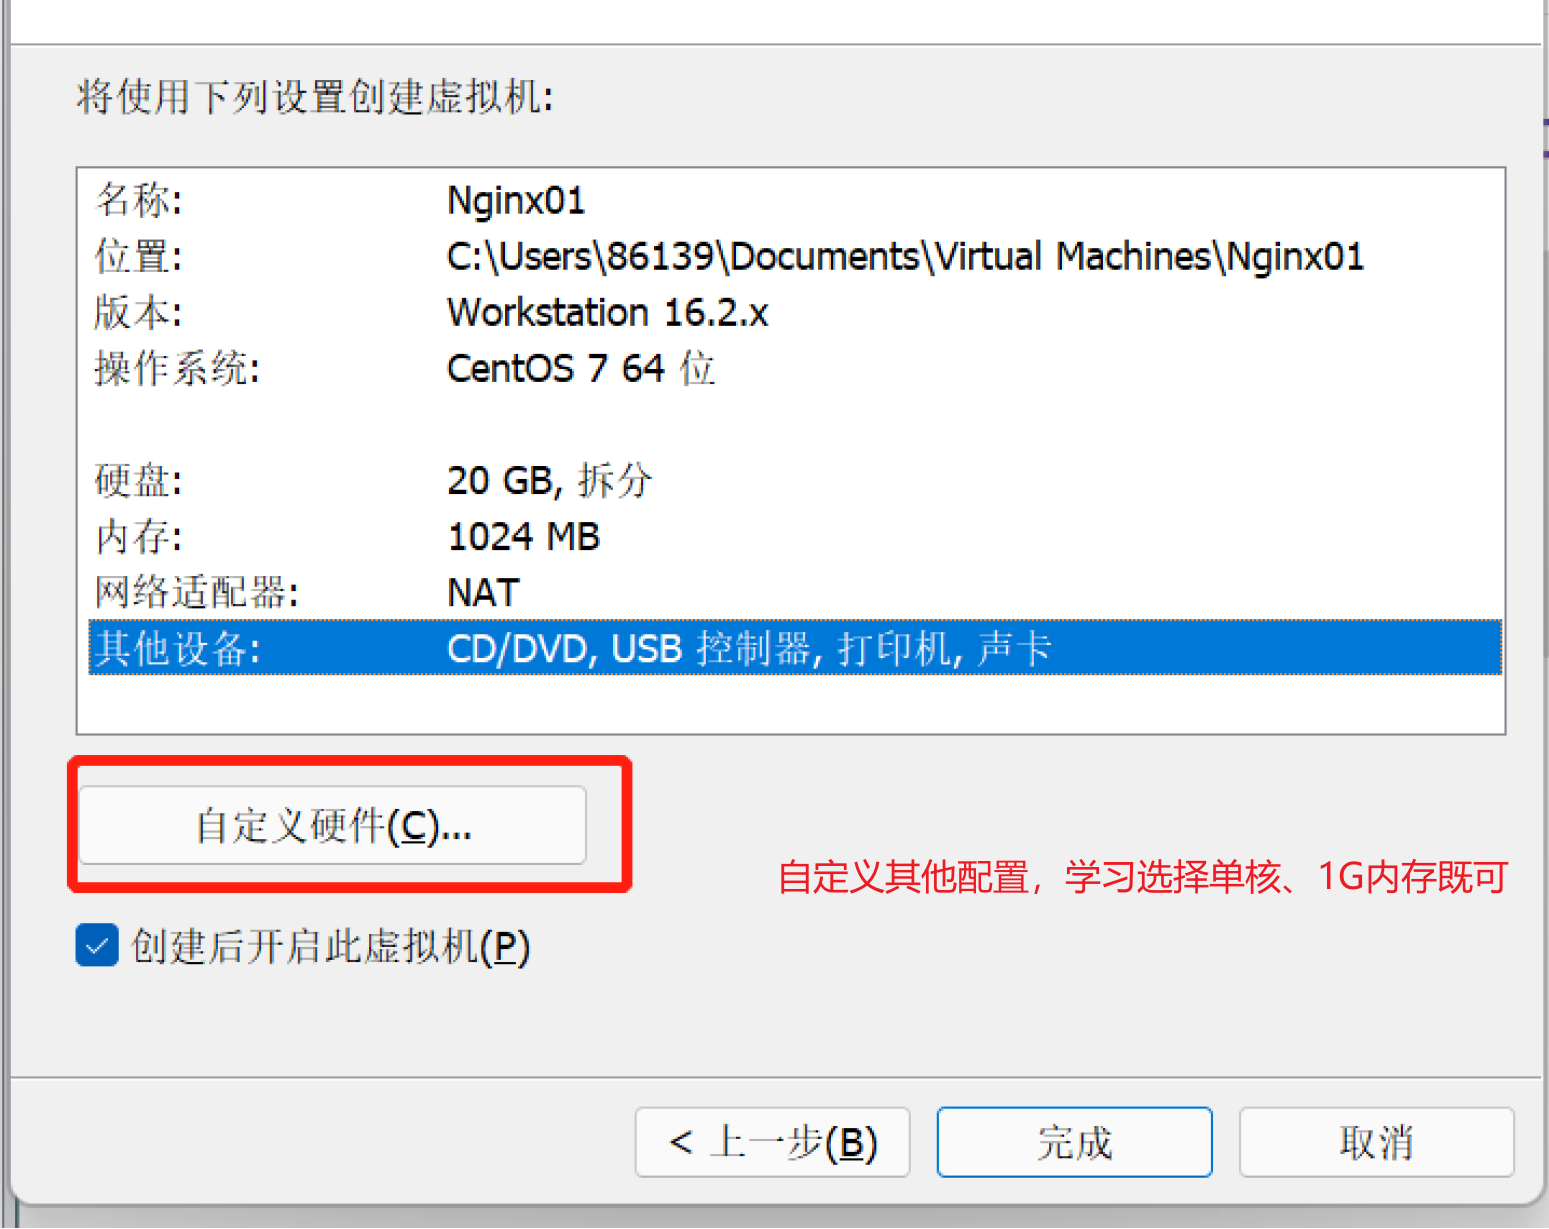
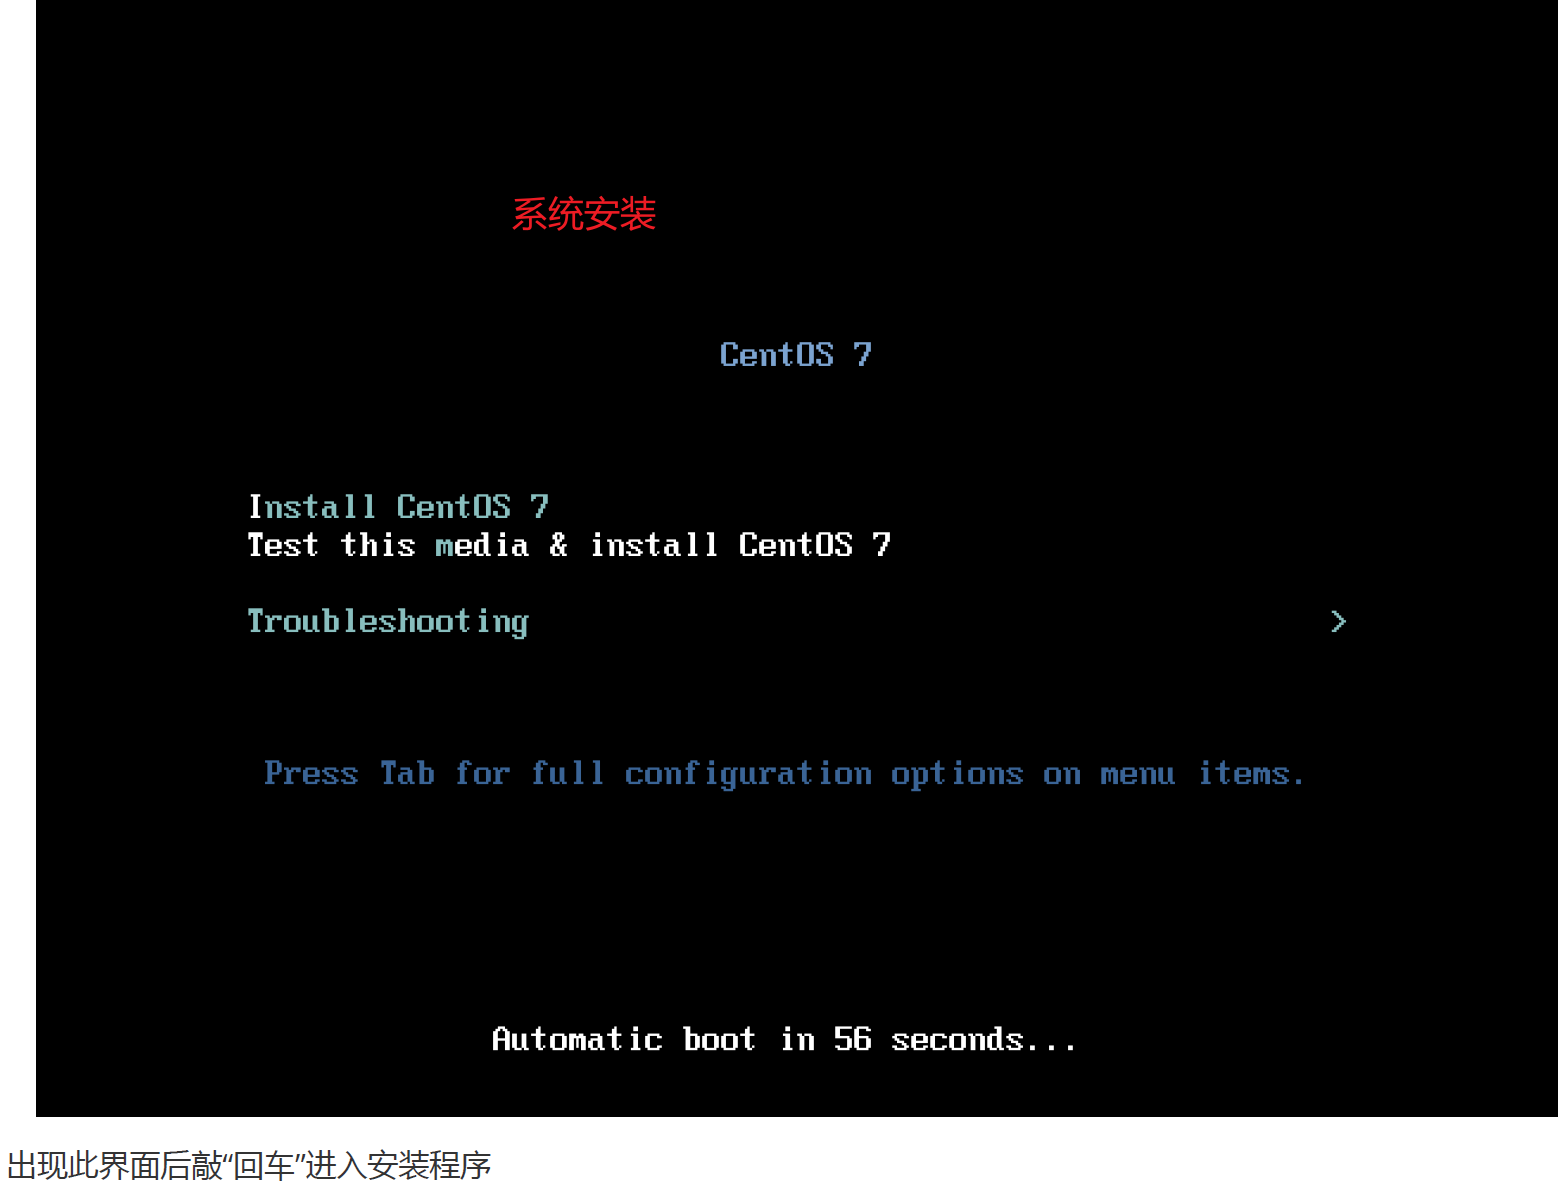
2.1 虚拟机安装
2.1.1 系统安装
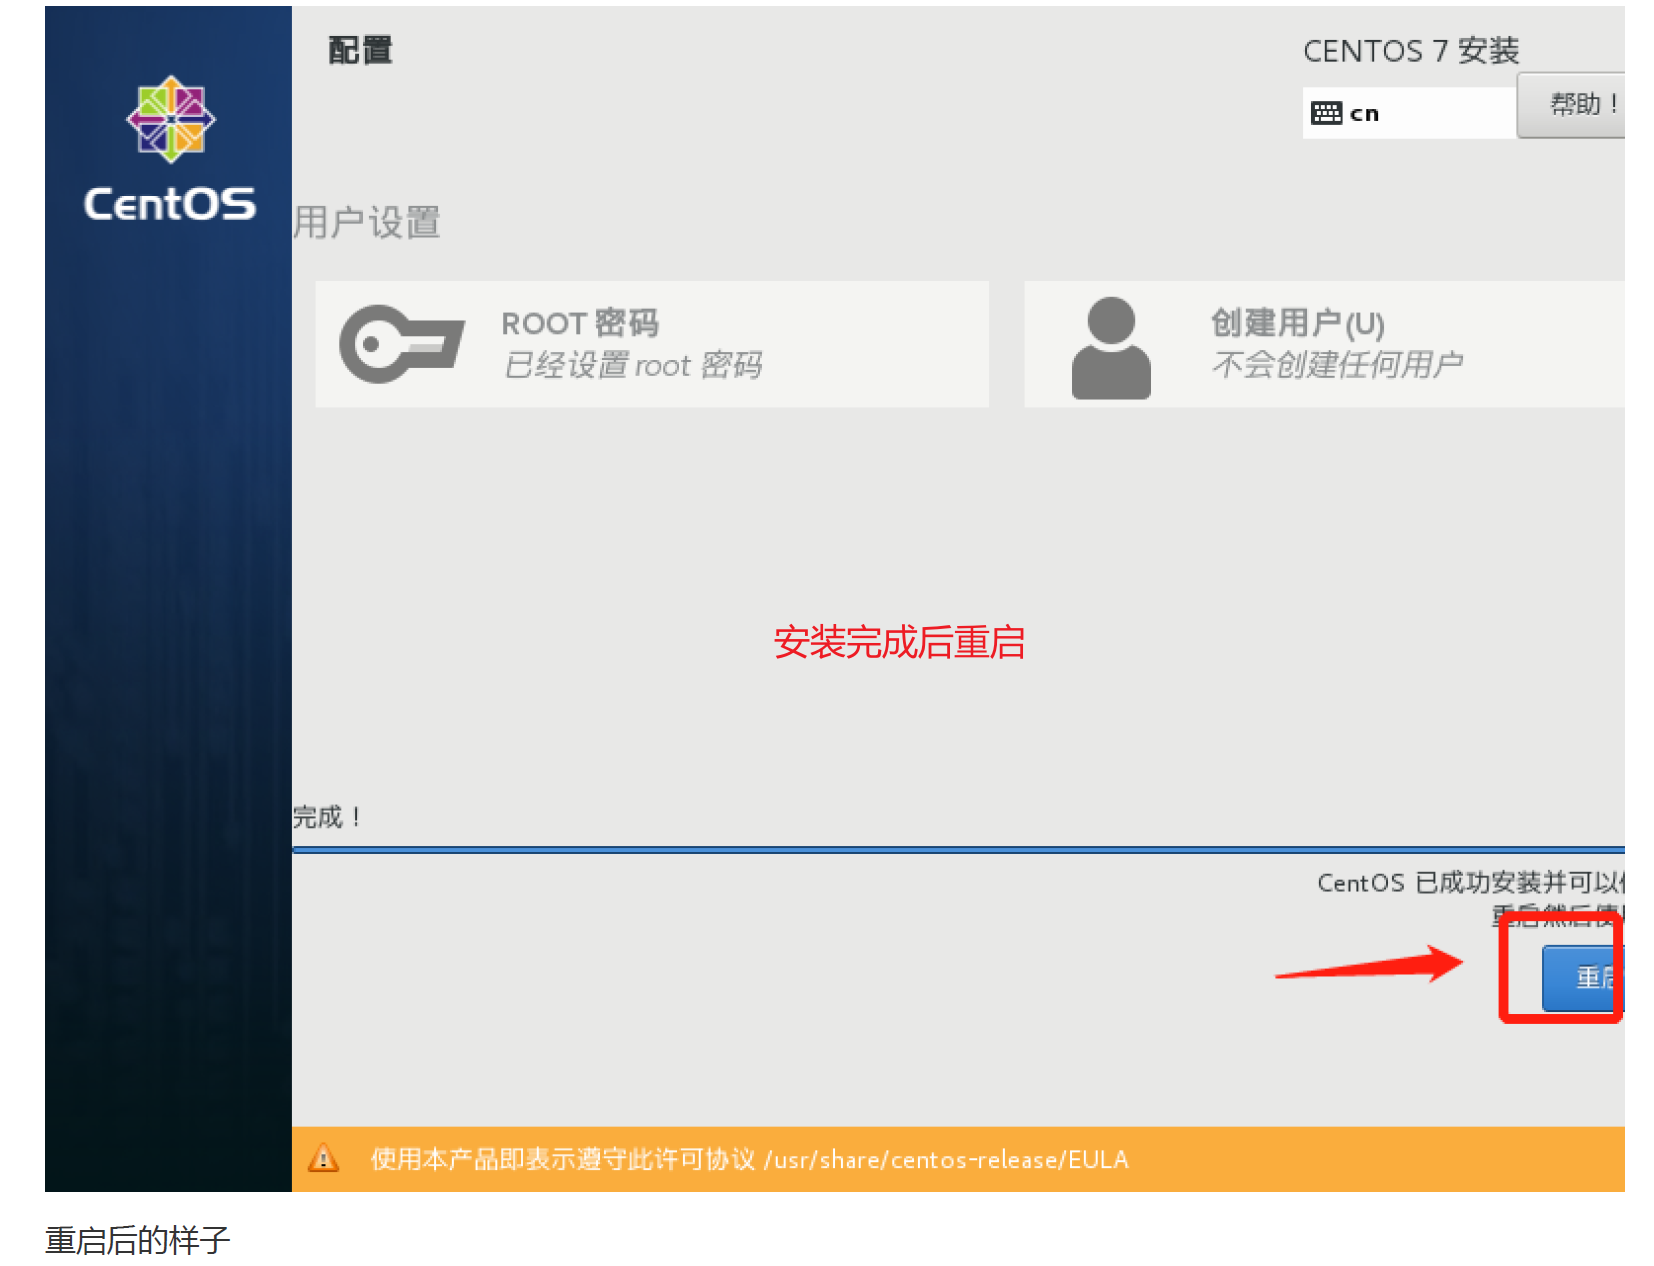
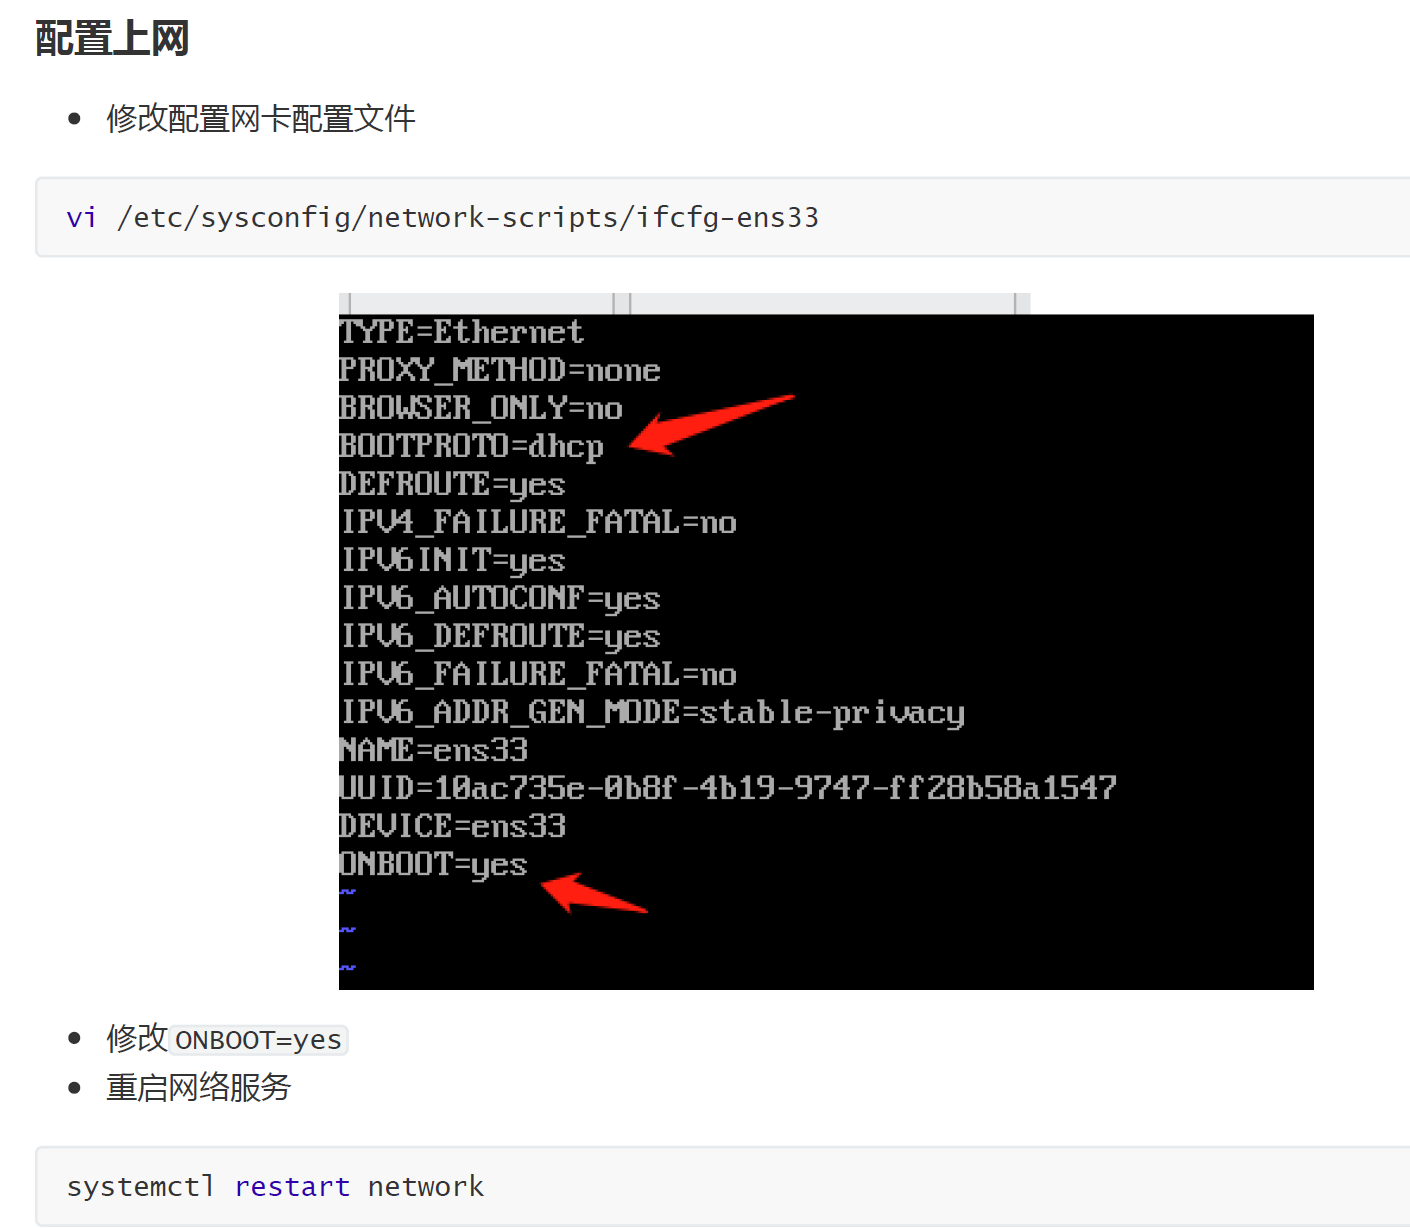
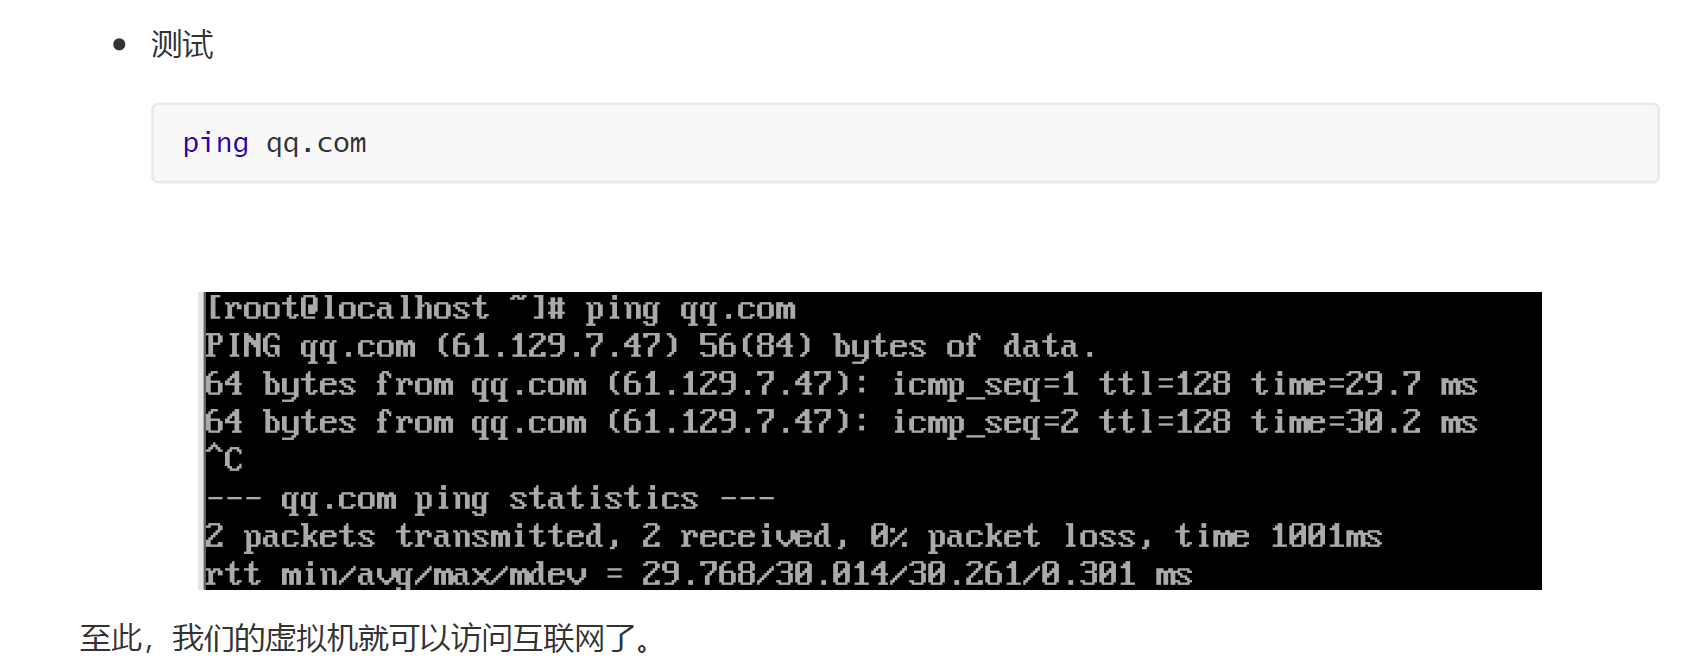
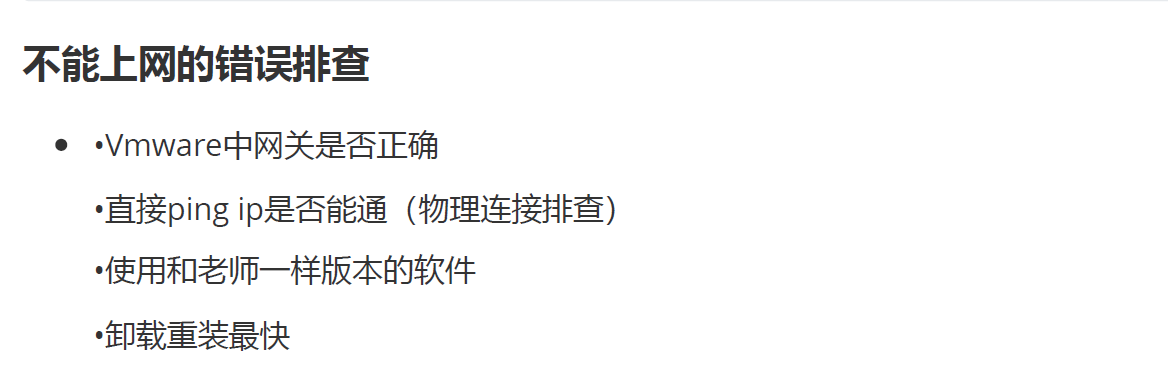
2.1.2 linux配置

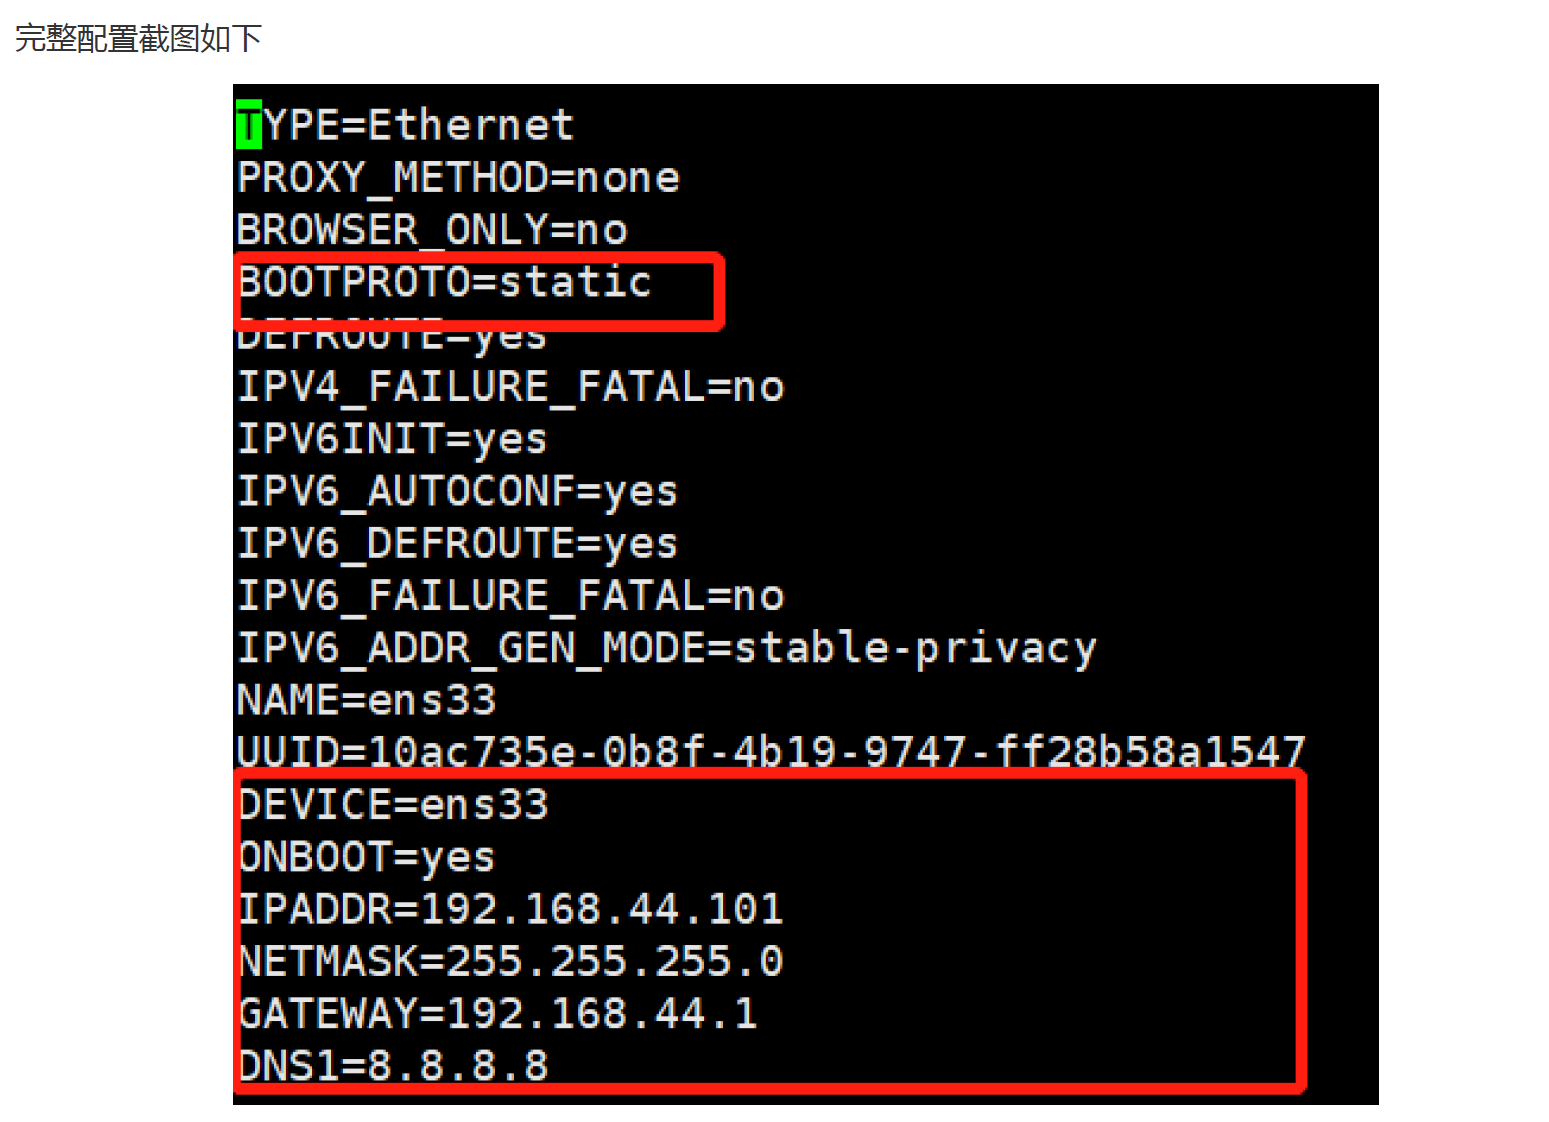
TYPE=Ethernet
PROXY_METHOD=none
BROWSER_ONLY=no
BOOTPROTO=static
DEFROUTE=yes
IPV4_FAILURE_FATAL=no
IPV6INIT=yes
IPV6_AUTOCONF=yes
IPV6_DEFROUTE=yes
IPV6_FAILURE_FATAL=no
IPV6_ADDR_GEN_MODE=stable-privacy
NAME=ens33
UUID=10ac735e-0b8f-4b19-9747-ff28b58a1547
DEVICE=ens33
ONBOOT=yes
IPADDR=192.168.44.101
NETMASK=255.255.255.0
GATEWAY=192.168.44.1
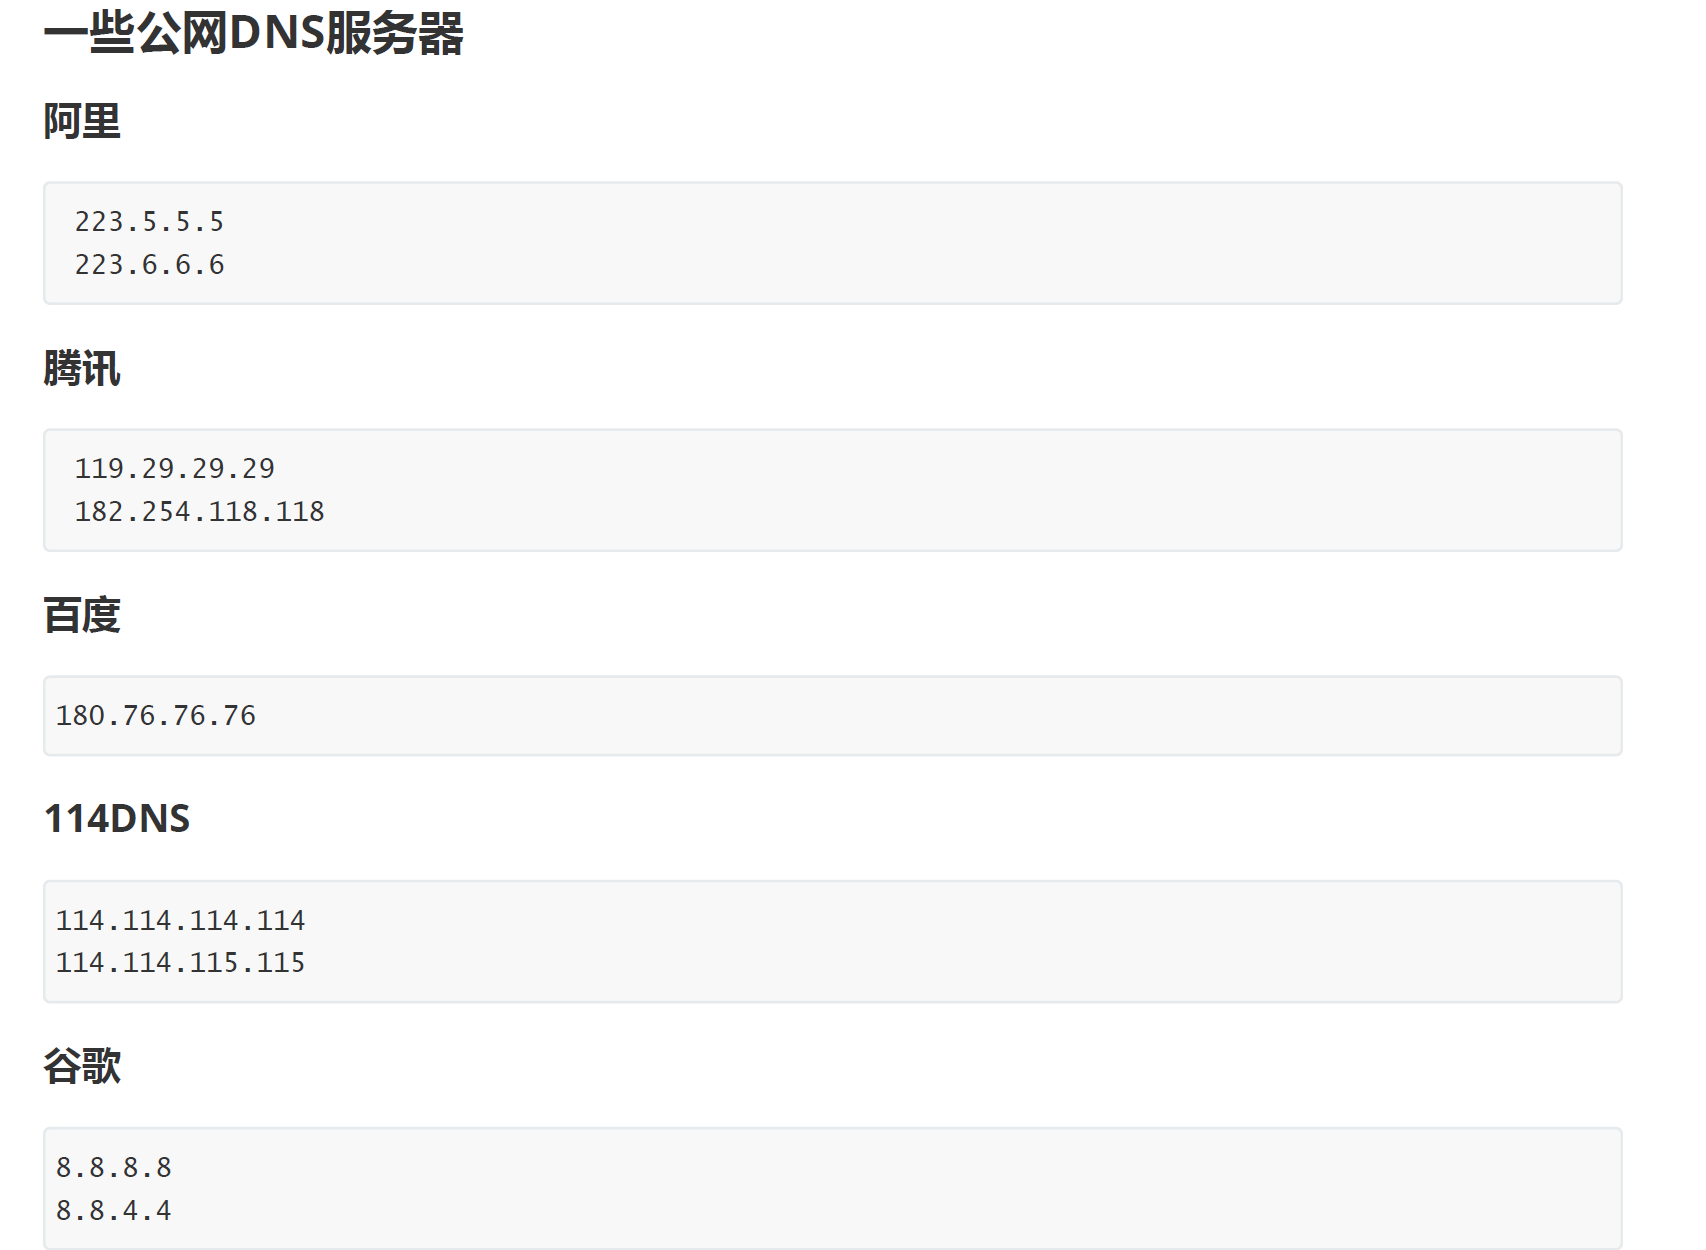
DNS1=8.8.8.8
2.2 NGINX安装
2.2.1 版本区别
常用版本分为四大阵营
2.2.2 编译安装
./configure --prefix=/usr/local/nginx
make
make install
如果出现警告或报错
提示
checking for OS
+ Linux 3.10.0-693.el7.x86_64 x86_64
checking for C compiler ... not found
./configure: error: C compiler cc is not found
安装gcc
yum install -y gcc
提示:
./configure: error: the HTTP rewrite module requires the PCRE library.
You can either disable the module by using --without-http_rewrite_module
option, or install the PCRE library into the system, or build the PCRE library
statically from the source with nginx by using --with-pcre=<path> option.
安装perl库
yum install -y pcre pcre-devel
提示:
./configure: error: the HTTP gzip module requires the zlib library.
You can either disable the module by using --without-http_gzip_module
option, or install the zlib library into the system, or build the zlib library
statically from the source with nginx by using --with-zlib=<path> option.
安装zlib库
yum install -y zlib zlib-devel
接下来执行
make
make install
2.2.3 启动Nginx
进入安装好的目录/usr/local/nginx/sbin
./nginx 启动
./nginx -s stop 快速停止
./nginx -s quit 优雅关闭,在退出前完成已经接受的连接请求
./nginx -s reload 重新加载配置
关于防火墙
关闭防火墙
systemctl stop firewalld.service
禁止防火墙开机启动
systemctl disable firewalld.service
放行端口
firewall-cmd --zone=public --add-port=80/tcp --permanent
重启防火墙
firewall-cmd --reload
安装成系统服务
创建服务脚本
vi /usr/lib/systemd/system/nginx.service
服务脚本内容
[Unit]
Description=nginx - web server
After=network.target remote-fs.target nss-lookup.target
[Service]
Type=forking
PIDFile=/usr/local/nginx/logs/nginx.pid
ExecStartPre=/usr/local/nginx/sbin/nginx -t -c /usr/local/nginx/conf/nginx.conf
ExecStart=/usr/local/nginx/sbin/nginx -c /usr/local/nginx/conf/nginx.conf
ExecReload=/usr/local/nginx/sbin/nginx -s reload
ExecStop=/usr/local/nginx/sbin/nginx -s stop
ExecQuit=/usr/local/nginx/sbin/nginx -s quit
PrivateTmp=true
[Install]
WantedBy=multi-user.target
重新加载系统服务
systemctl daemon-reload
启动服务
systemctl start nginx.service
开机启动
systemctl enable nginx.service
注意:如果在执行开放端口时,报错:可以参考以下解决办法:
centos7 firewall-cmd报错No module named gi.repository解决办法
即
yum install python-firewall -y
进行yum update操作发现缺少一个包python-firewall,安装后解决问题,执行下面代码即可。
2.3 Nginx卸载

-
停止Nginx软件
/usr/local/nginx/sbin/nginx -s stop
-
查找根下所有名字包含nginx的文件
find / -name nginx
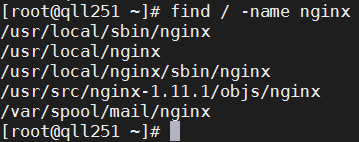
-
执行命令
rm -rf删除nignx安装的相关文件
说明:全局查找往往会查出很多相关文件,但是前缀基本都是相同,后面不同的部分可以用代替,以便快速删除~ -
其他设置
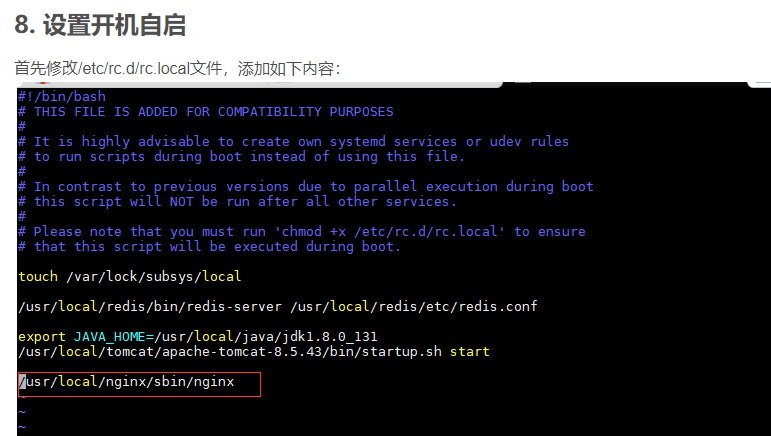
如果设置了Nginx开机自启动的话,可能还需要下面两步
chkconfig nginx off
rm -rf /etc/init.d/nginx
3 目录结构与运行原理
3.1 目录结构
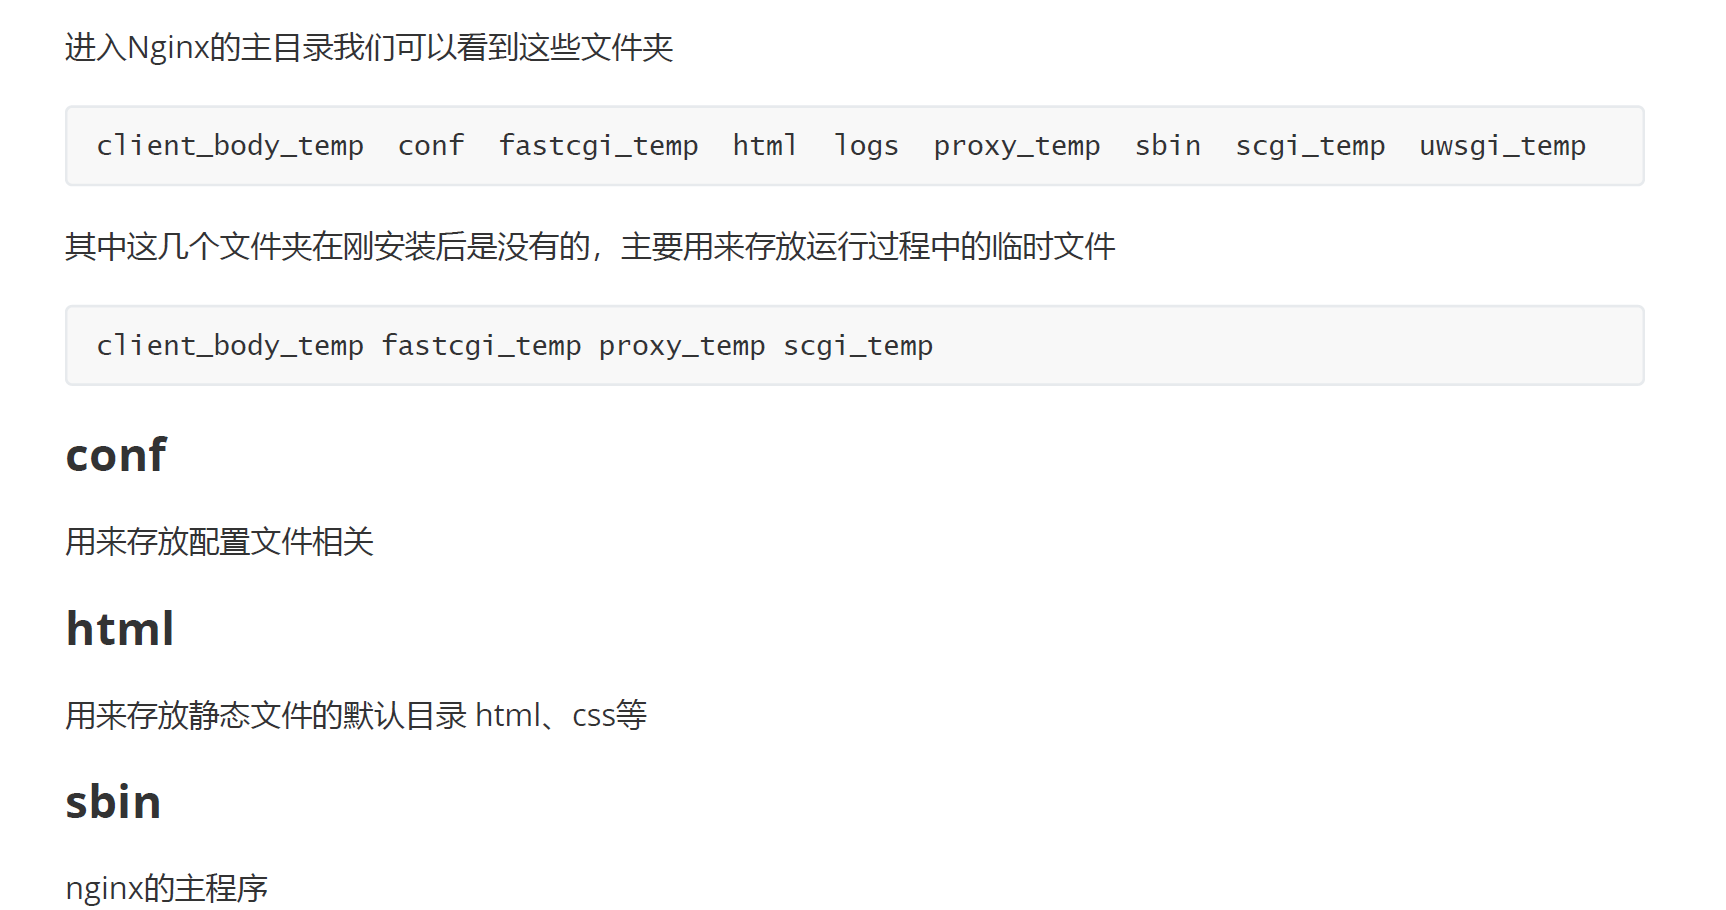
conf/nginx.conf
worker_processes 1;events {
worker_connections 1024;
}http {
include mime.types;
default_type application/octet-stream;sendfile on; server { listen 80; server_name localhost; location / { root html; index index.html index.htm; } error_page 500 502 503 504 /50x.html; location = /50x.html { root html; }
}
具体详解
worker_processes 1; # 启动的worker进程数events {
worker_connections 1024; #每个worker进程的连接数
}http {
include mime.types; #include是引入关键字,这里引入了mime.types这个配置文件(同在conf目录下,mime.types是用来定义,请求返回的content-type)
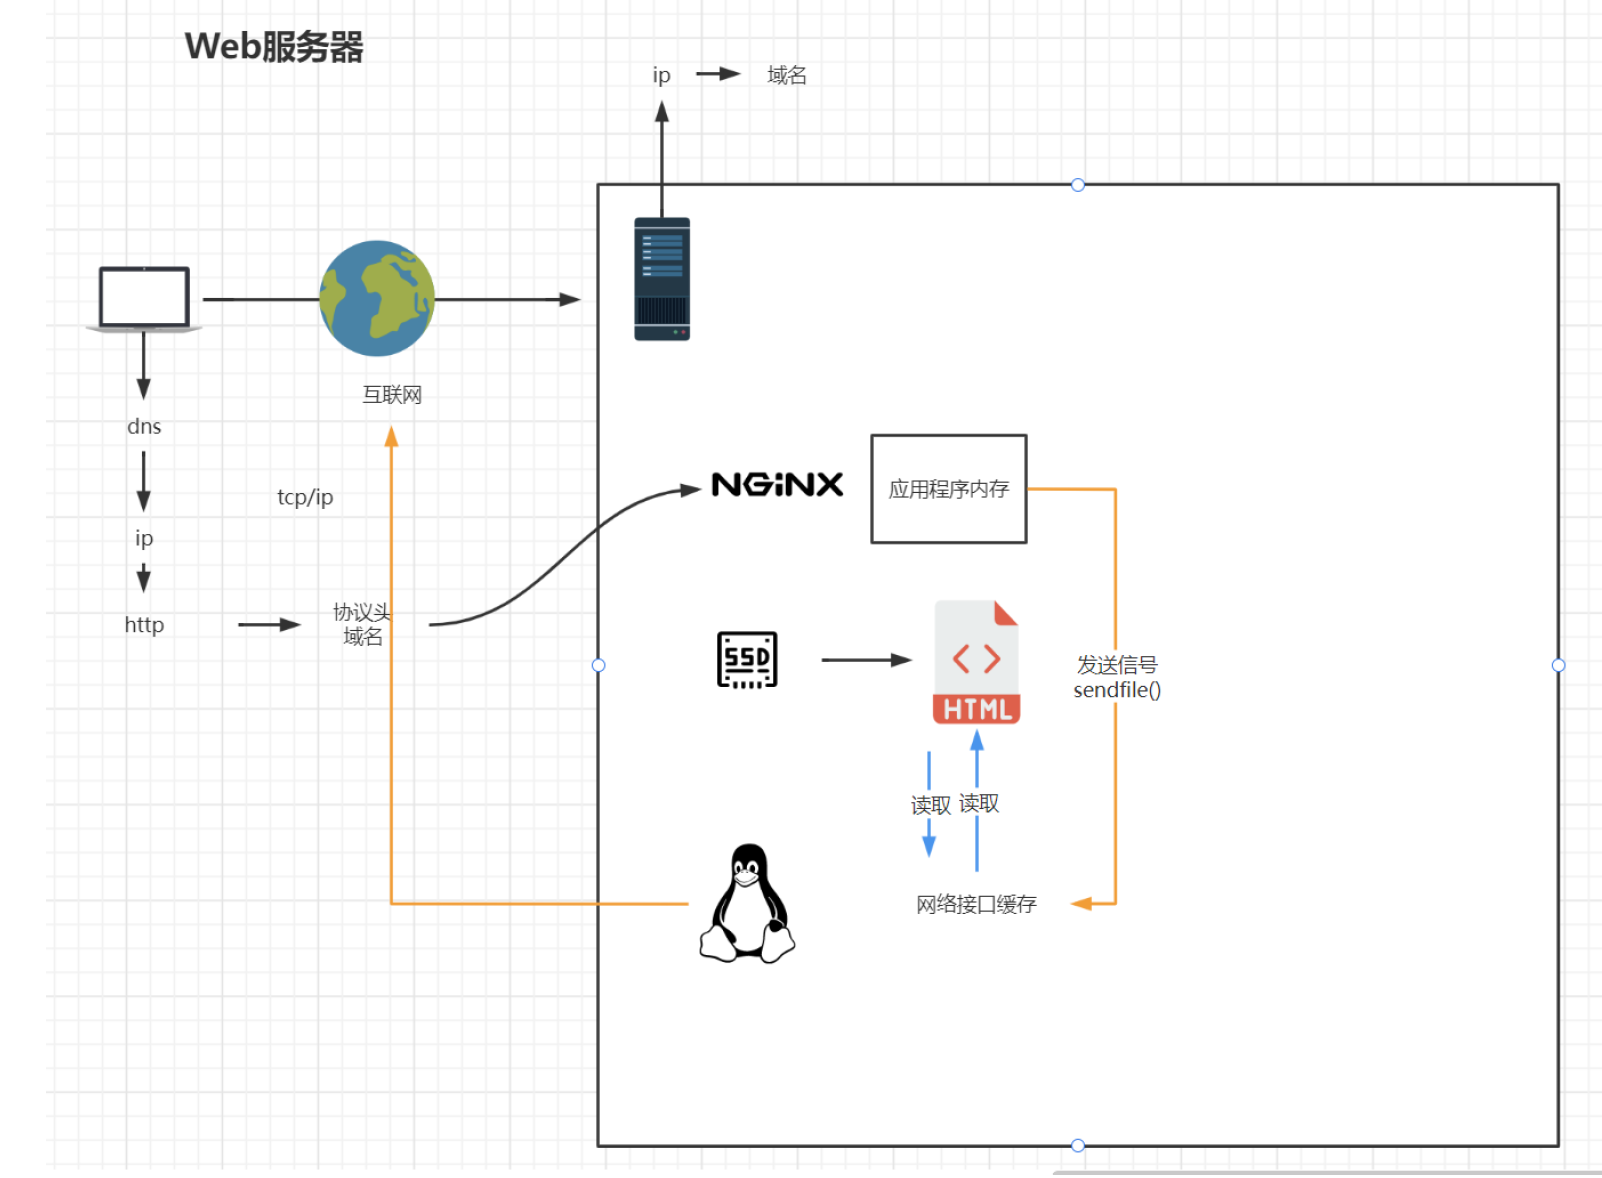
default_type application/octet-stream; # default_type未定义的,使用默认格式application/octet-streamsendfile on<span class="token punctuation">;</span> <span class="token comment">#打开sendfile,用户请求的数据不用再加载到nginx的内存中,而是直接发送</span> keepalive_timeout <span class="token number">65</span><span class="token punctuation">;</span> <span class="token comment">#长链接超时时间</span> <span class="token comment">#一个nginx可以启用多个server(虚拟服务器)</span> server <span class="token punctuation">{<!-- --></span> listen <span class="token number">80</span><span class="token punctuation">;</span><span class="token comment">#监听端口80</span> server_name localhost<span class="token punctuation">;</span> <span class="token comment">#接收的域名</span> location / <span class="token punctuation">{<!-- --></span> root html<span class="token punctuation">;</span> <span class="token comment">#根目录指向html目录</span> index index.html index.htm<span class="token punctuation">;</span> <span class="token comment">#域名/index 指向 index.html index.htm文件</span> <span class="token punctuation">}</span> error_page <span class="token number">500</span> <span class="token number">502</span> <span class="token number">503</span> <span class="token number">504</span> /50x.html<span class="token punctuation">;</span> <span class="token comment"># 服务器错误码为500 502 503 504,转到"域名/50x.html"</span> location <span class="token operator">=</span> /50x.html <span class="token punctuation">{<!-- --></span># 指定到html文件夹下找/50x.htm root html<span class="token punctuation">;</span> <span class="token punctuation">}</span> <span class="token punctuation">}</span>
}
注意:
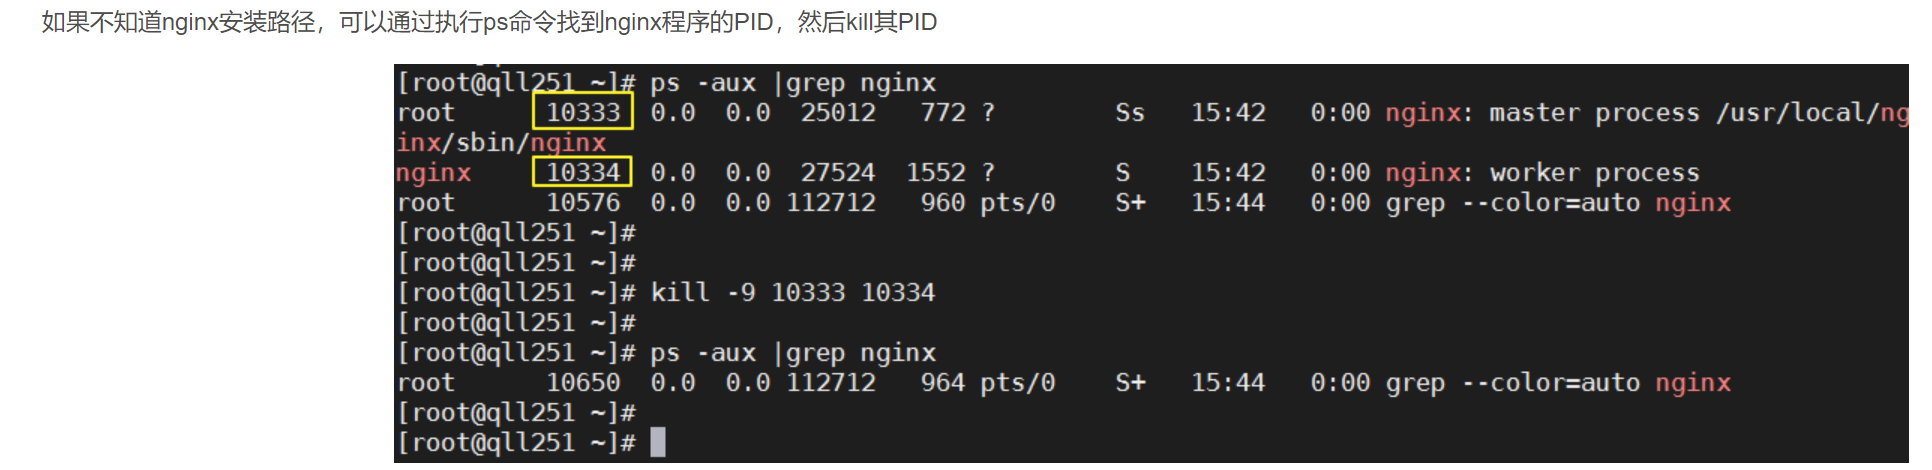
nginx查看是否运行:ps -ef |grep nginx

然后reboot重启就行了。
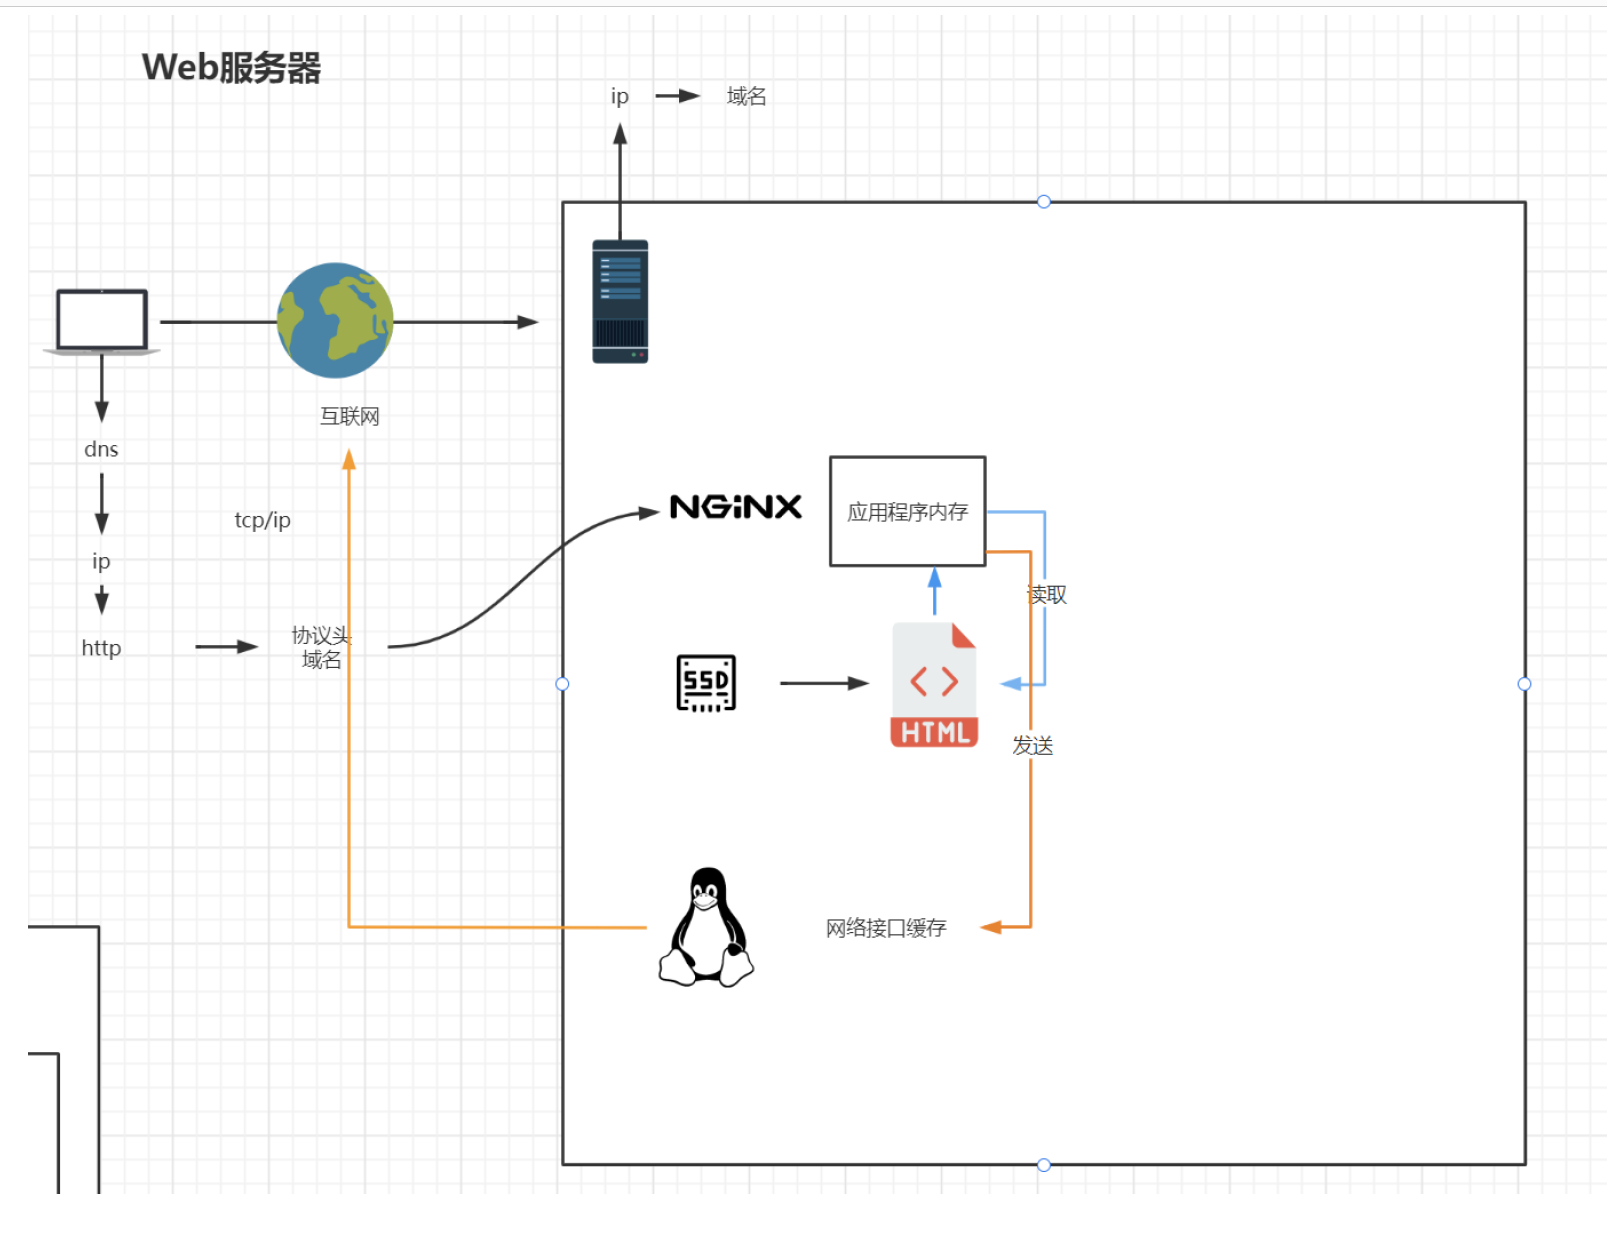
3.2 基本运行原理
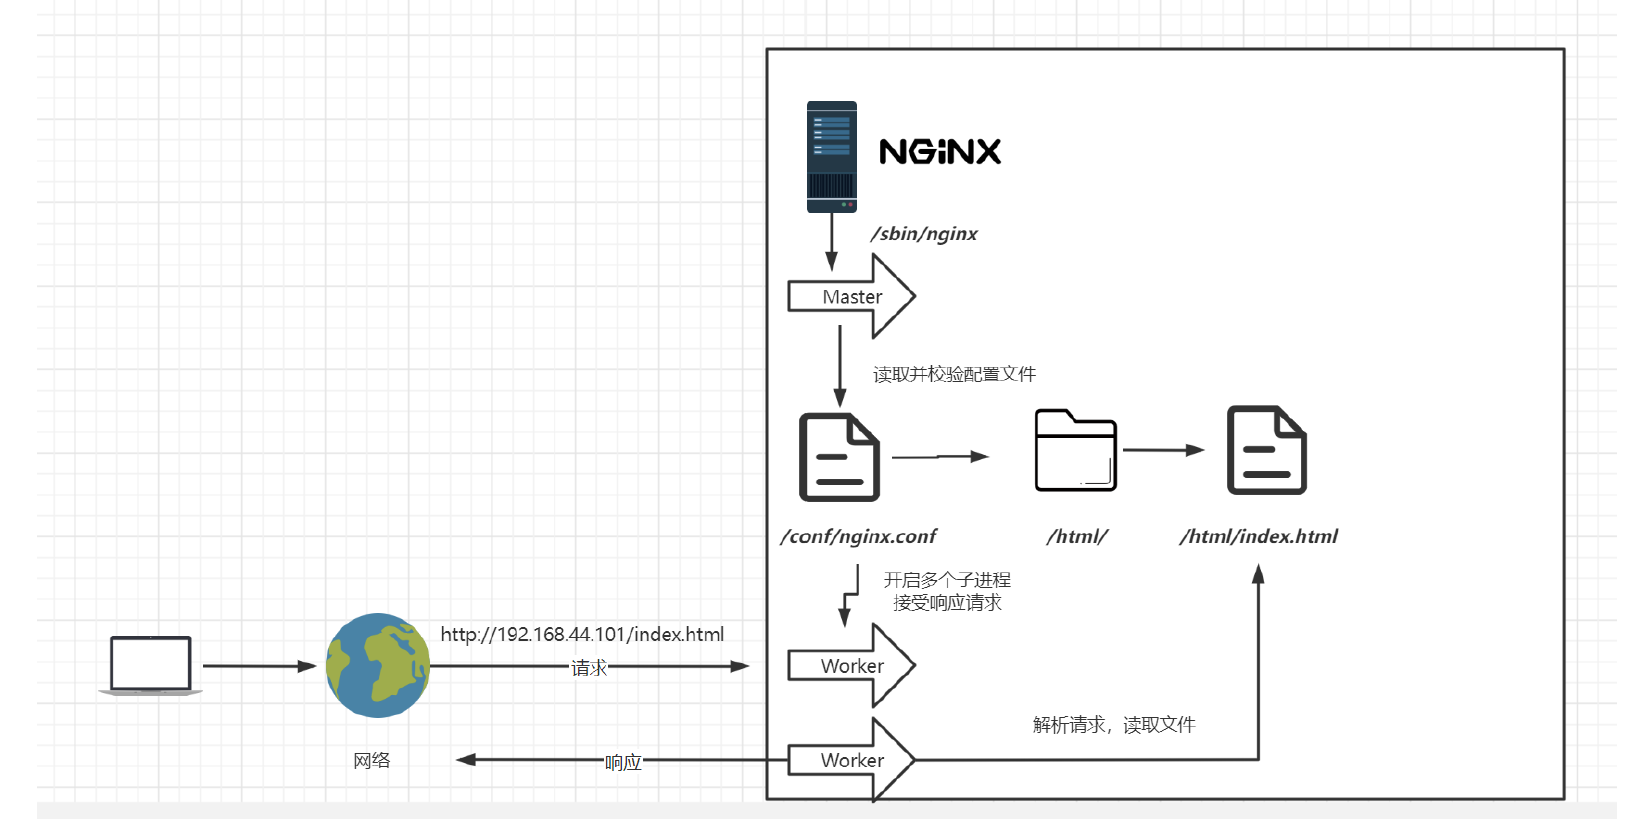
master进程不工作,真正工作的是worker进程,master进程是进行读取、校验配置文件的。
4 Nginx配置与应用场景
4.1 最小配置
开启后
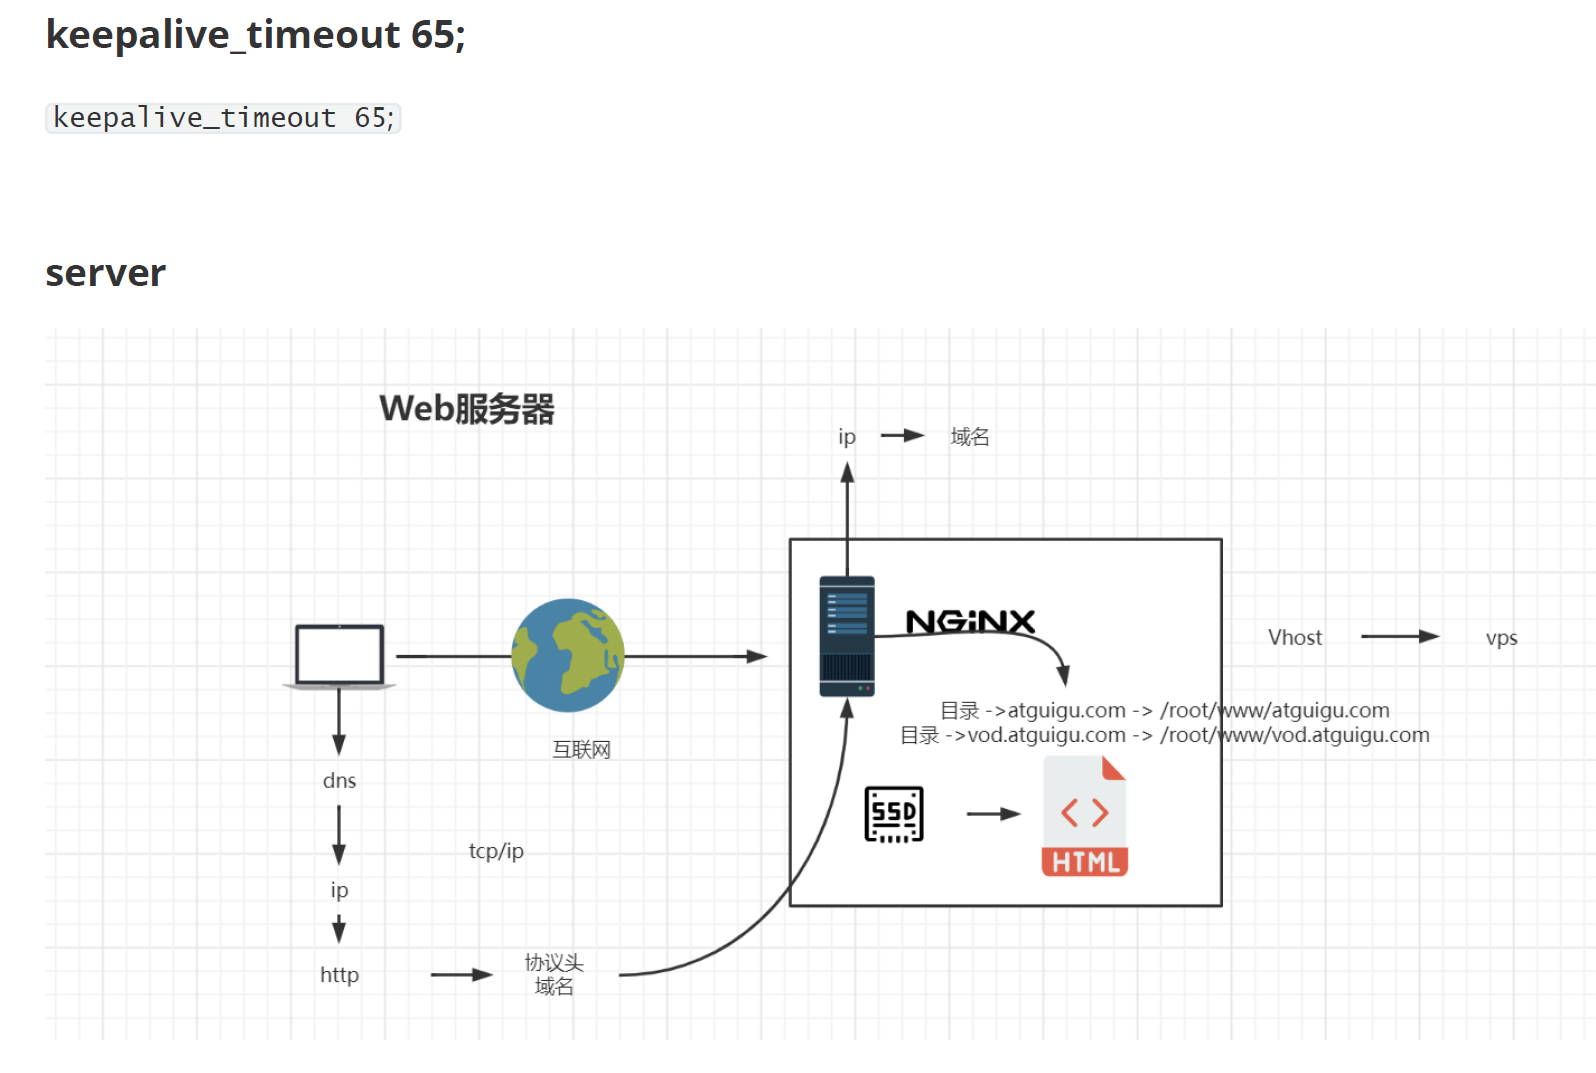
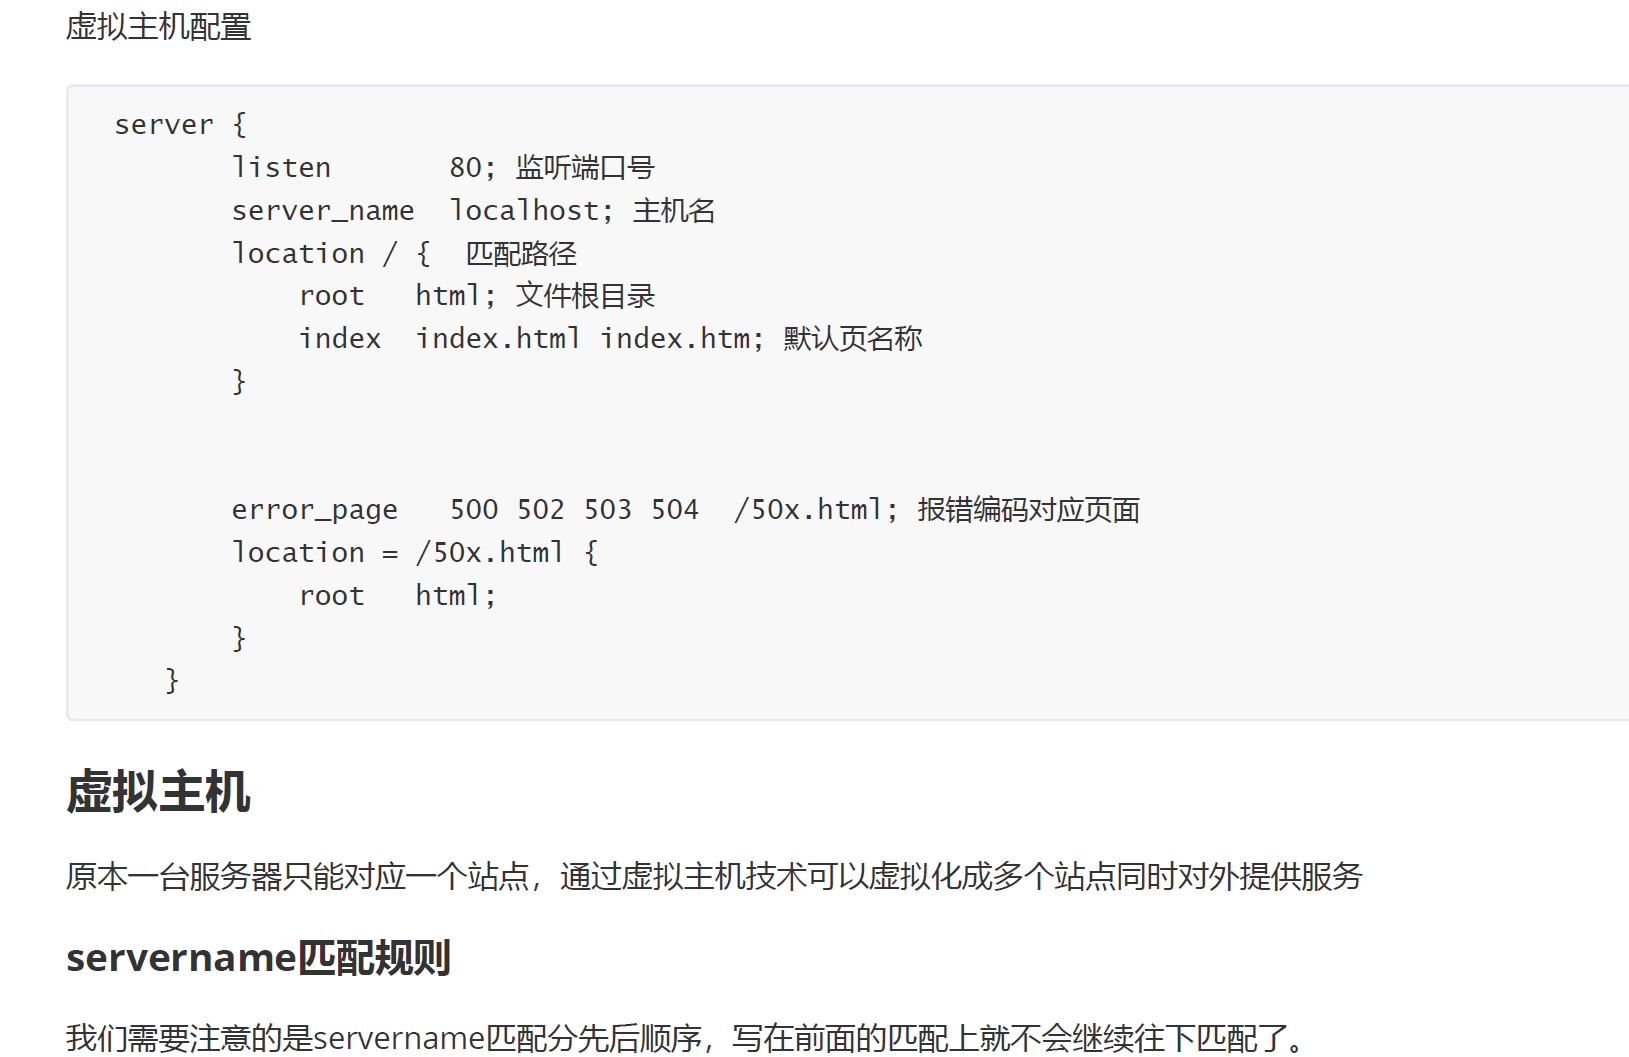
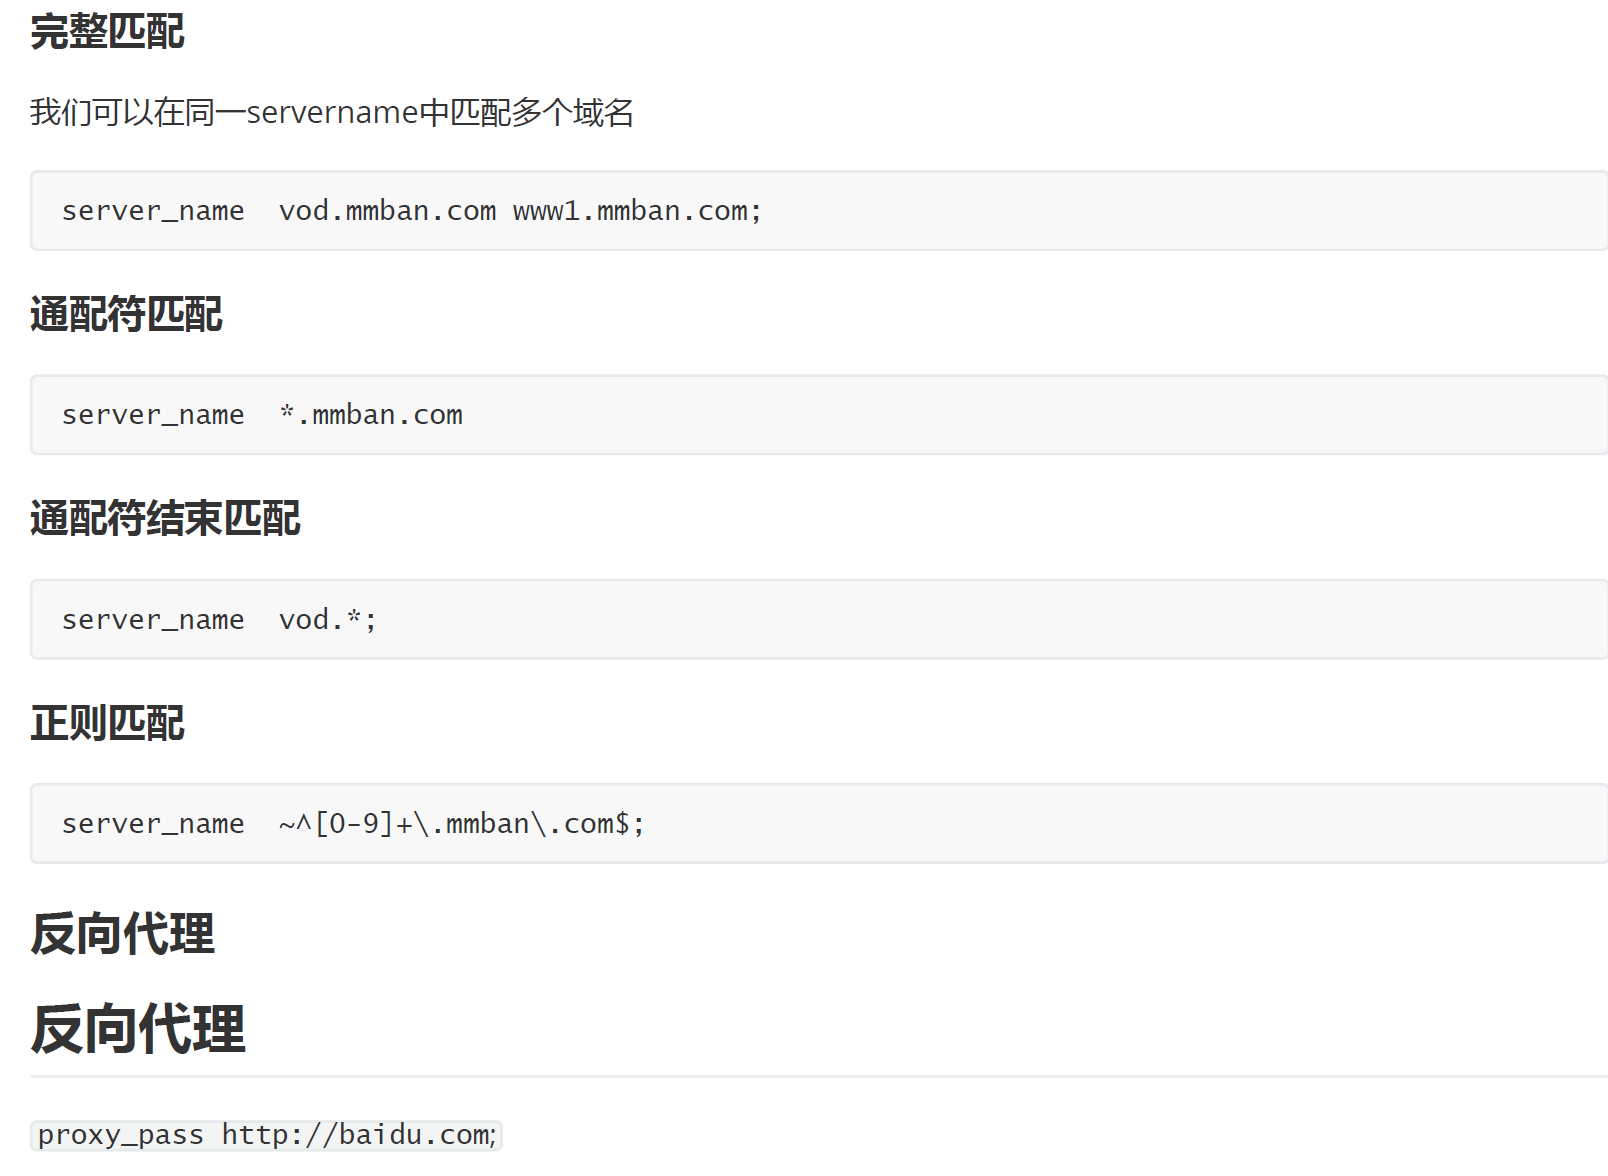
4.2 虚拟主机
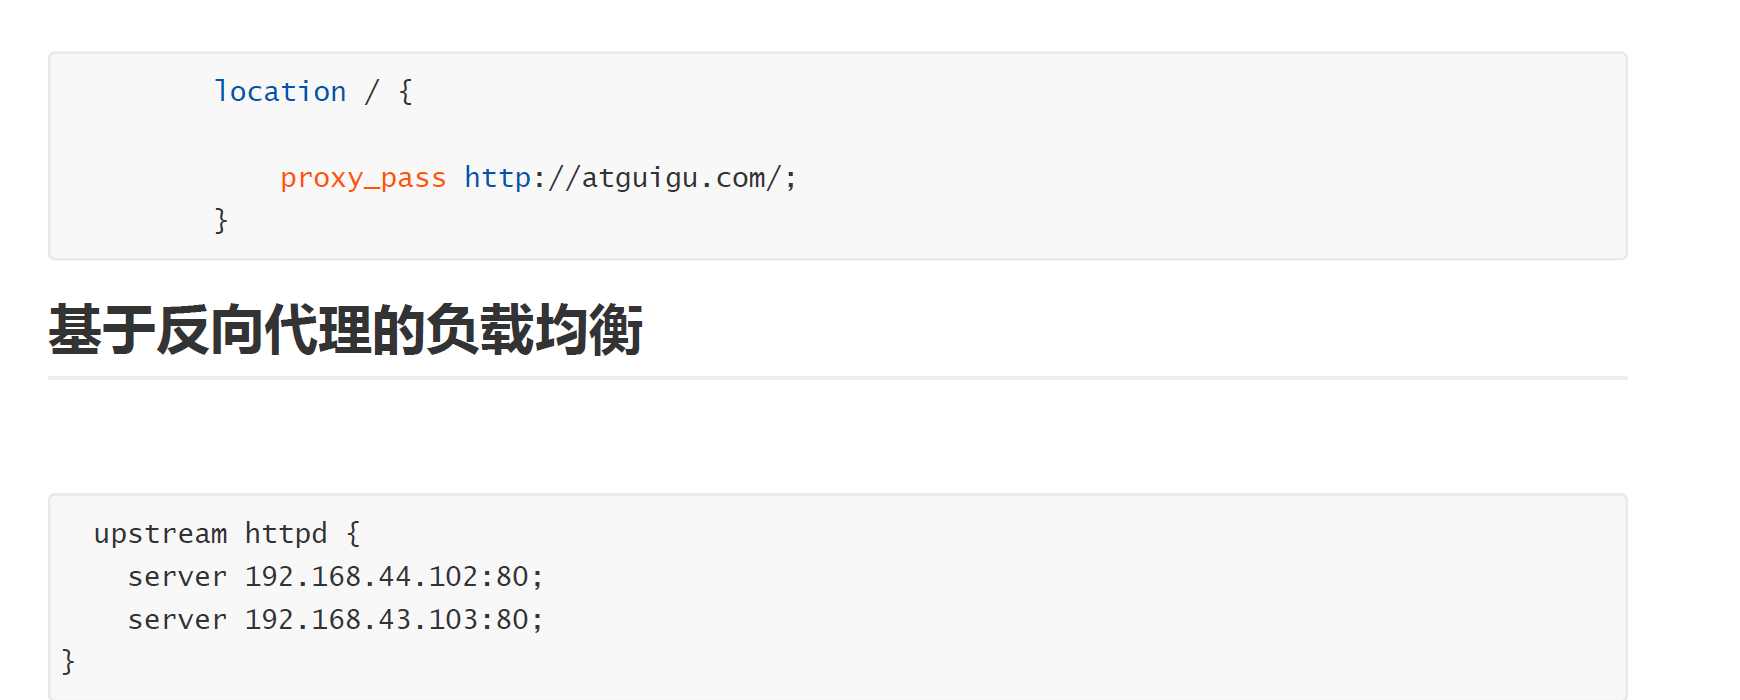
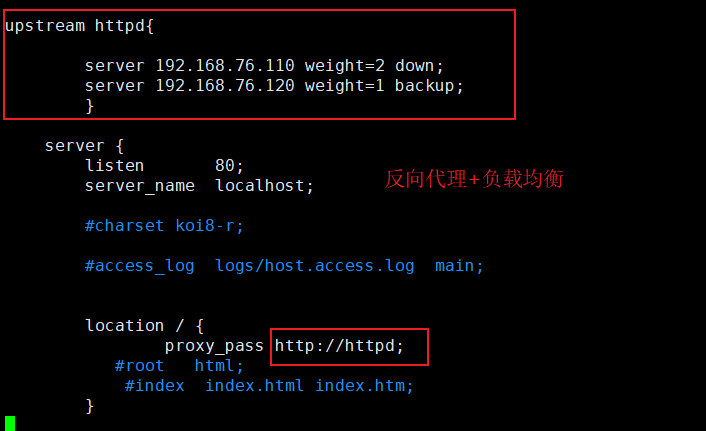
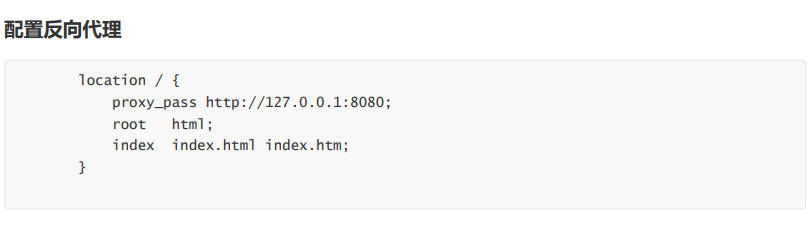
4.3 反向代理
在nginx.conf配置文件中:
启用proxy_pass,root和index字段就会失效
proxy_pass后的地址必须写完整 http://xxx,不支持https
当访问localhost时(Nginx服务器),网页打开的是http://xxx(应用服务器),网页地址栏写的还是localhost
http{ server { listen 80; server_name localhost;location / <span class="token punctuation">{<!-- --></span> proxy_pass http://xxx<span class="token punctuation">;</span> <span class="token comment">#root html/test; </span> <span class="token comment">#index index.html index.htm;</span> <span class="token punctuation">}</span> error_page <span class="token number">500</span> <span class="token number">502</span> <span class="token number">503</span> <span class="token number">504</span> /50x.html<span class="token punctuation">;</span> location <span class="token operator">=</span> /50x.html <span class="token punctuation">{<!-- --></span> root html<span class="token punctuation">;</span> <span class="token punctuation">}</span> <span class="token punctuation">}</span>
}
定义地址别名
使用upstream定义一组地址【在server字段下】
访问localhost,访问都会代理到192.168.44.102:80和192.168.44.103:80这两个地址之一,每次访问这两个地址轮着切换(后面讲到,因为默认权重相等)
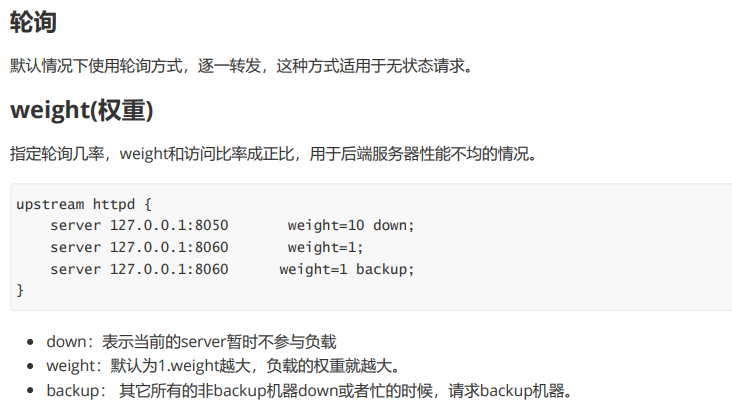
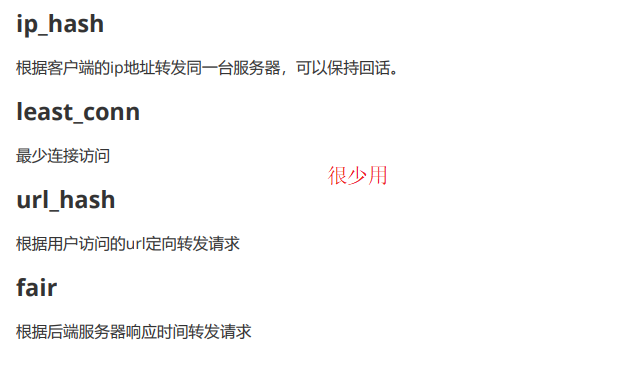
4.4 负载均衡策略
4.5 动静分离
当用户请求时,动态请求分配到Tomcat业务服务器,静态资源请求放在Nginx服务器中
例子:
-
如果请求的资源地址是
location/,/的优先级比较低,如果下面的location没匹配到,就会走http://xxx这个地址的机器 -
如果请求的资源地址是
location/css/*,就会被匹配到nginx的html目录下的css文件夹中(我们把css静态资源放在这个位置)
server { listen 80; server_name localhost;location / <span class="token punctuation">{<!-- --></span> <span class="token comment"># /的优先级比较低,如果下面的location没匹配到,就会走http://xxx这个地址的机器</span> proxy_pass http://xxx<span class="token punctuation">;</span> <span class="token punctuation">}</span> location /css <span class="token punctuation">{<!-- --></span> <span class="token comment"># root指的是html,location/css指的是root下的css,所以地址就是html/css</span> root html<span class="token punctuation">;</span> index index.html index.htm<span class="token punctuation">;</span> <span class="token punctuation">}</span> error_page <span class="token number">500</span> <span class="token number">502</span> <span class="token number">503</span> <span class="token number">504</span> /50x.html<span class="token punctuation">;</span> location <span class="token operator">=</span> /50x.html <span class="token punctuation">{<!-- --></span> root html<span class="token punctuation">;</span> <span class="token punctuation">}</span>
}
动态资源和静态资源。我们像html文件夹一样,单独设置css /js这种存放静态资源的文件夹,通过该location /css location /js单独设置来使得动态资源和静态资源的分离。
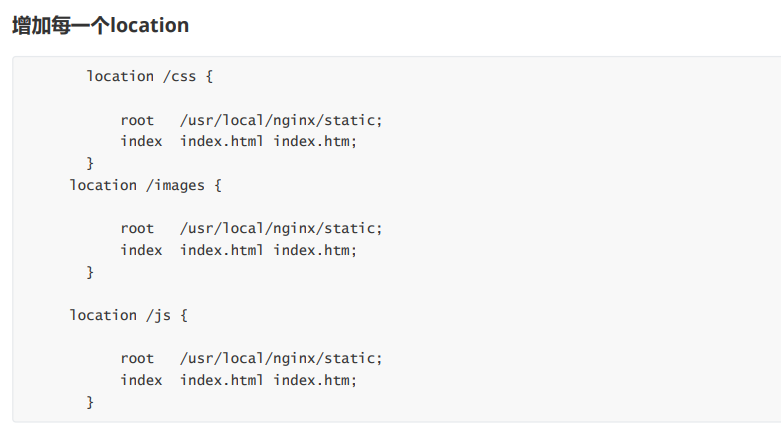
这样有一个问题,就是会有很多的这种location,那么我们可不可以使用一些方式来进行简单配置呢?
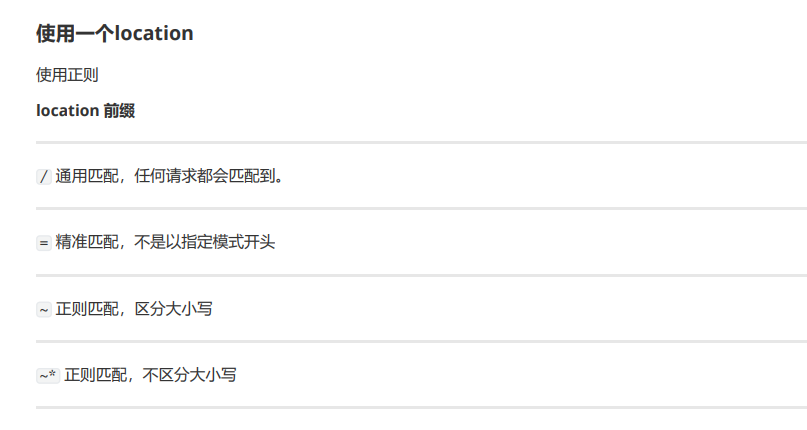
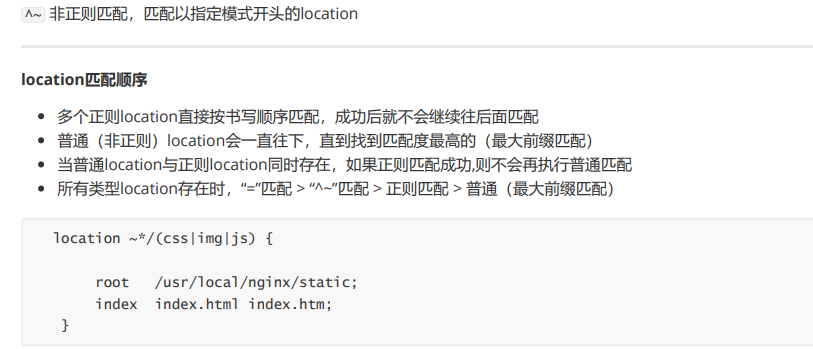
答案是使用正则表达式。
alias与root
location /css {
alias /usr/local/nginx/static/css;
index index.html index.htm;
}
root用来设置根目录,而alias在接受请求的时候在路径上不会加上location。
1)alias指定的目录是准确的,即location匹配访问的path目录下的文件直接是在alias目录下查找的;
2)root指定的目录是location匹配访问的path目录的上一级目录,这个path目录一定要是真实存在root指定目录下的;
3)使用alias标签的目录块中不能使用rewrite的break(具体原因不明);另外,alias指定的目录后面必须要加上"/“符号!!
4)alias虚拟目录配置中,location匹配的path目录如果后面不带”/“,那么访问的url地址中这个path目录后面加不加”/“不影响访问,访问时它会自动加上”/“; 但是如果location匹配的path目录后面加上”/“,那么访问的url地址中这个path目录必须要加上”/“,访问时它不会自动加上”/“。如果不加上”/“,访问就会失败!
5)root目录配置中,location匹配的path目录后面带不带”/",都不会影响访问。
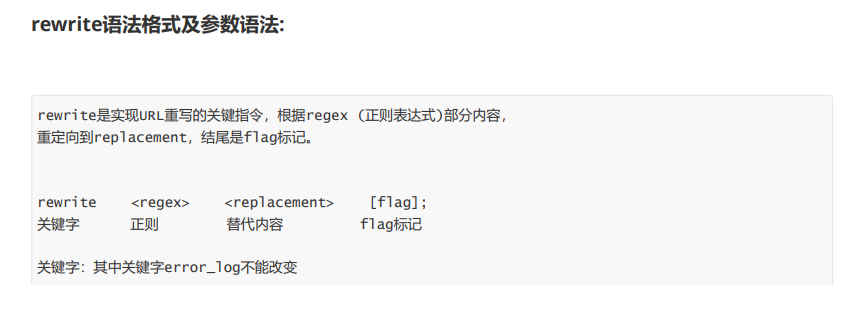
4.6 UrlRewrite
比如说http://192.168.76.100/login?userid=xxxx&password=xxxx 暴露在地址栏,我们不希望这样,所以进行重写。
继而在地址栏显示就是http://192.168.76.100/login/1
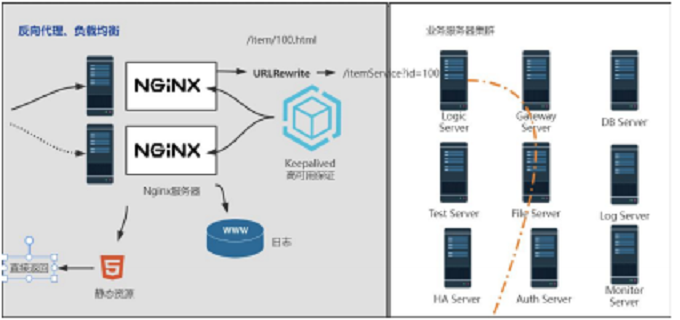

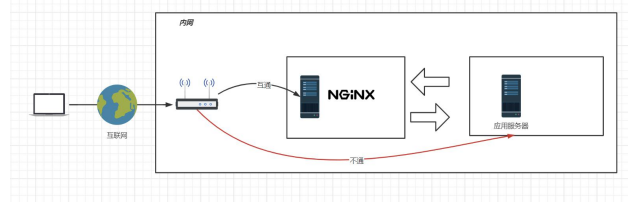
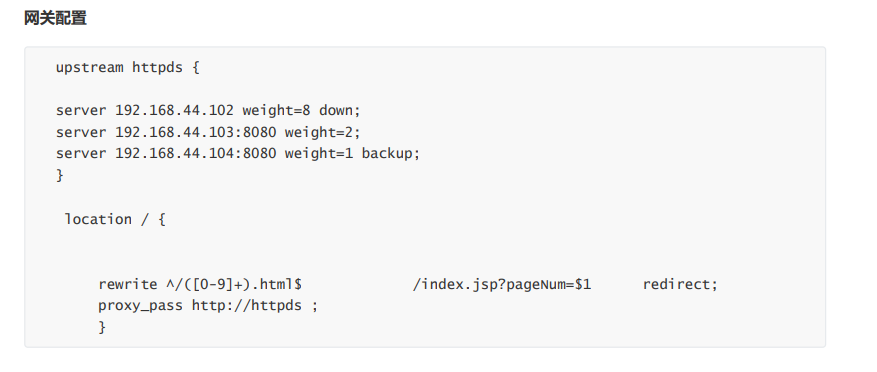
网关服务器
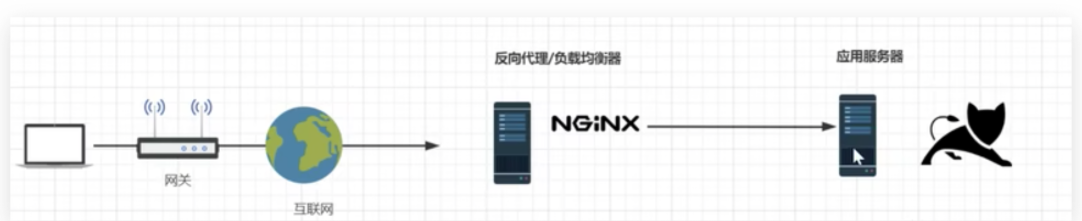
上图中,应用服务器,不能直接被外网访问到,只能通过Nginx服务器进行访问(使用proxy_pass),这时候这台Nginx服务器就成为了网关服务器(承担入口的功能)
所以,我们启动应用服务器的防火墙,设置其只能接受这台Nginx服务器的请求。
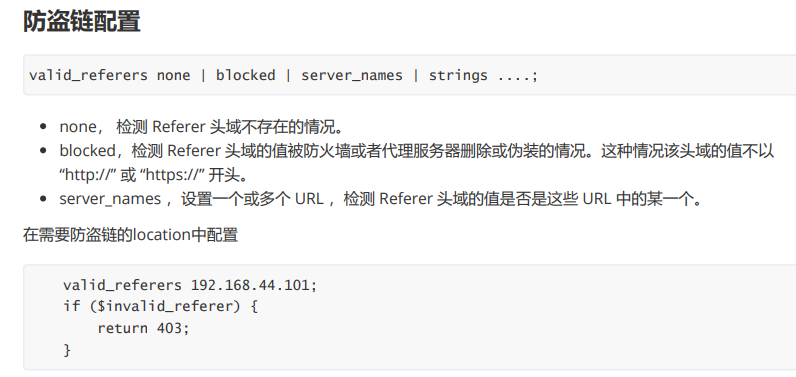
4.7 防盗链配置
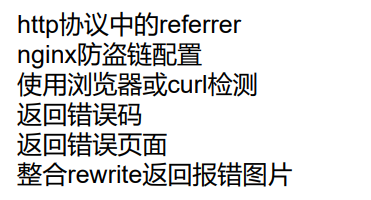
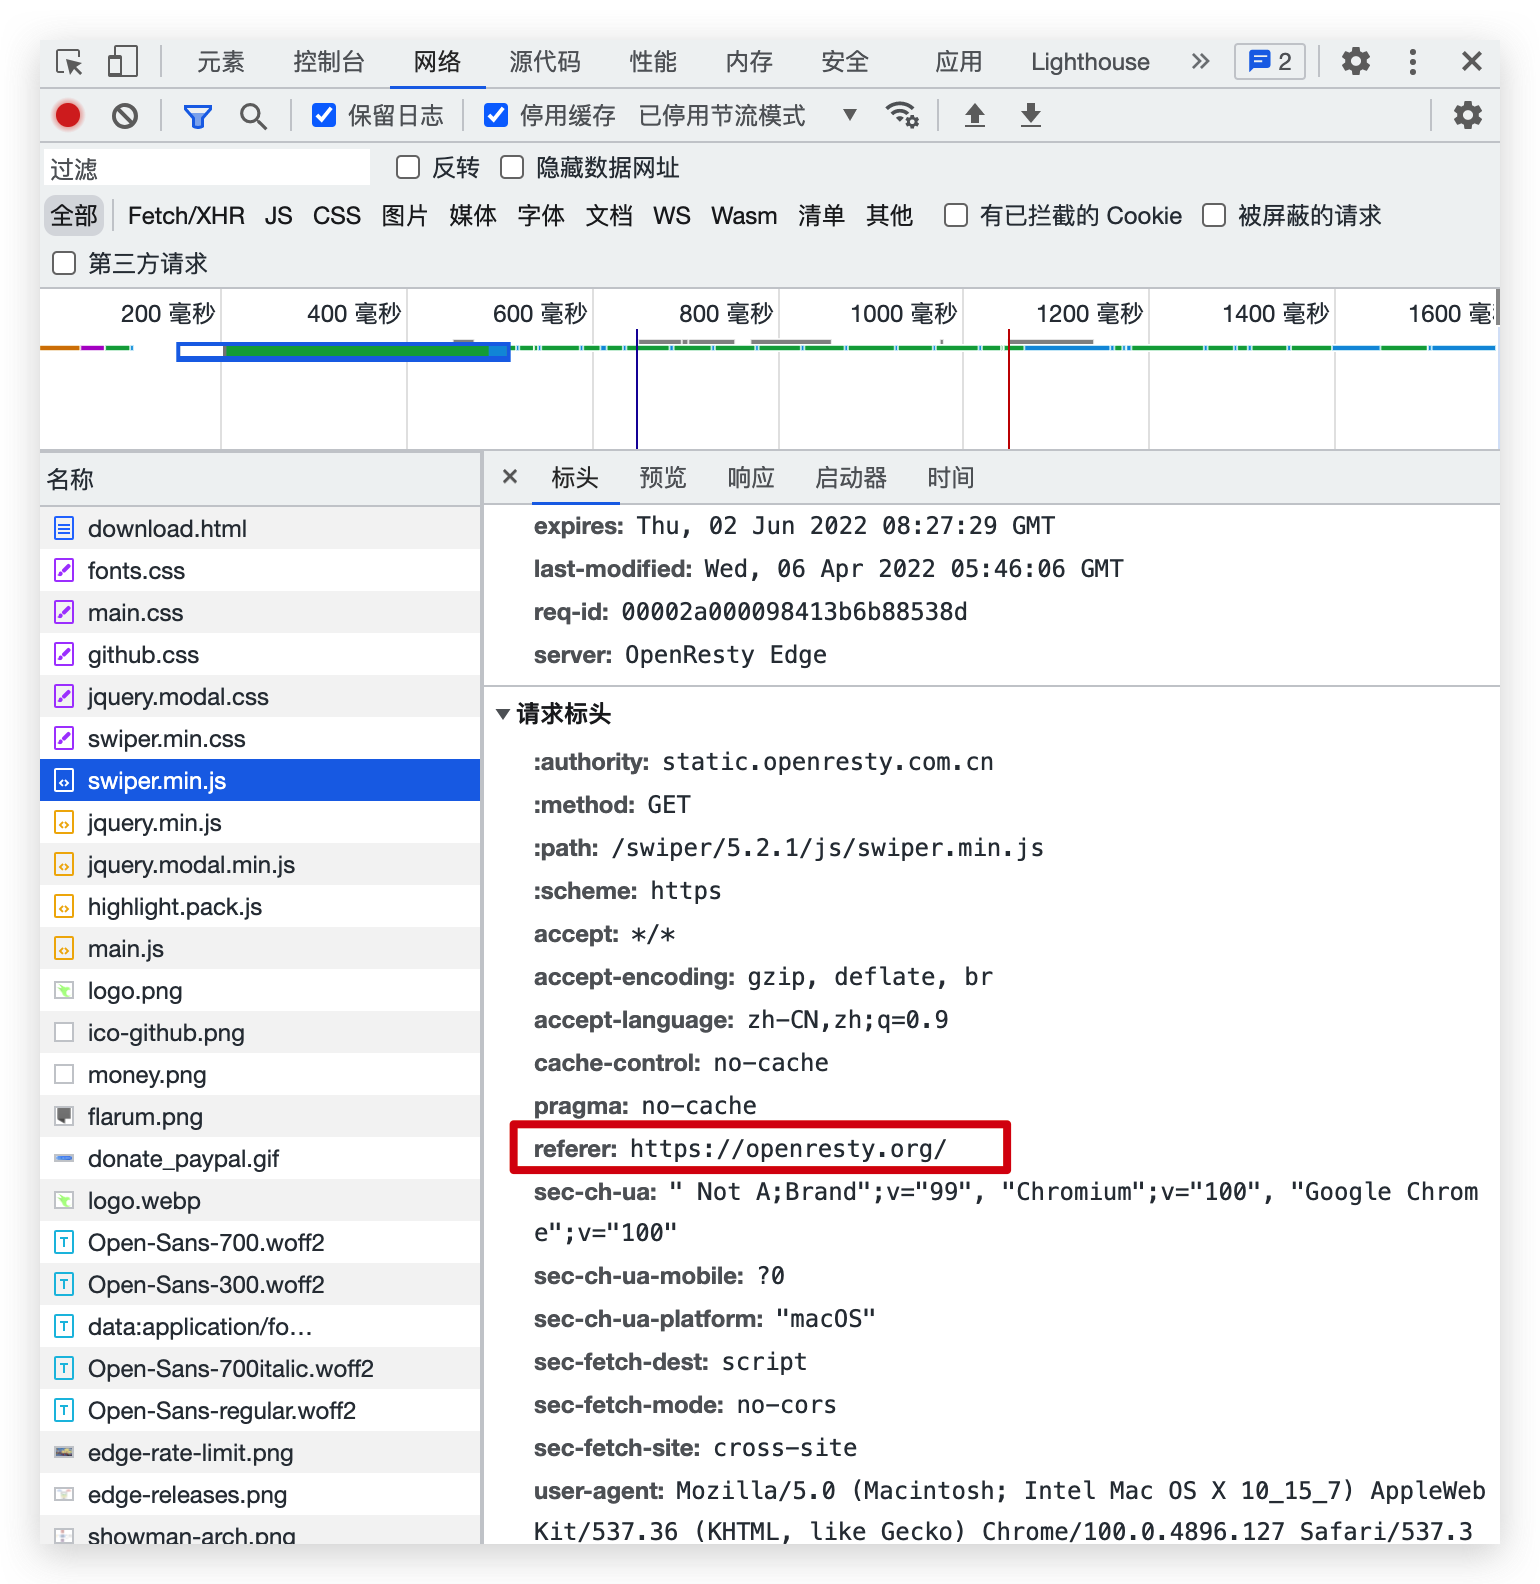
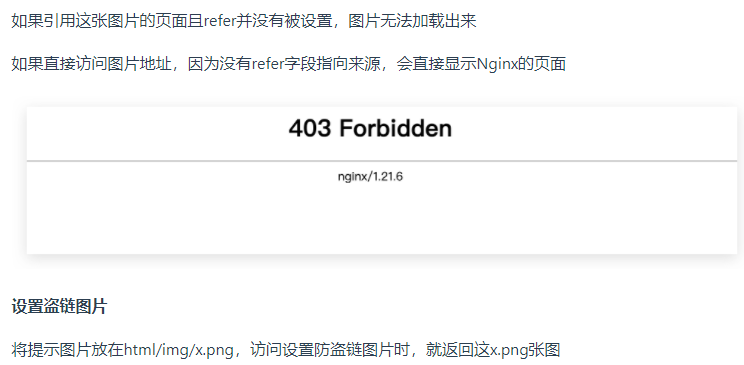
当我们请求到一个页面后,这个页面一般会再去请求其中的静态资源,这时候请求头中,会有一个refer字段,表示当前这个请求的来源,我们可以限制指定来源的请求才返回,否则就不返回,这样可以节省资源。
valid_referers none|server_name
设置有效的refer值
none:检测地址没有refer,则有效
server_name:检测主机地址,refer显示是从这个地址来的,则有效(server_name必须是完整的http://xxxx)
注意:if ($invalid_referer)中if后有个空格,不写就会报错
nginx: [emerg] unknown directive "if($invalid_referer)" in /usr/local/nginx/conf/nginx.conf:27
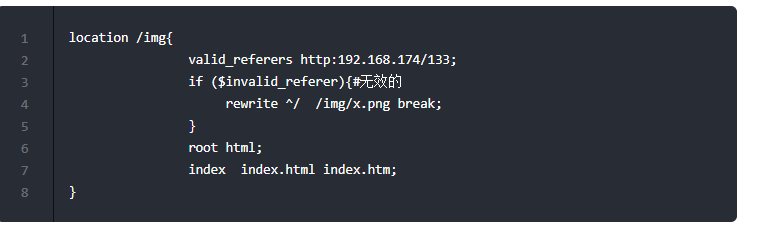
例子:这里设置nginx服务器中的img目录下的图片必须refer为http:192.168.174/133才能访问
server { listen 80; server_name localhost;location / <span class="token punctuation">{<!-- --></span> proxy_pass http://xxx<span class="token punctuation">;</span> <span class="token punctuation">}</span> location /img<span class="token punctuation">{<!-- --></span> valid_referers http:192.168.174/133<span class="token punctuation">;</span> <span class="token keyword">if</span> <span class="token punctuation">(</span><span class="token variable">$invalid_referer</span><span class="token punctuation">)</span><span class="token punctuation">{<!-- --></span>#无效的 <span class="token builtin class-name">return</span> <span class="token number">403</span><span class="token punctuation">;</span><span class="token comment">#返回状态码403</span> <span class="token punctuation">}</span> root html<span class="token punctuation">;</span> index index.html index.htm<span class="token punctuation">;</span> <span class="token punctuation">}</span> error_page <span class="token number">500</span> <span class="token number">502</span> <span class="token number">503</span> <span class="token number">504</span> /50x.html<span class="token punctuation">;</span> location <span class="token operator">=</span> /50x.html <span class="token punctuation">{<!-- --></span> root html<span class="token punctuation">;</span> <span class="token punctuation">}</span>
}
4.8 高可用配置
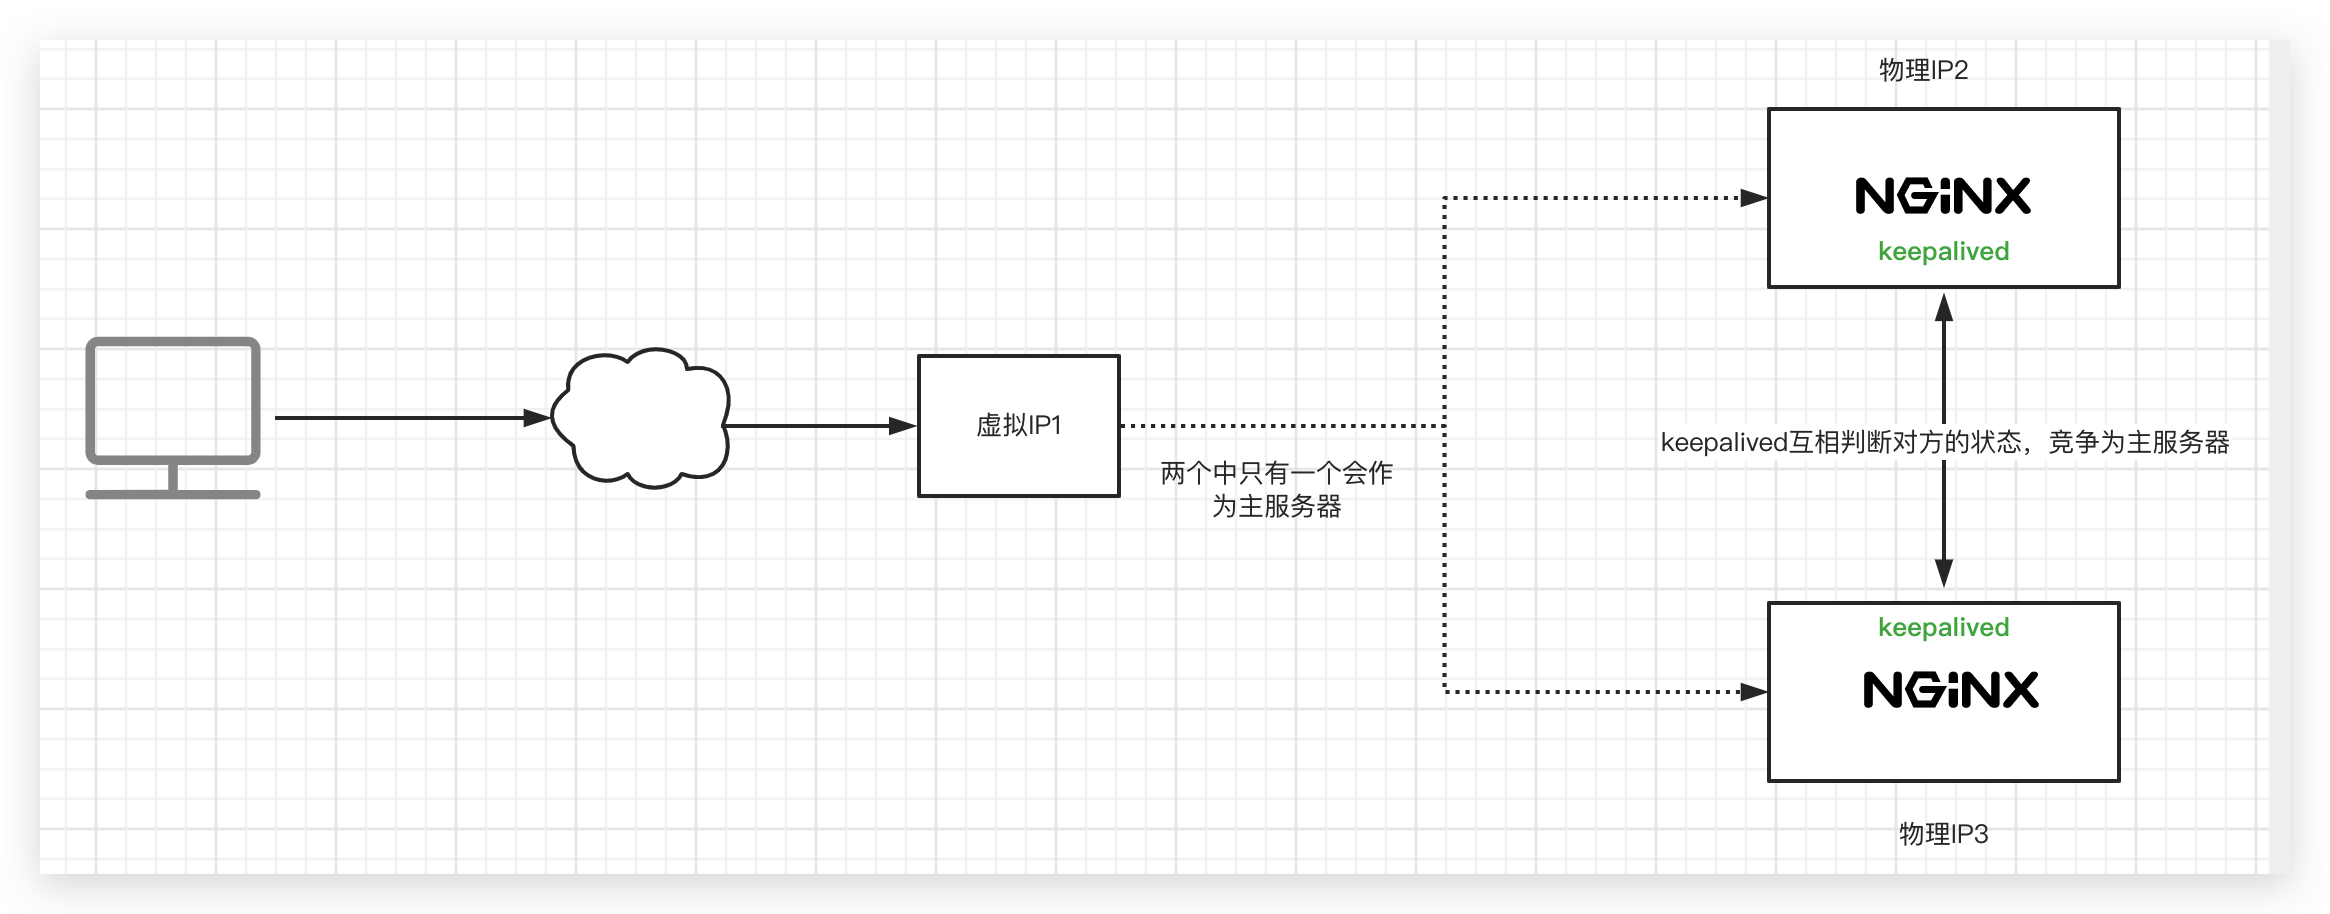
用户访问时,访问的是一个虚拟IP,keepalived会选定一个主服务器使用这个虚拟IP。
每台机器上的keepalived会相互通信,根据其他机器上的keepalived进程是否存在,判断服务器状态,如果默认的Master停止了,就会在剩下的Backup机器中,竞选出一台Nginx服务器作为Master。
仅供参考:
Keepalived的安装和卸载
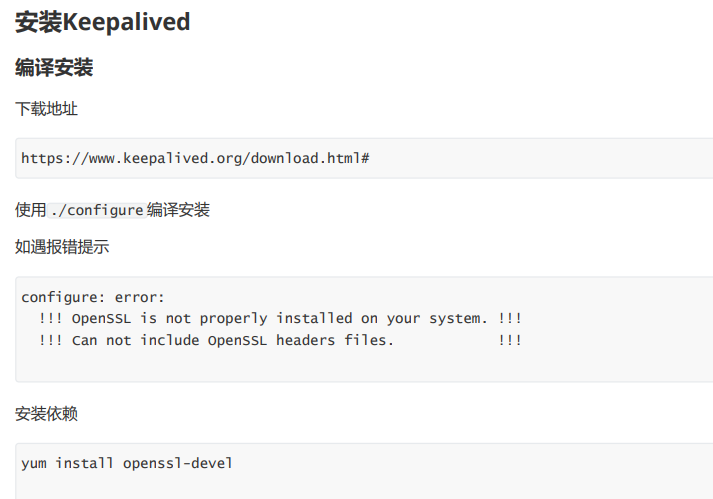
最小配置
- 第一台机器
! Configuration File for keepalivedglobal_defs {
router_id lb1 # 名字与其他配置了keepalive的机器不重复就行
}
vrrp_instance heyingjie {#vrrp实例名可以随意取
state MASTER #只能有一个默认的Master,其他写BACKUP
interface ens33 # ip addr查看下网卡名,默认时ens33
virtual_router_id 51
priority 100 # 多台安装了keepalived的机器竞争成为Master的优先级
advert_int 1 #通信时间
authentication {
auth_type PASS
auth_pass 1111
}
virtual_ipaddress {
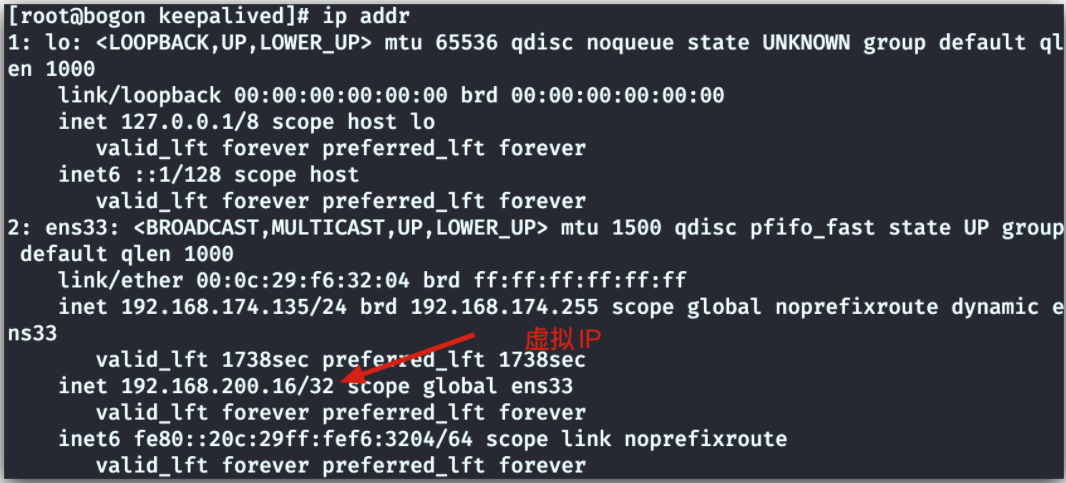
192.168.200.16 #虚拟IP
}
}
- 第二台机器
! Configuration File for keepalivedglobal_defs {
router_id lb2
}vrrp_instance heyingjie {
state BACKUP #只能有一个默认的Master,其他写BACKUP
interface ens33
virtual_router_id 51
priority 50
advert_int 1
authentication {
auth_type PASS
auth_pass 1111
}
virtual_ipaddress {
192.168.200.16 #虚拟IP
}
}
通过命令ip addr查看机器一的ip信息,可以看到虚拟IP

4.9 Https证书配置
不安全的http协议
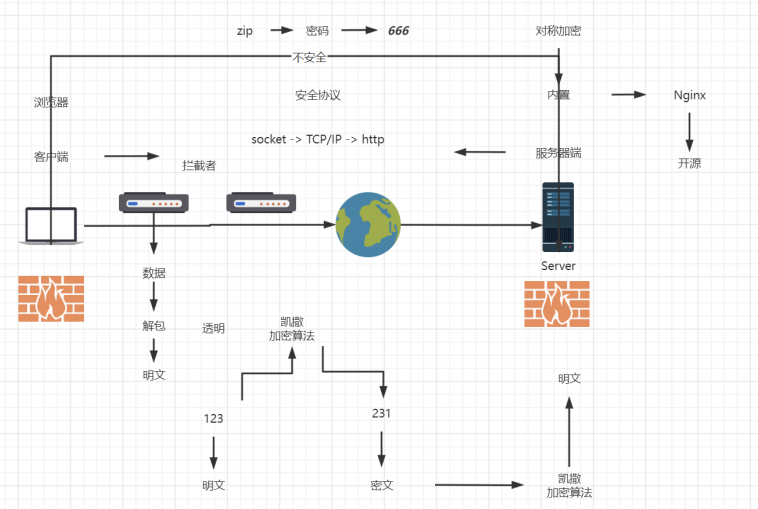
公钥加密,私钥解密
私钥加密,公钥解密
公钥加密,公钥解不开
对称加密的加密因子是公开的,所以不安全,引出了非对称加密
非对称加密指的就是加密和解密的算法不一致,加密用的是公钥,解密用的是私钥
需要保证以下三点就是合格的非对称加密算法
1、公钥加密,公钥不能解密
2、私钥能解密
3、公钥私钥不一致
非对称加密是https的底层算法,不过还不够安全,一旦伪造服务端,也就是一开始访问的就是伪造的服务端,我替你去访问了你真实要访问的服务器,然后拦截了真正的公钥,伪造了公钥给你;你用假私钥解密,和我建立了安全链接,我就可以拦截你的数据去篡改了,然后把篡改后的数据和你要访问的服务器进行链接。
这个时候就需要引入一个可信任的机构,用这个机构做证人,证明这个发送的机构确实是可以信任的机构这个机构就是CA机构
具体流程如下:
服务器端在未下发证书给用户时,需要先提交资料给CA机构,CA机构和服务器的通讯是非对称算法+CA机构。
自己内置的私钥是加密的,由于CA机构的私钥不在网络传输,所以非法机构无法获取到,而CA机构的证书下发的过程中如果被非法机构拦截了,非法机构可以解密,但是无法加密,因为它无法获取CA机构内置的私钥,所以无法再次加密,而未加密的证书,服务器端是不承认的,这就可以防止,被非法机构拦截了。
此时服务器端就直接发送自己的公钥加密数据给用户就可以了,因为非法机构此时获取的是CA机构的公钥,服务端给用户的
也是公钥,公钥是无法解密公钥的,所以可以防止被非法机构窃取

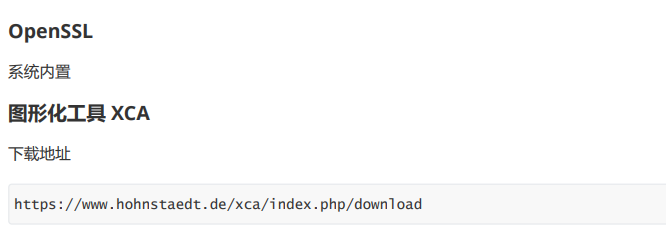
4.10 自签名
后记
以上仅仅是对Nginx进行了最基本的使用介绍,具体深入学习还需要以后的时间来完善。

 浙公网安备 33010602011771号