
drf07 三大认证之 认证、权限、频率
一、认证
介绍:
认证是APIView提供的三大认证之一,使用它视图类必须继承APIView
作用:校验用户是否登录
注意:认证一般搭配权限使用
两个参数:
SessionAuthentication 通过session认证
BasicAuthentication 认证基类
1.内置认证Authentication
1.1 前提准备
# 新建一个app
python manage.py startapp app_auth

# 使用django内置admin站点创建一个管理员 - shell窗口
python manage.py createsuperuser

# 1.用户名
admin
# 2.邮箱 - 可回车跳过
admin@qq.com
# 3.密码
admin123
# 4.确认密码
admin123

# 在settings中配置修改如下内容
LANGUAGE_CODE = "zh-hans"
TIME_ZONE = "Asia/shanghai"
USE_TZ = False

# 最后可以登录
http://127.0.0.1:8000/admin/
# 填写用户名密码
1.2 全局配置 -settings
可以在项目的配置文件中全局默认的认证方案:
(1) 查找默认配置
# 1.首先 三大认证是drf中实现的,所以先找到这个
# APIView是drf所有视图的基类
from rest_framework.views import APIView

# 2.点击 APIView 找到这个
  authentication_classes = api_settings.DEFAULT_AUTHENTICATION_CLASSES

# 3.点击api_settings
api_settings = APISettings(None, DEFAULTS, IMPORT_STRINGS)

# 4.点击DEFAULTS - 这个是rest_framwork的默认配置
DEFAULTS = {
    # Authentication 认证
    'DEFAULT_AUTHENTICATION_CLASSES': [
        'rest_framework.authentication.SessionAuthentication',
        'rest_framework.authentication.BasicAuthentication'
    ],}
(2) rest_framework 默认配置
DEFAULTS = {
    # Authentication 认证
    'DEFAULT_AUTHENTICATION_CLASSES': [
        'rest_framework.authentication.SessionAuthentication',
        'rest_framework.authentication.BasicAuthentication'
    ],
    # 权限
    'DEFAULT_PERMISSION_CLASSES': [
        'rest_framework.permissions.AllowAny',
    ],
    # Throttling 频率
    'DEFAULT_THROTTLE_RATES': {
        'user': None,
        'anon': None,
    },

    # Pagination 分页
    'PAGE_SIZE': None,

    # Filtering 过滤
    'SEARCH_PARAM': 'search',
    'ORDERING_PARAM': 'ordering',

    # Exception handling 异常处理
    'EXCEPTION_HANDLER': 'rest_framework.views.exception_handler',
    'NON_FIELD_ERRORS_KEY': 'non_field_errors',
}
(3) 在settings配置
# REST_FRAMEWORK,里面都是drf的配置信息
from rest_framework import settings
REST_FRAMEWORK = {
	# 配置认证
    'DEFAULT_AUTHENTICATION_CLASSES': [
        'rest_framework.authentication.SessionAuthentication',
        'rest_framework.authentication.BasicAuthentication'
    ],

}
(4) 说明
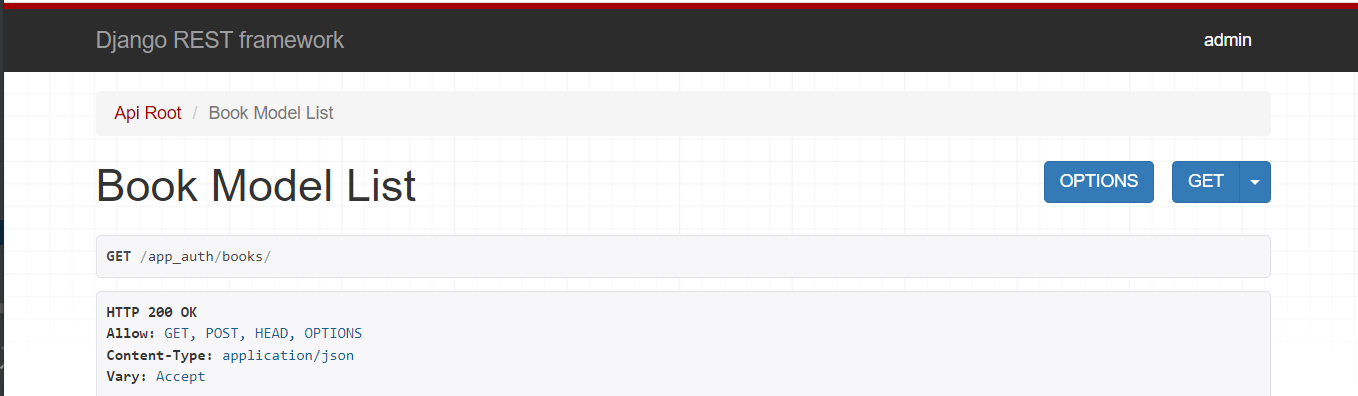
因为默认使用Authentication默认配置,并没有修改默认系统,所以可能会显示你当前登录的用户,但是不会限制你登录后才能方访问,也就是说,游客也可以方法。
重要提示: 认证 需要和权限搭配使用才能产生效果
1.3 局部配置 - 视图类
# views.py

from rest_framework.viewsets import ModelViewSet
from app05_api import models
from app05_api.ser import BookModelSerializer
from rest_framework.permissions import IsAuthenticated
from rest_framework.authentication import SessionAuthentication,BasicAuthentication

class BookModelViewSet(ModelViewSet):
    queryset = models.Book.objects.all()
    serializer_class = BookModelSerializer
    authentication_classes =[SessionAuthentication,BasicAuthentication] # 局部配置
     permission_classes = [IsAuthenticated] # 判断是否登录,未登录则不给访问
2.自定义认证
2.1 源码分析
#1 APIVIew----》dispatch方法---》self.initial(request, *args, **kwargs)---->有认证,权限,频率
#2 只读认证源码: self.perform_authentication(request)
#3 self.perform_authentication(request)就一句话:request.user,需要去drf的Request对象中找user属性(方法)
#4 Request类中的user方法,刚开始来,没有_user,走 self._authenticate()

#5 核心,就是Request类的 _authenticate(self):
    def _authenticate(self):
        # 遍历拿到一个个认证器,进行认证
        # self.authenticators配置的一堆认证类产生的认证类对象组成的 list
        #self.authenticators 你在视图类中配置的一个个的认证类:authentication_classes=[认证类1,认证类2],对象的列表
        for authenticator in self.authenticators:
            try:
                # 认证器(对象)调用认证方法authenticate(认证类对象self, request请求对象)
                # 返回值:登陆的用户与认证的信息组成的 tuple
                # 该方法被try包裹,代表该方法会抛异常,抛异常就代表认证失败
                user_auth_tuple = authenticator.authenticate(self) #注意这self是request对象
            except exceptions.APIException:
                self._not_authenticated()
                raise

            # 返回值的处理
            if user_auth_tuple is not None:
                self._authenticator = authenticator
                # 如何有返回值,就将 登陆用户 与 登陆认证 分别保存到 request.user、request.auth
                self.user, self.auth = user_auth_tuple
                return
        # 如果返回值user_auth_tuple为空,代表认证通过,但是没有 登陆用户 与 登陆认证信息,代表游客
        self._not_authenticated()
2.2 如何查找认证类
# 1. 找到这个 点击 BasicAuthentication
from rest_framework.authentication import SessionAuthentication,BasicAuthentication

# 2. 点击 BaseAuthentication
class BasicAuthentication(BaseAuthentication)

# 3. 找到这里,这里可以看到,基本的认证是要重写 authenticate
# 这里说明以下,这里规定了认证需要重写的方法,参照鸭子类型,可以不继承这个自己写一个

class BaseAuthentication:
    def authenticate(self, request):
        raise NotImplementedError(".authenticate() must be overridden.")
2.3 编写自定义认证类
前提准备 - 自定义类认证前提
# models.py
class User(models.Model):
    username=models.CharField(max_length=32)
    password=models.CharField(max_length=32)
    user_type=models.IntegerField(choices=((1,'超级用户'),(2,'普通用户'),(3,'二笔用户')))

class UserToken(models.Model):
    token=models.CharField(max_length=64)
    user=models.OneToOneField(to=User,on_delete=models.CASCADE)  #一对一关联到User表

# 别忘记在User表中添加数据

# views.py - 获取登录信息 - 并传如token 随机字符串
import uuid
from rest_framework.views import APIView
from app06_auth import models

class LoginView(APIView):
    authentication_classes = []
    def post(self,request):
        username=request.data.get('username')
        password=request.data.get('password')
        user=models.User.objects.filter(username=username,password=password).first()
        if user:
            # 登陆成功,生成一个随机字符串
            token=uuid.uuid4()
            # 存到UserToken表中
            # models.UserToken.objects.create(token=token,user=user)# 用它每次登陆都会记录一条,不好,如有有记录
            # update_or_create有就更新,没有就新增
            models.UserToken.objects.update_or_create(defaults={'token':token},user=user)
            return Response({'status':100,'msg':'登陆成功','token':token})
        else:
            return Response({'status': 101, 'msg': '用户名或密码错误'})


# urls.py
from django.urls import path, re_path
from app06_auth import views
from rest_framework import routers

router = routers.SimpleRouter()

router.register('books', views.BookModelViewSet) # 不用加后缀

urlpatterns = [
    path('login/', views.LoginView.as_view()),
]
urlpatterns += router.urls
注意事项
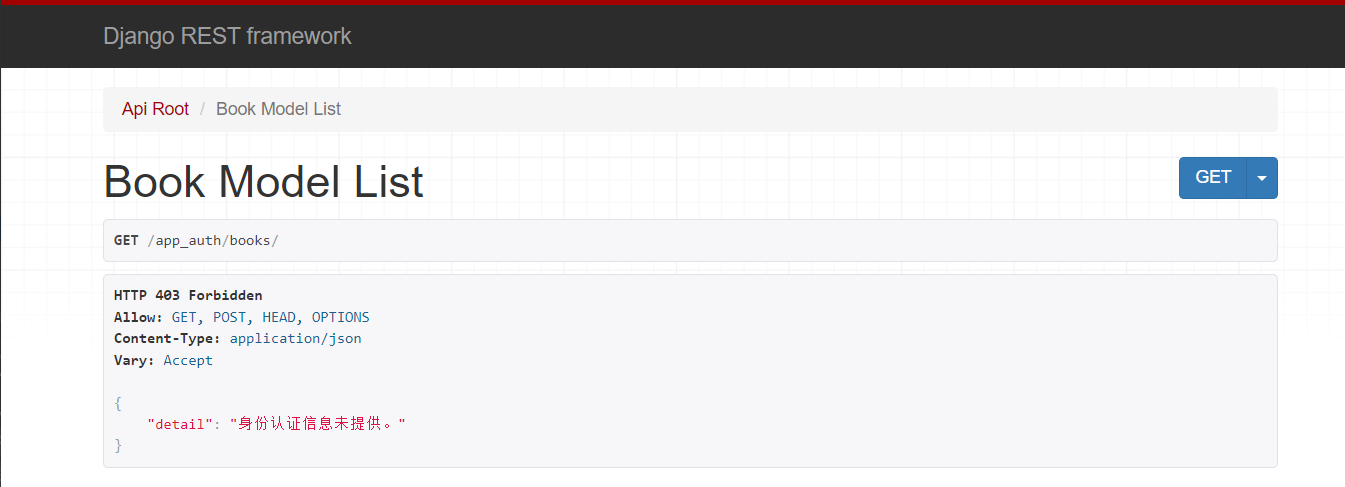
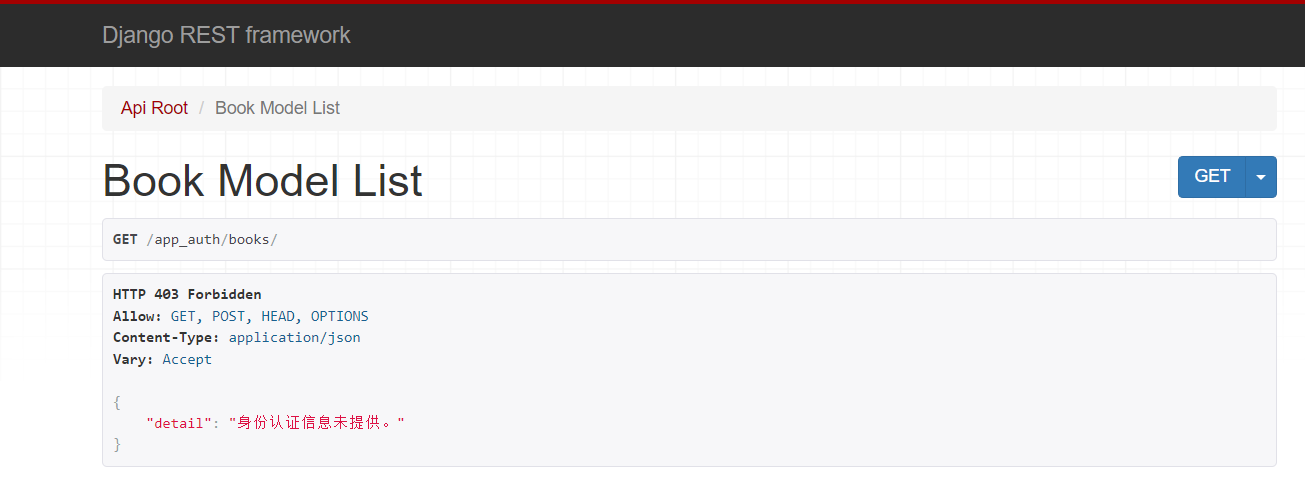
1.需要先登录,才能获得token
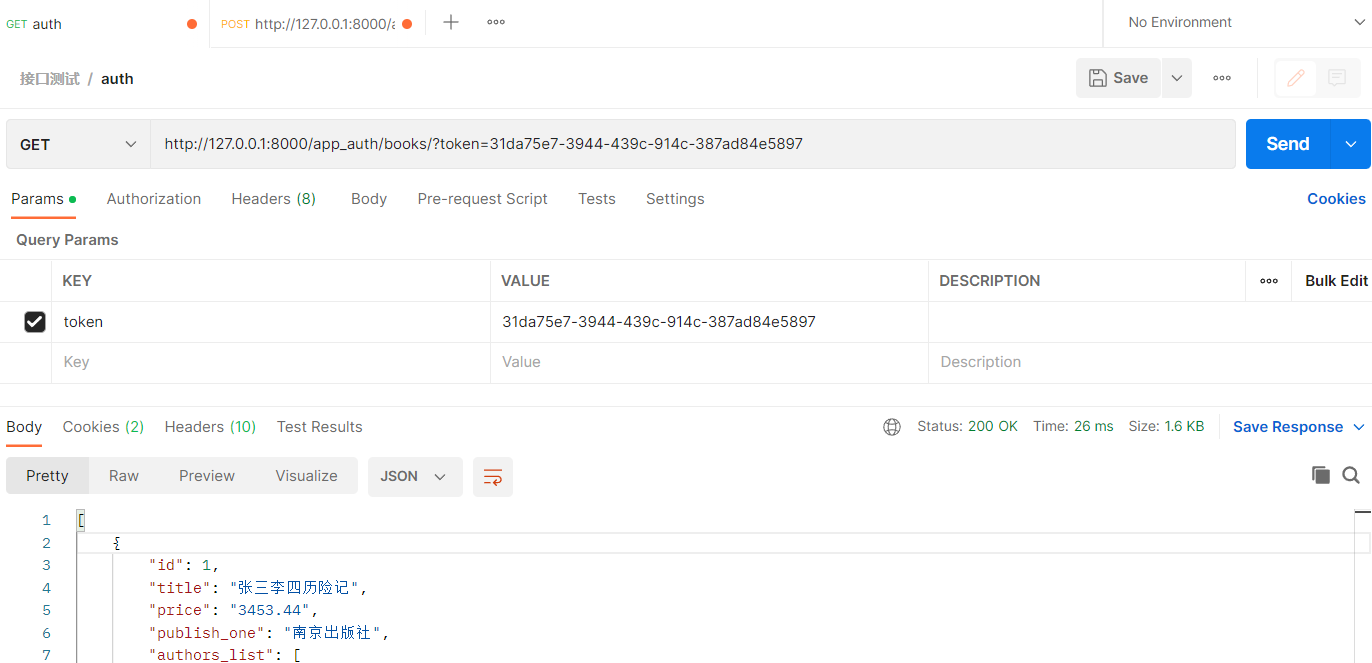
2.访问必须要带token
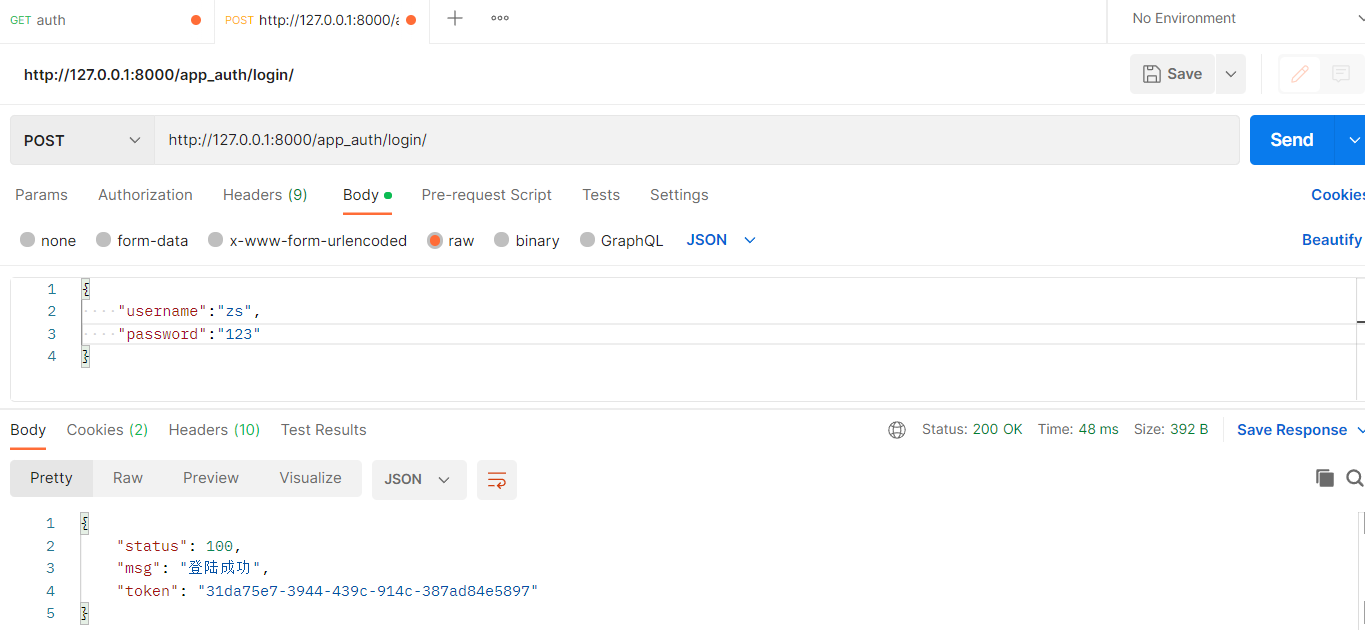
成功后拿到数据
登录失败后,访问不了


认证逻辑
from rest_framework.authentication import BaseAuthentication
from rest_framework.exceptions import AuthenticationFailed
from app06_auth import models
class MyAuthentication(BaseAuthentication):

    def authenticate(self,request):
        # 认证逻辑,如果认证通过,返回以元组的形式返回两个值  (user, token)
        token = request.GET.get('token')
        if token:
            user_token = models.UserToken.objects.filter(token=token).first()
            # 认证通过
            if user_token:
                # print(user_token.user) # 解释   user_token.user 值得是user对象
                return user_token.user,token
            else:
                raise AuthenticationFailed('认证失败')
        else:
            raise AuthenticationFailed('请求地址中需要携带token')
2.4 自定义认证类配置
2.4.1 全局配置 -settings
在项目的setting中配置如下
# 在项目的setting中配置如下

REST_FRAMEWORK = {

  'DEFAULT_AUTHENTICATION_CLASSES': [
        # 自定义认证类 - 类的路径
        # from app06_auth.utils.app_auth_utils import MyAuthentication
        'app06_auth.utils.app_auth_utils.MyAuthentication',
    ],

}
2.4.2 局部配置 - 视图类
# views.py

from rest_framework.viewsets import ModelViewSet
from app05_api import models
from app05_api.ser import BookModelSerializer
from rest_framework.permissions import IsAuthenticated
from rest_framework.authentication import SessionAuthentication,BasicAuthentication
from app06_auth.utils.app_auth_utils import MyAuthentication
class BookModelViewSet(ModelViewSet):
    queryset = Book.objects.all()
    serializer_class = BookModelSerializer
    # authentication_classes =[SessionAuthentication,BasicAuthentication] # 局部配置
    authentication_classes = [MyAuthentication]
二、权限
介绍:
权限控制可以限制用户对于视图的访问和对于具体数据对象的访问。
- 在执行视图的dispatch()方法前,会先进行视图访问权限的判断
- 在通过get_object()获取具体对象时,会进行模型对象访问权限的判断
两个参数:
IsAuthenticated 是否登录
IsAdminUser 是否为管理员
1. 内置权限
用法在内置认证中已经写了,这里就不在补充。这里写下如何配置。并且权限之前需要有认证才行。
1.1 全局配置 -settings
在项目的settings中配置如下:
# 在项目的settings中配置如下:
# 登录用户 - 才能访问
from rest_framework.permissions import IsAuthenticated
# 管理员用户 - 管理员才能访问
from rest_framework.permissions import IsAdminUser


# settings.py
REST_FRAMEWORK = {
    'DEFAULT_AUTHENTICATION_CLASSES': [
        # 自定义认证类
        # 'app06_auth.utils.app_auth_utils.MyAuthentication',
        # 默认认证类
        'rest_framework.authentication.SessionAuthentication',
        'rest_framework.authentication.BasicAuthentication',
    ],

    'DEFAULT_PERMISSION_CLASSES': [
        # 默认权限类
        'rest_framework.permissions.AllowAny',
        # 是否登录
        'rest_framework.permissions.IsAuthenticated',
        # 是否 为管理员
        'rest_framework.permissions.IsAdminUser',
    ],
}
1.2 局部配置 - 视图类
# views.py
# 可单个使用 最好搭配认证


from rest_framework.viewsets import ModelViewSet
from app05_api.models import Book
from app05_api.ser import BookModelSerializer
from rest_framework.permissions import IsAuthenticated,IsAdminUser
from rest_framework.authentication import SessionAuthentication,BasicAuthentication
from app06_auth.utils.app_auth_utils import MyAuthentication
# Create your views here.
class BookModelViewSet(ModelViewSet):
    queryset = Book.objects.all()
    serializer_class = BookModelSerializer
    # authentication_classes =[SessionAuthentication,BasicAuthentication] # 局部配置
    # authentication_classes = [MyAuthentication]
    permission_classes = [IsAuthenticated,IsAdminUser]
2. 自定义权限
2.1 源码分析
# APIView---->dispatch---->initial--->self.check_permissions(request)(APIView的对象方法)
    def check_permissions(self, request):
        # 遍历权限对象列表得到一个个权限对象(权限器),进行权限认证
        for permission in self.get_permissions():
            # 权限类一定有一个has_permission权限方法,用来做权限认证的
            # 参数:权限对象self、请求对象request、视图类对象
            # 返回值:有权限返回True,无权限返回False
            if not permission.has_permission(request, self):
                self.permission_denied(
                    request, message=getattr(permission, 'message', None)
                )
2.2 如何查找权限类
# 1. 找到这个 点击 IsAuthenticated
from rest_framework.permissions import IsAuthenticated,IsAdminUser

# 2. 看到这个 点击 BasePermission
class IsAuthenticated(BasePermission):

# 3. 看到如下内容
class BasePermission(metaclass=BasePermissionMetaclass):

    def has_permission(self, request, view):
        return True

    def has_object_permission(self, request, view, obj):
        return True

# 注意:里面还继承了元类,这里就不再深入
2.3 编写自定义认证类
前提准备
准备同 认证类 -> 2.3 -> 前期准备
注意事项
1.需要先登录,才能获得token
2.访问必须要带token

权限逻辑
from rest_framework.permissions import BasePermission

class MyPermission(BasePermission):

    def has_permission(self, request, view):

        user= request.user # 当前用户的user 是认证传过来的
        # 由于经过认证后,request内就有user对象了,这个时候就能拿到登录用户的用户类型
        # 如果该字段用了choice,别忘了用get_字段名_display()就能取出choice后面的中文
        try:
            if user.user_type == 1:
                return True # 表示通过权限
            else:
                return False # 表示未通过权限,会报相应的错误信息
        except:
            return False
2.4 自定义权限类配置
前提准备 - 参考认证
# views.py
class LoginView(APIView):
    authentication_classes = []
    permission_classes = []
    def post(self,request):
        username=request.data.get('username')
        password=request.data.get('password')
        user=models.User.objects.filter(username=username,password=password).first()
        if user:
            # 登陆成功,生成一个随机字符串
            token=uuid.uuid4()
            # 存到UserToken表中
            # models.UserToken.objects.create(token=token,user=user)# 用它每次登陆都会记录一条,不好,如有有记录
            # update_or_create有就更新,没有就新增
            models.UserToken.objects.update_or_create(defaults={'token':token},user=user)
            return Response({'status':100,'msg':'登陆成功','token':token})
        else:
            return Response({'status': 101, 'msg': '用户名或密码错误'})


# urls.py
from django.urls import path, re_path
from app06_auth import views
from rest_framework import routers

router = routers.SimpleRouter()

# router.register('books/', views.BookModelViewSet)
router.register('books', views.BookModelViewSet) # 不用加后缀

urlpatterns = [
    path('login/', views.LoginView.as_view()),
]
urlpatterns += router.urls
2.4.1 全局配置 - settings
from rest_framework import settings
REST_FRAMEWORK = {
    'DEFAULT_AUTHENTICATION_CLASSES': [
        # 自定义认证类
        'app06_auth.utils.app_auth.MyAuthentication',
        # 默认认证类
        # 'rest_framework.authentication.SessionAuthentication',
        # 'rest_framework.authentication.BasicAuthentication',
    ],

    'DEFAULT_PERMISSION_CLASSES': [
        # 自定义权限类
        'app06_auth.utils.app_permission.MyPermission'
        # 默认权限类
        # 'rest_framework.permissions.AllowAny',
        # 是否登录
        # 'rest_framework.permissions.IsAuthenticated',
        # 是否 为管理员
        # 'rest_framework.permissions.IsAdminUser',
    ],
}
2.4.2 局部配置 - 视图类
from rest_framework.viewsets import ModelViewSet
from app05_api.models import Book
from app05_api.ser import BookModelSerializer
from rest_framework.permissions import IsAuthenticated,IsAdminUser
from rest_framework.authentication import SessionAuthentication,BasicAuthentication
from app06_auth.utils.app_auth import MyAuthentication
from app06_auth.utils.app_permission import MyPermission

class BookModelViewSet(ModelViewSet):
    queryset = Book.objects.all()
    serializer_class = BookModelSerializer
    # authentication_classes =[SessionAuthentication,BasicAuthentication] # 局部配置
    authentication_classes = [MyAuthentication]
    # permission_classes = [IsAuthenticated,IsAdminUser] # 局部配置
    permission_classes = [MyPermission]
三、限流(频率)Throttling
介绍:
用来限制用户的访问频率
两个参数:
AnonRateThrottle 游客 - 未登录
UserRateThrottle 用户 - 登录
1. 内置限流
1.1 全局使用 - settings
这里添加了默认认证类 和权限 不在settings中配置就会用默认的
REST_FRAMEWORK = {
    # Authentication
    'DEFAULT_AUTHENTICATION_CLASSES': [
        # 默认认证类
        'rest_framework.authentication.SessionAuthentication',
    ],
    # Permission
    'DEFAULT_PERMISSION_CLASSES': [
        # 是否登录
        # 'rest_framework.permissions.IsAuthenticated',
    ],
    # Throttling
    # 配置角色
    'DEFAULT_THROTTLE_CLASSES': [
        # 未登录 - 游客
        'rest_framework.throttling.AnonRateThrottle',
        # 登录 - 用户
        'rest_framework.throttling.UserRateThrottle',
    ],
    # 设置频率
    'DEFAULT_THROTTLE_RATES': {
        'user': '10/m',
        'anon': '3/m',
    },

}
1.2 局部使用 - 视图类
注意:无论全局还是局部,都要在settings中设置频率
from rest_framework.viewsets import ModelViewSet
from app05_api.models import Book
from app05_api.ser import BookModelSerializer
from rest_framework.throttling import AnonRateThrottle,UserRateThrottle
# Create your views here.
class BookModelViewSet(ModelViewSet):
    queryset = Book.objects.all()
    serializer_class = BookModelSerializer
    # 认证
    # authentication_classes =[SessionAuthentication,BasicAuthentication] # 局部配置
    # authentication_classes = [MyAuthentication]
    # 权限
    # permission_classes = [IsAuthenticated,IsAdminUser]
    # permission_classes = [MyPermission]
    # 限流
    # AnonRateThrottle 未登录
    # UserRateThrottle 登录
    throttle_classes = [AnonRateThrottle,UserRateThrottle]
2.自定义限流(频率)
2.1源码分析
# SimpleRateThrottle源码分析
    def get_rate(self):
        """
        Determine the string representation of the allowed request rate.
        """
        if not getattr(self, 'scope', None):
            msg = ("You must set either `.scope` or `.rate` for '%s' throttle" %
                   self.__class__.__name__)
            raise ImproperlyConfigured(msg)

        try:
            return self.THROTTLE_RATES[self.scope]  # scope:'user' => '3/min'
        except KeyError:
            msg = "No default throttle rate set for '%s' scope" % self.scope
            raise ImproperlyConfigured(msg)
    def parse_rate(self, rate):
        """
        Given the request rate string, return a two tuple of:
        <allowed number of requests>, <period of time in seconds>
        """
        if rate is None:
            return (None, None)
        #3  mmmmm
        num, period = rate.split('/')  # rate:'3/min'
        num_requests = int(num)
        duration = {'s': 1, 'm': 60, 'h': 3600, 'd': 86400}[period[0]]
        return (num_requests, duration)
    def allow_request(self, request, view):
        if self.rate is None:
            return True
        #当前登录用户的ip地址
        self.key = self.get_cache_key(request, view)  # key:'throttle_user_1'
        if self.key is None:
            return True

        # 初次访问缓存为空,self.history为[],是存放时间的列表
        self.history = self.cache.get(self.key, [])
        # 获取一下当前时间,存放到 self.now
        self.now = self.timer()

        # Drop any requests from the history which have now passed the
        # throttle duration

        # 当前访问与第一次访问时间间隔如果大于60s,第一次记录清除,不再算作一次计数
        # 10 20 30 40
        # self.history:[10:23,10:55]
        # now:10:56
        while self.history and  self.now - self.history[-1] >= self.duration:
            self.history.pop()

        # history的长度与限制次数3进行比较
        # history 长度第一次访问0,第二次访问1,第三次访问2,第四次访问3失败
        if len(self.history) >= self.num_requests:
            # 直接返回False,代表频率限制了
            return self.throttle_failure()

        # history的长度未达到限制次数3,代表可以访问
        # 将当前时间插入到history列表的开头,将history列表作为数据存到缓存中,key是throttle_user_1,过期时间60s
        return self.throttle_success()
2.2 如何查找限流类
# 1.找到这个 然后点 SimpleRateThrottle - 其实这个已经够用了
from rest_framework.throttling import SimpleRateThrottle

# 2.看到这个 然后点 BaseThrottle
class SimpleRateThrottle(BaseThrottle):

# 3.重写 allow_request 方法
class BaseThrottle:

    def allow_request(self, request, view):
        raise NotImplementedError('.allow_request() must be overridden')

    def wait(self):
        return None
2.3 编写自定义限流
(1)根据IP限流 - 难度版
import time
# 其实这个没必要自己去写,逻辑还没有别人写的好呢
class MyThrottle():
    scope = 'test' # 设置这个后,需要与频率对应好
    #定义成类属性,所有对象用的都是这个
    VISIT_DIC = {}
    def __init__(self):
        self.history_list=[]
    def allow_request(self, request, view):
        '''
        #(1)取出访问者ip
        #(2)判断当前ip不在访问字典里,添加进去,并且直接返回True,表示第一次访问,在字典里,继续往下走
        #(3)循环判断当前ip的列表,有值,并且当前时间减去列表的最后一个时间大于60s,把这种数据pop掉,这样列表中只有60s以内的访问时间,
        #(4)判断,当列表小于3,说明一分钟以内访问不足三次,把当前时间插入到列表第一个位置,返回True,顺利通过
        #(5)当大于等于3,说明一分钟内访问超过三次,返回False验证失败
        '''

        ip=request.META.get('REMOTE_ADDR')
        ctime=time.time()
        if ip not in self.VISIT_DIC:
            self.VISIT_DIC[ip]=[ctime,]
            return True
        self.history_list=self.VISIT_DIC[ip]   #当前访问者时间列表拿出来
        while True:
            if ctime-self.history_list[-1]>60:
                self.history_list.pop() # 把最后一个移除
            else:
                break
        if len(self.history_list)<3:
            self.history_list.insert(0,ctime)
            return True
        else:
            return False

    def wait(self):
        # 当前时间,减去列表中最后一个时间
        ctime=time.time()

        return 60-(ctime-self.history_list[-1])
(2) 任意指标限流 - 简单版
from rest_framework.throttling import SimpleRateThrottle

class MyThrottle(SimpleRateThrottle):
    scope = 'sms'
    def get_cache_key(self, request, view):
        telephone = request.query_params.get('telephone')
        #'throttle_%(scope)s_%(ident)s'%{}
        return self.cache_format%{'scope':self.scope,'ident':telephone}
2.4 自定义限流类配置
2.4.1 全局配置 - settings
REST_FRAMEWORK = {
    # Throttling
    # 配置角色
    'DEFAULT_THROTTLE_CLASSES': [
        # 自定义角色 - ip 限流
        'app06_auth.utils.app_throttling.MyThrottle',
        # 默认角色
        # 未登录 - 游客
        # 'rest_framework.throttling.AnonRateThrottle',
        # 登录 - 用户
        # 'rest_framework.throttling.UserRateThrottle',
    ],
    # 设置频率
    'DEFAULT_THROTTLE_RATES': {
        # 'user': '10/m',
        # 'anon': '3/m',
        'test':'3/m', # 自定义限流类 scope='test'
    },

}
2.4.2 局部配置 - 视图类
from rest_framework.viewsets import ModelViewSet
from app05_api.models import Book
from app05_api.ser import BookModelSerializer
from rest_framework.permissions import IsAuthenticated,IsAdminUser
from rest_framework.authentication import SessionAuthentication,BasicAuthentication
from app06_auth.utils.app_auth import MyAuthentication
from app06_auth.utils.app_permission import MyPermission
from app06_auth.utils.app_throttling import MyThrottle

class BookModelViewSet(ModelViewSet):
    queryset = Book.objects.all()
    serializer_class = BookModelSerializer
    # authentication_classes =[SessionAuthentication,BasicAuthentication] # 局部配置
    authentication_classes = [MyAuthentication]
    # permission_classes = [IsAuthenticated,IsAdminUser] # 局部配置
    permission_classes = [MyPermission]
    # 限流
    # throttle_classes = [AnonRateThrottle,UserRateThrottle]
    throttle_classes = [MyThrottle]

 浙公网安备 33010602011771号