

简述前后端项目RSA+AES加解密
一、登录机制
在项目中,我们可以大致得出一个登录的过程,主要分为 登录验证、登录保持、退出三个部分。登录验证是指客户端提供用户名和密码,向服务器提出登录请求,服务器判断客户端是否可以登录并向客户端确认。 登录保持是指客户端登录后, 服务器能够分辨出已登录的客户端,并为其持续提供登录权限的服务器。退出是指客户端主动退出登录状态。而登录保持容易想到的方案是,客户端登录成功后, 服务器为其分配sessionId(token), 客户端随后每次请求资源时都带上sessionId(token)。
注意:session与token的区别,可阅读以下文章
- https://blog.csdn.net/mydistance/article/details/84545768
- https://www.cnblogs.com/moyand/p/9047978.html
1.1 登录验证
-
- 图解
-
- 流程
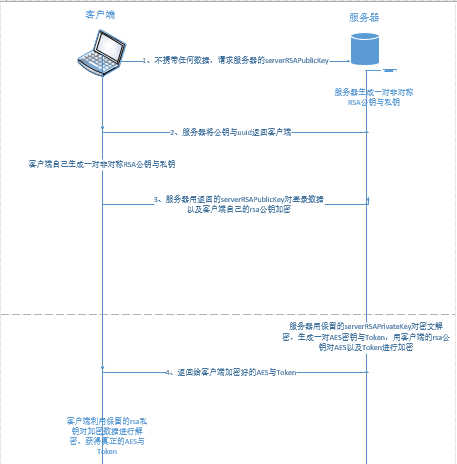
- 客户端向服务器 第一次 发起登录请求(不传输用户名和密码);
- 服务器利用RSA算法产生一对serverRSAPublicKey和serverRSAPrivateKey,并保留serverRSAPrivateKey, 将serverRSAPublicKey发送给客户端;
- 客户端收到serverRSAPublicKey之后,同样利用RSA算法产生一对clientRSAPublicKey与clientRSAPrivateKey,客户端自己保留clientRSAPrivateKey,并用serverRSAPublicKey对登录的数据以及clientRSAPublicKey进行加密,用加密后的数据 第二次 发出登录请求;
- 服务器收到加密后的数据,利用保留的serverRSAPrivateKey对密文进行解密,(经过判断,确定用户可以登录之后,生成一个加密字符串Token,)同时生成一对对称的AES密钥,并且利用密文中的clientRSAPublicKey对Token以及aesKey进行加密,将aesKey与Token全部返回给客户端;
- 客户端收到clientRSAPublicKey加密的aesKey与Token后,利用保留的clientRSAPrivateKey对其进行解密,并将其存储在localStorage中,使客户端每次发送请求headers都携带Token这一字段(基于Token的身份验证是无状态的,并且具有时效性);
- 编码
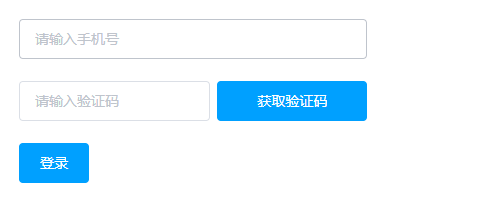
- HTML(由于目前成功的接口只找到username与password这两个字段的接口,为了方便讲解,先调用一下)
![]() View Code
View Code<template> <div class="security-main" style="width: 348px;height: 340px;margin:20px"> <el-form :model="loginData" :rules="loginRules" ref="loginForm" style="margin-top:20px"> <el-form-item prop="username"> <el-input id="phoneNumber" v-model.trim="loginData.username" maxlength="11" placeholder="请输入手机号" ></el-input> </el-form-item> <el-form-item prop="password"> <el-input id="verificationCode" style="width: 55%;float:left;" maxlength="6" v-model.trim="loginData.password" placeholder="请输入验证码" ></el-input> <el-button type="primary" class="btn-verificationCode" style="width: 43%;float: right;padding: 12px 0px;" >获取验证码</el-button> </el-form-item> <el-form-item> <el-button :disabled="loginBtnDisabled" type="primary" @click="submitForm('loginForm')"> <i class="el-icon-loading" v-if="isLogining"></i>登录 </el-button> </el-form-item> </el-form> </div> </template> <script> import { loginData, loginRules } from "../js/login/data"; import { loginHandler } from "../js/login/bussiness"; const _loginData = _.cloneDeep(loginData); export default { name: "security", data() { return { loginData, //登录的表单数据 loginRules, //登录表单的校验规则 loginBtnDisabled: false, //登录button是否禁用 isLogining: false, //是否登录中 serverRSAPublicKey: "", //服务端rsa公钥 clientRSAPublicKey: "", //客户端rsa公钥 clientRSAPrivateKey: "" //客户端rsa私钥 }; }, components: {}, mounted() { // console.log(_loginData); }, methods: { submitForm(formName) { this.$refs[formName].validate(valid => { if (valid) { this.isLogining = true; this.loginBtnDisabled = true; loginHandler({ vue: this }); // this.$refs[formName].resetFields(); } else { return false; } }); } } }; </script> <style lang="scss"> .security-main { } </style> <style scoped lang="scss"> .security { width: 100%; height: 100%; &-main { } } </style>
- HTML(由于目前成功的接口只找到username与password这两个字段的接口,为了方便讲解,先调用一下)
- 流程


-
-
- 所涉及到的数据data(loginData里面的uuid相当于userId)
![]() View Code
View Code//登录表单data export const loginData = { clientPublicKey: '', //客户端生成的RSA公钥base64后的字符串 不可为空 username: '', //手机号 不可为空 password: '', //手机验证码 uuid: '', //获取服务端RSA公钥时返回的uuid string 放到header中,key为uuid } //登录表单校验规则 export const loginRules = { username: [ { required: true, message: '请输入手机号', trigger: 'blur' }, // { pattern: /^1(3[0-2]|4[5]|5[56]|7[6]|8[56])[0-9]{8}$|^1709[0-9]{7}$|^1(3[4-9]|4[7]|5[0-27-9]|7[8]|8[2-478])[0-9]{8}$|^1705[0-9]{7}$|^1(33|53|7[37]|8[019])[0-9]{8}$|^1700[0-9]{7}$|^1(99|98|66)[0-9]{8}$/, message: '手机号码格式不正确', trigger: 'blur' } ], password: [ { required: true, message: '请输入手机验证码', trigger: 'blur' }, // { pattern: /^\d{4,}$/, message: '手机验证码格式不正确', trigger: 'blur' } ], }
- JS文件中(利用node-rsa工具进行密钥的处理)
![]() View Code
View Codeimport RSA from 'node-rsa' import { getServerRSAPublicKey, login } from '../../api/tuning' /** * [loginHandler 处理用户登录数据加密逻辑] * 1-----获取RSA key * 2-----获取AES key(通过登录) * @param {[JSON]} config [配置] * @return {[type]} [description] */ export async function loginHandler(config) { const { vue } = config; try { //1、不传输登录数据,获取RSA公钥 ----- 会返回一个serverPublicKey 与一个 uuid const rsaPromise = await getServerRSAPublicKey({}) //2、请求成功后 处理获取服务端RSA公钥 const getRSAKeyReturnCode = handleGetServerRSAPublicKey({ vue, promise: rsaPromise, dataKey: 'loginData' }) //4、处理好客户端与服务器的rsa if (getRSAKeyReturnCode === 200) { //5、用服务端返回的rsa公钥对登录的数据(客户端保留私钥、把公钥发送给服务器)进行加密 const rsaEncryptBody = RSAPublicKeyEncrypt(vue.serverRSAPublicKey, JSON.stringify(vue.loginData)) const loginConfig = { data: { encryptContent: rsaEncryptBody }, headers: { uuid: vue.loginData.uuid } } //6、服务端利用保留的rsa私钥对加密的数据进行解密 并且在服务端生成aes对称密钥 // 并用获取到的客户端公钥对aes密钥以及客户端需要的token进行加密 传递给客户端 const loginPromise = await login(loginConfig) handleLoginData({ vue, promise: loginPromise, }) } } catch (error) { console.log(error) } finally { vue.isLogining = false vue.loginBtnDisabled = false; vue.$refs['loginForm'].resetFields(); } } /** * [handleGetServerRSAPublicKey 处理获取服务端RSA公钥] * @param {[JSON]} config [参数] * @return {[type]} [description] */ export function handleGetServerRSAPublicKey(config) { const { vue, promise, dataKey } = config if (promise.data.code === 200) { const { serverPublicKey, uuid } = promise.data.body; // 3、生成客户端的 RSA 公钥与私钥 引用node-rsa工具 const clientRSAKeyPair = generateClientRSAKeyPair(); // console.log(clientRSAKeyPair.clientRSAPublicKey.replace(/\r|\n|\s/g, '').split('-----')) // console.log(clientRSAKeyPair.clientRSAPublicKey.split('-----')[2]) const clientRSAPublicKey = clientRSAKeyPair.clientRSAPublicKey.replace(/\r|\n/g, '').split('-----')[2] // console.log(clientRSAKeyPair.clientRSAPrivateKey.split('-----')) const clientRSAPrivateKey = clientRSAKeyPair.clientRSAPrivateKey.replace(/\r|\n/g, '') // console.log(clientRSAPrivateKey) vue[dataKey].clientPublicKey = clientRSAPublicKey vue[dataKey].uuid = uuid; vue.serverRSAPublicKey = '-----BEGIN PUBLIC KEY-----' + serverPublicKey + '-----END PUBLIC KEY-----' vue.clientRSAPublicKey = clientRSAPublicKey vue.clientRSAPrivateKey = clientRSAPrivateKey } return promise.data.code } /** * [generateClientRSAKeyPair 客户端生成RSA公钥私钥对] * @return {[type]} [description] */ export function generateClientRSAKeyPair() { // 首先生成1024位密钥 const NodeRSAKey = new RSA({ b: 1024 }) // 导出公钥 const clientRSAPublicKey = NodeRSAKey.exportKey('public') // 导出私钥 const clientRSAPrivateKey = NodeRSAKey.exportKey('pkcs8') return { clientRSAPublicKey, clientRSAPrivateKey, } } /** * [RSAPublicKeyEncrypt RSA公钥加密] * @param {[String]} publicKey [公钥] * @param {[String]} originalBody [要加密的明文字符串] * @return {[String]} [RSA公钥加密结果(Base64字符串)] */ export function RSAPublicKeyEncrypt(publicKey, originalBody) { /*if (!SecurityUtils.currentRSAPublicKey || SecurityUtils.currentRSAPublicKey !== SecurityUtils.publicKey) { SecurityUtils.publicRSAInstance = new RSA(publicKey) }*/ const NodeRSAKey = new RSA(publicKey) NodeRSAKey.setOptions({ encryptionScheme: 'pkcs1', environment: 'browser' }) const encryptBase64 = NodeRSAKey.encrypt(originalBody, 'base64', 'utf8') return encryptBase64 } /** * [RSAPublicKeyDecrypt RSA私钥解密] * @param {[String]} privateKey [私钥] * @param {[String]} encryptBody [要解密的数据] * @return {[JSON]} [RSA私钥解密结果(JSON)] */ export function RSAPrivateKeyDecrypt(privateKey, encryptBody) { /*if (!SecurityUtils.currentRSAPrivateKey || SecurityUtils.currentRSAPrivateKey !== SecurityUtils.privateKey) { SecurityUtils.privateRSAInstance = new RSA(privateKey) }*/ const NodeRSAKey = new RSA(privateKey) NodeRSAKey.setOptions({ encryptionScheme: 'pkcs1', environment: 'browser' }) const originalBody = NodeRSAKey.decrypt(encryptBody, 'utf8') return JSON.parse(originalBody) } /** * [handleLoginData 处理用户登录逻辑] * @param {[JSON]} config [参数] * @return {[type]} [description] */ export function handleLoginData(config) { const { vue, promise } = config if (promise.data.code === 200) { // 7、在客户端使用保留的rsa私钥对返回的数据进行解密 数据是accessToken 与aesKey promise.data.body = RSAPrivateKeyDecrypt(vue.clientRSAPrivateKey, promise.data.body); // 8、将这两个字段存入localStorage中 const { aesKey, accessToken } = promise.data.body window.localStorage.setItem('aesKey', aesKey) window.localStorage.setItem('auth-token', accessToken); // 9、登录成功后,接下来的代码可以写一些页面的跳转或者开发者项目的逻辑 // vue.$router.push({ name: '' }) } else if (promise.data.code === 205403) { const config = { vue, redirectUrl: promise.data.redirect } } else { vue.$message({ type: 'fail', message: promise.data.msg, duration: 1000, }) } return promise.data.code }
- 第一次发起登录,获取serverRSAPublicKey;
- api文件中(相当于发送axios请求)
![]() View Code
View Codeimport fetch from '../../../utils/fetch' import adrsConfig from '../config/adrs.config' import urlConfig from '../config/url.config' /** * [getServerRSAPublicKey 获取服务端RSA公钥] * @param {[JSON]} config [请求参数] * @return {[Promise]} [Promise] */ export function getServerRSAPublicKey(config) { const defaultConfig = { url: adrsConfig.IS_USE_RAP ? (adrsConfig.RAP_URL + urlConfig.GET_RSA_PUBLIC_KEY_URL) : (adrsConfig.USER_SERVICE_URL + urlConfig.GET_RSA_PUBLIC_KEY_URL), method: 'get', data: {}, } const mergeConfig = _.assign({}, defaultConfig, config) return fetch(mergeConfig) } /** * [login 用户进行登录 ] * @param {[JSON]} config [请求参数] * @return {[Promise]} [Promise] */ export function login(config) { const defaultConfig = { url: adrsConfig.IS_USE_RAP ? (adrsConfig.RAP_URL + urlConfig.SYS_LOGIN_URL) : (adrsConfig.USER_SERVICE_URL + urlConfig.SYS_LOGIN_URL), method: 'post', data: {}, } const mergeConfig = _.assign({}, defaultConfig, config) return fetch(mergeConfig) }
- 所涉及到的数据data(loginData里面的uuid相当于userId)
-
1.2 登录保持
*** 注意:签名指用私钥加密的消息(只有拥有私钥的用户可以生成签名)
    在最原始的方案中,登录保持仅仅靠服务器生成的sessionId,客户端的请求中带上sessionId, 如果服务器的redis中存在这个id,就认为请求来自相应的登录客户端。 但是
只要sessionId被截获, 请求就可以为伪造,存在安全隐患;
    引入token后,服务器将token和其它的一些变量(用户数据,例如uuid),利用一些算法(散列算法、对称加密或者非对称加密)得到签名后,将签名和登录的数据一并发送给客户端,
;客户端收到token之后,每次
发送请求,headers都携带了token,服务器收到token之后,再次利用相同的散列加密算法对数据在进行计算(服务端对token并不进行保存),生成新的token,如果生成的token与
携带的token一致, 就认为请求来自登录的客户端。如果不一致,则说明没有登陆过,或者用户的数据被人篡改了。
1.3 退出(用户退出系统的原理 ----- 有以下两种状况)
- 服务端将对应的sessionId从redis队列中删除;
- Token具有时效性,或者用户手动将其删除;
二、对称加密、非对称加密、散列(哈希)算法
- 对称加密
- AES
- DES
- 非对称加密(加密密钥与解密密钥不相同,并且不可能从加密密钥推导出解密密钥,也叫公钥加密算法)
- RSA
- 散列算法(签名算法)
- MD5
三、遇到的问题
暂无
北栀女孩儿

 浙公网安备 33010602011771号