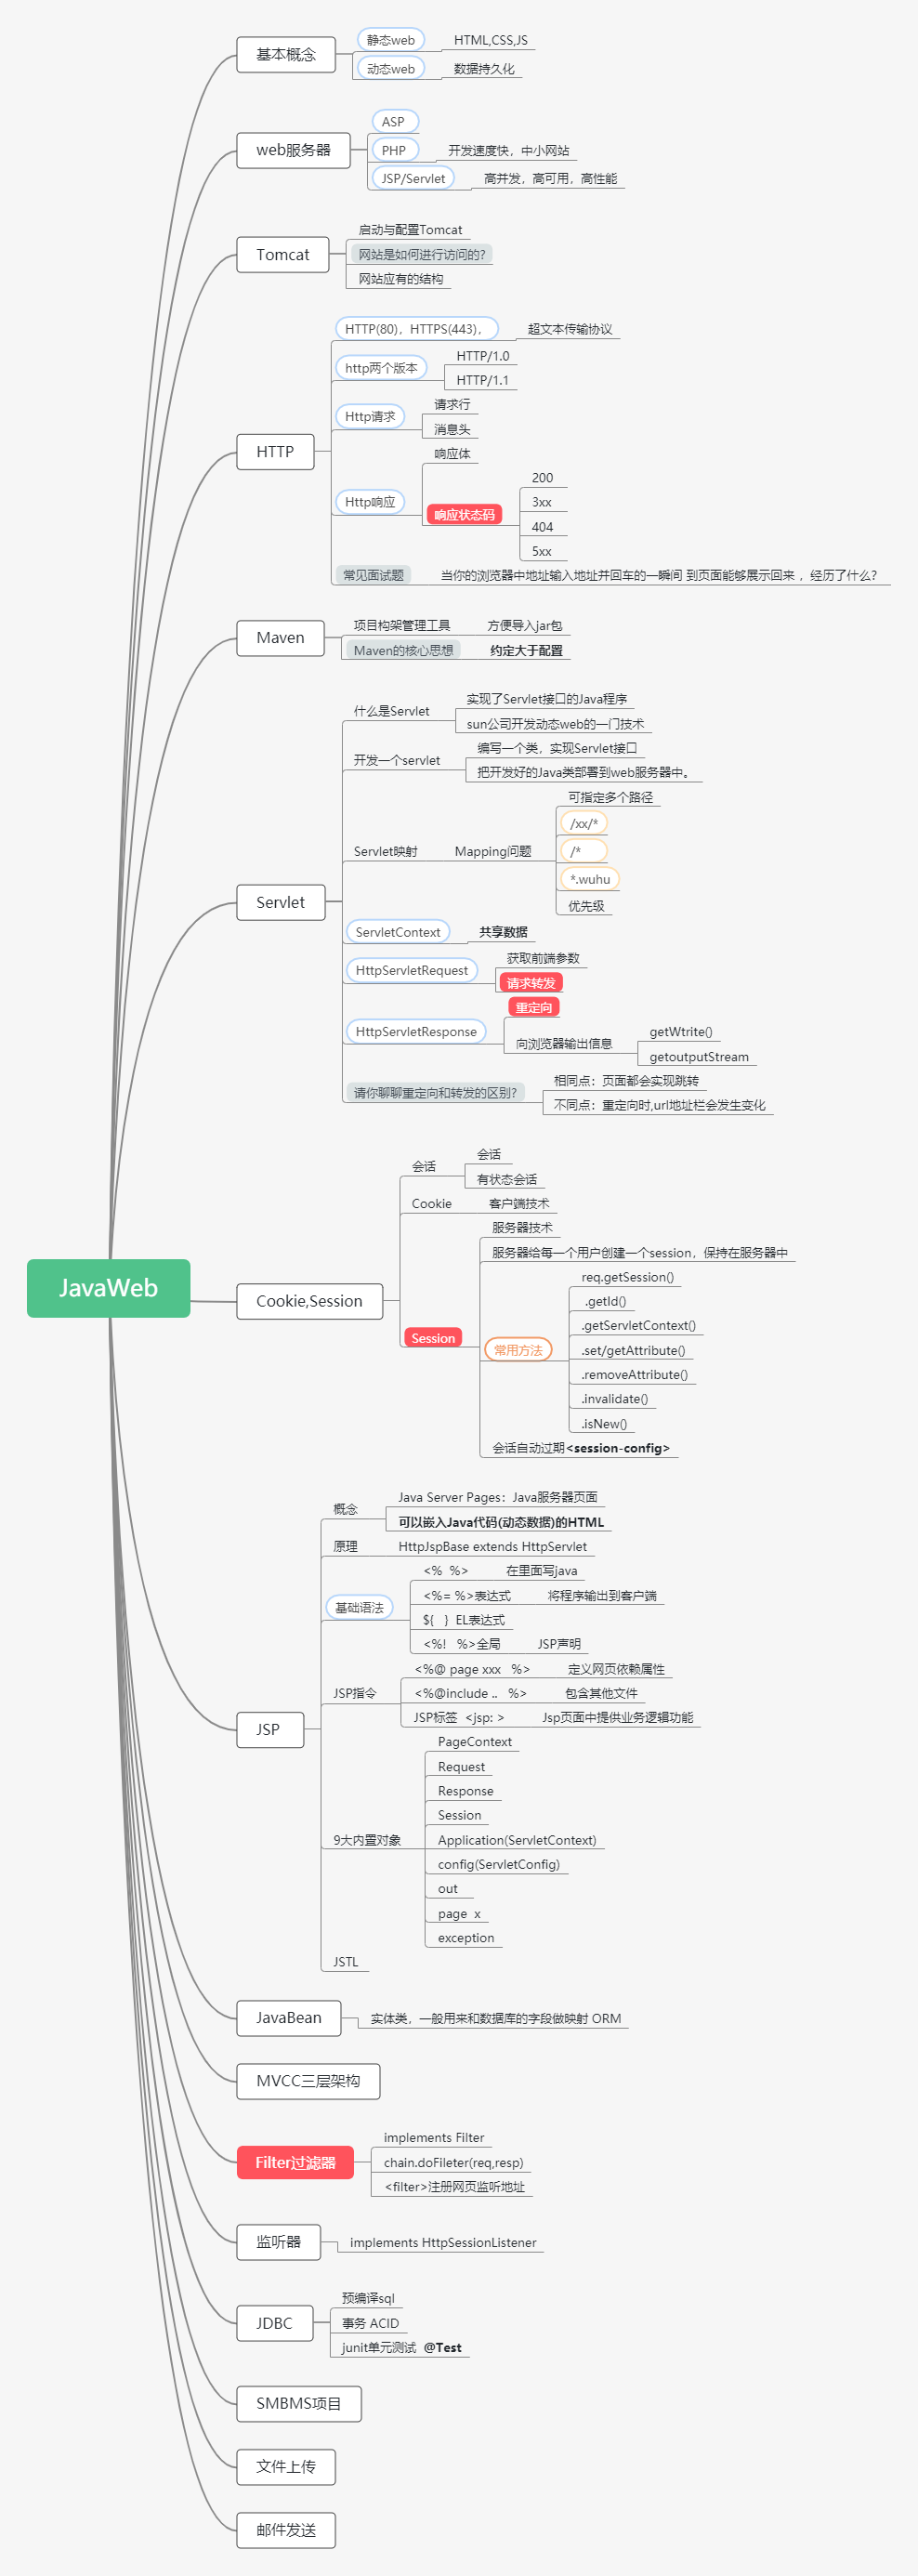
JavaWeb-总
JavaWeb
1、基本概念
1.1、前言
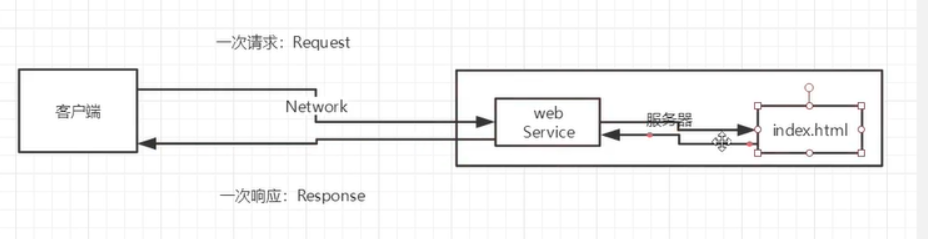
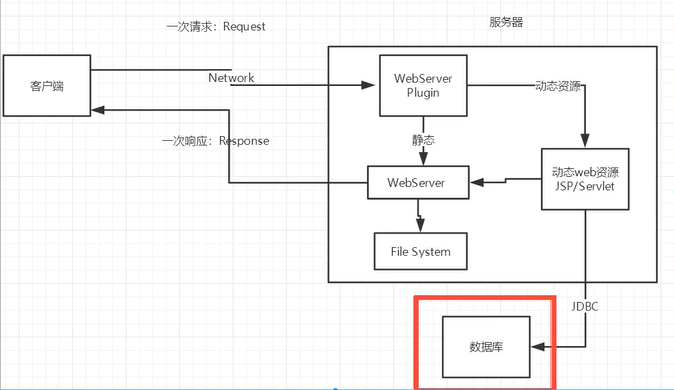
web开发:
- web,网页的意思, www.baidu.com
- 静态web
- html,css
- 提供给所有人看的数据始终不会发生变化!
- 动态web
- 淘宝,几乎是所有的网站;
- 提供给所有人看的数据会发生变化,每个人在不同的时间,不同的地点看到的信息各不相同。
- 技术栈: Servlet/JSP ,ASP,PHP
在Java中,动态web资源开发的技术统称为 JavaWeb;
1.2、web应用程序
web应用程序:可以提供浏览器访问的程序;
- a.html,b.html。。。多个web资源,这些web资源可以被外界访问,对外界提供服务;
- 我们能访问到的任何一个页面或资源,都存在于世界的某一个角落的计算机上。
- URL
- 这个统一的web资源会被放在同一文件夹下,web应用程序---> Tomcat:服务器
- 一个web应用 有多部份组成 (静态web,动态web)
- html,css,js
- jsp,servlet
- Java程序
- jar包
- 配置文件 (Properties)
web应用程序编写完毕之后,若想提供给外界访问:需要一个服务器来统一管理;
1.3、静态web
- *.htm , *.html , 这些都是网页的后缀,如果服务器上一直存在这些东西,我们就可以直接进行读取。---网络;
- 静态web存在的缺点
- Web页面无法动态更新,所有用户看到的都是同一个yemian
- 轮播图,点击特效:伪特效
- JavaScript [实际开发中,用的最多]
- VBScript
- 他无法和数据库交互 (数据无法持久化,用户无法交互)
- Web页面无法动态更新,所有用户看到的都是同一个yemian
1.4、动态web

缺点:
- 假如服务器的动态web资源出现了错误,我们需要重新编写我们的后台程序,重新发布
- 停机维护
优点:
- Web页面可以动态更新,所有用户看到的都不是同一个页面
- 它可以于数据库交互 (数据持久化:注册,商品信息,用户信息)
新手村:--魔鬼训练(分析原理,看源码)---->PK场
2、web服务器
2.1、技术讲解
ASP
-
微软:国内最早流行的就是ASP;
-
在HTML中嵌入了VB的脚本,ASP+COM;
-
在ASP开发中,基本一个页面都有几千行的业务代码,页面及其混乱
-
维护成本高
-
C#
-
IIS
<h1>
    <h1><h1>
        <h1>
            <h1>
                <h1>
        <h1>
            <%
            System.out.println("hello")
            %>
            <h1>
                <h1>
   <h1><h1>
<h1>
php
- PHP 开发速度很快,功能很强大,跨平台,代码很简单(70%都是中小型网站,WP)
- 无法承载大访问量的情况(局限性)
JSP/Servlet:
B/S:浏览器和服务器
C/S:客户端和服务器
- sun公司主推的B/S架构
- 基于Java语言的(所有的大公司,或者一些开源的组件,都是用Java写的)
- 可以承载三高带来的影响;
高并发,高可用,高性能
....
2.2、web服务器
服务器是一种被动的操作,用来处理用户的一些请求和给用户一些响应信息;
IIS
微软的; ASP....,Windows中自带的
Tomcat

面向百度编程;
Tomcat是Apache 软件基金会(Apache Software Foundation)的Jakarta 项目中的一个核心项目,最新的Servlet 和JSP 规范总是能在Tomcat 中得到体现,因为Tomcat 技术先进、性能稳定,而且免费,因而深受Java 爱好者的喜爱并得到了部分软件开发商的认可,成为目前比较流行的Web 应用服务器。
Tomcat 服务器是一个免费的开放源代码的Web 应用服务器,属于轻量级应用服务器,在中小型系统和并发访问用户不是很多的场合下被普遍使用,是开发和调试JSP 程序的首选。对于一个Java初学web的人来说,它是最佳的选择
Tomcat 实际上运行JSP 页面和Servlet。Tomcat最新版本为9.0。
....
工作3-5年后,可以尝试自己手写Tomcat服务器
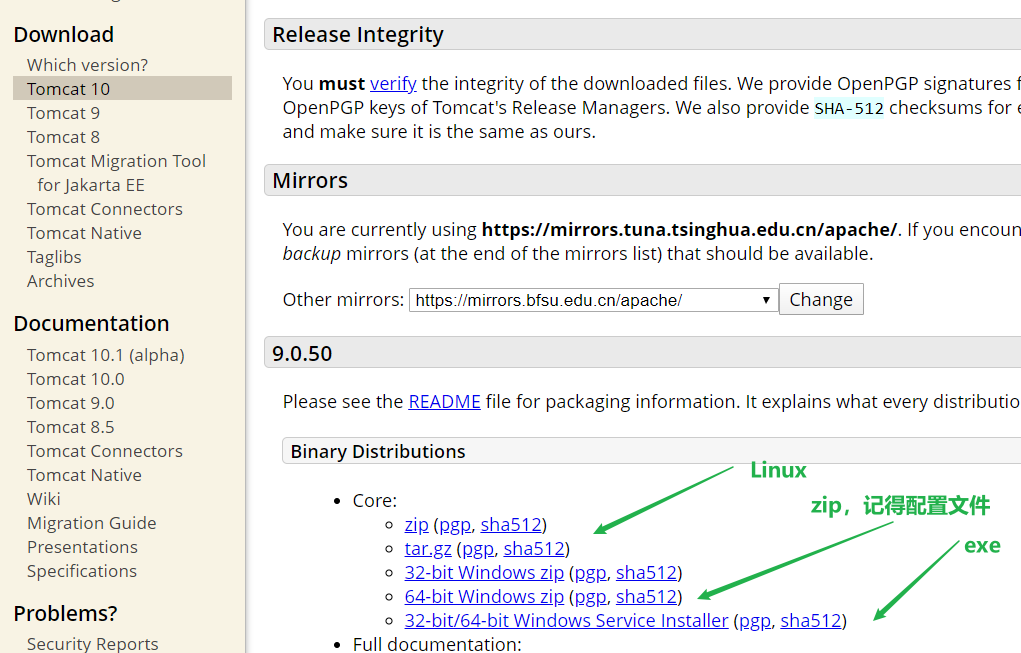
下载tomcat:
- 安装 or 解压
- 了解配置文件及目录结构
- 这个东西的作用
3.Tomcat
3.1、安装tomcat
tomcat官网:http://tomcat.apache.org/
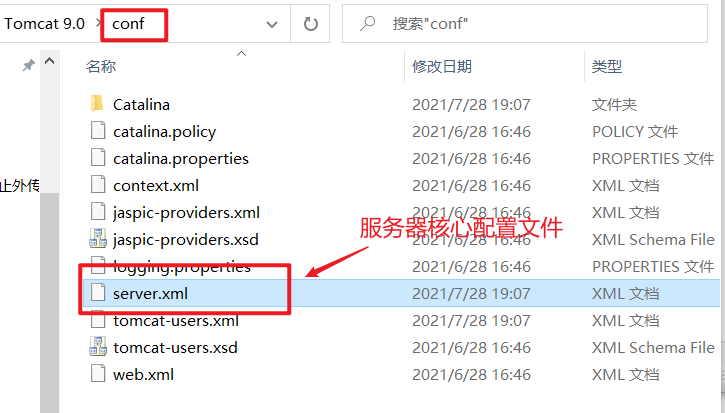
3.2、Tomcat启动和配置
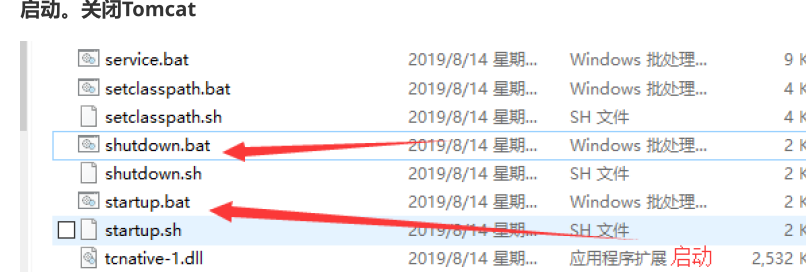
文件夹:
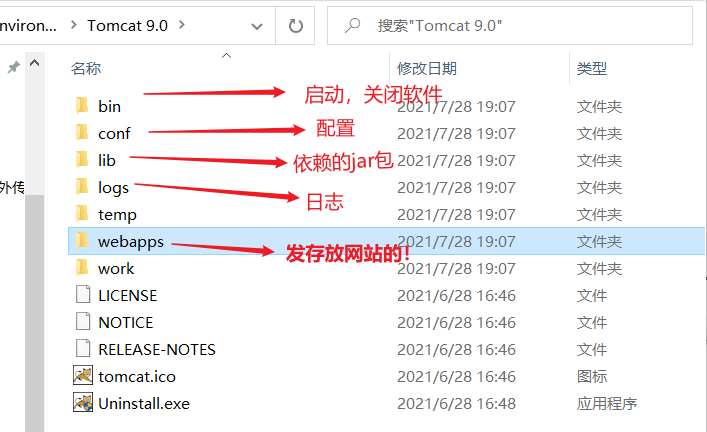
启动。关闭Tomcat
3.3、配置
可以配置启动的端口号:
- tomcat 的默认端口号:8080
- mysql:3360
- http : 80
- https:443
<Connector port="8081" protocol="HTTP/1.1"
           connectionTimeout="20000"
           redirectPort="8443" />
可以配置主机的名称
- 配置的主机名为:localhost -> 127.0.0.1
- 默认网站应用存放的位置为 : webapps
<Host name="www.qinjiang.com"  appBase="webapps"
      unpackWARs="true" autoDeploy="true">
高难度面试题:
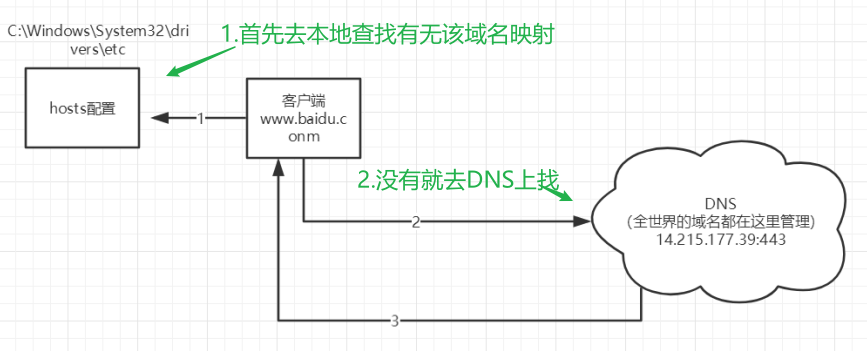
谈谈 网站时如何进行访问的?
-
输入一个域名 ; 回车
-
检查本机的 C:Windows\System32\drivers\etc\hosts 配置文件下有没有这个域名映射;
-
有:直接返回对应的ip地址,这个地址中,有我们需要访问的web程序,可以直接访问
127.0.0.1 www.qinjiang.com -
没有:去DNS 服务器找, 找得到--返回 , 找不到---找不到该网页
-
3.4、发布一个网站
不会就先模仿
- 将自己写的网站,放到服务器(Tomcat)中指定的web引用的文件夹(webapps)下,就可以访问了
网站应有的结构
--webapps : Tomcat服务器的web目录
    -ROOT
    -Kuangstudy :网站的目录名
    	- WEB-INF
    	    -classes: java程序
            -lib: web应用所依赖的jar包
            -web.xml: 网站配置文件
        - index.html 默认的首页
		- static
            -CSS
                -style.css
            -js
            -img
         - ....
HTTP协议:面试
Maven:构建工具
- Maven安装包
Servlet 入门
- HellowWorld
- Servlet配置
- 原理
4、HTTP
4.1、什么是HTTP
HTTP (超文本传输协议)是一个简单的 请求-响应协议,它通常运行在TCP之上。
- 文本:html ,字符串 。。
- 超文本:图片,audio,video,定位,地图。。。
- 80
HTTPS:安全的
- 443
4.2、两个时代
- http 1.0
- HTTP/1.0: 客户端与web服务器连接后,只能获得一个web资源, 断开连接 (之后只能再次请求连接)
- http 2.0
- HTTP/1.1: 客户端可以与web服务器连接后,可以获得多个web资源。
4.3、Http请求
- 客户端----发请求(Request)-----服务器
百度:
Request URL: https://www.baidu.com/   请求地址
Request Method: GET		 get方法/post方法
Status Code: 200 OK		 状态码:200
Remote (远程) Address: 112.80.248.76:443   远程地址
Accept: text/html,
Accept-Encoding: gzip, deflate, br
Accept-Language: zh-CN,zh;q=0.9   语言
Connection: keep-alive
1、请求行
- 请求行中的请求方式:GET
- 请求方式:Get,Post,HEAD,DELETE,PUT,TRACT...
- get:请求能够携带的参数比较少,大小有限制,会在浏览器的URL地址栏显示数据内容,不安全,但高效
- post:请求能够携带的参数没有限制,不会再浏览器URL显示数据内容,安全,但不高效
2、消息头
Accept:  告诉浏览器,它所支持的数据类型
Accept-Encoding: 支持那种编码格式  GBK UTF-8 GB2312  ISO8859-1
Accept-Language:告诉浏览器,它的语言环境
Cache-Control:缓存控制
Connection:告诉浏览器,请求完成是断开还是保持连接
HOST:主机..../.
4.4、Http响应
- 服务器----响应----客户端
百度:
Cache-Control: private     缓存控制
Connection: keep-alive	   连接
Content-Encoding: gzip	   编码
Content-Type: text/html;charset=utf-8  类型
1、响应体
Accept:告诉浏览器,它所支持的数据类型
Accept-Encoding:支持哪种编码格式  GBK   UTF-8   GB2312  ISO8859-1
Accept-Language:告诉浏览器,它的语言环境
Cache-Control:缓存控制
Connection:告诉浏览器,请求完成是断开还是保持连接
HOST:主机..../.
Refrush:告诉客户端,多久刷新一次;
Location:让网页重新定位;
2、响应状态码***
200:请求响应成功
3xx:请求重定向
- 重定向:你重新到我给你的新位置去;
404:找不到资源
- 资源不存在
5xx:服务器代码错误 500 502: 网关错误
常见面试题:
当你的浏览器中地址输入地址并回车的一瞬间 到页面能够展示回来 ,经历了什么?
5、Maven
为什么要学Maven?
- 在Javaweb开发中,需要使用大量的jar包,我们手动去导入;
- Maven:帮我们自动导入和配置 jar包;

5.1、Maven项目构架管理工具
方便导入jar包
Maven的核心思想:约定大于配置
Maven会规定好你该如何去编写我们的Java代码,必须要按照这个规范来;
5.2、软件下载与配置环境
Maven官网:Maven – Welcome to Apache Maven
环境搭建参考博客:https://yinglongwu.blog.csdn.net/article/details/106190745
控制台乱码问题:https://blog.csdn.net/qq_43107323/article/details/102852046
web.xml 替换为4.0版本和tomcat一致
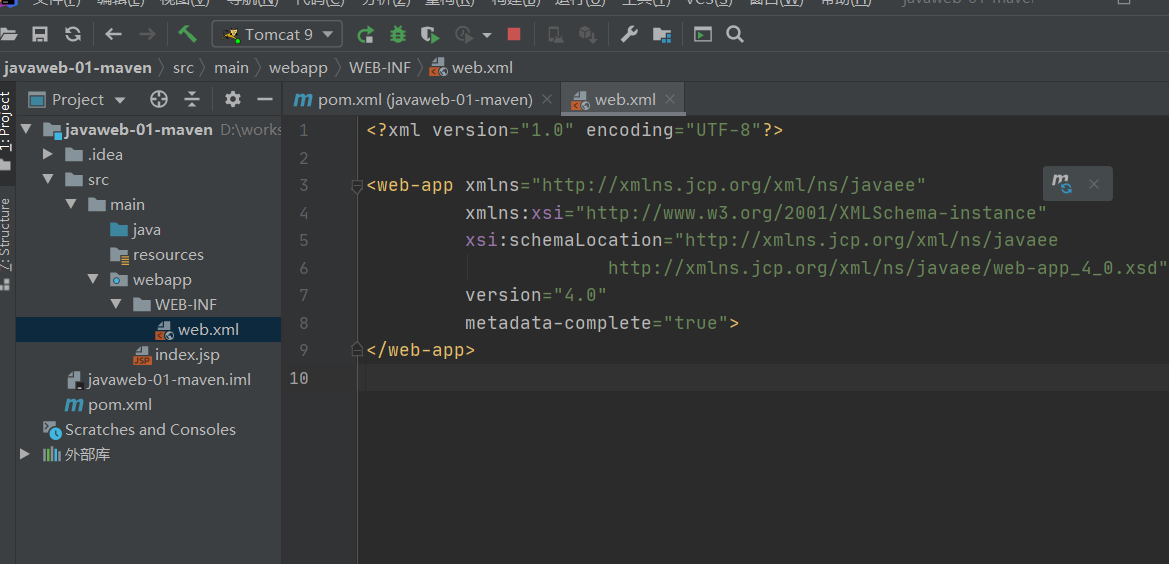
<?xml version="1.0" encoding="UTF-8"?>

<web-app xmlns="http://xmlns.jcp.org/xml/ns/javaee"
         xmlns:xsi="http://www.w3.org/2001/XMLSchema-instance"
         xsi:schemaLocation="http://xmlns.jcp.org/xml/ns/javaee
                             http://xmlns.jcp.org/xml/ns/javaee/web-app_4_0.xsd"
         version="4.0"
         metadata-complete="true">
</web-app>
Maven仓库
配置文件无法导出或生效
maven由于他的约定大于配置,我们之后可以能遇到我们写的配置文件,无法被导出或者生效的问题,
解决方案:
<!--在build中配置resources,来防止我们资源导出失败的问题-->
<build>
    <resources>
        <resource>
            <directory>src/main/resources</directory>
            <includes>
                <include>**/*.properties</include>
                <include>**/*.xml</include>
            </includes>
            <filtering>true</filtering>
        </resource>
        <resource>
            <directory>src/main/java</directory>
            <includes>
                <include>**/*.properties</include>
                <include>**/*.xml</include>
            </includes>
            <filtering>true</filtering>
        </resource>
    </resources>
</build>
6、Servlet
6.1、Servlet简介
- Servlet就是sun公司开发动态web的一门技术
- Sun在这些API中提供一个接口叫做:Servlet,开发一个Servlet只需两步
- 编写一个类,实现Servlet接口
- 把开发好的Java类部署到web服务器中。
把实现了Servlet接口的Java程序叫做,Servlet
6.2、HelloServlet
Servlet接口在Sun公司有两个默认的实现类:HttpServlet,GenericServlet
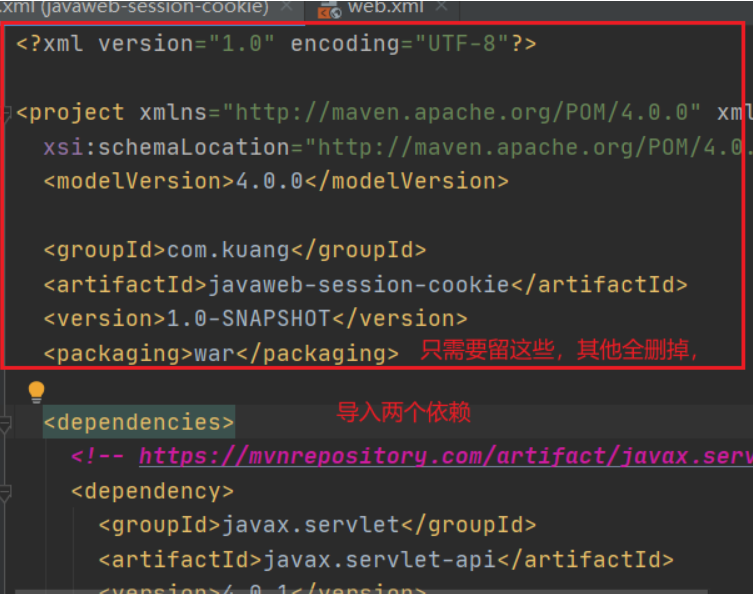
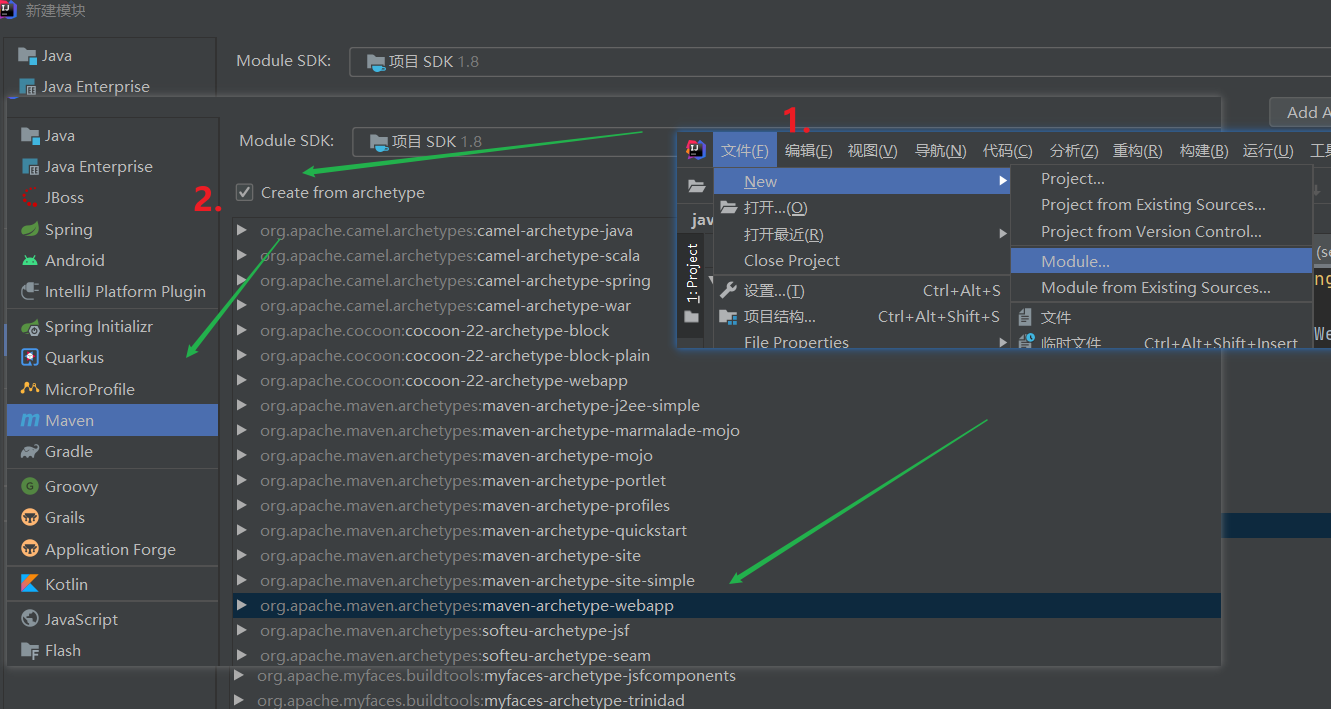
1、Maven项目创建
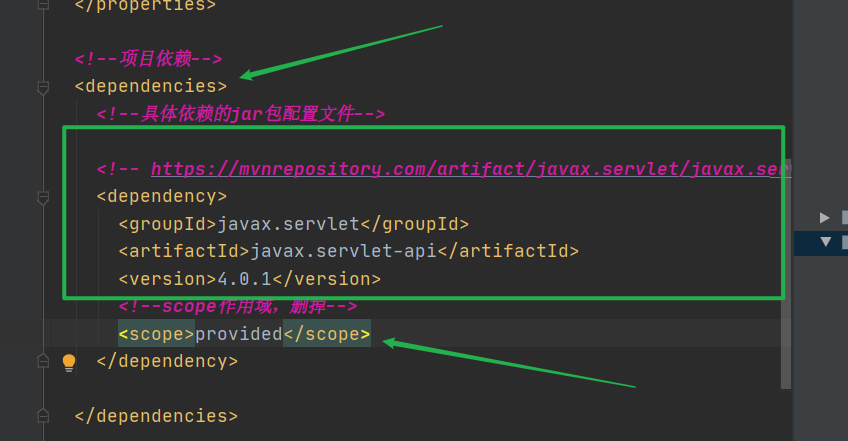
1.构建一个Maven项目,删掉里面是src目录,以后的学习就在里面建立Moudel; 空的工程(pom)就是Maven的主工程--在里面导依赖
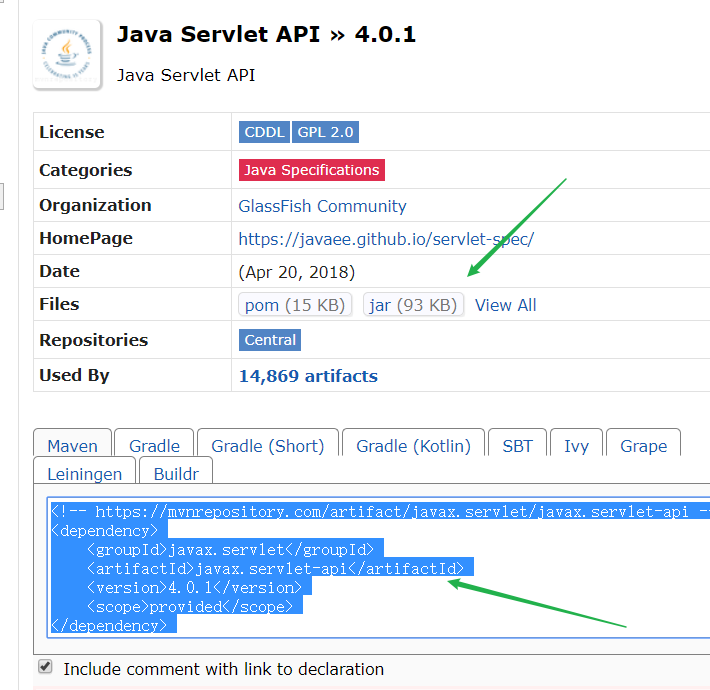
<dependencies>
    <!-- https://mvnrepository.com/artifact/javax.servlet/javax.servlet-api -->
    <dependency>
        <groupId>javax.servlet</groupId>
        <artifactId>javax.servlet-api</artifactId>
        <version>4.0.1</version>
        <scope>provided</scope>
    </dependency>

    <!-- https://mvnrepository.com/artifact/javax.servlet.jsp/javax.servlet.jsp-api -->
    <dependency>
        <groupId>javax.servlet.jsp</groupId>
        <artifactId>javax.servlet.jsp-api</artifactId>
        <version>2.3.3</version>
        <scope>provided</scope>
    </dependency>
</dependencies>
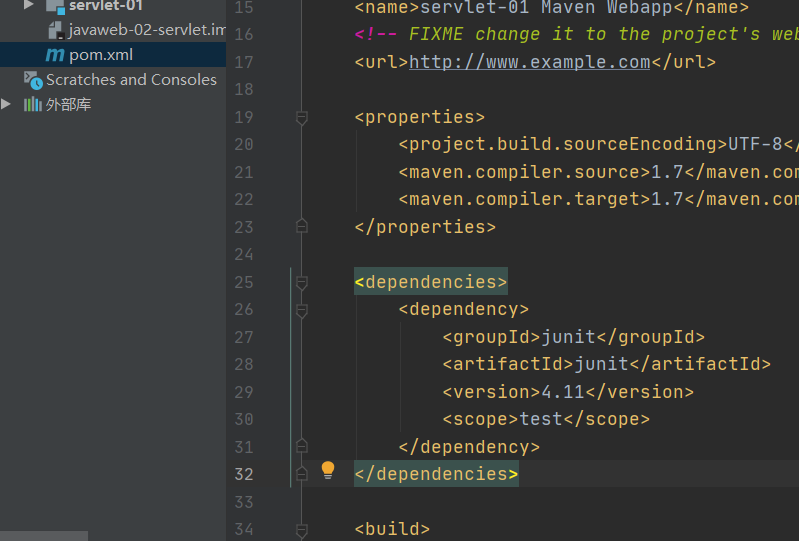
2.新建 Module
2、关于Maven父子工程的理解:
父项目中会有
<modules>
    <module>servlet-01</module>
</modules>
子项目会由
<parent>
    <artifactId>javaweb-02-servlet</artifactId>
    <groupId>com.kuang</groupId>
    <version>1.0-SNAPSHOT</version>
</parent>
父项目的jar包子项目可以直接使用,反之不行
son extend father
2、环境优化
1.1 web.xml替换
<?xml version="1.0" encoding="UTF-8"?>

<web-app xmlns="http://xmlns.jcp.org/xml/ns/javaee"
         xmlns:xsi="http://www.w3.org/2001/XMLSchema-instance"
         xsi:schemaLocation="http://xmlns.jcp.org/xml/ns/javaee
                             http://xmlns.jcp.org/xml/ns/javaee/web-app_4_0.xsd"
         version="4.0"
         metadata-complete="true">
</web-app>
1.2
3、编写一个Servlet程序
- 编写一个普通类
- 实现Servlet接口,继承HttpServlet

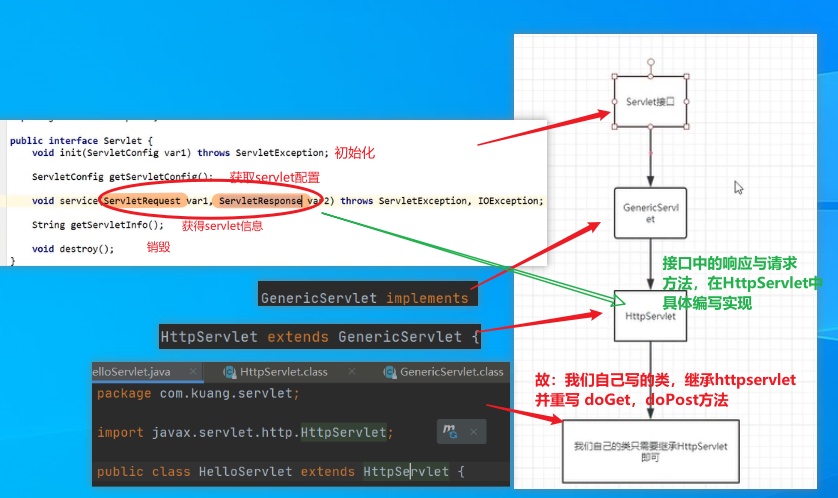
package com.kuang.servlet;
import javax.servlet.ServletException;
import javax.servlet.http.HttpServlet;
import javax.servlet.http.HttpServletRequest;
import javax.servlet.http.HttpServletResponse;
import java.io.IOException;
import java.io.PrintWriter;

public class HelloServlet extends HttpServlet {
    //继承类,重写httpServlet方法!
    // doGet , doPost
    // ctr+o   alt+enter

    //由于get或者post只是请求 实现的不同方式,可以相互调用,业务逻辑都一样
    @Override
    protected void doGet(HttpServletRequest req, HttpServletResponse resp) throws ServletException, IOException {
        //resp.getOutputStream();
        //req.getInputStream();
        PrintWriter writer = resp.getWriter(); //响应流

        writer.print("Hello,Servlet");
      /*
        writer.flush();//刷新
        writer.append();//追加*/

    }

    @Override
    protected void doPost(HttpServletRequest req, HttpServletResponse resp) throws ServletException, IOException {
        super.doPost(req, resp);
    }
}
4、编写Servlet的映射
为什么需要映射:我们写的是Java程序,但是要通过浏览器访问,而浏览器需要连接web服务器,所以我们需要在web服务器中注册我们写的Servlet,还需要给他一个浏览器能够访问的路径
<!--注册Servlet-->
<servlet>
    <servlet-name>hello</servlet-name>
    <servlet-class>com.kuang.servlet.HelloServlet</servlet-class>
</servlet>
<!--Servlet的请求路径-->
<servlet-mapping>
    <servlet-name>hello</servlet-name>
    <url-pattern>/wuhu</url-pattern>
</servlet-mapping>

5、配置Tomcat
注意:配置项目发布的路径就可以了

6、启动测试

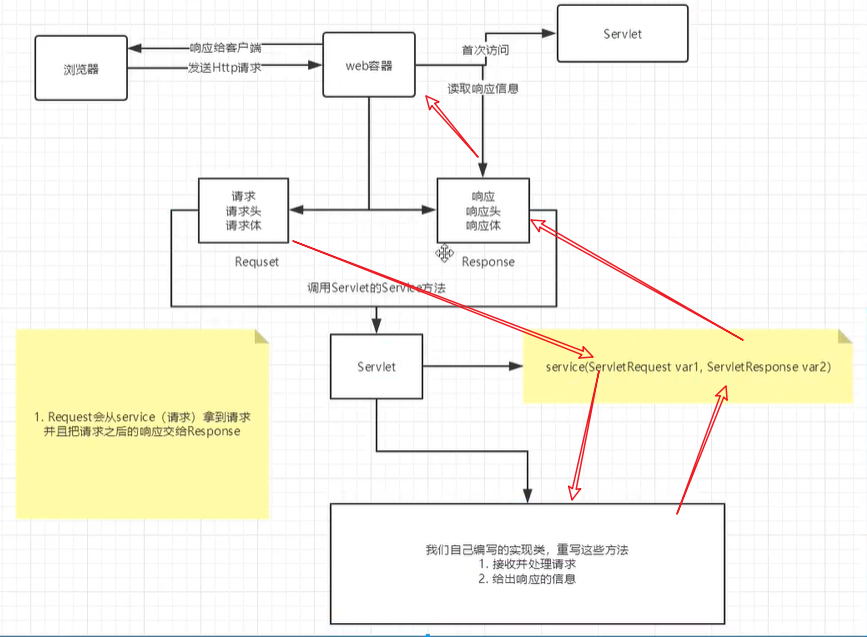
6.3、Servlet原理
Servlet是由Web服务器调用,web服务器在收到浏览器请求后,会:
6.4、Mapping问题
-
一个Servlet可以指定一个映射路径
<servlet-mapping> <servlet-name>hello</servlet-name> <url-pattern>/hello</url-pattern> </servlet-mapping> -
一个Servlet可以指定多个映射路径
<servlet-mapping> <servlet-name>hello</servlet-name> <url-pattern>/hello</url-pattern> </servlet-mapping> <servlet-mapping> <servlet-name>hello</servlet-name> <url-pattern>/hello2</url-pattern> </servlet-mapping> <servlet-mapping> <servlet-name>hello</servlet-name> <url-pattern>/hello3</url-pattern> </servlet-mapping> <servlet-mapping> <servlet-name>hello</servlet-name> <url-pattern>/hello</url-pattern> </servlet-mapping> -
一个Servlet可以指定通用映射路径
<servlet-mapping> <servlet-name>hello</servlet-name> <url-pattern>/hello/*</url-pattern> </servlet-mapping> -
默认请求路径(少用)
<servlet-mapping> <servlet-name>hello</servlet-name> <url-pattern>/*</url-pattern> </servlet-mapping> http://localhost:8080/s1 http://localhost:8080/s1/sfdsjf -
指定一些后缀或者前缀等等。。
<!--可以自定义后缀实现请求映射 注意: *前面不能加项目映射的路径 http://localhost:8080/s1/aw/wfwe.wuhu http://localhost:8080/s1/sdfs.wuhu --> <servlet-mapping> <servlet-name>hello</servlet-name> <url-pattern>*.wuhu</url-pattern> </servlet-mapping> -
优先级问题
指定了固有的映射路径 优先级最高,如果找不到就会走默认的处理请求;
<!--404-->
<servlet>
    <servlet-name>error</servlet-name>
    <servlet-class>com.kuang.servlet.ErrorServlet</servlet-class>
</servlet>
<servlet-mapping>
    <servlet-name>error</servlet-name>
    <url-pattern>/*</url-pattern>
</servlet-mapping>
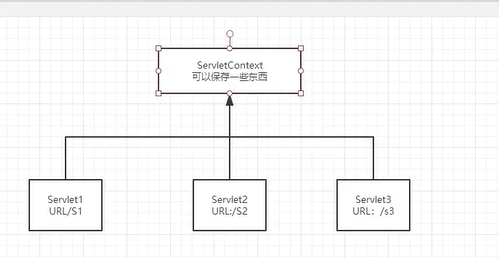
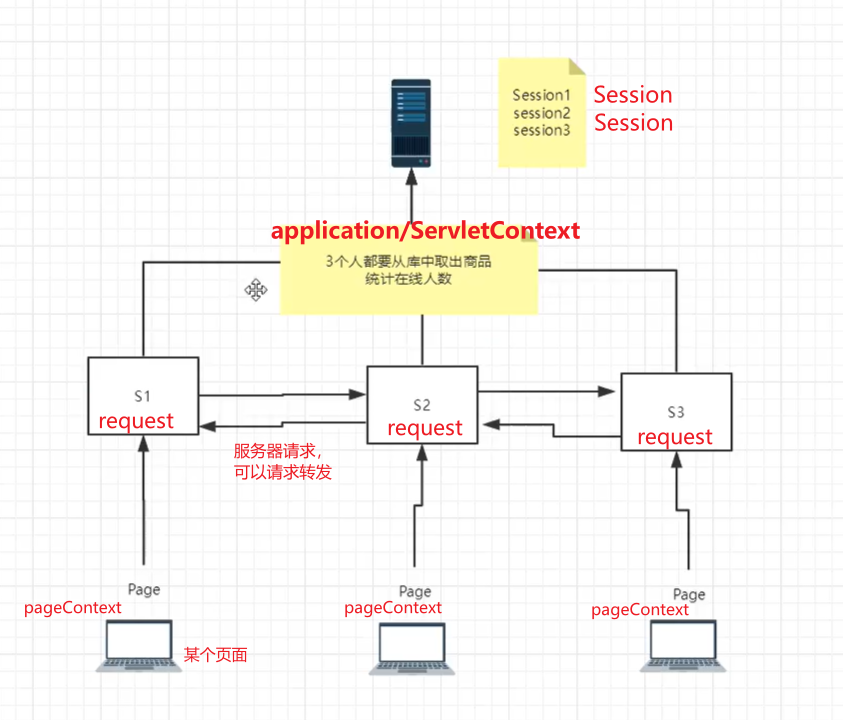
6.5、ServletContext
web容器在启动的时候,它会为每个web程序都创建一个对应的ServletContext对象,它代表了当前的web应用;
1、共享数据
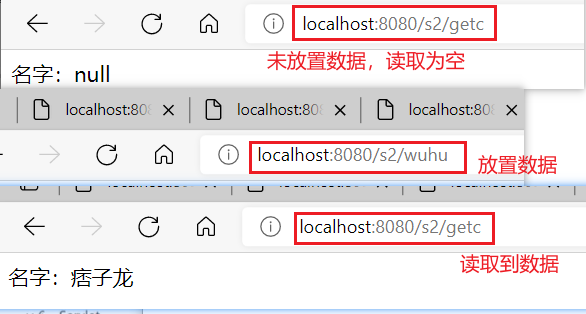
我在这个Servlet中保存的数据,可以在另一个servlet中 拿到;
放置数据:
servletContext对象 setAttribute方法 ("key",values)
public class helloServlet extends HttpServlet {
    @Override
    protected void doGet(HttpServletRequest req, HttpServletResponse resp) throws ServletException, IOException {

        //this.getInitParameter()   初始化参数
        //this.getServletConfig()   Servlet配置
        //this.getServletContext()  Servlet上下文
        ServletContext servletContext = this.getServletContext();

        String username="痞子龙";
        servletContext.setAttribute("username",username); //将一个数据保存在servletcontext中,名字(key)为username,值:username
        System.out.println("Hello");
    }
}
读取数据
注意 读取时的转型, 与 类型+编码问题 (否则无法识别)
public class GetServlet extends HttpServlet {
    @Override
    protected void doGet(HttpServletRequest req, HttpServletResponse resp) throws ServletException, IOException {
        ServletContext context = this.getServletContext();
        //context.getAttribute("username"); object对象--需要强转
        String username = (String) context.getAttribute("username");

        //resp.setContentType("text/html;charset=utf-8");
        resp.setContentType("text/html");
        resp.setCharacterEncoding("utf-8");
        resp.getWriter().print("名字:"+username);
        System.out.println("尝试getAttribute信息");
    }
}
配置web.xml
<servlet>
    <servlet-name>hello</servlet-name>
    <servlet-class>com.kuang.servlet.helloServlet</servlet-class>
</servlet>
<servlet-mapping>
    <servlet-name>hello</servlet-name>
    <url-pattern>/wuhu</url-pattern>
</servlet-mapping>

<servlet>
    <servlet-name>getc</servlet-name>
    <servlet-class>com.kuang.servlet.GetServlet</servlet-class>
</servlet>
<servlet-mapping>
    <servlet-name>getc</servlet-name>
    <url-pattern>/getc</url-pattern>
</servlet-mapping>
2、获取初始化参数
<!--配置一些web应用的初始化参数-->
<context-param>
    <param-name>url</param-name>
    <param-value>jdbc:mysql://localhost:3306/mybatis</param-value>
</context-param>
protected void doGet(HttpServletRequest req, HttpServletResponse resp) throws ServletException, IOException {
    ServletContext servletContext = this.getServletContext();
    String url = servletContext.getInitParameter("url");
    resp.getWriter().print(url);
}
3、请求转发
url路径不会变
protected void doGet(HttpServletRequest req, HttpServletResponse resp) throws ServletException, IOException {
    ServletContext context = this.getServletContext();
    // RequestDispatcher requestDispatcher = context.getRequestDispatcher("/gp");  //转发的请求路径
    // requestDispatcher.forward(req,resp);     //调用forward实现请求转发;
    context.getRequestDispatcher("/gp").forward(req,resp);
    System.out.println("进入请求转发类");
}

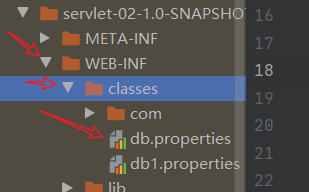
4、读取资源文件
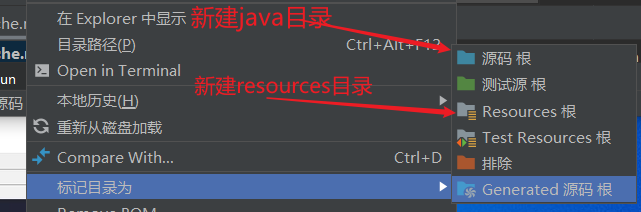
Properties类 properties
- 在java目录下新建properties
- 在resource目录下新建properties
发现都被打包到了同一路径下:classes,我们称这个路径为classpath;


思路:需要一个文件流
protected void doGet(HttpServletRequest req, HttpServletResponse resp) throws ServletException, IOException {
    InputStream is = this.getServletContext().getResourceAsStream("/WEB-INF/classes/db.properties"); //相对路径

    Properties properties = new Properties();
    properties.load(is);
    String user = properties.getProperty("username");
    String pwd = properties.getProperty("password");

    resp.getWriter().print(user+"::"+pwd);
}
6.6、HttpServletResponse
响应:web服务器接收到客户端的http请求,针对这个请求,分别创建一个代表请求的HttpServletRequest对象,一个代表响应的HttpServletResponse
- 如果要获取客户端请求过来的参数:找HttpServletRequest
- 如果要给客户端响应一些信息:找HttpServletResponse
1、简单分类
负责向浏览器发送数据的方法
ServletOutputStream getOutputStream() throws IOException;  //写 流

PrintWriter getWriter() throws IOException; //写中文
负责向浏览器发送响应头的方法
void setCharacterEncoding(String var1);

void setContentLength(int var1);

void setContentLengthLong(long var1);

void setContentType(String var1);

void setDateHeader(String var1, long var2);

void addDateHeader(String var1, long var2);

void setHeader(String var1, String var2);

void addHeader(String var1, String var2);

void setIntHeader(String var1, int var2);

void addIntHeader(String var1, int var2);
响应的状态码
    int SC_CONTINUE = 100;
    int SC_SWITCHING_PROTOCOLS = 101;
    int SC_OK = 200;
    int SC_CREATED = 201;
    int SC_ACCEPTED = 202;
    int SC_NON_AUTHORITATIVE_INFORMATION = 203;
    int SC_NO_CONTENT = 204;
    int SC_RESET_CONTENT = 205;
    int SC_PARTIAL_CONTENT = 206;
    int SC_MULTIPLE_CHOICES = 300;
    int SC_MOVED_PERMANENTLY = 301;
    int SC_MOVED_TEMPORARILY = 302;
    int SC_FOUND = 302;
    int SC_SEE_OTHER = 303;
    int SC_NOT_MODIFIED = 304;
    int SC_USE_PROXY = 305;
    int SC_TEMPORARY_REDIRECT = 307;
    int SC_BAD_REQUEST = 400;
    int SC_UNAUTHORIZED = 401;
    int SC_PAYMENT_REQUIRED = 402;
    int SC_FORBIDDEN = 403;
    int SC_NOT_FOUND = 404;
    int SC_METHOD_NOT_ALLOWED = 405;
    int SC_NOT_ACCEPTABLE = 406;
    int SC_PROXY_AUTHENTICATION_REQUIRED = 407;
    int SC_REQUEST_TIMEOUT = 408;
    int SC_CONFLICT = 409;
    int SC_GONE = 410;
    int SC_LENGTH_REQUIRED = 411;
    int SC_PRECONDITION_FAILED = 412;
    int SC_REQUEST_ENTITY_TOO_LARGE = 413;
    int SC_REQUEST_URI_TOO_LONG = 414;
    int SC_UNSUPPORTED_MEDIA_TYPE = 415;
    int SC_REQUESTED_RANGE_NOT_SATISFIABLE = 416;
    int SC_EXPECTATION_FAILED = 417;
    int SC_INTERNAL_SERVER_ERROR = 500;
    int SC_NOT_IMPLEMENTED = 501;
    int SC_BAD_GATEWAY = 502;
    int SC_SERVICE_UNAVAILABLE = 503;
    int SC_GATEWAY_TIMEOUT = 504;
    int SC_HTTP_VERSION_NOT_SUPPORTED = 505;
2、下载文件
- 向浏览器输出消息
getWriter() getoutputStream() - 下载文件
- 要获取下载文件的路径
- 下载的文件名
- 设置想办法让浏览器能支持下载我们需要的东西
- 获取下载文件的输入流
- 创建缓冲区
- 获取 OutputStream对象
- 讲FileOutputStream流写到buffer缓冲区
- 使用OutputStream将缓冲区中的数据输出到客户端
@Override
protected void doGet(HttpServletRequest req, HttpServletResponse resp) throws ServletException, IOException {
    //1. 要获取下载文件的路径
    //String realPath = this.getServletContext().getRealPath("D:\\workspace_idea1\\javaWeb\\javaweb-02-servlet\\response\\target\\classes\\1.png");
    String realPath="D:\\workspace_idea1\\javaWeb\\javaweb-02-servlet\\response\\target\\classes\\大司马.png";
    System.out.println("下载文件的路径:"+realPath);
    //2. 下载的文件名
    String fileName = realPath.substring(realPath.lastIndexOf("\\") + 1);
    //3. 设置想办法让浏览器能支持下载我们需要的东西    filename==========记得加=
    resp.setHeader("Content-Disposition","attachment;filename="+URLEncoder.encode(fileName,"utf-8"));
    System.out.println(fileName);
    //4. 获取下载文件的输入流

    FileInputStream fis = new FileInputStream(realPath);
    //5. 创建缓冲区
    int len =0;
    byte[] buffer = new byte[1024];
    //6. 获取 OutputStream对象
    ServletOutputStream os = resp.getOutputStream();
    //7. 讲FileOutputStream流写到buffer缓冲区,使用OutputStream将缓冲区中的数据输出到客户端
    while((len=fis.read(buffer))>0){
        os.write(buffer,0,len);
    }
    os.close();
    fis.close();
}
3、验证码功能
验证怎么来的?
- 前端实现
- 后端实现,需要用到 Java 的图片类,生成一个图片
protected void doGet(HttpServletRequest req, HttpServletResponse resp) throws ServletException, IOException {

    //如何让浏览器5秒自动刷新一次;
    resp.setHeader("refresh","3");

    //在内存中创建一个图片
    BufferedImage image = new BufferedImage(130,50,BufferedImage.TYPE_INT_RGB);
    //得到图片
    Graphics2D g = (Graphics2D) image.getGraphics();//笔
    //设置图片的背景颜色
    g.setColor(Color.white);
    g.fillRect(0,0,120,30); //x,y 根据左上角定位
    //给图片写数据
    g.setColor(Color.blue);
    g.setFont(new Font(null,Font.BOLD,20));
    g.drawString(makeNum(),0,25); //字体有20的大小,所以要y轴下来一定距离才能显示在白色背景上

    //告诉浏览器,这个请求用图片的方式打开
    resp.setContentType("image/png");
    //网站存在缓存,不让浏览器缓存
    resp.setDateHeader("expires",-1);
    resp.setHeader("Cache-Control","no-cache");
    resp.setHeader("Pragma","no-cache");

    //把图片写给浏览器
    ImageIO.write(image,"png",resp.getOutputStream());

}

//生成随机数
private String makeNum(){
    Random random = new Random();
    String num = random.nextInt(99999999) + "";//8位随机数

    StringBuffer sb = new StringBuffer();  //长度可变的字符串
    for (int i = 0; i < 8-num.length(); i++) {
        sb.append("0"); //若随机数少于8位,追加0
    }
    /*
        String s = sb.toString() + num ;//sb转为String
        num=s;  */
    num = sb.toString() + num ;
    return num;
}
4、实现重定向 ***

B 一个web资源收到客户端 A 请求后,B 它会通知 A 客户端去访问另外一个web资源 C ,这个过程叫重定向
常见场景:
-
用户登录
void sendRedirect(String var1) throws IOException;测试
protected void doGet(HttpServletRequest req, HttpServletResponse resp) throws ServletException, IOException {
    /*
        resp.setHeader("location","r/image");
        resp.setStatus(302);
         */

    resp.sendRedirect("/r/image"); //重定向
}
面试题:请你聊聊重定向和转发的区别?
相同点
- 页面都会实现跳转
不同点
- 请求转发的时候,url不会发生变化;
- 重定向的时候,url地址栏会发生变化;
5、简单实现登录重定向
<%@ page language="java" contentType="text/html; charset=UTF-8"  pageEncoding="UTF-8"%>可以解决乱码

<%--这里提交的路径,需要寻找到项目的路径--%>
<%--$ {pageContext.request.contextPath}代表当前的项目 --%>
<form action="${pageContext.request.contextPath}/login" method="get">
    用户名:<input type="text" name="username"> <br/>
    密码: <input type="password" name="password"> <br/>
    <input type="submit">
</form>
处理请求
protected void doGet(HttpServletRequest req, HttpServletResponse resp) throws ServletException, IOException {
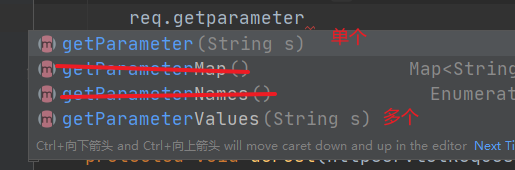
//处理请求 req.getParameter()
String username = req.getParameter("username");
String password = req.getParameter("password");
System.out.println(username+": "+password);
//重定向一定要注意 路径 问题; 否则404
resp.sendRedirect("/r/success.jsp");
}
注册class
<servlet>
    <servlet-name>requestTest</servlet-name>
    <servlet-class>com.kuang.servlet.RequestTest</servlet-class>
</servlet>
<servlet-mapping>
    <servlet-name>requestTest</servlet-name>
    <url-pattern>/login</url-pattern>
</servlet-mapping>
<%@ page contentType="text/html;charset=UTF-8" language="java" %>
<html>
    <head>
        <title>成功登录,完成跳转</title>
    </head>
    <body>

        <h1>Success</h1>

    </body>
</html>
6.7、HttpServletRequest
HttpServletRequest代表客户端的所有请求,用户通过Http协议访问协议,Http请求中的所有信息会被封装到HttpServletRequest,通过这个HttpServletRequest方法,获得客户端的所有信息;
获取前端参数,请求转发
protected void doGet(HttpServletRequest req, HttpServletResponse resp) throws ServletException, IOException {

    //防止 后台接收乱码
    req.setCharacterEncoding("utf-8");
    resp.setCharacterEncoding("utf-8");

    String username = req.getParameter("username");
    String password = req.getParameter("password");

    String[] hobbys = req.getParameterValues("hobbys");


    System.out.println("====================");
    System.out.println(username);
    System.out.println(password);
    System.out.println(Arrays.toString(hobbys));
    System.out.println("======================");

    //通过请求转发
    // 请求转发不用写当前web应用的名字,重定向得写
    req.getRequestDispatcher("/success.jsp").forward(req,resp);
    //req.getRequestDispatcher("success.jsp").forward(req,resp);
}
面试题:请你聊聊重定向和转发的区别?
相同点
- 页面都会实现跳转
不同点
- 请求转发的时候,url不会发生变化 307
- 重定向的时候,url地址栏会发生变化; 302
7、Cookie,Session
7.1、会话
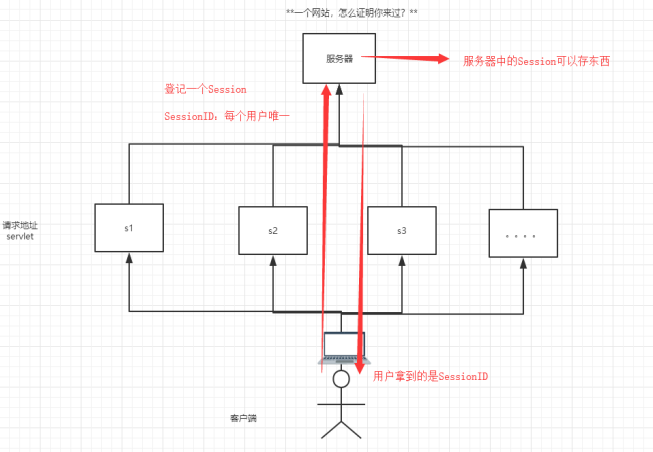
会话:用户打开一个浏览器,点击了很多超链接,访问多个web资源,关闭浏览器;这个过程称为会话。
有状态会话:一个同学来过教室,下次再来教室,我们会知道这个同学曾经来过, 称之为有状态会话。
一个网站如何 证明你来过?
客户端 服务端
- 服务端给客户端一个信件,客户端下次访问 服务端 带上信件就可以了; cookie;
- 服务端登记你来过,下次你来的时候 我匹配你; seesion
7.2、保存会话的两种技术
cookie
- 客户端技术 (响应,请求)
seesion
- 服务器技术 (保存用户的会话信息,可以把信息或数据放在seesion中)
常见场景: 网站登录后,下次不用再次登录,第二次访问直接登录状态;
7.3、Cookie
- 从请求中拿到cookie信息
- 服务器响应给客户端cookie
Cookie[] cookies = req.getCookies(); //获得Cookie
cookie.getName(); //获得Cookie中的key
cookie.getValue();//获取Cookie中的value
new Cookie("lastLongTime", System.currentTimeMillis()+"");//新建一个Cookie
cookie.setMaxAge(24*60*60); //设置cookie的有效期
resp.addCookie(cookie); //响应给客户端一个cookie
cookie:一般会保存在本地的 用户目录下 appdata;
一个网站cookie是否存在上限?
- 一个cookie只能保存一个信息;
- 一个web站点可以给浏览器发送多个cookie,最多存放20个cookie;
- Cookie大小有限制4kb
- 300个cookie浏览器上限
删除Cookie:
- 不设置有效期,关闭浏览器,自动失效;
- 设置有效期为时间 0;
编码解码:
URLEncoder.encode("芜湖大司马","utf-8");
URLDecoder.decode(cookie.getvalue,"utf-8");

7.4、Session (重点)
什么是Session:
- 服务器会给每一个用户(浏览器)创建一个Session对象;
- 一个Session独占一个浏览器,只要浏览器没有关闭,这个Session就一直存在
- 用户登录后,整个网站它都可以访问----> 保存用户的信息;保存购物车的信息....
Session和Cookie的区别:
- Cookie是把用户的数据写给用户的浏览器,浏览器保存(可以保存多个)
- Session把用户的数据写道用户独占的Session中,服务器保存(保存重要信息)
- Session对象由服务器创建;
使用场景:
- 保存一个登录用户的信息;
- 购物车信息
- 在整个网站中经常会使用 的数据
常用方法:
pa:注销Session:关闭浏览器,移除属性,设置Session默认的失效时间 <session-config>

设置session值
//设置session值
public class SessionDemo01 extends HttpServlet {
    @Override
    protected void doGet(HttpServletRequest req, HttpServletResponse resp) throws ServletException, IOException {
        //解决乱码问题
        req.setCharacterEncoding("utf-8");
        resp.setCharacterEncoding("utf-8");
        resp.setContentType("text/html;charset=utf-8");
        //得到Session
        HttpSession session = req.getSession();

        //给Session存东西 object对象
        session.setAttribute("name","芜湖大司马");
        session.setAttribute("myPerson",new Person("辰南",18,"小狗"));
        //获取Session ID
        String sessionId = session.getId();
        //判断Session是不是新创建的
        if(session.isNew()){
            resp.getWriter().print("New Session is success"+"Session ID is:"+sessionId);
        }else {
            resp.getWriter().print("The session is already exists"+"<br> Session ID is: "+sessionId);
        }

        //Session创建的时候做了什么事情:
//        Cookie cookie = new Cookie("JSESSIONID",sessionId);
//        resp.addCookie();  新建了一个存放sessionId 的cookie
    }
获得session数据
//获得session数据
public class SessionDemo02 extends HttpServlet {
    @Override
    protected void doGet(HttpServletRequest req, HttpServletResponse resp) throws ServletException, IOException {
        //乱码
        req.setCharacterEncoding("utf-8");
        resp.setCharacterEncoding("utf-8");
        resp.setContentType("text/html;charset=utf-8");

        //得到Session
        HttpSession session = req.getSession();

        //获取Session数据 object-->String
        String name = (String) session.getAttribute("name");
        resp.getWriter().print(name+"<br/>");
        //object 转 Person对象
        Person myPerson = (Person) session.getAttribute("myPerson");
        resp.getWriter().print(myPerson);
    }
}
会话自动过期:web.xml 配置
<!--设置Session默认的失效时间-->
<session-config>
    <!--xx分钟后Session自动失效-->
    <session-timeout>1</session-timeout>
</session-config>

8、JSP
8.1、什么是JSP
Java Server Pages: Java服务器页面。 也和Server一样,用于动态web技术!
最大的特点:
- 写JSP就像在写HTML
- 区别:
- HTML只能给用户提供静态数据
- JSP页面中可以嵌入Java代码,为用户提供动态数据;
8.2、JSP原理
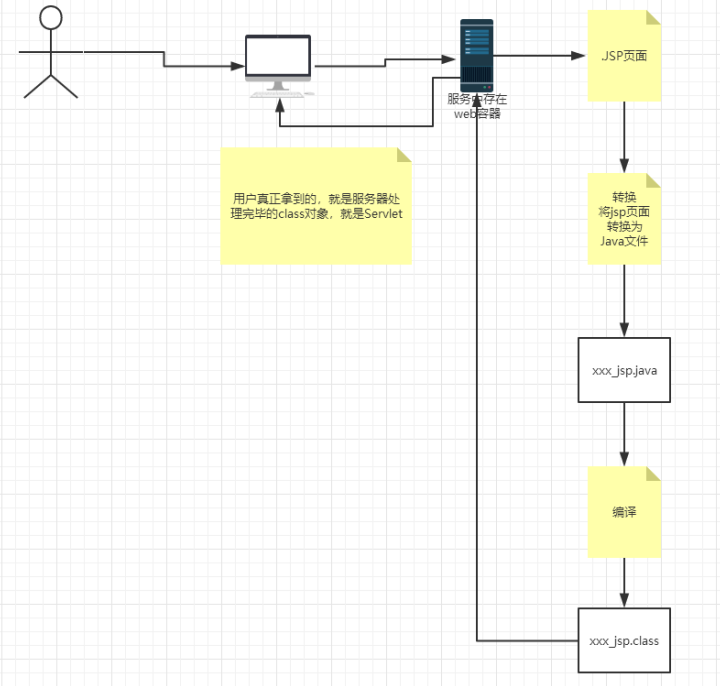
思路:JSP到底是怎么执行的?
-
代码层面没有任何问题
-
服务器内部工作
tomcat中有一个work目录;
IDEA中使用Tomcat 会在IDEA的tomcat中生成一个work目录
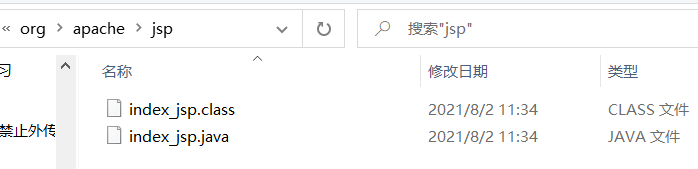
C:\Users\16062\AppData\Local\JetBrains\IntelliJIdea2020.1\tomcat\Unnamed_javaweb-session-cookie_2\work\Catalina\localhost\ROOT\org\apache\jsp
页面转化成了java程序
浏览器向服务器发送请求,不管访问什么资源,其实都是在访问Servlet !
JSP最终也会被转化为一个Java类
JSP本质上就是一个Servlet HttpJspBase extends HttpServlet
public void _jspInit() {} //初始化
public void _jspDestroy() {} //销毁
public void _jspService(.HttpServletRequest request,HttpServletResponse response) //JSPService
-
判断请求
-
内置了一些对象
final javax.servlet.jsp.PageContext pageContext;//页面上下文 javax.servlet.http.HttpSession session = null;//session final javax.servlet.ServletContext application;//applicationContext final javax.servlet.ServletConfig config;//config javax.servlet.jsp.JspWriter out = null;//out final java.lang.Object page = this; //page:当前 HttpServletRequest request //请求 HttpServletResponse respons //响应 -
输出页面前增加的代码
response.setContentType("text/html"); //设置响应的页面类型 pageContext = _jspxFactory.getPageContext(this, request, response, _jspx_page_context = pageContext; application = pageContext.getServletContext(); config = pageContext.getServletConfig(); session = pageContext.getSession(); out = pageContext.getOut(); _jspx_out = out; -
以上的这些对象,我们可以在JSP中直接使用
在JSP页面中:
只要是Java代码 就会被原封不动的输出
如果是HTML代码,就会被转化为:
out.write("<html>\r\n");
这样的格式,输出到前端;
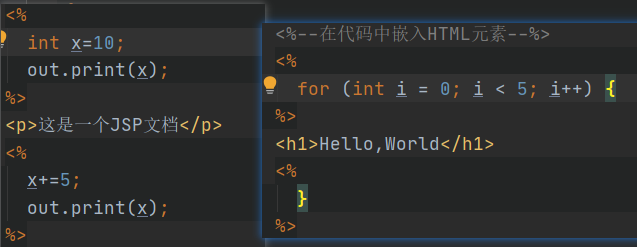
8.3、JSP基础语法
任何语言都有自己的语法,Java中有,JSP作为java技术的一种应用,它拥有一些自己扩充的语法(了解即可),java所有语法都支持;

<% %>
<%= %> 表达式
${}  EL表达式
<%! %> 全局
<%--注释--%>
<!--HTML注释--> JSP的注释不会再客户端显示,html的会
JSP表达式
<%--JSP表达式
    作用:将程序输出到客户端
    <%=变量或表达式%>>
--%>
<%= new Date()%>
JSP脚本片段
<%--JSP脚本片段--%>
<%
int sum = 0;
for (int i = 0; i <=10; i++) {
    sum+=i;
}
out.print("<h1>Sum="+sum+"</h1>");
%>
脚本片段的玩法: (相对于都在一个_javaService方法中 html+jsp<%%>)
JSP声明
<%--方法外部的代码(全局变量、方法)--%>
<%!
    static {
    System.out.println("enter static...Loading Servlet");
}
private int globavar = 0;

public void wuhu(){
    System.out.println("进入了wuhu()");
}
%>
JSP声明:会被编译到JSP生成的Java的类中;其他的被生成到_jspService方法中
8.4、JSP指令
设置整个JSP页面相关的属性,如网页的编码方式和脚本语言。
<%@ page args... %> 定义网页依赖属性
<%@include file="" %> 包含其他文件
JSP标签 <jsp:> 在Jsp页面中提供业务逻辑功能
@include 会将两个页面合二为一
    <%@include file="common/head.jsp"%>
    <h2>网页主体</h2>
    <%@include file="common/foot.jsp"%>


jsp:include 拼接页面 (通过方法引用拼接)
    <jsp:include page="/common/head.jsp" ></jsp:include>
    <h2>网页主体2</h2>
    <jsp:include page="common/foot.jsp"></jsp:include>
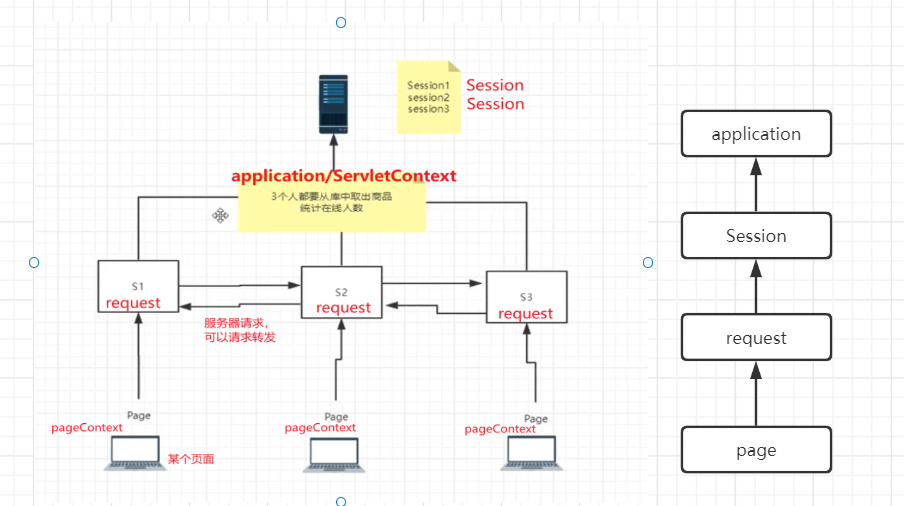
8.5、9大内置对象
- PageContext --存东西
- Request --存东西
- Response
- Session --存东西
- Application 【ServletContext】 --存东西
- config 【ServleteConfig】
- out
- page ,不用了解
- exception 异常
pageContext.setAttribute("name1","珎1"); //保存的数据只在一个页面有效
request.setAttribute("name2","珎2"); //只在一次请求转发中有效
session.setAttribute("name3","珎3"); //在一个会话中有效 (从打开浏览器到关闭浏览器)
application.setAttribute("name4","珎4"); //保存的数据在服务器中有效,从打开服务器到关闭服务器
request:客户端向服务器发送请求,产生的数据,用户看完就没用了
新闻
session:客户端向服务器发送请求,产生的数据,用户用完一会还有用 购物车
application:客户端向服务器发送请求,产生的数据,一个用户用完,其他的用户还能使用。聊天数据
8.6、JSP标签,JSTL标签,EL表达式
<!--jsp表达式的依赖 -->
<dependency>
    <groupId>javax.servlet</groupId>
    <artifactId>jstl</artifactId>
    <version>1.2</version>
</dependency>
<!--standard标签库-->
<dependency>
    <groupId>taglibs</groupId>
    <artifactId>standard</artifactId>
    <version>1.1.2</version>
</dependency>
EL表达式: ${}
- 获取数据
- 执行运算
- 获取web开发的常用对象
JSP标签
<%--jsp:include--%>

<%--
    http://localhost:8080/jspTag.jsp?name=天龙&age=18
--%>
<jsp:forward page="jspTag2.jsp">
    <jsp:param name="name" value="wuhu"/>
    <jsp:param name="age" value="18"/>
</jsp:forward>
JSTL
JSTL标签库的使用就是为了弥补HTML标签的不足;它自定义许多标签,可以供我们使用,标签的功能和 Java代码一样!
核心、格式化、sql、XML...标签 taglib
核心标签 (掌握部分)
- 先引入对应的标签库 taglib
- 再使用其中的方法
- 在Tomcat中,也需要引入jstl的包,否则报错:JSTL解析错误

c:if
<%@ page contentType="text/html;charset=UTF-8" language="java" %>

<%--引入JSTL核心标签库,我们才能使用JSTL标签--%>
<%@ taglib prefix="c" uri="http://java.sun.com/jsp/jstl/core" %>
<html>
<head>
    <title>核心标签JST</title>
</head>
<body>

<h4>if测试</h4>
<form action="coreif.jsp" method="get">
    <%--
    EL表达式 获取表单中的数据
    ${param.参数名}
    --%>
   <input type="text" name="username" value="${param.username}">
   <input type="submit" value="登录">
</form>

<c:if test="${param.username=='admin'}" var="isAdmin">
    <c:out value="管理员来了嗷"></c:out>
</c:if>

<c:out value="${isAdmin}"/>

</body>
</html>
c:choose c:when
<c:set var="score" value="50"/>

<c:choose>
    <c:when test="${score>=90}">
        你的成绩为优秀
    </c:when>
    <c:when test="${score>=80}">
        你的成绩为良好
    </c:when>
    <c:when test="${score>=60}">
        你的成绩为合格
    </c:when>
    <c:when test="${score<60}">
        你不及格啦
    </c:when>

</c:choose>
c:forEach
<%
    ArrayList<String> people = new ArrayList<String>();
    people.add(0,"张三");
    people.add("李四");
    people.add("王五");
    people.add("赵六");
    people.add(4,"钱七");
    request.setAttribute("list",people);//将数据添加到request请求中
%>

<%--forEach 循环
var ,变量名
items  要遍历的对象
begin
end
step  步长!
--%>
<c:forEach var="x" items="${list}">
    <c:out value="${x}"/> <br/>
</c:forEach>
<hr/>
<c:forEach var="y" items="${list}" begin="0" end="4" step="2">
    <c:out value="${y}"/> <br/>
</c:forEach>
9、JavaBean
实体类
JavaBean有特定的写法:
- 必须要有一个无参构造
- 属性必须私有化
- 必须有对应的get/set方法
一般用来和数据库的字段做映射 ORM;
ORM:对象关系映射
- 表--->类
- 字段--->属性
- 行记录---->对象
| id | name | age | address |
|---|---|---|---|
| 1 | 芜湖1号 | 3 | 安徽1 |
| 2 | 芜湖2号 | 6 | 安徽2 |
| 3 | 芜湖3号 | 9 | 安徽3 |
class People{
    int id;
    String name;
    int age;
    String address;
}
class A{
    new People(1,"芜湖1号",3,"安徽1");
    new People(2,"芜湖2号",6,"安徽2");
    new People(3,"芜湖3号",9,"安徽3");
}
- 过滤器
- 文件上传
- 邮件发送
- JDBC复习:如何使用JDBC,JDBC crud ,JDBC 事务
int不适合作为web层的表单数据的类型。
Integer是java为int提供的封装类。int的默认值为0,而Integer的默认值为null
10、MVC三层架构
什么是MVC:Moudel view Controller 模型,视图,控制器
10.1、早些年的架构

用户直接访问控制层,控制层就可以直接操作数据库;
servlet--CRUD--->数据库
弊端:程序十分臃肿,不利于维护
servle的代码中:处理请求、响应、视图跳转、处理JDBC、处理业务代码、处理逻辑代码

架构:没有什么是加一层解决不了的!
   程序员---[JDBC]--->Mysql、Oracle、SqlServer。。。
10.2、MVC三层架构
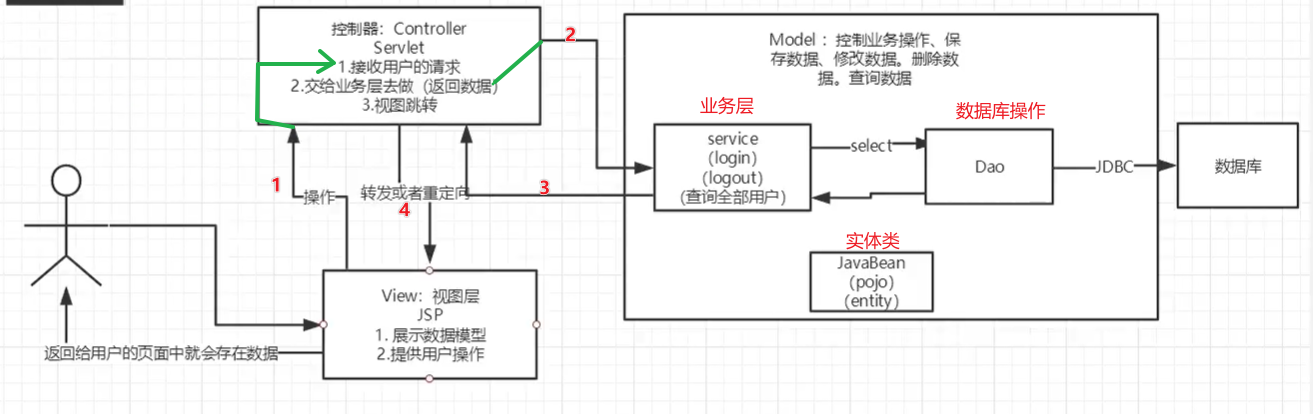
Model
- 业务处理:业务逻辑(Service)
- 数据持久层:CRUD (Dao)
View
- 展示数据
- 提供链接,发起Servlet请求 (a,form,img....)
Controller(Servlet)
-
接收用户的请求:(req:请求参数,Session信息.... )
-
交给业务层处理对应的代码
-
控制试图的跳转
登录--->接收用户的登录请求--->处理用户的请求(获取用户登录的参数,usesrname,password)--->交给业务层处理登录业务(判断用户名密码是否正确:事务)--->Dao层查询用户名和密码是否正确--->数据库
11、Filter (重点)
Filter:过滤器,用来过滤网站的数据;
- 处理中文乱码
- 登录验证....
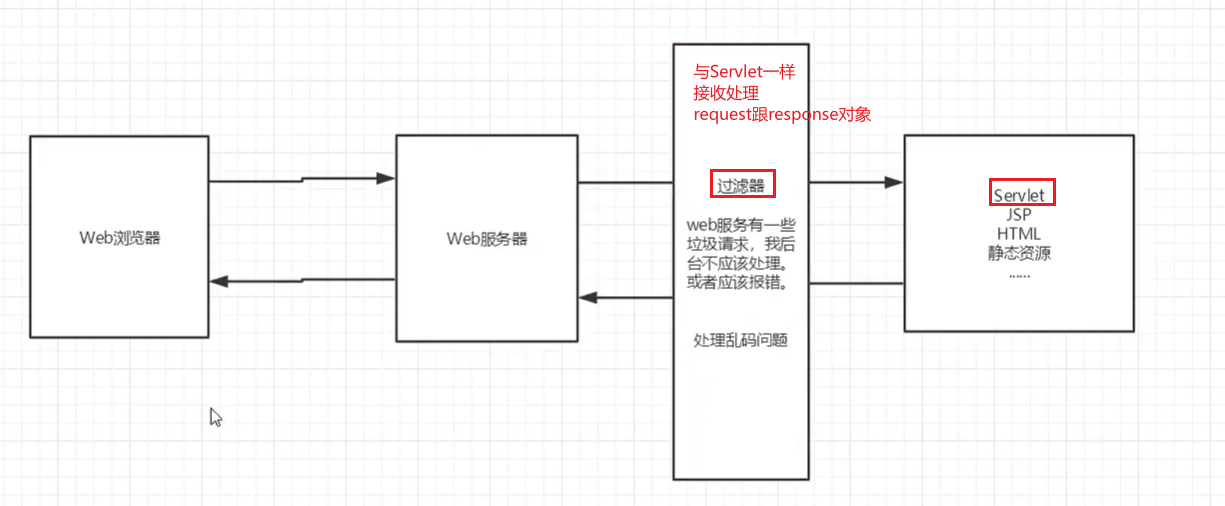
Filter开发步骤:
1、导包
添加框架支持+添加依赖

<dependencies>
    <!--Servlet 依赖-->
    <dependency>
        <groupId>javax.servlet</groupId>
        <artifactId>servlet-api</artifactId>
        <version>2.5</version>
    </dependency>
    <!--JSP依赖 -->
    <dependency>
        <groupId>javax.servlet.jsp</groupId>
        <artifactId>javax.servlet.jsp-api</artifactId>
        <version>2.3.3</version>
    </dependency>
    <!--JSTL表达式的依赖 -->
    <dependency>
        <groupId>javax.servlet</groupId>
        <artifactId>jstl</artifactId>
        <version>1.2</version>
    </dependency>
    <!--standard标签库-->
    <dependency>
        <groupId>taglibs</groupId>
        <artifactId>standard</artifactId>
        <version>1.1.2</version>
    </dependency>

    <!--连接数据库-->
    <dependency>
        <groupId>mysql</groupId>
        <artifactId>mysql-connector-java</artifactId>
        <version>5.1.47</version>
    </dependency>
</dependencies>

2、编写过滤器
3.实现Filter接口,重写对应的方法 chain链
package com.kuang.filter;

import javax.servlet.*;
import java.io.IOException;

//字符编码过滤器
//实现接口,重写三个方法
public class CharacterEncodingFilter implements Filter {

    //初始化:web服务器启动,就已经初始化了,随时等待过滤对象的出现!
    public void init(FilterConfig filterConfig) throws ServletException {
        System.out.println("CharacterEncodingFilter初始化");
    }

    // Chain: 链
    /*
    1.过滤器中的所有代码,在 过滤特定请求 的时候都会执行
    2.必须要让过滤器继续通行
        filterChain.doFilter(servletRequest,servletResponse);
    * */
    public void doFilter(ServletRequest servletRequest, ServletResponse servletResponse, FilterChain filterChain) throws IOException, ServletException {

        servletRequest.setCharacterEncoding("utf-8");
        servletResponse.setCharacterEncoding("utf-8");
        servletResponse.setContentType("text/html;charset=utf-8");

        System.out.println("CharacterEncoding执行前....");

        //chain.doFilter 让请求继续走,如果不写,程序会被拦截停止
        filterChain.doFilter(servletRequest,servletResponse);

        System.out.println("CharacterEncoding执行后.......");

    }
    //销毁 :web服务器关闭的时候,过滤销毁
    public void destroy() {
        System.out.println("CharacterEncodingFilter销毁");
    }
}
4.在web.xml中配置 Filter
<!--注册过滤器-->
<filter>
    <filter-name>characterEncodingFilter</filter-name>
    <filter-class>com.kuang.filter.CharacterEncodingFilter</filter-class>
</filter>
<filter-mapping>
    <filter-name>characterEncodingFilter</filter-name>
    <!--只要是 /servlet的任何请求,都会经过这个过滤器-->
    <url-pattern>/servlet/*</url-pattern>
</filter-mapping>
12、监听器
实现一个监听器的接口:(有许多种接口)
-
编写一个监听器
实现监听器的接口
//统计网站在线人数:统计session public class OnlineCountListener implements HttpSessionListener { //创建session监听 //一旦创建session就会触发一次这个事件 public void sessionCreated(HttpSessionEvent se) { ServletContext context = se.getSession().getServletContext();//获取session对象,获取servletcontext共享数据 System.out.println(se.getSession().getId());//打印session ID Integer onlineCount = (Integer) context.getAttribute("OnlineCount");//获取在线数量 //判断session数量 并 +1 if(onlineCount==null){ onlineCount=new Integer(1); }else{ int count = onlineCount.intValue(); onlineCount=new Integer(count+1); } context.setAttribute("OnlineCount",onlineCount);//设置session } //销毁session监听 public void sessionDestroyed(HttpSessionEvent se) { ServletContext context = se.getSession().getServletContext(); Integer onlineCount = (Integer) context.getAttribute("OnlineCount"); if(onlineCount==null){ onlineCount=new Integer(0); }else { int count = onlineCount.intValue(); onlineCount=new Integer(count-1); } context.setAttribute("OnlineCount",onlineCount); } /* Session销毁: 1.手动销毁 se.getSession().invalidate(); 2.自动销毁 <session-config> */ } -
web.xml中注册监听器
<!--注册监听器--> <listener> <listener-class>com.kuang.listener.OnlineCountListener</listener-class> </listener> -
看情况是否使用
13、过滤器、监听器常见应用
用户登录之后才能进入主页;用户注销后不能进入
-
用户登录后,向Session中放入用户的数据
-
在进入主页的时候要判断用户是否已经登录;要求:在过滤器中实现
        //Servlet req,resp 转为其子类 HttpServlet,获取session对象
        HttpServletRequest request = (HttpServletRequest) req;
        HttpServletResponse response = (HttpServletResponse) resp;

        if(request.getSession().getAttribute(Constant.USER_SESSION) ==null){
            response.sendRedirect("/error.jsp");
        }
        chain.doFilter(req,resp);
14、JDBC
什么是JDBC:Java连接数据库

需要的jar包的支持:
- java.sql
- javax.sql
- mysql-conneter-java... 连接驱动(必须要导)
实验环境搭建
DROP TABLE `jdbc`.`people`;

CREATE TABLE IF NOT EXISTS `users`(
    `id` INT(4) ,
    `name` VARCHAR(40) COMMENT'用户名',
    `password` VARCHAR(40) COMMENT'密码',
    email VARCHAR(40) COMMENT'邮箱',
    birthday DATE COMMENT'生日',
    PRIMARY KEY(`id`)
)ENGINE=INNODB DEFAULT CHARSET=utf8;

INSERT INTO users(id,`name`,`password`,email,birthday)
VALUES(1,'张三','123456','wuhu1@qq.com','2000-01-01'),
(2,'李四','123456','wuhu2@qq.com','2000-01-02'),
(3,'王五','123456','wuhu3@qq.com','2000-01-03'),
(4,'赵六','123456','wuhu4@qq.com','2000-01-04');

SELECT * FROM users;
导入数据库依赖
<!--mysql的连接驱动-->
<dependency>
    <groupId>mysql</groupId>
    <artifactId>mysql-connector-java</artifactId>
    <version>5.1.47</version>
</dependency>
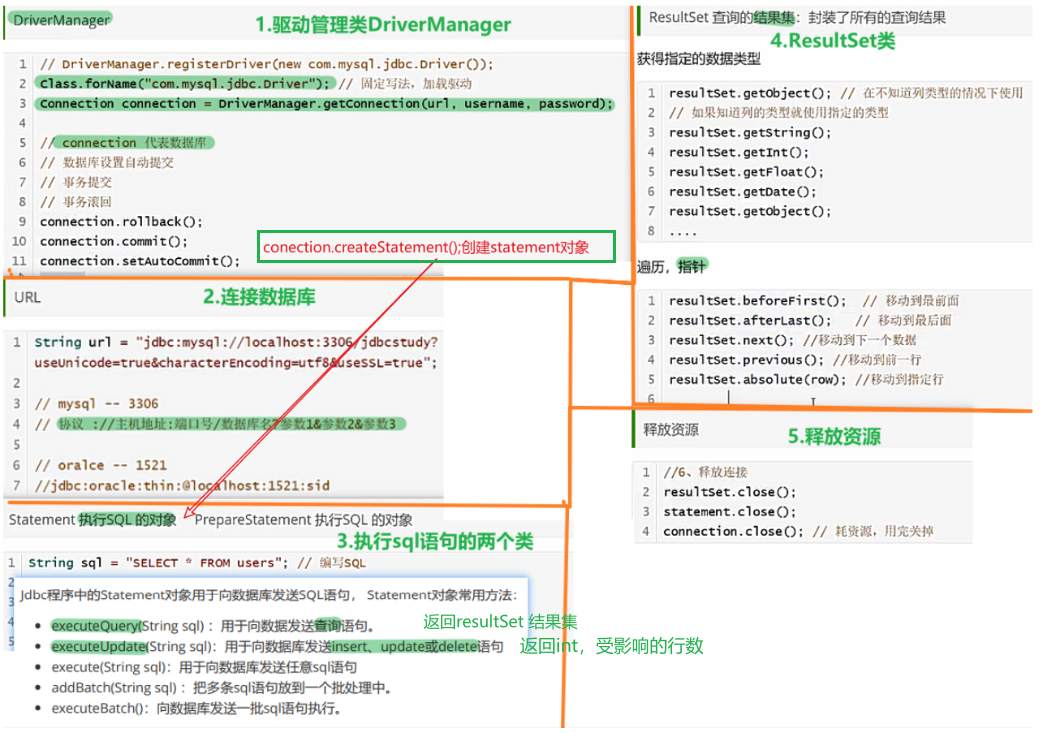
public static void main(String[] args) throws Exception {
        //配置信息
        // jdbc:mysql://localhost:3306 /表 ? 配置信息1 & 配置信息2
        String url = "jdbc:mysql://localhost:3306/jdbc?useUnicode=true&characterEncoding=utf8";
        String username = "root";
        String password = "123456";

        //1.加载驱动
        Class.forName("com.mysql.jdbc.Driver");
        //2.连接数据库, 获取数据库对象connection
        Connection connection = DriverManager.getConnection(url, username, password);

        //3.向数据库发送SQL的对象Statement :CRUD
        Statement statement = connection.createStatement();

        //4.编写SQL
        String sql = "select *from users";

        //5.执行 查询SQL,返回一个resultSet--结果集
        ResultSet resultSet = statement.executeQuery(sql);

        while(resultSet.next()){
            System.out.println("id="+resultSet.getObject("id"));
            System.out.println("name="+resultSet.getObject("name"));
            System.out.println("password="+resultSet.getObject("password"));
            System.out.println("email"+resultSet.getObject("email"));
            System.out.println("birthday"+resultSet.getObject("birthday"));

        }
        //6.关闭连接
        resultSet.close();
        statement.close();
        connection.close();
    }
预编译SQL
public static void main(String[] args) throws Exception {
    //配置信息
    // jdbc:mysql://localhost:3306 /表 ? 配置信息1 & 配置信息2
    String url = "jdbc:mysql://localhost:3306/jdbc?useUnicode=true&characterEncoding=utf8";
    String username = "root";
    String password = "123456";

    //1.加载驱动
    Class.forName("com.mysql.jdbc.Driver");
    //2.连接数据库
    Connection connection = DriverManager.getConnection(url, username, password);
    //3.编写sql
    String sql = "insert into users(id, name, password, email, birthday) values(?,?,?,?,?)";
    //4.预编译
    PreparedStatement preparedStatement = connection.prepareStatement(sql);

    preparedStatement.setInt(1,5);//给第一个占位符赋值
    preparedStatement.setString(2,"芜湖");
    preparedStatement.setString(3,"123456");
    preparedStatement.setString(4,"999@qq.com");
    preparedStatement.setDate(5,new Date(new java.util.Date().getTime()));//new sql.Date(new util.Date().getTime)

    //5.执行sql
    int i = preparedStatement.executeUpdate();

    if (i>0){
        System.out.println("插入成功!");
    }
    //6.释放资源
    preparedStatement.close();
    connection.close();
}
事务
要么都成功,要么都失败
ACID原则:保证数据的安全
开启事务
事务提交 commit()
事务回滚 rollback()
关闭事务
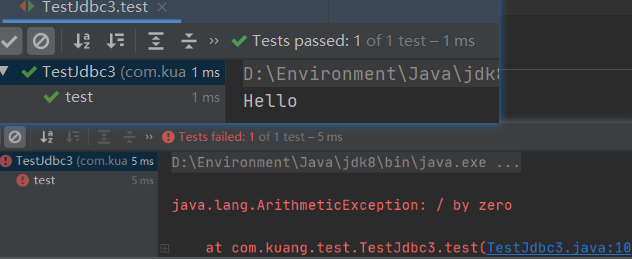
junit 单元测试
依赖
<dependency>
    <groupId>junit</groupId>
    <artifactId>junit</artifactId>
    <version>4.12</version>
</dependency>
简单使用
@Test注解 只有在方法上有效,只要加了这个注解的方法,就可以直接运行;
15、SMBMS项目
16、文件上传
17、邮件发送
18、总览
附:
Servlet四个层级

 浙公网安备 33010602011771号