通过 loganalyzer 展示数据库中的日志
环境准备
三台主机
    一台日志服务器,利用上一个案例实现,IP:192.168.39.7,
    一台数据库服务器,利用上一个案例实现,IP:192.168.39.27,
    一台当httpd+php 服务器,并安装loganalyzer展示web图形,IP:192.168.39.77

    日志服务器工具  loganalyzer-4.1.8.tar.gz
准备服务器:
# 日志服务器
[root@centos7 ~]$hostname rsyslog
[root@centos7 ~]$exit
[root@rsyslog ~]$
# 数据库服务器
[root@centos7 ~]$hostname mysql
[root@centos7 ~]$exit
[root@mysql ~]$
# websrv服务器
[root@centos ~]# hostname websrv
[root@centos ~]# exit
[root@websrv ~]$
日志服务器:
- 在rsyslog服务器上安装连接mysql模块相关的程序包
[root@rsyslog ~]$yum install rsyslog-mysql -y
- 找到sql脚本发送到数据库
# 下载辅助软件查找
[root@rsyslog ~]$yum install mlocate
[root@rsyslog ~]$updatedb   # 更新数据库信息
[root@rsyslog ~]$locate mysql-createDB.sql   # 使用locatedb查找脚本文件存放路径
/usr/share/doc/rsyslog-8.24.0/mysql-createDB.sql

[root@rsyslog ~]$cat /usr/share/doc/rsyslog-8.24.0/mysql-createDB.sql   # 脚本文件内容
CREATE DATABASE Syslog;
USE Syslog;
CREATE TABLE SystemEvents
(
        ID int unsigned not null auto_increment primary key,
        CustomerID bigint,
        ReceivedAt datetime NULL,
        DeviceReportedTime datetime NULL,
        Facility smallint NULL,
        Priority smallint NULL,
        FromHost varchar(60) NULL,
        Message text,
        NTSeverity int NULL,
        Importance int NULL,
        EventSource varchar(60),
        EventUser varchar(60) NULL,
        EventCategory int NULL,
        EventID int NULL,
        EventBinaryData text NULL,
        MaxAvailable int NULL,
        CurrUsage int NULL,
        MinUsage int NULL,
        MaxUsage int NULL,
        InfoUnitID int NULL ,
        SysLogTag varchar(60),
        EventLogType varchar(60),
        GenericFileName VarChar(60),
        SystemID int NULL
);

CREATE TABLE SystemEventsProperties
(
        ID int unsigned not null auto_increment primary key,
        SystemEventID int NULL ,
        ParamName varchar(255) NULL ,
        ParamValue text NULL
);

[root@rsyslog ~]$scp /usr/share/doc/rsyslog-8.24.0/mysql-createDB.sql 192.168.39.27:/root  # 发送到数据库服务器
The authenticity of host '192.168.39.27 (192.168.39.27)' can't be established.
ECDSA key fingerprint is SHA256:XVNFzEbN3eaCzTwYrlQg2SzHZXHbd0dS0YKLuIOXVr0.
ECDSA key fingerprint is MD5:df:4d:86:ba:0c:e6:c1:a2:6c:45:71:e9:ac:ea:1d:a5.
Are you sure you want to continue connecting (yes/no)? yes
Warning: Permanently added '192.168.39.27' (ECDSA) to the list of known hosts.
root@192.168.39.27's password:
mysql-createDB.sql                            100% 1046   588.1KB/s   00:00
- 修改配置文件启动服务模块并且写如数据库信息(用于给数据库服务器发送日志信息)
# The imjournal module bellow is now used as a message source instead of imuxsock.
$ModLoad ommysql   # 添加这一行

# Don't log private authentication messages!
*.info;mail.none;authpriv.none;cron.none                /var/log/messages
*.info;mail.none;authpriv.none;cron.none                :ommysql:192.168.39.27,Syslog,syslog,taotaobao
#配置rsyslog将日志保存到mysql中
[root@centos8 ~]#vim /etc/rsyslog.conf
####MODULES####
#在 MODULES 语言下面,如果是 CentOS 8 加下面行
module(load="ommysql")
#在 MODULES 语言下面,如果是 CentOS 7,6 加下面行
$ModLoad ommysql
数据库服务器:
- 安装数据库
[root@mysql ~]$yum install mariadb-server -y

[root@mysql ~]$systemctl start mariadb.service
- 执行考过来的脚本
[root@mysql ~]$mysql <
anaconda-ks.cfg     .cshrc              .tcshrc
.bash_history       ifcfg-eth0          .viminfo
.bash_logout        init_env_191113.sh  .vimrc
.bash_profile       mysql-createDB.sql
.bashrc             .pki/
[root@mysql ~]$mysql < mysql-createDB.sql   # 直接导入数据库
- 创建Syslog库使用的账号
[root@mysql ~]$mysql
Welcome to the MariaDB monitor.  Commands end with ; or \g.
Your MariaDB connection id is 3
Server version: 5.5.60-MariaDB MariaDB Server

Copyright (c) 2000, 2018, Oracle, MariaDB Corporation Ab and others.

Type 'help;' or '\h' for help. Type '\c' to clear the current input statement.

MariaDB [(none)]> grant all on Syslog.* to syslog@'192.168.39.%' identified by 'taotaobao';  # 注意这里的数据库名要对应执行的sql脚本里的数据库名。
Query OK, 0 rows affected (0.00 sec)
测试日志服务器和数据库是否连接:
MariaDB [Syslog]> show tables;
+------------------------+
| Tables_in_Syslog       |
+------------------------+
| SystemEvents           |
| SystemEventsProperties |
+------------------------+
2 rows in set (0.00 sec)

MariaDB [Syslog]>

MariaDB [Syslog]> SELECT COUNT(*) FROM SystemEvents;
+----------+
| COUNT(*) |
+----------+
|        0 |
+----------+
1 row in set (0.00 sec)
[root@rsyslog ~]$systemctl restart rsyslog.service

[root@rsyslog ~]$logger "this is a test log" # 日志服务器触发日志(logger触发日志命令)
MariaDB [Syslog]> SELECT COUNT(*) FROM SystemEvents;
+----------+
| COUNT(*) |
+----------+
|        8 |
+----------+
1 row in set (0.00 sec)
websrv服务器端:
- 解压缩工具
[root@websrv ~]# ll
-rw-r--r--  1 root root 2943754 Oct 10 13:04 loganalyzer-4.1.8.tar.gz # web界面日志服务工具包
[root@websrv ~]# tar xvf loganalyzer-4.1.8.tar.gz
- 安装需要的服务实现LAMP架构
# 注意这里的php版本一定要是在5.6版本相同或以上要不这个软件不支持
[root@websrv ~]# yum install httpd php56-php-fpm.x86_64 php56-php-mysqlnd.x86_64 -y
- 把loganalyzer需要的目录切到网站目录下
[root@websrv loganalyzer-4.1.8]# ll
total 100
drwxrwxr-x 13 root root 4096 Sep 26 23:41 src
-rw-rw-r-- 1 root root 48571 Sep 26 23:41 ChangeLog
drwxrwxr-x 2 root root    43 Sep 26 23:41 contrib
-rw-rw-r-- 1 root root 35497 Sep 26 23:41 COPYING
drwxrwxr-x 3 root root   258 Sep 26 23:41 doc
-rw-rw-r-- 1 root root  8449 Sep 26 23:41 INSTALL

[root@websrv loganalyzer-4.1.8]# mv src/ /var/www/html/log  # 切到网站目录下

[root@websrv loganalyzer-4.1.8]# ll /var/www/html/
total 4
drwxrwxr-x 13 root root 4096 Sep 26 23:41 log

# 修改所有者为apache
[root@websrv loganalyzer-4.1.8]# cd /var/www/html/
[root@websrv html]# chown -R apache.apache log/
- 修改httpd配置文件支持php-fpm
# 添加index.php
<IfModule dir_module>
    DirectoryIndex index.php index.html
</IfModule>

# 找到这个模块位置,添加中间三行内容。
<IfModule mime_module>
    AddType application/x-httpd-php .php
    AddType application/x-httpd-php-source .phps
    ProxyRequests Off
</IfModule>
- 创建调用模块文件(或者理解为反向代理)
[root@websrv html]# vim /etc/httpd/conf.d/fcgi.conf
Directoryindex index.php
Proxyrequests off
ProxyPassMatch ^/(.*\.php)$ fcgi://127.0.0.1:9000/var/www/html/$1
第4、5这两项的配置在centos7上要加。centos8是默认配置好的不用修改。
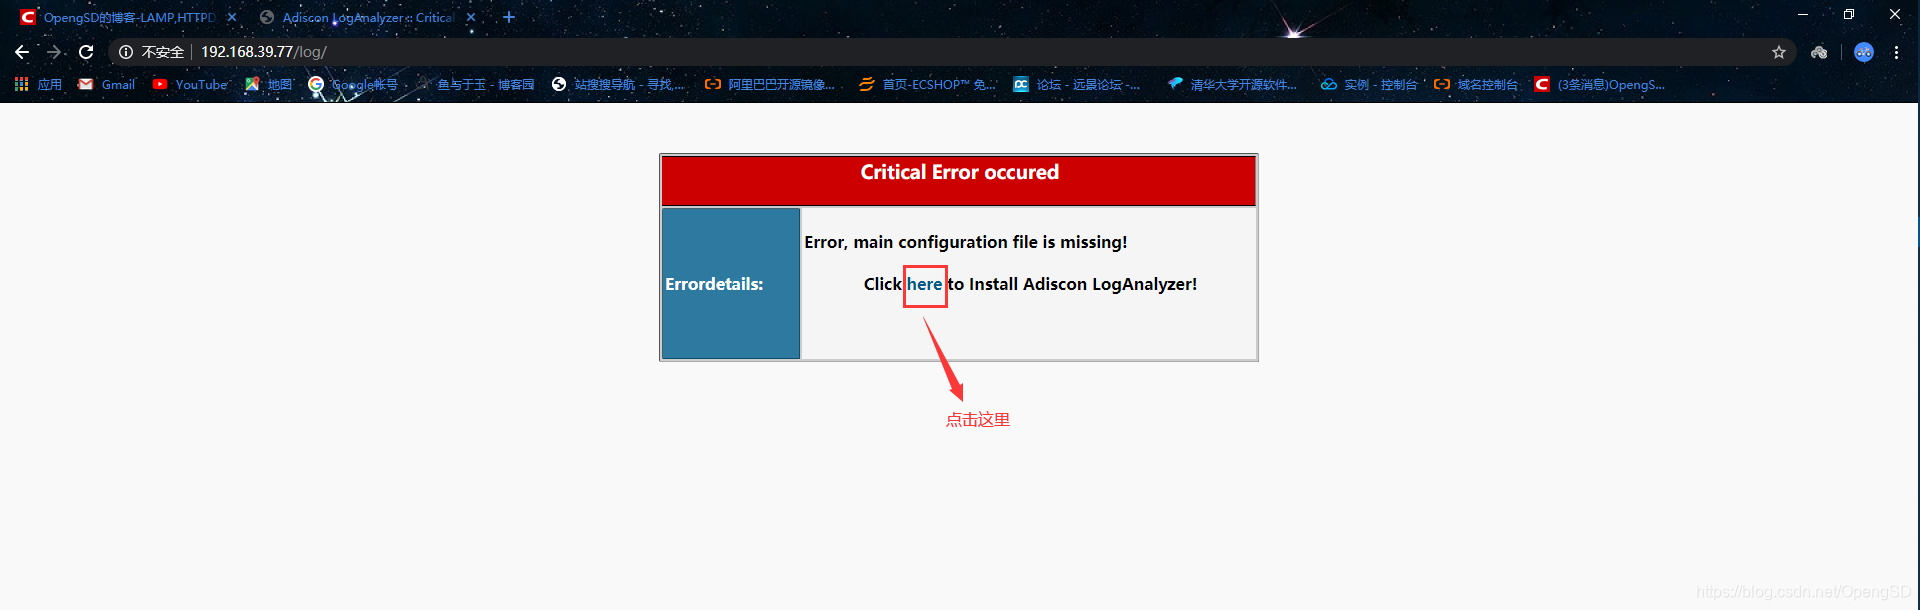
- web界面测试
![在这里插入图片描述]()
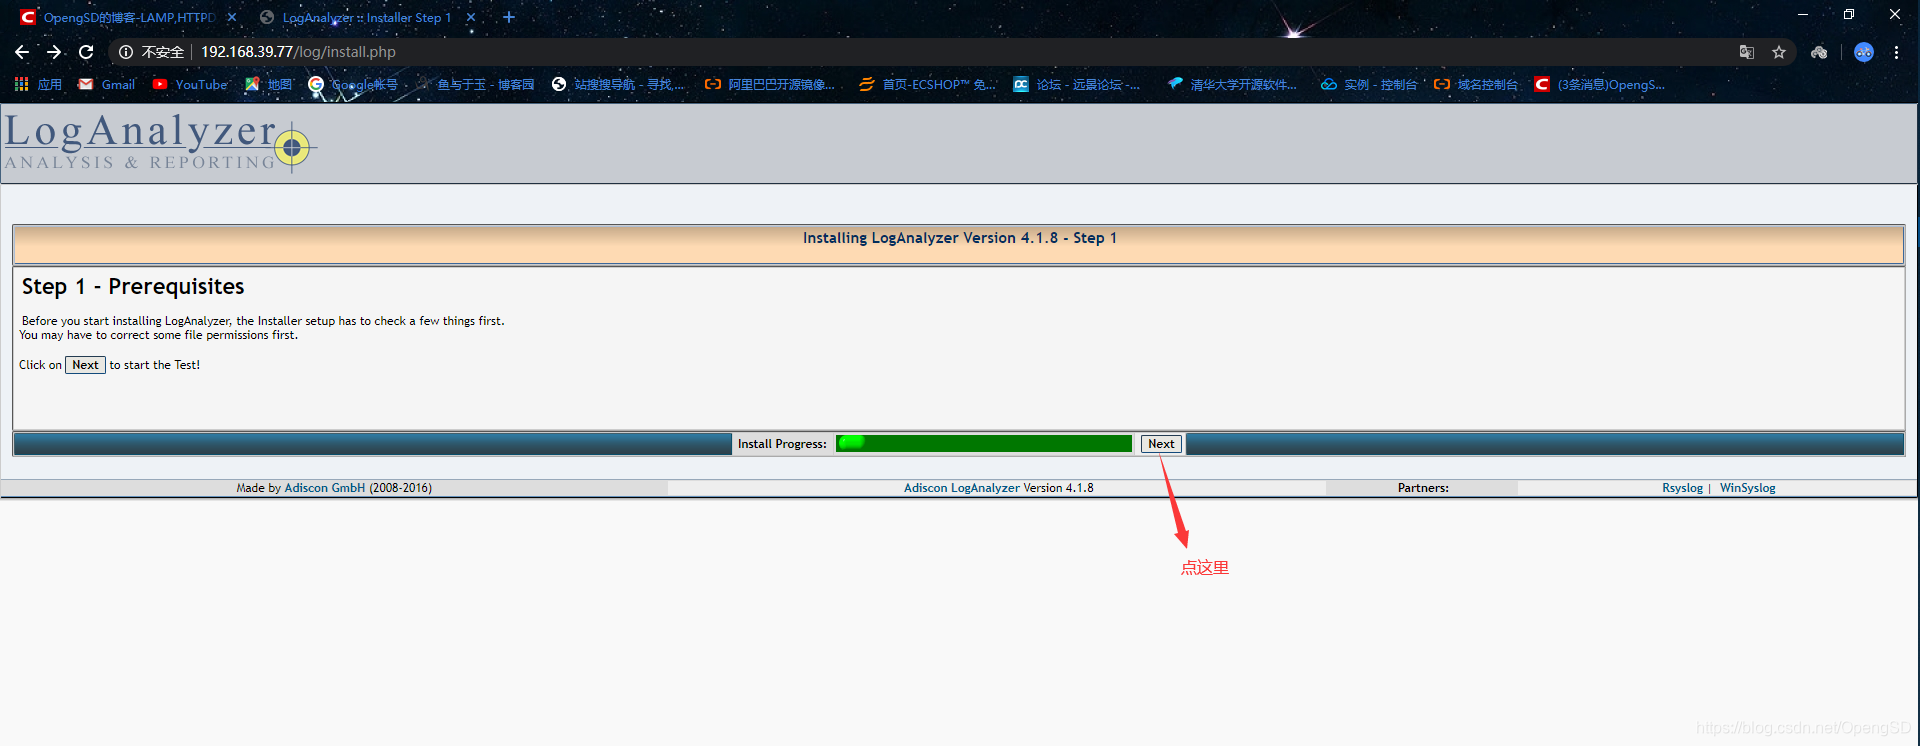
- 进行检测
![在这里插入图片描述]()
- 这里如果错了可能会显示没有用于写的文件
![在这里插入图片描述]()
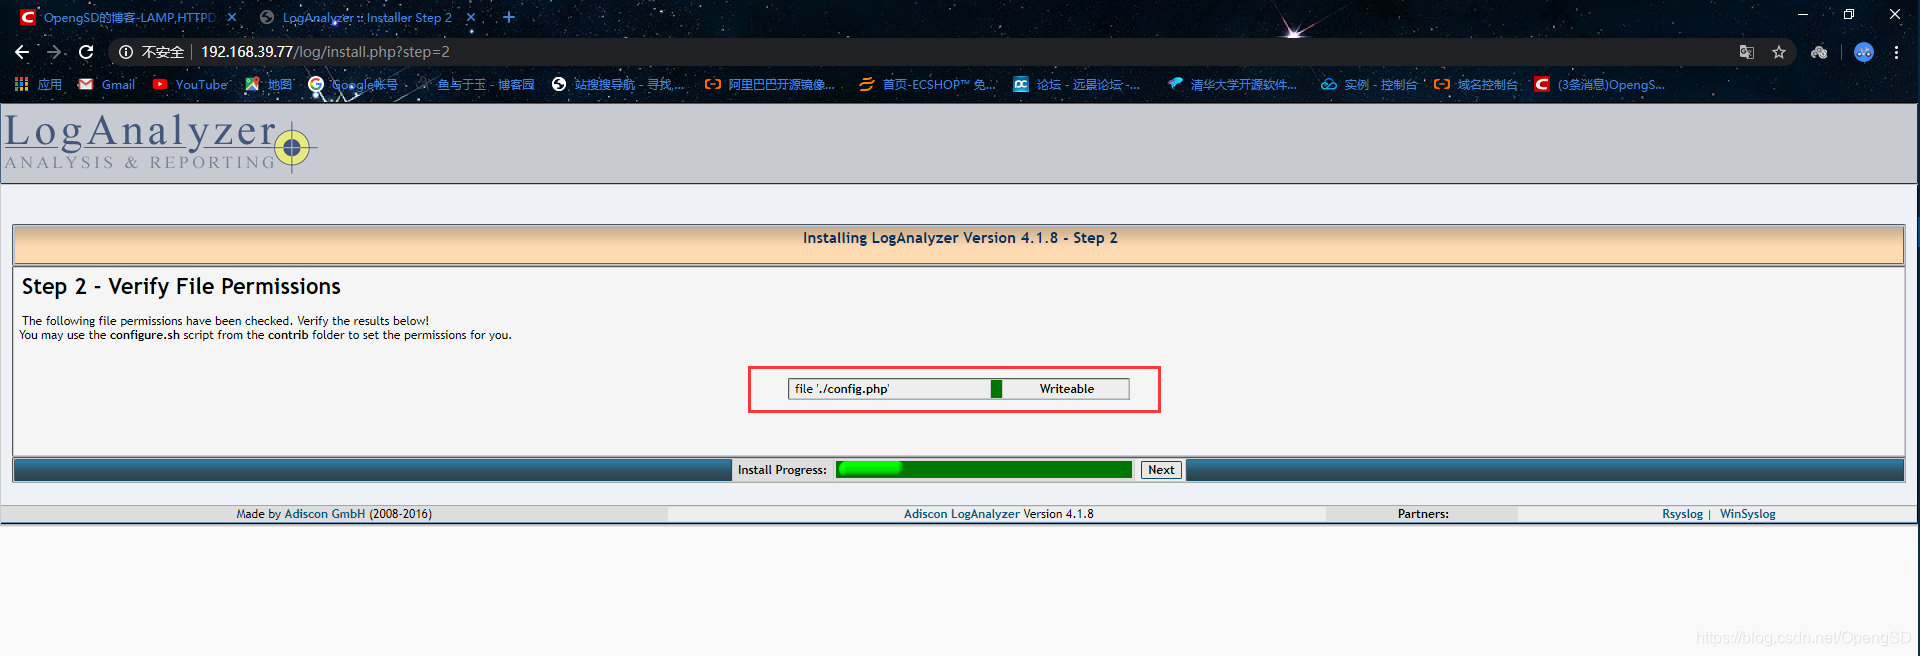
- 解决方法(是缺少这个文件导致的)
[root@websrv html]# cd log/
[root@websrv log]# pwd
/var/www/html/log
[root@websrv log]# touch config.php  # 创建这个文件
[root@websrv log]# chmod 666 config.php # 给这个文件所有人可读和可写权限(根据工作需求更改)
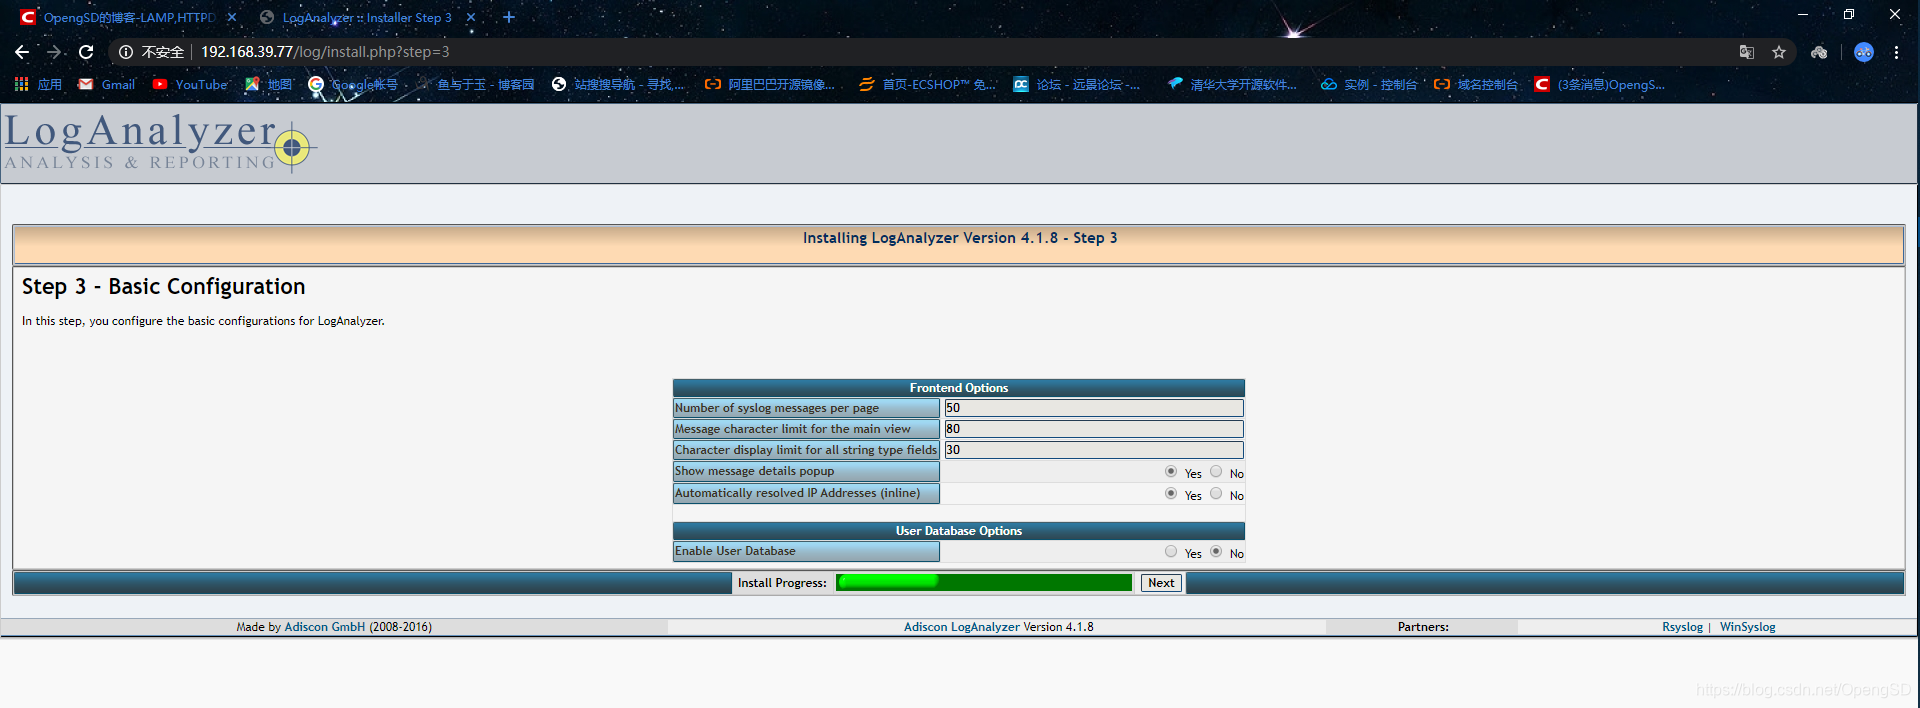
- 这些信息是最后显示的日志格式是什么样的
![在这里插入图片描述]()
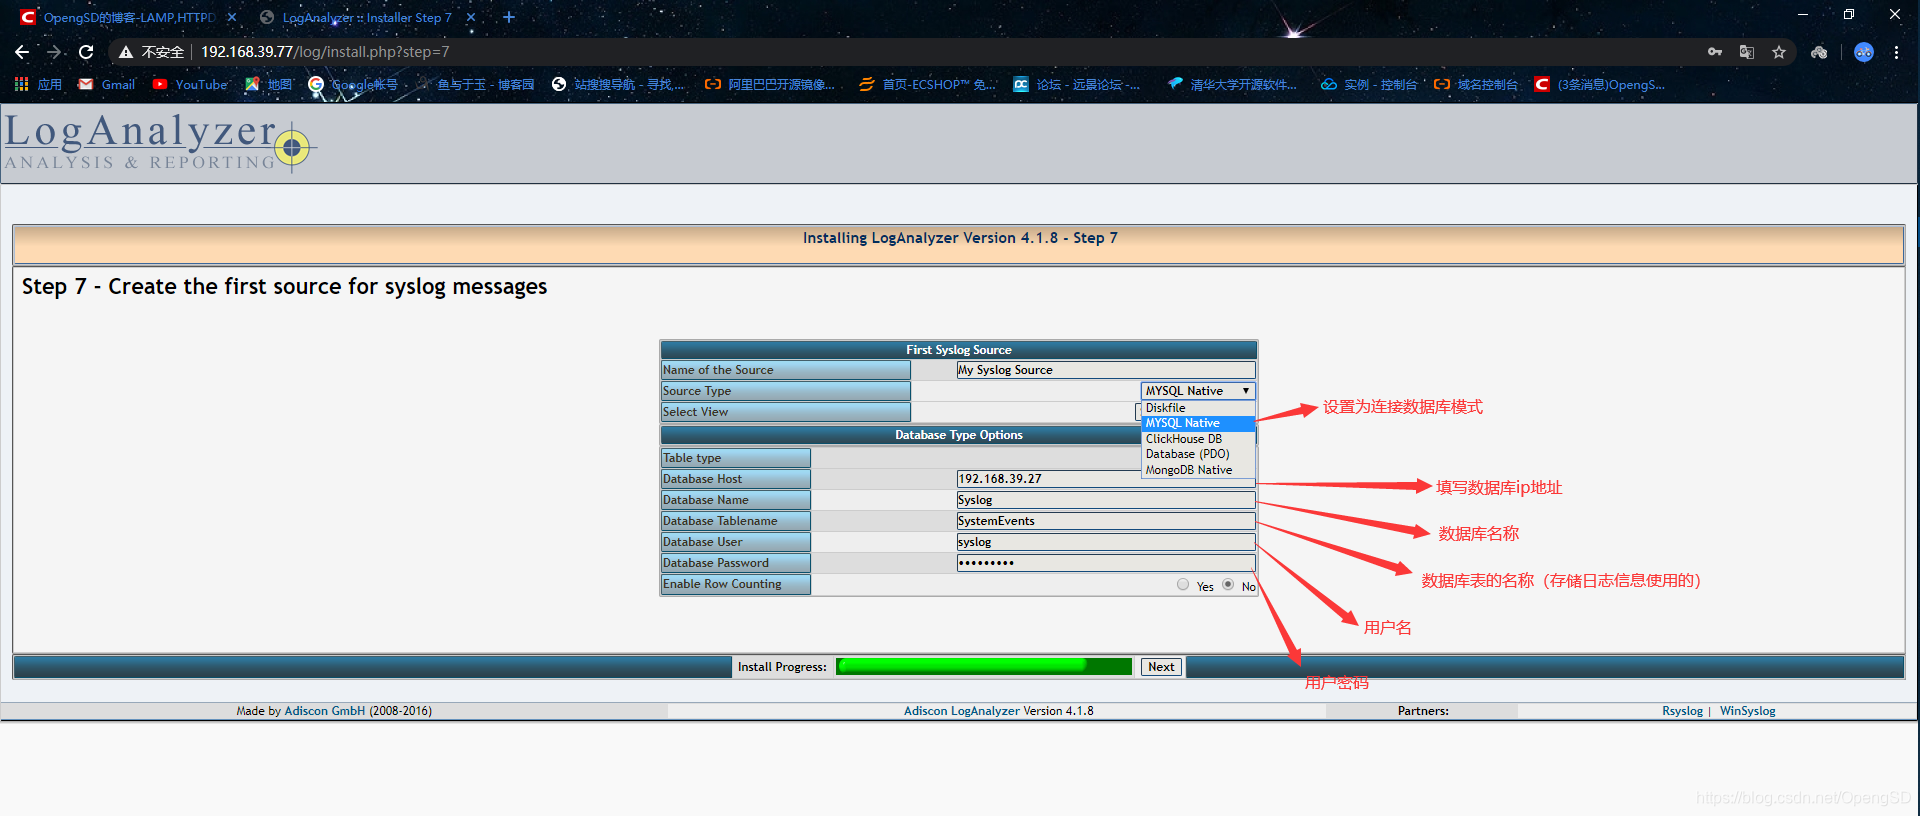
- 填写数据库的信息
![在这里插入图片描述]()
- 查看添加的表名
[root@centos7 ~]$mysql
Welcome to the MariaDB monitor.  Commands end with ; or \g.
Your MariaDB connection id is 8
Server version: 5.5.60-MariaDB MariaDB Server

Copyright (c) 2000, 2018, Oracle, MariaDB Corporation Ab and others.

Type 'help;' or '\h' for help. Type '\c' to clear the current input statement.

MariaDB [(none)]> use Syslog;
Reading table information for completion of table and column names
You can turn off this feature to get a quicker startup with -A

Database changed
MariaDB [Syslog]> show tables;
+------------------------+
| Tables_in_Syslog       |
+------------------------+
| SystemEvents           |   # 这个表是作为存储日志信息使用的
| SystemEventsProperties |
+------------------------+
2 rows in set (0.00 sec)
[root@websrv html]# yum install php56-php-gd.x86_64 -y  # 支持画饼状图的包
[root@websrv html]# systemctl restart httpd.service php56-php-fpm.service  # 重启服务
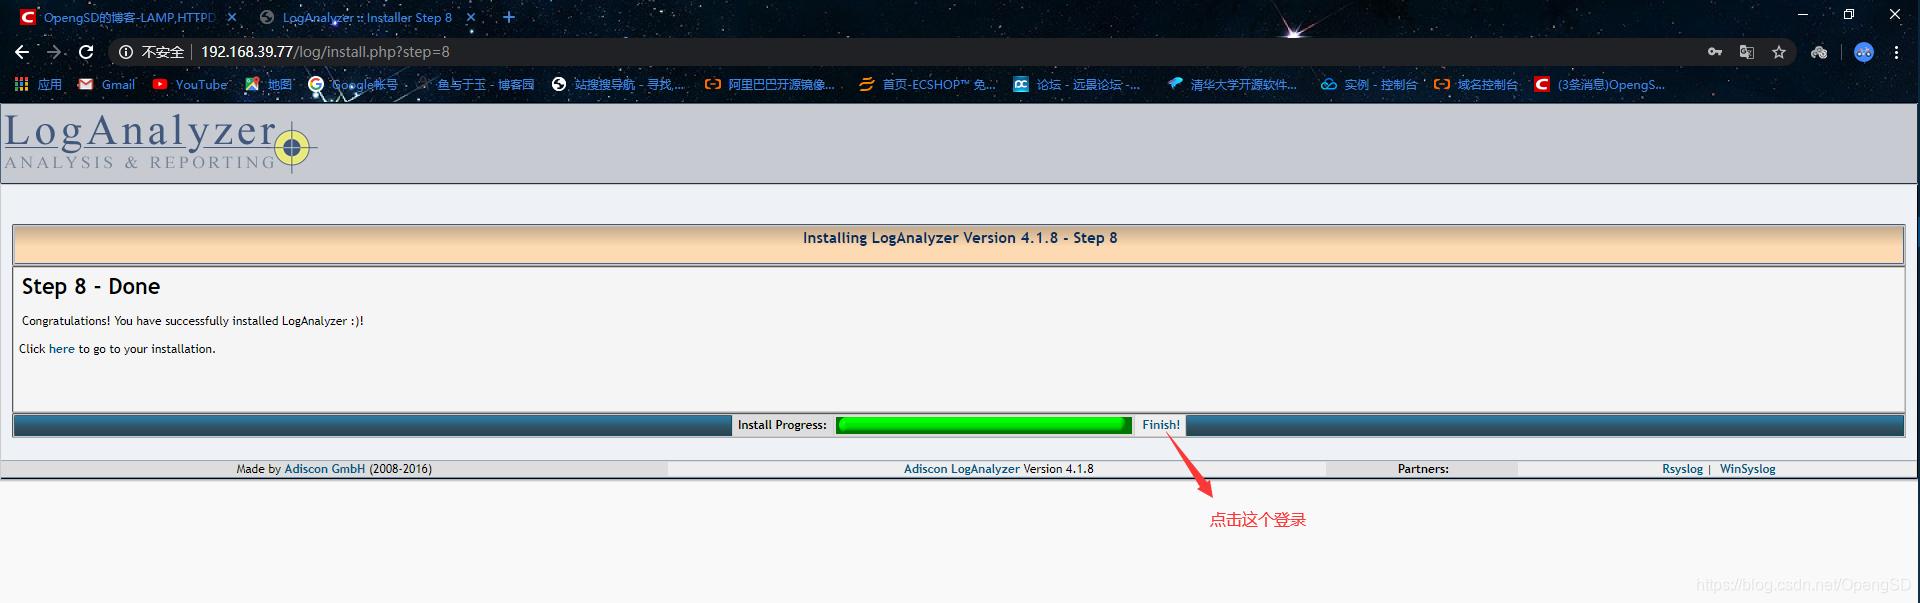
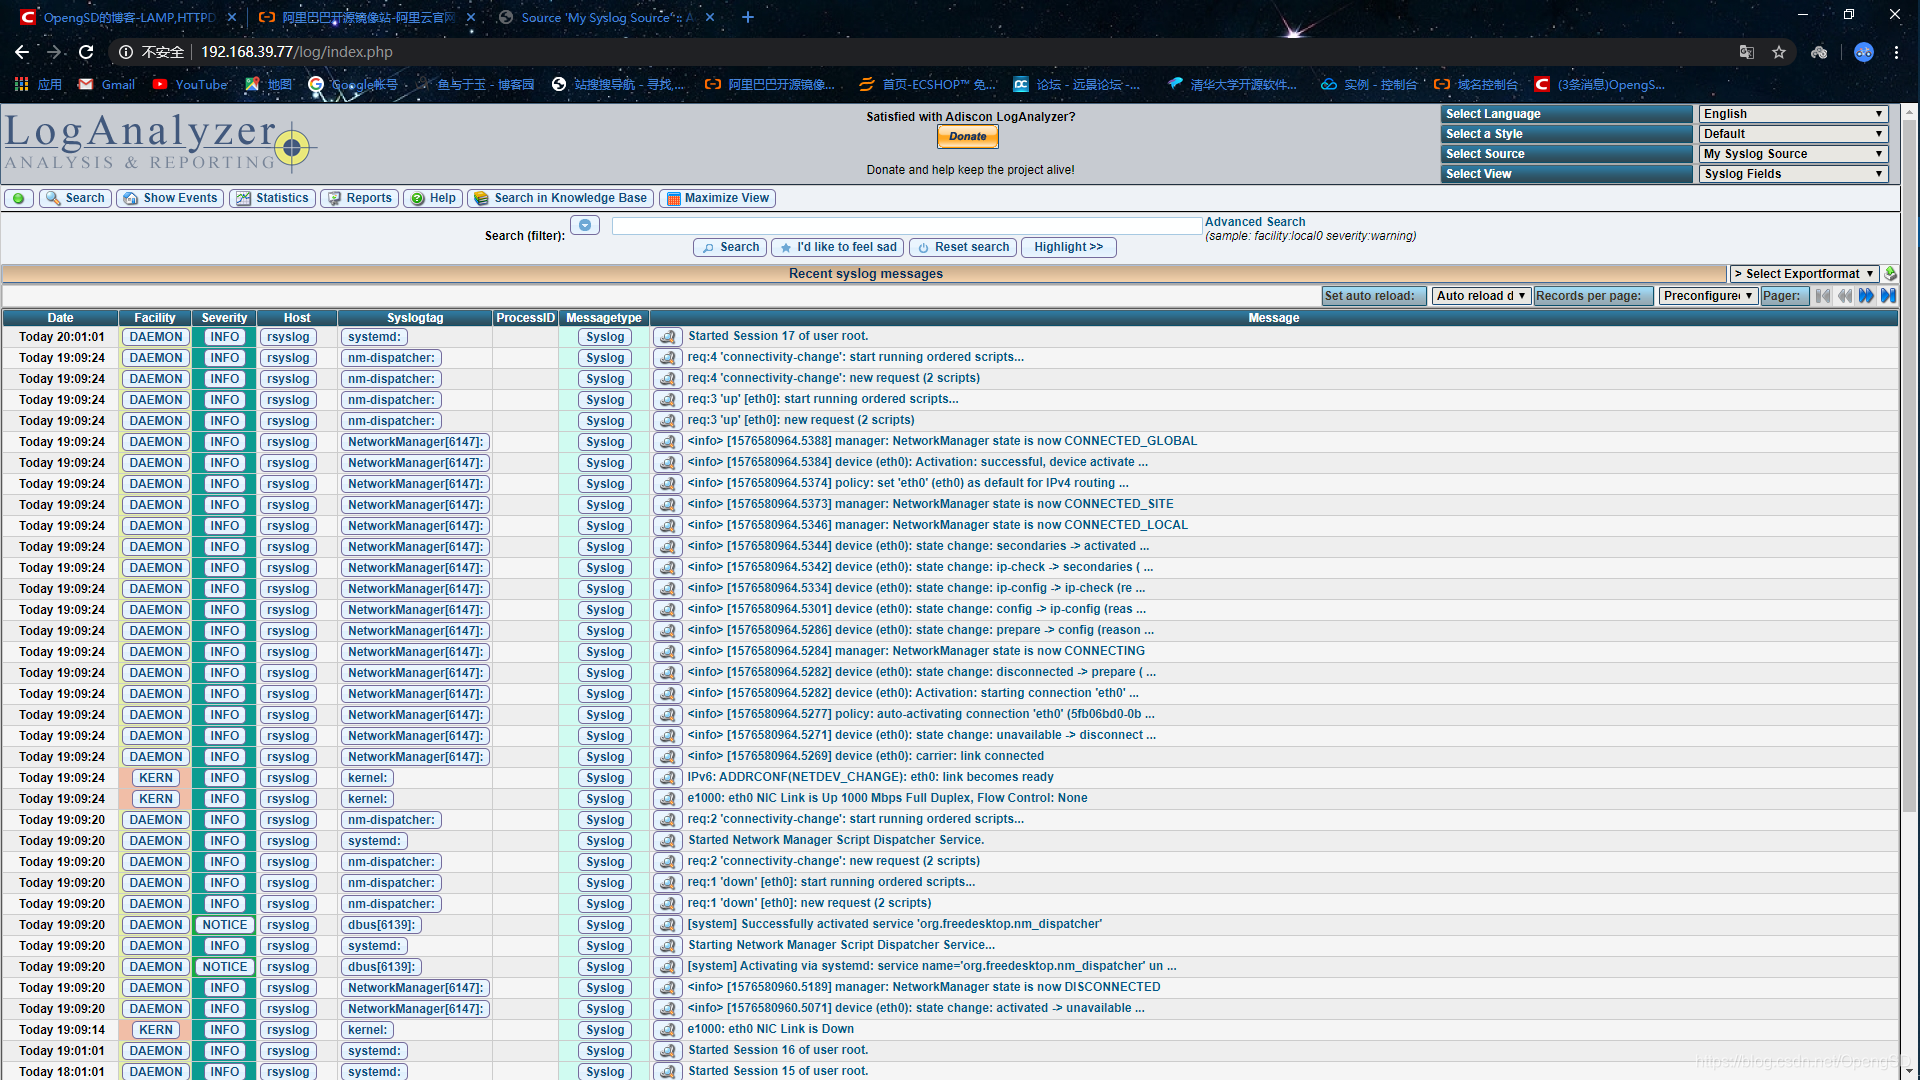
- 刷新web界面(这样就会产生比较清晰的饼状图)
![在这里插入图片描述]()


 浙公网安备 33010602011771号