

elk基本配置
https://www.cnblogs.com/zsl-find/articles/10730458.html
https://www.cnblogs.com/mylovelulu/p/10530002.html
https://www.cnblogs.com/lkun/p/7927308.html
https://www.cnblogs.com/elvi/p/8654021.html
https://www.cnblogs.com/kevingrace/p/5919021.html
https://blog.csdn.net/li123128/article/details/81052374
https://blog.csdn.net/qq_33406938/article/details/80307679清华源带安装
搭建elk 6.8.*版本方法 (一个安装方式,有时候文件的位置不同,所以,尽量按照这种方式安装)
一 elasticsearch
1.配置jdk环境,将selinux改为dis模式
2.配置yum源
导入GPG key
rpm --import https://artifacts.elastic.co/GPG-KEY-elasticsearch 检查机制
yum update curl#如果报错执行一下这个 刷新yum源
vim /etc/yum.repos.d/elasticsearch.repo
[elasticsearch-6.x]
name=Elasticsearch repository for 6.x packages
baseurl=https://artifacts.elastic.co/packages/6.x/yum
gpgcheck=1
gpgkey=https://artifacts.elastic.co/GPG-KEY-elasticsearch
enabled=1
autorefresh=1
type=rpm-md
需要刷新yum源 , yum makecache
安装目录: mkdir /usr/share/elasticsearch
yum install elasticsearch -y yum安装
3.配置文件的修改
配置自动启动
chkconfig --add elasticsearch
创建数据目录
/data/elasticsearch/lib
/data/elasticsearch/log
chmod 777 -R /data/elasticsearch
vim /etc/elasticsearch/elasticsearch.yml
path.data: /data/elasticsearch/lib #路径没有就去创建
path.logs: /data/elasticsearch/log
修改配置文件/etc/security/limits.conf 添加两行 (elk有效期为默认30天,加上可以是永久)
* soft nofile 65536
* hard nofile 65536
修改配置文件/etc/elasticsearch/jvm.options
-Xms8g
-Xmx8g #需要根据自己的配置修改,内存的大小
启动
service elasticsearch start
如果启动报错
tail -F /var/log/messages
which: no java in (/usr/local/sbin:/usr/local/bin:/usr/sbin:/usr/bin)
解决办法:
vi /etc/sysconfig/elasticsearch
JAVA_HOME=/usr/local/jdk1.8.0_211
service elasticsearch restart
验证安装
curl -X GET "localhost:9200/"
端口配置
iptables -I INPUT -p tcp --dport 9200 -j ACCEPT #允许端口9200通过,若清空了防火墙,就无需配置
service iptables save
service iptables restart
二 Logstash
1. yum 源
导入GPG key
rpm --import https://artifacts.elastic.co/GPG-KEY-elasticsearch
新建repo文件
vi /etc/yum.repos.d/logstash.repo
[logstash-6.x]
name=Elastic repository for 6.x packages
baseurl=https://artifacts.elastic.co/packages/6.x/yum
gpgcheck=1
gpgkey=https://artifacts.elastic.co/GPG-KEY-elasticsearch
enabled=1
autorefresh=1
type=rpm-md
2.安装
yum install logstash -y
配置
参考链接: https://www.cnblogs.com/jsonhc/p/7562412.html
3.测试 加启动 并且 需要持续的启动
/usr/share/logstash/bin/logstash -e 'input { stdin { } } output {stdout {} }' #测试logstash
4.vi /root/file.conf #创建日志收集规则
文件内容:
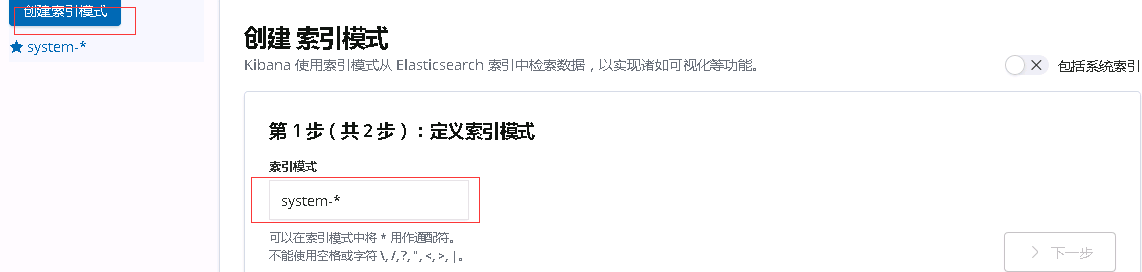
input {
    file {
      path => "/var/log/messages"
      type => "system"
      start_position => "beginning"
    }
}

output {
    elasticsearch {
       hosts => ["192.168.1.151:9200"]
       index => "system-%{+YYYY.MM.dd}"
    }
}

5.按照配置好的收集日志的规则去启动logstash
/usr/share/logstash/bin/logstash -f /root/file.conf
/usr/share/logstash/bin/logstash -f /root/file.conf & #后台登录
备注:
配置文件默认目录配置文件拷贝到这下面(/etc/logstash/conf.d/)执行 systemctl restart logstach 是不行的
只能指定文件启动
三. 安装 Kibana
参考链接: https://www.elastic.co/guide/en/kibana/current/rpm.html
导入GPG Key
rpm --import https://artifacts.elastic.co/GPG-KEY-elasticsearch
1.新建repo文件: /etc/yum.repos.d/kibana.repo
[kibana-6.x]
name=Kibana repository for 6.x packages
baseurl=https://artifacts.elastic.co/packages/6.x/yum
gpgcheck=1
gpgkey=https://artifacts.elastic.co/GPG-KEY-elasticsearch
enabled=1
autorefresh=1
type=rpm-md
2安装
yum install kibana -y
3.配置
vi /etc/kibana/kibana.yml
server.port: 5601
server.host: "0.0.0.0"
elasticsearch.hosts: ["http://localhost:9200"]
i18n.locale: "zh-CN" #最后一行汉化
4.启服务
/usr/share/kibana/bin/kibana
systemctl restart kibana #持续开启服务
5.访问http://192.168.1.151:5601/
添加索引


 浙公网安备 33010602011771号