

org.apache.dubbo 2.7.7 服务端处理请求及时间轮(失败重试)
本文主要针对 dubbo-spring-boot-starter 2.7.7版本, 对应的 org.apache.dubbo 2.7.7 版本的源码。
本文主要从以下几个点来分析:
- 服务端处理请求.
- 时间轮(失败重试)。
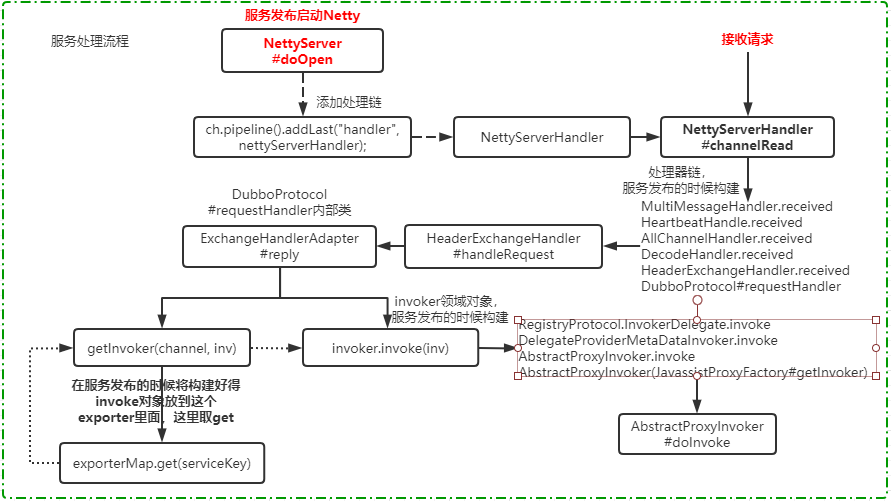
服务端接收数据的处理流程:
客户端请求发出去之后,服务端会收到这个请求的消息,然后触发调用。服务端这边接收消息的处理链路,也比较复杂,我们回到NettServer中创建io的过程。
@Override
protected void doOpen() throws Throwable {
        bootstrap = new ServerBootstrap();

        bossGroup = NettyEventLoopFactory.eventLoopGroup(1, "NettyServerBoss");
        workerGroup = NettyEventLoopFactory.eventLoopGroup(
                getUrl().getPositiveParameter(IO_THREADS_KEY, Constants.DEFAULT_IO_THREADS),
                "NettyServerWorker");

        final NettyServerHandler nettyServerHandler = new NettyServerHandler(getUrl(), this);
        channels = nettyServerHandler.getChannels();

        bootstrap.group(bossGroup, workerGroup)
                .channel(NettyEventLoopFactory.serverSocketChannelClass())
                .option(ChannelOption.SO_REUSEADDR, Boolean.TRUE)
                .childOption(ChannelOption.TCP_NODELAY, Boolean.TRUE)
                .childOption(ChannelOption.ALLOCATOR, PooledByteBufAllocator.DEFAULT)
                .childHandler(new ChannelInitializer<SocketChannel>() {
                    @Override
                    protected void initChannel(SocketChannel ch) throws Exception {
                        // FIXME: should we use getTimeout()?
                        int idleTimeout = UrlUtils.getIdleTimeout(getUrl());
                        NettyCodecAdapter adapter = new NettyCodecAdapter(getCodec(), getUrl(), NettyServer.this);
                        if (getUrl().getParameter(SSL_ENABLED_KEY, false)) {
                            ch.pipeline().addLast("negotiation",
                                    SslHandlerInitializer.sslServerHandler(getUrl(), nettyServerHandler));
                        }
                        ch.pipeline()
                                .addLast("decoder", adapter.getDecoder())
                                .addLast("encoder", adapter.getEncoder())
                                .addLast("server-idle-handler", new IdleStateHandler(0, 0, idleTimeout, MILLISECONDS))
                                .addLast("handler", nettyServerHandler);
                    }
                });
        // bind
        ChannelFuture channelFuture = bootstrap.bind(getBindAddress());
        channelFuture.syncUninterruptibly();
        channel = channelFuture.channel();

}
服务端启动的时候,配置的消息处理是handler配置的是nettyServerHandler , 所以我们直接进入到 NettyServerHandler#channelRead ,这个方法负责处理请求。
@Override
public void channelRead(ChannelHandlerContext ctx, Object msg) throws Exception {
  NettyChannel channel = NettyChannel.getOrAddChannel(ctx.channel(), url, handler);
  handler.received(channel, msg);
}
服务端收到读的请求是,会进入这个方法。接着通过handler.received来处理msg ,而这个handler 是在服务发布的时候构建得。起链路如下:
MultiMessageHandler(复合消息处理) ---> HeartbeatHandle(心跳消息处理,接收心跳并发送心跳响应) ---> AllChannelHandler (业务线程转化处理器)---> DecodeHandler (业务解码处理器)---> HeaderExchangeHandler ---> DubboProtocol#requestHandler(new ExchangeHandlerAdapter())
而在构建 NettyServerHandler 得时候将 this 传了进去。this 即 NettyServer 。NettyServer是 AbstractPeer 得子类。所以 handler.received 此时会调用AbsstractPeer.received方法,这个方法用来判断服务端是否关闭了,如果关闭就直接返回,否则,通过handler处理链进行层层调用。
我们直接进入 HeaderExchangeHandler.received,交互层请求响应处理,有三种处理方式
- handlerRequest,双向请求
- handler.received 单向请求
- handleResponse 响应消息
public void received(Channel channel, Object message) throws RemotingException {
        final ExchangeChannel exchangeChannel = HeaderExchangeChannel.getOrAddChannel(channel);
        if (message instanceof Request) {
            // handle request. 处理请求
            Request request = (Request) message;
            if (request.isEvent()) {
                handlerEvent(channel, request);
            } else {
                if (request.isTwoWay()) {
                    handleRequest(exchangeChannel, request);
                } else {
                    handler.received(exchangeChannel, request.getData());
                }
            }
        } else if (message instanceof Response) {
            handleResponse(channel, (Response) message);
        } else if (message instanceof String) {
            if (isClientSide(channel)) {
                Exception e = new Exception("Dubbo client can not supported string message: " + message + " in channel: " + channel + ", url: " + channel.getUrl());
                logger.error(e.getMessage(), e);
            } else {
                String echo = handler.telnet(channel, (String) message);
                if (echo != null && echo.length() > 0) {
                    channel.send(echo);
                }
            }
        } else {
            handler.received(exchangeChannel, message);
        }
}
接着调用handleRequest方法。这个方法中,构建返回的对象Response,并且最终会通过异步的方式来把msg传递到invoker中进行调用 handler.reply .这里得最后一层就是调用 DubboProtocol 类中得 requestHandler 属性构造得 ExchangeHandlerAdapter 内部类的 reply 方法:
private ExchangeHandler requestHandler = new ExchangeHandlerAdapter() {

        @Override
        public CompletableFuture<Object> reply(ExchangeChannel channel, Object message) throws RemotingException {
        //如果消息类型不是invocation,则抛出异常表示无法识别
            if (!(message instanceof Invocation)) {
                throw new RemotingException(channel, "Unsupported request: "
                        + (message == null ? null : (message.getClass().getName() + ": " + message))
                        + ", channel: consumer: " + channel.getRemoteAddress() + " --> provider: " + channel.getLocalAddress());
            }
        //获得请求参数
            Invocation inv = (Invocation) message;
          // 获取 invoker 领域对象,这个对象是在发布服务的时候构建,然后封装成 exporter 存在map里面的。
            Invoker<?> invoker = getInvoker(channel, inv);
            // need to consider backward-compatibility if it's a callback
            if (Boolean.TRUE.toString().equals(inv.getObjectAttachments().get(IS_CALLBACK_SERVICE_INVOKE))) {
                String methodsStr = invoker.getUrl().getParameters().get("methods");
                boolean hasMethod = false;
                if (methodsStr == null || !methodsStr.contains(",")) {
                    hasMethod = inv.getMethodName().equals(methodsStr);
                } else {
                    String[] methods = methodsStr.split(",");
                    for (String method : methods) {
                        if (inv.getMethodName().equals(method)) {
                            hasMethod = true;
                            break;
                        }
                    }
                }
                if (!hasMethod) {
                    logger.warn(new IllegalStateException("The methodName " + inv.getMethodName()
                            + " not found in callback service interface ,invoke will be ignored."
                            + " please update the api interface. url is:"
                            + invoker.getUrl()) + " ,invocation is :" + inv);
                    return null;
                }
            }
            RpcContext.getContext().setRemoteAddress(channel.getRemoteAddress());
            Result result = invoker.invoke(inv); // 发起对应调用
            return result.thenApply(Function.identity());
        }
  //......省略代码
};
invoker.invoke,发起本地服务调用,但是此时调用之前,invoke并不是一个直接调用的对象,而是包装过的。在 ServiceConfig#doExportUrlsFor1Protocol 构建包装。最后的调用链路如下:
RegistryProtocol.InvokerDelegate.invoke ---> DelegateProviderMetaDataInvoker.invoke ---> AbstractProxyInvoker.invoke ---> AbstractProxyInvoker(JavassistProxyFactory#getInvoker)
InvokerDelegate 未实现父类 InvokerWrapper invoke方法。进入到InvokerWrapper.invoke方法,这个是一个Invoker包装类,包装了URL地址信息和真正的Invoker代理对象。
@Override
public Result invoke(Invocation invocation) throws RpcException {
    return invoker.invoke(invocation);
}
DelegateProviderMetaDataInvoker:这里是一个委派类,它提供了服务提供者的元数序信息。
@Override
public Result invoke(Invocation invocation) throws RpcException {
    return invoker.invoke(invocation);
}
AbstractProxyInvoker:接着进入到AbstractProxyInvoker的invoke方法,在这个方法中,我们可以看到它会调用子类的doInvoke方法,获得返回结果。其中proxy,表示服务端的对象实例,这个实例很显然是在构建动态代理Invoker对象时保存进来的。
public Result invoke(Invocation invocation) throws RpcException {
        try {
            Object value = doInvoke(proxy, invocation.getMethodName(), invocation.getParameterTypes(), invocation.getArguments());
            CompletableFuture<Object> future = wrapWithFuture(value);
            CompletableFuture<AppResponse> appResponseFuture = future.handle((obj, t) -> {
                AppResponse result = new AppResponse();
                if (t != null) {
                    if (t instanceof CompletionException) {
                        result.setException(t.getCause());
                    } else {
                        result.setException(t);
                    }
                } else {
                    result.setValue(obj);
                }
                return result;
            });
            return new AsyncRpcResult(appResponseFuture, invocation);
        } catch (InvocationTargetException e) {
            if (RpcContext.getContext().isAsyncStarted() && !RpcContext.getContext().stopAsync()) {
                logger.error("Provider async started, but got an exception from the original method, cannot write the exception back to consumer because an async result may have returned the new thread.", e);
            }
            return AsyncRpcResult.newDefaultAsyncResult(null, e.getTargetException(), invocation);
        } catch (Throwable e) {
            throw new RpcException("Failed to invoke remote proxy method " + invocation.getMethodName() + " to " + getUrl() + ", cause: " + e.getMessage(), e);
        }
}
最后进入到具体的子类,也就是在服务的发布的时候通过 构建的
@Override
public <T> Invoker<T> getInvoker(T proxy, Class<T> type, URL url) {
        // TODO Wrapper cannot handle this scenario correctly: the classname contains '$'
        final Wrapper wrapper = Wrapper.getWrapper(proxy.getClass().getName().indexOf('$') < 0 ? proxy.getClass() : type);
        return new AbstractProxyInvoker<T>(proxy, type, url) {
            @Override
            protected Object doInvoke(T proxy, String methodName,
                                      Class<?>[] parameterTypes,
                                      Object[] arguments) throws Throwable {
                return wrapper.invokeMethod(proxy, methodName, parameterTypes, arguments);
            }
        };
}
然后发起本地的调用即可,将结果返回 。至此,服务消费的处理流程就分析完了。最后附上这个流程的流程图。
Dubbo中失败重试的设计:
在Dubbo中,有很多地方涉及到服务失败重试,比如服务注册失败时,会调用一个方法把失败的请求保存起来进行重试。clusterInvoker失败重试
注册中心失败重试 FailbackRegistry#addFailedRegistered
private final HashedWheelTimer retryTimer;
private void addFailedRegistered(URL url) {
        FailedRegisteredTask oldOne = failedRegistered.get(url);
        if (oldOne != null) {
            return;
        }
        FailedRegisteredTask newTask = new FailedRegisteredTask(url, this);
        oldOne = failedRegistered.putIfAbsent(url, newTask);
        if (oldOne == null) {
            // never has a retry task. then start a new task for retry.
            retryTimer.newTimeout(newTask, retryPeriod, TimeUnit.MILLISECONDS);
        }
}
clusterInvoker(FailbackClusterInvoker)失败重试
private void addFailed(LoadBalance loadbalance, Invocation invocation, List<Invoker<T>> invokers, Invoker<T> lastInvoker) {
        if (failTimer == null) {
            synchronized (this) {
                if (failTimer == null) {
                    failTimer = new HashedWheelTimer(
                            new NamedThreadFactory("failback-cluster-timer", true),
                            1,
                            TimeUnit.SECONDS, 32, failbackTasks);
                }
            }
        }
        RetryTimerTask retryTimerTask = new RetryTimerTask(loadbalance, invocation, invokers, lastInvoker, retries, RETRY_FAILED_PERIOD);
        try {
            failTimer.newTimeout(retryTimerTask, RETRY_FAILED_PERIOD, TimeUnit.SECONDS);
        } catch (Throwable e) {
            logger.error("Failback background works error,invocation->" + invocation + ", exception: " + e.getMessage());
        }
}
不难发现他们都是基于HashedWhelloTimer这个类来实现的。
时间轮:
时间轮这个技术其实出来很久了,在kafka、zookeeper等技术中都有时间轮使用的方式。什么是时间轮呢?
简单来说: 时间轮是一种高效利用线程资源进行批量化调度的一种调度模型。把大批量的调度任务全部绑定到同一个调度器上,使用这一个调度器来进行所有任务的管理、触发、以及运行。所以时间轮的模型能够高效管理各种延时任务、周期任务、通知任务。 在工作中遇到类似的功能,可以采用时间轮机制。
时间轮,从图片上来看,就和手表的表圈是一样,所以称为时间轮,是因为它是以时间作为刻度组成的一个环形队列,这个环形队列采用数组来实现,数组的每个元素称为槽,每个槽可以放一个定时任务列表,叫HashedWheelBucket,它是一个双向链表,量表的每一项表示一个定时任务项(HashedWhellTimeout),其中封装了真正的定时任务TimerTask。时间轮是由多个时间格组成,下图中有8个时间格,每个时间格代表当前时间轮的基本时间跨度(tickDuration),其中时间轮的时间格的个数是固定的。
在下图中,有8个时间格(槽),假设每个时间格的单位为1s,那么整个时间轮走完一圈需要8s钟。每秒钟指针会沿着顺时针方向移动一格,这个单位可以设置,比如以秒为单位,可以以一小时为单位,这个单位可以代表时间精度。
通过指针移动,来获得每个时间格中的任务列表,然后遍历这一个时间格中的双向链表来执行任务,以此循环。

时间轮的运行逻辑:
首先,时间轮在启动的时候,会记录一下当前启动时间,并赋值给一个叫startTime的变量。然后当需要添加任务的时候,首先会计算延迟时间(deadline),比如一个任务的延迟时间是24ms,那么在添加任务时,会将当前时间(currentTime)+24ms-时间轮的启动时间(startTime),然后把这个任务封装成HashedWheelTimeout加入到链表中。
那么这个任务应该放在哪个时间格里面呢? 通过 deadline%wheel.length 计算.时间轮在运行的时候,会从任务队列中取出10W个进行遍历处理。
Dubbo中的时间轮实现类是:HashedWheelTimer:
在FailbackClusterInvoker这个类中,构建了一个HashedWheelTimer,然后增加了一个任务RetryTimerTask到时间轮中。基于这段代码, 我们去分析一下HashedWheelTimer的实现。 FailbackClusterInvoker#addFailed 主要做了两件事情:
- 如果时间轮等于 null,则初始化时间轮
- 创建重试任务,启动时间轮。
HashedWheelTimer的构造:
- 调用createWheel创建一个时间轮,时间轮数组一定是2的幂次方,比如传入的 ticksPerWheel=6,那么初始化的wheel长度一定是8,这样是便于时间格的计算。tickDuration,表示时间轮的跨度,代表每个时间格的时间精度,以纳秒的方式来表现。
- 把工作线程Worker封装成WorkerThread,从名字可以知道,它就是最终那个负责干活的线程。
public HashedWheelTimer(
            ThreadFactory threadFactory,
            long tickDuration, TimeUnit unit, int ticksPerWheel,
            long maxPendingTimeouts) {
     // 省略判断逻辑代码
        // Normalize ticksPerWheel to power of two and initialize the wheel.
     // 创建时间轮基本的数据结构,一个数组。长度为不小于ticksPerWheel的最小2的n次方
        wheel = createWheel(ticksPerWheel);
     // 这是一个标示符,用来快速计算任务应该呆的格子。
     // 我们知道,给定一个deadline的定时任务,其应该呆的格子=deadline%wheel.length.但是%操作是个相对耗时的操作,所以使用一种变通的位运算代替:
     // 因为一圈的长度为2的n次方,mask = 2^n-1后低位将全部是1,然后deadline&mast == deadline%wheel.length
     // java中的HashMap在进行hash之后,进行index的hash寻址寻址的算法也是和这个一样的
        mask = wheel.length - 1;

        // Convert tickDuration to nanos.
     //时间轮的基本时间跨度,(tickDuration传入是1的话,这里会转换成1000000)
        this.tickDuration = unit.toNanos(tickDuration);

        // Prevent overflow.
     // 校验是否存在溢出。即指针转动的时间间隔不能太长而导致tickDuration*wheel.length>Long.MAX_VALUE
        if (this.tickDuration >= Long.MAX_VALUE / wheel.length) {
            throw new IllegalArgumentException(String.format(
                    "tickDuration: %d (expected: 0 < tickDuration in nanos < %d",
                    tickDuration, Long.MAX_VALUE / wheel.length));
        }
     //把worker包装成thread
        workerThread = threadFactory.newThread(worker);

        this.maxPendingTimeouts = maxPendingTimeouts;
     //如果HashedWheelTimer实例太多,那么就会打印一个error日志
        if (INSTANCE_COUNTER.incrementAndGet() > INSTANCE_COUNT_LIMIT &&
                WARNED_TOO_MANY_INSTANCES.compareAndSet(false, true)) {
            reportTooManyInstances();
        }
}
然后来看看时间轮的创建 createWheel
- 对传入的ticksPerWheel进行整形
- 初始化固定长度的HashedWheelBucket
private static HashedWheelBucket[] createWheel(int ticksPerWheel) {
        if (ticksPerWheel <= 0) {
            throw new IllegalArgumentException(
                    "ticksPerWheel must be greater than 0: " + ticksPerWheel);
        }
        if (ticksPerWheel > 1073741824) {
            throw new IllegalArgumentException(
                    "ticksPerWheel may not be greater than 2^30: " + ticksPerWheel);
        }
        //对传入的时间轮大小进行整形,整形成2的幂次方
        ticksPerWheel = normalizeTicksPerWheel(ticksPerWheel);
        //初始化一个固定长度的Bucket数组
        HashedWheelBucket[] wheel = new HashedWheelBucket[ticksPerWheel];
        for (int i = 0; i < wheel.length; i++) {
            wheel[i] = new HashedWheelBucket();
        }
        return wheel;
}

private static int normalizeTicksPerWheel(int ticksPerWheel) {
        int normalizedTicksPerWheel = ticksPerWheel - 1;
        normalizedTicksPerWheel |= normalizedTicksPerWheel >>> 1;
        normalizedTicksPerWheel |= normalizedTicksPerWheel >>> 2;
        normalizedTicksPerWheel |= normalizedTicksPerWheel >>> 4;
        normalizedTicksPerWheel |= normalizedTicksPerWheel >>> 8;
        normalizedTicksPerWheel |= normalizedTicksPerWheel >>> 16;
        return normalizedTicksPerWheel + 1;
}
完成时间轮的初始化之后,并没有去启动时间轮,继续看FailbackClusterInvoker中的代码。构建了一个RetryTimerTask,也就是一个重试的定时任务,接着把这个任务通过newTimeout加入到时间轮中,其中
- retryTimerTask,表示具体的重试任务
- RETRY_FAILED_PERIOD , 表示重试间隔时间,默认为5s
调用newTimeout方法,把任务添加进来。
public Timeout newTimeout(TimerTask task, long delay, TimeUnit unit) {
        if (task == null) {
            throw new NullPointerException("task");
        }
        if (unit == null) {
            throw new NullPointerException("unit");
        }
        //统计任务个数
        long pendingTimeoutsCount = pendingTimeouts.incrementAndGet();
        //判断最大任务数量是否超过限制
        if (maxPendingTimeouts > 0 && pendingTimeoutsCount > maxPendingTimeouts) {
            pendingTimeouts.decrementAndGet();
            throw new RejectedExecutionException("Number of pending timeouts ("
                    + pendingTimeoutsCount + ") is greater than or equal to maximum allowed pending "
                    + "timeouts (" + maxPendingTimeouts + ")");
        }
        //如果时间轮没有启动,则通过start方法进行启动
        start();

        // Add the timeout to the timeout queue which will be processed on the next tick.
        // During processing all the queued HashedWheelTimeouts will be added to the correct HashedWheelBucket.
        //计算任务的延迟时间,通过当前的时间+当前任务执行的延迟时间-时间轮启动的时间。
        long deadline = System.nanoTime() + unit.toNanos(delay) - startTime;
        //在delay为正数的情况下,deadline是不可能为负数
        //如果为负数,那么说明超过了long的最大值
        // Guard against overflow.
        if (delay > 0 && deadline < 0) {
            deadline = Long.MAX_VALUE;
        }
        //创建一个Timeout任务,理论上来说,这个任务应该要加入到时间轮的时间格子中,但是这里并不是先添加到时间格,
        //而是先加入到一个阻塞队列,然后等到时间轮执行到下一个格子时,再从队列中取出最多100000个任务添加到指定的时间格(槽)中。
        HashedWheelTimeout timeout = new HashedWheelTimeout(this, task, deadline);
        timeouts.add(timeout);
        return timeout;
}
任务添加到阻塞队列之后,我们再来看启动方法,start方法会根据当前的workerState状态来启动时间轮。并且用了startTimeInitialized来控制线程的运行,如果workerThread没有启动起来,那么newTimeout方法会一直阻塞在运行start方法中。如果不阻塞,newTimeout方法会获取不到startTime。
public void start() {
        //workerState一开始的时候是0(WORKER_STATE_INIT),然后才会设置为1(WORKER_STATE_STARTED)
        switch (WORKER_STATE_UPDATER.get(this)) {
            case WORKER_STATE_INIT:
                if (WORKER_STATE_UPDATER.compareAndSet(this, WORKER_STATE_INIT, WORKER_STATE_STARTED)) {
                    workerThread.start();
                }
                break;
            case WORKER_STATE_STARTED:
                break;
            case WORKER_STATE_SHUTDOWN:
                throw new IllegalStateException("cannot be started once stopped");
            default:
                throw new Error("Invalid WorkerState");
        }
        // 等待worker线程初始化时间轮的启动时间
        // Wait until the startTime is initialized by the worker.
        while (startTime == 0) {
            try {
                //这里使用countDownLauch来确保调度的线程已经被启动
                startTimeInitialized.await();
            } catch (InterruptedException ignore) {
                // Ignore - it will be ready very soon.
            }
        }
}
启动时间轮:调用start()方法, 会调用 workerThread.start(); 来启动一个工作线程,这个工作线程是在构造方法中初始化的,包装的是一个Worker内部线程类。所以直接进入到Worker这个类的run方法,了解下它的设计逻辑
public void run() {
            // Initialize the startTime.
            // 初始化startTime,表示时间轮的启动时间
            startTime = System.nanoTime();
            // 唤醒被阻塞的start()方法。
            if (startTime == 0) {
                // We use 0 as an indicator for the uninitialized value here, so make sure it's not 0 when initialized.
                startTime = 1;
            }

            // Notify the other threads waiting for the initialization at start().
            startTimeInitialized.countDown();

            do {
                //返回每tick一次的时间间隔
                final long deadline = waitForNextTick();
                if (deadline > 0) {
                    //计算时间轮的槽位
                    int idx = (int) (tick & mask);
                    //移除掉CancelledTask
                    processCancelledTasks();
                    //得到当前指针位置的时间槽
                    HashedWheelBucket bucket =
                            wheel[idx];
                    //将newTimeout()方法中加入到待处理定时任务队列中的任务加入到指定的格子中
                    transferTimeoutsToBuckets();
                    //运行目前指针指向的槽中的bucket链表中的任务
                    bucket.expireTimeouts(deadline);
                    tick++;
                }
            } while (WORKER_STATE_UPDATER.get(HashedWheelTimer.this) == WORKER_STATE_STARTED);

            // Fill the unprocessedTimeouts so we can return them from stop() method.
            //如果Worker_State一只是started状态,就一直循环
            for (HashedWheelBucket bucket : wheel) {
                //清除时间轮中不需要处理的任务
                bucket.clearTimeouts(unprocessedTimeouts);
            }
            for (; ; ) {
                //遍历任务队列,发现如果有任务被取消,则添加到unprocessedTimeouts,也就是不需要处理的队列中。
                HashedWheelTimeout timeout = timeouts.poll();
                if (timeout == null) {
                    break;
                }
                if (!timeout.isCancelled()) {
                    unprocessedTimeouts.add(timeout);
                }
            }//处理被取消的任务.
            processCancelledTasks();
}
时间轮指针跳动:这个方法的主要作用就是返回下一个指针指向的时间间隔,然后进行sleep操作。可以想象一下,一个钟表上秒与秒之间是有时间间隔的,那么waitForNextTick就是根据当前时间计算出跳动到下个时间的时间间隔,然后进行sleep,然后再返回当前时间距离时间轮启动时间的时间间隔。
说得再直白一点:,假设当前的tickDuration的间隔是1s,tick默认=0, 此时第一次进来,得到的deadline=1,也就是下一次跳动的时间间隔是1s。
private long waitForNextTick() {
            //tick表示总的tick数
            //tickDuration表示每个时间格的跨度,所以deadline返回的是下一次时间轮指针跳动的时间
            long deadline = tickDuration * (tick + 1);

            for (; ; ) {
                //计算当前时间距离启动时间的时间间隔
                final long currentTime = System.nanoTime() - startTime;
                //通过下一次指针跳动的延迟时间距离当前时间的差额,这个作为sleep时间使用。
                // 其实线程是以睡眠一定的时间再来执行下一个ticket的任务的
                long sleepTimeMs = (deadline - currentTime + 999999) / 1000000;
                //sleepTimeMs小于零表示走到了下一个时间槽位置
                if (sleepTimeMs <= 0) {
                    if (currentTime == Long.MIN_VALUE) {
                        return -Long.MAX_VALUE;
                    } else {
                        return currentTime;
                    }
                }
                if (isWindows()) {
                    sleepTimeMs = sleepTimeMs / 10 * 10;
                }
                //进入到这里进行sleep,表示当前时间距离下一次tick时间还有一段距离,需要sleep。
                try {
                    Thread.sleep(sleepTimeMs);
                } catch (InterruptedException ignored) {
                    if (WORKER_STATE_UPDATER.get(HashedWheelTimer.this) == WORKER_STATE_SHUTDOWN) {
                        return Long.MIN_VALUE;
                    }
                }
            }
}
transferTimeoutsToBuckets:转移任务到时间轮中,前面我们讲过,任务添加进来时,是先放入到阻塞队列。
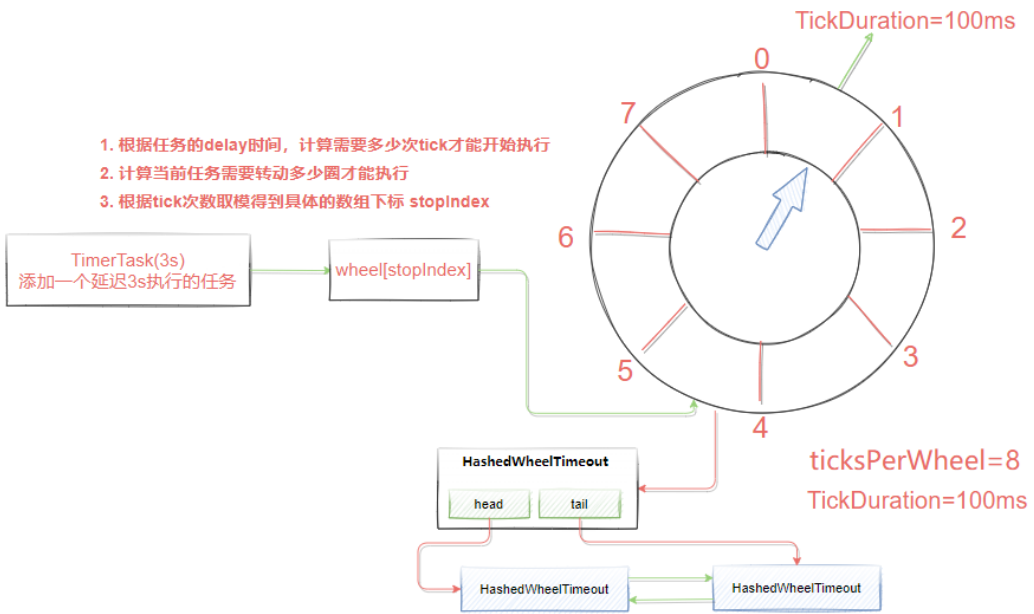
而在现在这个方法中,就是把阻塞队列中的数据转移到时间轮的指定位置。在这个转移方法中,写死了一个循环,每次都只转移10万个任务。然后根据HashedWheelTimeout的deadline延迟时间计算出时间轮需要运行多少次才能运行当前的任务,如果当前的任务延迟时间大于时间轮跑一圈所需要的时间,那么就计算需要跑几圈才能到这个任务运行。最后计算出该任务在时间轮中的槽位,添加到时间轮的链表中。
private void transferTimeoutsToBuckets() {
            // transfer only max. 100000 timeouts per tick to prevent a thread to stale the workerThread when it just
            // adds new timeouts in a loop.
            // 循环100000次,也就是每次转移10w个任务
            for (int i = 0; i < 100000; i++) {
                //从阻塞队列中获得具体的任务
                HashedWheelTimeout timeout = timeouts.poll();
                if (timeout == null) {
                    // all processed
                    break;
                }
                if (timeout.state() == HashedWheelTimeout.ST_CANCELLED) {
                    // Was cancelled in the meantime.
                    continue;
                }
                //计算tick次数,deadline表示当前任务的延迟时间,tickDuration表示时间槽的间隔,两者相除就可以计算当前任务需要tick几次才能被执行
                long calculated = timeout.deadline / tickDuration;
                // 计算剩余的轮数, 只有 timer 走够轮数, 并且到达了 task 所在的 slot, task 才会过期.(被执行)
                timeout.remainingRounds = (calculated - tick) / wheel.length;

                // Ensure we don't schedule for past.
                //如果任务在timeouts队列里面放久了, 以至于已经过了执行时间, 这个时候就使用当前tick,也就是放到当前bucket, 此方法调用完后就会被执行
                final long ticks = Math.max(calculated, tick);
                // 算出任务应该插入的 wheel 的 slot, stopIndex = tick 次数 & mask, mask =wheel.length - 1
                int stopIndex = (int) (ticks & mask);
                //把timeout任务插入到指定的bucket链中
                HashedWheelBucket bucket = wheel[stopIndex];
                bucket.addTimeout(timeout);
            }
}
运行时间轮中的任务:当指针跳动到某一个时间槽中时,会就触发这个槽中的任务的执行。该功能是通过expireTimeouts来实现这个方法的主要作用是: 过期并执行格子中到期的任务。也就是当tick进入到指定格子时,worker线程会调用这个方法
HashedWheelBucket是一个链表,所以我们需要从head节点往下进行遍历。如果链表没有遍历到链表尾部那么就继续往下遍历。获取的timeout节点,如果剩余轮数remainingRounds大于0,那么就说明要到下一圈才能运行,所以将剩余轮数减一
如果当前剩余轮数小于等于零了,那么就将当前节点从bucket链表中移除,并判断一下当前的时间是否大于timeout的延迟时间,如果是则调用timeout的expire执行任务。
void expireTimeouts(long deadline) {
            HashedWheelTimeout timeout = head;

            // process all timeouts
            // 遍历当前时间槽中的所有任务
            while (timeout != null) {
                HashedWheelTimeout next = timeout.next;
                //如果当前任务要被执行,那么remainingRounds应该小于或者等于0
                if (timeout.remainingRounds <= 0) {
                    //从bucket链表中移除当前timeout,并返回链表中下一个timeout
                    next = remove(timeout);
                    //如果timeout的时间小于当前的时间,那么就调用expire执行task
                    if (timeout.deadline <= deadline) {
                        timeout.expire();
                    } else {
                        //不可能发生的情况,就是说round已经为0了,deadline却>当前槽的deadline
                        // The timeout was placed into a wrong slot. This should never happen.
                        throw new IllegalStateException(String.format(
                                "timeout.deadline (%d) > deadline (%d)", timeout.deadline, deadline));
                    }
                } else if (timeout.isCancelled()) {
                    next = remove(timeout);
                } else {
                    //因为当前的槽位已经过了,说明已经走了一圈了,把轮数减一
                    timeout.remainingRounds--;
                }
                //把指针放置到下一个timeout
                timeout = next;
            }
}
这就是整个时间轮的流程了。

 浙公网安备 33010602011771号