

实验1:SDN拓扑实践
实验1:SDN拓扑实践
一、实验要求
-
a) Mininet运行结果截图

-
b) 2的执行结果截图
a) 3台交换机,每个交换机连接1台主机,3台交换机连接成一条线。

b) 3台主机,每个主机都连接到同1台交换机上。

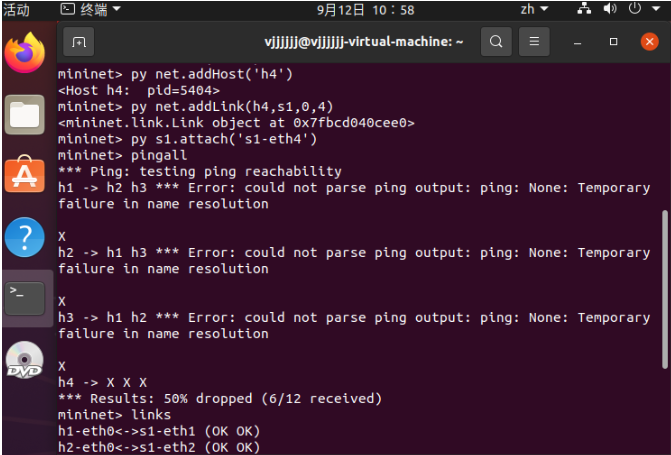
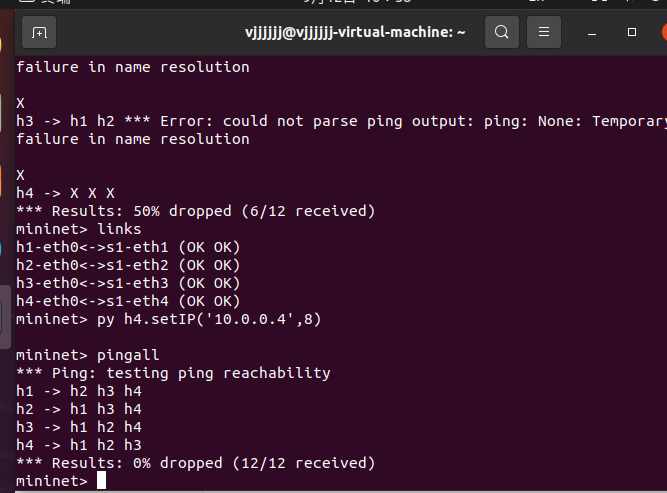
在2 b)的基础上,在Mininet交互界面上新增1台主机并且连接到交换机上,再测试新拓扑的连通性。
c) 3修改过的“学号.py”代码、Mininet运行结果
编辑(一)中第1步保存的Python脚本,添加如下网络性能限制,生成拓扑:
a) h1的cpu最高不超过50%;
b) h1和s1之间的链路带宽为10,延迟为5ms,最大队列大小为1000,损耗率50。
#!/usr/bin/env python

from mininet.net import Mininet
from mininet.node import Controller, RemoteController, OVSController
from mininet.node import CPULimitedHost, Host, Node
from mininet.node import OVSKernelSwitch, UserSwitch
from mininet.node import IVSSwitch
from mininet.cli import CLI
from mininet.log import setLogLevel, info
from mininet.link import TCLink, Intf
from subprocess import call

def myNetwork():

    net = Mininet( topo=None,
                   build=False,
                   ipBase='10.0.0.0/8')

    info( '*** Adding controller\n' )
    c0=net.addController(name='c0',
                      controller=Controller,
                      protocol='tcp',
                      port=6633)

    info( '*** Add switches\n')
    s1 = net.addSwitch('s1', cls=OVSKernelSwitch)
    s2 = net.addSwitch('s2', cls=OVSKernelSwitch)

    info( '*** Add hosts\n')
    h1 = net.addHost('h1', cls=Host, ip='10.0.0.1', defaultRoute=None, cpu=0.5)  #add 'cpu=0.5'
    h2 = net.addHost('h2', cls=Host, ip='10.0.0.2', defaultRoute=None)
    h3 = net.addHost('h3', cls=Host, ip='10.0.0.3', defaultRoute=None)
    h4 = net.addHost('h4', cls=Host, ip='10.0.0.4', defaultRoute=None)

    info( '*** Add links\n')
    net.addLink(h1, s1, bw=10, delay='5ms', max_queue_size=1000, loss=50, use_htb=True) #add bw=10, delay='5ms', max_queue_size=1000, loss=50, use_htb=True
    net.addLink(s1, h3)
    net.addLink(s1, s2)
    net.addLink(s2, h4)
    net.addLink(s2, h2)

    info( '*** Starting network\n')
    net.build()
    info( '*** Starting controllers\n')
    for controller in net.controllers:
        controller.start()

    info( '*** Starting switches\n')
    net.get('s1').start([c0])
    net.get('s2').start([c0])

    info( '*** Post configure switches and hosts\n')

    CLI(net)
    net.stop()

if __name__ == '__main__':
    setLogLevel( 'info' )
    myNetwork()
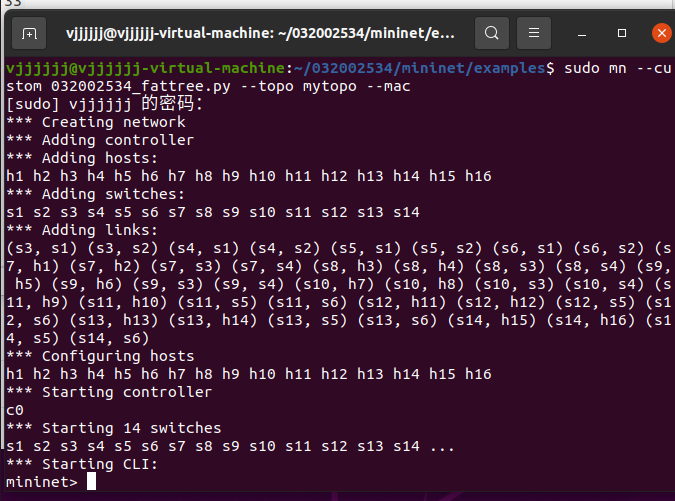
运行结果:

二、进阶要求
编写Python脚本,生成如下数据中心网络拓扑,要求:
-
编写.py拓扑文件,命名为“学号_fattree.py”;
-
必须通过Mininet的custom参数载入上述文件,不得直接使用miniedit.py生成的.py文件;
-
设备名称必须和下图一致;
-
使用Python的循环功能实现,不得在代码中手工直接添加设备和链路。
代码(修改后):
#!/usr/bin/python
#创建网络拓扑
"""Custom topology example
Adding the 'topos' dict with a key/value pair to generate our newly defined
topology enables one to pass in '--topo=mytopo' from the command line.
"""

from mininet.topo import Topo
from mininet.net import Mininet
from mininet.node import RemoteController,CPULimitedHost
from mininet.link import TCLink
from mininet.util import dumpNodeConnections

class MyTopo( Topo ):
    "Simple topology example."

    def __init__( self ):
        "Create custom topo."

        # Initialize topology
        Topo.__init__( self )
        L1 = 2
        L2 = L1 * 2
        L3 = L2 * 2  #改!
        c = []
        a = []
        e = []

        # add core ovs
        for i in range( L1 ):
                sw = self.addSwitch( 's{}'.format( i + 1 ) )
                c.append( sw )

        # add aggregation ovs
        for i in range( L2 ):
                sw = self.addSwitch( 's{}'.format( L1 + i + 1 ) )
                a.append( sw )

        # add edge ovs
        for i in range( L3 ):
                sw = self.addSwitch( 's{}'.format( L1 + L2 + i + 1 ) )
                e.append( sw )

        # add links between core and aggregation ovs
        for i in range( L1 ):
                sw1 = c[i]
                for sw2 in a[i//2::L1//2]:    #注意这里要取整数
                # self.addLink(sw2, sw1, bw=10, delay='5ms', loss=10, max_queue_size=1000, use_htb=True)
                        self.addLink( sw2, sw1 )

        # add links between aggregation and edge ovs
        for i in range( 0, L2, 2 ):
                for sw1 in a[i:i+2]:
	                for sw2 in e[i*2:i*2+4]:  #再改
                            self.addLink( sw2, sw1 )

        #add hosts and its links with edge ovs
        count = 1
        for sw1 in e:
                for i in range(2):
                	host = self.addHost( 'h{}'.format( count ) )
                	self.addLink( sw1, host )
                	count += 1
topos = { 'mytopo': ( lambda: MyTopo() ) }
运行结果:
三、个人总结
心得:这次实验难度会比上次稍微难一些,在没有理解Mininet CLI的交互式API情况下,要完成在2 b)的基础上,在Mininet交互界面上新增1台主机并且连接到交换机上,再测试新拓扑的连通性以及后面的进阶任务是相当困难的。本来以为这次实验只要照着pdf里的代码敲一遍就好了,结果并没有想象的那么简单,还是得经过一定的思考。
在其中遇到的问题主要是有三个:
-
运行不了mininet/examples/miniedit.py
解决:把python的默认版本改成python3 click here
-
python缩进问题
解决:空格全换成tab
-
TypeError: slice indices must be integers or None or have an index metho
解决:索引时只能用整数,所以把py文件中的除号'/'换成取整'//'

 浙公网安备 33010602011771号