react基础03-react脚手架、服务器代理、pubsubjs、react-router-dom、
react脚手架的使用:
使用脚手架创建项目,前提是node版本14及以上:
npx create-react-app react_staging
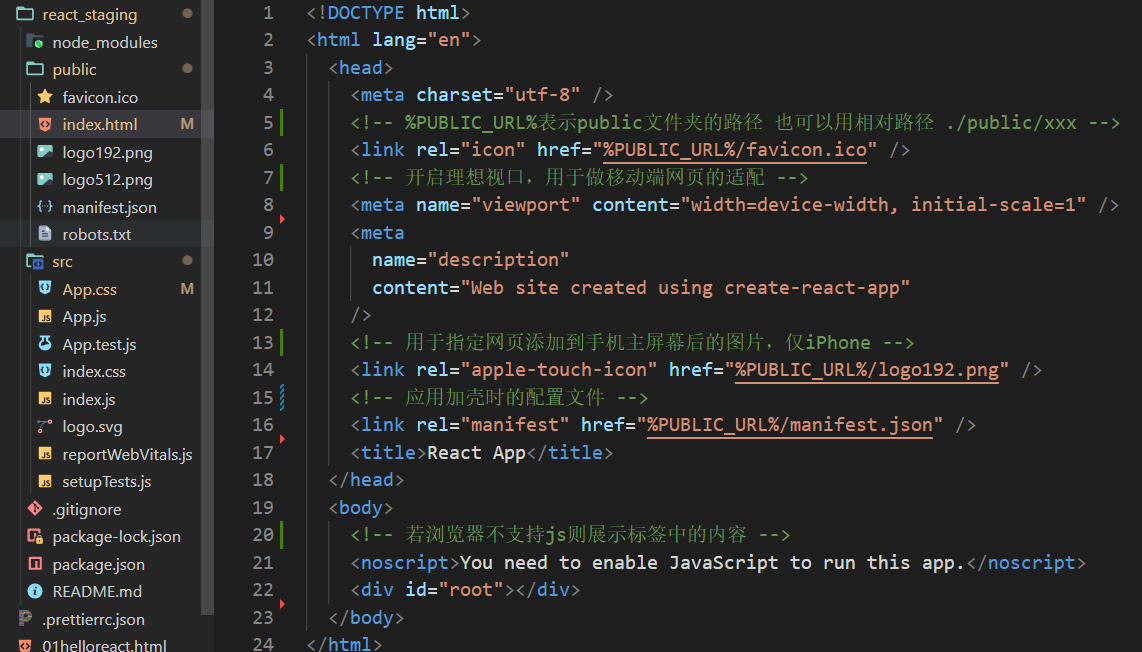
public/index.html文件介绍:
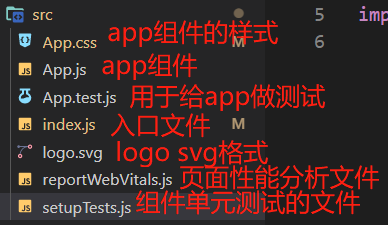
src文件介绍:
一个简单的组件:
src/components/Hello/index.jsx
import React, { Component } from 'react'
import styles from './index.module.css'

export default class Hello extends Component {
  render() {
    return (
      <div>
        <h2 className={styles.title}>hello</h2>
        {/* 样式不生效 */}
        <h3 className="h3">hello</h3>
      </div>
    )
  }
}
index.module.css(样式的模块化)
.title{
  background-color: red;
}

.h3{
  background-color: yellow;
}
App.js中使用:
import React, { Component } from 'react'
import Hello from './components/Hello'

/*
const Person = { name: 'xx', age: 18 }

export class Component1 {}

Person.Component1 = Component1 // 引入Person类后可以通过解构赋值获取Component1:const { Component1 } = Person

export default Person
*/
import Person, { Component1 } from './Person'
// console.log(Person)
// console.log(Component1)

export default class App extends Component {
  render() {
    return (
      <div>
        <Hello />
      </div>
    )
  }
}
ToDoList:
https://gitee.com/wuqilang/react_staging/tree/dev_02ToDoList/
注意事项:
  1、动态初始化列表,数据应该放在哪个组件中:
    某个组件使用,放在其自身的state中
    某些组件使用,放在他们共同的父组件state中(状态提升)
  2、父子组件通信:
    父传子:通过props传递
    子传父:通过props传递,父组件给子组件中传递一个函数
  3、defaultChecked和checked之前的区别,defaultValue和value的区别:
    defaultChecked只管初始化的回显,如果要支持改变状态需要使用checked,并且和onChange事件搭配使用
  4、状态在哪里,操作状态的方法就在哪里
配置代理
第一种:package.json中添加配置,将本地(http://localhost:3000)代理到服务器(http://localhost:5000)上
"proxy": "http://localhost:5000",
优点:配置简单,前端请求资源时不用加任何前缀
缺点:不能配置多个代理
使用:
    axios.get('http://localhost:3000/students').then(
      (response) => {
        console.log('成功了', response.data)
      },
      (error) => {
        console.log('失败了', error)
      }
    )
这里访问的localhost:3000其实就是被代理到localhost:5000
注意:这种方式的代理,先在localhost:3000上找(优先匹配前端资源),如果有就不走localhost:5000,没有的话才走localhost:5000
以下代码返回结果是public中的index.html
  getStudentData = () => {
    axios.get('http://localhost:3000/index.html').then(
      (response) => {
        console.log('成功了', response.data)
      },
      (error) => {
        console.log('失败了', error)
      }
    )
  }
第二种:
src/setupProxy.js
const { createProxyMiddleware: proxy } = require('http-proxy-middleware')

module.exports = function (app) {
  app.use(
    proxy('/api', {
      target: 'https://i.maoyan.com', // 请求转发给谁
      changeOrigin: true, // 控制服务器收到的请求头中host值,设置为true,服务器认为就是i.maoyan.com发出的请求,而不是localhost:3000发出的
      pathRewrite: { '^/api': '' } // 如果地址不是以/api开头的,必须要重写请求路径为 ''
    }),
    proxy('/ajax', {
      target: 'https://i.maoyan.com',
      changeOrigin: true
    })
  )
}
使用:
  componentDidMount() {
    // 完整地址:https://i.maoyan.com/ajax/comingList?ci=50&limit=10&movieIds=&token=&optimus_uuid=5396E540BE4D11EC98EF0950A05EDCAA33D4DF57D3474F469990D4BAEE37948B&optimus_risk_level=71&optimus_code=10
    const url =
      '/comingList?ci=50&limit=10&movieIds=&token=&optimus_uuid=5396E540BE4D11EC98EF0950A05EDCAA33D4DF57D3474F469990D4BAEE37948B&optimus_risk_level=71&optimus_code=10'
    axios.get('/api/ajax' + url).then((res) => {
      console.log('需要重写请求路径', res)
    })
    axios.get('/ajax' + url).then((res) => {
      console.log('不需要重写请求路径', res)
    })
  }
pubsub-js兄弟组件间传递数据
1、安装
npm i pubsub-js
2、使用
    // 发布
    PubSub.publish('my_search', { isFirst: false, isLoading: true })


  componentDidMount() {
    // 订阅
    this.token = PubSub.subscribe('my_search', (_, item) => this.setState(item))
  }
  componentWillUnmount() {
    // 销毁
    PubSub.unsubscribe(this.token)
  }
app.js


import React, { Component } from 'react'
import Search from './components/Search'
import List from './components/List'

export default class App extends Component {
  // state = {
  //   users: [],
  //   isFirst: true,
  //   isLoading: false,
  //   err: ''
  // }
  render() {
    return (
      <div className="container">
        {/* <Search updateAppState={this.updateAppState} />
        <List {...this.state} /> */}
        <Search />
        <List />
      </div>
    )
  }
  // updateAppState = (item) => {
  //   console.log(item)
  //   this.setState(item)
  // }
}
components/Search
import React, { Component } from 'react'
import PubSub from 'pubsub-js'
import axios from 'axios'

export default class Search extends Component {
  render() {
    return (
      <div>
        <h3>搜索github用户</h3>
        <input
          ref={(c) => (this.keyWordElement = c)}
          type="text"
          placeholder="请输入关键词"
        />
        <button onClick={this.search}>搜索</button>
      </div>
    )
  }
  search = () => {
    console.log(this.keyWordElement.value)
    const {
      keyWordElement: { value: keyWord }
    } = this
    // this.props.updateAppState({ isFirst: false, isLoading: true })
    PubSub.publish('my_search', { isFirst: false, isLoading: true })
    // 发送请求,先启动server文件夹服务器
    axios.get(`/api1/search/users?q=${keyWord}`).then(
      (res) => {
        // console.log(res.data)
        // this.props.updateAppState({ isLoading: false, users: res.data.items })
        PubSub.publish('my_search', { isLoading: false, users: res.data.items })
      },
      (err) => {
        // this.props.updateAppState({ isLoading: false, err: err.message })
        PubSub.publish('my_search', { isLoading: false, err: err.message })
      }
    )
  }
}
components/List
import React, { Component } from 'react'
import PubSub from 'pubsub-js'
import './index.css'

export default class List extends Component {
  state = { users: [], isFirst: true, isLoading: false, err: '' }
  render() {
    // const { users, isFirst, isLoading, err } = this.props
    const { users, isFirst, isLoading, err } = this.state
    return (
      <div className="row">
        {isFirst ? (
          <h2>欢迎使用,输入关键字,点击搜索</h2>
        ) : isLoading ? (
          <h2>loading...</h2>
        ) : err ? (
          <h2 style={{ color: 'red' }}>{err}</h2>
        ) : (
          users.map((item) => (
            <div key={item.id} className="card">
              <a rel="noreferrer" href={item.html_url} target="_blank">
                <img
                  src={item.avatar_url}
                  alt="head_protait"
                  style={{ width: '100px' }}
                />
                <p className="card-text">{item.login}</p>
              </a>
            </div>
          ))
        )}
      </div>
    )
  }
  componentDidMount() {
    this.token = PubSub.subscribe('my_search', (_, item) => this.setState(item))
  }
  componentWillUnmount() {
    PubSub.unsubscribe(this.token)
  }
}
3、pubsub-js文档:https://www.npmjs.com/package/pubsub-js
4、git:https://gitee.com/wuqilang/react_staging/tree/dev_05pubsub/
使用fetch:
    try {
      const res = await fetch(`/api1/search/users?q=${keyWord}`)
      console.log(res)
      const data = await res.json()
      console.log(data)
      PubSub.publish('my_search', { isLoading: false, users: data.items })
    } catch (err) {
      console.warn('请求出错', err)
      PubSub.publish('my_search', { isLoading: false, err: err.message })
    }
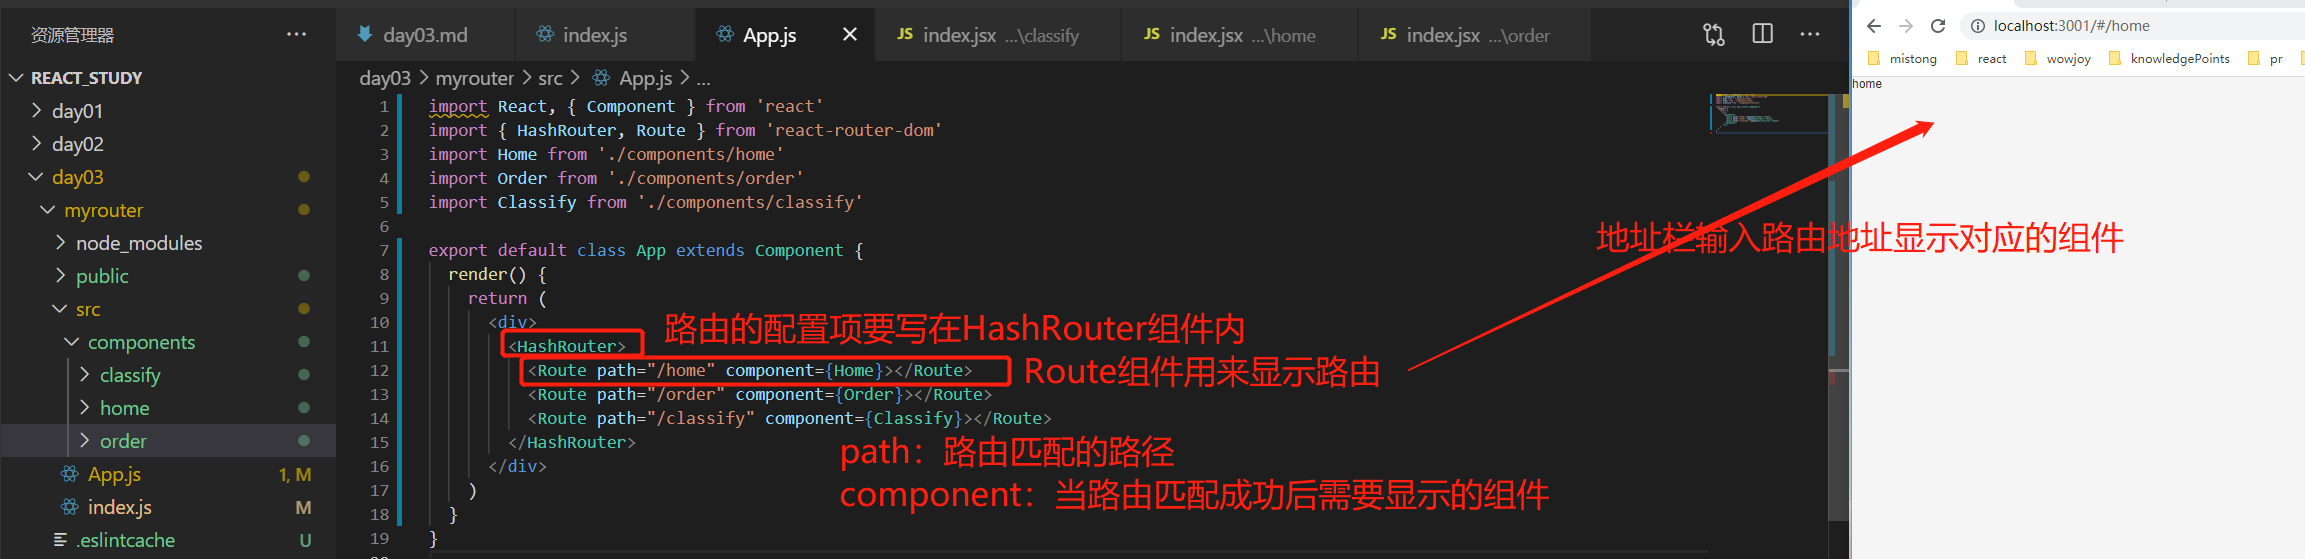
路由:react-router-dom
使用:
          1、app组件外包裹一层BrowserRouter或HashRouter标签
          2、Link标签指定去往哪个路由
          3、Route标签根据路由展示对应的组件
1、index.js
import React from 'react'
import ReactDOM from 'react-dom'
import App from './App'
import { BrowserRouter, HashRouter } from 'react-router-dom'

ReactDOM.render(
  <BrowserRouter>
    <App />
  </BrowserRouter>,
  document.querySelector('#root')
)
2、准备2个组件Home和About
import React, { Component } from 'react'

export default class Home extends Component {
  render() {
    return <div>Home</div>
  }
}
3、App.jsx
import React, { Component } from 'react'
import { Link, NavLink, Route, Switch } from 'react-router-dom'
import About from './pages/About'
import Home from './pages/Home'

/*
  访问localhost:3000时,devServer找到public文件夹下对应路径的内容返回回来,如果没有匹配的内容,则将index.html返回
*/
export default class App extends Component {
  render() {
    return (
      <div className="container">
        {/* 原生中,通过a标签跳转至不同的页面 */}
        {/* <a href="./about.html">about</a>
        <a href="./home.html">home</a> */}

        {/* 编写路由链接(更改路由地址) */}
        {/* <Link to="/about">About</Link>
        <Link to="/home">Home</Link> */}
        <NavLink activeClassName="highlight" to="/about">
          About
        </NavLink>
        <NavLink activeClassName="highlight" to="/home">
          Home
        </NavLink>

        {/* 注册路由(根据路由地址显示对应的组件) Switch组件包裹可以将路径和组件一对一匹配 */}
        {/* 5.2.0的写法 */}
        <Switch>
          <Route path="/my/about" component={About} />
          <Route path="/my/home" component={Home} />
        </Switch>

        {/* 6.3.0的写法 */}
        {/* <Routes>
          <Route path="/about" element={<About />} />
          <Route path="/home" element={<Home />} />
        </Routes> */}
      </div>
    )
  }
}
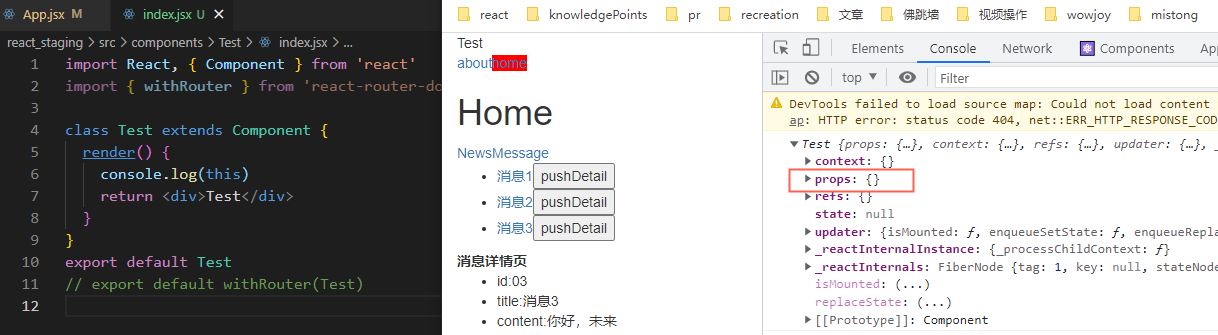
路由组件和一般组件的区别:
1、写法不同:
          一般组件:<Demo />
          路由组件:<Route path='/demo' component={Demo} />
        2、存放在src中的位置:
          一般组件放在components中
          路由组件放在pages中
        3、接收到的props不同:
          一般组件:在组件中传了什么,组件中的props中就有什么(可以通过withRouter让一般组件拥有路由组件的特有属性)
      路由组件:接收到3个固定的属性 history: go goBack goForward push replace location: pathname search state match: params path url
样式(bootstrap.css)丢失解决办法
丢失场景:在所有的路径前加上前缀 /my,页面可以正常切换组件,但是一刷新发现无法请求了
        <MyNavLink to="/my/about">about</MyNavLink>
        <MyNavLink to="/my/home">home</MyNavLink>
<Switch>
          <Route path="/my/about" component={About} />
          <Route path="/my/home" component={Home} />
        </Switch>

这是因为public文件夹下没有my文件夹,导致错误,devServer服务器会默认将public/index.html返回回来
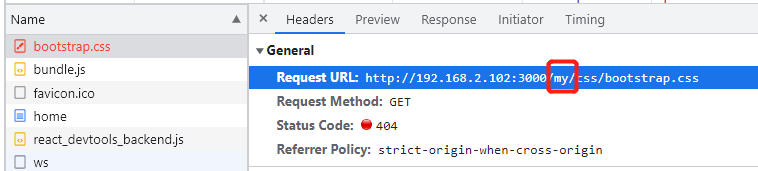
解决办法:
第一种:index.html中引入css样式时将css文件夹前的 . 删除(常用)或者替换为 %PUBLIC_URL%
    <link rel="stylesheet" href="%PUBLIC_URL%/css/bootstrap.css" />
    <link rel="stylesheet" href="/css/bootstrap.css" />
第二种:使用hash路由
    ReactDOM.render(
      <HashRouter>
        <App />
      </HashRouter>,
      document.querySelector('#root')
    )
路由精准匹配(若当前路由下有嵌套的子路由,不可以加exact)
默认是模糊匹配,即 /home/aaa 可以展示路由 /home 对应的组件
        <MyNavLink to="/about">about</MyNavLink>
        <MyNavLink to="/home/aaa">home</MyNavLink><Switch>
          <Route path="/about" component={About} />
          <Route path="/home" component={Home} />
        </Switch>
开启精准匹配:
<Route path="/home" exact component={Home} />
路由重定向
        <Switch>
          <Route path="/about" component={About} />
          <Route path="/home" exact component={Home} />
          <Redirect to="/about" />
        </Switch>
嵌套路由
1、一级路由 App.jsx (注册Home路由时,不能写exact)
import React, { Component } from 'react'
import { Link, NavLink, Route, Switch, Redirect } from 'react-router-dom'
import About from './pages/About'
import Home from './pages/Home'
import MyNavLink from './components/MyNavLInk'

export default class App extends Component {
  render() {
    return (
      <div className="container">
        <MyNavLink to="/about">about</MyNavLink>
        <MyNavLink to="/home">home</MyNavLink>

        <Switch>
          <Route path="/about" component={About} />
          <Route path="/home" component={Home} />
          <Redirect from='/' to="/about" />
        </Switch>
      </div>
    )
  }
}
2、二级路由 Home/index.jsx
import React, { Component } from 'react'
import { NavLink, Route, Switch, Redirect } from 'react-router-dom'
import News from './News'
import Message from './Message'

export default class Home extends Component {
  render() {
    return (
      <div>
        <h1>Home</h1>
        <NavLink to="/home/news">News</NavLink>
        <NavLink to="/home/message">Message</NavLink>
        <Switch>
          <Route path="/home/news" component={News} />
          <Route path="/home/message" component={Message} />
          <Redirect to="/home/news" />
        </Switch>
      </div>
    )
  }
}
react路由传参
方式一:params(类似vue中的params传参,react中使用最多,vue中也建议使用params传参,比query传参优雅)
Home/Message/index.jsx
import React, { Component } from 'react'
import { NavLink, Redirect, Route } from 'react-router-dom'
import Detail from './Detail'

export default class Message extends Component {
  state = {
    list: [
      { id: '01', title: '消息1' },
      { id: '02', title: '消息2' },
      { id: '03', title: '消息3' }
    ]
  }
  render() {
    const { list } = this.state
    return (
      <>
        <ul>
          {list.map(({ id, title }) => (
            <li key={id}>
              {/* 1、传递参数 */}
              <NavLink to={`/home/message/detail/${id}/${title}`}>
                {title}
              </NavLink>
              <Redirect to="/home/message/detail/第一个参数/第二个参数" />
            </li>
          ))}
        </ul>
        {/* 2、声明参数 (Route组件类似<router-view  />,用于展示路由对应的组件    path属性有点像vue的动态路由传值,需要在路由地址上加上 /:id/:title ) */}
        <Route path="/home/message/detail/:id/:title" component={Detail} />
      </>
    )
  }
}
Home/Message/Detail/index.jsx
import React, { Component } from 'react'

const data = [
  { id: '01', content: '你好,世界' },
  { id: '02', content: '你好,中国' },
  { id: '03', content: '你好,未来' }
]

export default class Detail extends Component {
  render() {
    const { id, title } = this.props.match.params // 3、接收参数
    const item = data.find((item) => item.id === id)
    return (
      <>
        <b>消息详情页</b>
        <ul>
          <li>id:{id}</li>
          <li>title:{title}</li>
          <li>content:{item?.content || '没有content'}</li>
        </ul>
      </>
    )
  }
}
方式二:search(类似vue中的query传参)
Home/Message/index.jsx
import React, { Component } from 'react'
import { NavLink, Redirect, Route } from 'react-router-dom'
import Detail from './Detail'

export default class Message extends Component {
  state = {
    list: [
      { id: '01', title: '消息1' },
      { id: '02', title: '消息2' },
      { id: '03', title: '消息3' }
    ]
  }
  render() {
    const { list } = this.state
    return (
      <>
        <ul>
          {list.map(({ id, title }) => (
            <li key={id}>
              {/* 1、传递参数 */}<NavLink to={`/home/message/detail/?id=${id}&title=${title}`}>
                {title}
              </NavLink>
            </li>
          ))}
        </ul><Route path="/home/message/detail" component={Detail} />
      </>
    )
  }
}
Home/Message/Detail/index.jsx
import React, { Component } from 'react'

const data = [
  { id: '01', content: '你好,世界' },
  { id: '02', content: '你好,中国' },
  { id: '03', content: '你好,未来' }
]

// 将地址栏参数转为对象
const getObj = (str) => {
  const obj = {}
  const arr = str.split('&')
  for (const item of arr) {
    const key = item.split('=')[0],
      value = item.split('=')[1]
    obj[key] = value
  }
  return obj
}

export default class Detail extends Component {
  render()
    const { search } = this.props.location // 2、接收参数
    const { id, title } = getObj(search.slice(1))
    const item = data.find((item) => item.id === id)
    return (
      <>
        <b>消息详情页</b>
        <ul>
          <li>id:{id}</li>
          <li>title:{title}</li>
          <li>content:{item?.content || '没有content'}</li>
        </ul>
      </>
    )
  }
}
方式三:state(最方便,但HashRouter模式不支持)
Home/Message/index.jsx
import React, { Component } from 'react'
import { NavLink, Redirect, Route } from 'react-router-dom'
import Detail from './Detail'

export default class Message extends Component {
  state = {
    list: [
      { id: '01', title: '消息1' },
      { id: '02', title: '消息2' },
      { id: '03', title: '消息3' }
    ]
  }
  render() {
    const { list } = this.state
    return (
      <>
        <ul>
          {list.map(({ id, title }) => (
            <li key={id}><NavLink to={{ pathname: '/home/message/detail', state: { id, title } }}>
                {title}
              </NavLink>
            </li>
          ))}
        </ul><Route path="/home/message/detail" component={Detail} />
      </>
    )
  }
}
Home/Message/Detail/index.jsx
import React, { Component } from 'react'

const data = [
  { id: '01', content: '你好,世界' },
  { id: '02', content: '你好,中国' },
  { id: '03', content: '你好,未来' }
]

export default class Detail extends Component {
  render() {
    const { id, title } = this.props.location.state || {} // 2、接收参数 HashRouter模式下刷新页面state为undefined
    const item = data.find((item) => item.id === id) || {}
    return (
      <>
        <b>消息详情页</b>
        <ul>
          <li>id:{id}</li>
          <li>title:{title}</li>
          <li>content:{item?.content || '没有content'}</li>
        </ul>
      </>
    )
  }
}
Link和NavLink组件支持replace属性,默认以push(压栈)方式跳转,设置后以replace(替换)方式跳转
              <NavLink to={{ pathname: '/home/message/detail', state: { id, title } }} replace>
                {title}
              </NavLink>
编程式导航+传参(Link必须要点击才能触发,编程式导航可以在初始化时或定时器触发,更加灵活)
注意:路由组件才可以通过props拿到history对象,进行路由的跳转
方式一:params
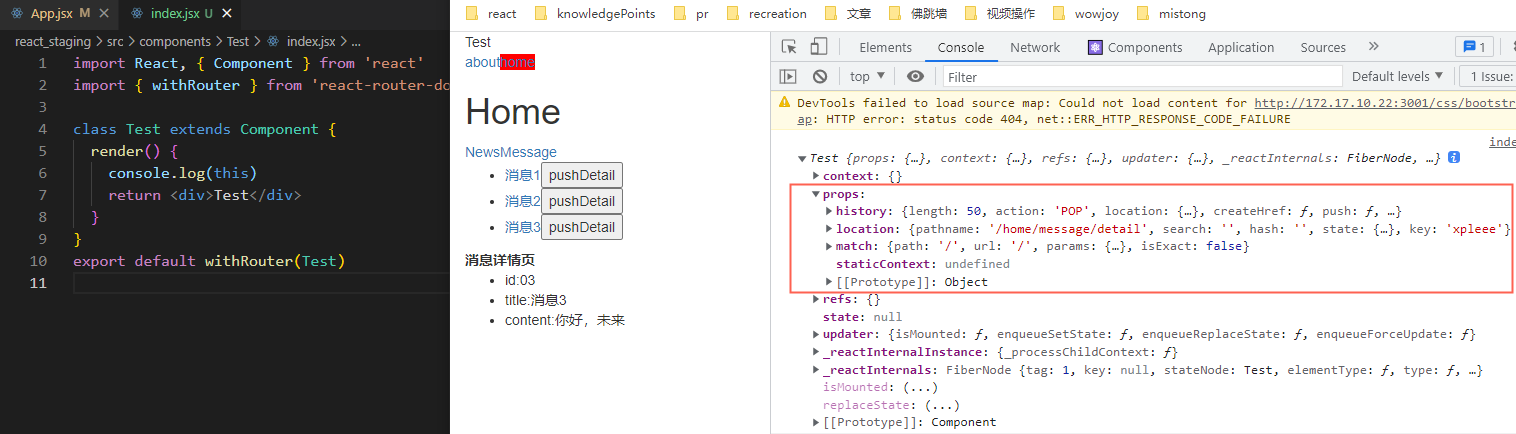
              <button onClick={() => this.props.history.push(`/home/message/detail/${id}/${title}`)}>
                pushDetail
              </button>
使用history对象的push方法替换Link/NavLink的to属性,声明参数和接收时和之前一样
方式二:search
              <button onClick={() => this.props.history.push(`/home/message/detail/?id=${id}&title=${title}`)}>
                pushDetail
              </button>
方式三:state
              <button onClick={() => this.props.history.push('/home/message/detail', { id, title })}>
                pushDetail
              </button>
五个方法:
push
replace
go
goBack
goForward
withRouter
写在Route组件component属性中的组件叫路由组件,props对象下默认带history、location、match等属性;
一般组件,直接用来展示在页面上的组件props是一个空对象,如果也需要和路由组件一样具有这些属性,就需要用到withRouter
vue里一般组件和路由组件一样,都具有路由组件的属性。react需要自己动手
使用withRouter包裹组件:
BrowserRouter和HashRouter的区别
1、底层原理不一样
BrowserRouter使用的是h5的history API,不兼容IE9及以下的版本
HashRouter使用的是url的哈希值
2、path表现形式不一样
BrowserRouter的路径中没有# localhost:3000/demo/test
HashRouter的路径包含# localhost:3000/#/demo/test
3、刷新后对路由state参数的影响
BrowserRouter没有任何影响,因为state保存在history对象中
HashRouter刷新后会导致路由state参数的丢失
4、备注:HashRouter可以解决一些路径错误相关的问题,如:样式丢失的解决
react脚手架:
全局安装:npm i create-react-app -g
查看脚手架版本:create-react-app -V
脚手架创建项目:
create-react-app myrouter(要求node版本最低是v10.14.2)
react路由:
安装:npm i react-router-dom
基本使用:
1、路由的形式:
hash路由:HashRouter
history路由:BrowserRouter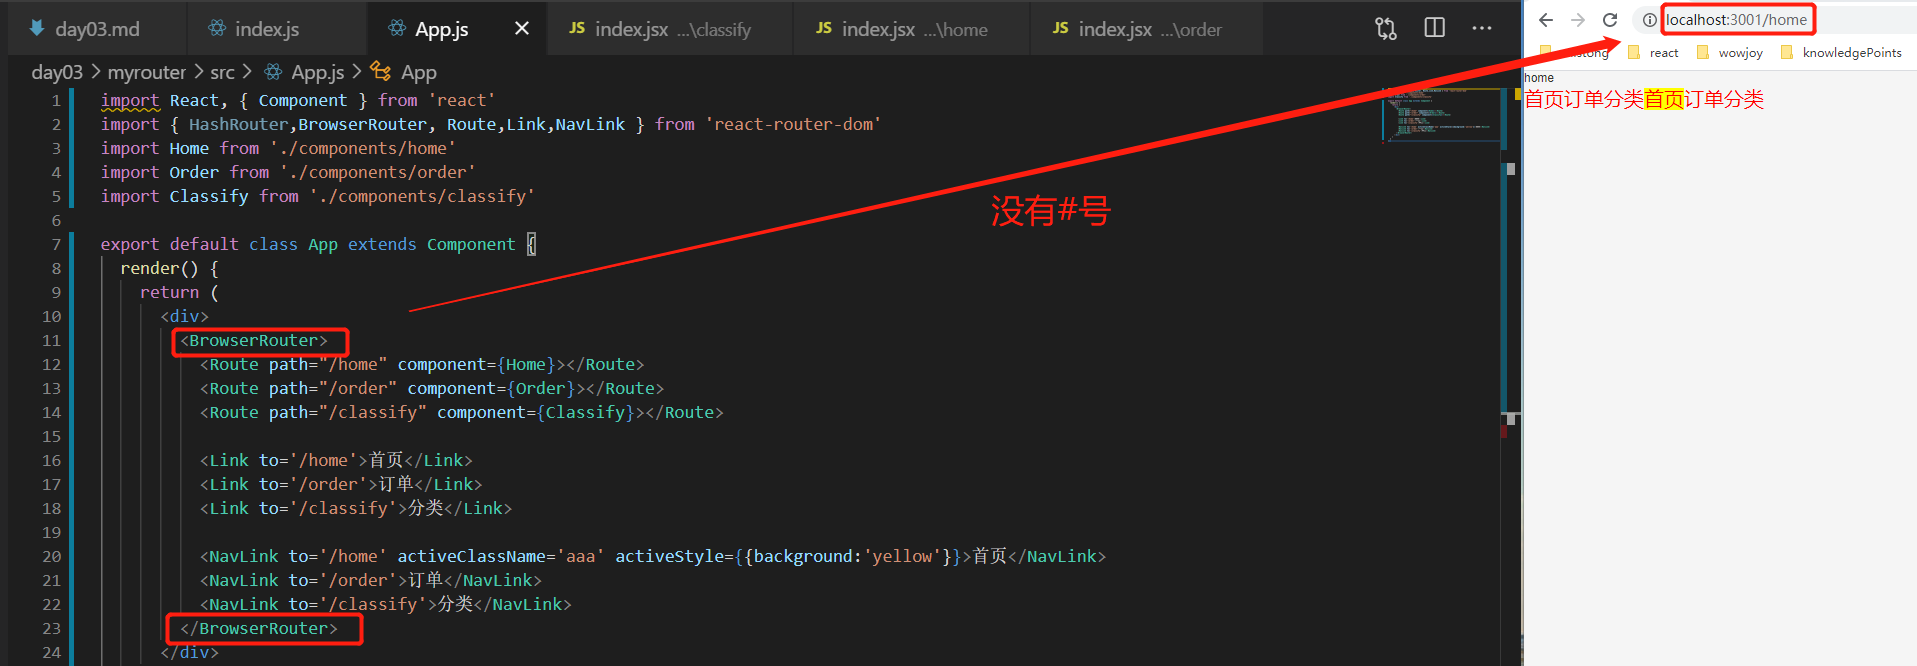
路由的所有配置必须在HashRouter或BrowserRouter的包裹范围之内
2、路由的显示:
route:
作用:用来配置路由以及路由的显示
配置项:
path:路由匹配的路径
component:当路径匹配成功后需要渲染的组件(值为组件名称)
render:当路径匹配成功后需要渲染的组件(值是一个函数)
exact:完全匹配
3、路由跳转的方式:
①a标签
          <a href="#/home">首页</a>
          <a href="#/classify">分类</a>
          <a href="#/order">订单</a>
②Link(没有选中标识的,使用场景:返回)
          <Link to='/home'>首页</Link>
          <Link to='/order'>订单</Link>
          <Link to='/classify'>分类</Link>
如果重复点击某个路由会报警告:

警告:哈希历史不能推送相同的路径;新的条目不会被添加到历史堆栈中
③NavLink(使用场景:底部导航、有选中标识的导航)
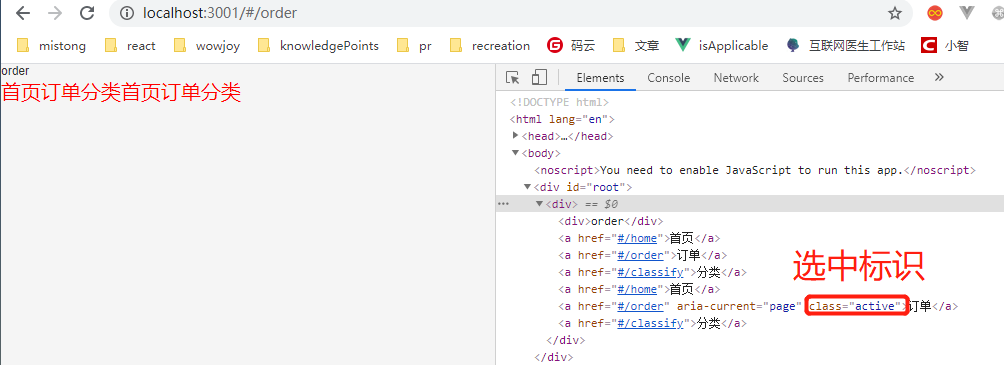
          <NavLink to='/home' activeClassName='aaa' activeStyle={{background:'yellow'}}>首页</NavLink>
          <NavLink to='/order'>订单</NavLink>
          <NavLink to='/classify'>分类</NavLink>
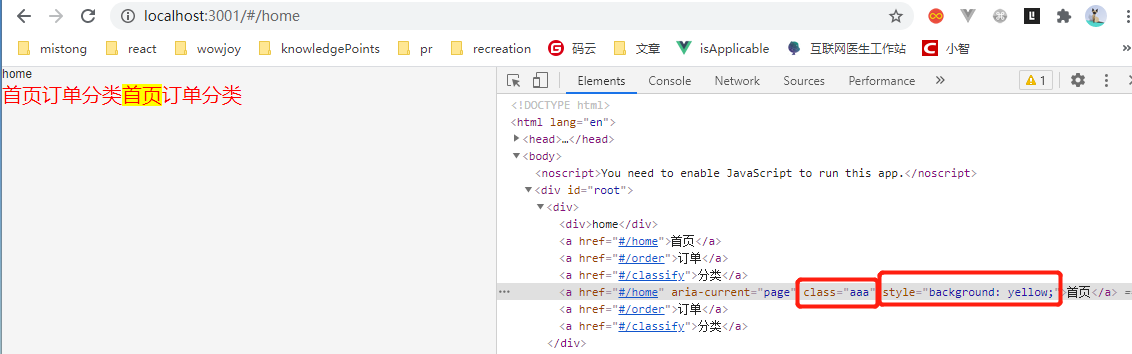
配置项:
to:需要跳转的路径
activeClassName:更改选中后的标识
activeStyle:选中后的样式
④编程式导航
4、路由传值:
①动态路由:(地址栏上有参数:details/xxx/xxx,刷新不丢失)
在定义的时候通过 /:属性 的方式来定义传递的属性

在路由跳转的时候通过 /值 的方式进行传值

在需要接收数据的页面通过 this.props.match.params 来接收

②query传值:(地址栏上有参数:details?id=xxx&name=xxx,刷新不丢失)
路由:
在路由跳转的时候通过 query 进行传值

在需要接收数据的页面通过 this.props.location.search 来接收(?id=0&name=%E9%A6%99%E8%95%89)

③内存传值:(地址栏上没有参数,刷新会丢失)
路由:
在路由跳转的时候通过 to={{pathname:'', query:{}}} 进行传值

在需要接收的页面通过 this.props.location.query 来接收

5、路由嵌套:
6、编程式导航:
this.props.history.push()


this.props.history.goBack()
this.props.history.goForward()
this.props.history.go()
this.props.history.replace()
7、component渲染和render渲染的区别:
①在route组件中通过component属性进行页面渲染的时候会默认的给当前组件传递三个值(history match location)


②render渲染的时候可以渲染组件也可以渲染标签

③render渲染的时候可以进行传值

④一般情况下会通过render的方式进行路由的嵌套
⑤render可以进行更多的业务逻辑
8、路由重定向:
import {Redirect} from 'react-router-dom'

9、Switch
作用:只匹配一个路由
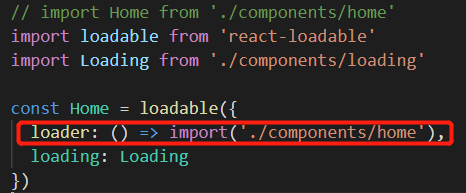
10、路由懒加载:
①安装:npm i react-loadable
②引入并使用:
11、withRouter:
高阶组件:
作用:可以给当前组件的props传入一个对象,这个对象就是路由的三个值{history match location}
当使用render方式渲染组件时,如果没有手动去传路由的三个值:

此时在order组件中的this.props是一个空对象:
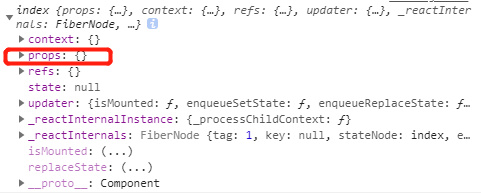
使用withRouter将组件包裹:
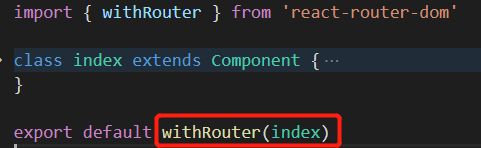
此时再打印this:
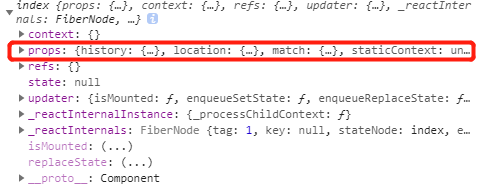
说明withRouter给当前被包裹的组件传递了路由的三个值,就可以正常使用编程式导航等功能了。
路由表封装:
1、在components中新建index.js文件,将所有的页面都用懒加载的方式引入,整体导出出去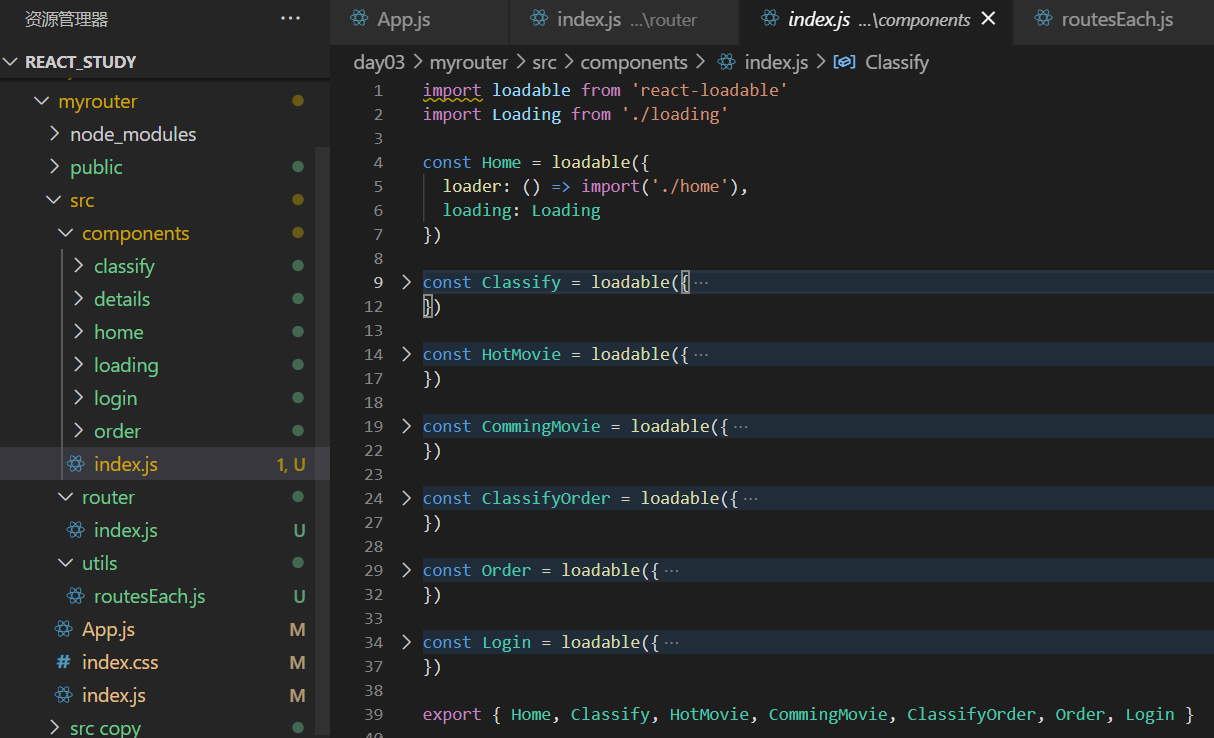
2、src下新建router/index.js:将路由放入路由表中
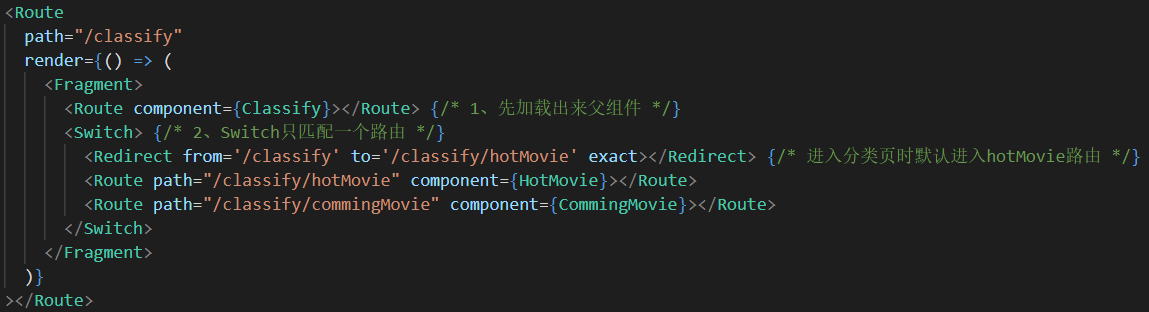
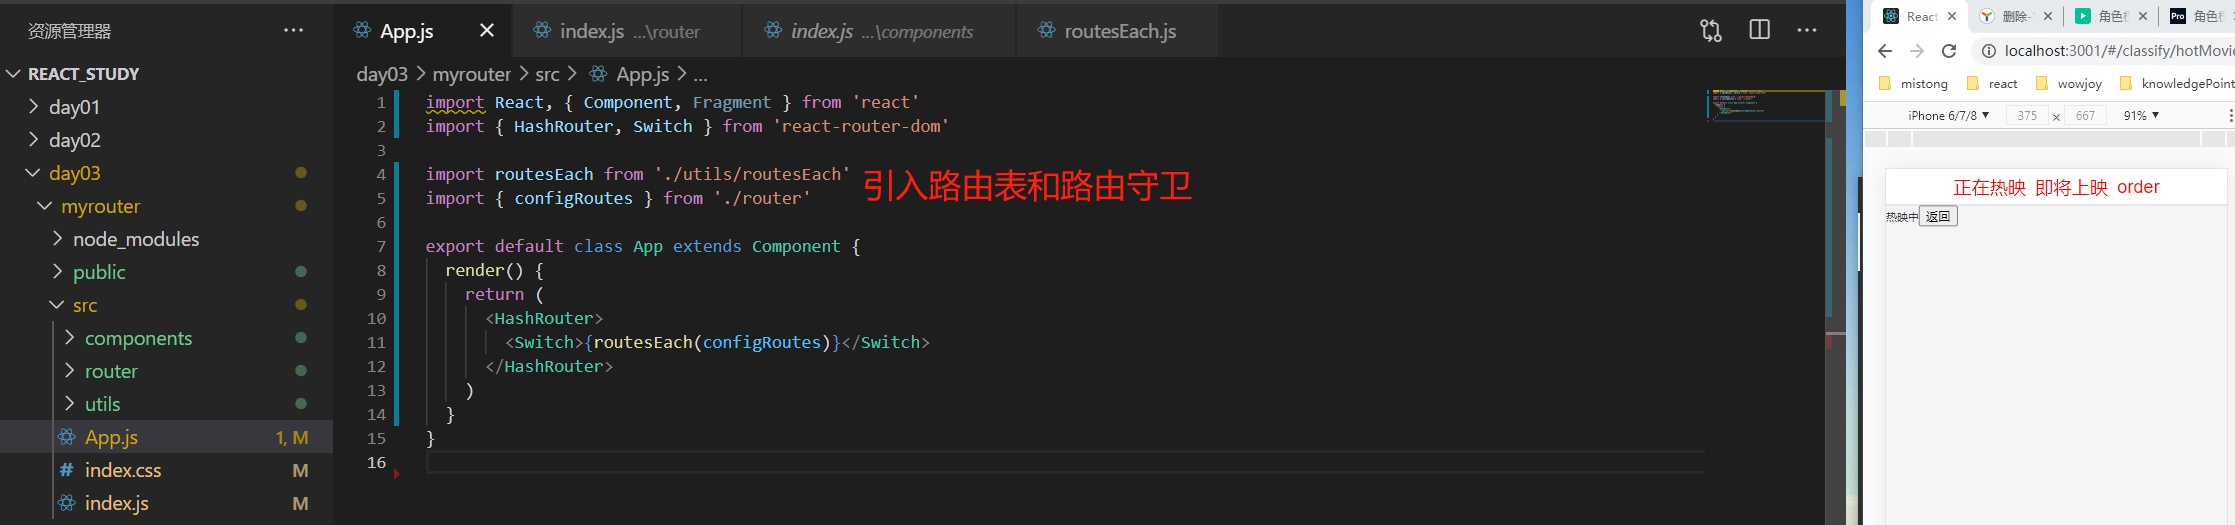
        import {
          Home,
          Classify,
          HotMovie,
          CommingMovie,
          ClassifyOrder,
          Order,
          Login
        } from '../components'

        // 有layout布局的路由表
        export const layoutRoutes = [
          {
            path: '/home',
            component: Home,
            icon: '',
            meta: {}
          },
          {
            path: '/classify',
            component: Classify,
            icon: '',
            meta: {},
            children: [
              {
                path: '/classify/hotMovie',
                component: HotMovie,
                meta: {}
              },
              {
                path: '/classify/commingMovie',
                component: CommingMovie,
                meta: {}
              },
              {
                path: '/classify/order',
                component: ClassifyOrder,
                meta: {}
              }
            ]
          },
          {
            path: '/order',
            component: Order,
            icon: '',
            meta: {}
          }
        ]

        // 没有layout布局的路由表
        export const notLayoutRoutes = [
          {
            path: '/login',
            component: Login,
            meta: {}
          }
        ]

        // 所有路由的配置项
        export const configRoutes = layoutRoutes.concat(notLayoutRoutes)
3、src下新建utils/routesEach.js:传入路由表返回对应的组件,并且模拟vue中路由守卫
        import React, { Fragment } from 'react'
        import { Switch, Redirect, Route } from 'react-router-dom'

        export default (routes) => {
          function routesEach(routeConfig) {
            return routeConfig.map((item) => {
              if (item.children) {
                return (
                  <Route
                    path={item.path}
                    key={item.path}
                    render={() => {
                      return (
                        <Fragment>
                          <Route component={item.component}></Route>
                          <Switch>
                            <Redirect
                              from={item.path}
                              to={item.children[0].path} // 重定向到第一个路由
                              exact
                            ></Redirect>
                            {item.children.map((child) => {
                              return (
                                <Route
                                  path={child.path}
                                  key={item.path}
                                  render={() => {
                                    return isAuthRequired(child) // 权限验证
                                  }}
                                ></Route>
                              )
                            })}
                          </Switch>
                        </Fragment>
                      )
                    }}
                  ></Route>
                )
              } else {
                return (
                  <Route
                    path={item.path}
                    key={item.path}
                    render={() => {
                      return isAuthRequired(item)
                    }}
                  ></Route>
                )
              }
            })
          }
          // 权限验证:路由守卫
          function isAuthRequired(item) {
            // 先判断当前路由是否需要权限验证
            if (item.meta.authRequired) {
              // 当前路由需要权限验证,判断token是否存在
              if (localStorage.getItem('token')) {
                return <item.component></item.component>
              } else {
                return <Redirect to="/login"></Redirect>
              }
            } else {
              return <item.component></item.component> // 不需要权限验证的路由可以直接返回
            }
          }
          return routesEach(routes)
        }
4、app.js

 浙公网安备 33010602011771号