pytorch-day02
1、基本数据类型

Data type:

Type check:
a = torch.randn(2, 3)
print(a.type())  # torch.FloatTensor
print(type(a))  # <class 'torch.Tensor'>
print(isinstance(a, torch.FloatTensor))  # True

print(isinstance(a, torch.cuda.FloatTensor))  # False
a = a.cuda()  # 搬运到cuda上
print(isinstance(a, torch.cuda.FloatTensor))  # True
2、维度
2.1、标量(Dimension 0 / rank 0),例如loss
# 0维:没有[]
a = torch.tensor(1.0)
print(a)  # tensor(1.)
print(a.shape)  # torch.Size([])
print(len(a.shape))  # 0
print(a.size())  # torch.Size([])
2.2、向量(Dim 1 / rank 1),例如bias
# 1维:最外层有1个[]
a = torch.tensor([1.1, 2.2])
print(a)  # tensor([1.1000, 2.2000])
print(a.shape)  # torch.Size([2])
print(len(a.shape))  # 1
print(a.size())  # torch.Size([2])

# 随机生成时,只需要指定维数(容易和0维时混淆)
b = torch.FloatTensor(1)
b = torch.FloatTensor(2)
# 使用numpy生成
c = np.ones(3)
d = torch.from_numpy(c)
2.3、矩阵(Dim 2),例如带有batch的线性函数的输入
# 2维:最外层有2个[]
a = torch.randn(2, 3)
print(a)
print(a.shape)  # torch.Size([2, 3])
print(a.shape[0])  # 2
print(a.shape[1])  # 3
print(a.size(0))  # 2
print(a.size(1))  # 3
2.4、Dim 3,例如,RNN中,[10,20,100]:10句话(即batch为10);每句话有20个单词;每个单词用100维的向量表示
# 3维:最外层有3个[]
a = torch.randn(2, 3, 4)
print(a)
print(a.shape)  # torch.Size([2, 3, 4])
print(list(a.shape))  # [2, 3, 4])
print(a.shape[0])  # 2
print(a.shape[1])  # 3
print(a.shape[2])  # 4
print(a.size(0))  # 2
print(a.size(1))  # 3
print(a.size(2))  # 4
2.5、Dim 4,例如CNN中,图片[2,3,28,28]:2张图片;3彩色图(为1时是灰度图);28图片的像素
a = torch.randn(2, 3, 28, 28)
2.6、补充
# 4维:最外层有4个[]
a = torch.randn(2, 3, 28, 28)
# 所占的内存大小,即2*3*28*28
print(a.numel())  # 4704
# 维度
print(a.dim())  # 4
3、创建Tensor
# 1、从Numpy引入
a = np.array([2, 3.3])
b = torch.from_numpy(a)

c = torch.tensor([5, 8.8])  # 小写的是接收现成的数据
print(c)
d = torch.Tensor([5, 8.8])  # 大写的可以接收现成的数据
print(d)
e = torch.Tensor(2, 3)  # 大写的也可以接受shape
print(e)
3.1、创建未初始化的数据(不代表没有数据,而是其中的数据很random)
# 1、Torch.empty() 括号里给shape
a = torch.empty(2, 3)
print(a)
# 2、Torch.FloatTensor(d1, d2, d3) 数值会很大或很小,所有这种只适合做容器,后期需要把具体的数据写进来
b = torch.FloatTensor(2, 3)
print(b)
# 3、Torch.IntTensr(d1, d2, d3)
c = torch.IntTensor(2, 3)
print(c)
3.2、设置默认类型
# torch.Tensor()默认与torch.FloatTensor()同类型
print(torch.Tensor(2, 3).type())  # torch.FloatTensor
print(torch.FloatTensor(2, 3).type())  # torch.FloatTensor

torch.set_default_tensor_type(torch.DoubleTensor)
print(torch.Tensor(2, 3).type())  # torch.DoubleTensor
3.3、创建并初始化数据
# 1、rand:会随机产生0~1之间的数值,不包括1
a = torch.rand(3, 3)
print(a)
# 2、rand_like:把参数(tensor类型)的读出来,传给torch.rand()
b = torch.rand_like(a)
print(b)
# 在上面的基础上,可以均匀采样0~10的tensor
c = 10 * torch.rand(2, 3)
print(c)
# 3、randint只能采样整数(min,max,shape)
d = torch.randint(1, 10, [1, 2, 3])
print(d)
# 4、randn:正太分布N(0,1):均值为0,方差为1
e = torch.randn(3, 3)
print(e)
# normal:自定义正太分布的均值和方差
f = torch.normal(mean=torch.full([10], 0), std=torch.arange(1, 0, -0.1))
print(f)
# torch.full:第一个参数是shape,第二个参数是填充的数
g = torch.full([2, 3], 7)
print(g)
torch.full([], 7)
torch.full([1], 7)
# 5、arange/range(不建议使用):等差数列
h = torch.arange(0, 10, 2)  # 第三个参数默认是1
print(h)
# 6、linspace(0,10,step=4):取4个数
i = torch.linspace(0, 10, 11)
print(i)
# 7、logspace(a,b,c):从10^a到10^b中取c个数
j = torch.logspace(0, 1, steps=8)
print(j)
# 8、Ones/zeros/eye(对角线为1):参数是shape
# 9、randperm():随机打散
k = torch.randperm(10)
print(k)
# 两个tensor需要保持对应时
aa = torch.rand(2, 3)
bb = torch.rand(2, 2)
idx = torch.randperm(2)
print(aa[idx])
print(bb[idx])
4、切片和索引
 1 a = torch.rand(4, 3, 28, 28)
 2 print(a[0].shape)  # torch.Size([3, 28, 28])
 3 print(a[0][0].shape)  # torch.Size([28, 28])
 4 print(a[0][0][0].shape)  # torch.Size([28])
 5 print(a[0][0][2][4])  # tensor(0.0374)
 6
 7 b = a[:2]  # 前两张图片
 8 print(b.shape)  # torch.Size([2, 3, 28, 28])
 9 c = a[:2, :1, :, :]  # 前两张图片的第1个通道上所有的数据
10 print(c.shape)  # torch.Size([2, 1, 28, 28])
11 d = a[:2, 1:, :, :]  # 前两张图片的除了第1个通道上所有的数据
12 print(d.shape)  # torch.Size([2, 2, 28, 28])
13 e = a[:2, -1:, :, :]  # 前两张图片的最后1个通道上所有的数据
14 print(e.shape)  # torch.Size([2, 1, 28, 28])
15
16 # 隔行采样(start:end:steps)不包含end
17 f = a[:, :, 0:28:2, 0:28:2]  # 隔2行进行采样,默认行数是1
18 print(f.shape)  # torch.Size([4, 3, 14, 14])
19 h = a[:, :, 0:28:, 0:28:]
20 print(h.shape)  # torch.Size([4, 3, 28, 28])
21 g = a[:, :, ::2, ::2]
22 print(g.shape)  # torch.Size([4, 3, 14, 14])
 1 # index_select(a,torch.tensor([0,2])):a:表示要操作的通道,第二个参数表示取a通道的第0个数据和第3个数据
 2 a = torch.rand(4, 3, 28, 28)
 3 b = a.index_select(0, torch.tensor([0, 2]))
 4 print(b.shape)  # torch.Size([2, 3, 28, 28])
 5
 6 # ...:任意多的维度
 7 print(a[...].shape)  # torch.Size([4, 3, 28, 28])
 8 print(a[0, ...].shape)  # torch.Size([3, 28, 28])
 9
10 # ge(i):把大于i的数值置为True
11 x = torch.randn(2, 3)
12 c = x.ge(0.5)
13 print(c)
14 # 再把掩码为True的数取出来
15 d = torch.masked_select(x, c)
16 print(d)
17
18 # 打平之后再取值
19 y = torch.tensor([[1, 2, 3], [4, 5, 6]])
20 z = torch.take(y, torch.tensor([0, 2, 5]))
21 print(z)  # tensor([1, 3, 6])
5、Tensor维度变换
 1 # 1、View/reshape
 2 a = torch.rand(4, 1, 28, 28)
 3 b = a.view(4, 1 * 28 * 28)  # 只要保持整个Tensor的a.numel()不变即可
 4 a.view(4 * 1, 28, 28)
 5 a.view(4 * 1 * 28, 28)
 6 # 弊端,在恢复原始数据维度时,容易丢失维度是“1”的维度信息
 7
 8 # 2、Squeeze/unsqueeze(删减/增加维度),给数据新增加/减少一个组别,不改变数据
 9 print(a.unsqueeze(0).shape)  # torch.Size([1, 4, 1, 28, 28])
10 print(a.unsqueeze(-1).shape)  # torch.Size([4, 1, 28, 28, 1])
11 print(a.unsqueeze(4).shape)  # torch.Size([4, 1, 28, 28, 1])
12 print(a.unsqueeze(-4).shape)  # torch.Size([4, 1, 1, 28, 28])
13 print(a.unsqueeze(-5).shape)  # torch.Size([1, 4, 1, 28, 28])
14 # print(a.unsqueeze(5).shape)  # IndexError
15 # squeeze()的操作与unsqueeze()对应
16 # 注意1:squeeze()不给参数的话,会把所有维度为"1"的全挤压。
17 # 注意2:对于维度不为"1"即不能挤压的,返回原始数据
18
19 # 3、Transpose/t/permute(矩阵的转置)
20 # 3.1、t():只适合于矩阵(2D)
21 e = torch.rand(2, 3)
22 e.t()
23 # 3.2、transpose(a,b):交换a,b维度
24 f = torch.rand(4, 3, 32, 32)
25 # a1=a.transpose(1,3).view(4,3*32*32).view(4,3,32,32) # RuntimeError
26 f1 = f.transpose(1, 3).contiguous().view(4, 3 * 32 * 32).view(4, 3, 32, 32)  # 错误用法,数据污染
27 f2 = f.transpose(1, 3).contiguous().view(4, 3 * 32 * 32).view(4, 32, 32, 3)  # 推荐用法
28 f3 = f.transpose(1, 3).contiguous().view(4, 3 * 32 * 32).view(4, 32, 32, 3).transpose(1, 3)
29 print(f1.shape)  # torch.Size([4, 3, 32, 32])
30 print(f3.shape)  # torch.Size([4, 3, 32, 32])
31 print(torch.all(torch.eq(f, f1)))  # tensor(False)
32 print(torch.all(torch.eq(f, f3)))  # tensor(True)
33 # 3.3、permute(a,b,c,d):参数表示维数的位置
34 g = f.permute(0, 2, 3, 1)
35
36 # 4、Expand/repea(维度的扩展),两者效果一样,仅限于原来的维度是"1"
37 c = torch.rand(32)
38 c = c.unsqueeze(1).unsqueeze(2).unsqueeze(0)  # torch.Size([1, 32, 1, 1])
39 d = torch.rand(4, 32, 14, 14)
40 # 如果想让c和d相加,就要对c进行扩展
41 # 4.1、Expand: broadcasting(不会主动复制数据)推荐,速度快,节省内存
42 print(c.expand(4, 32, 14, 14).shape)  # torch.Size([4, 32, 14, 14])
43 print(c.expand(-1, 32, -1, -1).shape)  # torch.Size([1, 32, 1, 1]),-1表示不变
44 print(c.expand(-1, 32, -1, -4).shape)  # torch.Size([1, 32, 1, -4]) ,无意义
45 # 4.2、Repeat: memory copied(把所有扩展的数据按原数据拷贝一遍)
46 print(c.repeat(4, 32, 1, 1).shape)  # torch.Size([4, 1024, 1, 1]),每个参数表示对应维度拷贝的次数
47 print(c.repeat(4, 1, 14, 14).shape)  # torch.Size([4, 32, 14, 14])
6、Broadcasting(自动扩展)
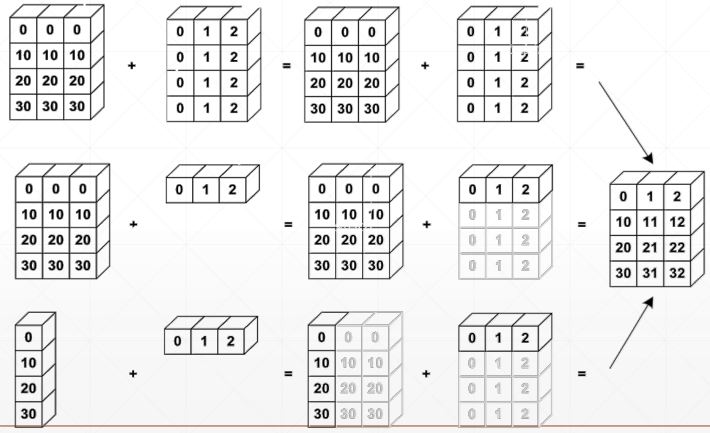
6.1、Why broadcasting


7、合并与分割
# 1、Cat除了指定的dim,其它维度要相同
a = torch.rand(4, 32, 8)
b = torch.rand(5, 32, 8)
c = torch.cat([a, b], dim=0)
print(c.shape)  # torch.Size([9, 32, 8])
# 2、Stack
a1 = torch.rand(4, 3, 16, 16)
a2 = torch.rand(4, 3, 16, 16)
print(torch.cat([a1, a2], dim=2).shape)  # torch.Size([4, 3, 32, 16])
print(torch.stack([a1, a2], dim=2).shape)  # torch.Size([4, 3, 2, 16, 16])

b = torch.rand(32, 8)
c = torch.rand(30, 8)
print(torch.cat([b, c], dim=0).shape)  # torch.Size([62, 8])
# print(torch.stack([b,c],dim=0).shape) # RuntimeError
# 3、Split
b1 = torch.rand(32, 8)
c1 = torch.rand(32, 8)
d1 = torch.stack([b1, c1], dim=0)  # torch.Size([2, 32, 8])
bb, cc = d1.split([1, 1], dim=0)
print(bb.shape, cc.shape)  # torch.Size([1, 32, 8]) torch.Size([1, 32, 8])
bb, cc = d1.split(1, dim=0)
print(bb.shape, cc.shape)  # torch.Size([1, 32, 8]) torch.Size([1, 32, 8])
# bb,cc=d1.split(2,dim=0) #ValueError
# 4、Chunk
bb, cc = d1.chunk(2, dim=0)
print(bb.shape, cc.shape)  # torch.Size([1, 32, 8]) torch.Size([1, 32, 8])
8、基本运算

 1 # 1、Add/minus/multiply/divide
 2 a = torch.rand(3, 4)
 3 b = torch.rand(4)
 4 print(torch.all(torch.eq(a + b, torch.add(a, b))))  # tensor(True)
 5
 6 # 2、矩阵相乘
 7 # 2.1、*:相同位置相乘
 8 # 2.1、torch.mm:只适合2Dtensor,所有不推荐
 9 # 2.2、torch.matmul:
10 # 2.3、@:与torch.matmul一样
11 a = torch.rand(4, 3, 28, 64)
12 b = torch.rand(4, 3, 64, 32)
13 print(torch.matmul(a, b).shape)  # torch.Size([4, 3, 28, 32]) #前面的两维保持不变
14 # 3、pow次方
15 a = torch.full([2, 2], 3)
16 print(a.pow(2))
17 print(a ** 2)
18 # 4、sprt次方根
19 b = a.pow(2)
20 print(b.sqrt())
21 print(b ** 0.5)
22 # 5、rsqrt先开方,再求导数
23 a = torch.tensor([4., 4.])
24 print(a.rsqrt())
25
26 a = torch.exp(torch.ones(2, 2))  # 全是e
27 print(torch.log(a))
28 print(torch.log2(a))
29 print(torch.log10(a))
30 # 6、round矩阵的近似运算
31 # 往下取整/往上取整/取整/取小数/四舍五入
32 a = torch.tensor(3.14)
33 print(a.floor(), a.ceil(), a.trunc(), a.frac(), a.round())  # tensor(3.) tensor(4.) tensor(3.) tensor(0.1400) tensor(3.)
34
35 # 7、clamp裁剪(限制),例如gradient clipping
36 grad = torch.rand(2, 3) * 15
37 print(grad.max())
38 print(grad.median())
39 print(grad.clamp(10))  # 把数值限制在10以上
40 print(grad.clamp(0, 10))  # 把数值限制在0~10之间
9、Tensor统计

 浙公网安备 33010602011771号