VUE学习整理
VUE
VUE介绍
vue是前端渐进式js框架,使用声明式编程,与JQuery的命令式编程不同,使用声明式编程可以减少很多代码。
作者:尤雨溪
作用:动态构建用户界面
vue借鉴了angular的模板和数据绑定技术,借鉴了react的组件化和虚拟DOM技术。
特点:
1、遵循MVVM模式
2、编写简洁,体积小,运行效率高
3、本身只关注UI。可以引入vue插件或第三方库(vue插件:依赖vue,第三方库:不依赖vue)
官网:
中文:
英文:
vue扩展插件:
vue-cli:vue脚手架
vue-resource(axios):ajax请求
vue-router:路由
vuex:状态管理
vue-lazyload:图片懒加载
vue-scroller:页面滑动相关
mint-ui:移动端组件
element-ui:pc端组件
vue的mvvm
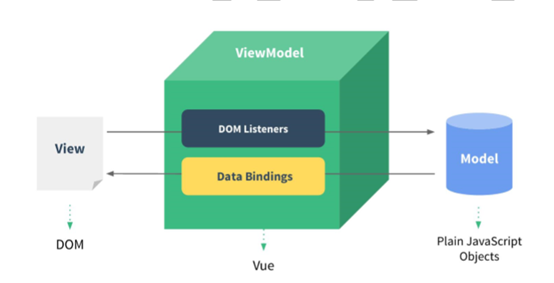
其中View是页面,Model是data,ViewModel是Vue实例。
vue通过dom监听和数据绑定同步view和model之间的数据。
基本使用及语法
基本使用:
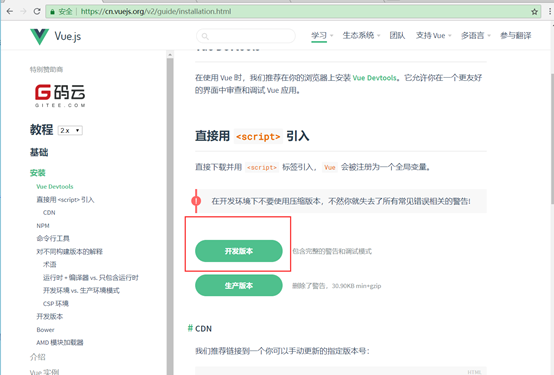
1、下载vue.js,就一个js文件
2、编写test1.html,其中引入vue.js
test1.html内容:
<div id="ddd">
<input type="text" v-model="message">
{{message}}
</div>
<script src="vue.js"></script>
<script>
// 创建vue对象,el指定元素,data指定数据
var vm = new Vue({
el: '#ddd',
data: {
message: 'kkk'
}
})
</script>
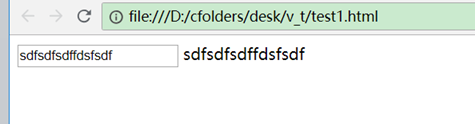
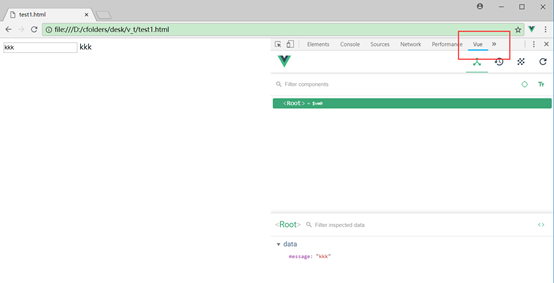
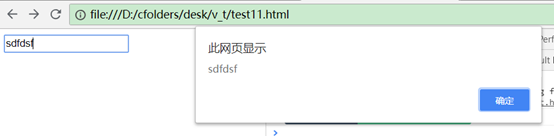
这里创建了Vue对象(vue.js中定义的),使用el指定vue管理的dom元素的id,data指定数据,然后input标签用v-model绑定数据(双向绑定数据,v-model是一个指令,类似于v-if等),显示数据的地方用{{}}绑定数据(双大括号表达式),都绑定了message这个变量。
这里mvvm中的model是data,view是div对象,vm是Vue实例对象。
注意:当input标签绑定数据以后,表示这个标签交给vue来生成了。
3、效果:
当输入框的值改变时,下面文本显示也跟着变(声明式编程的好处,不需要去手动写事件操作)。
4、ps:
1、data里面的变量会设置到Vue对象的属性中,如控制台手动更改变量,界面上绑定的变量也会自动更新:

2、vue是一个渐进式框架,它可以对现有的页面进行逐步替换,比如对其中某一块内容进行vue渲染。vue可以定义多个对象,如:
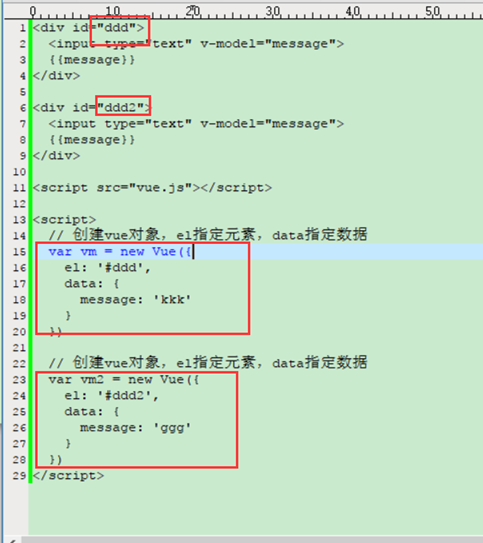
虽然都定义了message的变量数据,但它们互不影响:

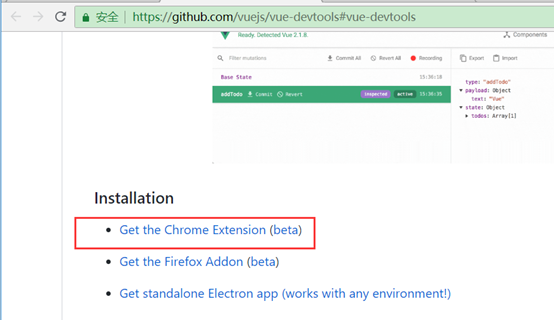
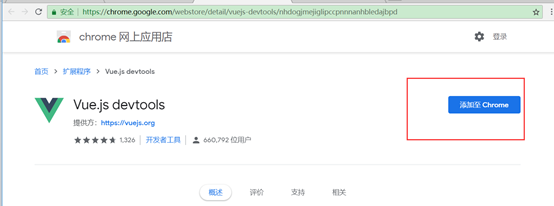
5、安装vue devtools插件:
在线安装(可能需要先FQ):

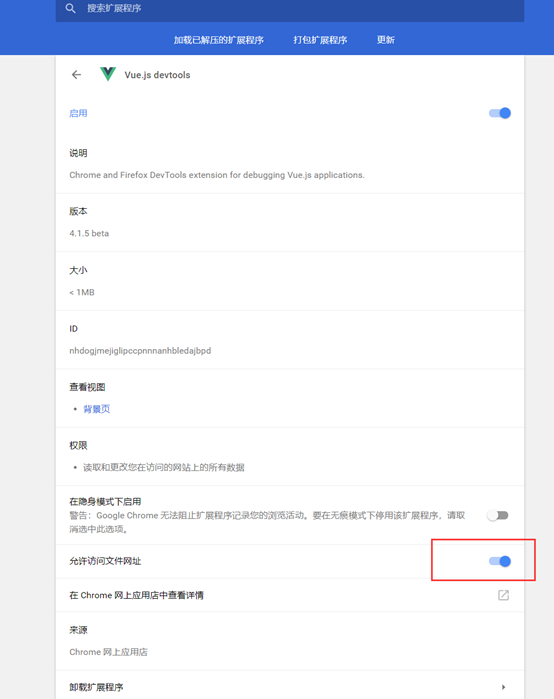
该插件默认不能对本地文件进行使用,可以打开选项让其支持:
F12debug窗口里点开即可看到效果:
基本语法:
双大括号表达式和v-text、v-html指令
html:
<div id="ddd">
<p>{{msg}}</p>
<p>{{msg.toUpperCase()}}</p>
<p>{{bbb}}</p>
<p v-text="bbb"></p>
<p v-html="bbb"></p>
</div>
<script src="vue.js"></script>
<script>
var vm = new Vue({
el: '#ddd',
data: {
msg: 'kkk',
bbb: '<a href="https://www.baidu.com">go to baidu</a>'
}
})
</script>
效果:
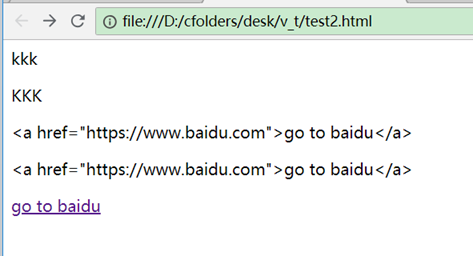
双大括号相当于v-text,会转义成文本,v-html相当于html中的innerHtml,会翻译成html。
指令:
一般以"v-"开头,也有例外,如ref指令。
常用指令有v-on、v-bind、v-if(v-else)、v-show、ref、v-cloak、v-for、v-text、v-html、v-model
强制数据绑定(v-bind:或:)
<div id="ddd">
<img :src="imgUrl"/>
</div>
<script src="vue.js"></script>
<script>
var vm = new Vue({
el: '#ddd',
data: {
imgUrl: 'https://cn.vuejs.org/images/logo.png'
}
})
</script>
img的src属性从data中取值,不能用{{}}表达式,而用<img :src="imgUrl"/>绑定,
它是<img v-bind:src="imgUrl"/>的缩写。
也就是说在html标签中的属性名前面加冒号或者加v-bind:就可以将属性值指定成变量名,其实就是个js表达式,如:<img v-bind:src="'https://cn.vuejs.org/images/logo.png'"/>也能正常显示。
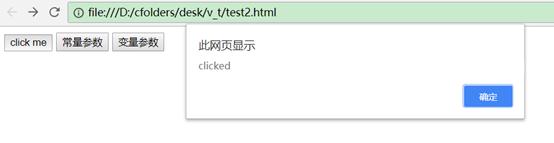
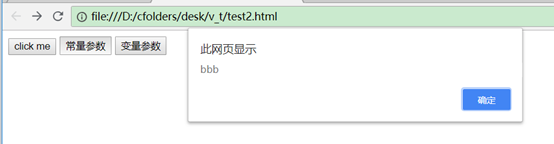
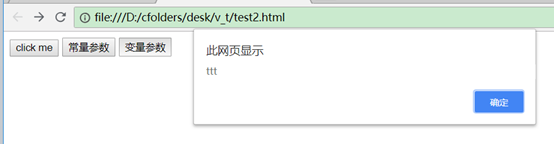
绑定事件@click
<div id="ddd">
<button @click="ctest">click me</button>
<button @click="ctest2('bbb')">常量参数</button>
<button @click="ctest2(t2)">变量参数</button>
</div>
<script src="vue.js"></script>
<script>
var vm = new Vue({
el: '#ddd',
data: {
t2: 'ttt'
},
methods: {
ctest() {
alert('clicked')
},
ctest2(aaa) {
alert(aaa);
}
}
})
</script>
其中@click是v-on:click的缩写.
事件方法都写在methods里。这里mothods里面直接写函数是es6的语法支持。
这里的:
ctest() {
alert('clicked')
}
相当于
ctest: function() {
alert('clicked')
}
ref指令
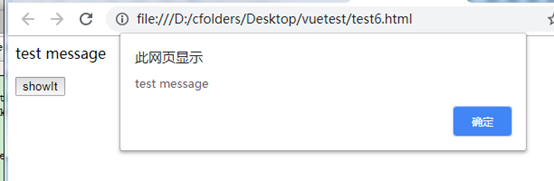
ref指令不以v-开头,通过ref指令为dom元素指定唯一标识,类似于id,然后通过vue的$refs.属性值获取到dom元素,如:
<div id="test">
<p ref="mmm">test message</p>
<button @click="showMsg">showIt</button>
</div>
<script src="vue.js"></script>
<script>
new Vue({
el: '#test',
methods: {
showMsg() {
// this.$refs获取到ref属性定义的标签集合,然后通过属性名获取到具体标签dom元素
alert(this.$refs.mmm.innerHTML)
// alert(this.$refs.mmm.textContent)
}
}
})
</script>
这里为p标签指定ref="mmm",然后通过this.$refs.mmm获取到该dom对象。
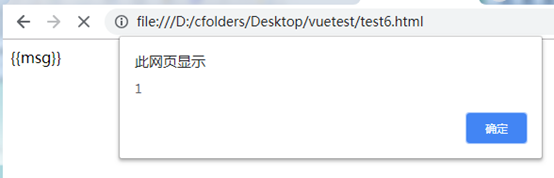
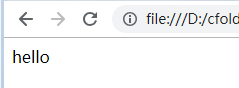
v-cloak指令
v-cloak用于对标签做一个标识,通过与css样式相结合,可以做到防止闪现的问题,如下程序:
<div id="test">
<p>{{msg}}</p>
</div>
<script src="vue.js"></script>
<script>
alert(1)
new Vue({
el: '#test',
data: {
msg: 'hello'
}
})
</script>
在Vue创建之前弹出alert(1),这时候页面会有{{msg}}显示出来,如果页面很大加载时间很长,就会出现这种问题,{{msg}}在Vue挂载完以后才会被替换。
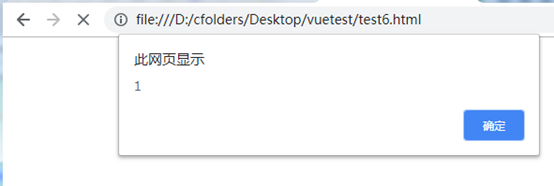
使用v-cloak指令可以解决这个问题,如:
<style>
[v-cloak]{
display:none;
}
</style>
<div id="test">
<p v-cloak>{{msg}}</p>
</div>
<script src="vue.js"></script>
<script>
alert(1)
new Vue({
el: '#test',
data: {
msg: 'hello'
}
})
</script>
为p标签加了一个v-cloak指令属性,它在Vue挂载完成前一直存在,而样式中[v-cloak]是css的属性选择器,为它指定了display:none属性,也就是Vue挂载完成前一直不显示。
由于vue挂载完成后所有指令属性都会从html中移除,因此挂载完成后v-cloak将被移除,此时display:none属性不生效,于是标签又会显示出来,而此时已经替换完了。
自定义指令
自定义指令类似于v-if、v-show等,也是用在标签上的,自定义指令分为全局的和局部的,全局指令的可以用在多个Vue实例上,局部指令定义在创建Vue的参数里。
如:
<div id="test1">
<p v-upper-text="msg"></p>
<p v-lower-text="msg"></p>
</div>
<div id="test2">
<p v-upper-text="msg"></p>
<p v-lower-text="msg"></p>
</div>
<script src="vue.js"></script>
<script>
// 定义全局指令upper-text,转为大写,使用时加v-,写成v-upper-text
Vue.directive(
// 第一个参数el是指令所在的标签,第二个参数binding是指令包含指令参数相关数据的对象,binding.value就能得到参数值
'upper-text', function(el, binding) {
el.textContent = binding.value.toUpperCase();
}
)
new Vue({
el: '#test1',
data: {
msg: 'Hello'
},
// 定义局部指令lower-text,转为小写,使用时加v-,写成v-lower-text
directives: {
'lower-text': function(el, binding) {
el.textContent = binding.value.toLowerCase();
}
}
})
new Vue({
el: '#test2',
data: {
msg: 'Apache Tomcat'
}
})
</script>
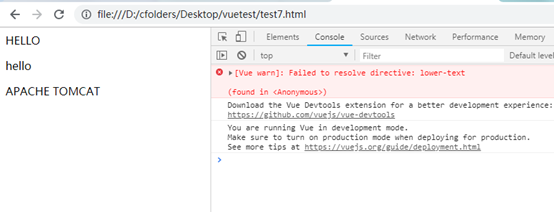
由于'lower-text'是局部指令,定义在第一个Vue的参数里,只能在第一个Vue实例管理的范围#test1里使用。因此第二个Vue实例管理的范围#test2就找不到该指令.
computed计算属性和watch监视
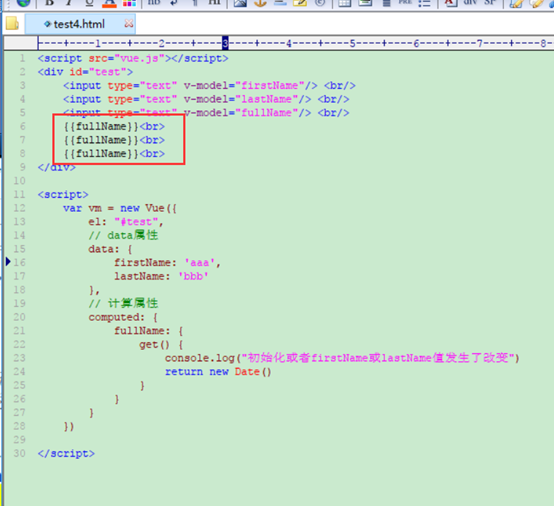
computed的属性不需要再写在data里面,而监视的属性与data相互独立。
computed计算属性
使用,如:
<script src="vue.js"></script>
<div id="test">
<input type="text" v-model="firstName"/> <br/>
<input type="text" v-model="lastName"/> <br/>
<input type="text" v-model="fullName"/> <br/>
</div>
<script>
var vm = new Vue({
el: "#test",
// data属性
data: {
firstName: 'aaa',
lastName: 'bbb'
},
// 计算属性
computed: {
fullName: {
get() {
console.log("初始化或者firstName或lastName值发生了改变")
return this.firstName + " " + this.lastName
},
set(val) {
console.log("fullName值发生了改变")
// this.firstName = val.split(' ')[0]
// this.lastName = val.split(' ')[1]
}
}
}
})
</script>
这里的fullName属性在firstName或者lastName更改时都需要刷新,因此将它定义到computed中。computed中的方法只有在相关属性发生改变时才会调用,不相关的属性发生改变不会调用。
computed跟data属性类似,data属性分为数据改变同步到view,view改变同步到数据这两种情况。computed与之对应的是get与set方法。
1、数据改变同步到view这种情况下,couputed可以同时监视多个属性的变化,其中有任何一个属性值改变时,它就会被调用一次get()方法(计算一次)。
2、view改变同步到数据这种情况下,computed属性在view里的值发生改变,会自动回调set方法,而不是更新数据(因为computed没有像data那样绑定属性,而是绑定的一个表达式,可能含有多个属性)。
computed通常用在需要多个属性通过表达式计算出一个结果的情况,它可以自动监视多个属性的变化,而不需要对每个属性都去单独写一个监视函数命令式的计算。
ps:
1、通常computed只用get而不用set,因此可以只写一个方法,默认就是get,如:
computed: {
fullName() {
console.log("初始化或者firstName或lastName值发生了改变")
return this.firstName + " " + this.lastName
}
}
相当于:
computed: {
fullName: {
get() {
console.log("初始化或者firstName或lastName值发生了改变")
return this.firstName + " " + this.lastName
}
}
}
2、计算属性使用了缓存,多次调用只要没有相关属性发生改变,则只会调用一次(缓存的key就是计算属性的名字,如fullName)。
如:

只执行了一次
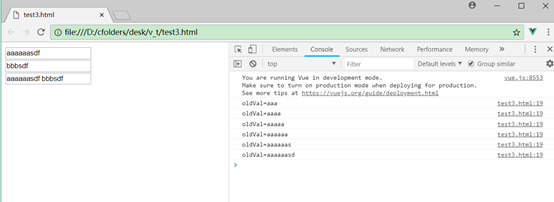
watch监视
监听某个属性的变化,执行回调函数,与计算属性的自动监视相关属性改变不同,这里是自己指定需要监视的属性。
<script src="vue.js"></script>
<div id="test">
<input type="text" v-model="firstName"/> <br/>
<input type="text" v-model="lastName"/> <br/>
<input type="text" v-model="fullName"/> <br/>
</div>
<script>
var vm = new Vue({
el: "#test",
data: {
firstName: 'aaa',
lastName: 'bbb',
fullName: ''
},
// 通过设置Vue的watch属性设置监视
watch: {
firstName: function(newVal, oldVal) {
console.log("oldVal=" + oldVal)
this.fullName = newVal + ' ' + this.lastName
}
}
})
// 通过调用Vue的$watch方法设置监视
vm.$watch('lastName', function(newVal){
this.fullName = this.firstName + ' ' + newVal
})
</script>
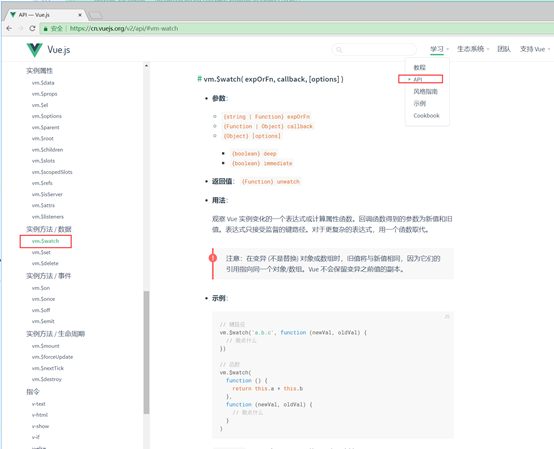
有2种方式,设置watch属性或者调用Vue的$watch方法,第一个参数是新值,第二个参数是旧值。
$watch对应官方api文档:
动态样式控制
:class绑定
:class可以用指定一个js表达式,可以是普通字符串或者对象、数组。
class属性使用普通字符串或者变量
<script src="vue.js"></script>
<head>
<style>
.aClass{color: red;}
</style>
</head>
<div id="test">
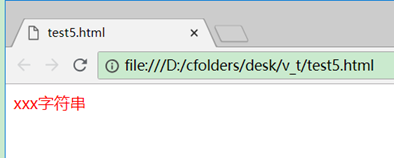
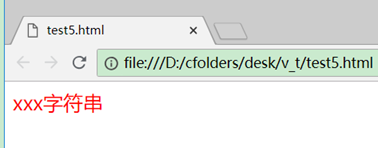
<p :class="'aClass'">xxx字符串</p>
</div>
<script>
new Vue({
el: '#test'
})
</script>
这里'aClass'的单引号不能少,因为它是一个js表达式。
或者
<script src="vue.js"></script>
<head>
<style>
.aClass{color: red;}
</style>
</head>
<div id="test">
<p :class="a">xxx字符串</p>
</div>
<script>
new Vue({
el: '#test',
data: {
a: 'aClass'
}
})
</script>
这里的a是一个变量。
测试:
:class属性使用js对象
如:
<script src="vue.js"></script>
<head>
<style>
.aClass{color: red;}
.bClass{color: blue;}
.cClass{font-size: 20px;}
</style>
</head>
<div id="test">
<p :class="{aClass: isA, bClass: isB, cClass: isC}">xxx字符串</p>
<p><button @click='update'>更新</button></p>
</div>
<script>
new Vue({
el: '#test',
data: {
isA: true,
isB: false,
isC: false
},
methods: {
update() {
this.isA = false,
this.isB = true,
this.isC = true
}
}
})
</script>
用一个json对象表示:class属性{aClass: isA, bClass: isB, cClass: isC},然后通过变量的true或false分别控制每个样式是否加入(属性名用class名字,属性值用布尔值)。
点更新前:

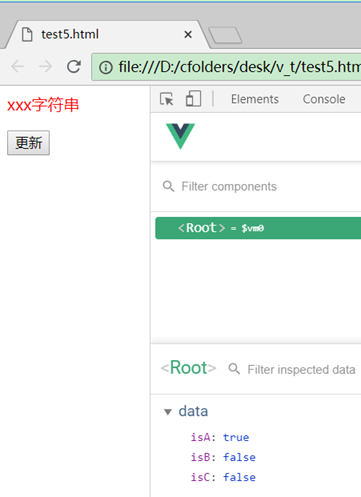
点更新后:


:class属性使用数组(很少使用)
如:
<script src="vue.js"></script>
<head>
<style>
.aClass{color: red;}
.bClass{color: blue;}
.cClass{font-size: 20px;}
</style>
</head>
<div id="test">
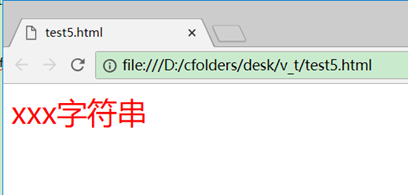
<p :class="['aClass', 'cClass']">xxx字符串</p>
</div>
<script>
new Vue({
el: '#test'
})
</script>
由于class的属性可以直接用空格间隔写出来,使用数组指定class的场景很少。
:style绑定
:style可以用普通字符串或者js对象绑定。
:style属性使用普通字符串或变量
如:
普通字符串:
<script src="vue.js"></script>
<div id="test">
<p :style="'color: red'">xxx字符串</p>
</div>
<script>
new Vue({
el: '#test'
})
</script>
这里'color: red'的单引号不能省略,因为它是一个js表达式。
使用变量:
<script src="vue.js"></script>
<div id="test">
<p :style="a">xxx字符串</p>
</div>
<script>
new Vue({
el: '#test',
data: {
a: 'color: red'
}
})
</script>
这里a是一个变量
效果:

:style属性使用js对象
<script src="vue.js"></script>
<div id="test">
<p :style="{color:'red', fontSize: bbb + 'px'}">xxx字符串</p>
</div>
<script>
new Vue({
el: '#test',
data: {
bbb: 30
}
})
</script>
js对象的属性名和属性值跟style里面的相对应,不过像font-size这种有中横线的属性名可以用驼峰来写,写成fontSize,当然用font-size也可以,不过有这种特殊字符的属性名上需要加单引号才行,如:
<p :style="{color:'red', 'font-size': bbb + 'px'}">xxx字符串</p>
显示:
条件渲染
用户v-if、v-else、v-show控制
如:
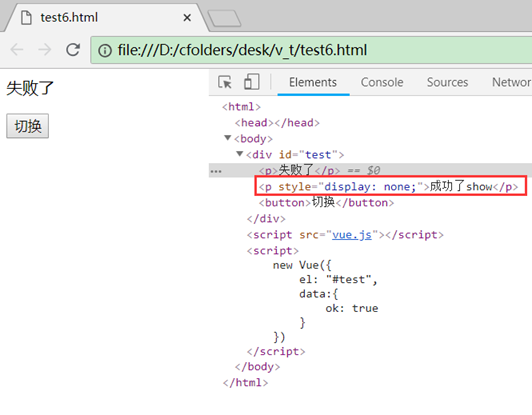
<div id="test">
<p v-if="ok">成功了</p>
<p v-else>失败了</p>
<p v-show="ok">成功了show</p>
<button @click="ok=!ok">切换</button>
</div>
<script src="vue.js"></script>
<script>
new Vue({
el: "#test",
data:{
ok: true
}
})
</script>
v-if和v-else控制的标签只会显示其中一个,这里用ok这个变量来判断。如果v-if标签和v-else标签中间有其他标签,其他标签的显示不受影响。
v-show跟v-if类似,只是没有对应的v-else
v-if采用不生产标签元素的方式,而v-show采用display:none来隐藏,因此在页面显示隐藏切换频繁的情况下v-show的效率会高一些。
列表渲染
遍历数组
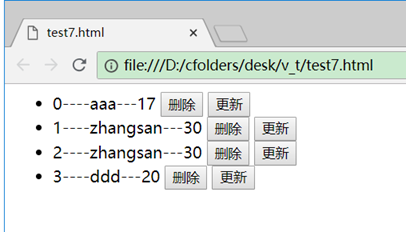
采用v-for控制标签,标签会根据集合的长度显示多个,如:
<div id="test">
<ul>
<li v-for="(p, index) in persons">
{{index}}----{{p.name}}---{{p.age}}
<button @click="deleteP(index)">删除</button>
<button @click="updateP(index, {name: 'zhangsan', age: '30'})">更新</button>
</li>
</ul>
</div>
<script src="vue.js"></script>
<script>
new Vue({
el: "#test",
data: {
persons: [
{name: 'aaa', age: '17'},
{name: 'bbb', age: '18'},
{name: 'ccc', age: '19'},
{name: 'ddd', age: '20'}
]
},
methods: {
// 根据下标删除数组元素
deleteP(idx) {
this.persons.splice(idx, 1)
},
// 根据下标更新数组元素
updateP(idx, newP) {
// 直接用下标替换数组元素不会触发界面view自动刷新
//this.persons[idx] = newP
// 采用数组的变异方法才能触发界面view自动刷新
this.persons.splice(idx, 1, newP)
}
}
})
</script>
说明:
1、这里用v-for控制li标签,遍历数组,li会显示4个(数组长度为4)
2、(p, index) in persons中p是元素,index是遍历的下标。
3、这里的删除按钮点击时删除当前行,更新按钮点击时将当前行更新为zhangsan 30。
4、直接用下标替换数组元素不会触发界面view自动刷新,因为vue不知道。需要数组的变异方法才能触发界面view自动刷新。变异方法是经过vue重写的数组方法。见如下api说明:
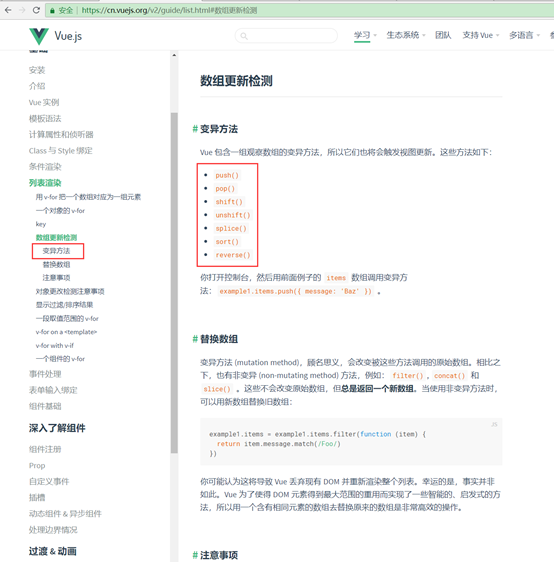
5、数组的splice方法可以删除、更新、插入元素,功能比较强大,它的第一个参数是下标,第二个参数是删除元素的个数,第三个参数是替换后的元素,如:
删除:
persons.splice(idx, 1)
从idx下标开始删除1个元素,没有第三个参数表示不替换。
更新:
persons.splice(idx, 1, newP)
将idx下标的元素删除1个,替换为newP
插入:
persons.splice(idx, 0, newP)
将idx下标的元素删除0个,也就是不删除,再插入一个newP元素。
6、给v-for加:key属性可以提高渲染效率,如:
<li v-for="(p, index) in persons" :key="index">
遍历对象
如:
<div id="test">
<ul>
<li v-for="(value, key) in person" :key="key">
{{key}}---{{value}}
</li>
</ul>
</div>
<script src="vue.js"></script>
<script>
new Vue({
el: "#test",
data: {
person: {name: 'aaa', age: '17'}
}
})
</script>
效果:
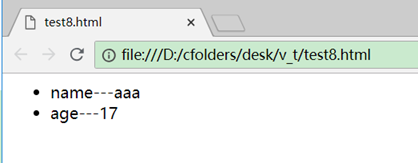
对象有多个属性时v-for会生成多个标签,:key属性值一般用对象的key,而不用value,因为key不会重复。
案例:列表的模糊搜索
实现效果:输入框输入关键字,列表自动模糊匹配名字中包含关键字的行,其他行过滤掉。
思路:
1、将列表变量对应到一个computed变量中,包含所有列的数组放到其他地方(如data中或者定义到Vue外面),回调函数中模糊匹配数组中包含关键字的列生成新数组返回。
实现:
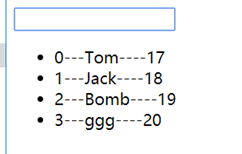
<div id="test">
<p>
<input type="text" v-model="searchName"></input>
</p>
<ul>
<li v-for="(p, index) in fPersons">
{{index}}---{{p.name}}----{{p.age}}
</li>
</ul>
</div>
<script src="vue.js"></script>
<script>
new Vue({
el: "#test",
data:{
searchName: '',
persons: [
{name: 'Tom', age: '17'},
{name: 'Jack', age: '18'},
{name: 'Bomb', age: '19'},
{name: 'ggg', age: '20'}
]
},
computed: {
fPersons() {
/*
// 常规方式:遍历数组元素,匹配上的放入新数组
var arr = [];
for(var i = 0; i < this.persons.length; i++) {
if (this.persons[i].name.indexOf(this.searchName) >= 0) {
arr.push(this.persons[i])
}
}
return arr
*/
// 使用数组的filter方法更简洁
return this.persons.filter(p => p.name.indexOf(this.searchName) >= 0)
}
}
})
</script>
这里将persons放到了data中,也可以放到Vue的外面。
2、常规思路:将列表值对应到data的一个数组便令中,用watch监听输入框变量的改变,一旦输入框有改变,就执行回调函数,回调函数中模糊匹配关键字,生成新数组赋值给数组变量,列表就会更新列表。
实现:
<div id="test">
<p>
<input type="text" v-model="searchName"></input>
</p>
<ul>
<li v-for="(p, index) in fPersons">
{{index}}---{{p.name}}----{{p.age}}
</li>
</ul>
</div>
<script src="vue.js"></script>
<script>
var persons = [
{name: 'Tom', age: '17'},
{name: 'Jack', age: '18'},
{name: 'Bomb', age: '19'},
{name: 'ggg', age: '20'}
]
new Vue({
el: "#test",
data:{
searchName: '',
fPersons: persons
},
watch:{
searchName() {
this.fPersons = persons.filter(p => p.name.indexOf(this.searchName) >= 0)
}
}
})
</script>
案例:列表的排序
接上例,加入排序的功能
思路,定义一个排序变量orderType,computed列表数组变量回调函数中判断它的值来决定升序、降序还是原本顺序,然后在按钮上绑定改变该变量值的回调函数,当该变量改变时computed会自动重新计算(因为orderType是相关属性)
实现:
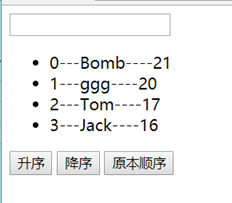
<div id="test">
<p>
<input type="text" v-model="searchName"></input>
</p>
<ul>
<li v-for="(p, index) in fPersons">
{{index}}---{{p.name}}----{{p.age}}
</li>
</ul>
<button @click="setOrderType(1)">升序</button>
<button @click="setOrderType(2)">降序</button>
<button @click="setOrderType(0)">原本顺序</button>
</div>
<script src="vue.js"></script>
<script>
var vm = new Vue({
el: "#test",
data:{
searchName: '',
orderType: 0,
persons: [
{name: 'Tom', age:17},
{name: 'Jack', age:16},
{name: 'Bomb', age:21},
{name: 'ggg', age:20}
]
},
methods: {
setOrderType(orderType) {
this.orderType = orderType
}
},
computed: {
fPersons() {
// 过滤
var arr = this.persons.filter(p => p.name.indexOf(this.searchName) >= 0)
if (this.orderType == 0) {
return arr;
}
// 排序,利用数组的sort方法
arr.sort(function(p1, p2) {
if (vm.orderType == 1) {
return p1.age - p2.age
} else {
return p2.age- p1.age
}
})
return arr
}
}
})
</script>
事件处理-扩展
事件的$event参数
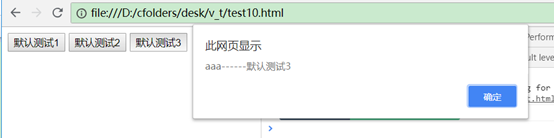
事件的参数,无参数时默认传了一个$event,有自定义参数时,不会自动传$event。
因此需要同时传自定义参数和$event时,需要手动写出$event参数。
如:
<div id="test">
<button @click="test1">默认测试1</button>
<button @click="test1($event)">默认测试2</button>
<button @click="test2('aaa', $event)">默认测试3</button>
</div>
<script src="vue.js"></script>
<script>
new Vue({
el: '#test',
methods: {
test1(event){
alert(event.target.innerHTML)
},
test2(a, event){
alert(a + "------" + event.target.innerHTML)
}
}
})
</script>
第一个按钮和第二个按钮的作用相同,第一个是第二个的简写,没有参数时默认会自动加一个$event参数。
第三个按钮需要传2个参数,其中一个是$event,因此需要手动写出来。
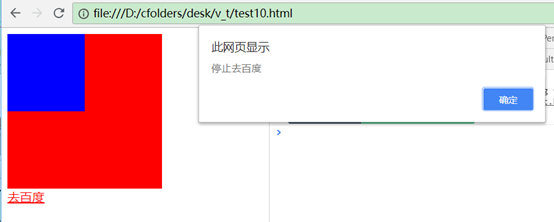
事件的修饰符(阻止冒泡、停止标签默认行为)
修饰符.stop阻止冒泡,.prevent停止标签默认行为。
如:
<div id="test">
<div style="width:200px; height:200px; background-color:red;" @click="test1">
<div style="width:100px; height:100px; background-color:blue;" @click.stop="test2">
</div>
</div>
<a href="https://www.baidu.com" @click.prevent="test3">去百度</a>
</div>
<script src="vue.js"></script>
<script>
new Vue({
el: '#test',
methods: {
test1() {
alert("outter")
},
test2() {
alert("inner")
},
test3() {
alert("停止去百度")
}
}
})
</script>
这里如果没有.stop则会先弹出inner,后弹出outter,加了以后只会弹出inner,停止了向外冒泡。
如果没有.prevent则页面会在弹出test3以后跳转到百度去,加了以后就不跳转了。
按键修饰符
可以指定特定按键才触发keyup等按键事件,如:
<div id="test">
<input type="text" @keyup.13="test"/>
</div>
<script src="vue.js"></script>
<script>
new Vue({
el: '#test',
methods: {
test() {
alert(event.target.value)
}
}
})
</script>
只有放开回车键(回车键的keyCode是13)时才弹出alert,其他按键不调用test方法。@keyup.13也可以写成@keyup.enter
常用表单组件数据绑定和收集
如:
<div id="test">
<form action="xxx">
<p>用户名:<input type="text" v-model="username"/></p>
<p>性别:
<input type="radio" value="female" v-model="sex"/>女
<input type="radio" value="male" v-model="sex"/>男
</p>
<p>爱好:
<input type="checkbox" value="games" v-model="interest"/>游戏
<input type="checkbox" value="football" v-model="interest"/>足球
<input type="checkbox" value="basketball" v-model="interest"/>篮球
</p>
<p>城市:
<select v-model="city">
<option :value="cityOption.id" v-for="cityOption in cities">{{cityOption.name}}</option>
</select>
</p>
<p>说明:
<textarea v-model="remark"></textarea>
</p>
<input type="submit" value="提交" @click.prevent="submitForm"></input>
</form>
</div>
<script src="vue.js"></script>
<script>
new Vue({
el: '#test',
data: {
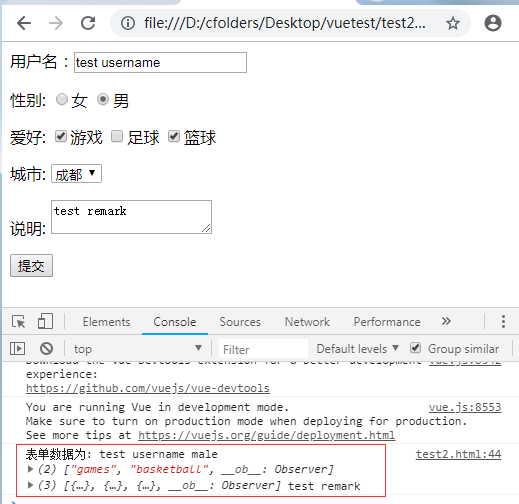
username: 'test username',
sex: 'male',
interest: ['games', 'basketball'],
cities: [
{id: 'bj', name: '北京'},
{id: 'sh', name: '上海'},
{id: 'cd', name: '成都'}
],
city: 'cd',
remark: 'test remark'
},
methods:{
submitForm() {
console.log("表单数据为:", this.username, this.sex, this.interest, this.cities, this.remark)
}
}
})
</script>
这里用@click.prevent="submitForm"阻止了表单的默认提交。
Vue的生命周期
概念
Vue的生命周期分为初始化、更新、销毁3个阶段,可以自定义每个阶段的回调函数,
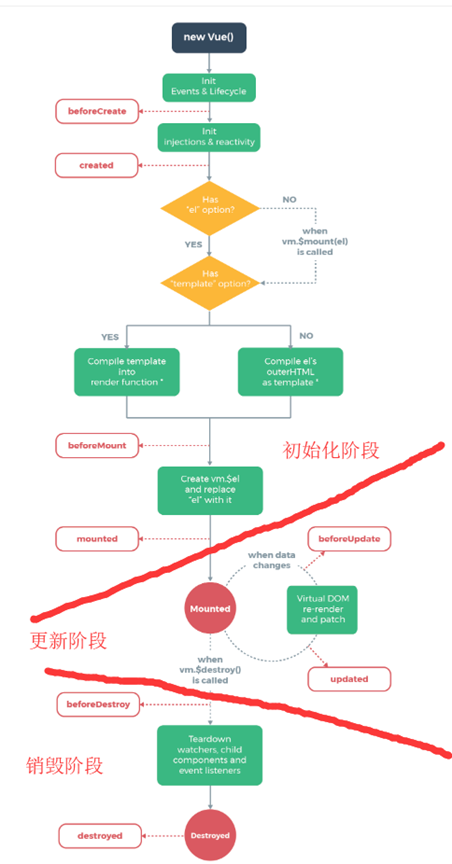
初始化阶段
1、首先创建Vue对象,创建完成后回调beforeCreate
2、对变量完成数据绑定,对view完成监听绑定后回调created
3、检查是否有template选项,如果有就编译template的配置,如果没有就编译el对应的标签作为template,完了以后执行回调beforeMount
4、vue会对view需要显示的数据先在内存中全计算好,然后一次性挂载到页面上去,比如view里面多次引用一个computed的变量,只会在内存中计算一次,挂载完成后回调mounted
初始化阶段只执行一次
更新阶段
5、每次数据的改变会自动更新view,更新之前回调beforeUpdate,更新完成回调updated
更新阶段可以执行多次
销毁阶段
6、当调用vue的$destory()方法时会销毁vue,销毁后数据绑定和view监听等都会没有,页面也没有交互了。销毁前回调beforeDestroy,销毁后回调destroyed、
销毁阶段只执行一次
常用的是mounted和beforeDestroy方法:
初始化阶段完成回调mounted,常用来做一些ajax取数、启动定时器等异步任务操作。
页面销毁前回调beforeDestroy常用来做一些收尾工作,如清除定时器等。
案例
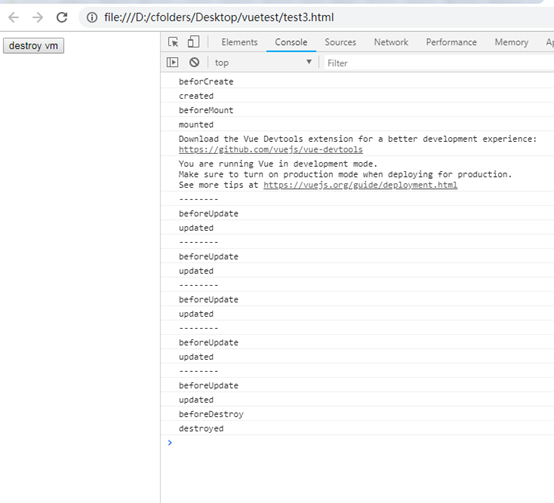
实现一个页面加载后一个标签每隔1秒切换一次显示(隐藏)的自动闪烁效果,点击按钮后停止闪烁并且销毁vm,利用mouted回调函数在vm挂载(初始化)之后执行,beforeDestroy回调函数在vm销毁前执行,实现代码如下:
<div id="test">
<button @click="destroyIt">destroy vm</button>
<p v-show="isShow">测试的文本<p>
</div>
<script src="vue.js"></script>
<script>
var vm = new Vue({
el: '#test',
data: {
isShow: true
},
beforeCreate() {
console.log('beforCreate')
},
created() {
console.log('created')
},
beforeMount() {
console.log('beforeMount')
},
// vm挂载后启动定时器,测试文本开始闪烁,每隔1秒切换一次显示(隐藏)
mounted() {
console.log('mounted')
this.intervalId = setInterval(function() {
console.log("--------")
vm.isShow = !vm.isShow
}, 1000)
},
beforeUpdate() {
console.log('beforeUpdate')
},
updated() {
console.log('updated')
},
// vm销毁前清除定时器
beforeDestroy() {
console.log('beforeDestroy')
clearInterval(this.intervalId)
},
destroyed() {
console.log('destroyed')
},
methods: {
// 手动执行销毁vm,vm销毁后isShow变量将不再跟view绑定,测试文本停止闪烁
destroyIt() {
vm.$destroy()
}
}
})
</script>
动画效果
Vue的动画可以用在条件渲染 (使用 v-if)、条件展示 (使用 v-show)、动态组件、组件根节点等情况下。
如使用v-show时,v-show分为显示隐藏2个状态。在这2个状态切换时可以加入动画过渡效果。Vue定义动画时,整个动画过程是个独立的过程,动画的最初状态和最终状态不一定跟v-show的最初和最终状态相对应。
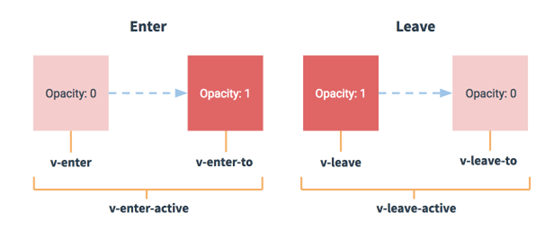
动画分为显示(enter)、隐藏(leave)2种,每种又对应3种状态,分别是:
显示开始(enter)、显示中(enter-active)、显示结束(enter-to)、隐藏开始(leave-active)、隐藏中(leave-active)、隐藏结束(leave-to)。
使用方法:
1、使用transition标签包裹v-show等标签,v-show加name属性
2、然后在css中定义xxx-enter、xxx-enter-to等属性,其中xxx是v-show的name。
当v-show有显示隐藏等操作时,会自动加入动画执行,动画执行不影响v-show的最终显示。
如下案例:
<style>
.kkk-enter-active{
transition: all 1s;
}
.kkk-enter{
padding-left: 50px
}
/*如果不写下面的.kkk-enter-to样式,则文字会从右向左移动*/
/*默认的.kkk-enter-to样式就是显示后的最终状态*/
.kkk-enter-to{
padding-left: 150px
}
</style>
<div id="test">
<button @click="isShow=!isShow">切换</button>
<transition name="kkk">
<p v-show="isShow">一段测试文字</p>
</transition>
</div>
<script src="vue.js"></script>
<script>
new Vue({
el: '#test',
data: {
isShow: true
}
})
</script>
1、动画开始:文字处于padding-left:50px处, .kkk-enter的样式

2、然后动画开始,文字向右移动到padding-left:150px处,移动1s,由.kkk-enter-active决定。动画的最终位置由.kkk-enter-to决定。
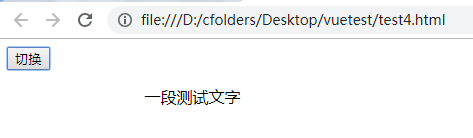
3、动画完成后,文字显示到没有padding-left定义处,也就是最左边。动画不影响最终效果
Vue过滤器
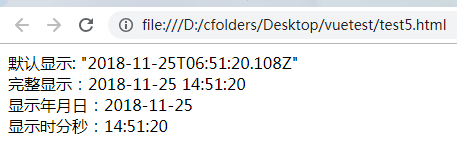
相当于自定义一个函数,供view调用,用Vue.filter定义,第一个参数是过滤器名字(函数名),第二个参数是回调函数。回调函数中的第一个参数是需要过滤的变量,如:
<div id="test">
默认显示: {{date}} <br/>
完整显示:{{date | dateFormat}} <br/>
显示年月日:{{date | dateFormat('YYYY-MM-DD')}} <br/>
显示时分秒:{{date | dateFormat('HH:mm:ss')}} <br/>
</div>
<script src="vue.js"></script>
<script src="https://cdnjs.cloudflare.com/ajax/libs/moment.js/2.22.2/moment.js"></script>
<script>
Vue.filter('dateFormat', function(value, formatPattern){
return moment().format(formatPattern || 'YYYY-MM-DD HH:mm:ss');
})
new Vue({
el: '#test',
data:{
date: new Date()
}
})
</script>
这里定义了一个格式化日期时间输出的过滤器dateFormat,过滤器第一个参数就是需要过滤的变量,这里就是date,调用的时候用一个竖线隔开即可。
Vue插件
定义Vue插件就是对Vue进行扩展,比如定义一些Vue的全局方法、自定义指令、自定义过滤器、自定义Vue的实例方法等,将其单独定义到一个js中,成为插件。使用的时候引入该js,然后通过一个Vue.use(xxx)命令一次性将这些自定义的东西安装进来就能使用。
步骤:
1、编写插件文件my-vue-plugin.js:
var MyPlugin = {}
// install会在Vue的use方法执行时被回调
MyPlugin.install = function(Vue, options) {
// install方法中对Vue进行扩展,自定义自己的Vue全局方法、自定义指令、自定义过滤器、自定义Vue的实例方法等
// 自定义一个测试的VUE的函数对象的方法
Vue.customGlobalMethod = function() {
console.log('customGlobalMethod')
}
// 自定义一个测试的指令
Vue.directive(
'upper-text', function(el, binding) {
el.textContent = binding.value.toUpperCase();
})
// 自定义一个Vue实例的方法(通过prototype得到原型对象,原型对象上定义的方法就是实例的方法)
// Vue实例方法约定都以$开头,以区别于Vue的全局方法。
Vue.prototype.$customObjectMethod = function() {
console.log('$customObjectMethod')
}
// 将插件放到window里,以便使用者可以访问到。
window.MyPlugin = MyPlugin
}
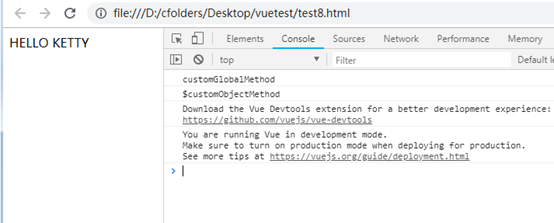
这里编写了一个名为MyPlugin的插件,自定义了一个全局方法customGlobalMethod,一个自定义指令upper-text,一个Vue实例方法$customObjectMethod。
2、使用插件,test8.html:
<div id="test">
<!-- 1、使用插件的自定义指令upper-text -->
<p v-upper-text="msg"></p>
</div>
<script src="vue.js"></script>
<!-- 1、引入插件的js -->
<script src="my-vue-plugin.js"></script>
<script>
// 2、声明使用插件,它会回调插件的install方法
Vue.use(MyPlugin)
// 调用插件的全局方法
Vue.customGlobalMethod()
var vm = new Vue({
el: '#test',
data: {
msg: 'Hello Ketty'
}
})
// 调用插件的实例方法
vm.$customObjectMethod()
</script>
效果:
基于组件化开发
实际中使用vue都是基于组件化进行开发,而不是单纯引入vue.js使用。
将一个页面分成不同的部分,每个部分都由一个根标签如div包裹起来,每个部分就是一个页面组件。
一个页面组件通常放到一个.vue文件里,然后由一个主页面将它们引入进来。组件里进行二次拆分成多个组件。每个组件对应一个单独的Vue实例,组件之间可以传递参数。
最后由脚手架工具vue-cli运行npm run build将页面组件进行构建,它会将组件最后构建成html+js+css页面,类似于maven的打包。
使用脚手架vue-cli搭建vue项目
npm安装
npm是集成在nodejs中的一个包管理工具,因此安装好nodejs后,npm命令就能运行了,类似于maven。
npm有一个中心服务器,各种第三方库都上传代码到那里,如jquery、vue-cli、grunt等,npm也有很多镜像,也可以配置镜像的地址下载库。如淘宝镜像,类似于maven的镜像仓库。
通过"npm install 包名字"可以下载库包,它会自动下载依赖库包,类似于maven。
vue测试项目的安装步骤
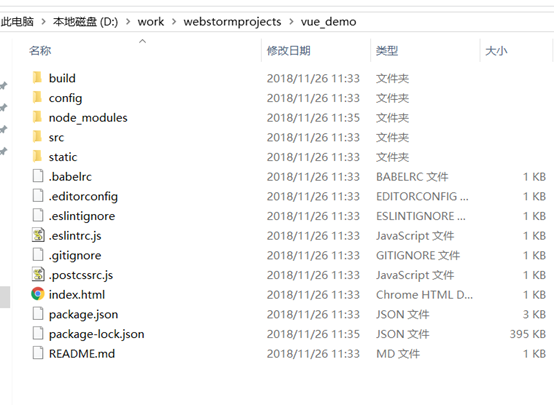
vue-cli是vue的脚手架,使用它可以构建vue的项目。
1、npm全局安装vue-cli脚手架
npm -g install vue-cli
2、使用脚手架初始化创建vue项目
vue init webpack vue-demo
初始化完成后如下:
其中webpack是一个选项
3、进入到vue-demo,启动项目:
cd vue-demo
npm run dev
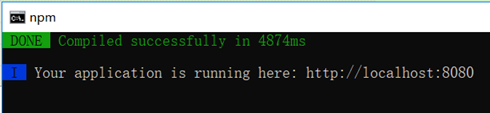
默认8080端口。
4、访问测试:
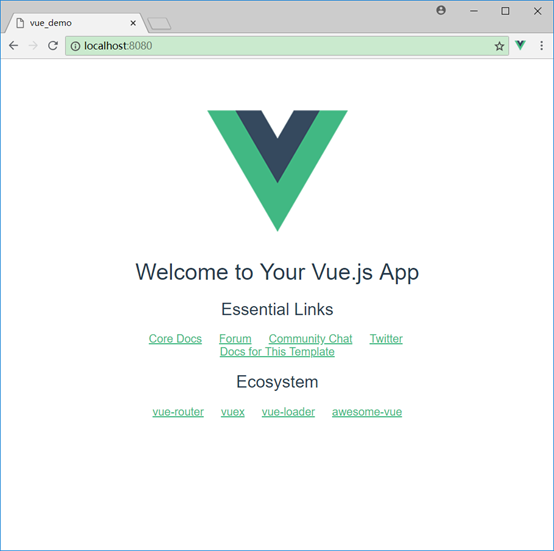
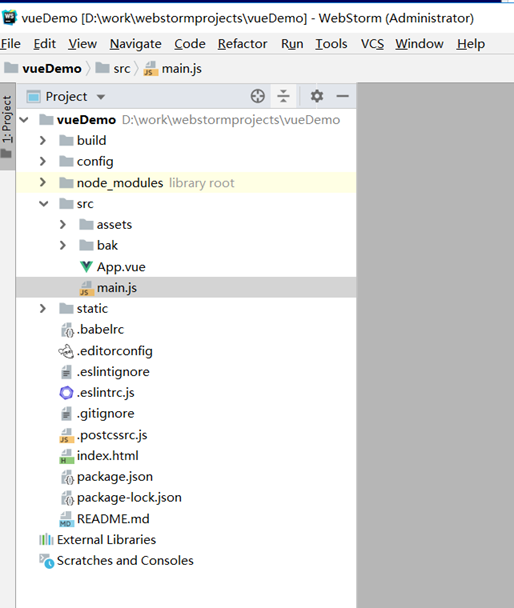
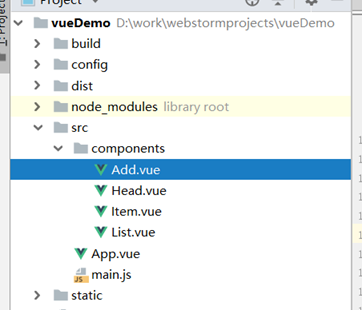
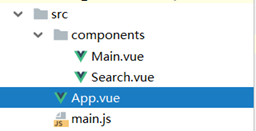
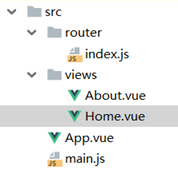
vue项目结构及说明
项目结构说明:
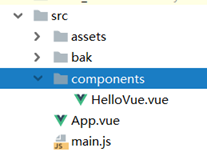
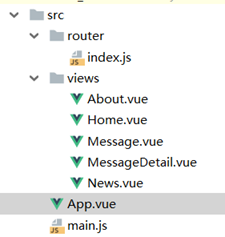
main.js是入口js,它负责创建Vue实例,其他的组件文件都以.vue结尾,main.js引入App.vue组件,然后App.vue再引入其他组件,其他组件都放在components目录下。
使用webstorm打开脚手架创建的项目,有各种代码自动补全,错误提示等。
vue采用组件的方式进行模块划分,每个组件就是一个单独的文件,例如可以是一个子页面,有自己的html、js、css,多个组件拼装成一个完整页面。
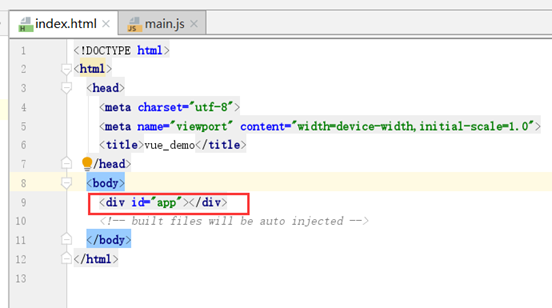
在npm run dev时,脚手架会读取main.js内容,将其解析的vue内容填充到index.html对应的id元素下,访问时访问的是index.html如:
index.html:
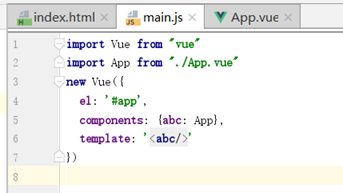
main.js
这里的id是"app"。
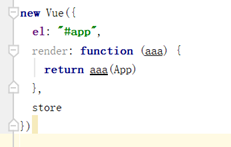
import App表示引入App.vue组件,起别名为App,components属性又为App起别名为abc,最后template表示使用abc这个组件模板。
可以使用render简写:
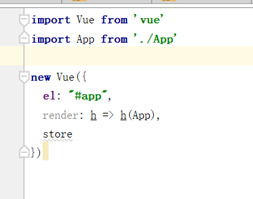
render属性值是一个箭头函数,这个函数的内容是以App作为参数进行回调,等价于:
模块组件的定义,如:App.vue
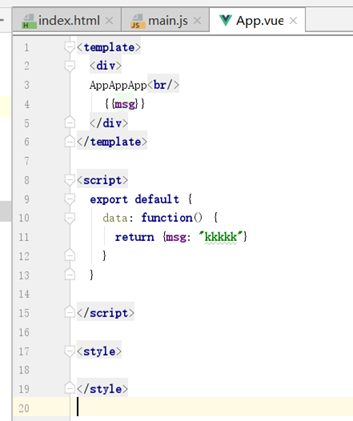
分为三部分:html(对应template标签)、js(对应script标签)、css(对应style标签)
其中template可以理解为前面写测试功能时的div,只是这里不用指定id。template部分必须有一个根标签,否则会报错,这里是div。
js部分的export default表示该组件的返回值,这里是一个对象,对应到前面写测试时的new Vue。
只不过这里的data不能直接用大括号json,而要用一个函数返回json。、
style一般会加一个scoped属性,表示该style只应用于本vue,不影响引用它的vue。
组件的引用,如main.js
组件引用其实就是引用文件,import引用的时候指定文件路径,然后给被引用的组件起一个名字。

如:
import App from "./App.vue"表示引用了./App.vue这个文件,并且给它起了个名字叫App,这个名字也可以定义成其他的。
引入vue组件或者一些使用npm install安装好的vue插件时,不需要指定文件路径,如:
import Vue from 'vue'
import Vuex from 'vuex'
components标签声明需要使用的组件,这里为它起了别名abc,如果不起别名而使用默认的,可以写成{App}即可。
AppVue组件引入HelloVue组件的例子
HelloVue.vue

App.vue
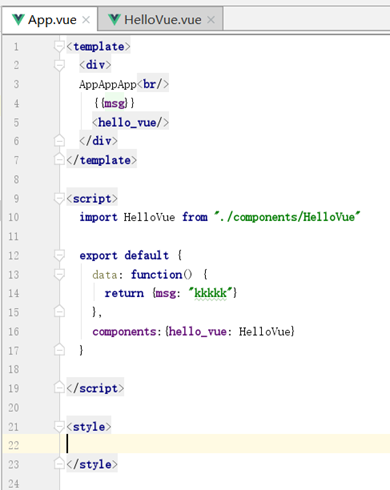
用标签即可使用被引用的组件,如<hello_vue/>
项目打包发布
运行npm run build即可打包项目,自动生成dist目录。
serve运行
安装serve插件可以运行dist
npm -g install serve
然后运行
serve dist

默认5000端口访问
tomcat运行
1、打包时需要修改一个配置:
修改webpack.prod.conf.js
output里加
publicPath: '/vue-demo/'
这里的vue-demo需要与tomcat的webapps下的工程目录名一致
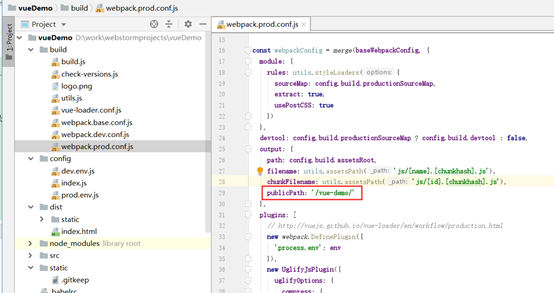
2、然后运行npm run build打包,然后将dist放到tomcat的webapps下,重命名成vue-demo,启动tomcat即可访问。
案例1
效果:
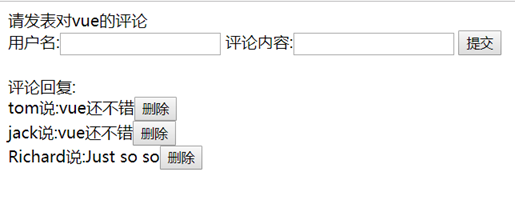
对应静态html demo:
<!DOCTYPE html>
<html lang="en">
<head>
<meta charset="UTF-8">
<title>Title</title>
</head>
<body>
<!-- 对应Head.vue -->
<div>请发表对vue的评论</div>
<!-- 对应Add.vue -->
<div>
用户名:<input type="text"/>
评论内容:<input type="text"/>
<button>提交</button>
<br/><br/>
</div>
<!-- 对应List.vue -->
<div>
<div>评论回复:</div>
<!-- 对应Item.vue -->
<div>tom说:vue还不错<button>删除</button></div>
<div>jack说:vue还不错<button>删除</button></div>
<div>Richard说:Just so so<button>删除</button></div>
</div>
</body>
实现
main.js
import Vue from 'vue'
import App from './App'
new Vue({
el: '#app',
components: {App},
template: '<App/>'
})
App.vue
<template>
<div>
<Head/>
<Add :addItem="addItem"/>
<List :comments="comments" :deleteItem="deleteItem"/>
</div>
</template>
<script>
import Head from './components/Head'
import Add from './components/Add'
import List from './components/List'
export default {
components: {Head, Add, List},
data: function () {
return {
comments: [
{name: 'tom', content: 'vue还不错'},
{name: 'jack', content: 'vue还不错'},
{name: 'Richard', content: 'Just so so'}
]
}
},
methods: {
addItem(comment) {
this.comments.unshift(comment)
},
deleteItem(index) {
if (window.confirm(`确定删除第${index + 1}条记录吗`)) {
this.comments.splice(index, 1)
}
}
}
}
</script>
<style>
</style>
其中:
1、引用组件的时候传递参数:
<List :comments="comments" :deleteItem="deleteItem"/>
标签名字一般跟参数名字同名
定义参数的位置一般选择几个vue都要用到该数据的父组件,如这里的comments就定义在App.vue中。
第一个参数comments是data的数据,第二个参数deleteItem是methods的方法。
2、一般数据在哪个组件,更新数据的方法就在哪个组件里定义。
3、`是es6新增的模板字符串表示,更简洁,如:
`确定删除第${index + 1}条记录吗`
如果用单引号需要写成
'确定删除第' + (index + 1) + '条记录吗'
List.vue
<template>
<div>
<div>评论回复:</div>
<div v-for="(comment, index) in comments"><Item :comment="comment" :deleteItem="deleteItem" :index="index"/></div>
</div>
</template>
<script>
import Item from './Item'
export default {
props: ['comments', 'deleteItem'],
components: {Item}
}
</script>
<style>
</style>
List.vue引用了Item.vue,并且把deleteItem方法、index、comment对象传给了它,这里v-for会使该div产生多个。
props用于接收参数,接收到的参数相当于当前vue实例中也定义了。
接收参数的方式有几种:
1、最简单的方式:
props: ['comments']:
2、可选的配置方式:
props: {
// 2.1声明类型(中等复杂方式)
height: Number,
// 2.2声明类型 + 其他验证 + 设置默认值(最复杂方式)
age: {
type: Number,
default: 0,
required: true,
validator: function (value) {
return value >= 0
}
}
}
Item.vue
<template>
<div>{{comment.name}}说:{{comment.content}}<button @click="deleteItem(index)">删除</button></div>
</template>
<script>
export default {
props:['comment', 'deleteItem', 'index']
}
</script>
<style>
</style>
这里删除方法直接使用List传过来的deleteItem方法。
Add.vue
<template>
<div>
用户名:<input type="text" v-model="name"/>
评论内容:<input type="text" v-model="content"/>
<button @click="add(name, content)">提交</button>
<br/><br/>
</div>
</template>
<script>
export default {
props:['addItem'],
data: function() {
return {
name: '',
content: ''
}
},
methods: {
add(name, content) {
let comment = {}
comment.name = name
comment.content = content
this.addItem(comment)
}
}
}
</script>
<style>
</style>
Head.vue
<template>

					<div>请发表对vue的评论</div>
</template>

<script>

					export default {

							name: "Head"

										}
</script>

<style scoped>

</style>
案例2
效果:
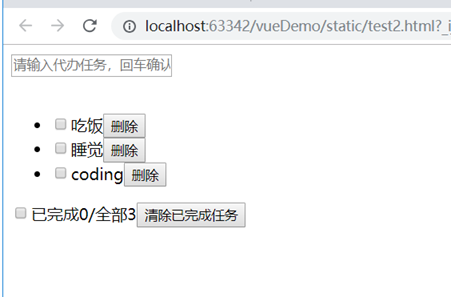
对应静态html demo:
<!DOCTYPE html>
<html lang="en">
<head>
<meta charset="UTF-8">
<title>Title</title>
</head>
<body>
<!-- 对应Add.vue -->
<div>
<input type="text" placeholder="请输入代办任务,回车确认"/>
<br/><br/>
</div>
<!-- 对应List.vue -->
<ul>
<!-- 对应Item.vue -->
<li>
<input type="checkbox">吃饭<button>删除</button>
</li>
<li>
<input type="checkbox">睡觉<button>删除</button>
</li>
<li>
<input type="checkbox">coding<button>删除</button>
</li>
</ul>
<!-- 对应Footer.vue -->
<div>
<input type="checkbox">已完成0/全部3<button>清除已完成任务</button>
</div>
</body>
实现:
main.js:
import Vue from 'vue'
import App from './App'
new Vue({
el: "#app",
components: {App},
template: '<App/>'
})
App.vue:
<template>
<div>
<Add :todos="todos" :addTodo="addTodo"/>
<List :todos="todos" :deleteTodo="deleteTodo"/>
<Footer :todos="todos" :selectAll="selectAll" :deleteFinishedTodos="deleteFinishedTodos"/>
</div>
</template>
<script>
import List from './components/List'
import Add from './components/Add'
import Footer from './components/Footer'
export default {
components:{List, Add, Footer},
data: function () {
return {
todos:[
{name:'吃饭', isFinished: false},
{name:'睡觉', isFinished: true},
{name:'coding', isFinished: false}
]
}
},
methods: {
// 新增
addTodo(todo) {
this.todos.unshift(todo)
},
// 删除
deleteTodo(index) {
this.todos.splice(index, 1)
},
// 清除已完成任务
deleteFinishedTodos() {
this.todos = this.todos.filter(todo => !todo.isFinished)
},
// 全选(全不选)
selectAll(isSelect) {
this.todos.forEach(todo => todo.isFinished = isSelect)
}
}
}
</script>
<style>
</style>
这里使用了数组的forEach方法箭头函数改变元素,可以触发view更新。
List.vue:
<template>
<ul>
<!-- 对应Item.vue -->
<Item v-for="(todo, index) in todos" :key="index" :todo="todo" :index="index" :deleteTodo="deleteTodo"/>
</ul>
</template>
<script>
import Item from './Item'
export default {
components:{Item},
props:['todos', 'deleteTodo']
}
</script>
<style>
</style>
Add.vue
<template>
<div>
<input type="text" placeholder="请输入代办任务,回车确认" v-model="name" @keyup.enter="addTodoInAddVue"/>
<br/><br/>
</div>
</template>
<script>
export default {
props: ['todos', 'addTodo'],
data: function() {
return {
name: ''
}
},
methods: {
addTodoInAddVue() {
if (this.name.trim == '') {
alert('请输入任务内容')
return
}
let todo = {}
todo.name = this.name
todo.isFinished = false
this.addTodo(todo)
this.name = ''
}
}
}
</script>
<style>
</style>
Item.vue:
<template>
<li @mouseenter="handleEnter(true)" @mouseleave="handleEnter(false)" :style="{'background-color': bgColor}">
<input type="checkbox" v-model="todo.isFinished">{{todo.name}}
<button v-show="isShowDeleteButton" @click="deleteTodo(index)">删除</button>
</li>
</template>
<script>
export default {
props:['todo', 'index', 'deleteTodo'],
data: function() {
return {
isShowDeleteButton: false,
bgColor: 'white'
}
},
methods: {
handleEnter(isShowDeleteButton) {
if (isShowDeleteButton) {
this.isShowDeleteButton = true
this.bgColor = 'gray'
} else {
this.isShowDeleteButton = false
this.bgColor = 'white'
}
}
}
}
</script>
<style>
</style>
这里使用了mouseenter、mouseleave,分别是进入移出元素时触发,而mouseover和mouseout也是进入移出元素触发,不过如果元素内有子元素,进入移出子元素时mouseover和mouseout也会被触发。
Footer.vue:
<template>
<div>
<input type="checkbox" v-model="isSelectedAll"/>
已完成{{finishedCount}}/全部{{todos.length}}
<button @click="deleteFinishedTodos">清除已完成任务</button>
</div>
</template>
<script>
export default {
props: ['todos', 'selectAll', 'deleteFinishedTodos'],
methods: {
// selectAllInFooter(isSelectedAll) {
// this.selectAll(isSelectedAll)
// }
},
// 统计完成数量
computed: {
finishedCount() {
// 传统方式计算
// let count = 0;
// for(let i = 0; i < this.todos.length; i++) {
// if (this.todos[i].isFinished) {
// count++
// }
// }
// return count
// 更好的方式,利用reduce计算
return this.todos.reduce((preTotal, todo) => preTotal + (todo.isFinished?1:0) ,0)
},
isSelectedAll: {
get() {
return this.finishedCount === this.todos.length && this.todos.length > 0
},
set(value) {
this.selectAll(value)
}
}
}
}
</script>
<style>
</style>
1、这里利用了数组的reduce方法统计。
2、checkbox绑定的v-model是选中与否的true和false,而不是checkbox的value值。
3、这里的全选框利用了计算属性的get和set方法。
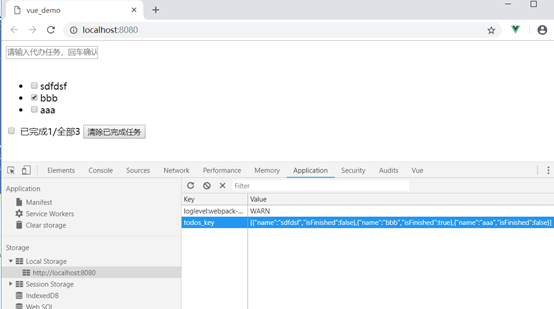
深度监视和用localStorage存取
data: function () {
return {
// 从localStorage里取
todos: JSON.parse(window.localStorage.getItem("todos_key") || '[]')
}
},
watch: {
todos: {
// 深度监视
deep: true,
handler: function(value){
// 存储到localStorage里
window.localStorage.setItem("todos_key", JSON.stringify(value))
}
}
},
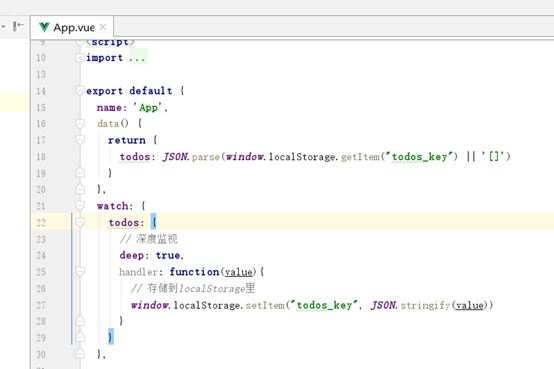
这样在浏览器关闭或者刷新后,仍能保持数据。
其中用了深度监视,在被监视的数组中元素属性发生改变(这里是勾选状态)也能监视到。
自定义事件
组件间传递参数除了用自定义属性,还能用自定义事件的方式。
自定义事件只能用于父子之间传递参数,无法进行第三层传递,自定义属性则不限制传递层数。
标签内绑定(常用方式)
App.vue中
<!--<Add :todos="todos" :addTodo="addTodo"/>-->
<Add :todos="todos" @addTodo="addTodo"/>
自定义事件addtodo,
Add.vue中,使用$emit触发事件
// this.addTodo(todo)
this.$emit('addTodo', todo)
与自定义属性传参相比,自定义事件会少一点代码,不用写props。
$on绑定(不常用)
写代码绑定:
Add.vue中:
<Add :todos="todos" ref="addDom"/>
mounted() {
this.$refs.addDom.$on('addTodo', this.addTodo)
},
指定在mouted以后绑定,通过ref找到标签,然后用$on方法绑定,这种方式增加了代码量。
pubsub组件发布/订阅消息
组件间通信除了通过自定义属性、自定义事件,还能通过pubsub发布订阅消息。
使用pubsub可以减少很多代码量,且不用逐层传递参数,跨层直接订阅发布。
使用:
1、安装pubsub-js第三方组件
npm install --save pubsub-js
2、Item.vue中调用publish方法发布消息
<button v-show="isShowDeleteButton" @click="deleteTodoInItem(index)">删除</button>
// 引入pubsub-js
import PubSub from 'pubsub-js'
deleteTodoInItem(index) {
PubSub.publish('deleteIt', index)
}
第1个参数是消息名字,类似于mq的topic,第2个参数是业务参数
3、App.vue中调用subscribe方法订阅消息
// 引入pubsub-js
import PubSub from 'pubsub-js'
mounted() {
PubSub.subscribe('deleteIt', (msg, index) => {
this.deleteTodo(index)
})
}
一般在mouted时订阅
slot
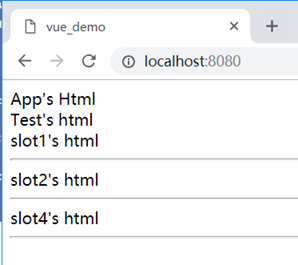
slot插槽,用于父子组件通信传递标签时使用。在子组件中定义多个slot,父组件传递标签过来进行对应放置,用name进行对应。如果没有传则不显示,如:
App.vue:
<template>
<div>
App's Html
<br/>
<!-- 为Test组件传递3个标签,其中slot3没有传 -->
<Child>
<div slot="slot2">slot2's html</div>
<div slot="slot1">slot1's html</div>
<div slot="slot3">slot4's html</div>
</Child>
</div>
</template>
<script>
import Child from './components/Child'
export default {
components: {Child},
name: 'App'
}
</script>
<style scoped>
</style>
Child.vue:
<template>
<div>
Test's html
<br/>
<!-- 子组件定义的4个插槽 -->
<slot name="slot1"></slot>
<hr/>
<slot name="slot2"></slot>
<hr/>
<slot name="slot3"></slot>
<hr/>
<slot name="slot4"></slot>
</div>
</template>
<script>
export default {
name: 'Test'
}
</script>
<style scoped>
</style>
效果:
创建和使用util工具包
可以将一些常用方法放到单独的js中,成为工具包,工具包可以暴露一个或多个函数供调用,如将存取todos放到工具包中:
创建util目录,下面创建storageUtil.js文件:

文件内容:
const TODOS_KEY = 'todos_key'
export default {
// 存todos到localStorage
saveTodos(todos) {
window.localStorage.setItem(TODOS_KEY, JSON.stringify(todos))
},
// 从localStorage取todos
getTodos() {
return JSON.parse(window.localStorage.getItem(TODOS_KEY) || '[]')
}
}
App.vue中使用:
import storageUtil from './util/storageUtil'
data: function () {
return {
// 从localStorage里取
todos: storageUtil.getTodos()
}
},
watch: {
todos: {
// 深度监视
deep: true,
handler: function(value){
// 存储到localStorage里
storageUtil.saveTodos(value)
}
}
},
使用Ajax
使用axios(常用)
axios不需要用Vue.use方法安装,直接就能使用。
1、npm安装
npm install --save axios
2、使用:
App.vue:
<template>
<div>
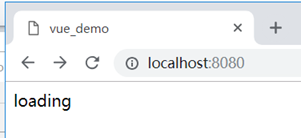
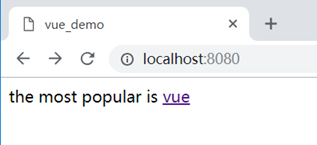
<div v-if="!searchUrl">loading</div>
<div v-else>the most popular is <a :href="searchUrl">{{searchName}}</a></div>
</div>
</template>
<script>
// 引入axios组件
import axios from 'axios'
export default {
mounted () {
// 发送ajax请求
const url = 'https://api.github.com/search/repositories?q=v&sort=stars'
axios.get(url).then(
// 成功回调函数
response => {
// response.data是返回数据
const result = response.data
const mostPopularItem = result.items[0]
this.searchUrl = mostPopularItem.html_url
this.searchName = mostPopularItem.name
}).catch(error => {
alert('失败了')
})
},
data: function() {
return {
searchUrl: '',
searchName: ''
}
}
}
</script>
<style scoped>
</style>
使用vue-resource(已淘汰,vue1.0时使用)
1、npm安装
npm install --save vue-resource
2、main.js引入和安装
import Vue from 'vue'
import App from './App'
// 引入vue-resource
import VueResource from 'vue-resource'
// 安装插件
Vue.use(VueResource)
new Vue({
el: '#app',
components: {App},
template: '<App/>'
})
3、App.vue使用
<template>
<div>
<div v-if="!searchUrl">loading</div>
<div v-else>the most popular is <a :href="searchUrl">{{searchName}}</a></div>
</div>
</template>
<script>
export default {
mounted () {
// 发送ajax请求
const url = 'https://api.github.com/search/repositories?q=v&sort=stars'
this.$http.get(url).then(
// 成功回调函数
response => {
// response.data是返回数据
const result = response.data
const mostPopularItem = result.items[0]
this.searchUrl = mostPopularItem.html_url
this.searchName = mostPopularItem.name
},
// 失败回调函数
response => {
alert('失败了')
}
)
},
data: function() {
return {
searchUrl: '',
searchName: ''
}
}
}
</script>
<style scoped>
</style>
vue-resource插件安装后会在vue实例是注册$http对象,它有get、post等方法。
效果:
案例(搜索)
需要实现的效果:
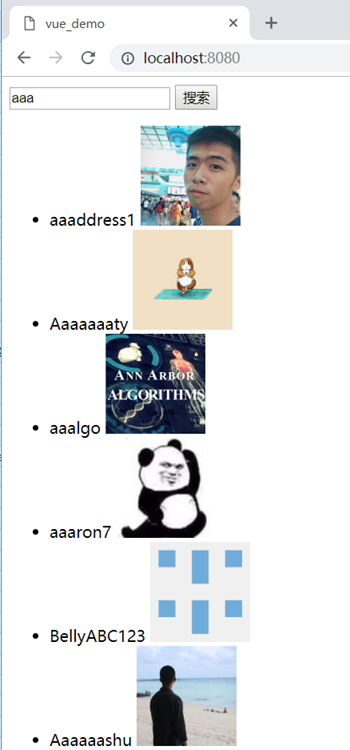
输入关键字搜索,到github模糊匹配用户名字搜索,显示用户名和照片。
实现:
利用Pubsub发布订阅的方式,Search组件中点搜索按钮时发布消息,Main组件接收消息,发送ajax请求,Search和Main是兄弟组件关系。
main.js:
import Vue from 'vue'
import App from './App'
new Vue({
el: '#app',
components: {App},
template: '<App/>'
})
App.vue
<template>
<div>
<Search/>
<UserMain/>
</div>
</template>
<script>
import Search from './components/Search'
import Main from './components/Main'
export default {
name: 'App',
components: {
Search,
// Main是关键字,不能用于标签,所以起别名UserMain
UserMain: Main
}
}
</script>
<style scoped>
</style>
Search.vue:
<template>
<div>
<input type="text" v-model="searchName">
<button @click="search">搜索</button>
</div>
</template>
<script>
import PubSub from 'pubsub-js'
export default {
name: 'Search',
data() {
return {
searchName: ''
}
},
methods: {
search() {
// pubsub发送搜索消息
PubSub.publish('search', this.searchName)
}
}
}
</script>
<style scoped>
</style>
Main.vue
<template>
<div>
<!--搜索前-->
<div v-show="first">输入名称进行搜索</div>
<!--搜索中-->
<div v-show="isLoading">LOADING</div>
<!--搜索成功-列表-->
<div v-show="users">
<ul>
<li v-for="(user, index) in users">
{{user.name}}
<img :src="user.url" style="max-width: 100px;max-height: 100px;"/>
</li>
</ul>
</div>
<!--搜索失败-->
<div v-show="errorMsg">
{{errorMsg}}
</div>
</div>
</template>
<script>
import PubSub from 'pubsub-js'
import axios from 'axios'
export default {
name: 'Main',
data() {
return {
// 定义4种状态
first: true,
isLoading: false,
showList: false,
errorMsg: '',
users: null // {name: '', url: ''}
}
},
mounted () {
// 订阅消息
PubSub.subscribe("search", (msg, searchName) => {
this.first = false
this.isLoading = true
this.users = null
this.errorMsg = ''
// 发送ajax请求搜索
const url = `https://api.github.com/search/users?q=${searchName}`
axios.get(url).then(
// 成功回调函数
response => {
// response.data是返回数据
const result = response.data
// 使用数组的map方法进行属性映射
const users = result.items.map(item => ({
url: item.avatar_url,
name: item.login
}))
this.users = users
// 成功更新状态
this.isLoading = false
}).catch(error => {
this.users = null
this.isLoading = false
this.errorMsg = error
})
})
}
}
</script>
<style scoped>
</style>
路由router
基本使用
路由类似于nginx,配置路径和页面的映射,只不过这里是配置路径和子组件的映射。
1、安装路由插件
npm install --save vue-router
2、定义路由组件:创建路由映射文件src/router/index.js
import Vue from 'vue'
import VueRouter from 'vue-router'
import About from '../views/About'
import Home from '../views/Home'
Vue.use(VueRouter)
export default new VueRouter({
// n个路由
routes: [
{
path: '/about',
component: About
},
{
path: '/home',
component: Home
},
// 主页,重定向到about
{
path: '/',
redirect: '/about'
}
]
})
这里创建了路由对象,配置了路由映射
3、注册路由:在main.js引入
import Vue from 'vue'
import App from './App'
// 引入路由组件
import router from './router'
new Vue({
el: '#app',
components: {App},
template: '<App/>',
router // 或者写成router: router
})
这里import router from './router',它默认会去找index.js,如果是其他名字如index2.js,则需要写成:import router from './router/index2'
4、编写子组件
About.vue
<template>
<div>about</div>
</template>
<script>
export default {
name: 'About'
}
</script>
<style scoped>
</style>
Home.vue
<template>
<div>home</div>
</template>
<script>
export default {
name: 'Home'
}
</script>
<style scoped>
</style>
5、父组件中使用路由
App.vue:
<template>
<div>
<div>
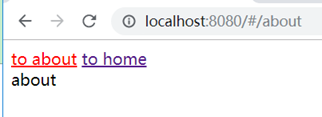
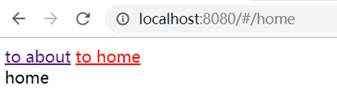
<router-link to="/about">to about</router-link>
<router-link to="/home">to home</router-link>
</div>
<div>
<router-view/>
</div>
</div>
</template>
<script>
export default {
name: 'App'
}
</script>
<style scoped>
/* 当前活跃的路由项链接为红色 */
.router-link-active{color:red;}
</style>
<router-link>和<router-view>标签配合使用,点击router-link链接时,会自动找到to属性的path对应的子组件,显示到router-view标签。
ps:
当前选择的路由链接会自动加上router-link-active这个class属性,可用于控制样式。这个class名字可以自定义,如:linkActiveClass: 'active123',自定义成了active123
效果:
6、路由的过程
路由路径可以看做访问url中带的一个参数,通过该参数去找路由配置中的path,找到以后取出对应的vue显示到<router-view/>标签所在的地方。
如果找不到,则不显示路由组件,但主页面也可以正常显示,如:
localhost:8080/#/abcdef这个abcdef路径没有配置,则找不到对应的vue,而页面也可以正常访问。
直接在url的#号后面接路由路径即可指定路由访问,因此router-link点击时相当于动态更新了#号后面的路由路径。
嵌套路由
使用children标签,如:
routes: [
{
path: '/about',
component: About
},
{
path: '/home',
component: Home,
// 定义home下面的子路由
children: [
{
path: 'news', // 也可以写成/home/news
component: News
},
{
path: 'message',
component: Message
},
{
path: '/',
redirect: 'news'
}
]
},
// 主页,重定向到about
{
path: '/',
redirect: '/about'
}
]
链接写成:
<router-link to="/home/news">to news</router-link>
<router-link to="/home/message">to message</router-link>
缓存路由组件
<keep-alive>
<router-view/>
</keep-alive>
默认路由组件会切换会销毁,使用keep-alive可以缓存起来,比如输入框中的数据可以保持下来。
案例(使用路径参数)
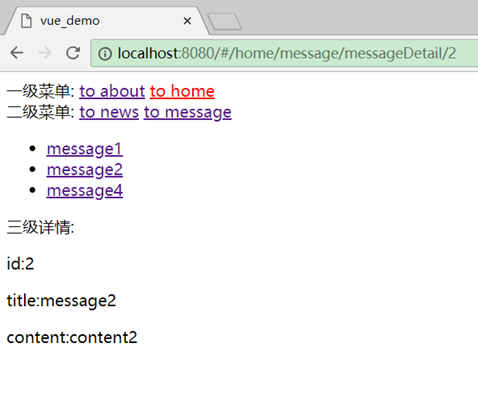
效果:
实现:
main.js:
import Vue from 'vue'
import App from './App'
// 引入路由组件
import router from './router'
new Vue({
el: '#app',
components: {App},
template: '<App/>',
router // 或者写成router: router
})
App.vue
<template>
<div>
<div>
一级菜单:
<router-link to="/about">to about</router-link>
<router-link to="/home">to home</router-link>
</div>
<div>
<keep-alive>
<router-view/>
</keep-alive>
</div>
</div>
</template>
<script>
export default {
name: 'App'
}
</script>
<style scoped>
/* 当前活跃的路由项链接为红色 */
.router-link-active{color:red;}
</style>
About.vue
<template>
<div>
about
<input type="text">
</div>
</template>
<script>
export default {
name: 'About'
}
</script>
<style scoped>
</style>
Home.vue
<template>
<div>
<div>
二级菜单:
<router-link to="/home/news">to news</router-link>
<router-link to="/home/message">to message</router-link>
</div>
<div>
<router-view/>
</div>
</div>
</template>
<script>
export default {
name: 'Home'
}
</script>
<style scoped>
</style>
News.vue
<template>
<ul>
<li v-for="(news, index) in newsArr" :key="index">{{news}}</li>
</ul>
</template>
<script>
export default {
name: 'News',
data() {
return {
newsArr: ['news1','news2','news3']
}
}
}
</script>
<style scoped>
</style>
Message.vue
<template>
<div>
<ul>
<li v-for="(message, index) in messages">
<router-link :to="`/home/message/messageDetail/${message.id}`">{{message.title}}</router-link>
</li>
</ul>
<router-view/>
</div>
</template>
<script>
export default {
name: 'News',
data() {
return {
messages: null
}
},
mounted () {
// 模拟从后台异步取数据,需要1秒钟
setTimeout(() => {
this.messages = [
{id: 1, title: 'message1'},
{id: 2, title: 'message2'},
{id: 4, title: 'message4'}
]
}, 1000)
}
}
</script>
<style scoped>
</style>
其中使用`messageDetail/${message.id}`的es6语法定义带参数路径
MessageDetail.vue
<template>
<div>
<p>三级详情:</p>
<p>id:{{messageDetail.id}}</p>
<p>title:{{messageDetail.title}}</p>
<p>content:{{messageDetail.content}}</p>
</div>
</template>
<script>
const messageDetails = [
{id: 1, title: 'message1', content: 'content1'},
{id: 2, title: 'message2', content: 'content2'},
{id: 4, title: 'message4', content: 'content4'}
]
export default {
name: 'MessageDetail',
data() {
return {
messageDetail: {}
}
},
mounted () {
// 模拟从后台查询消息详情,需要1秒
setTimeout(() => {
const id = this.$route.params.id * 1
this.messageDetail = messageDetails.find(messageDetailDb => messageDetailDb.id === id)
},500)
},
watch: {
$route() {
this.messageDetail = {}
// 模拟从后台查询消息详情,需要0.5秒
setTimeout(() => {
const id = this.$route.params.id * 1
this.messageDetail = messageDetails.find(messageDetailDb => messageDetailDb.id === id)
},500)
}
}
}
</script>
<style scoped>
</style>
其中messageDetails.find(messageDetailDb => messageDetailDb.id === id)用数组的find方法查询第一个符合条件的元素
$route.params可以取到路径参数,如果要取query参数,用$route.query
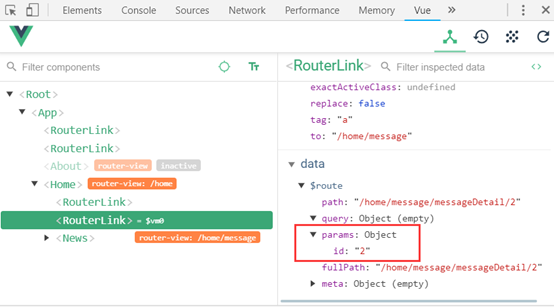
路由链接更新时不会重新调用mounted方法,因此需要监视$route。
this.$route.params.id * 1用字符串乘上数字1可以变成数字,三个等号会比较类型,如果用2个等号就不需要转换。
index.js
import Vue from 'vue'
import VueRouter from 'vue-router'
import About from '../views/About'
import Home from '../views/Home'
import News from '../views/News'
import Message from '../views/Message'
import MessageDetail from '../views/MessageDetail'
Vue.use(VueRouter)
export default new VueRouter({
// n个路由
routes: [
{
path: '/about',
component: About
},
{
path: '/home',
component: Home,
// 定义home下面的子路由
children: [
{
path: 'news', // 也可以写成/home/news
component: News
},
{
path: 'message',
component: Message,
children: [
{
path: 'messageDetail/:id',
component: MessageDetail
}
]
},
{
path: '/',
redirect: 'news'
}
]
},
// 主页,重定向到about
{
path: '/',
redirect: '/about'
}
]
})
其中path: 'messageDetail/:id'用冒号的方式传递了路径参数
router-view用属性传参数
路由可以用属性传参数,如:
<router-view :msg="'abc'"/>
接收参数用props
export default {
name: 'About',
props: ['msg']
}
效果:
push、replace、back跳转
类似于页面的window.location.href跳转和window.location.replace跳转,vue也可以用js进行组件间跳转,也叫编程式路由导航,区别于router-link链接跳转。用法,如:
this.$router.push(`/home/message/messageDetail/1`)
this.$router.replace(`/home/message/messageDetail/2`)
this.$router.back()等价于this.$router.go(-1):返回上一页
this.$router.go(1):前进到下一页
路由提供了$route 和$router对象,前者是路由对象,可以用于取参数,后者是路由器对象,可以用于页面跳转。
push压栈当前页,replace替换当前页。
style样式的作用范围
vue的style标签如果没有加scoped则会影响包含了它的父vue组件,如果加了scoped则只会影响本身及子组件,因此除了最外层vue组件,其他的vue都最好加上scoped,在最外层vue上可以定义一些公共样式。
路由组件也是同理,不加scoped会影响父组件,最好都加上。
Vuex
使用传统方式实现一个计数功能
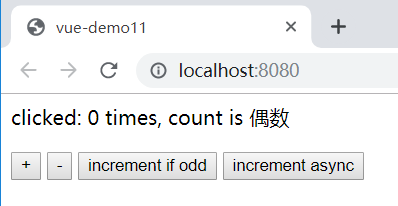
App.vue:
<template>
<div id="app">
clicked: {{count}} times, count is {{type}}
<p>
<button @click="increment">+</button>
<button @click="reduction">-</button>
<button @click="incrementIfOdd">increment if odd</button>
<button @click="incrementAsync">increment async</button>
</p>
</div>
</template>
<script>
export default {
name: 'App',
data() {
return {
count: 0
}
},
computed : {
type() {
if (this.count % 2 == 0) {
return "偶数"
} else {
return "奇数"
}
}
},
methods: {
// 加1
increment() {
this.count++;
},
// 减1
reduction() {
this.count--;
},
// 奇数时加1
incrementIfOdd() {
if (this.count % 2 == 1) {
this.count++;
}
},
// 延迟1秒加1
incrementAsync() {
setTimeout(() => {
this.count++;
}, 1000)
}
}
}
</script>
<style>
</style>
vuex介绍
vuex在线文档:
vuex是一个vue的插件,只不过没有遵循一般的插件命名方式vue-xxxxx。
vuex对应用中多个组件的共享状态进行集中式管理(读和写)
传统状态自管理应用
前面的应用都是"状态自管理应用",组成是:
1、state: 数据,对应上面的count,也叫驱动应用的数据源
2、 view:视图,对应上面示例的template模板部分,它以声明方式将 映射state数据,如{{count}}就是一个声明,它会自动找到count的值展示出来,不用手动去取值。
3、actions:事件,对应上面示例的increment(),reduction(),incrementIfOdd(),incrementAsync(),也叫响应在 view 上的用户输入导致的状态变化(包含 n 个更新状态的方法)
状态自管理应用都是单向数据流,如上面的流程是:
view上面操作按钮 -> 调用actions事件 -> 更新state数据 -> 再刷新view显示。
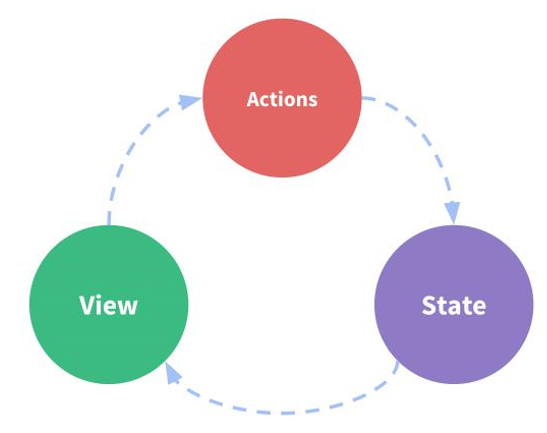
状态自管理应用存在多组件共享状态的问题:
1) 多个视图依赖于同一状态
2) 来自不同视图的行为需要变更同一状态
3) 以前的解决办法 a. 将数据以及操作数据的行为都定义在父组件 b. 将数据以及操作数据的行为传递给需要的各个子组件(有可能需要多级传递) 4) vuex 就是用来解决这个问题的
vuex的流程图:
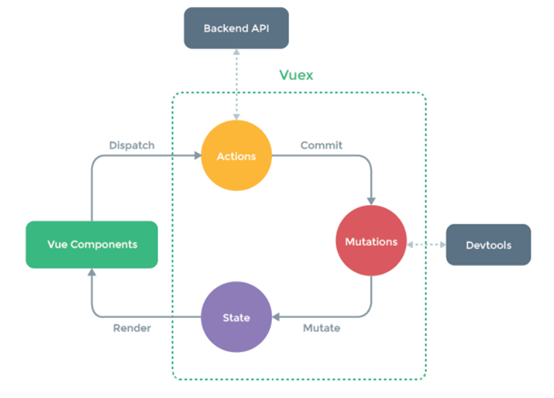
多了一个Mutations,中文翻译是变异,在vuex中视图组件通过dispatch调用actions,但actions不直接更新state数据状态,而是提交给mutations去更新。
Backend API是服务器后台,通常在Actions中发送Ajax请求跟后台交互。
Devtools开发工具监视的是Mutations的调用。
vuex使用案例
安装vuex
npm install --save vuex
main.js中增加store的配置:
import Vue from 'vue'
import App from './App'
import store from './store'
Vue.config.productionTip = false
new Vue({
el: '#app',
components: { App },
template: '<App/>',
store // 使用$store引用
})
这里引入了store.js,它是一个插件,将它定义成名称为store的变量,后面在App.vue中就可以用$store使用了。
编写store.js插件:
// 本文件中定义state、mutations、actions、getters
import Vue from 'vue'
import Vuex from 'vuex'
Vue.use(Vuex)
// 定义state
const state = {
count: 0
}
// 定义mutations
const mutations = {
INCREMENT(state) {
state.count++
},
REDUCTION(state) {
state.count--
}
}
// 定义actions
const actions = {
increment ({commit}) {
commit('INCREMENT');
},
reduction ({commit}) {
commit('REDUCTION');
},
incrementIfOdd ({commit, state}) {
if (state.count % 2 == 1) {
commit('INCREMENT');
}
},
incrementAsync ({commit}) {
setTimeout(() => {
commit('INCREMENT');
}, 1000)
},
}
// 定义getters
const getters = {
type(state) {
if (state.count % 2 == 0) {
return "偶数"
} else {
return "奇数"
}
}
}
export default new Vuex.Store({
state,
mutations,
actions,
getters
})
store.js插件中定义了state、mutations、actions、getters,封装到Vuex.Store中返回。Vuex.Store是一个构造函数。在main.js中将这个插件返回对象命名成了store.
其中参数{commit}表示一个包含commit函数的对象,而不只是commit函数,该对象还可以有其他属性。
App.vue调整:
<template>
<div id="app">
clicked: {{$store.state.count}} times, count is {{type}}
<p>
<button @click="increment">+</button>
<button @click="reduction">-</button>
<button @click="incrementIfOdd">increment if odd</button>
<button @click="incrementAsync">increment async</button>
</p>
</div>
</template>
<script>
export default {
name: 'App',
computed : {
type() {
return this.$store.getters.type
}
},
methods: {
// 加1
increment() {
this.$store.dispatch('increment')
},
// 减1
reduction() {
this.$store.dispatch('reduction')
},
// 奇数时加1
incrementIfOdd() {
this.$store.dispatch('incrementIfOdd')
},
// 延迟1秒加1
incrementAsync() {
this.$store.dispatch('incrementAsync')
}
}
}
</script>
<style>
</style>
可以看出app.vue的data数据、competed计算属性、methods事件都放到了store.js,并且store.js中由actions调用mutations实现数据更新。
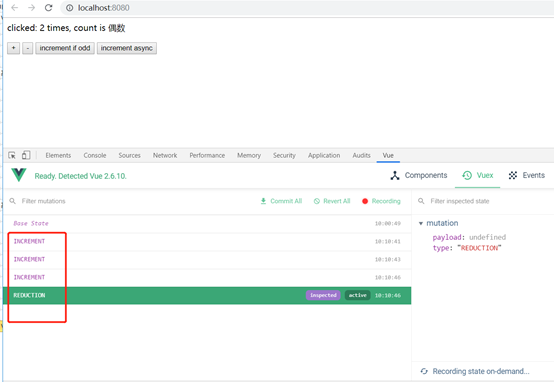
效果:
利用map映射简化编码:
<template>
<div id="app">
clicked: {{count}} times, count is {{type}}
<p>
<button @click="increment">+</button>
<button @click="reduction">-</button>
<button @click="incrementIfOdd">increment if odd</button>
<button @click="incrementAsync">increment async</button>
</p>
</div>
</template>
<script>
import {mapState, mapGetters, mapActions} from 'vuex'
export default {
name: 'App',
computed : {
...mapState(['count']),
...mapGetters(['type'])
},
methods : {
...mapActions(['increment', 'reduction', 'incrementIfOdd', 'incrementAsync'])
}
}
</script>
<style>
</style>
默认约定的App.uve里面的事件名、属性名等跟store.js中的一样,如果不一样则需要映射(尽量不要写成不一样,约定大于配置)如:
store.js中配置:
// 定义getters
const getters = {
type2(state) {
if (state.count % 2 == 0) {
return "偶数"
} else {
return "奇数"
}
}
}
App.vue中调整:
computed : {
...mapState(['count']),
...mapGetters({type: "type2"})
},
Todos使用vuex改造案例
整体说明:
1、将各组件的共享变量todos交给vuex管理,而组件内部自己使用的变量不用交给vuex管理如Add.vue的name和Item.vue的isShowDeleteButton、bgColor。
2、将vuex的各模块单独建立文件state.js、mutations.js、actions.js、getters.js统一放到store目录下,然后用一个index.js引入它们,在main.js中用import store from './store'引入store,他会自动找到index.js引入。
3、使用mutation_types.js将mutations的方法名定义为常量
注意点:
1、List引用Item时传递的参数todo和index不要交给vuex管理,还是用以前传递参数的方式,因为它是迭代出来的多个变量。
2、Footer中的isSelectedAll计算属性由于有set监视方法,因此不能放到mapGetters列表中去声明,而要单独写在computed里。
3、方法中除了能默认传递state,还能传递getters,如:isSelectedAll(state, getters)
4、json定义中的key使用中括号括起来就表示是个变量,会取变量的值作为key,如mutations.js中的:[ADD_TODO],他会取mutation_types.js中配置的"add_todo"
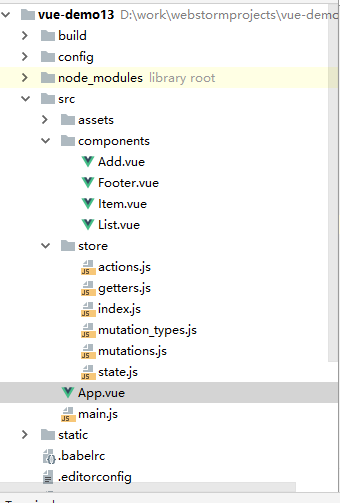
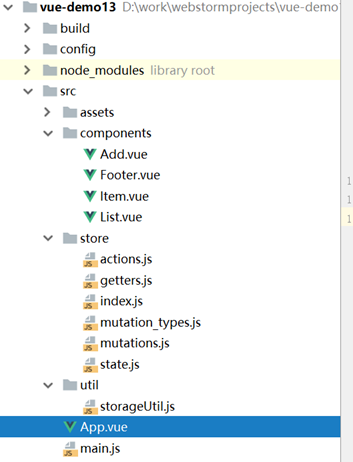
项目结构:
main.js:
import Vue from 'vue'
import App from './App'
import store from './store'
new Vue({
el: "#app",
components: {App},
template: '<App/>',
store
})
App.vue
<template>
<div>
<Add/>
<List/>
<Footer/>
</div>
</template>
<script>
import List from './components/List'
import Add from './components/Add'
import Footer from './components/Footer'
import {mapActions} from 'vuex'
export default {
components:{List, Add, Footer},
}
</script>
<style>
</style>
components/ Add.vue
<template>
<div>
<input type="text" placeholder="请输入代办任务,回车确认" v-model="name" @keyup.enter="addTodoInAddVue"/>
<br/><br/>
</div>
</template>
<script>
export default {
data() {
return {
name: ''
}
},
methods: {
addTodoInAddVue() {
if (this.name.trim == '') {
alert('请输入任务内容')
return
}
let todo = {}
todo.name = this.name
todo.isFinished = false
this.$store.dispatch('addTodoInAddVue', todo)
this.name = ''
}
}
}
</script>
<style>
</style>
components/ Footer.vue
<template>
<div>
<input type="checkbox" v-model="isSelectedAll"/>
已完成{{finishedCount}}/全部{{$store.state.todos.length}}
<button @click="deleteFinishedTodos">清除已完成任务</button>
</div>
</template>
<script>
import {mapActions, mapGetters} from 'vuex'
export default {
methods: {
...mapActions(['deleteFinishedTodos'])
},
// 统计完成数量
computed: {
...mapGetters(['finishedCount']),
isSelectedAll: {
get() {
return this.$store.getters.isSelectedAll;
},
set(value) {
return this.$store.dispatch('selectAll', value)
}
}
}
}
</script>
<style>
</style>
components/ Item.vue
<template>
<li @mouseenter="handleEnter(true)" @mouseleave="handleEnter(false)" :style="{'background-color': bgColor}">
<input type="checkbox" v-model="todo.isFinished">{{todo.name}}
<button v-show="isShowDeleteButton" @click="$store.dispatch('deleteTodo', index)">删除</button>
</li>
</template>
<script>
export default {
props:['todo', 'index'],
data: function() {
return {
isShowDeleteButton: false,
bgColor: 'white'
}
},
methods: {
handleEnter(isShowDeleteButton) {
if (isShowDeleteButton) {
this.isShowDeleteButton = true
this.bgColor = 'gray'
} else {
this.isShowDeleteButton = false
this.bgColor = 'white'
}
}
}
}
</script>
<style>
</style>
components/ List.vue
<template>
<ul>
<!-- 对应Item.vue -->
<Item v-for="(todo, index) in $store.state.todos" :key="index" :todo="todo" :index="index"/>
</ul>
</template>
<script>
import Item from './Item'
export default {
components:{Item}
}
</script>
<style>
</style>
store/index.js
import Vue from 'vue'
import Vuex from 'vuex'
Vue.use(Vuex)
import state from './state'
import mutations from './mutations'
import actions from './actions'
import getters from './getters'
export default new Vuex.Store({
state,mutations,actions,getters
})
store/actions.js
import {ADD_TODO, DELETE_TODO, DELETE_FINISHED_TODOS, SELECT_ALL} from './mutation_types'
export default {
addTodoInAddVue({commit}, todo) {
commit(ADD_TODO, todo)
},
// 删除
deleteTodo({commit, state}, index) {
commit(DELETE_TODO, index)
},
// 清除已完成任务
deleteFinishedTodos({commit}) {
commit(DELETE_FINISHED_TODOS)
},
// 全选(全不选)
selectAll({commit}, isSelect) {
commit(SELECT_ALL, isSelect)
}
}
store/getters.js
export default {
finishedCount(state) {
return state.todos.reduce((preTotal, todo) => preTotal + (todo.isFinished?1:0) ,0)
},
isSelectedAll(state, getters) {
return getters.finishedCount === state.todos.length && state.todos.length > 0
}
}
store/mutation_types.js
export const ADD_TODO = "add_todo";
export const DELETE_TODO = "delete_todo";
export const DELETE_FINISHED_TODOS = "delete_finished_todos";
export const SELECT_ALL = "select_all";
store/ mutations.js
import {ADD_TODO, DELETE_TODO, DELETE_FINISHED_TODOS, SELECT_ALL} from './mutation_types'
export default {
// 新增
[ADD_TODO] (state, todo) {
state.todos.unshift(todo)
},
// 删除
[DELETE_TODO](state, index) {
state.todos.splice(index, 1)
},
// 清除已完成任务
[DELETE_FINISHED_TODOS](state) {
state.todos = state.todos.filter(todo => !todo.isFinished)
},
// 全选(全不选)
[SELECT_ALL](state, isSelect) {
state.todos.forEach(todo => todo.isFinished = isSelect)
}
}
store/ state.js
export default {
todos:[
{name:'吃饭', isFinished: false},
{name:'睡觉', isFinished: true},
{name:'coding', isFinished: false}
]
}
模拟异步初始化Todos数据:
整体结构:
说明:
1、模拟项目启动时异步从服务器获取初始化数据,这里从localStorage获取。
2、使用watch深度监视时,key可以是mapState映射的属性。
3、在mounted时请求服务器数据,请求服务器数据的代码在actions中,请求成功后调用mutations初始化数据。
main.js:
同上
App.vue:
<template>
<div>
<Add/>
<List/>
<Footer/>
</div>
</template>
<script>
import List from './components/List'
import Add from './components/Add'
import Footer from './components/Footer'
import storageUtil from './util/storageUtil'
import {mapState} from 'vuex'
export default {
components:{List, Add, Footer},
mounted() {
this.$store.dispatch("loadTodos");
},
computed: {
...mapState(['todos'])
},
watch: {
todos: {
// 深度监视
deep: true,
handler: function(value){
// 存储到localStorage里
storageUtil.saveTodos(value)
}
}
}
}
</script>
<style>
</style>
components
Add.vue、Footer.vue、Item.vue、List.vue同上
store/index.js
同上
store/actions.js
import {ADD_TODO, DELETE_TODO, DELETE_FINISHED_TODOS, SELECT_ALL, LOAD_TODOS} from './mutation_types'
import storageUtil from '../util/storageUtil'
export default {
addTodoInAddVue({commit}, todo) {
commit(ADD_TODO, todo)
},
// 删除
deleteTodo({commit, state}, index) {
commit(DELETE_TODO, index)
},
// 清除已完成任务
deleteFinishedTodos({commit}) {
commit(DELETE_FINISHED_TODOS)
},
// 全选(全不选)
selectAll({commit}, isSelect) {
commit(SELECT_ALL, isSelect)
},
// 初始化数据
loadTodos({commit}) {
// 模拟异步加载数据
setTimeout(() => {
commit(LOAD_TODOS, storageUtil.getTodos())
}, 1000)
}
}
store/getters.js
同上
store/mutation_types.js
export const ADD_TODO = "add_todo";
export const DELETE_TODO = "delete_todo";
export const DELETE_FINISHED_TODOS = "delete_finished_todos";
export const SELECT_ALL = "select_all";
export const LOAD_TODOS = "load_todos";
store/ mutations.js
import {ADD_TODO, DELETE_TODO, DELETE_FINISHED_TODOS, SELECT_ALL, LOAD_TODOS} from './mutation_types'
export default {
// 新增
[ADD_TODO] (state, todo) {
state.todos.unshift(todo)
},
// 删除
[DELETE_TODO](state, index) {
state.todos.splice(index, 1)
},
// 清除已完成任务
[DELETE_FINISHED_TODOS](state) {
state.todos = state.todos.filter(todo => !todo.isFinished)
},
// 全选(全不选)
[SELECT_ALL](state, isSelect) {
state.todos.forEach(todo => todo.isFinished = isSelect)
},
// 加载todos
[LOAD_TODOS](state, todos) {
state.todos = todos;
}
}
store/ state.js
export default {
todos:[]
}
util/ storageUtil.js
const TODOS_KEY = 'todos_key'
export default {
// 存todos到localStorage
saveTodos(todos) {
window.localStorage.setItem(TODOS_KEY, JSON.stringify(todos))
},
// 从localStorage取todos
getTodos() {
return JSON.parse(window.localStorage.getItem(TODOS_KEY) || '[]')
}
}

 浙公网安备 33010602011771号