Springcloud基础及使用
spring cloud
本文档示例采用spring boot 的 1.5.9版本
spring cloud用于spring boot项目的分布式管理,它的部分功能同dubbo很类似,如eureka跟zookeeper功能类似,zuul跟nginx类似,同时它集成了hystrix断路器、spring cloud config统一配置等实用功能组件。
spring boot项目通信的直连方式:
服务之间互相调用可以用直连的方式,直连不需要依赖spring cloud,使用spring boot的依赖就够了。
provider:
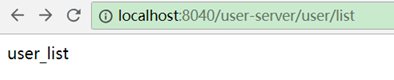
没有特殊配置,直接通过controller提供http接口:
@RestController
@RequestMapping("user")
public class UserController {
@RequestMapping("list")
public String list() {
System.out.println("服务被调用");
return "user_list";
}
}
consumer:
注入RestTemplate,然后通过它调用远程接口:
@RequestMapping("test")
@RestController
public class TestController {
@Autowired
public RestTemplate restTemplate;
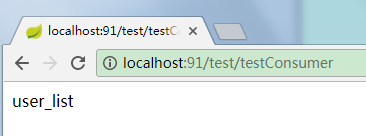
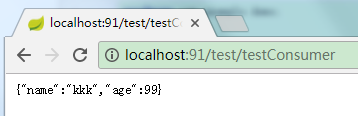
@RequestMapping("testConsumer")
public String testConsumer() {
String a = restTemplate.getForObject("http://localhost:90/user/list", String.class);
return a;
}
}
RestTemplate在主程序中通过@Bean标签配置:
@SpringBootApplication
public class ConsumerApplication {
@Bean
public RestTemplate restTemplate() {
return new RestTemplate();
}
public static void main(String[] args) {
SpringApplication.run(ConsumerApplication.class, args);
}
}
测试访问:
使用Eureka:
Eureka是一个服务发现组件,类似于zookeeper用来做注册中心的功能。可以将服务注册到Eureka上。
服务注册表记录服务的ip、端口等信息。
服务注册到Eureka的服务注册表,每30秒发送一次心跳(续约),连续3次(90秒)没有接收到心跳,就会将服务从服务注册表移除掉。
客户端缓存提供者ip,即使Eureka挂掉,也可以继续调用服务。
Eureka通过心跳检测、健康检查、客户端缓存确保高可用性、灵活性、可伸缩性。
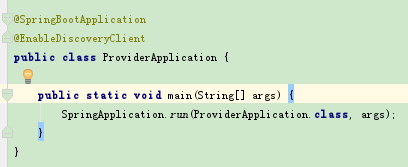
创建Eureka的server服务发现组件工程
Eureka服务发现组件作为一个spring boot工程创建。
1、pom.xml加入依赖
<parent>
   <groupId>org.springframework.boot</groupId>
   <artifactId>spring-boot-starter-parent</artifactId>
   <version>1.5.9.RELEASE</version>
   <relativePath/> <!-- lookup parent from repository -->
</parent>
<dependencyManagement>
   <dependencies>
      <dependency>
         <groupId>org.springframework.cloud</groupId>
         <artifactId>spring-cloud-dependencies</artifactId>
         <version>Edgware.SR2</version>
         <type>pom</type>
         <scope>import</scope>
      </dependency>
   </dependencies>
</dependencyManagement>
<properties>
   <project.build.sourceEncoding>UTF-8</project.build.sourceEncoding>
   <project.reporting.outputEncoding>UTF-8</project.reporting.outputEncoding>
   <java.version>1.8</java.version>
</properties>

<dependencies>
   <dependency>
      <groupId>org.springframework.boot</groupId>
      <artifactId>spring-boot-starter</artifactId>
   </dependency>

   <dependency>
      <groupId>org.springframework.boot</groupId>
      <artifactId>spring-boot-starter-test</artifactId>
      <scope>test</scope>
   </dependency>


					<dependency>
      <groupId>org.springframework.cloud</groupId>
      <artifactId>spring-cloud-starter-eureka-server</artifactId>
   </dependency>
</dependencies>
其中定义了依赖管理如下:
<dependencyManagement>
   <dependencies>
      <dependency>
         <groupId>org.springframework.cloud</groupId>
         <artifactId>spring-cloud-dependencies</artifactId>
         <version>Edgware.SR1</version>
         <type>pom</type>
         <scope>import</scope>
      </dependency>
   </dependencies>
</dependencyManagement>
它里面定了各种依赖的版本,使用了它之后,以后的eureka、ribbon、feign、hystrix等依赖加入时都不用再写版本号。
2、启动类:
EurekaserverApplication:
import org.springframework.boot.SpringApplication;
import org.springframework.boot.autoconfigure.SpringBootApplication;
import org.springframework.cloud.netflix.eureka.server.EnableEurekaServer;
@SpringBootApplication
@EnableEurekaServer
public class EurekaserverApplication {
public static void main(String[] args) {
SpringApplication.run(EurekaserverApplication.class, args);
}
}
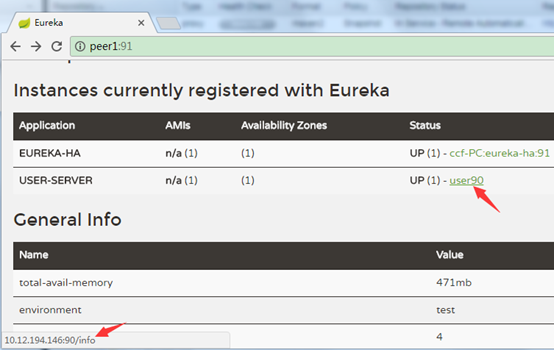
3、启动启动类后浏览器访问:

上面列出了eureka服务启动时间,服务器内存、Cpu等信息,注册到上面的实例、状态等信息。
服务端注册到Eureka
pom.xml加入依赖
<dependencyManagement>
<dependencies>
<dependency>
<groupId>org.springframework.cloud</groupId>
<artifactId>spring-cloud-dependencies</artifactId>
<version>Edgware.SR2</version>
<type>pom</type>
<scope>import</scope>
</dependency>
</dependencies>
</dependencyManagement>
<dependency>
<groupId>org.springframework.cloud</groupId>
<artifactId>spring-cloud-starter-eureka</artifactId>
</dependency>
启动类加注解:
@EnableDiscoveryClient
或者
@EnableEurekaClient

application.yml加入配置:
eureka:
client:
service-url:
defaultZone: http://localhost:8761/eureka/
启动服务,观察Eureka服务器:

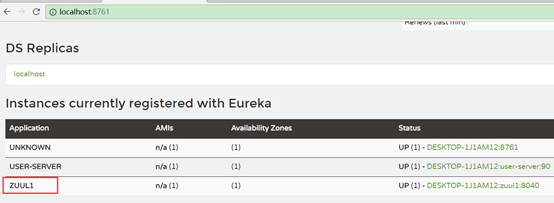
可以看到服务列表多了一条记录。
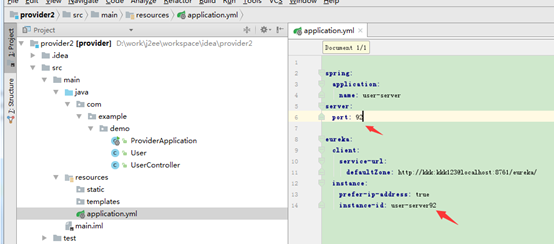
设置服务名称
provider方的yml文件增加配置:
spring:
application:
name: user-server
效果:

自定义状态status格式
最后一个参数可以通过instance_id自定义名字,如:
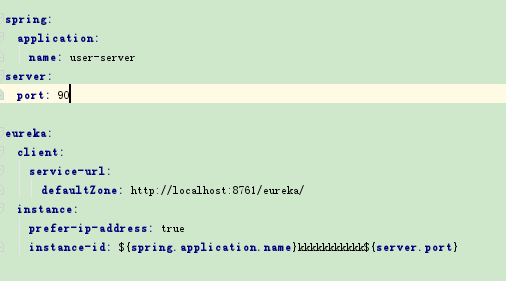
效果:

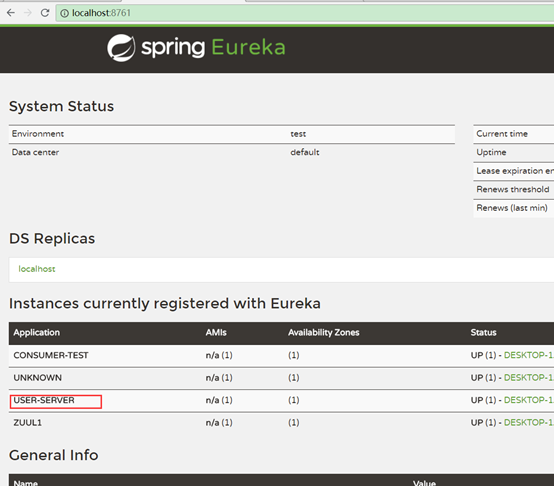
消费端注册到Eureka
pom.xml加入依赖
<dependencyManagement>
<dependencies>
<dependency>
<groupId>org.springframework.cloud</groupId>
<artifactId>spring-cloud-dependencies</artifactId>
<version>Edgware.SR2</version>
<type>pom</type>
<scope>import</scope>
</dependency>
</dependencies>
</dependencyManagement>
<dependency>
<groupId>org.springframework.cloud</groupId>
<artifactId>spring-cloud-starter-eureka</artifactId>
</dependency>
启动类加注解:
@EnableDiscoveryClient
或者
@EnableEurekaClient
application.yml加入配置:
eureka:
client:
service-url:
#defaultZone: http://localhost:8761/eureka/
defaultZone: http://kkk:kkk123@localhost:8761/eureka/
spring:
application:
name: consumer-test
启动服务,观察Eureka服务器:

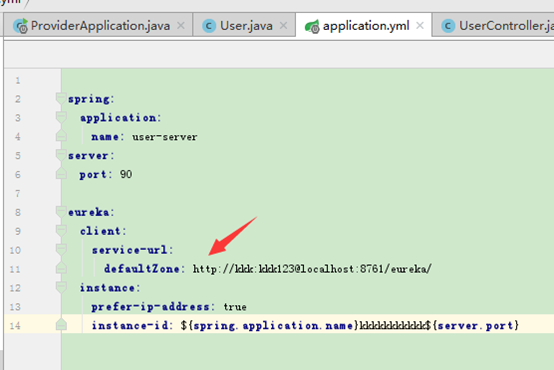
eurekaserver服务器配置登录验证
配置登录账号密码,正确才能进入管理界面。
pom.xml引入依赖
<dependency>
<groupId>org.springframework.boot</groupId>
<artifactId>spring-boot-starter-security</artifactId>
</dependency>
yml文件增加配置:
security:
basic:
enabled: true
user:
name: kkk
password: kkk123
效果:

输入kkk kkk123登录以后才能进服务管理界面。
provider端配置用户名密码注册服务
只需要通过curl的方式将用户名密码写入链接地址即可:
如:
defaultZone: http://kkk:kkk123@localhost:8761/eureka/
监控和管理生产环境
<dependency>
<groupId>org.springframework.boot</groupId>
<artifactId>spring-boot-starter-actuator</artifactId>
</dependency>
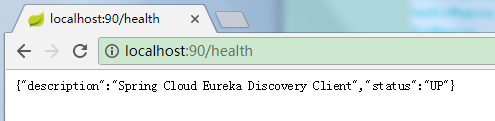
这个包提供了状态查看、健康检查等功能,可以用在provider、consumer、eurekaserver任何一个工程里。
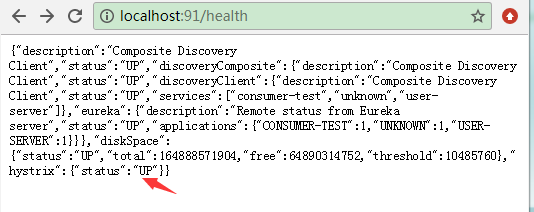
服务状态查看
启动时可以看到很多url地址:
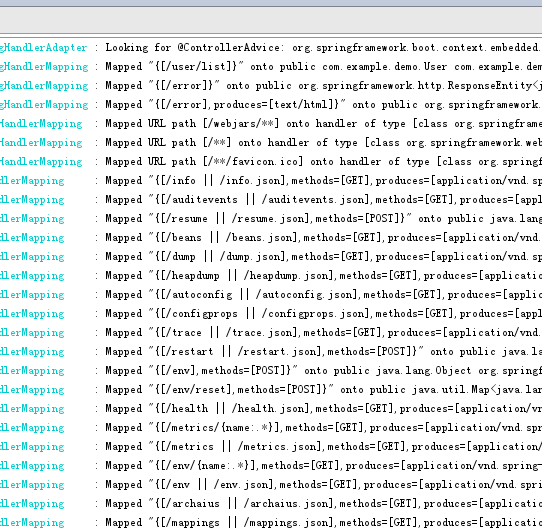
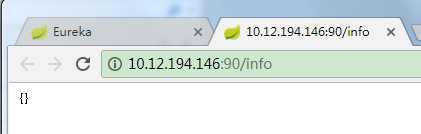
服务启动后可访问,如:
如果要看更多信息,则需要配置登录验证账号和密码,provider、consumer端配置方法跟eurekaserver端配置方法一样,见上面"eurekaserver服务器配置登录验证"。
也可以通过禁用验证查看更多信息,application.yml中加入配置:
management:
security:
enabled: false
效果:

查询服务提供者节点信息
可以通过服务名查询节点
在provider中配置:
import com.netflix.appinfo.InstanceInfo;
import com.netflix.discovery.EurekaClient;
import com.netflix.discovery.converters.Auto;
import org.springframework.beans.factory.annotation.Autowired;
import org.springframework.beans.factory.annotation.Qualifier;
import org.springframework.cloud.client.ServiceInstance;
import org.springframework.cloud.client.discovery.DiscoveryClient;
import org.springframework.web.bind.annotation.GetMapping;
import org.springframework.web.bind.annotation.RequestMapping;
import org.springframework.web.bind.annotation.RestController;
/**
* Created by Administrator on 2018/1/26.
*/
@RestController
@RequestMapping("user")
public class UserController {
@Autowired
private EurekaClient eurekaClient;
@Autowired
private DiscoveryClient discoveryClient;
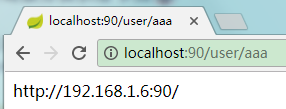
@GetMapping("aaa")
public String serviceUrl() {
InstanceInfo instanceInfo = eurekaClient.getNextServerFromEureka("user-server", false);
return instanceInfo.getHomePageUrl();
}
@GetMapping("bbb")
public ServiceInstance showInfo() {
ServiceInstance serviceInstance = discoveryClient.getLocalServiceInstance();
return serviceInstance;
}
@RequestMapping("list")
public User list() {
System.out.println("服务被调用");
User user = new User();
user.setName("kkk");
user.setAge(99L);
return user;
}
}
效果:

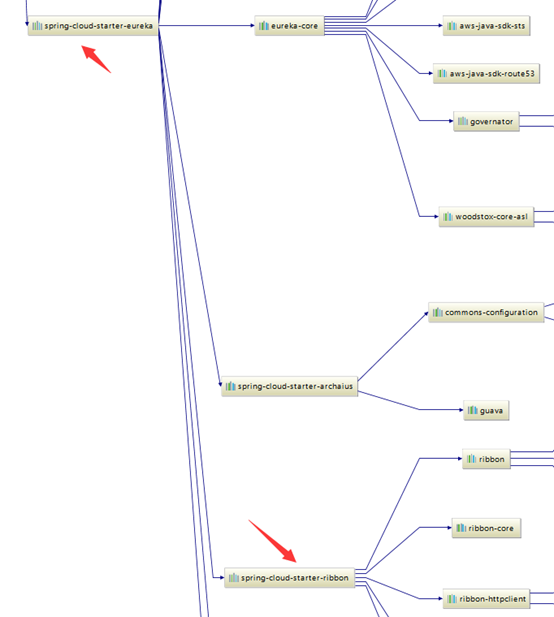
使用ribbon:
服务器端负载均衡和客户端负载均衡
服务器端负载均衡组件如nginx、tengine等,在服务器端做反向代理实现负载均衡。
客户端负载均衡是在客户端记录服务器节点列表,然后在客户端决定访问哪个节点实现负载均衡,如dubbo也是使用客户端负载均衡。ribbon就是一种客户端负载均衡组件。
基本使用(consumer端配置)
由于ribbon是客户端负载均衡组件,因此配置到了consumer端。
使用ribbon需要引入ribbon的依赖,由于cloud-starter已经引入了ribbon的依赖, 所以不需要再引入。
启动类加入@LoadBalanced注解:
ConsumerApplication.java:
import org.springframework.boot.SpringApplication;
import org.springframework.boot.autoconfigure.SpringBootApplication;
import org.springframework.cloud.client.discovery.EnableDiscoveryClient;
import org.springframework.cloud.client.loadbalancer.LoadBalanced;
import org.springframework.context.annotation.Bean;
import org.springframework.web.client.RestTemplate;
@SpringBootApplication
@EnableDiscoveryClient
public class ConsumerApplication {
@Bean
@LoadBalanced
public RestTemplate restTemplate() {
return new RestTemplate();
}
public static void main(String[] args) {
SpringApplication.run(ConsumerApplication.class, args);
}
}
加入了@LoadBalanced注解表示它使用ribbon
通过服务名调用服务:
TestController:
import
org.springframework.beans.factory.annotation.Autowired;
import org.springframework.web.bind.annotation.RequestMapping;
import org.springframework.web.bind.annotation.RestController;
import org.springframework.web.client.RestTemplate;
@RequestMapping("test")
@RestController
public class TestController {
@Autowired
public RestTemplate restTemplate;
@RequestMapping("testConsumer")
public User testConsumer() {
// 通过服务名调用服务
User user = restTemplate.getForObject("http://user-server/user/list", User.class);
return user;
}
}
注意这里的user-server是服务名,没有区分大小写。

application.yml配置文件不变
spring:
application:
name: consumer-test
server:
port: 91
eureka:
client:
service-url:
#defaultZone: http://localhost:8761/eureka/
defaultZone: http://kkk:kkk123@localhost:8761/eureka/
效果:
List参数的坑(只能接收数组类型,不能是List类型)
返回List时,不能用List接收,而要用数组,如:
服务端方法:
@RequestMapping("list")
public List<User> list() {
System.out.println("服务被调用");
User user1 = new User();
user1.setName("kkk");
user1.setAge(99L);
User user2 = new User();
user2.setName("kkk2");
user2.setAge(100L);
List<User> list = new ArrayList<>();
list.add(user1);
list.add(user2);
return list;
}
客户端方法(只能接收为数组):
@RequestMapping("testConsumer")
public List<User> testConsumer() {

											// 通过服务名调用服务

												User[] userArray = restTemplate.getForObject("http://user-server/user/list", User[].class);
    List<User> users = Arrays.asList(userArray);

																			for (User user : users) {
        System.out.println(user.getName());
    }

																							return users;
}
如果写成:
@RequestMapping("testConsumer")
public List<User> testConsumer() {

											// 通过服务名调用服务

												List<User> users = restTemplate.getForObject("http://user-server/user/list", List.class);

																			for (User user : users) {
        System.out.println(user.getName());
    }

																							return users;
}
则访问会报错

负载均衡测试
ribbon的负载均衡默认采用轮询的方式。
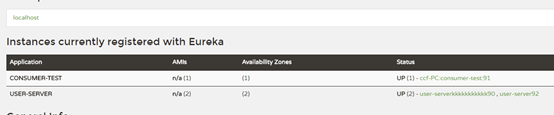
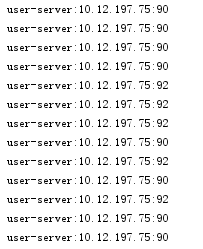
复制一个provider工程为provider2,使用92端口,服务名也为user-server,实例id(instance-id)为user-server92。
启动后在eureka上可以看到。
然后使用客户端访问多次,效果:
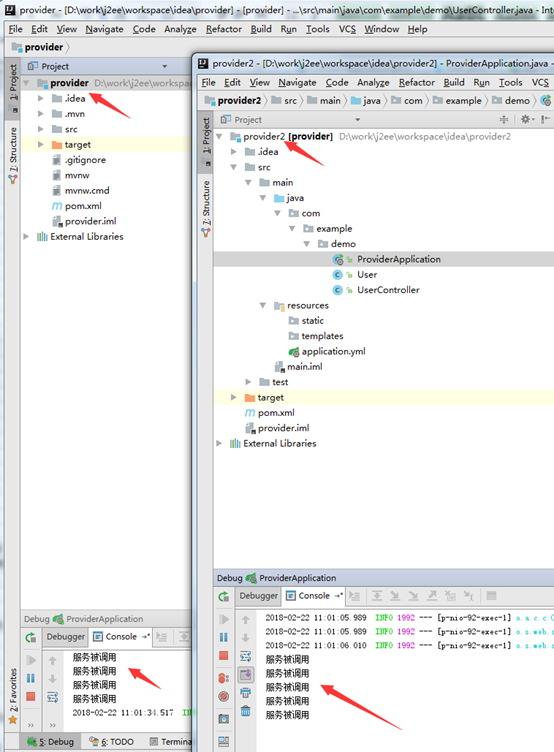
2个服务节点被轮流调用。
代码自定义使用ribbon负载均衡规则
ribbon默认采用轮询方式使用服务节点,可以进行自定义配置。
配置
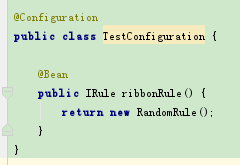
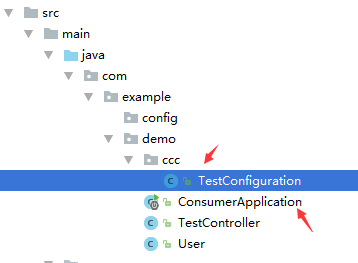
编写配置类TestConfiguration:
package com.example.config;
import com.netflix.loadbalancer.IRule;
import com.netflix.loadbalancer.RandomRule;
import org.springframework.context.annotation.Bean;
import org.springframework.context.annotation.Configuration;
@Configuration
public class TestConfiguration {
@Bean
public IRule ribbonRule() {
return new RandomRule();
}
}
这里定义了一个随机的ribbonRule,它会随机访问服务节点。ribbonRule这个方法会被自动回调。
注意这个类不要放到启动类及其子包下,也就是不能让@ComponentScan扫描到它。否则会对所有服务都生效,而不只是对user-server生效了。
启动类增加@RibbonClient注解:
ConsumerApplication:
package com.example.demo;
import com.example.config.TestConfiguration;
import org.springframework.boot.SpringApplication;
import org.springframework.boot.autoconfigure.SpringBootApplication;
import org.springframework.cloud.client.discovery.EnableDiscoveryClient;
import org.springframework.cloud.client.loadbalancer.LoadBalanced;
import org.springframework.cloud.netflix.ribbon.RibbonClient;
import org.springframework.context.annotation.Bean;
import org.springframework.web.client.RestTemplate;
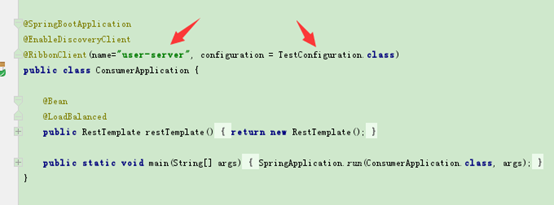
@SpringBootApplication
@EnableDiscoveryClient
@RibbonClient(name="user-server", configuration = TestConfiguration.class)
public class ConsumerApplication {
@Bean
@LoadBalanced
public RestTemplate restTemplate() {
return new RestTemplate();
}
public static void main(String[] args) {
SpringApplication.run(ConsumerApplication.class, args);
}
其中:name="user-server", configuration = TestConfiguration.class
表示对某个服务采用哪种负载均衡规则。
说明:
没有配置Configuration时,spring cloud默认采用RibbonClientConfiguration。
它也实现了ribbonRule方法。
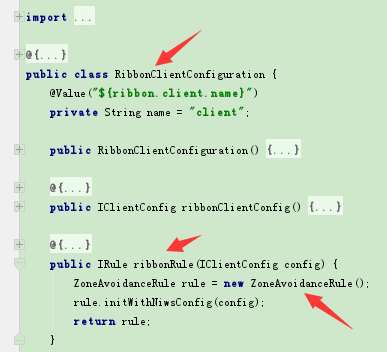
默认使用的ZoneAvoidanceRule。
自定义配置负载均衡规则测试
2个服务分别使用不同规则
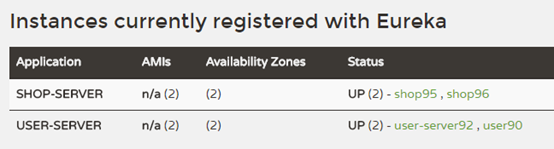
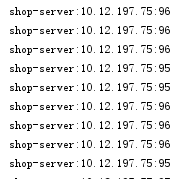
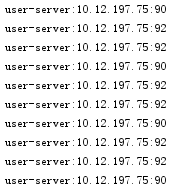
新建user-server服务,提供者为2个节点user90、user92,同理新建shop-server服务,提供者为2个节点shop95、shop96。eureka上显示如下:
consumer端仅对user-server服务配置随机访问规则,而shop-server采用默认的轮询规则:
编写Controller的测试访问类:
TestController:
import org.springframework.beans.factory.annotation.Autowired;
import org.springframework.cloud.client.ServiceInstance;
import org.springframework.cloud.client.loadbalancer.LoadBalancerClient;
import org.springframework.web.bind.annotation.GetMapping;
import org.springframework.web.bind.annotation.RequestMapping;
import org.springframework.web.bind.annotation.RestController;
@RequestMapping("test")
@RestController
public class TestController {
@Autowired
public LoadBalancerClient loadBalancerClient;
@GetMapping("testUserServer")
public String testUserServer() {
ServiceInstance userServiceInstance = loadBalancerClient.choose("user-server");
System.out.println(String.format("%s:%s:%s", userServiceInstance.getServiceId(), userServiceInstance.getHost(), userServiceInstance.getPort()));
return "finished";
}
@GetMapping("testShopServer")
public String testShopServer() {
ServiceInstance shopServiceInstance = loadBalancerClient.choose("shop-server");
System.out.println(String.format("%s:%s:%s", shopServiceInstance.getServiceId(), shopServiceInstance.getHost(), shopServiceInstance.getPort()));
return "finished";
}
}
其中loadBalancerClient可以访问节点,并且取到当前使用节点的ip、端口等信息。
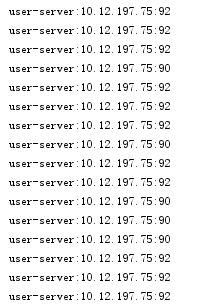
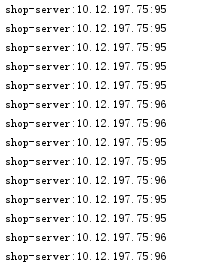
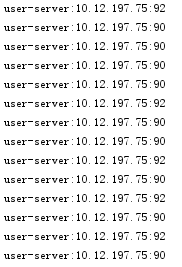
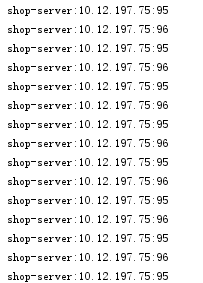
分别多次访问
http://localhost:91/test/testUserServer和http://localhost:91/test/testShopServer
控制台打印如下:
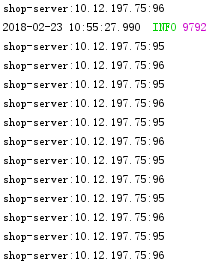
可以看出user-server是随机的,而shop-server是轮询的。
Configuration放到启动类或其子包下时的情况
Configuration放到启动类或其子包下时的会对所有的服务都生效,而不只是RibbonClient里name配置的服务,而且会在服务启动时就回调ribbonRule
方法(而不放在启动类及其子包下时,需要第一次访问到时才会回调ribbonRule)。

效果:
user-server和shop-server都使用了自定义的随机访问规则。
排除Configuration到扫描包之外
可以通过自定义注解,将自定义Configuration排除到扫描包之外:
ExcludeScan.java:
public @interface ExcludeScan {
}
启动类加注解:
@ComponentScan(excludeFilters = {@ComponentScan.Filter(type = FilterType.ANNOTATION, value = ExcludeScan.class)})
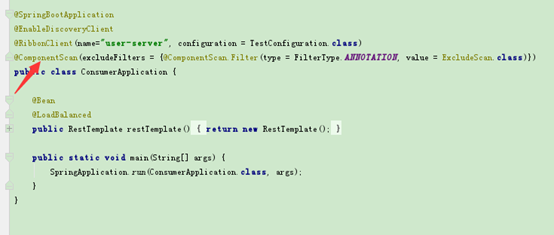
表示将带有@ ExcludeScan注解的类排除到扫描范围之外。
TestConfiguration加@ExcludeScan注解

效果:
随机只对user-server生效,shop-server还是采用默认的轮询。
配置文件使用ribbon负载均衡规则
前提是需要Spring Cloud1.2.0及以上的版本。
这里用的是1.4.3
<dependency>
<groupId>org.springframework.cloud</groupId>
<artifactId>spring-cloud-starter-eureka</artifactId>
<version>1.4.3.RELEASE</version>
</dependency>
application.yml增加配置:
user-server:
ribbon:
NFLoadBalancerRuleClassName: com.netflix.loadbalancer.RandomRule
shop-server:
ribbon:
NFLoadBalancerRuleClassName: com.netflix.loadbalancer.RandomRule
表示user-server和shop-server都用随机的规则,效果:
脱离eureka使用ribbon
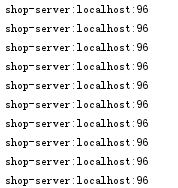
ribbon的服务节点列表可以不从eureka获取,而将其配置到yml文件中。
如:
shop-server:
ribbon:
listOfServers: localhost:96
ribbon:
eureka:
enabled: false
这里禁用了eureka,同时配置了shop-server服务的节点列表为localhost:96
效果:
使用feign:
feign是一个声明式的web service client。springcloud整合了feign,让它支持spring mvc的注解。
使用feign可以不用将访问url的具体路径写到代码里(因此可以不使用RestTemplate去手动调用远程服务),而是将它抽象成client接口。通过client接口的方法调用远程服务。
consumer端配置:
pom.xml加入依赖
<dependency>
<groupId>org.springframework.cloud</groupId>
<artifactId>spring-cloud-starter-openfeign</artifactId>
</dependency>
启动类加注解:
@EnableFeignClients
编写接口
UserFeignClient:
import
org.springframework.cloud.netflix.feign.FeignClient;
import org.springframework.web.bind.annotation.*;
@FeignClient("user-server")
public interface UserFeignClient {
@GetMapping(value = "/user/list")
User list(@RequestParam("id") Long id);
@PostMapping(value = "/user/postList")
User postList(@RequestBody Long id);
}
注意这里如果是get请求,则参数必须加@RequestParam注解,否则会发送post请求。并且括号内的参数"id"不能省略,否则报错。
Controller里调用:
TestController:
import org.springframework.beans.factory.annotation.Autowired;
import org.springframework.web.bind.annotation.GetMapping;
import org.springframework.web.bind.annotation.RequestMapping;
import org.springframework.web.bind.annotation.RestController;
@RequestMapping("test")
@RestController
public class TestController {
@Autowired
private UserFeignClient userFeignClient;
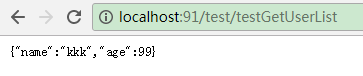
@GetMapping("testGetUserList")
public User testGetUserList() {
return userFeignClient.list(5L);
}
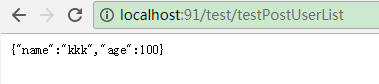
@GetMapping("testPostUserList")
public User testPostUserList() {
return userFeignClient.postList(6L);
}
}
provider端controller提供的接口:
@GetMapping("list")
public User list(@RequestParam Long id) {
System.out.println("服务被调用");
User user = new User();
user.setName("kkk");
user.setAge(99L);
return user;
}
@PostMapping("postList")
public User postList(@RequestBody Long id) {
System.out.println("服务被调用");
User user = new User();
user.setName("kkk");
user.setAge(100L);
return user;
}
访问测试:
说明:Feign通信都是采用字符串的方式,参数中定义的User类其实是转成json字符串传输的,返回时发现需要User,就自动创建User对象,再设置属性,也可以用String类型接收返回的json串,还可以把User改成其他的名字,如Dog.java,也是可以转换成功的:
public class Dog {
public String name;
public Long age;
public String getName() {
return name;
}
public void setName(String name) {
this.name = name;
}
public Long getAge() {
return age;
}
public void setAge(Long age) {
this.age = age;
}
}
设置属性时需要能够转换,比如将name定义成Long型:
public Long name
则返回的"kkk"转换不了会报错:

与dubbo类似,服务端多出的属性会被消费端设置时忽略,消费端多出的属性会默认为null、0等,而不会报错。
自定义配置feign
类似于ribbon的自定义配置,feign也可以用写代码或者配置文件的方式进行自定义配置。
手动写代码配置:
编写Configuration类:
TestFeignConfiguration:
package com.example.config;
import feign.Contract;
import org.springframework.context.annotation.Bean;
import org.springframework.context.annotation.Configuration;
@Configuration
public class TestFeignConfiguration {
@Bean
public Contract feignContract() {
return new feign.Contract.Default();
}
}
这个类有一个feignContract()方法,返回一个Contract对象(契约对象),这个方法会自动被回调,类似于ribbon的ribbonRule()方法回调。
这里用feign默认的Contract覆盖了原来的SpringMvcContract ,而Contract会影响Client接口中方法的定义方式等。
因此这里覆盖之后就只能用feign的方式定义方法了,否则会报错:
@FeignClient(name= "user-server", configuration = TestFeignConfiguration.class)
public interface UserFeignClient {
@RequestLine("GET /user/list")
Dog list(@Param("id") Long id);
}
服务提供端provider:
@RequestMapping("list")
public User list(@RequestParam(value = "id", defaultValue = "0") Long id) {
System.out.println("服务被调用");
User user = new User();
user.setName("kkk");
user.setAge(99L);
return user;
}
配置类的路径规则同Ribbon的类似,也是不能放在启动类及其子包下,否则会被所有FeignClient使用到,也可以用自定义注解让@ComponentScan扫描不到。
name属性必须唯一,在没有url属性时它是指服务名,有url属性时它只是一个唯一标识。
通过url属性从eureka服务器获取服务信息
加了url属性以后,name属性就不再是服务名了,而只是一个唯一标识。
TestFeignConfiguration2:
import feign.auth.BasicAuthRequestInterceptor;
import org.springframework.context.annotation.Bean;
import org.springframework.context.annotation.Configuration;
@Configuration
public class TestFeignConfiguration2 {
@Bean
public BasicAuthRequestInterceptor basicAuthRequestInterceptor() {
return new BasicAuthRequestInterceptor("kkk", "kkk123");
}
}
自定义了一个Configuration,它使用默认配置,只是加了一个用户名密码,便于访问eureka。
FeignUrlClient.java:
import
com.example.config.TestFeignConfiguration2;
import org.springframework.cloud.netflix.feign.FeignClient;
import org.springframework.web.bind.annotation.GetMapping;
import org.springframework.web.bind.annotation.RequestMapping;
import org.springframework.web.bind.annotation.RequestParam;
@FeignClient(name= "aaa", url="http://localhost:8761/", configuration = TestFeignConfiguration2.class)
public interface FeignUrlClient {
@RequestMapping(value = "/eureka/apps/user-server")
String aaa();
}
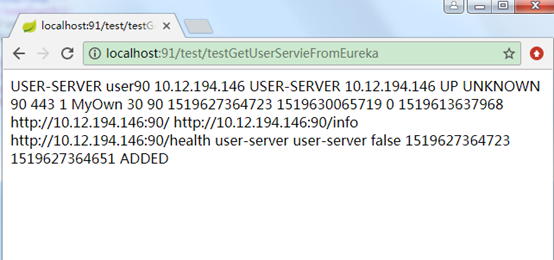
定义了一个FeignClient,它的url是eureka的地址,name是唯一标识。
@RequestMapping(value = "/eureka/apps/user-server")是eureka上的user-server服务描述路径。
Controller中调用:
@GetMapping("testGetUserServieFromEureka")
public String testGetUserServieFromEureka() {
return feignUrlClient.aaa();
}
测试:
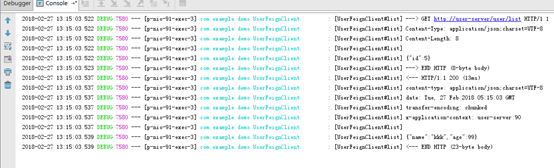
设置日志打印
feign默认在调用远程服务时是没有日志打印的,可以通过配置设置,可以对单个FeignClient设置不同的日志级别,如对UserFeignClient设置DEBUG级别:
1、application.yml增加配置:
logging:
level:
com.example.demo.UserFeignClient: DEBUG
2、在UserFeignClient使用的TestFeignConfiguration增加Bean配置:
@Bean
Logger.Level feignLoggerLevel() {

						return Logger.Level.FULL;
}

3、测试效果:
解决超时问题
设置断路器的超时时间、禁用超时、禁用断路器都可以:
application.yml
hystrix.command.default.execution.isolation.timeoutInMilliseconds: 5000
或者
hystrix.command.default.execution.timeout.enabled: false
或者
feign.hystrix.enabled: false
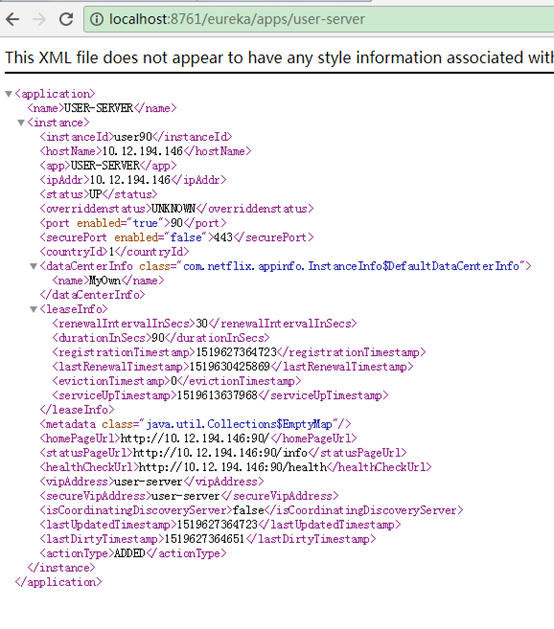
设置客户端元数据
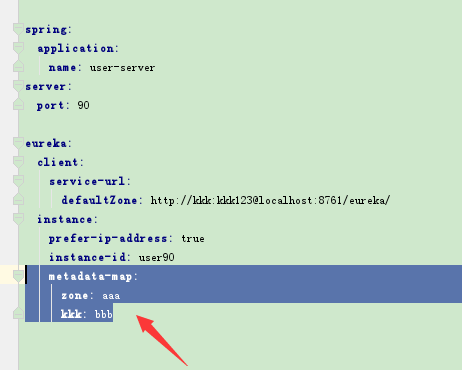
客户端注册到eureka上时,可以设置元数据参数,通过instance.metadata-map设置,如user服务提供端增加配置:
metadata-map:
zone: aaa
kkk: bbb
然后到eureka上看:
http://localhost:8761/eureka/apps/user-server

元数据分为eureka可以识别的和用户自定义的,可以识别的元数据会影响客户端的行为,不能识别的元数据相当于自定义参数。
设置客户端心跳检测间隔时间
leaseRenewalIntervalInSeconds:5
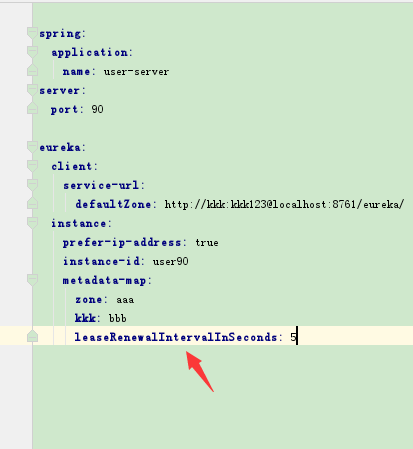
默认是30秒
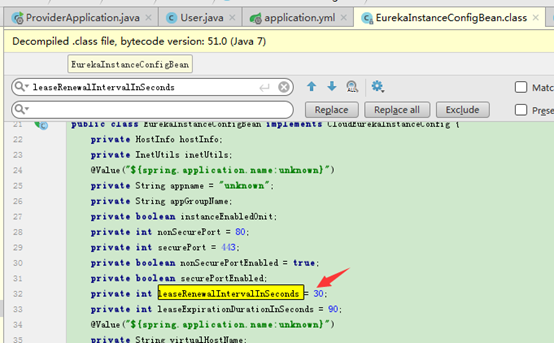
这个参数主要用在测试时,而在生成环境最好不要改,用默认值。
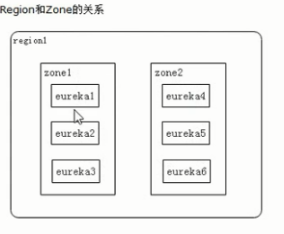
Eureka集群
多个eurekaserver集群高可用时,每个eurekaserver同时也是eureka客户端,它会注册到至少其他一个eurekaserver上去。如A、B、C三个eurekaserver节点组成高可用,则A会作为一个客户端注册到B或C上(也可以B和C上都注册)。
eureka服务器配置
这里配置3个eurekaserver服务器peer1、peer2、peer3,做高可用。
1、将peer1、peer2、peer3加入hosts:
127.0.0.1 peer1 peer2 peer3
2、创建3个eurekaserver服务器工程peer1、peer2、peer3
peer1的application.yml:
spring:
  application:
    name: eureka-ha
eureka:
  instance:
    hostname: peer1

									client:
    serviceUrl:

    defaultZone: http://peer2:92/eureka/,http://peer3:93/eureka/
server:
port: 91
peer2的application.yml:
spring:
application:
name: eureka-ha
eureka:
  instance:
    hostname: peer2

							client:
    serviceUrl:

      defaultZone: http://peer1:91/eureka/,http://peer3:93/eureka/
server:
port: 92
peer3的application.yml:
spring:
application:
name: eureka-ha
eureka:
  instance:
    hostname: peer3

							client:
    serviceUrl:

      defaultZone: http://peer1:91/eureka/,http://peer2:92/eureka/
server:
  port: 93
这里peer1注册到了peer2、pee3上,peer2注册到了peer1、peer3上,peer3注册到了peer1、peer2上。
3、浏览器访问:
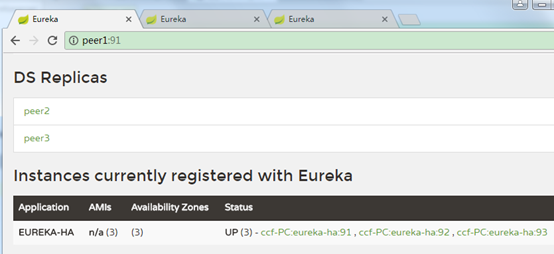
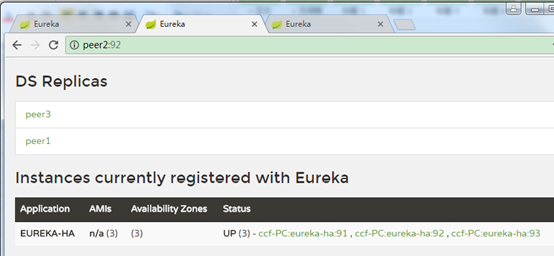

可以看到eureka-ha有了3个可用节点。
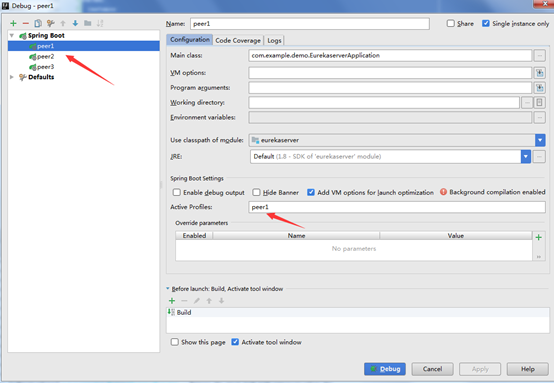
为了方便测试,可以用springboot的profiles在一个工程中启动3个:
application.yml:
spring:
application:
name: eureka-ha
---
spring:
profiles: peer1
eureka:
instance:
hostname: peer1
client:
serviceUrl:
defaultZone: http://peer2:92/eureka/,http://peer3:93/eureka/
server:
port: 91
---
spring:
profiles: peer2
eureka:
instance:
hostname: peer2
client:
serviceUrl:
defaultZone: http://peer1:91/eureka/,http://peer3:93/eureka/
server:
port: 92
---
spring:
profiles: peer3
eureka:
instance:
hostname: peer3
client:
serviceUrl:
defaultZone: http://peer1:91/eureka/,http://peer2:92/eureka/
server:
port: 93
客户端注册到eureka集群
如user注册到eureka
再application.yml中配置:
eureka:
client:
service-url:
defaultZone: http://kkk:kkk123@peer1:91/eureka/
可以只注册到其中一个节点,它会自动同步到其他节点
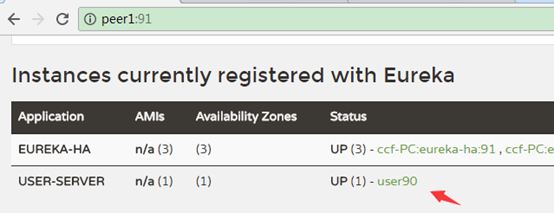
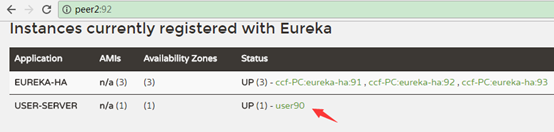

不过如果只注册到一个节点,那个节点挂了之后,服务如果此时重启,则注册不上去了,因此一般都注册到多个节点上:
eureka:
  client:
    service-url:
      defaultZone: http://kkk:kkk123@peer1:91/eureka/,http://kkk:kkk123@peer2:92/eureka/,http://kkk:kkk123@peer3:93/eureka/
常用配置
eureka.client.enabled true
表明eureka client是否可用
eureka.client.fetch-registry true
表明eureka客户端是否从eureka服务器上拉取注册信息
eureka.client.g-zip-content true
内容传输时是否采用g-zip压缩
eureka.client.prefer-same-zone-eureka true
客户端优先到相同的zone里面找eureka server,如客户端在zone1,就优先找zone1里面eureka服务器,而不是zone2里面的。
eureka.client.region us-east-1
默认使用的region名字
eureka.client.register-with-eureka true
指示此实例是否应该将其信息注册到eureka服务器以供其他人发现。
在某些情况下,不希望您的实例被发现,而您只是想发现其他实例。
eureka.client.registry-fetch-interval-seconds 30
客户端到eureka服务端抓取注册信息的间隔时间,默认30秒。
eureka.client.service-url
它是一个map,如:
service-url:
defaultZone: http://kkk:kkk123@peer1:91
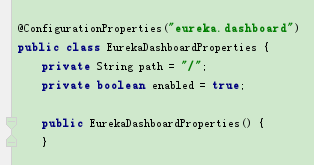
eureka.dashboard.enabled true
是否启用eureka的界面(网页查看首页)
eureka.dashboard.path /
界面首页路径,默认是/,如:
http://localhost:8761/
eureka.instance.appname unknown
客户端配置的服务名字,配置了它,它就会覆盖spring.application.name,如:
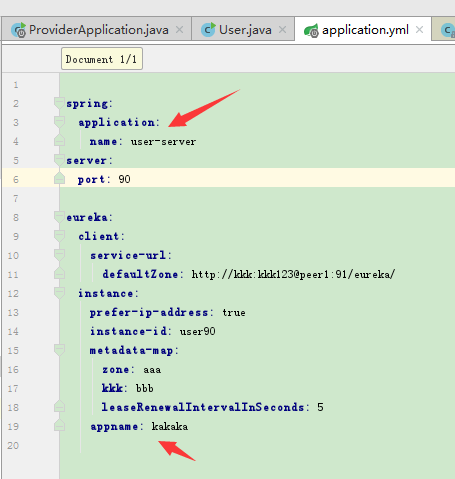

使用场景是当eureka与其他软件结合使用可能会产生冲突,导致spring.application.name配置不生效时,此时再配置eureka.instance.appname即可。
eureka.instance.hostname
指定eureka服务器的主机名,高可用eureka服务器时使用很多。
eureka.instance.instance-id
节点的唯一id
eureka.instance.lease-expiration-duration-in-seconds 90
指定时间内节点无响应就移除,默认90秒
eureka.instance.metadata-map
客户端发送给eurekaserver的键值对参数,有一些会改变客户端的行为(eureka可理解的参数),见"设置客户端元数据"
eureka.instance.prefer-ip-address false
客户端在eureka服务器中是否注册ip地址,如;
为true时:
鼠标移动到链接上。链接到了ip地址。
为false时:
链接地址是电脑的机器名字。

修改系统状态信息
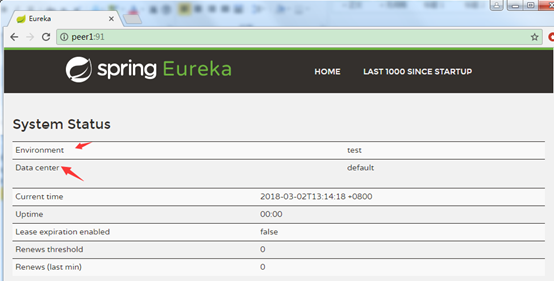
可以修改默认的Environment和Data center信息
application.yml中配置:
eureka:
datacenter: aaaaa
environment: bbbbb

超时机制和自我保护机制
超时机制
客户端可配置该节点发送一次心跳给eureka服务器,以及多久不发送心跳(超时时间)就自动变为无效节点(也就是摘除该instance,但在界面列表中依然能看到,需要清理无效节点后才会从列表删掉)。
客户端参数:
eureka.instance.lease-renewal-interval-in-seconds:
表示eureka client发送心跳给server端的频率,默认30秒
eureka.instance.lease-expiration-duration-in-seconds:
客户端多久不发送心跳(超时时间)就自动变为无效节点,默认90秒。
eureka服务端参数:
eureka.server.eviction-interval-timer-in-ms:
eureka server清理无效节点的时间间隔,默认60000(毫秒),即60秒.
因此想要客户端失去连接后,很快就能从列表中移除,可以这样配置:
客户端:
eureka:
instance:
lease-expiration-duration-in-seconds: 4
lease-renewal-interval-in-seconds: 2
eureka服务器端:
eureka:
eviction-interval-timer-in-ms: 2000
表示每隔2秒向eureka发送一次心跳,如果4秒没有发送心跳就成为无效节点,而服务端每隔2秒扫描一次无效节点,将它从列表删除。
自我保护机制:
引用:
默认情况下,如果Eureka Server在一定时间内没有接收到某个微服务实例的心跳,Eureka Server将会注销该实例(默认90秒)。但是当网络分区故障发生时,微服务与Eureka Server之间无法正常通信,以上行为可能变得非常危险了——因为微服务本身其实是健康的,此时本不应该注销这个微服务。
Eureka通过"自我保护模式"来解决这个问题——当Eureka Server节点在短时间内丢失过多客户端时(可能发生了网络分区故障),那么这个节点就会进入自我保护模式。一旦进入该模式,Eureka Server就会保护服务注册表中的信息,不再删除服务注册表中的数据(也就是不会注销任何微服务)。当网络故障恢复后,该Eureka Server节点会自动退出自我保护模式。
综上,自我保护模式是一种应对网络异常的安全保护措施。它的架构哲学是宁可同时保留所有微服务(健康的微服务和不健康的微服务都会保留),也不盲目注销任何健康的微服务。使用自我保护模式,可以让Eureka集群更加的健壮、稳定。
自我保护机制要在短时间内丢失1个或多个客户端节点才有可能触发。
通过eureka.server.enable-self-preservation参数配置,默认为true,配置为false时会禁用,建议采用默认。
hystrix
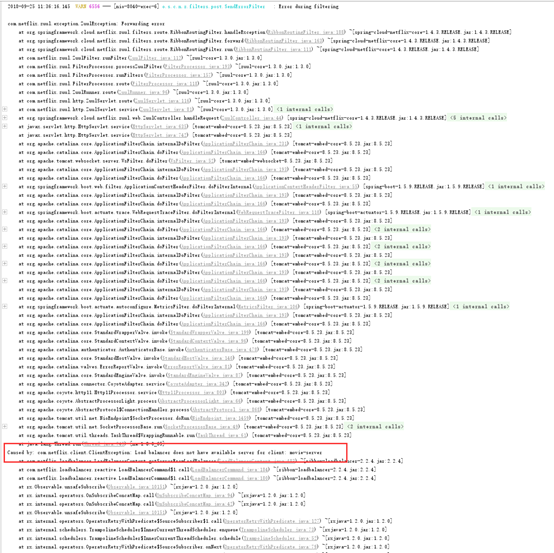
雪崩效应:分布式应用中当某个服务不可用时,导致其他服务调用等到,进而扩大到很多服务不可用的情况。
解决方案:
超时机制:调用超时自动降级。
断路器:服务健康状态不佳时,不调用服务而调用降级函数(短路机制),防止等待线程积压。
hytrix概念
hystrix断路器只是作用在服务调用这一端,只需改consumer端。
断路器模式:当一个服务不可用时,其他服务不再调用它,避免出现等待。
断路器的三种状态:关闭、打开、半开:
服务的健康状况 = 请求失败数 / 请求总数。
断路器关闭时,允许服务被调用。
当一个服务的健康状态很低时,断路器打开,不允许服务被调用,调用者直接返回失败(快速返回结果, 避免大量的同步等待)。
处于打开状态的断路器经过一段时间后,自动进入半开状态,此时只允许一个请求通过,当该请求调用成功时, 断路器恢复到关闭状态. 若该请求失败, 断路器继续保持打开状态, 接下来的请求被禁止通过(在一段时间后继续侦测请求执行结果, 提供恢复服务调用的可能)。
B服务不可用且断路器打开时,调用Fallback,而不去调用服务B
配置(consumer端,ribbon):
1、pom.xml引入依赖:
<dependency>
<groupId>org.springframework.cloud</groupId>
<artifactId>spring-cloud-starter-netflix-hystrix</artifactId>
</dependency>
2、启动类上加注解@EnableCircuitBreaker

3、编写断路器方法,指定到目标方法:
import
com.netflix.hystrix.contrib.javanica.annotation.HystrixCommand;
import org.springframework.beans.factory.annotation.Autowired;
import org.springframework.web.bind.annotation.RequestMapping;
import org.springframework.web.bind.annotation.RestController;
import org.springframework.web.client.RestTemplate;
@RequestMapping("test")
@RestController
public class TestController {
@Autowired
public RestTemplate restTemplate;
@RequestMapping("testUserConsumer")
@HystrixCommand(fallbackMethod = "userFallback")
public String testUserConsumer() {
// 通过服务名调用服务
String user = restTemplate.getForObject("http://user-server/user/list", String.class);
return user;
}
@RequestMapping("testMovieConsumer")
@HystrixCommand(fallbackMethod = "movieFallback")
public String testMovieConsumer() {
// 通过服务名调用服务
String movie = restTemplate.getForObject("http://movie-server/movie/list", String.class);
return movie;
}
// testUserConsumer的hystrix短路回调方法
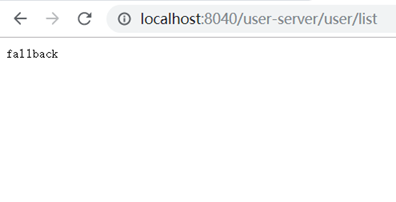
public String userFallback() {
System.out.println("testUserConsumer断路器方法被调用");
return "default user fallback";
}
// testMovieConsumer的hystrix短路回调方法
public String movieFallback() {
System.out.println("testMovieConsumer断路器方法被调用");
return "default movie fallback";
}
}
这里将断路器方法userFallback ()指定给了目标方法testUserConsumer (),
断路器方法movieFallback() 指定给了目标方法testMovieConsumer()。
当服务请求失败或者是断路器打开时,会自动调用断路器方法返回结果。
注意:断路器方法的参数、返回值必须跟目标方法一致。
否则报错,如:
返回值不一致:

参数不一致:

4、访问测试
user服务正常时:

movie服务正常时:

user服务挂掉时:
movie服务挂掉时:
流程:
1、初始状态断路器关闭:先进目标方法,发现服务不可用,转而调用断路器方法返回结果。
2、多次请求服务都不可用时,断路器自动打开,此时不再调用目标方法,而直接调断路器方法返回
3、等一段时间后半开,只有单个请求去调用目标方法,其他请求还是直接调用断路器方法返回。
4、如发现服务健康后,关闭断路器,如服务还不健康,保持打开状态,过一段时间再去试。
日志:
断路器打开后,隔一段时间才去尝试一次目标方法调用。
设置线程隔离
默认hystrimCommand修饰的方法执行时会单独放到一个线程池里,因此ThreadLocal里的变量带不过来,可以进行配置,如:
@HystrixCommand(fallbackMethod = "dddTestList", commandProperties = {@HystrixProperty(name="execution.isolation.strategy", value="SEMAPHORE")})
此时就使用同一个线程。
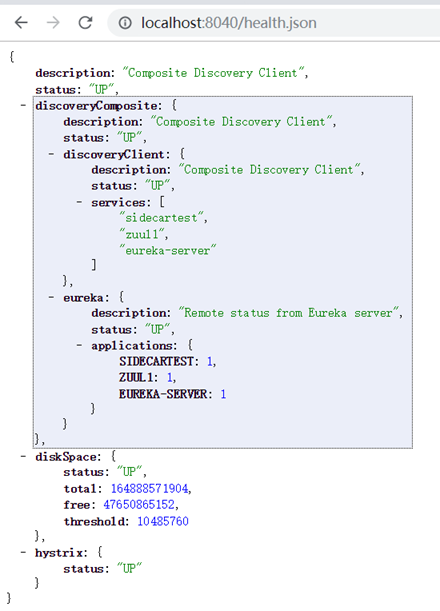
health页面查看hystrix状态
前提:
1、加入依赖:
<dependency>
<groupId>org.springframework.boot</groupId>
<artifactId>spring-boot-starter-actuator</artifactId>
</dependency>
2、禁用验证或者指定账号密码:
management:
security:
enabled: false
查看:
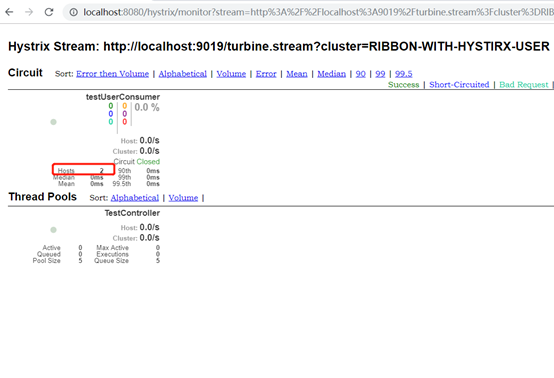
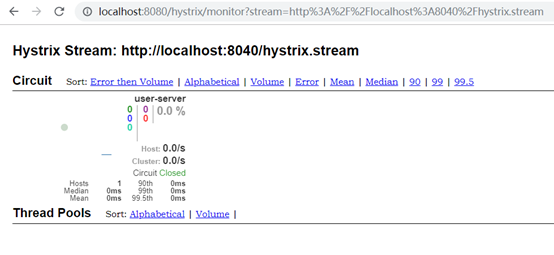
刚开始访问时,断路器关闭,status:UP表示关闭,CIRCUIT_OPEN才是打开
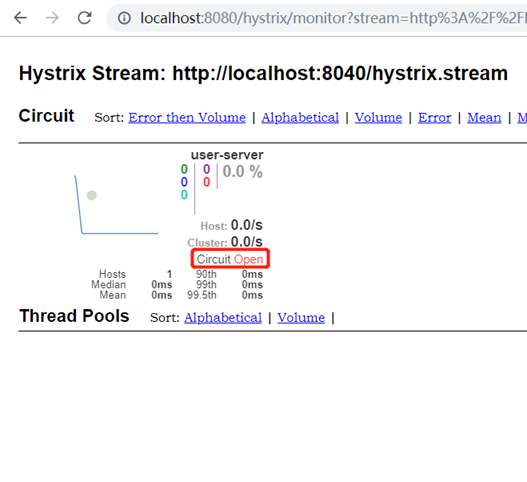
将movie服务停掉,然后多次刷新http://localhost:9030/test/testMovieConsumer页面,断路器打开。
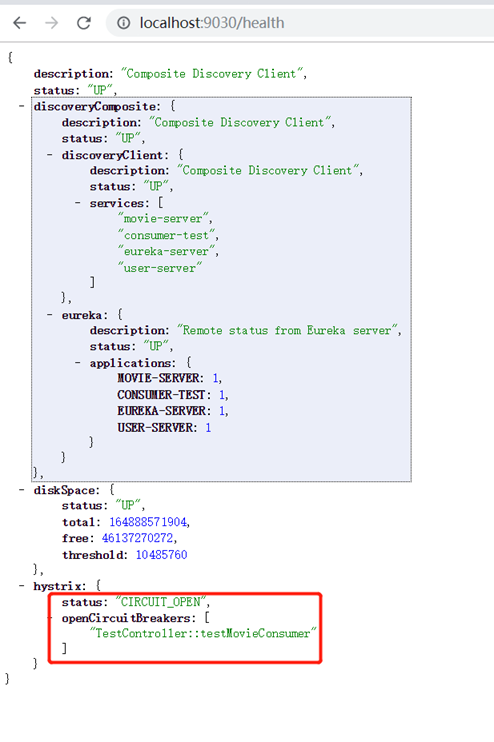
再将user服务也停掉,多次刷新http://localhost:9030/test/testUserConsumer ,此时user的断路器也打开了
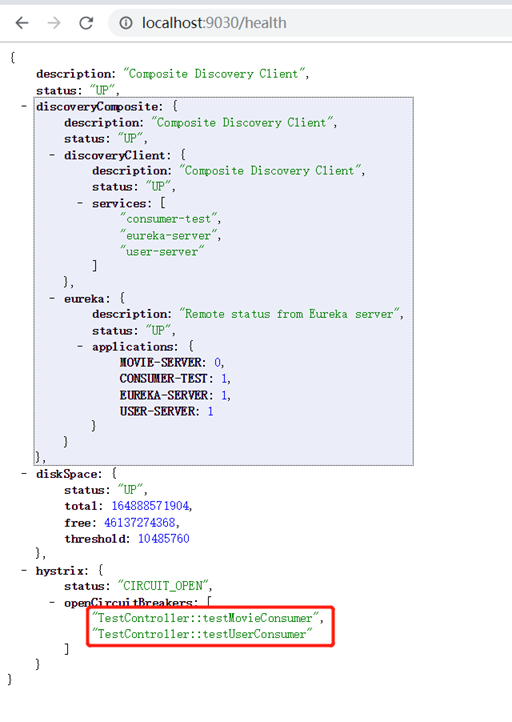
只要有一个服务断路器打开,hystrix的状态就是CIRCUIT_OPEN。
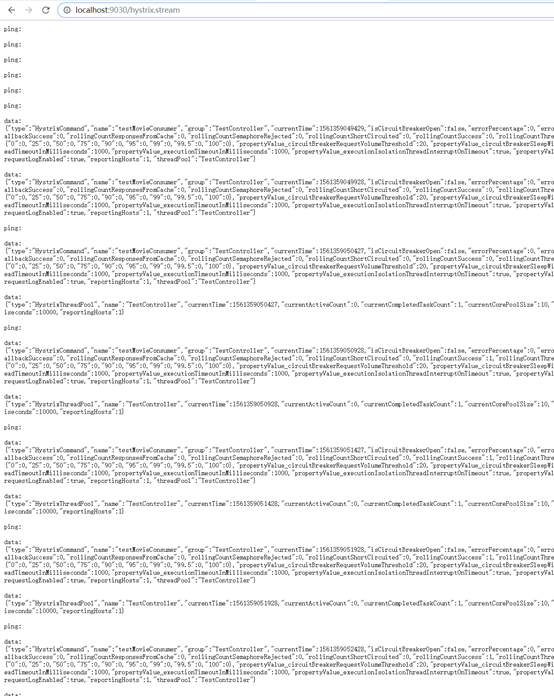
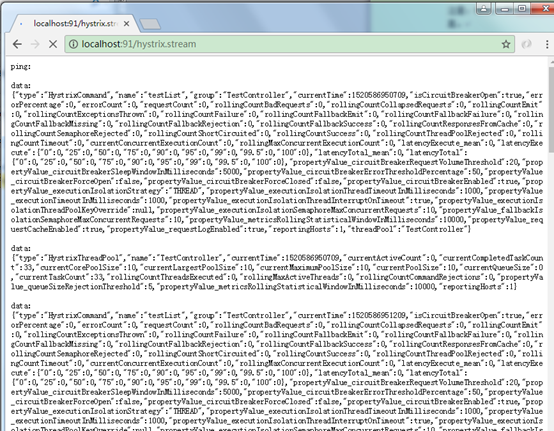
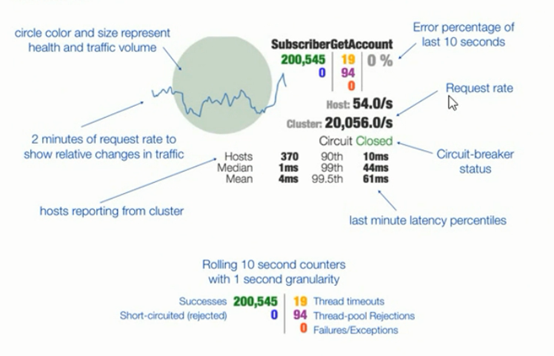
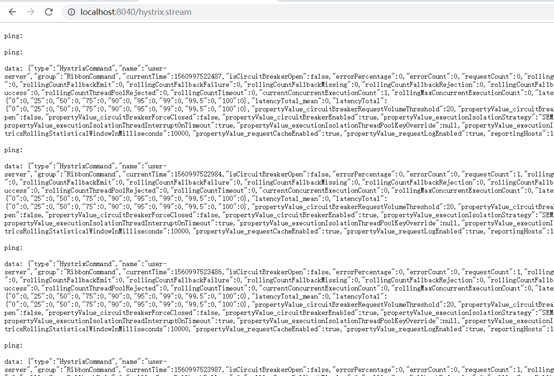
hystrix监控:
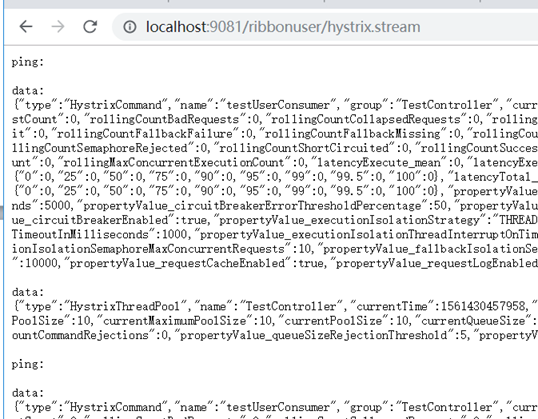
http://localhost:91/hystrix.stream
http://localhost:91/test/testConsumer
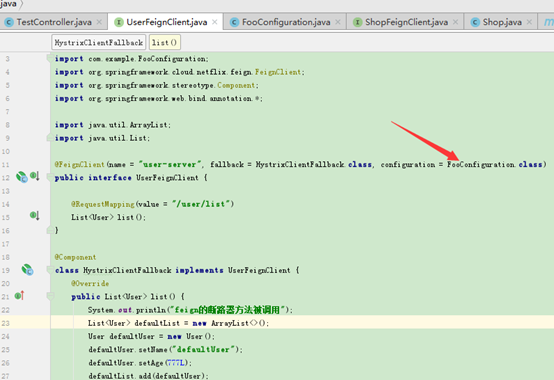
feign使用hystrix
配置
这里定义了回调类HystrixClientFallback,它实现了UserFeignClient接口,服务调用失败或者断路器打开时会自动回调实现方法。

禁用单个feignClient的hystrix
通过单个feignClient的Configuration配置即可,如:
这样它就会去找fallback方法了,其实也可以把fallback = HystrixClientFallback.class
使用fallbackFactory打印异常信息
与fallback很类似,只是fallbackFactory可以获取异常对象,然后打印异常信息等。
注意:fallback和fallbackFactory同时使用时fallbackFactory会不生效,而fallback优先级更高。

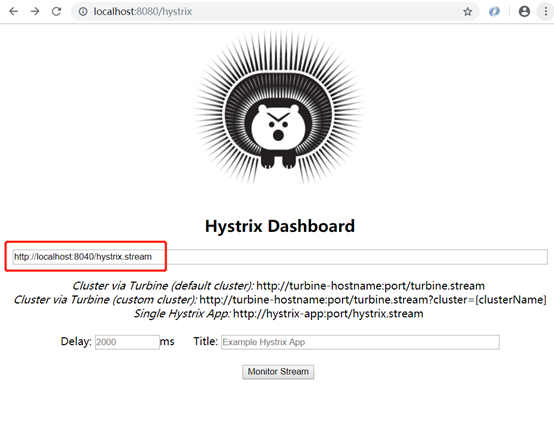
hystrix dashboard查看断路器状态
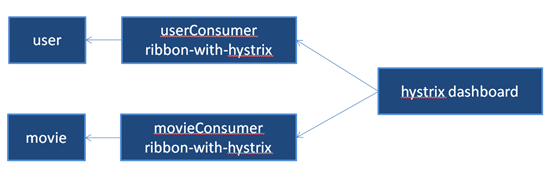
可以创建一个单独的工程用于监控各应用的hystrix情况。它可以读取应用的/hystrix.stream结尾地址的数据出来显示。
使用hystrix dashboard可以图形化方式查看断路器状态。
配置:
1、创建hystrix-dashboard工程,pom.xml加入依赖:
2、启动类加入@EnableHystrixDashboard注解
3、访问dashboard主页:
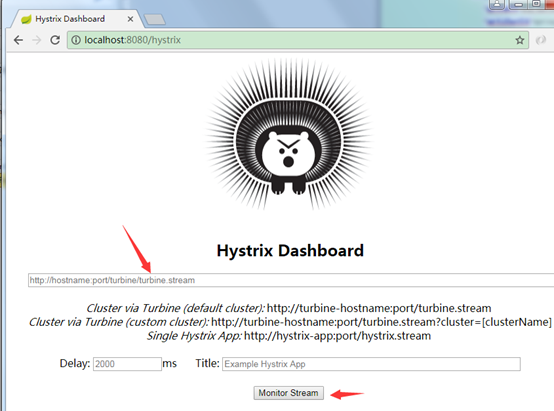
4、输入需要监控的应用的hystrix.stream地址,点击监控:
如:http://localhost:91/hystrix.stream
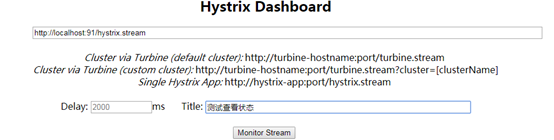
如:

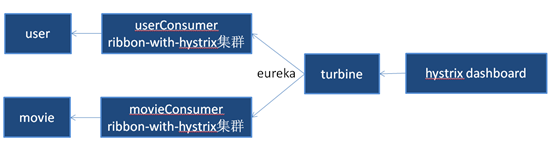
turbine
hystrix dashboard默认一次只能监控一个接入了hystrix的项目的断路情况,因为填项目地址的stream时一次只能填一个,使用turbine可以将项目的服务名填到参数里(如:http://localhost:9019/turbine.stream?cluster=RIBBON-WITH-HYSTIRX-USER表示监控服务名为RIBBON-WITH-HYSTIRX-USER的项目,可以是集群),同时监控多个接入了接入hystrix的项目。
turbine.stream可以看成是一个聚合的数据,交给hystrix dashboard同时监控多个项目。
配置:
加依赖
<dependency>
<groupId>org.springframework.cloud</groupId>
<artifactId>spring-cloud-starter-turbine</artifactId>
</dependency>
启动类加注解:
@EnableTurbine
3、application.yml配置:
server:
port: 9019
eureka:
client:
service-url:
defaultZone: http://localhost:8761/eureka/
spring:
application:
name: turbine
turbine:
aggregator:
cluster-config: RIBBON-WITH-HYSTIRX-USER
app-config: ribbon-with-hystirx-user
注册到eureka,配置监控的hystrix项目。
与hystrix dashboard类似,turbine也有stream端点,可以查看hystrix状态数据,如:
http://localhost:9019/turbine.stream?cluster=RIBBON-WITH-HYSTIRX-USER
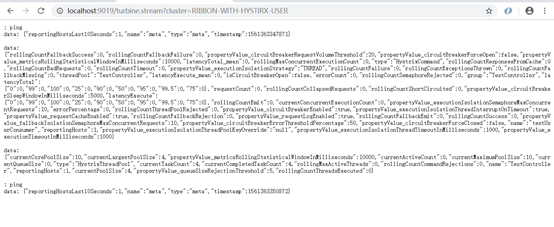
将这个地址放到hystrix dashboard监控,可以看到结果:
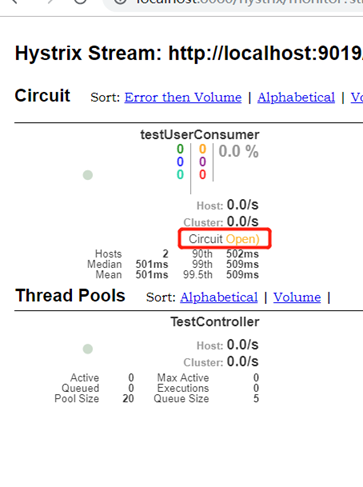
这里RIBBON-WITH-HYSTIRX-USER服务用了2个节点(1个9081端口,1个9181端口)做测试,因此hosts数量为2.

停掉user服务后,多次刷新9181端口的服务http://localhost:9181/test/testUserConsumer使它的断路器打开,观察dashboard可以看到Circuit状态的变化。

再多次刷新9081端口的服务http://localhost:9081/test/testUserConsumer使它的断路器也打开。
断路器状态变化如下,2个全都打开了:
监控多个不同服务名的项目:
修改配置即可,将服务名用逗号分隔写到app-config属性中。然后cluster-config配置成default,这样dashboard不需要加参数,默认就监控这些配置的服务。
application.yml配置:
server:
port: 9019
eureka:
client:
service-url:
defaultZone: http://localhost:8761/eureka/
spring:
application:
name: turbine
turbine:
aggregator:
cluster-config: default
app-config: ribbon-with-hystirx-user,ribbon-with-hystirx-movie
cluster-name-expression: "'default'"
dashboard地址去掉参数:
http://localhost:9019/turbine.stream
效果:

上下文路径配置
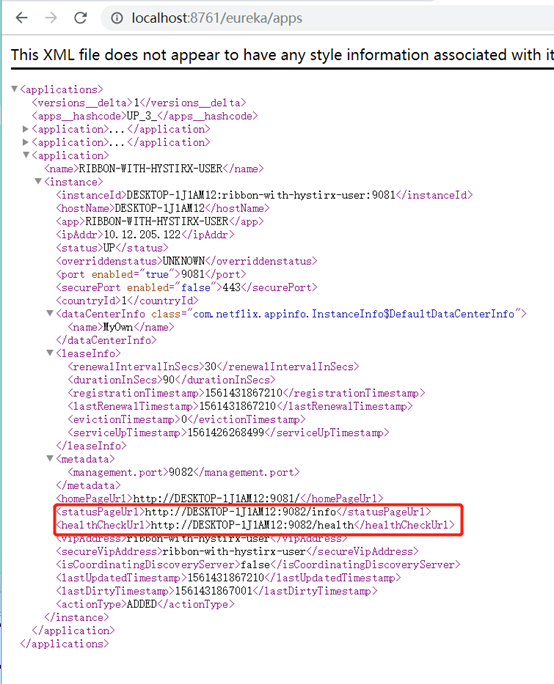
hystrix项目有上下文路径时,默认主页会带上上下文,如:
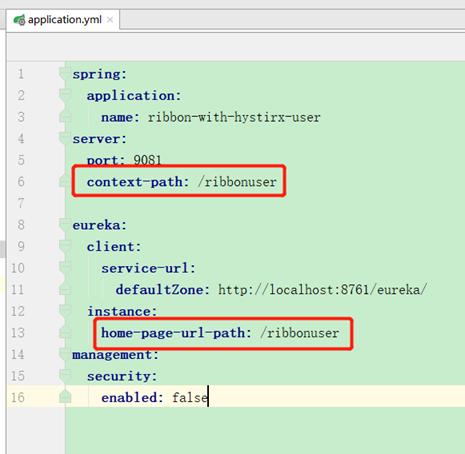
其中context-path配置了上下文,home-page-url-path指定了主页地址,可通过eureka的apps节点查看:
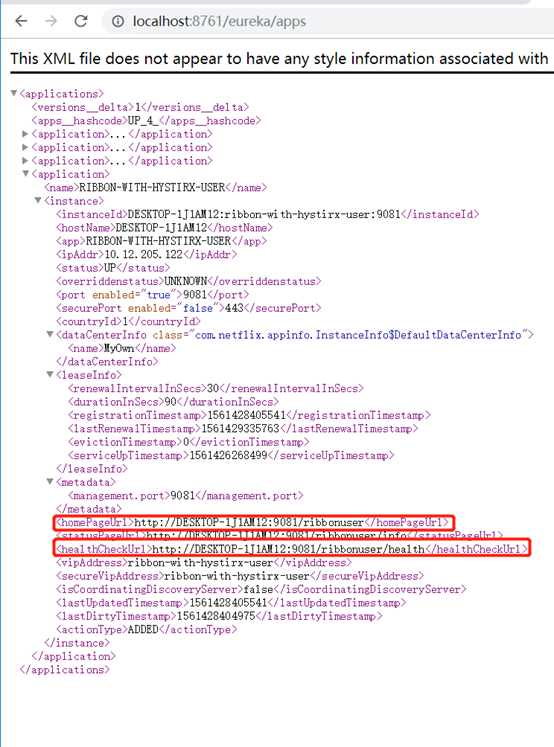
同时,hystrix.stream的地址也要加上上下文才可以访问:
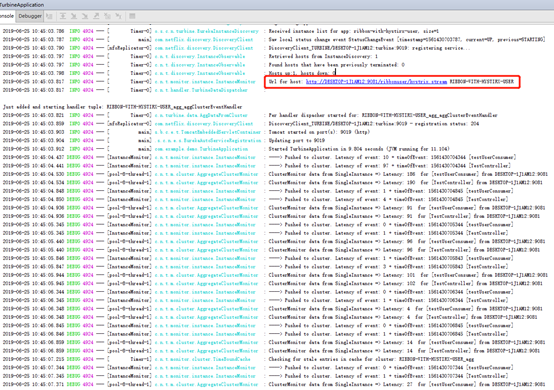
http://localhost:9081/ribbonuser/hystrix.stream
因此turbine里面也需要加上该项目的上下文路径配置,通过instanceUrlSuffix配置。
turbine项目的application.yml配置:
server:
port: 9019
eureka:
client:
service-url:
defaultZone: http://localhost:8761/eureka/
spring:
application:
name: turbine
turbine:
aggregator:
cluster-config: RIBBON-WITH-HYSTIRX-USER
app-config: ribbon-with-hystirx-user
turbine.instanceUrlSuffix.RIBBON-WITH-HYSTIRX-USER: ribbonuser/hystrix.stream
logging:
level:
root:
com.netflix.turbine.monitor: DEBUG
这里加了日志打印:可以从控制台看到如下日志:
管理端口配置
管理端口默认跟应用端口使用同一个,可以单独配置管理端口,这样即使应用有上下文也不影响了。
其实就是把监控依赖的端点单独配置了端口。
<dependency>
<groupId>org.springframework.boot</groupId>
<artifactId>spring-boot-starter-actuator</artifactId>
</dependency>

zuul
zuul是spring cloud常用的一个网关(API Gateway)服务器。zuul本身也是一个eureka的客户端,可以将eureka中所有的服务通过zuul的入口来访问。类似于nginx的作用。
配置:
新建spring boot工程。
1、pom.xml:
<?xml version="1.0" encoding="UTF-8"?>
<project xmlns="http://maven.apache.org/POM/4.0.0" xmlns:xsi="http://www.w3.org/2001/XMLSchema-instance"
xsi:schemaLocation="http://maven.apache.org/POM/4.0.0 http://maven.apache.org/xsd/maven-4.0.0.xsd">
<modelVersion>4.0.0</modelVersion>
<groupId>com.example</groupId>
<artifactId>zuul1</artifactId>
<version>0.0.1-SNAPSHOT</version>
<packaging>jar</packaging>
<name>zuul1</name>
<description>Demo project for Spring Boot</description>
<parent>
<groupId>org.springframework.boot</groupId>
<artifactId>spring-boot-starter-parent</artifactId>
<version>1.5.9.RELEASE</version>
<relativePath/>
<!-- lookup parent from repository -->
</parent>
<dependencyManagement>
<dependencies>
<dependency>
<groupId>org.springframework.cloud</groupId>
<artifactId>spring-cloud-dependencies</artifactId>
<version>Edgware.SR2</version>
<type>pom</type>
<scope>import</scope>
</dependency>
</dependencies>
</dependencyManagement>
<properties>
<project.build.sourceEncoding>UTF-8</project.build.sourceEncoding>
<project.reporting.outputEncoding>UTF-8</project.reporting.outputEncoding>
<java.version>1.8</java.version>
</properties>
<dependencies>
<dependency>
<groupId>org.springframework.boot</groupId>
<artifactId>spring-boot-starter-web</artifactId>
</dependency>
<dependency>
<groupId>org.springframework.boot</groupId>
<artifactId>spring-boot-starter-test</artifactId>
<scope>test</scope>
</dependency>
<dependency>
<groupId>org.springframework.cloud</groupId>
<artifactId>spring-cloud-starter-zuul</artifactId>
</dependency>
<dependency>
<groupId>org.springframework.cloud</groupId>
<artifactId>spring-cloud-starter-eureka</artifactId>
</dependency>
</dependencies>
<build>
<plugins>
<plugin>
<groupId>org.springframework.boot</groupId>
<artifactId>spring-boot-maven-plugin</artifactId>
</plugin>
</plugins>
</build>
</project>
其中引入了zuul的依赖
<artifactId>spring-cloud-starter-zuul</artifactId>
和eureka客户端的依赖
<artifactId>spring-cloud-starter-eureka</artifactId>
2、application.yml配置:
server:
port: 8040
eureka:
client:
service-url:
defaultZone: http://localhost:8761/eureka/
spring:
application:
name: zuul1
3、启动类加@EnableZuulProxy注解:
@SpringBootApplication
@EnableZuulProxy
public class Zuul1Application {
public static void main(String[] args) {
SpringApplication.run(Zuul1Application.class, args);
}
}
4、启动:
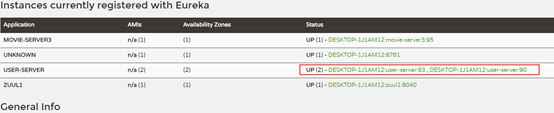
可以从启动日志看到它把user-service工程提供的服务映射到了mapping:
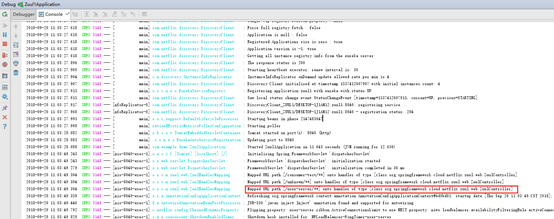
zuul1注册到了eureka上,
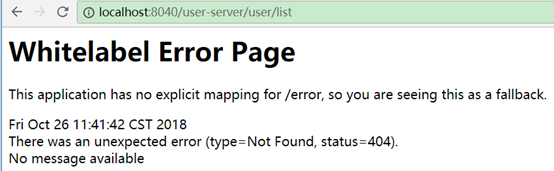
5、访问测试:
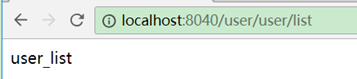
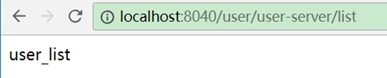
http://localhost:8040/user-server/user/list

其中的user-server对应服务提供者的name(注意访问时要用小写)。
这样就通过访问zuul1这个工程的端口调用到了user-server的服务,zuul1起了网关的作用。类似于nginx的反向代理。zuul默认会代理所有注册到eureka上的服务。
zuul可以先于或后于服务启动,zuul会自动到eureka找服务。
以下再加入一个movie-server服务方便测试:
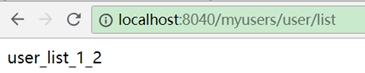
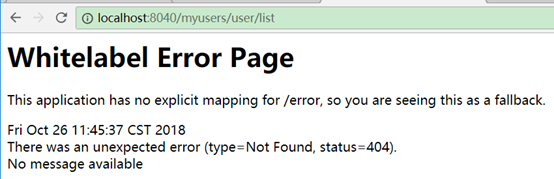
服务的路径(路由)匹配:

默认使用服务名作为访问路径映射到指定服务,也可以使用匹配路径映射到指定服务。如:
zuul:
routes:
user-server: /myusers/**
或者:
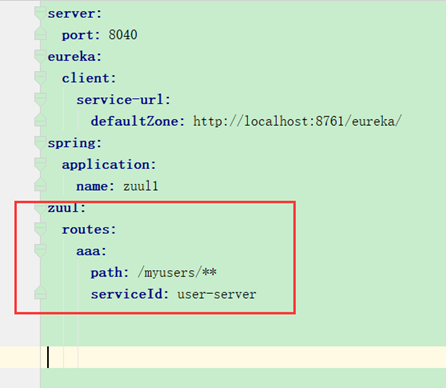
zuul:
routes:
aaa:
path: /myusers/**
serviceId: user-server
也可以使用url指定服务,代替服务名指定服务, 如:
zuul:
routes:
aaa:
path: /myusers/**
#serviceId: user-server
url: http://localhost:90
其中aaa是自定义取的名字,指定一对映射关系。
此时用
http://localhost:8040/user-server/user/list
或者
http://localhost:8040/myusers/user/list
都可以访问user-server服务。
但movie-server服务不受影响还是只能用
http://localhost:8040/movie-server/movie/list
访问。


注意:使用服务名匹配时如果有多个节点服务名是相同的,则会轮询访问节点(如果某个节点下没有该路径则会返回404),而用url匹配的只会访问到url指定的节点。
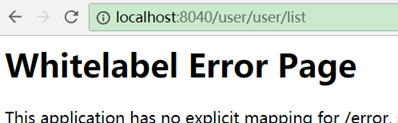
排除服务与路径:
在指定了服务与路径的匹配后,可以用ignored-services和ignoredPatterns指定其中哪些服务于路径排除映射,被排除的映射如果访问到会提示找不到页面。
排除服务
用ignored-services指定,如:
ignored-services: 'movie-server'
表示排除movie-server服务映射
ignored-services: 'user-server,movie-server'
表示排除user-server和movie-server服务映射。
ignored-services: '*'
表示排除所有服务映射
排除服务不会影响配置的路径映射,如:
zuul:
ignored-services: '*'
routes:
user-server: /myusers/**
此时user-server服务只能用路径配置方式myusers访问,而不能再用服务名user-server访问。
排除路径:
用ignoredPatterns指定排除路径
如:
zuul:
ignoredPatterns: /user-server/**
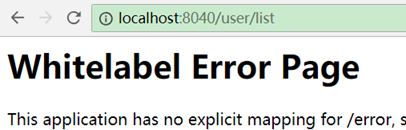
排除user-server/开头的路径映射,如果有服务名是user-server的,则相当于该服务被排除了。
routes如果也有相同路径,则ignoredPatterns的优先级高于routes,如:
zuul:
routes:
user-server: /myusers/**
ignored-patterns: /myusers/**
此时/myusers开头路径不可访问:
ignoredPatterns通常用在子路径匹配中,表示排除某个子路径下的匹配,如:
zuul:
routes:
user-server: /myusers/**
ignored-patterns: /myusers/aaa/**
表示myusers/aaa子路径下的不匹配,myusers下其他的子路径匹配。
负载均衡:
默认方式(ribbon轮询)
如果zuul所调用的服务有多个相同的提供者,它默认使用的是ribbon的的轮询方式调用。
如配置了2个id都为user-server的服务,一个返回user_list一个返回user_list_1_2。
zuul配置:
测试访问:


交替出现。
自定义服务提供者节点:
zuul定义:
zuul:
routes:
aaa:
path: /myusers/**
serviceId: user-server
ribbon:
eureka:
enabled: false
user-server:
ribbon:
listOfServers: http://localhost:90
它表示禁用ribbon的默认方式。为user-server这个serviceId自定义服务提供者节点,此时访问http://localhost:8040/myusers/user/list或者http://localhost:8040/user-server/user/list
都只会返回user-list,说明http://localhost:93这个节点不会被请求到。

而如果通过zuul访问movie-server则会报错,因为它没有配置自定义的负载均衡节点:
对于配置多个节点,也会采用轮询的方式访问,如:
user-server:
ribbon:
listOfServers: http://localhost:90,http://localhost:93
正则表达式映射服务名和路由路径
在zuul中配置,如:
public class Zuul1Application {
public static void main(String[] args) {
SpringApplication.run(Zuul1Application.class, args);
}
@Bean
public PatternServiceRouteMapper serviceRouteMapper() {
return new PatternServiceRouteMapper(
"(?<name>^.+)-(?<version>v.+$)",
"${version}/${name}");
}
}
此时符合user-server-v1这种服务名的会映射成v1/user-server的形式访问,如:

但使用服务名就不能访问了
相当于修改了默认的用服务id访问方式。yml中配置的映射不受影响,如:
zuul:
routes:
aaa:
path: /myusers/**
serviceId: user-server-v1
测试访问:
如果匹配不成功,则还是按原样访问(服务id)。
strip-prefix
strip-prefix默认为true,表示去掉前缀。
单个服务中的strip-prefix
zuul单个服务中的strip-prefix需要配合path使用,否则没有任何作用。
strip-prefix表示zuul在转发服务时是否去掉前缀。如:
zuul:
routes:
aaa:
path: /user/**
serviceId: user-server
strip-prefix: false
此时如果访问:http://localhost:8040/user/user/list,本来是想访问/user/list路径,然而由于strip-prefix: false,表示不去掉前缀,它会把前缀/user再加上去,因此zuul会去访问服务的/user/user/list路径,显然user_server中不存在这个地址。
而用http://localhost:8040/user/list访问,它会把"user"前缀加到"/list"前面。
这种strip-prefix: false通常用在服务有上下文路径的情况中,不用每次访问都带上上下文。
zuul全局配置中的strip-prefix
zuul全局的strip-prefix需要配合prefix使用,否则没有任何作用。
如:
zuul:
routes:
aaa:
path: /user/**
serviceId: user-server
prefix: /user
strip-prefix: false
首先prefix表示访问zuul的所有服务都要带上这个前缀,其次strip-prefix: false表示这个前缀会自动加到所有访问到的服务的前面。如:
此时用http://localhost:8040/user/user/list 或者http://localhost:8040/user-server/user/list都可以访问。
它会去查找前缀之后的服务名或路径路由(user和user-server),找到以后再把前缀拼接到后面的地址(/list)前面,形成/user/list
而用http://localhost:8040/user-server/user/list则不能访问,因为没有带上/user前缀。
通常全局的strip-prefix使用很少,除非所有服务都用同一个上下文。全局的strip-prefix和单个strip-prefix同时使用的情况也很少。
用http://localhost:8040/user/list也无法访问,因为user后面是list,而list既不是服务名也不是可匹配的path路径。
日志打印(访问的服务路径等)
如:
logging:
level:
com.netflix: debug
后台查看:

zuul的文件上传
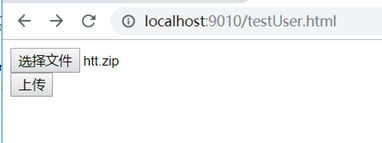
默认的文件上传
user工程:static/testUser.html
<!DOCTYPE html>
<html lang="en">
<head>
<meta charset="UTF-8">
<title>user 上传测试</title>
</head>
<body>
<form method="post" action="user/upload" enctype="multipart/form-data">
<input type="file" name="attach"/>
<br/>
<input type="submit" value="上传"/>
</form>
</body>
</html>
UserController.java添加方法:
@RequestMapping(value="/upload", method= RequestMethod.POST)
public String upload(MultipartFile attach) throws IOException {
// 保存文件
FileCopyUtils.copy(attach.getBytes(), new File("d:/" + attach.getOriginalFilename()));
return "upload success";
}
user工程的application.yml配置文件大小:
server:
port: 9010
eureka:
client:
service-url:
defaultZone: http://localhost:8761/eureka/
spring:
application:
name: user-server
http:
multipart:
max-file-size: 100Mb #默认1M
max-request-size: 120Mb #默认10M
此时使用http://localhost:9010/testUser.html可以上传100Mb以下的任何文件
而使用http://localhost:8040/user-server/testUser.html的zuul转发,还是只能上传1M以下的文件,且文件名不能带有中文。因为zuul那里也需要配置支持的文件大小。
使用/zuul前缀替代默认的DispatchServlet
zuul默认代理请求路径是采用DispatchServlet转发,添加zuul前缀可以使用zuul的方式替代它。
如:
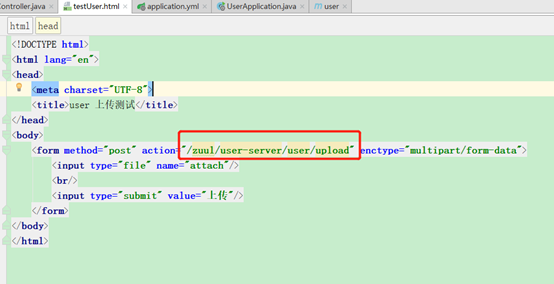
此时,上传路径变成了
http://localhost:8040/zuul/user-server/user/upload
此时上传文件大小取决于user端的配置,中文名也没问题了。
如果提示超时,可在zuul工程的application.yml里配置超时时间设置,如:
hystrix.command.default.execution.isolation.thread.timeoutInMilliseconds: 60000
ribbon:
ConnectTimeout: 3000
ReadTimeout: 60000
zuul的hystrix的fallback回退
zuul默认集成了hystrix,查看如下:
使用hystrix的dashboard查看:
短路测试
停掉user-server服务,然后不停刷新http://localhost:8040/user-server/user/list
多次刷新以后断路器自动开启:

自定义fallback
实现ZuulFallbackProvider即可:
package com.example.demo.fallback;
import org.springframework.cloud.netflix.zuul.filters.route.ZuulFallbackProvider;
import org.springframework.http.HttpHeaders;
import org.springframework.http.HttpStatus;
import org.springframework.http.MediaType;
import org.springframework.http.client.ClientHttpResponse;
import org.springframework.stereotype.Component;
import java.io.ByteArrayInputStream;
import java.io.IOException;
import java.io.InputStream;
@Component
class MyFallbackProvider implements ZuulFallbackProvider {
@Override
public String getRoute() {
return "user-server";
}
@Override
public ClientHttpResponse fallbackResponse() {
return new ClientHttpResponse() {
@Override
public HttpStatus getStatusCode() throws IOException {
return HttpStatus.OK;
}
@Override
public int getRawStatusCode() throws IOException {
return 200;
}
@Override
public String getStatusText() throws IOException {
return "OK";
}
@Override
public void close() {
}
@Override
public InputStream getBody() throws IOException {
return new ByteArrayInputStream("fallback".getBytes());
}
@Override
public HttpHeaders getHeaders() {
HttpHeaders headers = new HttpHeaders();
headers.setContentType(MediaType.APPLICATION_JSON);
return headers;
}
};
}
}
其中getRoute()方法返回的是服务名。
此时user-server挂掉时会调用getHeaders()、getBody()、getStatusText()等方法封装返回头和返回信息:
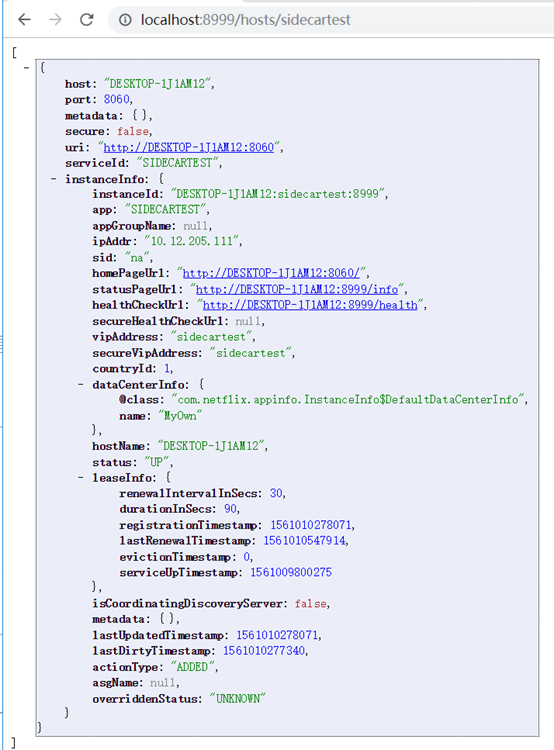
sidecar
sidecar用于代理异构语言,将其他语言编写的服务桥接到spring boot的java工程,被zuul代理之后,可以像操作java的服务一样操作其他语言的服务,并实现健康检查等监控。
异构语言需要实现健康检查/health.json的url。

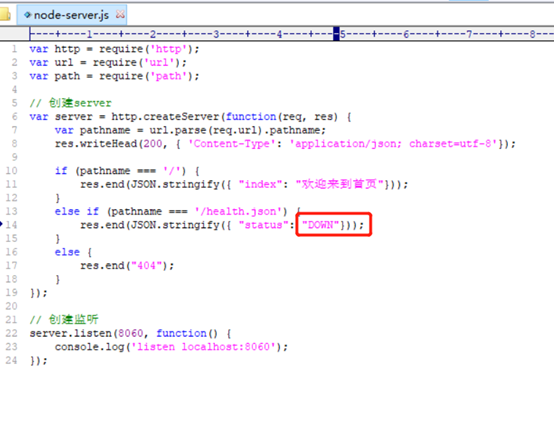
node语言编写的服务如下:
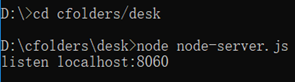
node-server.js内容
var http = require('http');
var url = require('url');
var path = require('path');
// 创建server
var server = http.createServer(function(req, res) {
var pathname = url.parse(req.url).pathname;
res.writeHead(200, { 'Content-Type': 'application/json; charset=utf-8'});
if (pathname === '/') {
res.end(JSON.stringify({ "index": "欢迎来到首页"}));
}
else if (pathname === '/health.json') {
res.end(JSON.stringify({ "status": "UP"}));
}
else {
res.end("404");
}
});
// 创建监听
server.listen(8060, function() {
console.log('listen localhost:8060');
});
使用node运行服务
访问测试:
创建sidecar工程:
加依赖:
<dependency>
<groupId>org.springframework.cloud</groupId>
<artifactId>spring-cloud-netflix-sidecar</artifactId>
</dependency>
启动类加注解
@EnableSidecar
它是一个组合注解,包含了zuul和hystrix的断路器注解

application.yml加配置:
sidecar:
port: 8060
health-uri: http://localhost:8060/health.json
访问测试:
使用zuul访问:
http://localhost:8040/sidecartest
http://localhost:8040/health.json
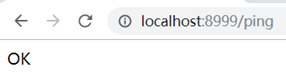
直接访问sidecar的应用,出现几个链接
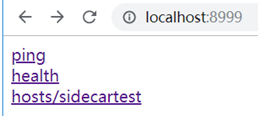
依次点进去可以看到:

修改health状态测试:
将node服务的health.json的UP改为DOWN
重启之后观察eureka
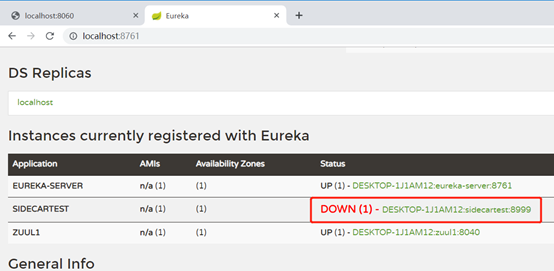
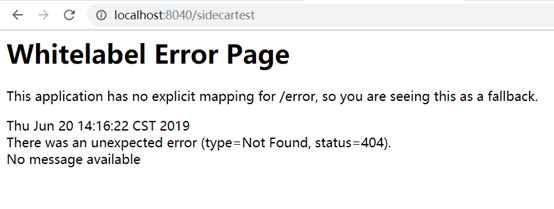
sidecar的状态也变成了DOWN,说明sidecar的状态同步了被桥接服务的状态。
此时代理服务也没法使用了:
再改为UP再重启,要过一会服务才可用。
zuul过滤器(Filter)
zuul根据请求的生命周期分为4中过滤器:
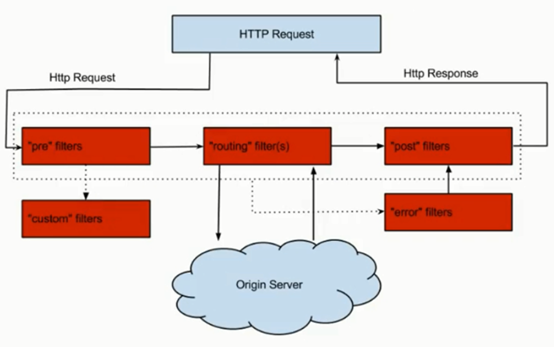
PRE:请求路由到微服务之前调用
ROUTING:这种过滤器是请求路由到微服务过程中调用
POST:路由到微服务之后调用,可以用来添加Header,进行信息统计等。
ERROR:发生错误时调用。
配置:
创建Filter继承ZuulFilter即可,这里创建2个Filter,一个pre一个post(通过filterType()方法返回决定)。
TestPreZuulFilter.java
package com.example.demo.filter;
import com.netflix.zuul.ZuulFilter;
import com.netflix.zuul.context.RequestContext;
import javax.servlet.http.HttpServletRequest;
public class TestPreZuulFilter extends ZuulFilter {
@Override
public String filterType() {
return "pre";
}
@Override
public int filterOrder() {
return 0;
}
@Override
public boolean shouldFilter() {
return true;
}
@Override
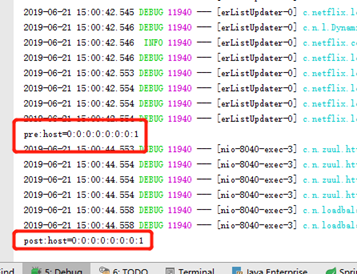
public Object run() {
HttpServletRequest request = RequestContext.getCurrentContext().getRequest();
System.out.println("pre:host=" + request.getRemoteHost());
return null;
}
}
TestPostZuulFilter.java:
package com.example.demo.filter;
import com.netflix.zuul.ZuulFilter;
import com.netflix.zuul.context.RequestContext;
import javax.servlet.http.HttpServletRequest;
public class TestPostZuulFilter extends ZuulFilter {
@Override
public String filterType() {
return "post";
}
@Override
public int filterOrder() {
return 0;
}
@Override
public boolean shouldFilter() {
return true;
}
@Override
public Object run() {
HttpServletRequest request = RequestContext.getCurrentContext().getRequest();
System.out.println("post:host=" + request.getRemoteHost());
return null;
}
}
其中shouldFilter()返回false时不走该filter。
filterOrder()表示顺序,多个filter时该值越小越先执行
filterType()返回filter的类型,如"pre"、"post"等。
启动类中用@Bean将Filter配置成Bean
package com.example.demo;
import com.example.demo.filter.TestPostZuulFilter;
import com.example.demo.filter.TestPreZuulFilter;
import org.springframework.boot.SpringApplication;
import org.springframework.boot.autoconfigure.SpringBootApplication;
import org.springframework.cloud.netflix.zuul.EnableZuulProxy;
import org.springframework.context.annotation.Bean;
@SpringBootApplication
@EnableZuulProxy
public class Zuul1Application {
public static void main(String[] args) {
SpringApplication.run(Zuul1Application.class, args);
}
@Bean
public TestPreZuulFilter testPreZuulFilter() {
return new TestPreZuulFilter();
}
@Bean
public TestPostZuulFilter testPostZuulFilter() {
return new TestPostZuulFilter();
}
}
测试:
请求http://localhost:8040/user-server/user/list,观察控制台打印:
禁用zuul的filter
zuul默认使用了多个filter,可以根据情况禁用,如配置:
zuul.SendResponseFilter.post.disable=true
则可以禁用默认的SendResponseFilter
spring cloud config
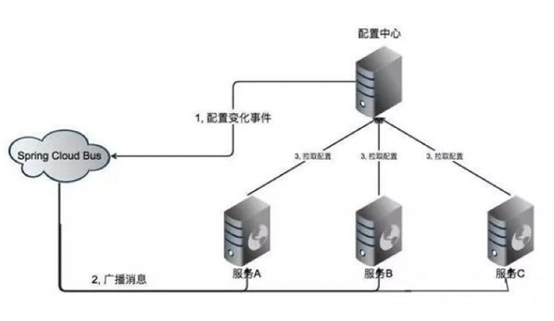
spring cloud config可以实现集中配置、分环境配置(如dev、test、product等)、动态调整刷新配置的功能。将配置信息放在git、svn等服务端,然后工程中配上配置服务端地址,自动去获取配置。
比如有20个项目都有相同配置,就可以将这些相同的配置抽出来放到服务端,不用每个项目都去配,修改的时候只需要改服务端一个地方即可动态刷新,不需要每个项目去改,然后重启。
也可以用zookeeper或者consul,也有很多第三方的,如百度的disconf,淘宝的diamond,携程的apollo
cloud config包括Config Server和Config Client两部分。默认使用Git存储,也可以使用SVN、本地File等,方便实现配置的版本控制。
config server配置:
1、pom加入config server依赖:
<dependencies>
<dependency>
<groupId>org.springframework.boot</groupId>
<artifactId>spring-boot-starter-web</artifactId>
</dependency>
<dependency>
<groupId>org.springframework.boot</groupId>
<artifactId>spring-boot-starter-test</artifactId>
<scope>test</scope>
</dependency>
<dependency>
<groupId>org.springframework.cloud</groupId>
<artifactId>spring-cloud-config-server</artifactId>
</dependency>
</dependencies>
2、启动类加@EnableConfigServer注解
@SpringBootApplication
@EnableConfigServer
public class Cloud1Application {
public static void main(String[] args) {
SpringApplication.run(Cloud1Application.class, args);
}
}
加了@EnableConfigServer注解
3、application.yml加配置:
spring:
cloud:
config:
server:
git:
uri: https://gitee.com/wukejing2/cloudtest
username: xxxxxxx@qq.com
password: xxxxxxxx
这里配置了git的地址,账号和密码
git地址本来是
https://gitee.com/wukejing2/cloudtest.git
这里去掉了".git"后缀
匹配规则:
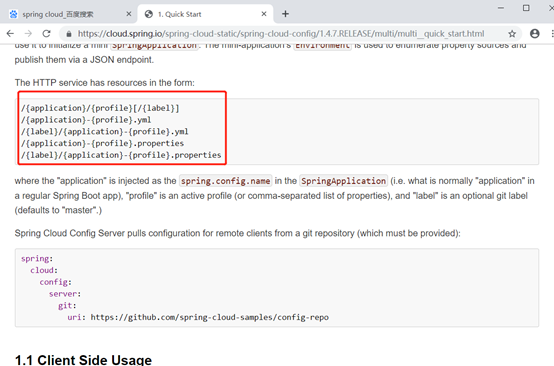
/{application}/{profile}[/{label}]
/{application}-{profile}.yml
/{label}/{application}-{profile}.yml
/{application}-{profile}.properties
/{label}/{application}-{profile}.properties
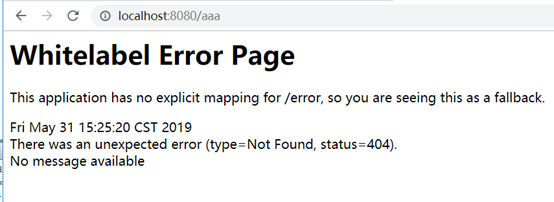
有这几种匹配方式,传入的路径必须跟它匹配上。否则返回404,如:
其中{application}表示配置项名。
{profile}一般是dev、test、product等,表示环境名称。
{label}一般是dev、test、master,表示分支名称
正确的格式,如:
/aaa/bbb/master
/aaa-bbb.yml
/master/aaa-bbb.yml
/aaa-bbb.properties
/master/aaa-bbb.properties
匹配逻辑:
1、解析出{application}和{profile}。
2、然后去匹配,如果没有匹配到对应的{application}+{profile}的组合,则去找{application}.yml
3、如果没有找到,则将{application}置为默认的"application",再去匹配application+{profile}。
4、如果还没有匹配到,则去掉{profile},直接取application.xml.
5、同名的properties文件和yml文件同时存在时,如application.yml和application.properties。properties文件优先抓取。
4、测试:
服务器文件:
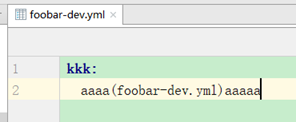
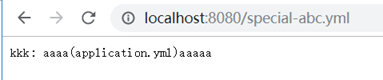
例1:
没有找到ggg-dev.yml,则去找ggg.yml,没有找到,然后将ggg置为application,找application-dev。找到了。
例2:
没有找到foobar-bbb.yml,则去找foobar.yml,找到了。
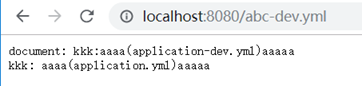
例3:
没有找到ggg-dev.yml,,则去找ggg.yml,没有找到,然后将ggg置为application,找application-aaa.yml。也没有找到,去掉-aaa,直接找application.yml。
config client配置:
client连接server,然后获取配置信息。当然也可以手动写代码用http连接server获取配置然后解析,不过client有封装好的方式,直接用@Value通过key获取配置的值。
1、pom加入client的依赖:
<dependency>
<groupId>org.springframework.cloud</groupId>
<artifactId>spring-cloud-starter-config</artifactId>
</dependency>
2、创建bootstrap.yml文件,内容:
spring:
cloud:
config:
uri: http://localhost:8080
profile: dev
label: master
application:
name: foobar
其中uri是server的地址,profile是${application}-${profile}中的profile。
label是分支,当仓库为git时,默认是master
foobar是${application}部分,同理如果没有找到会默认为"application"
ps:spring:cloud:config的部分不能直接在application.yml中配置。
下面的
application:
name: foobar
可以放到application.yml中
3、使用@Value注入使用:
ClientController.java:
import
org.springframework.beans.factory.annotation.Value;
import org.springframework.web.bind.annotation.RequestMapping;
import org.springframework.web.bind.annotation.RestController;
@RequestMapping("client")
@RestController
public class ClientController {
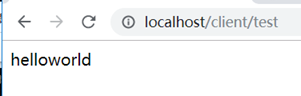
@Value("${kkk}")
private String tk;
@RequestMapping("test")
public String test() {
return tk;
}
}
4、测试访问:
配置文件测试内容如下:
效果:
ps:如果本地有相同的配置,也会优先取远程服务端的。
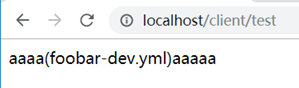
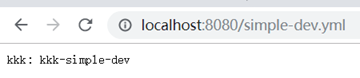
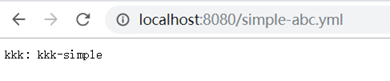
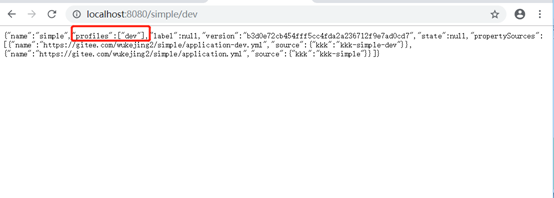
通配符{application}匹配仓库地址
git仓库的地址在server可以用{application}通配符配置,请求的时候传入仓库名,自动动态定位到对应仓库,这样可以做到一个微服务对应一个仓库。
1、创建仓库及application.yml文件
创建2个仓库分别是:
https://gitee.com/wukejing2/simple.git
https://gitee.com/wukejing2/special.git
仓库文件
2、server的application.yml配置
spring:
cloud:
config:
server:
git:
uri: https://gitee.com/wukejing2/{application}
username: xxxxxx
password: xxxxxxxx
使用{application}通配符
3、访问测试:
3.1、访问的方式需要是{application}-{profile}的形式才可以:

3.2默认访问master分支。


3.3找到profile为dev时的情况:

找不到profile时默认访问application.yml:

模式匹配仓库
可以对每个仓库单独设置匹配的方式,如:
spring:
cloud:
config:
server:
git:
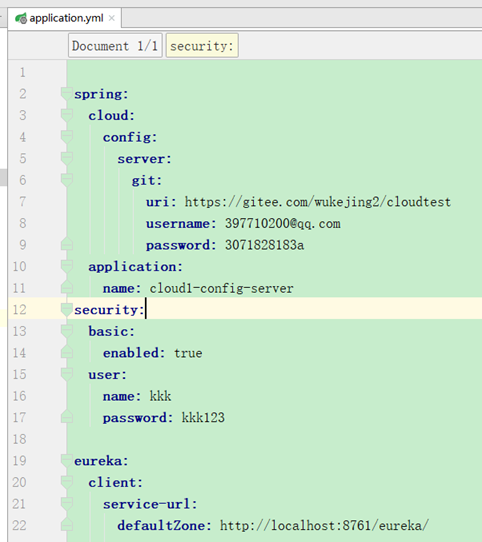
uri: https://gitee.com/wukejing2/cloudtest
username: 397710200@qq.com
password: 3071828183a
repos:
simple_test:
pattern:
- 'simple*'
uri: https://gitee.com/wukejing2/simple
special_test:
pattern:
- 'special*/dev*'
- '*special*/test*'
uri: https://gitee.com/wukejing2/special
测试访问:
全都可以用{application}/{profile}或者{application}-{profile}访问
1、simple*的访问方式是{application}-{profile}或者{application}/{profile}
2、special*/dev*这种模式的访问方式也是{application}-{profile}或者{application}/{profile},
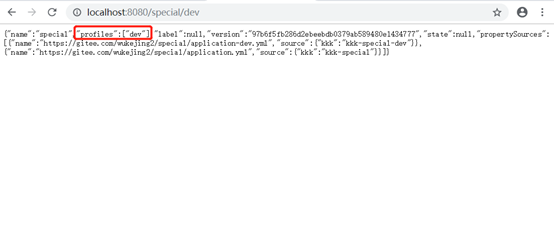

匹配不到时取默认(配置中只匹配了dev和test)
3、无法命中时,取上面uri的公用配置
加密
将密码等配置信息放到git仓库会带来安全问题,因此最好对其进行加密,将密文放到git仓库,使用时由server端获取后进行解密,再传给client。
对称加密
配置:
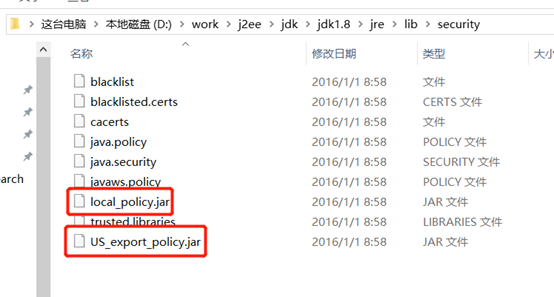
1、下载替换jdk的jce安全策略文件
jce下载地址:
https://www.oracle.com/technetwork/java/javase/downloads/jce-6-download-429243.html
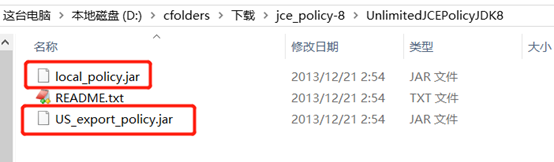
这2个文件是jce安全策略文件,将local_policy.jar和US_export_policy.jar替换jdk的jdk1.8\jre\lib\security目录同名文件。
2、server端的bootstrap.yml配置密钥
如:
encrypt:
key: foo
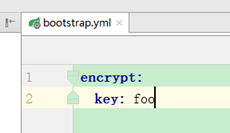
启动server,从启动日志可以看到加密端点和解密端点的路径。
用postman或者curl工具访问:
curl使用如:
curl http://localhost:8080/encrypt -d foobar

postman:
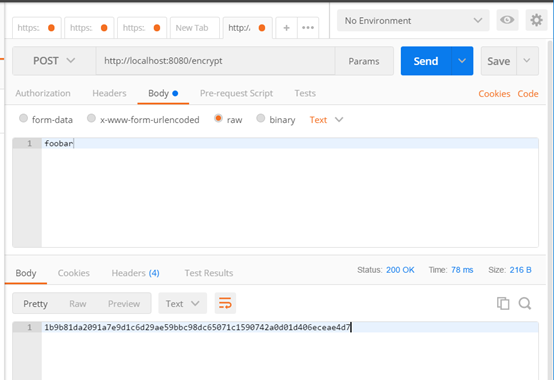
其中-d表示后面的参数是提交的数据,也就是foobar是提交的body数据。
可以看到同一个body文本(foobar)每次加密生成的密文都不一样,而解密的结果都是foobar。
可以推断出加密时可能加入一个随机字符串或者时间戳作为salt,解密后将salt去掉就得到明文。
3、客户端使用(上传密文到git仓库)
将密文前面加上{cipher}上传到git仓库,如:
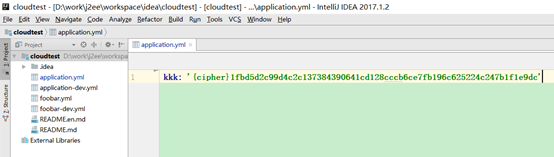
注意:如果是properties文件,则不能加单引号,而yml文件里的要加单引号。
client不用做任何修改,在server端解密后传给client
4、测试访问:

非对称加密
非对称加解密是指用公钥加密,私钥解密。这里由keytool工具生成公钥+私钥。
1、用keytool工具生成密钥对(公钥+私钥)文件
keytool是jdk自带的密钥工具。
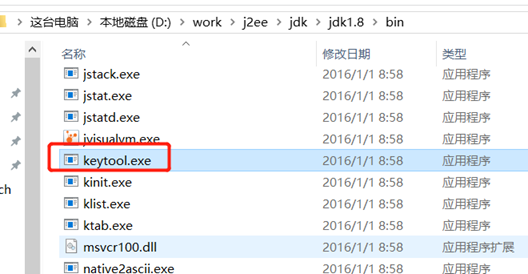
cd到D盘,执行:
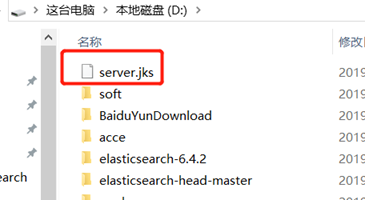
keytool -genkeypair -alias mytestkey -keyalg RSA -dname "CN=Web Server,OU=Unit,O=Organization,L=City,S=State,C=US" -keypass changeme -keystore server.jks -storepass letmein
生成的文件server.jks;
命令含义,使用keytool -genkeypair –help查看

其中-dname可以用向导方式创建,如:

2、server的bootstrap.yml配置:
encrypt:
keyStore:
location: classpath:/server.jks
password: letmein
alias: mytestkey
secret: changeme
其中location指定密钥对文件路径,其他几个参数跟创建密钥对文件时的参数对应。
使用curl命令测试
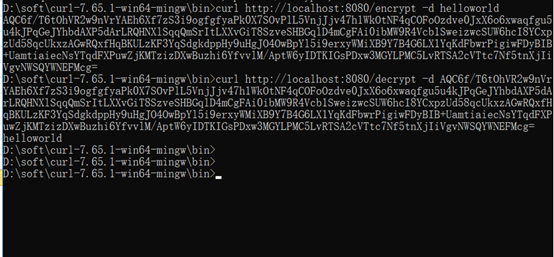
ps:同spring cloud的对称加密一样,spring cloud的非对称加密每次生成的密文也都不同。
3、客户端使用(上传密文到git仓库)
同对称加密使用方式相同,也是将密文上传到git仓库:

4、测试访问:
安全认证
配置方式:
1、加依赖:
<dependency>
<groupId>org.springframework.boot</groupId>
<artifactId>spring-boot-starter-security</artifactId>
</dependency>
重启访问,要求输入密码
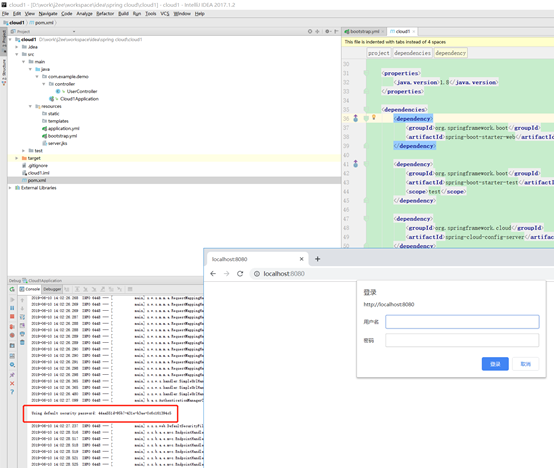
用户名user
密码打印在了启动日志中。
2、配置手动设置用户名密码
同eureka一样的方式手动设置用户名密码。
security:
basic:
enabled: true
user:
name: kkk
password: kkk123
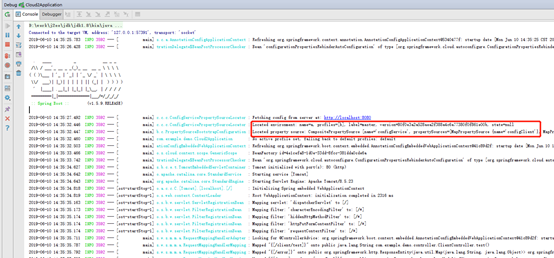
client没有配置正确的账号密码时的日志:
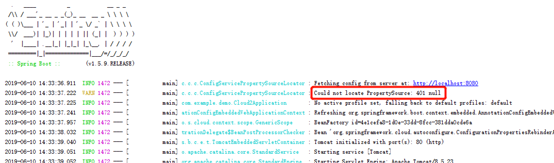
client配置了正确的账号密码时的日志:
3、client配置使用
bootstrap.yml里配置上用户名密码即可,如:
spring:
cloud:
config:
uri: http://kkk:kkk123@localhost:8080
profile: b
label: master
# username: kkk
# password: kkk123
application:
name: a
配到uri里面,或者单独配置username和password属性都可以。属性比uri里面的优先级高。
集成eureka
client端直接硬编码配置server的地址不利于server的迁移、扩容、负载均衡等方式,如果要实现高可用还得借助nginx等。
将server注册到eureka可以解决此问题,并可以做到server多节点的高可用。
server端配置:
配置方式同eureka的client端一样
1、加依赖:
<dependency>
<groupId>org.springframework.cloud</groupId>
<artifactId>spring-cloud-starter-eureka</artifactId>
</dependency>
2、启动类加@EnableDiscoveryClient或者@EnableEurekaClient注解
3、application.yml加入配置:
eureka:
client:
service-url:
defaultZone: http://localhost:8761/eureka/

4、访问eureka服务器查看
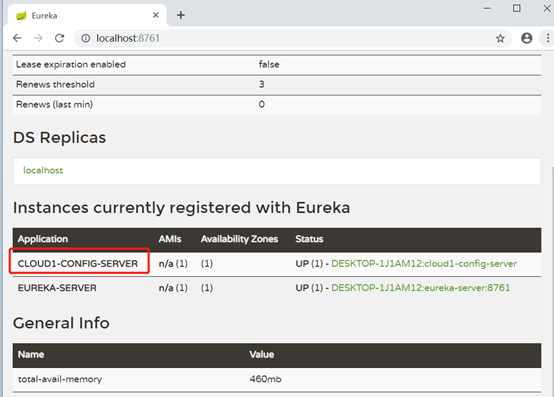
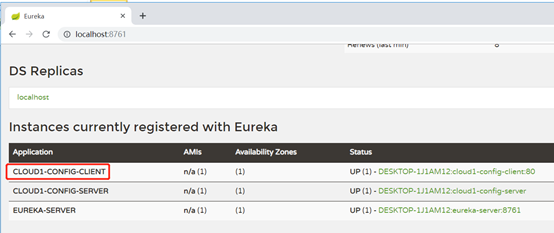
可以看到server已经在eureka上注册成功了。
client端配置:
配置方式同server端类似,只是bootstrap.yml的配置需要调整。
1、加依赖:
<dependency>
<groupId>org.springframework.cloud</groupId>
<artifactId>spring-cloud-starter-eureka</artifactId>
</dependency>
2、启动类加@EnableDiscoveryClient或者@EnableEurekaClient注解
3、application.yml加入配置:
eureka:
client:
service-url:
defaultZone: http://localhost:8761/eureka/
4、bootrap.yml配置调整
spring:
cloud:
config:
# uri: http://kkk:kkk123@localhost:8080
# profile: b
# label: master
discovery:
enabled: true
service-id: cloud1-config-server
username: kkk
password: kkk123
name: a
去掉了server地址的硬编码配置,改为服务发现配置,配置的service-id对应server的服务名application-name
5、访问eureka服务器查看,网页测试

配置刷新
git中存储的配置更新以后,client默认是需要重启服务重新获取配置,它也支持不重启的情况下重新拉取配置。
client单节点刷新
1、client的Controller上加@RefreshScope注解。

使用@RefreshScope注解标注的bean在配置发生更新时会进行特殊处理。
2、加监控依赖
<dependency>
<groupId>org.springframework.boot</groupId>
<artifactId>spring-boot-starter-actuator</artifactId>
</dependency>
它提供了/refresh端点,用于刷新配置。
3、关闭监控默认认证
由于监控的端点如refresh默认需要用户名密码认证,需要将其关闭才能用curl访问.
application.yml中增加配置:
management:
security:
enabled: false
4、手动访问链接刷新/refresh
修改配置信息上传git后,使用curl手动刷新client配置:
curl -X POST http://localhost/refresh

日志滚动:

配置刷新成功。
如果没有做上述第3步关闭默认监控,则可能出现如下报错:

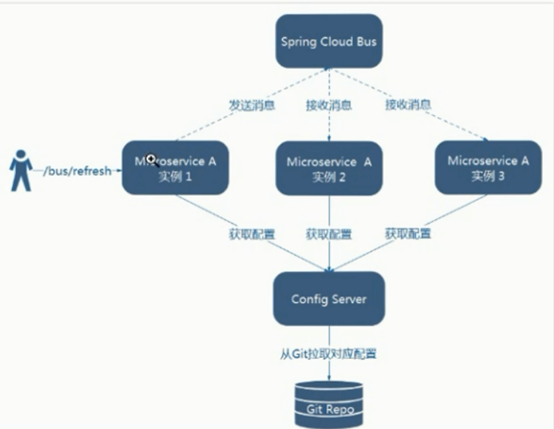
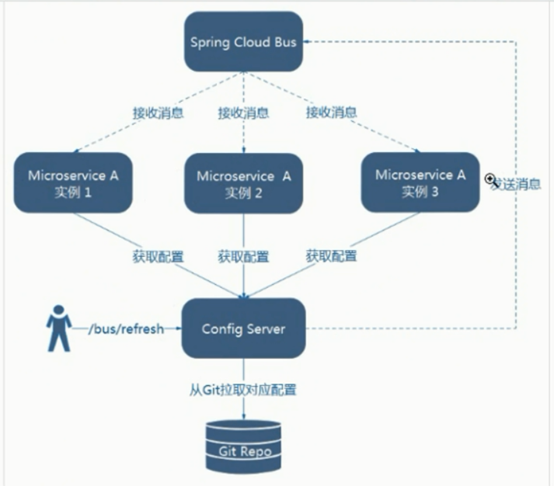
多个client节点刷新(使用spring cloud bus)
如果对每个client节点都去访问/refresh刷新很麻烦,尤其是在client节点很多的时候。可以采用spring cloud bus,在一个节点刷新时发送mq消息通知其他节点刷新。它依赖了mq组件,这里采用rabbitmq做例子,也可以用kafka等其他mq消息组件。
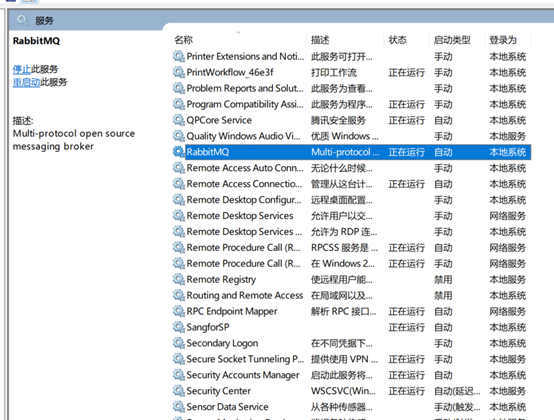
rabbitmq安装
1、安装erlang
http://www.erlang.org/downloads
2、安装rabbitmq
https://www.rabbitmq.com/install-windows.html
rabbitmq默认会安装为系统服务
3、安装management插件
management插件提供了界面查看mq运行情况。
进入到rabbitmq安装目录下的sbin目录执行rabbitmq-plugins enable rabbitmq_management
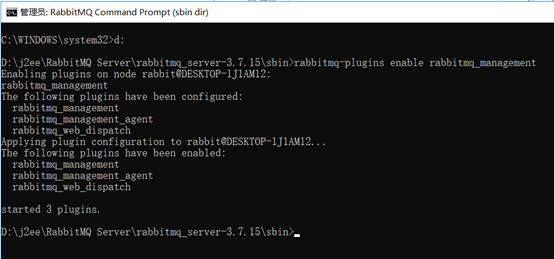
然后重启rabbitmq服务,就可以访问了:
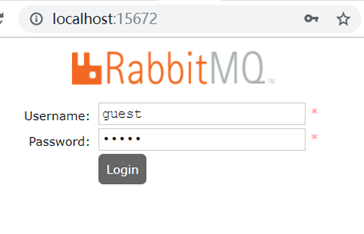
账号密码都是guest
client端使用spring cloud bus
使用步骤
1、pom加spring cloud bus依赖
<dependency>
<groupId>org.springframework.cloud</groupId>
<artifactId>spring-cloud-starter-bus-amqp</artifactId>
</dependency>
2、bootstrap.yml加配置
配置mq的连接地址和账号密码。
spring:
rabbitmq:
host: localhost
port: 5672
username: guest
password: guest
3、配置更新时刷新链接:/bus/refresh
如;
curl -X POST http://localhost/bus/refresh
访问一个client的/bus/refresh时会触发一个事件,该事件会通过mq广播发送到其他client节点
对应的topic名字是springCloudBus。
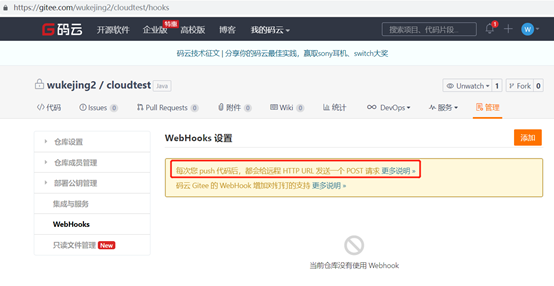
设置webhooks(可选操作)
通过在git仓库配置webhooks,可以设置在代码push等操作以后自动访问特定链接,触发事件。
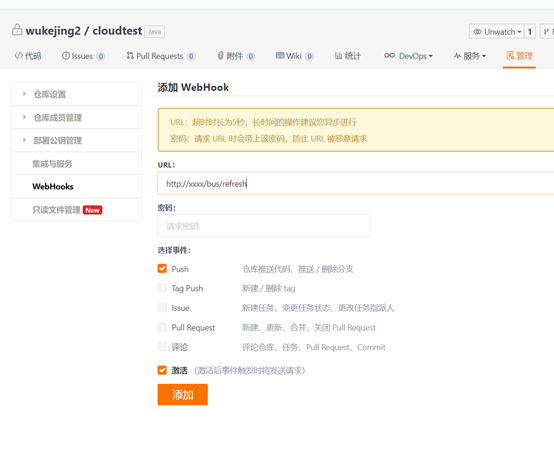
测试:
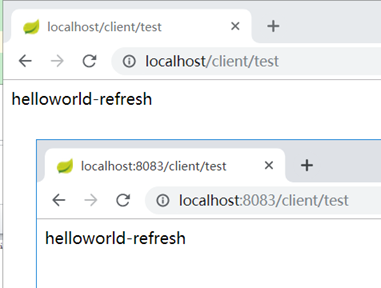
复制一个client端将端口改为8083
然后启动原client和8083的client
此时2个client的配置都相同
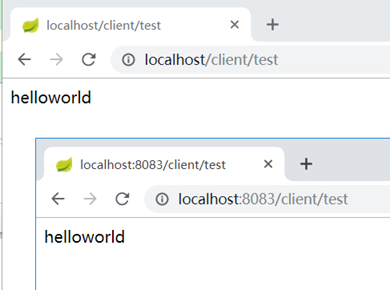
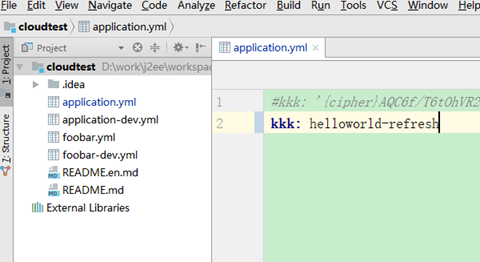
修改git文件内容,改为hellworld-refresh,然后提交
client不刷新也没有重启的情况下还是原来的helloworld
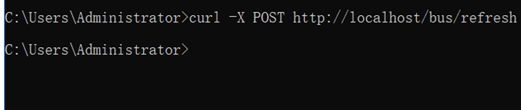
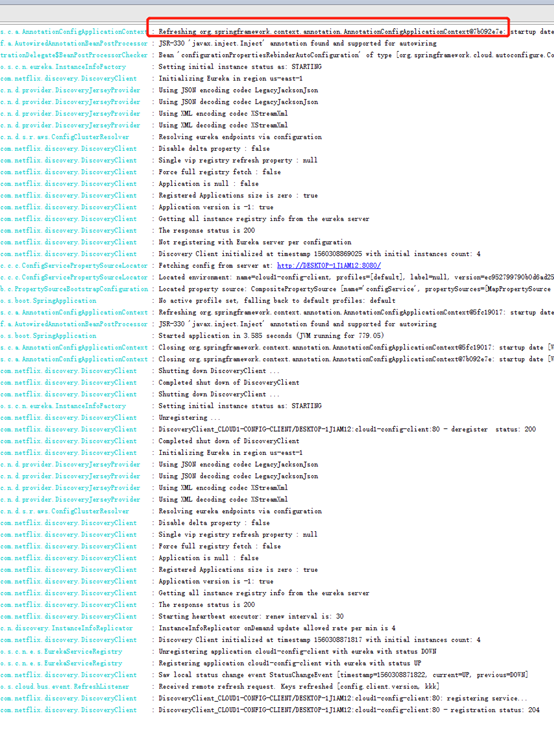
执行刷新操作:
curl -X POST http://localhost/bus/refresh
可以看到client的日志滚动了:
同时,2个client的配置都更新了:
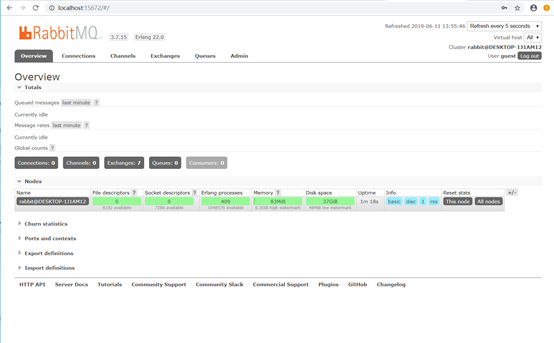
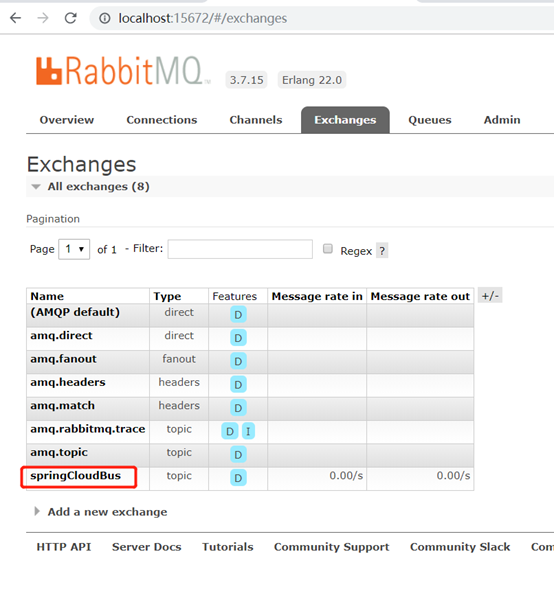
在rabbitMQ可以看到topic名字是springCloudBus
指定节点刷新
刷新时可以指定刷新哪些节点,可以用在切流量更新配置等情况。
如:
curl -X POST http://localhost/bus/refresh?destination=cloud1-config-client:80
效果:

只刷新了cloud1-config-client:80这个节点
ps:被访问链接的节点默认会被刷新,不管是否配置到了destination.
spring.application.index的坑
cloud bus在刷新配置时通过spring.application.index属性的值来区分不同的client节点,spring.application.index属性的值默认是"应用名:端口",如果client部署到多台机器的相同端口上,则"应用名+端口"都相同,因此这种情况下cloud bus在刷新配置时只会刷新其中一台。
解决办法让每个client节点的spring.application.index都配成不同的值,cloud bus就能区分了,不过比较麻烦。
trace查看访问记录
trace端点可查看访问的历史记录
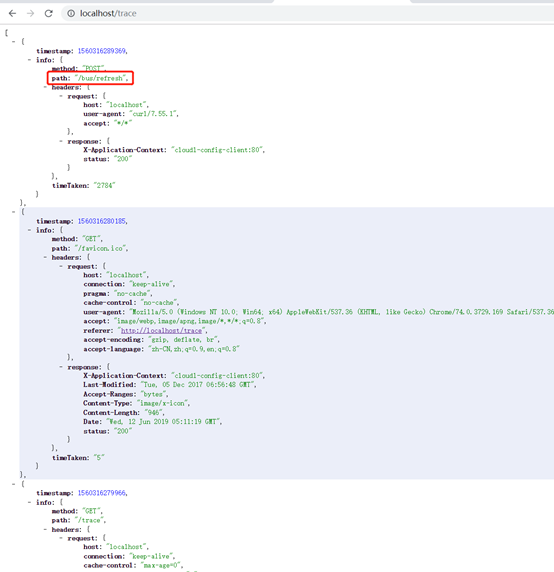
开启bus的trace可以看到收到MQ消息的记录:
spring:
cloud:
bus:
trace:
enabled: true

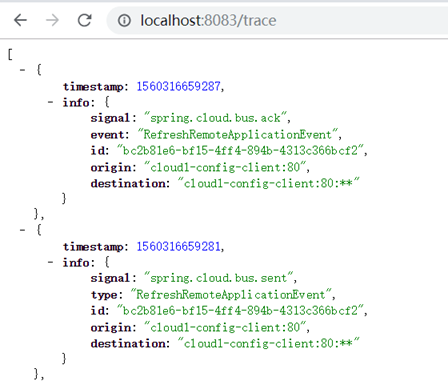
这是接收方收到MQ消息时的trace记录。client节点会解析destination属性中是否包含当前节点,包含的话就刷新配置。
刷新节点放到server
由于client节点变动的可能性,比如服务器ip端口都可能经常变,如果作为bus请求节点,则在webhooks上需要经常改地址,很不方便,而server的ip、端口相对稳定,因此通常将server端配置上mq的接入,作为client刷新/bus/refresh。
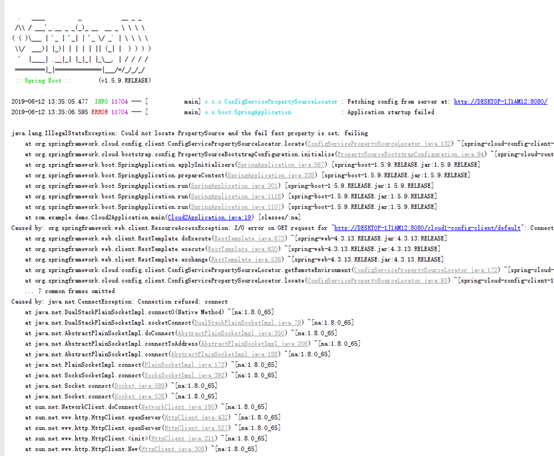
配置fail-fast
默认client获取远程配置失败时,采用本地配置,可以设置成远程获取失败就报错启动失败,不用本地配置。
spring:
cloud:
config:
fail-fast: true
效果:

 浙公网安备 33010602011771号