
tensorflow(深度学习框架)详细讲解及实战
还未完全写完,本人会一直持续更新!~
各大深度学习框架总结和比较
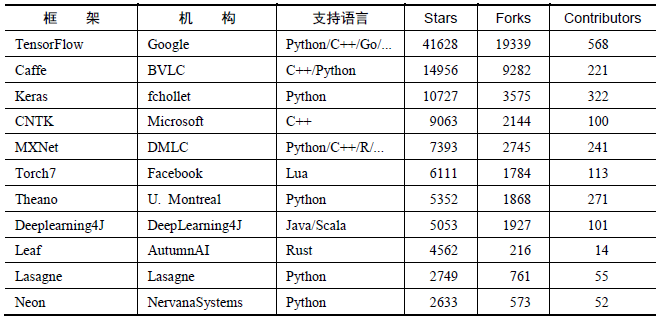
各个开源框架在GitHub上的数据统计,如下表:
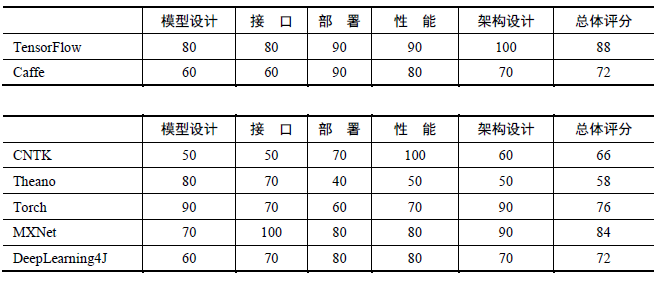
主流深度学习框架在各个维度的评分,如下表:
-
Caffe可能是第一个主流的工业级深度学习工具,它开始于2013年底,具有出色的卷积神经网络实现。在计算机视觉领域Caffe依然是最流行的工具包,它有很多扩展,但是由于一些遗留的架构问题,它对递归网络和语言建模的支持很差。此外,在Caffe中图层需要使用C++定义,而网络则使用Protobuf定义。
-
CNTK由深度学习热潮的发起演讲人创建,目前已经发展成一个通用的、平台独立的深度学习系统。在CNTK中,网络会被指定为向量运算的符号图,运算的组合会形成层。CNTK通过细粒度的构件块让用户不需要使用低层次的语言就能创建新的、复杂的层类型。
-
TensorFlow是一个理想的RNN(递归神经网络) API的实现,TensorFlow使用了向量运算的符号图方法,使得新网络的指定变得相当容易,但TensorFlow并不支持双向RNN和3D卷积,同时公共版本的图定义也不支持循环和条件控制,这使得RNN的实现并不理想,因为必须要使用Python循环且无法进行图编译优化。
-
Theano支持大部分先进的网络,现在的很多研究想法都来源于Theano,它引领了符号图在编程网络中使用的趋势。Theano的符号API支持循环控制,让RNN的实现更加容易且高效。
-
Torch对卷积网络的支持非常好。在TensorFlow和Theano中时域卷积可以通过conv2d来实现,但这样做有点取巧;Torch通过时域卷积的本地接口使得它的使用非常直观。Torch通过很多非官方的扩展支持大量的RNN,同时网络的定义方法也有很多种。但Torch本质上是以图层的方式定义网络的,这种粗粒度的方式使得它对新图层类型的扩展缺乏足够的支持。与Caffe相比,在Torch中定义新图层非常容易,不需要使用C++编程,图层和网络定义方式之间的区别最小。
学会用conda管理环境
Linux系统下conda命令(光速浏览熟悉):
- 查看当前conda版本:
conda --v- 查看当前环境下安装的包:
conda list- 查看系统中存在的所有由conda创建的python环境:
conda env list- 创建环境:
conda create -n (新环境名) python=2/3(指定python版本) package(要安装的包)- 删除环境:
conda remove -n (已存在的环境名)- 切换到已存在的指定环境:
source activate (已存在的环境名)- 退出当前环境:
source deactivate (已存在的环境名)- 在当前环境中安装包:
pip install package(要安装的包)
更改conda源(光速安装tensorflow)
conda config --add channels https://mirrors.tuna.tsinghua.edu.cn/anaconda/pkgs/free/
conda config --add channels https://mirrors.tuna.tsinghua.edu.cn/anaconda/pkgs/main/
conda config --set show_channel_urls yes
conda install tensorflow
解决Your CPU supports instructions that this TensorFlow binary was not compiled to use: AVX2 FMA问题
前期基础概念
-
反向传播算法(backpropagation algorithm)
-
梯度下降算法(gradient descent algorithm)
-
损失(loss)/成本(cost)函数
- 交叉熵(cross-entropy)
-
均值归一化
- softmax函数
充分理解数据流图,并用tensorflow实现之
tensorflow基础定义:它是一个采用数据流图(Data Flow Graph)用于数值计算的开源软件。它由Google大拿2015年开源出来的。
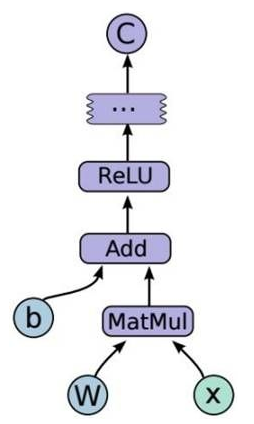
数据流图(用结点和边的有向图来描述数学计算)由两部分组成:
-
结点(node):一般代表了对数据所做的运算或某种操作。但也可以表示数据输入(feed in)的起点/输出(push out)的终点,或者是读取/写入持久变量(persistent variable)的终点。
-
边(edge):表示“节点”之间的输入/输出关系。
这些“边”可以输运“size可动态调整”的多维数据数组,即“张量”(tensor),因为tensor是在图里面flow(流动),所以可以说tensorflow这个词再形象不过了。
Tensors常量值函数:
- tf.zeros(shape, dtype=tf.float32, name=None)
- tf.zeros_like(tensor, dtype=None, name=None)
- tf.ones(shape, dtype=tf.float32, name=None)
- tf.ones_like(tensor, dtype=None, name=None)
- tf.fill(dims, value, name=None)
- tf.constant(value, dtype=None, shape=None, name='Const')
tensorflow中四个重要概念及五大重要属性
-
Tensor
-
Variable
-
placeholder
-
Session
-
使用图 (graph) 来表示计算任务
-
在被称之为 会话 (Session) 的上下文 (context) 中执行图
-
使用 tensor 表示数据
-
通过 变量 (Variable) 维护状态
-
使用 feed 和 fetch 可以为任意的操作(arbitrary operation) 赋值或者从其中获取数据
tensorflow两个主要过程
-
构建抽象模型
-
实际训练
tensorflow中mnist数字识别代码(简单单层softmax神经网络)
import tensorflow as tf
import numpy as np
from tensorflow.examples.tutorials.mnist import input_data
import os
os.environ['TF_CPP_MIN_LOG_LEVEL'] = '2'
# 读入数据
mnist = input_data.read_data_sets('MINIST_data/', one_hot = True)

def Mnist_Simple_Tesorflow():
    mnist = input_data.read_data_sets('MINIST_data/', one_hot = True)
    # 构建抽象模型
    x = tf.placeholder('float', [None, 784])
    W = tf.Variable(tf.zeros([784, 10]))
    b = tf.Variable(tf.zeros([10]))
    y = tf.nn.softmax(tf.matmul(x, W) +  b)
    # 训练模型
    y_ = tf.placeholder('float', [None, 10])
    cross_entropy = -tf.reduce_sum(y_ * tf.log(y))
    train_step = tf.train.GradientDescentOptimizer(0.01).minimize(cross_entropy)
    # 初始化
    init = tf.global_variables_initializer()
    # 用Session启动模型
    sess = tf.Session()
    sess.run(init)
    # 训练1000次!
    for step in range(1000):
        # 采用随机训练(stochastic training),即随机抓取训练数据中的100个批处理数据点,然后我们用这些数据点作为参数替换之前的占位符来运行train_step。
        batch_xs, batch_ys = mnist.train.next_batch(100)
        sess.run(train_step, feed_dict = {x : batch_xs, y_ : batch_ys})
    # 评估模型
    correct_pre = tf.equal(tf.argmax(y, 1), tf.argmax(y_, 1))
    accuracy = tf.reduce_mean(tf.cast(correct_pre, 'float'))
    print(sess.run(accuracy, feed_dict = {x : mnist.test.images, y_ : mnist.test.labels}))

if __name__ == '__main__':
    Mnist_Tesorflow()
上述代码的输出结果约为91%左右(运行后可能会出现许多警告,你可以暂时先不用管它~)
tensorflow中mnist数字识别代码(复杂多层卷积神经网络)
import tensorflow as tf
import numpy as np
from tensorflow.examples.tutorials.mnist import input_data
import os
os.environ['TF_CPP_MIN_LOG_LEVEL'] = '2'

# 读入数据
mnist = input_data.read_data_sets('MINIST_data/', one_hot = True)

# 权重初始化
def weight_variable(shape):
    initial = tf.truncated_normal(shape, stddev=0.1)
    return tf.Variable(initial)

def bias_variable(shape):
    initial = tf.constant(0.1, shape=shape)
    return tf.Variable(initial)

# 卷积
def conv2d(x, W):
    return tf.nn.conv2d(x, W, strides=[1, 1, 1, 1], padding='SAME')

# 池化
def max_pool_2x2(x):
    return tf.nn.max_pool(x, ksize=[1, 2, 2, 1], strides=[1, 2, 2, 1], padding='SAME')

def Mnist_Complex_Tensorflow():
    # 构建抽象模型
    x = tf.placeholder('float', [None, 784])
    W = tf.Variable(tf.zeros([784, 10]))
    b = tf.Variable(tf.zeros([10]))
    y_ = tf.placeholder('float', [None, 10])
    # 第一层卷积
    W_conv1 = weight_variable([5, 5, 1, 32])
    b_conv1 = bias_variable([32])
    x_image = tf.reshape(x, [-1, 28, 28, 1])
    h_conv1 = tf.nn.relu(conv2d(x_image, W_conv1) + b_conv1)
    h_pool1 = max_pool_2x2(h_conv1)
    # 第二层卷积
    W_conv2 = weight_variable([5, 5, 32, 64])
    b_conv2 = bias_variable([64])
    h_conv2 = tf.nn.relu(conv2d(h_pool1, W_conv2) + b_conv2)
    h_pool2 = max_pool_2x2(h_conv2)
    # 密集连接层
    W_fc1 = weight_variable([7 * 7 * 64, 1024])
    b_fc1 = bias_variable([1024])
    h_pool2_flat = tf.reshape(h_pool2, [-1, 7 * 7 * 64])
    h_fc1 = tf.nn.relu(tf.matmul(h_pool2_flat, W_fc1) + b_fc1)
    # Dropout
    keep_prob = tf.placeholder("float")
    h_fc1_drop = tf.nn.dropout(h_fc1, keep_prob)
    # 输出层
    W_fc2 = weight_variable([1024, 10])
    b_fc2 = bias_variable([10])
    y_conv = tf.nn.softmax(tf.matmul(h_fc1_drop, W_fc2) + b_fc2)
    # 训练和模型评估
    cross_entropy = -tf.reduce_sum(y_ * tf.log(y_conv))
    train_step = tf.train.AdamOptimizer(1e-4).minimize(cross_entropy)
    correct_prediction = tf.equal(tf.argmax(y_conv, 1), tf.argmax(y_, 1))
    accuracy = tf.reduce_mean(tf.cast(correct_prediction, "float"))
    with tf.Session() as sess:
        sess.run(tf.initialize_all_variables())
        for i in range(20000):
            batch = mnist.train.next_batch(50)
            if i % 100 == 0:
                train_accuracy = accuracy.eval(feed_dict={x: batch[0], y_: batch[1], keep_prob: 1.0})
                print("step %d, training accuracy %g" % (i, train_accuracy))
            train_step.run(feed_dict={x: batch[0], y_: batch[1], keep_prob: 0.5})
        print("test accuracy %g" % accuracy.eval(feed_dict={x: mnist.test.images, y_: mnist.test.labels, keep_prob: 1.0}))

if __name__ == '__main__':
    Mnist_Complex_Tensorflow()
上述代码执行结果约为99.2%,还是不错的,不过执行起来可能需要一些时间。

 浙公网安备 33010602011771号