
NPU开发环境搭建
如何在Ubuntu系统(PC)上搭建RK3588 Buildroot Linux的NPU开发环境?即电脑端运行Ubuntu系统,而RK3588板卡运行Buildroot Linux系统的情况下,搭建RK3588 NPU开发环境。下面是相应的部署搭建步骤:0.依赖文件RKNPU2 工程下载地址:https://github.com/airockchip/rknn-toolkit2/tree/master/rknpu2RKNN-Toolkit2 工程下载地址:
https://github.com/airockchip/rknn-toolkit21.环境配置 电脑的操作系统需要Ubuntu18.04/20.04/22.04,还有一块RK3588开发板(使用buildroot生成的文件系统或者Ubuntu等,下面我们使用buildroot)。 RK提供的RKNN-Toolkit2的安装方法有两种:直接安装开发环境;通过Docker环境。下面直接在Ubuntu18.04环境下操作: 1).同步RK仓库mkdir ~/rknpucd ~/rknpu#下载RKNN-Toolkit2仓库git clone https://github.com/airockchip/rknn-toolkit2.git#下载RKNN Model Zoo仓库(示例)git clone https://github.com/airockchip/rknn_model_zoo.git 2).安装RKNN-Toolkit2环境 a.安装Python RK建议在使用Python3.8版本,使用Conda来创建相应的环境。 首先,通过如下操作安装Conda(默认安装在~/miniconda3目录):wget -c https://mirrors.bfsu.edu.cn/anaconda/miniconda/Miniconda3-latest-Linux-x86_64.shchmod 777 Miniconda3-latest-Linux-x86_64.shbash Miniconda3-latest-Linux-x86_64.sh 接下来,使用Conda创建Python环境: 在电脑终端执行如下命令进入Conda base环境:source ~/miniconda3/bin/activate #miniconda3安装的目录#成功后,命令行提示符会变成类似如下形式:#(base) xxx@xxx:~$ 在上面的提示符下执行如下命令创建名称为toolkit2的Python3.8环境:conda create -n toolkit2 python=3.8 命令执行后,会自动网络同步下载相关套件并安装,接下来使用如下命令激活toolkit2环境,后面将在该环境下安装RKNN-Toolkit2:conda activate toolkit2#成功后,命令行提示符会变成如下形式:#(toolkit2) xxx@xxx:~$#可以执行如下命令deactive一个active environment(退出当前active的这个环境):#conda deactivate b.安装依赖库和RKNN-Toolkit2 在上面激活的toolkit2环境下执行如下命令:#进入rknn-toolkit2目录cd ~/rknpu/rknn-toolkit2/rknn-toolkit2/
#根据不同python版本选择不同requirements文件(requirements_cpxx.txt)安装依赖库,如python3.8对应requirements_cp38.txtpip install -r packages/requirements_cp38-2.0.0b0.txt
#根据不同的Python版本及处理器架构,选择不同的wheel安装RKNN-Toolkit2套件#其中,x.x.x是RKNN-Toolkit2版本号,xxxxxxxx是提交号,cpxx是python版本号pip install packages/rknn_toolkit2-2.0.0b0+9bab5682-cp38-cp38-linux_x86_64.whl c.验证是否安装成功 在上面的步骤后面执行如下命令:#进入Python交互模式python
#导入RKNN类from rknn.api import RKNN 安装的情况下有如下打印输出:(toolkit2) guochongxin@guochongxin-virtual-machine:~/rknpu/rknn-toolkit2/rknn-toolkit2$ pythonPython 3.8.19 (default, Mar 20 2024, 19:58:24) [GCC 11.2.0] :: Anaconda, Inc. on linuxType "help", "copyright", "credits" or "license" for more information.>>> from rknn.api import RKNN>>> 3).安装编译工具 a.安装CMakesudo apt updatesudo apt install cmake b.安装编译器 使用如下命令确认SOC的CPU架构(板端运行):uname -a 我们的RK3588板端返回值如下:Linux RK3588 5.10.66 #1 SMP Sun May 5 17:27:55 CST 2024 aarch64 GNU/Linux 为aarch64,ARM64架构。 通过如下命令下载相应的GCC交叉编译工具链并解压到~/rknpu目录下(后面编译RKNN C Demo时会用到):cd ~/rknpuwget -c https://releases.linaro.org/components/toolchain/binaries/6.3-2017.05/aarch64-linux-gnu/gcc-linaro-6.3.1-2017.05-x86_64_aarch64-linux-gnu.tar.xztar xvf gcc-linaro-6.3.1-2017.05-x86_64_aarch64-linux-gnu.tar.xz 4).安装板端RKNPU2环境 a.确认RKNPU2驱动版本 在开发板上执行如下命令:dmesg | grep -i rknpu 返回如下值:

添加图片注释,不超过 140 字(可选)
如上,可得知,我们板卡使用的代码里面RKNPU2驱动版本为0.7.2。(RK建议是>=0.9.2) b.检查RKNPU2环境是否安装 RKNN-Toolkit2的连板调试功能要求板端安装RKNPU2环境,并且启动rknn_server服务。RKNPU2环境涉及如下两个基本概念:RKNN Server:运行在开发板上的后台代理服务。主要功能为调用板端Runtime对应的接口处理计算机通过USB传输过来的数据,并将处理结果返回给计算机。RKNPU2 Runtime库(librknnrt.so):主要是负责在系统中加载RKNN模型,并通过调用专用的神经处理单元(NPU)执行RKNN模型的推理操作。 如果板端没有安装RKNN Server和Runtime库,或者版本不一致,都需要重装RKNPU2环境。注意:1.若使用动态维度输入的RKNN模型,则要求RKNN Server和Runtime库版本>=1.5.0;2.要保证RKNN Server、Runtime库的版本、RKNN-Toolkit2的版本是一致的,建议都用最新版本。 可通过如下命令来确认RKNPU2环境是否安装(如果rknn_server服务能够启动,则表示板端已安装RKNPU2环境):#进入板端adb shell
#重启rknn_serverrestart_rknn.sh 如果出现如下输出信息,则代表启动rknn_server服务成功,即已安装RKNPU2环境:

添加图片注释,不超过 140 字(可选)
接下来再使用如下命令检查版本是否一致:#查询rknn_server版本strings /usr/bin/rknn_server | grep -i "rknn_server version"
#查询librknnrt.so库版本strings /usr/lib/librknnrt.so | grep -i "librknnrt version" 上述第一个命令,返回为空,如果将上面的rknn server version改为version,其返回值如下:

添加图片注释,不超过 140 字(可选)
第二个命令返回值如下:

添加图片注释,不超过 140 字(可选)
按RK的文档,应该是返回类似如下信息:

添加图片注释,不超过 140 字(可选)
按RK的文档,应该是返回类似如下信息: 如果上述RKNPU2环境有问题,或者想使用最新的环境,可以使用如下命令来更新替换(也可以替换源码相关文件,重新打包文件系统):cd ~/rknpu/rknn-toolkit2/rknpu2adb push runtime/Linux/rknn_server/aarch64/usr/bin/* /usr/binadb push runtime/Linux/librknn_api/aarch64/librknnrt.so /usr/lib
adb shellsuchmod +x /usr/bin/rknn_serverchmod +x /usr/bin/start_rknn.shchmod +x /usr/bin/restart_rknn.sh
#根据需要可以设置日志等级#export RKNN_SERVER_LOGLEVEL=5
restart_rknn.sh
2.运行例子
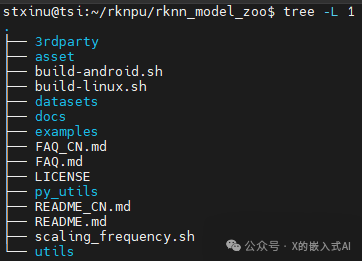
上面,我们下载了RKNN Model Zoo仓库代码,其为RK提示的示例代码,整个工程目录结构如下:
添加图片注释,不超过 140 字(可选)
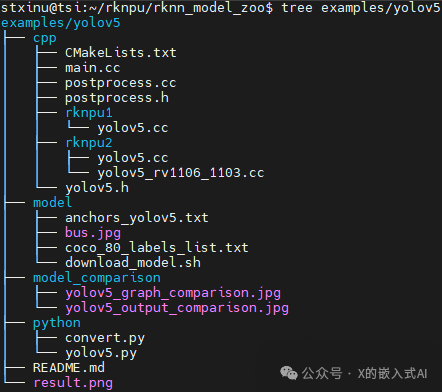
其中,3rdparty为第三方库,datasets为数据集,examples为示例代码,utils为常用方法(如文件操作、画图等),build-android.sh用于目标为Android系统开发板的编译脚本,build-linux.sh用于目标为Linux系统开发板的编译脚本。examples目录包括了一些常用模型的示例,提供了Python和C/C++两个版本的示例代码,下面以YOLOv5模型为例 ,其目录结构如下:
添加图片注释,不超过 140 字(可选)
1).RKNN Python Demo a.准备模型 进入rknn_model_zoo/examples/yolov5/model目录,运行download_model.sh脚本来下载一个可用的YOLOv5 ONNX模型,并存放在当前model目录下,命令如下:cd ~/rknpu/rknn_model_zoo/examples/yolov5/modelchmod +x download_model.sh./download_model.sh 下载后会多了yolov5s_relu.onnx文件。 b.模型转换 进入rknn_model_zoo/examples/yolov5/python目录,运行convert.py脚本,将ONNX模型转成RKNN模型,命令如下:cd ~/rknpu/rknn_model_zoo/examples/yolov5/python
#运行convert.py脚本,将ONNX模型转成RKNN模型#用法:python convert.py model_path [rk3566|rk3588|rk3562] [i8/fp] [output path]python convert.py ../model/yolov5s_relu.onnx rk3588 i8 ../model/yolov5s_relu.rknn 执行后会有如下打印输出:(toolkit2) guochongxin@guochongxin-virtual-machine:~/rknpu/rknn_model_zoo/examples/yolov5/python$ python convert.py ../model/yolov5s_relu.onnx rk3588 i8 ../model/yolov5s_relu.rknnI rknn-toolkit2 version: 2.0.0b0+9bab5682--> Config modeldone--> Loading modelI It is recommended onnx opset 19, but your onnx model opset is 12!I Model converted from pytorch, 'opset_version' should be set 19 in torch.onnx.export for successful convert!I Loading : 100%|███████████████████████████████████████████████| 125/125 [00:00<00:00, 7527.25it/s]done--> Building modelI GraphPreparing : 100%|████████████████████████████████████████| 149/149 [00:00<00:00, 2011.07it/s]I Quantizating : 100%|████████████████████████████████████████████| 149/149 [00:23<00:00, 6.25it/s]W build: The default input dtype of 'images' is changed from 'float32' to 'int8' in rknn model for performance! Please take care of this change when deploy rknn model with Runtime API!W build: The default output dtype of 'output0' is changed from 'float32' to 'int8' in rknn model for performance! Please take care of this change when deploy rknn model with Runtime API!W build: The default output dtype of '286' is changed from 'float32' to 'int8' in rknn model for performance! Please take care of this change when deploy rknn model with Runtime API!W build: The default output dtype of '288' is changed from 'float32' to 'int8' in rknn model for performance! Please take care of this change when deploy rknn model with Runtime API!I rknn building ...I rknn buiding done.done--> Export rknn modeldone c.运行RKNN Python Demo 进入rknn_model_zoo/examples/yolov5/python目录,运行yolov5.py脚本,便可通过连板调试的方式在板端运行YOLOv5模型(模型格式为:RKNN),命令如下:cd ~/rknpu/rknn_model_zoo/examples/yolov5/python
#运行yolov5.py脚本,在板端运行yolov5模型#用法:python yolov5.py --model_path {rknn_model} --target {target_platform} --img_show# 其中,带上--img_show参数,则会显示结果图片#注意,我们是用RK3588开发板,如果是其他平台方案,则相应自行修改python yolov5.py --model_path ../model/yolov5s_relu.rknn --target rk3588 --img_show 上述命令执行时,会有如下提示:(toolkit2) guochongxin@guochongxin-virtual-machine:~/rknpu/rknn_model_zoo/examples/yolov5/python$ python yolov5.py --model_path ../model/yolov5s_relu.rknn --target rk3588 --img_showuse anchors from '../model/anchors_yolov5.txt', which is [[[10.0, 13.0], [16.0, 30.0], [33.0, 23.0]], [[30.0, 61.0], [62.0, 45.0], [59.0, 119.0]], [[116.0, 90.0], [156.0, 198.0], [373.0, 326.0]]]I rknn-toolkit2 version: 2.0.0b0+9bab5682--> Init runtime environmentadb: unable to connect for root: closedI target set by user is: rk3588I Get hardware info: target_platform = rk3588, os = Linux, aarch = aarch32I Check RK3588 board npu runtime versionI Starting ntp or adb, target is RK3588I Start adb...I Connect to Device success!I NPUTransfer: Starting NPU Transfer Client, Transfer version 2.1.0 (b5861e7@2020-11-23T11:50:36)D RKNNAPI: ==============================================D RKNNAPI: RKNN VERSION:D RKNNAPI: API: 2.0.0b0 (18eacd0 build@2024-03-22T06:07:59)D RKNNAPI: DRV: rknn_server: 1.3.0 (121b661 build: 2022-04-29 11:12:02)D RKNNAPI: DRV: rknnrt: 1.3.0 (c193be371@2022-05-04T20:16:33)D RKNNAPI: ==============================================E RKNNAPI: rknn_init, msg_load_ack fail, ack = 1(ACK_FAIL), expect 0(ACK_SUCC)!E init_runtime: Catch exception when init runtime!E init_runtime: Traceback (most recent call last):E init_runtime: File "rknn/api/rknn_base.py", line 2511, in rknn.api.rknn_base.RKNNBase.init_runtimeE init_runtime: File "rknn/api/rknn_runtime.py", line 406, in rknn.api.rknn_runtime.RKNNRuntime.build_graphE init_runtime: Exception: RKNN init failed. error code: RKNN_ERR_MODEL_INVALIDW If you can't handle this error, please try updating to the latest version of the toolkit2 and runtime from: https://console.zbox.filez.com/l/I00fc3 (Pwd: rknn) Path: RKNPU2_SDK / 2.X.X / develop / If the error still exists in the latest version, please collect the corresponding error logs and the model, convert script, and input data that can reproduce the problem, and then submit an issue on: Rockchip Redmine (Please consult our sales or FAE for the redmine account) Init runtime environment failed 于是,我们按上面“1-4)-b”小节的内容,把最新的RKNPU2相关文件推到板卡上,重启RKNPU2相关服务,有如下打印,相关版本信息已更新:root@RK3588:/# restart_rknn.shroot@RK3588:/# start rknn server, version:2.0.0b0 (18eacd0 build@2024-03-22T14:07:19)I NPUTransfer: Starting NPU Transfer Server, Transfer version 2.1.0 (b5861e7@2020-11-23T11:50:51) 按上面查看版本信息命令,执行后会返回如下值:

添加图片注释,不超过 140 字(可选)
再执行上面的命令,会有如下输出:(toolkit2) guochongxin@guochongxin-virtual-machine:~/rknpu/rknn_model_zoo/examples/yolov5/python$ python yolov5.py --model_path ../model/yolov5s_relu.rknn --target rk3588 --img_showuse anchors from '../model/anchors_yolov5.txt', which is [[[10.0, 13.0], [16.0, 30.0], [33.0, 23.0]], [[30.0, 61.0], [62.0, 45.0], [59.0, 119.0]], [[116.0, 90.0], [156.0, 198.0], [373.0, 326.0]]]I rknn-toolkit2 version: 2.0.0b0+9bab5682--> Init runtime environmentadb: unable to connect for root: closedI target set by user is: rk3588I Get hardware info: target_platform = rk3588, os = Linux, aarch = aarch32I Check RK3588 board npu runtime versionI Starting ntp or adb, target is RK3588I Start adb...I Connect to Device success!I NPUTransfer: Starting NPU Transfer Client, Transfer version 2.1.0 (b5861e7@2020-11-23T11:50:36)D RKNNAPI: ==============================================D RKNNAPI: RKNN VERSION:D RKNNAPI: API: 2.0.0b0 (18eacd0 build@2024-03-22T06:07:59)D RKNNAPI: DRV: rknn_server: 2.0.0b0 (18eacd0 build@2024-03-22T14:07:19)D RKNNAPI: DRV: rknnrt: 2.0.0b0 (35a6907d79@2024-03-24T10:31:14)D RKNNAPI: ==============================================D RKNNAPI: Input tensors:D RKNNAPI: index=0, name=images, n_dims=4, dims=[1, 640, 640, 3], n_elems=1228800, size=1228800, w_stride = 0, size_with_stride = 0, fmt=NHWC, type=INT8, qnt_type=AFFINE, zp=-128, scale=0.003922D RKNNAPI: Output tensors:D RKNNAPI: index=0, name=output0, n_dims=4, dims=[1, 255, 80, 80], n_elems=1632000, size=1632000, w_stride = 0, size_with_stride = 0, fmt=NCHW, type=INT8, qnt_type=AFFINE, zp=-128, scale=0.003922D RKNNAPI: index=1, name=286, n_dims=4, dims=[1, 255, 40, 40], n_elems=408000, size=408000, w_stride = 0, size_with_stride = 0, fmt=NCHW, type=INT8, qnt_type=AFFINE, zp=-128, scale=0.003922D RKNNAPI: index=2, name=288, n_dims=4, dims=[1, 255, 20, 20], n_elems=102000, size=102000, w_stride = 0, size_with_stride = 0, fmt=NCHW, type=INT8, qnt_type=AFFINE, zp=-128, scale=0.003922doneModel-../model/yolov5s_relu.rknn is rknn model, starting valW inference: The 'data_format' is not set, and its default value is 'nhwc'!
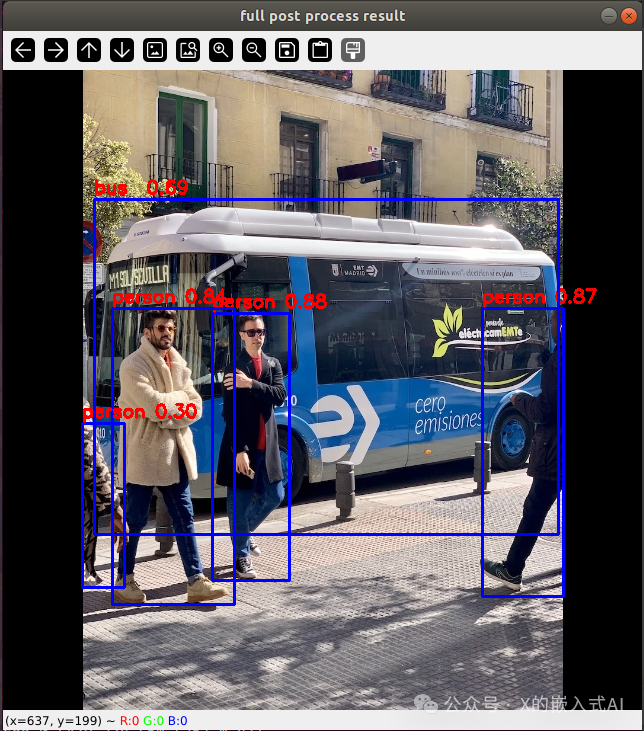
IMG: bus.jpgperson @ (209 243 286 510) 0.880person @ (479 238 560 526) 0.871person @ (109 238 231 534) 0.840person @ (79 353 121 517) 0.301bus @ (91 129 555 464) 0.692 此时会显示如下图片(~/rknpu/rknn_model_zoo/examples/yolov5/result.png):
添加图片注释,不超过 140 字(可选)
(根据上面的打印信息,再看这结果图片,识别到4个人和一辆巴士)
原始图片为(~/rknpu/rknn_model_zoo/examples/yolov5/model/bus.jpg):

添加图片注释,不超过 140 字(可选)
上述操作是PC Ubuntu电脑命令行下通过ADB连上板卡,通过板卡来运行RKNN格式模型,如果我们不想连上板卡运行,而是直接在Ubuntu电脑上运行ONNX格式模型呢?那么可以通过如下命令来使用:cd ~/rknpu/rknn_model_zoo/examples/yolov5/python #在计算机端运行原始的onnx模型,用法:python yolov5.py --model_path {onnx_model} --img_show python yolov5.py --model_path ../model/yolov5s_relu.onnx --img_show 执行后,有如下打印信息:(toolkit2) guochongxin@guochongxin-virtual-machine:~/rknpu/rknn_model_zoo/examples/yolov5/python$ python yolov5.py --model_path ../model/yolov5s_relu.onnx --img_showuse anchors from '../model/anchors_yolov5.txt', which is [[[10.0, 13.0], [16.0, 30.0], [33.0, 23.0]], [[30.0, 61.0], [62.0, 45.0], [59.0, 119.0]], [[116.0, 90.0], [156.0, 198.0], [373.0, 326.0]]]/home/guochongxin/rknpu/rknn_model_zoo/py_utils/onnx_executor.py:12: FutureWarning: In the future `np.bool` will be defined as the corresponding NumPy scalar. if getattr(np, 'bool', False): Model-../model/yolov5s_relu.onnx is onnx model, starting val infer 1/1 IMG: bus.jpg person @ (208 242 286 508) 0.881 person @ (478 238 560 525) 0.859 person @ (109 237 232 534) 0.842 person @ (79 355 121 515) 0.318 bus @ (91 129 555 465) 0.702 同时会显示上面一样的识别图片,从上面的打印信息看,使用RK3588 NPU和VM虚拟机Ubuntu18.04运行同一个yolov5模型,识别到的结果是一样的,不过处理速度上,RKNPU略快点。 下面是RK的可选内容“数据集精度评估的使用”,验证如下: 在rknn_model_zoo工程根目录下的datasets目录,存放了用于精度评估的数据集,对于YOLO那模型,需要下载COCO数据集,命令如下:cd ~/rknpu/rknn_model_zoo/datasets/COCOpython download_eval_dataset.py 命令执行完成后,下载了val2017数据集到COCO目录下。进行数据集精度评估时,需要指定--coco_map_test参数,以及评估数据集路径--img_folder,命令如下(需要连到RK3588开发板):pip install pycocotools
cd ~/rknpu/rknn_model_zoo/examples/yolov5/pythonpython yolov5.py --model_path ../model/yolov5s_relu.rknn --target rk3588 --img_folder ../../../datasets/COCO/val2017 --coco_map_test 运行后会有如下打印信息:(toolkit2) guochongxin@guochongxin-virtual-machine:~/rknpu/rknn_model_zoo/examples/yolov5/python$ python yolov5.py --model_path ../model/yolov5s_relu.rknn --target rk3588 --img_folder ../../../datasets/COCO/val2017 --coco_map_testuse anchors from '../model/anchors_yolov5.txt', which is [[[10.0, 13.0], [16.0, 30.0], [33.0, 23.0]], [[30.0, 61.0], [62.0, 45.0], [59.0, 119.0]], [[116.0, 90.0], [156.0, 198.0], [373.0, 326.0]]]I rknn-toolkit2 version: 2.0.0b0+9bab5682--> Init runtime environmentadb: unable to connect for root: closedI target set by user is: rk3588I Get hardware info: target_platform = rk3588, os = Linux, aarch = aarch32I Check RK3588 board npu runtime versionI Starting ntp or adb, target is RK3588I Start adb...I Connect to Device success!I NPUTransfer: Starting NPU Transfer Client, Transfer version 2.1.0 (b5861e7@2020-11-23T11:50:36)D RKNNAPI: ==============================================D RKNNAPI: RKNN VERSION:D RKNNAPI: API: 2.0.0b0 (18eacd0 build@2024-03-22T06:07:59)D RKNNAPI: DRV: rknn_server: 2.0.0b0 (18eacd0 build@2024-03-22T14:07:19)D RKNNAPI: DRV: rknnrt: 2.0.0b0 (35a6907d79@2024-03-24T10:31:14)D RKNNAPI: ==============================================D RKNNAPI: Input tensors:D RKNNAPI: index=0, name=images, n_dims=4, dims=[1, 640, 640, 3], n_elems=1228800, size=1228800, w_stride = 0, size_with_stride = 0, fmt=NHWC, type=INT8, qnt_type=AFFINE, zp=-128, scale=0.003922D RKNNAPI: Output tensors:D RKNNAPI: index=0, name=output0, n_dims=4, dims=[1, 255, 80, 80], n_elems=1632000, size=1632000, w_stride = 0, size_with_stride = 0, fmt=NCHW, type=INT8, qnt_type=AFFINE, zp=-128, scale=0.003922D RKNNAPI: index=1, name=286, n_dims=4, dims=[1, 255, 40, 40], n_elems=408000, size=408000, w_stride = 0, size_with_stride = 0, fmt=NCHW, type=INT8, qnt_type=AFFINE, zp=-128, scale=0.003922D RKNNAPI: index=2, name=288, n_dims=4, dims=[1, 255, 20, 20], n_elems=102000, size=102000, w_stride = 0, size_with_stride = 0, fmt=NCHW, type=INT8, qnt_type=AFFINE, zp=-128, scale=0.003922doneModel-../model/yolov5s_relu.rknn is rknn model, starting valW inference: The 'data_format' is not set, and its default value is 'nhwc'!Traceback (most recent call last): File "yolov5.py", line 289, in <module> score = round(scores[i], 5).astype(np.float) File "/home/guochongxin/miniconda3/envs/toolkit2/lib/python3.8/site-packages/numpy/__init__.py", line 305, in __getattr__ raise AttributeError(__former_attrs__[attr])AttributeError: module 'numpy' has no attribute 'float'.`np.float` was a deprecated alias for the builtin `float`. To avoid this error in existing code, use `float` by itself. Doing this will not modify any behavior and is safe. If you specifically wanted the numpy scalar type, use `np.float64` here.The aliases was originally deprecated in NumPy 1.20; for more details and guidance see the original release note at: https://numpy.org/devdocs/release/1.20.0-notes.html#deprecations 按上面的提示,把yolov5.py文件中的np.float改为np.float64后能正常运行,有如下打印信息:(toolkit2) guochongxin@guochongxin-virtual-machine:~/rknpu/rknn_model_zoo/examples/yolov5/python$ python yolov5.py --model_path ../model/yolov5s_relu.rknn --target rk3588 --img_folder ../../../datasets/COCO/val2017 --coco_map_testuse anchors from '../model/anchors_yolov5.txt', which is [[[10.0, 13.0], [16.0, 30.0], [33.0, 23.0]], [[30.0, 61.0], [62.0, 45.0], [59.0, 119.0]], [[116.0, 90.0], [156.0, 198.0], [373.0, 326.0]]]I rknn-toolkit2 version: 2.0.0b0+9bab5682--> Init runtime environmentadb: unable to connect for root: closedI target set by user is: rk3588I Get hardware info: target_platform = rk3588, os = Linux, aarch = aarch32I Check RK3588 board npu runtime versionI Starting ntp or adb, target is RK3588I Start adb...I Connect to Device success!I NPUTransfer: Starting NPU Transfer Client, Transfer version 2.1.0 (b5861e7@2020-11-23T11:50:36)D RKNNAPI: ==============================================D RKNNAPI: RKNN VERSION:D RKNNAPI: API: 2.0.0b0 (18eacd0 build@2024-03-22T06:07:59)D RKNNAPI: DRV: rknn_server: 2.0.0b0 (18eacd0 build@2024-03-22T14:07:19)D RKNNAPI: DRV: rknnrt: 2.0.0b0 (35a6907d79@2024-03-24T10:31:14)D RKNNAPI: ==============================================D RKNNAPI: Input tensors:D RKNNAPI: index=0, name=images, n_dims=4, dims=[1, 640, 640, 3], n_elems=1228800, size=1228800, w_stride = 0, size_with_stride = 0, fmt=NHWC, type=INT8, qnt_type=AFFINE, zp=-128, scale=0.003922D RKNNAPI: Output tensors:D RKNNAPI: index=0, name=output0, n_dims=4, dims=[1, 255, 80, 80], n_elems=1632000, size=1632000, w_stride = 0, size_with_stride = 0, fmt=NCHW, type=INT8, qnt_type=AFFINE, zp=-128, scale=0.003922D RKNNAPI: index=1, name=286, n_dims=4, dims=[1, 255, 40, 40], n_elems=408000, size=408000, w_stride = 0, size_with_stride = 0, fmt=NCHW, type=INT8, qnt_type=AFFINE, zp=-128, scale=0.003922D RKNNAPI: index=2, name=288, n_dims=4, dims=[1, 255, 20, 20], n_elems=102000, size=102000, w_stride = 0, size_with_stride = 0, fmt=NCHW, type=INT8, qnt_type=AFFINE, zp=-128, scale=0.003922doneModel-../model/yolov5s_relu.rknn is rknn model, starting valW inference: The 'data_format' is not set, and its default value is 'nhwc'!W inference: The 'data_format' is not set, and its default value is 'nhwc'!W inference: The 'data_format' is not set, and its default value is 'nhwc'!infer 84/5000loading annotations into memory...Done (t=1.26s)creating index...index created!Loading and preparing results...DONE (t=0.70s)creating index...index created!Running per image evaluation...Evaluate annotation type *bbox*DONE (t=24.36s).Accumulating evaluation results...DONE (t=3.87s). Average Precision (AP) @[ IoU=0.50:0.95 | area= all | maxDets=100 ] = 0.310 Average Precision (AP) @[ IoU=0.50 | area= all | maxDets=100 ] = 0.470 Average Precision (AP) @[ IoU=0.75 | area= all | maxDets=100 ] = 0.341 Average Precision (AP) @[ IoU=0.50:0.95 | area= small | maxDets=100 ] = 0.158 Average Precision (AP) @[ IoU=0.50:0.95 | area=medium | maxDets=100 ] = 0.358 Average Precision (AP) @[ IoU=0.50:0.95 | area= large | maxDets=100 ] = 0.408 Average Recall (AR) @[ IoU=0.50:0.95 | area= all | maxDets= 1 ] = 0.253 Average Recall (AR) @[ IoU=0.50:0.95 | area= all | maxDets= 10 ] = 0.362 Average Recall (AR) @[ IoU=0.50:0.95 | area= all | maxDets=100 ] = 0.367 Average Recall (AR) @[ IoU=0.50:0.95 | area= small | maxDets=100 ] = 0.180 Average Recall (AR) @[ IoU=0.50:0.95 | area=medium | maxDets=100 ] = 0.417 Average Recall (AR) @[ IoU=0.50:0.95 | area= large | maxDets=100 ] = 0.491map --> 0.3103840693475262map50--> 0.4700350008577292map75--> 0.34075462605442625map85--> 0.41660348340163067map95--> 0.4907678607067517 精度测试完成后,先把上面修改的yolov5.py的np.float64改回np.float,再进行其他实验。 2).RKNN C Demo "准备模型“与”模型转换“跟上面的”RKNN Python Demo“一样命令,由于Python脚本可以执行,不像C需要编译,故在上面这两步后,需要进行C编译,将C/C++源码编译成可执行文件,然后将可执行文件、模型文件、测试图片等相关文件推送到板端后再执行。 首先进入到~/rknpu/rknn_model_zoo目录,修改该目录下的build-linux.sh脚本,在脚本开头位置添加如下内容(为我们上面下载解压的交叉编译工具链):
GCC_COMPILER=~/rknpu/gcc-linaro-6.3.1-2017.05-x86_64_aarch64-linux-gnu/bin/aarch64-linux-gnu 接下来执行下述命令进行编译:cd ~/rknpu/rknn_model_zoo
#运行build-linux.sh脚本#用法:# ./build-linux.sh -t <target> -a <arch> -d <build_demo_name> [-b <build_type>] [-m]# -t : target(rk356x/rk3588),平台类型,rk3568/rk3566统一为rk356x# -a : arch(aarch64/armhf),板端系统架构# -d : demo name,对应examples目录下子文件夹的名称,如yolov5、mobilenet# -b : build_type(Debug/Release)# -m : enable address sanitizer, build_type need set to Debugbash -e build-linux.sh -t rk3588 -a aarch64 -d yolov5 执行后,有如下提示:(base) guochongxin@guochongxin-virtual-machine:~/rknpu/rknn_model_zoo$ bash -e build-linux.sh -t rk3588 -a aarch64 -d yolov5build-linux.sh -t rk3588 -a aarch64 -d yolov5/home/guochongxin/rknpu/gcc-linaro-6.3.1-2017.05-x86_64_aarch64-linux-gnu/bin/aarch64-linux-gnu===================================BUILD_DEMO_NAME=yolov5BUILD_DEMO_PATH=examples/yolov5/cppTARGET_SOC=rk3588TARGET_ARCH=aarch64BUILD_TYPE=ReleaseENABLE_ASAN=OFFINSTALL_DIR=/home/guochongxin/rknpu/rknn_model_zoo/install/rk3588_linux_aarch64/rknn_yolov5_demoBUILD_DIR=/home/guochongxin/rknpu/rknn_model_zoo/build/build_rknn_yolov5_demo_rk3588_linux_aarch64_ReleaseCC=/home/guochongxin/rknpu/gcc-linaro-6.3.1-2017.05-x86_64_aarch64-linux-gnu/bin/aarch64-linux-gnu-gccCXX=/home/guochongxin/rknpu/gcc-linaro-6.3.1-2017.05-x86_64_aarch64-linux-gnu/bin/aarch64-linux-gnu-g++===================================-- The C compiler identification is GNU 6.3.1-- The CXX compiler identification is GNU 6.3.1-- Check for working C compiler: /home/guochongxin/rknpu/gcc-linaro-6.3.1-2017.05-x86_64_aarch64-linux-gnu/bin/aarch64-linux-gnu-gcc-- Check for working C compiler: /home/guochongxin/rknpu/gcc-linaro-6.3.1-2017.05-x86_64_aarch64-linux-gnu/bin/aarch64-linux-gnu-gcc -- works-- Detecting C compiler ABI info-- Detecting C compiler ABI info - done-- Detecting C compile features-- Detecting C compile features - done-- Check for working CXX compiler: /home/guochongxin/rknpu/gcc-linaro-6.3.1-2017.05-x86_64_aarch64-linux-gnu/bin/aarch64-linux-gnu-g++-- Check for working CXX compiler: /home/guochongxin/rknpu/gcc-linaro-6.3.1-2017.05-x86_64_aarch64-linux-gnu/bin/aarch64-linux-gnu-g++ -- works-- Detecting CXX compiler ABI info-- Detecting CXX compiler ABI info - done-- Detecting CXX compile features-- Detecting CXX compile features - doneCMake Error at /home/guochongxin/rknpu/rknn_model_zoo/3rdparty/CMakeLists.txt:1 (cmake_minimum_required): CMake 3.15 or higher is required. You are running version 3.10.2 -- Configuring incomplete, errors occurred!See also "/home/guochongxin/rknpu/rknn_model_zoo/build/build_rknn_yolov5_demo_rk3588_linux_aarch64_Release/CMakeFiles/CMakeOutput.log". 使用如下命令查看机器cmake版本信息如下:(base) guochongxin@guochongxin-virtual-machine:~/rknpu/rknn_model_zoo$ cmake -versioncmake version 3.10.2
CMake suite maintained and supported by Kitware (kitware.com/cmake). 通过如下命令进行更新:sudo apt-get autoremove cmakesudo apt-get install libssl-devcd ~/wget -c https://github.com/Kitware/CMake/releases/download/v3.16.0/cmake-3.16.0.tar.gztar xvf cmake-3.16.0.tar.gzcd cmake-3.16.0./configuremakesudo make install (注意:在miniconda环境上执行完上面命令后,需退出再进该环境才能更新成功cmake) 更新cmake后,重新编译yolov5 C demo,编译成功,生成的文件在~/rknpu/rknn_model_zoo/install目录下,编译最后的输出打印内容如下:[100%] Built target rknn_yolov5_demoInstall the project...-- Install configuration: "Release"-- Installing: /home/guochongxin/rknpu/rknn_model_zoo/install/rk3588_linux_aarch64/rknn_yolov5_demo/./rknn_yolov5_demo-- Set runtime path of "/home/guochongxin/rknpu/rknn_model_zoo/install/rk3588_linux_aarch64/rknn_yolov5_demo/./rknn_yolov5_demo" to "$ORIGIN/lib"-- Installing: /home/guochongxin/rknpu/rknn_model_zoo/install/rk3588_linux_aarch64/rknn_yolov5_demo/./model/bus.jpg-- Installing: /home/guochongxin/rknpu/rknn_model_zoo/install/rk3588_linux_aarch64/rknn_yolov5_demo/./model/coco_80_labels_list.txt-- Installing: /home/guochongxin/rknpu/rknn_model_zoo/install/rk3588_linux_aarch64/rknn_yolov5_demo/model/yolov5s_relu.rknn-- Installing: /home/guochongxin/rknpu/rknn_model_zoo/install/rk3588_linux_aarch64/rknn_yolov5_demo/lib/librknnrt.so-- Installing: /home/guochongxin/rknpu/rknn_model_zoo/install/rk3588_linux_aarch64/rknn_yolov5_demo/lib/librga.so 相应的install目录的树形图如下:
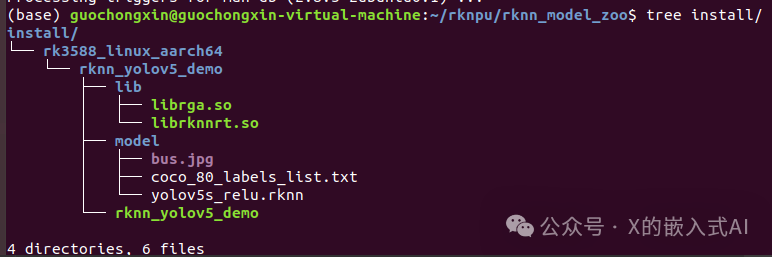
添加图片注释,不超过 140 字(可选)
接下来将编译生成的文件直接推到板卡上:cd ~/rknpu/rknn_model_zooadb push install/rk3588_linux_aarch64/rknn_yolov5_demo /data/ 然后使用如下命令到板卡上运行:#进入到板端adb shell
#adb shell命令交互环境下,进入到板端相应demo目录cd /data/rknn_yolov5_demo/
#设置链接库路径export LD_LIBRARY_PATH=./lib
#运行可执行文件#用法./rknn_yolov5_demo <model_path> <input_path>./rknn_yolov5_demo model/yolov5s_relu.rknn model/bus.jpg 执行上述命令后,有如下打印输出,并在当前目录下生成out.png文件:root@RK3588:/data/rknn_yolov5_demo# ./rknn_yolov5_demo model/yolov5s_relu.rknn model/bus.jpgload lable ./model/coco_80_labels_list.txtmodel input num: 1, output num: 3input tensors: index=0, name=images, n_dims=4, dims=[1, 640, 640, 3], n_elems=1228800, size=1228800, fmt=NHWC, type=INT8, qnt_type=AFFINE, zp=-128, scale=0.003922output tensors: index=0, name=output0, n_dims=4, dims=[1, 255, 80, 80], n_elems=1632000, size=1632000, fmt=NCHW, type=INT8, qnt_type=AFFINE, zp=-128, scale=0.003922 index=1, name=286, n_dims=4, dims=[1, 255, 40, 40], n_elems=408000, size=408000, fmt=NCHW, type=INT8, qnt_type=AFFINE, zp=-128, scale=0.003922 index=2, name=288, n_dims=4, dims=[1, 255, 20, 20], n_elems=102000, size=102000, fmt=NCHW, type=INT8, qnt_type=AFFINE, zp=-128, scale=0.003922model is NHWC input fmtmodel input height=640, width=640, channel=3origin size=640x640 crop size=640x640input image: 640 x 640, subsampling: 4:2:0, colorspace: YCbCr, orientation: 1scale=1.000000 dst_box=(0 0 639 639) allow_slight_change=1 _left_offset=0 _top_offset=0 padding_w=0 padding_h=0src width=640 height=640 fmt=0x1 virAddr=0x0x24f3cb80 fd=0dst width=640 height=640 fmt=0x1 virAddr=0x0x25068b90 fd=0src_box=(0 0 639 639)dst_box=(0 0 639 639)color=0x72rga_api version 1.10.1_[0]rknn_runwrite_image path: out.png width=640 height=640 channel=3 data=0x24f3cb80 上面C例子Yolov5生成的图片跟原图一样,从打印信息看,确实也没有打印出识别到物品信息,后来尝试了Yolov8,也一样,故找开发板供应商要了份今年的代码(rk-linux5.10-20231226.tgz),确实解决了,运行后打印信息如下:root@rk3588-buildroot:/data/rknn_yolov5_demo# export LD_LIBRARY_PATH=./librelu.rknn model/bus.jpgdata/rknn_yolov5_demo# ./rknn_yolov5_demo model/yolov5s_rload lable ./model/coco_80_labels_list.txtmodel input num: 1, output num: 3input tensors: index=0, name=images, n_dims=4, dims=[1, 640, 640, 3], n_elems=1228800, size=1228800, fmt=NHWC, type=INT8, qnt_type=AFFINE, zp=-128, scale=0.003922output tensors: index=0, name=output0, n_dims=4, dims=[1, 255, 80, 80], n_elems=1632000, size=1632000, fmt=NCHW, type=INT8, qnt_type=AFFINE, zp=-128, scale=0.003922 index=1, name=286, n_dims=4, dims=[1, 255, 40, 40], n_elems=408000, size=408000, fmt=NCHW, type=INT8, qnt_type=AFFINE, zp=-128, scale=0.003922 index=2, name=288, n_dims=4, dims=[1, 255, 20, 20], n_elems=102000, size=102000, fmt=NCHW, type=INT8, qnt_type=AFFINE, zp=-128, scale=0.003922model is NHWC input fmtmodel input height=640, width=640, channel=3origin size=640x640 crop size=640x640input image: 640 x 640, subsampling: 4:2:0, colorspace: YCbCr, orientation: 1scale=1.000000 dst_box=(0 0 639 639) allow_slight_change=1 _left_offset=0 _top_offset=0 padding_w=0 padding_h=0src width=640 height=640 fmt=0x1 virAddr=0x0x1dd1ff20 fd=0dst width=640 height=640 fmt=0x1 virAddr=0x0x1de4bf30 fd=0src_box=(0 0 639 639)dst_box=(0 0 639 639)color=0x72rga_api version 1.10.1_[0]rknn_runperson @ (209 243 286 510) 0.880person @ (479 238 560 526) 0.871person @ (109 238 231 534) 0.840bus @ (91 129 555 464) 0.692person @ (79 353 121 517) 0.301write_image path: out.png width=640 height=640 channel=3 data=0x1dd1ff20 然后通过如下命令,将out.png提取到电脑上:
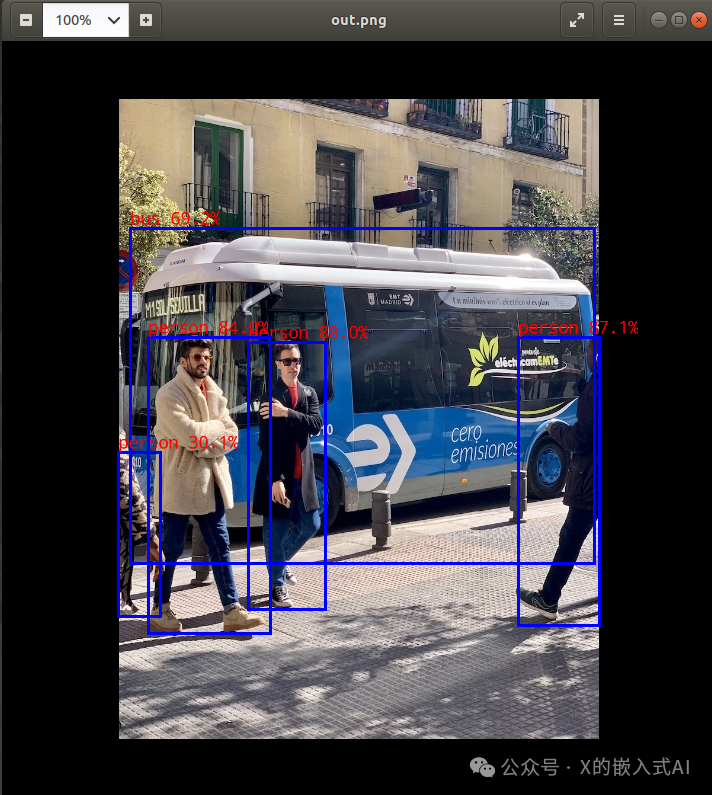
添加图片注释,不超过 140 字(可选)
参考文献链接
人工智能芯片与自动驾驶

 浙公网安备 33010602011771号