Jenkins集成K8S集群实现CICD
一、部署jenkins环境
1.准备环境
CPU : 1C
内存: 2G
DISK: 50G
2.安装JDK
2.1 下载jdk
` wget http://192.168.21.253/Resources/Kubernetes/Project/DevOps/Jenkins/jdk-17_linux-x64_bin.tar.gz`
2.2 解压软件包
tar xf jdk-17_linux-x64_bin.tar.gz -C /usr/local/
2.3 配置环境变量
 cat  /etc/profile.d/jdk.sh
#!/bin/bash

export JAVA_HOME=/usr/local/jdk-17.0.8
export PATH=$PATH:$JAVA_HOME/bin
3.安装jenkins
3.1 安装jenkins的依赖
apt install fontconfig
3.2 下载jenkins
wget http://192.168.21.253/Resources/Kubernetes/Project/DevOps/Jenkins/jenkins-v2.479.3/jenkins_2.479.3_all.deb
3.3 安装jenkins
dpkg -i jenkins_2.479.3_all.deb
3.4修改jenkins的启动脚本
vim /lib/systemd/system/jenkins.service
...
#User=jenkins
#Group=jenkins
User=root
Group=root
# Directory where Jenkins stores its configuration and workspaces
Environment="JENKINS_HOME=/var/lib/jenkins"
Environment="JAVA_HOME=/usr/local/jdk-17.0.8"
3.5启动jenkins
systemctl daemon-reload
systemctl restart jenkins.service
ss -nlt | grep 8080
LISTEN 0      50                 *:8080            *:*
3.6访问jenkins的WebUI
http://10.0.0.211:8080/
3.7 基于密码访问登录
cat /var/lib/jenkins/secrets/initialAdminPassword
417305a1be944bb38b8c217c01ba1040
[root@jenkins211 ~]#
4.安装jenkins的插件
4.1 下载jenkins的插件包
wget http://192.168.21.253/Resources/Kubernetes/Project/DevOps/Jenkins/jenkins-v2.479.3/oldboyedu-jenkins-2.479.3-plugins.tar.gz
4.2 解压插件包
[root@jenkins211 ~]# ll /var/lib/jenkins/plugins/
total 8
drwxr-xr-x 2 root    root    4096 Jul 24 09:34 ./
drwxr-xr-x 8 jenkins jenkins 4096 Jul 24 09:36 ../
[root@jenkins211 ~]#
[root@jenkins211 ~]# tar xf oldboyedu-jenkins-2.479.3-plugins.tar.gz -C /var/lib/jenkins/plugins/
[root@jenkins211 ~]#
[root@jenkins211 ~]# ll /var/lib/jenkins/plugins/ | wc -l
227
4.3 重启jenkins
http://10.0.0.211:8080/restart
二、gitlab环境部署
1.导入镜像
[root@worker233 ~]# wget http://192.168.21.253/Resources/Kubernetes/Project/DevOps/images/oldboyedu-gitlab-ce-v17.5.2.tar.gz
[root@worker233 ~]# docker load -i oldboyedu-gitlab-ce-v17.5.2.tar.gz
[root@worker233 ~]# docker tag gitlab/gitlab-ce:17.5.2-ce.0  harbor250.oldboyedu.com/oldboyedu-devops/gitlab-ce:17.5.2-ce.0
[root@worker233 ~]# docker push harbor250.oldboyedu.com/oldboyedu-devops/gitlab-ce:17.5.2-ce.0
2.创建nfs共享目录
[root@master231 ~]# mkdir -pv /yinzhengjie/data/nfs-server/case-demo/gitlab/{data,logs,conf}
mkdir: created directory '/yinzhengjie/data/nfs-server/case-demo/gitlab'
mkdir: created directory '/yinzhengjie/data/nfs-server/case-demo/gitlab/data'
mkdir: created directory '/yinzhengjie/data/nfs-server/case-demo/gitlab/logs'
mkdir: created directory '/yinzhengjie/data/nfs-server/case-demo/gitlab/conf'
3.编写资源清单
k8s资源清单
cat 01-deploy-svc-gitlab.yaml
apiVersion: apps/v1
kind: Deployment
metadata:
  name: deploy-gitlab
spec:
  replicas: 1
  selector:
    matchLabels:
      apps: gitlab
  template:
    metadata:
      labels:
        apps: gitlab
    spec:
      volumes:
      - name: data
        nfs:
          server: 10.0.0.231
          path: /yinzhengjie/data/nfs-server/case-demo/gitlab/data
      - name: conf
        nfs:
          server: 10.0.0.231
          path: /yinzhengjie/data/nfs-server/case-demo/gitlab/conf
      - name: logs
        nfs:
          server: 10.0.0.231
          path: /yinzhengjie/data/nfs-server/case-demo/gitlab/logs
      containers:
      - name: c1
        image: harbor250.oldboyedu.com/oldboyedu-devops/gitlab-ce:17.5.2-ce.0
        ports:
        - containerPort: 22
          name: ssh
        - containerPort: 80
          name: http
        - containerPort: 443
          name: https
        volumeMounts:
        - name: logs
          mountPath: /var/log/gitlab
        - name: data
          mountPath: /var/opt/gitlab
        - name: conf
          mountPath: /etc/gitlab


---

apiVersion: v1
kind: Service
metadata:
  name: svc-gitlab
spec:
  type: LoadBalancer
  selector:
    apps: gitlab
  ports:
  - protocol: TCP
    port: 80
    name: http
  - protocol: TCP
    port: 443
    name: https
  - protocol: TCP
    port: 22
    name: sshd
4.创建资源
[root@master231 02-jenkins]# kubectl apply -f  01-deploy-svc-gitlab.yaml
deployment.apps/deploy-gitlab created
service/svc-gitlab created
[root@master231 02-jenkins]#
[root@master231 02-jenkins]# kubectl get svc svc-gitlab
NAME         TYPE           CLUSTER-IP       EXTERNAL-IP   PORT(S)                                   AGE
svc-gitlab   LoadBalancer   10.200.237.106   10.0.0.153    80:41391/TCP,443:15760/TCP,22:39022/TCP   9m12s
[root@master231 02-jenkins]#
[root@master231 02-jenkins]# kubectl get pods -o wide
NAME                            READY   STATUS    RESTARTS   AGE     IP            NODE        NOMINATED NODE   READINESS GATES
deploy-gitlab-c84979449-f5rn9   1/1     Running   0          9m16s   10.100.2.53   worker233   <none>           <none>
[root@master231 02-jenkins]#
[root@master231 02-jenkins]#
5.查看gitlab的初始密码
[root@master231 02-jenkins]# kubectl logs  deploy-gitlab-c84979449-f5rn9 | grep /etc/gitlab/initial_root_password
Password stored to /etc/gitlab/initial_root_password. This file will be cleaned up in first reconfigure run after 24 hours.
[root@master231 02-jenkins]#
[root@master231 02-jenkins]# kubectl exec deploy-gitlab-c84979449-f5rn9  -- cat /etc/gitlab/initial_root_password
# WARNING: This value is valid only in the following conditions
#          1. If provided manually (either via `GITLAB_ROOT_PASSWORD` environment variable or via `gitlab_rails['initial_root_password']` setting in `gitlab.rb`, it was provided before database was seeded for the first time (usually, the first reconfigure run).
#          2. Password hasn't been changed manually, either via UI or via command line.
#
#          If the password shown here doesn't work, you must reset the admin password following https://docs.gitlab.com/ee/security/reset_user_password.html#reset-your-root-password.

Password: a9/WZNn+4VHTjFa3pd6h2niEodrEYQUcepGNjWc7AEc=

# NOTE: This file will be automatically deleted in the first reconfigure run after 24 hours.
[root@master231 02-jenkins]#
6.访问测试
http://10.0.0.153/
**用上一步的密码进行登录,用户名为: root **
推荐密码为: Linux98@2025
7、代码推送到gitlab
wget http://192.168.21.253/Resources/Kubernetes/Project/DevOps/Jenkins/oldboyedu-yiliao.zip
8、编写Dockerfile
root@harbor250.oldboyedu.com code]
cat Dockerfile
FROM harbor250.oldboyedu.com/oldboyedu-xiuxian/apps:v1

MAINTAINER Jason Yin

LABEL school=oldboyedu \
      class=linux98

ADD . /usr/share/nginx/html


EXPOSE 80

WORKDIR /usr/share/nginx/html
9.开发人员初始化项目并添加远程仓库
代码提交
[root@harbor250.oldboyedu.com code]# git init .
[root@harbor250.oldboyedu.com code]# git remote add origin http://10.0.0.153/root/oldboyedu-yiliao.git
[root@harbor250.oldboyedu.com code]#
[root@harbor250.oldboyedu.com code]# git remote -v
origin	http://10.0.0.153/root/oldboyedu-yiliao.git (fetch)
origin	http://10.0.0.153/root/oldboyedu-yiliao.git (push)
[root@harbor250.oldboyedu.com code]#


	5.推送代码到远程仓库
[root@harbor250.oldboyedu.com code]# git add .
[root@harbor250.oldboyedu.com code]# git commit -m 'k8s yiliao demo'
[root@harbor250.oldboyedu.com code]# git push origin master
Username for 'http://10.0.0.153': root
Password for 'http://root@10.0.0.153':   # 此处输入密码不会提示你,建议直接复制密码回车即可。
Enumerating objects: 91, done.
Counting objects: 100% (91/91), done.
Delta compression using up to 2 threads
Compressing objects: 100% (91/91), done.
Writing objects: 100% (91/91), 1.48 MiB | 7.69 MiB/s, done.
Total 91 (delta 11), reused 0 (delta 0), pack-reused 0
remote:
remote: To create a merge request for master, visit:
remote:   http://deploy-gitlab-c84979449-f5rn9/root/oldboyedu-yiliao/-/merge_requests/new?merge_request%5Bsource_branch%5D=master
remote:
To http://10.0.0.153/root/oldboyedu-yiliao.git
 * [new branch]      master -> master
[root@harbor250.oldboyedu.com code]#
三、 jenkins和gitlab
[root@harbor250.oldboyedu.com code]# git remote -v
gitee	https://gitee.com/yinzhengjie/oldboyedu-yiliao.git (fetch)
gitee	https://gitee.com/yinzhengjie/oldboyedu-yiliao.git (push)
origin	http://10.0.0.153/root/oldboyedu-yiliao.git (fetch)
origin	http://10.0.0.153/root/oldboyedu-yiliao.git (push)
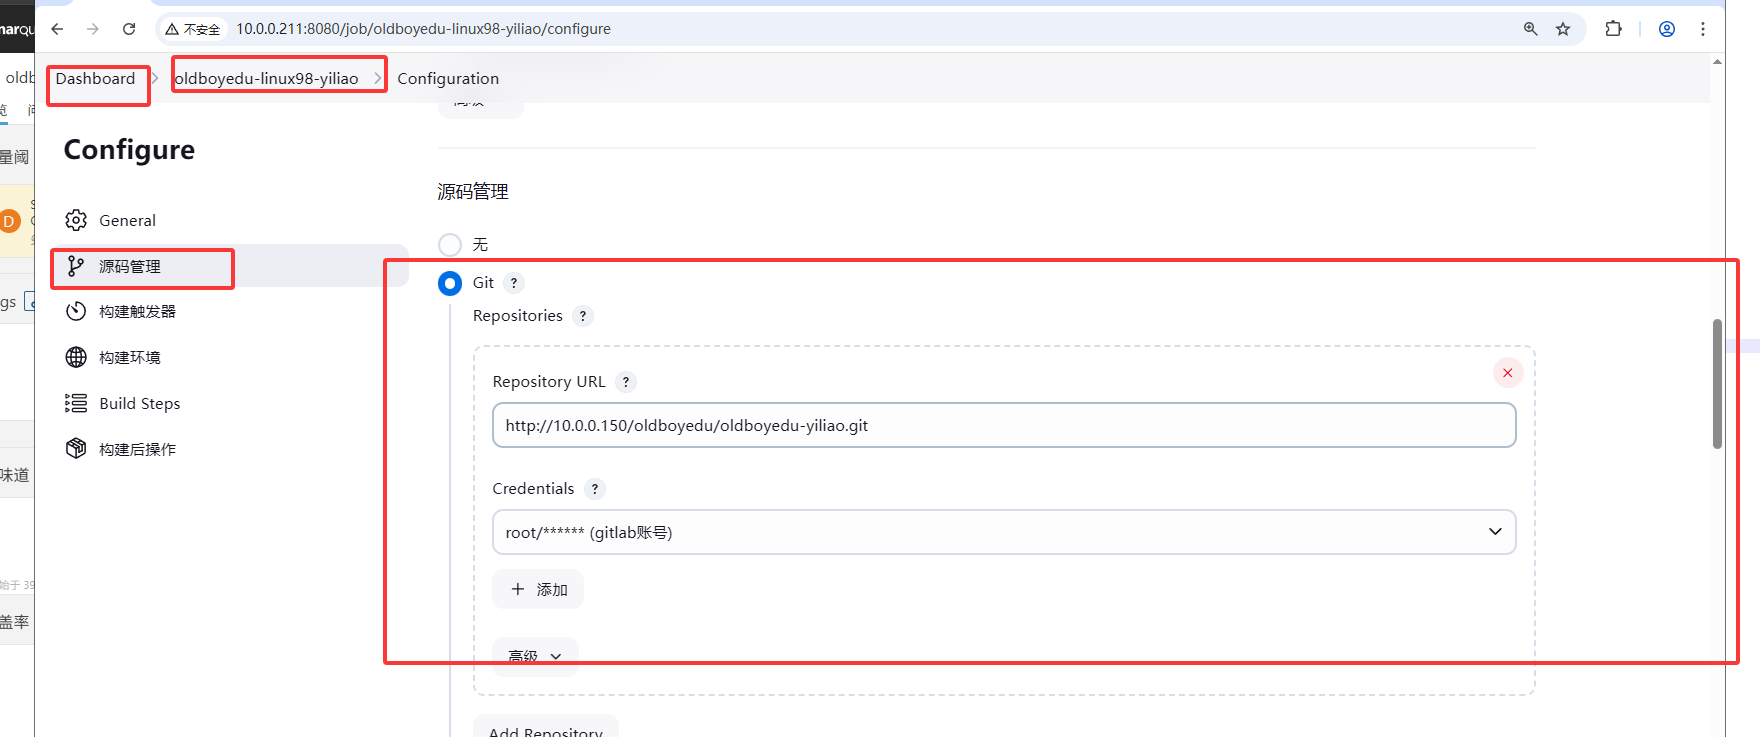
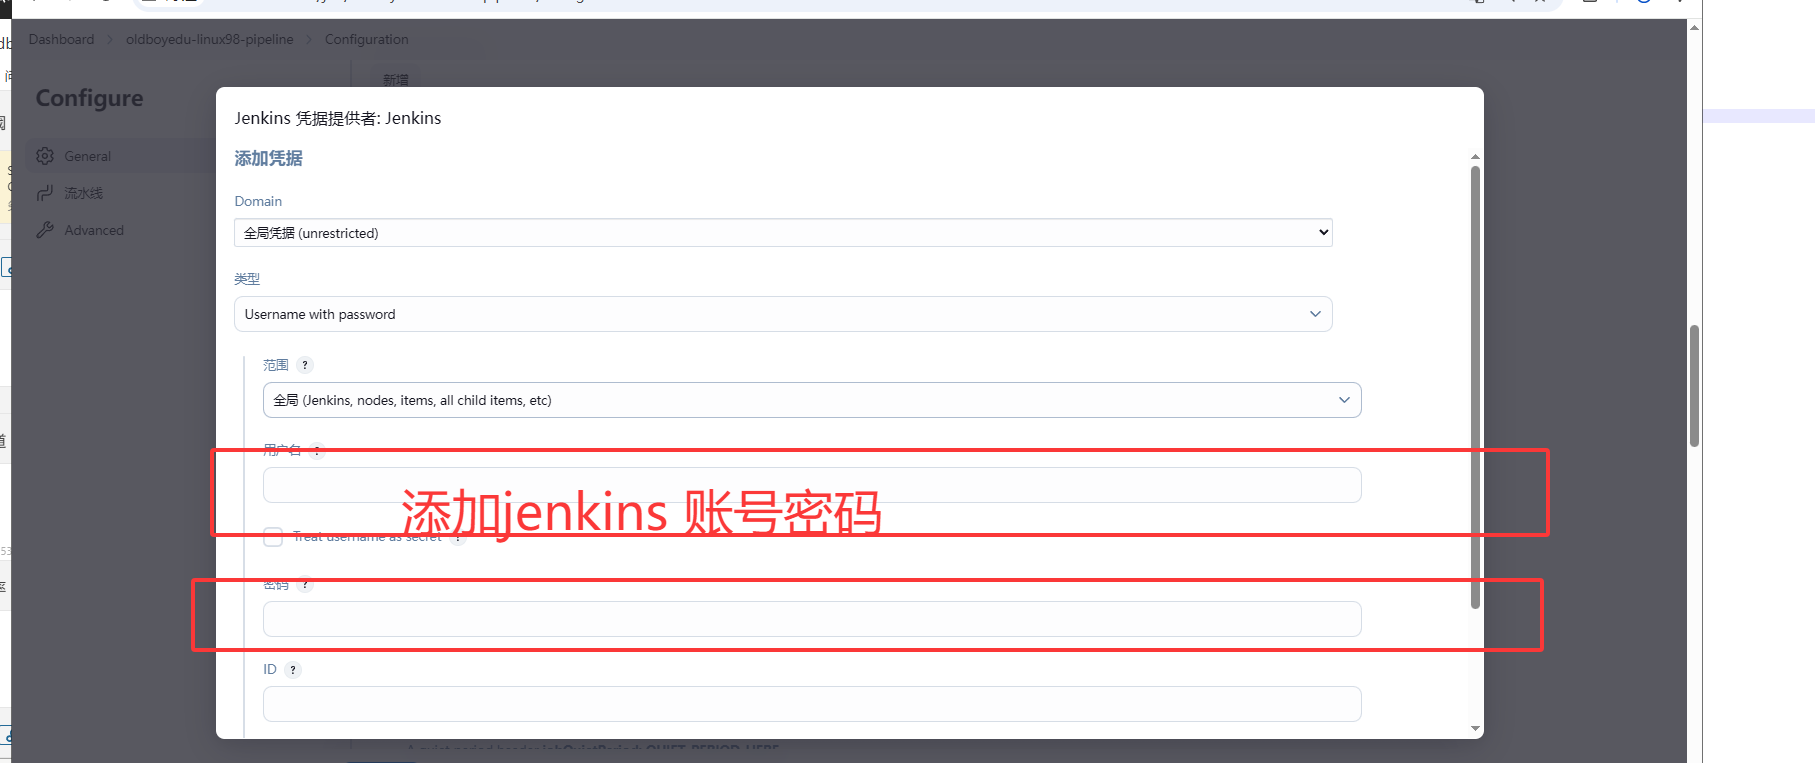
1、jenkins配置git账号
2、安装docker环境
	1.安装docker环境
[root@jenkins211 ~]# wget http://192.168.21.253/Resources/Docker/scripts/oldboyedu-autoinstall-docker-docker-compose.tar.gz
[root@jenkins211 ~]# tar xf oldboyedu-autoinstall-docker-docker-compose.tar.gz
[root@jenkins211 ~]# ./install-docker.sh i


	2.添加解析
[root@jenkins211 ~]# echo 10.0.0.250 harbor250.oldboyedu.com >> /etc/hosts
[root@jenkins211 ~]#
[root@jenkins211 ~]# tail  -1 /etc/hosts
10.0.0.250 harbor250.oldboyedu.com
[root@jenkins211 ~]#


	3.拷贝证书文件
[root@jenkins211 ~]# scp -r 10.0.0.231:/etc/docker/certs.d/ /etc/docker/
[root@jenkins211 ~]# apt -y install tree
[root@jenkins211 ~]# tree /etc/docker/certs.d/
/etc/docker/certs.d/
└── harbor250.oldboyedu.com
    ├── ca.crt
    ├── harbor250.oldboyedu.com.cert
    └── harbor250.oldboyedu.com.key
3、jenkins编写执行脚本
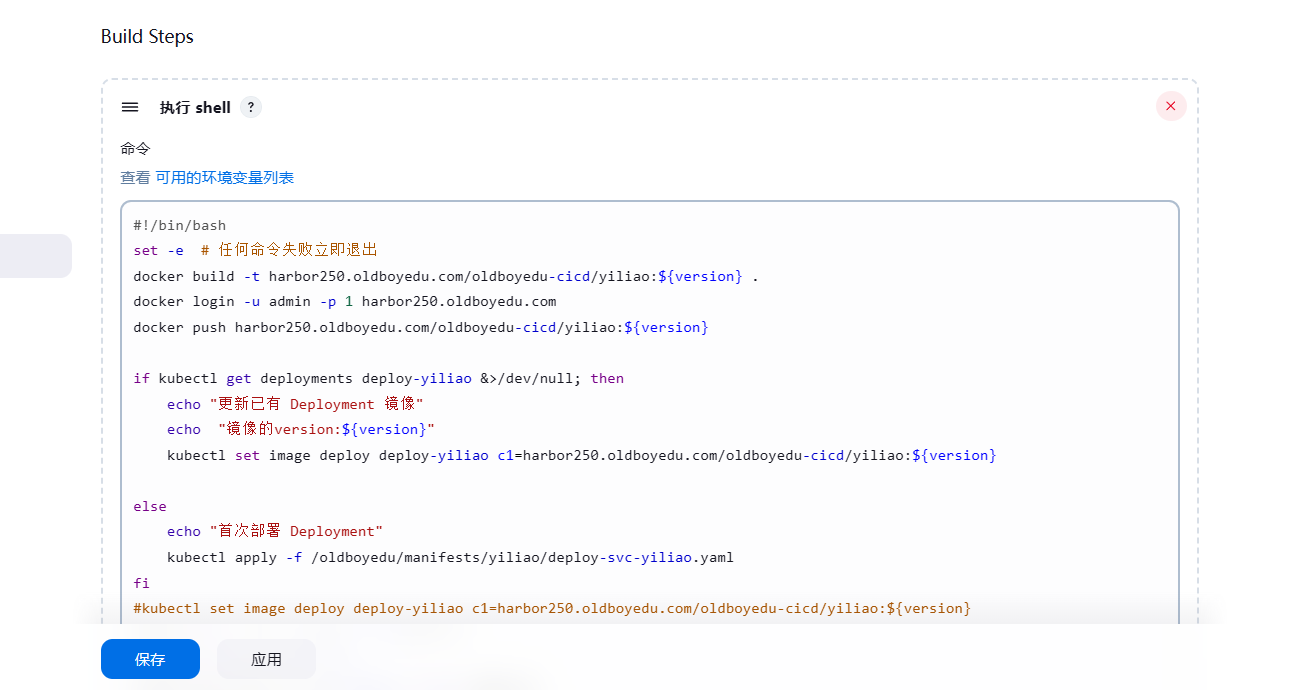
jekins执行脚本
#!/bin/bash
set -e  # 任何命令失败立即退出
docker build -t harbor250.oldboyedu.com/oldboyedu-cicd/yiliao:${version} .
docker login -u admin -p 1 harbor250.oldboyedu.com
docker push harbor250.oldboyedu.com/oldboyedu-cicd/yiliao:${version}

if kubectl get deployments deploy-yiliao &>/dev/null; then
 	echo "更新已有 Deployment 镜像"
    echo  "镜像的version:${version}"
	kubectl set image deploy deploy-yiliao c1=harbor250.oldboyedu.com/oldboyedu-cicd/yiliao:${version}

else
	echo "首次部署 Deployment"
	kubectl apply -f /oldboyedu/manifests/yiliao/deploy-svc-yiliao.yaml
fi
#kubectl set image deploy deploy-yiliao c1=harbor250.oldboyedu.com/oldboyedu-cicd/yiliao:${version}
kubectl get pods -o wide -l apps=yiliao
kubectl get svc svc-yiliao
kubectl describe svc svc-yiliao | grep Endpoints
4、安装kubectl客户端工具到jenkins 服务器
[root@jenkins211 ~]# wget http://192.168.21.253/Resources/Kubernetes/Project/DevOps/Jenkins/kubectl-1.23.17
[root@jenkins211 ~]# chmod +x kubectl-1.23.17
[root@jenkins211 ~]# mv kubectl-1.23.17 /usr/local/bin/kubectl
[root@jenkins211 ~]# ll /usr/local/bin/kubectl
-rwxr-xr-x 1 root root 45174784 Sep  4  2023 /usr/local/bin/kubectl*
[root@jenkins211 ~]#
5、准备k8s认证文件
[root@jenkins211 ~]# mkdir -p ~/.kube/
[root@jenkins211 ~]# scp 10.0.0.231:/root/.kube/config ~/.kube/
[root@jenkins211 ~]# kubectl version
Client Version: version.Info{Major:"1", Minor:"23", GitVersion:"v1.23.17", GitCommit:"953be8927218ec8067e1af2641e540238ffd7576", GitTreeState:"clean", BuildDate:"2023-02-22T13:34:27Z", GoVersion:"go1.19.6", Compiler:"gc", Platform:"linux/amd64"}
Server Version: version.Info{Major:"1", Minor:"23", GitVersion:"v1.23.17", GitCommit:"953be8927218ec8067e1af2641e540238ffd7576", GitTreeState:"clean", BuildDate:"2023-02-22T13:27:46Z", GoVersion:"go1.19.6", Compiler:"gc", Platform:"linux/amd64"}
[root@jenkins211 ~]#
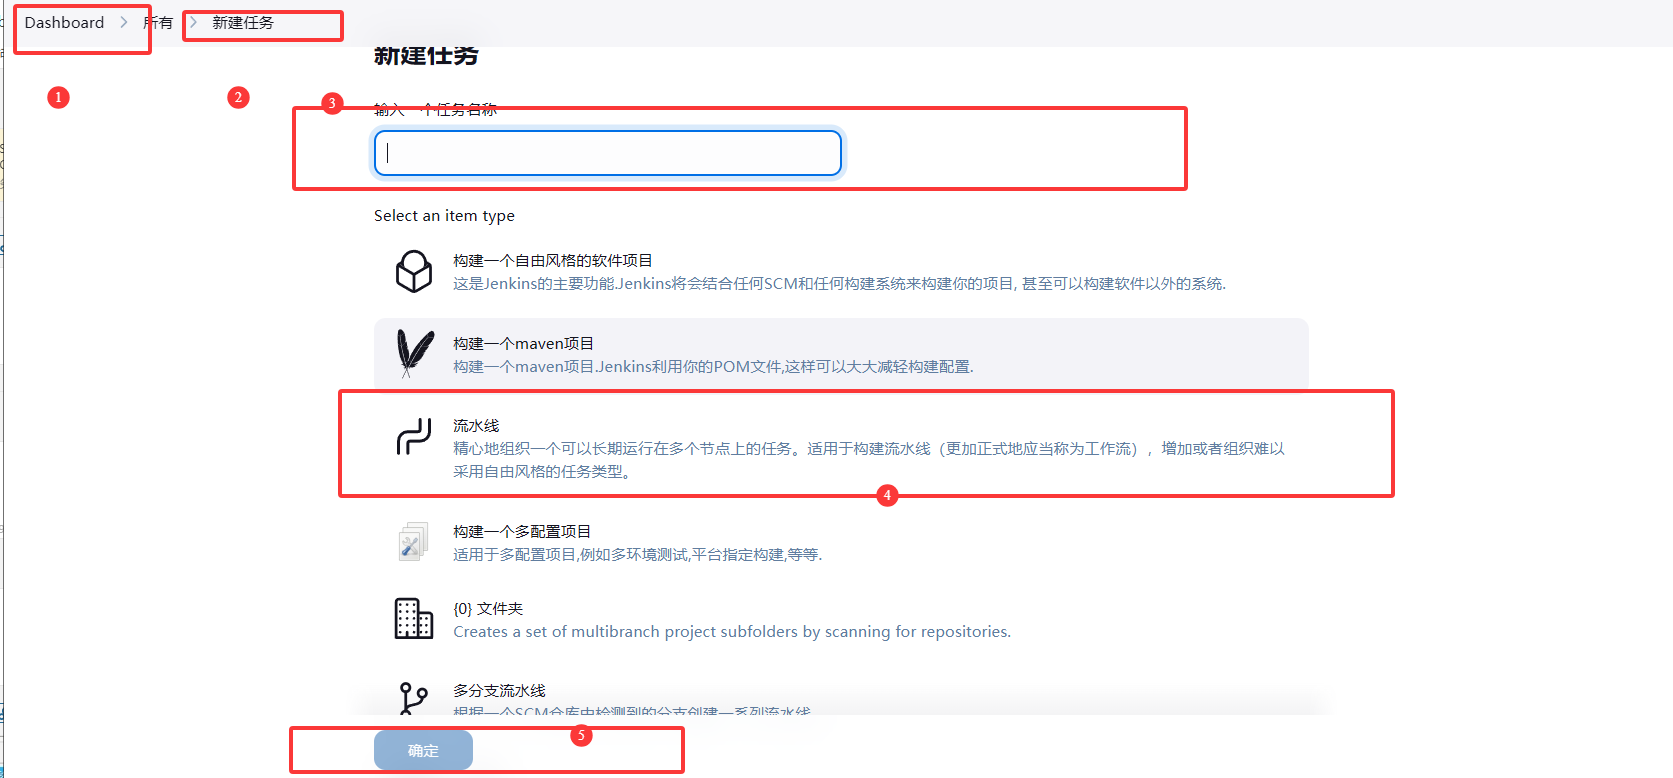
四、jenkins基于pipeline构建实战
1.编写pipeline
pipeline脚本
	pipeline {
    agent any

    stages {
        stage('pull dode') {
            steps {
               git credentialsId: '791f6b31-8913-454c-a2e3-eee52c15ae72', url: 'http://10.0.0.150/oldboyedu/oldboyedu-yiliao.git'
            }
        }
        stage('SonarQube Analysis') {
            steps {
                     sh '/usr/local/sonar-scanner/bin/sonar-scanner \

            -Dsonar.projectKey=oldboyedu-linux98-pipeline \

            -Dsonar.sources=. \

            -Dsonar.host.url=http://10.0.0.217:9000 \

            -Dsonar.login=408cfdee570ef67a7f0e676c6841e11bf1b5c17a'
            }
        }


         stage('build images') {
                steps {
             sh 'docker build -t harbor250.oldboyedu.com/oldboyedu-cicd/yiliao:v2  .'
                }
            }
           stage('push code ') {
            steps {
                sh '''docker login -u admin -p 1 harbor250.oldboyedu.com
                docker push harbor250.oldboyedu.com/oldboyedu-cicd/yiliao:v2
                '''
            }
        }
          stage('jenkins to k8s') {
         steps {
        script {
            // 检查Deployment是否存在
            def deployExists = sh(
                script: 'kubectl get deploy deploy-yiliao --ignore-not-found --no-headers | wc -l',
                returnStdout: true
            ).trim() == "1"  // 存在返回1,否则0

            if (deployExists) {
                echo "更新已有 Deployment 镜像"
                sh """
                    kubectl set image deploy deploy-yiliao \
                    c1=harbor250.oldboyedu.com/oldboyedu-cicd/yiliao:v2
                """
            } else {
                echo "首次部署 Deployment"
                sh "kubectl apply -f /oldboyedu/manifests/yiliao/deploy-svc-yiliao.yaml"
            }

            // 等待滚动更新完成
            sh "kubectl rollout status deploy/deploy-yiliao --timeout=300s"
        }
    }
        }
            stage('k8s logs') {
            steps {
           sh '''kubectl get pods -o wide -l apps=yiliao
            kubectl get svc svc-yiliao
            kubectl describe svc svc-yiliao | grep Endpoints'''
            }
        }

    }
        post {
        always {
            emailext (
                subject: '构建结果: ${PROJECT_NAME} - ${BUILD_STATUS}',
                body: '''
                构建信息:
                项目: ${PROJECT_NAME}
                状态: ${BUILD_STATUS}

                ''',
                to: '327172173@qq.com',
                attachLog: true
            )
        }
    }

}
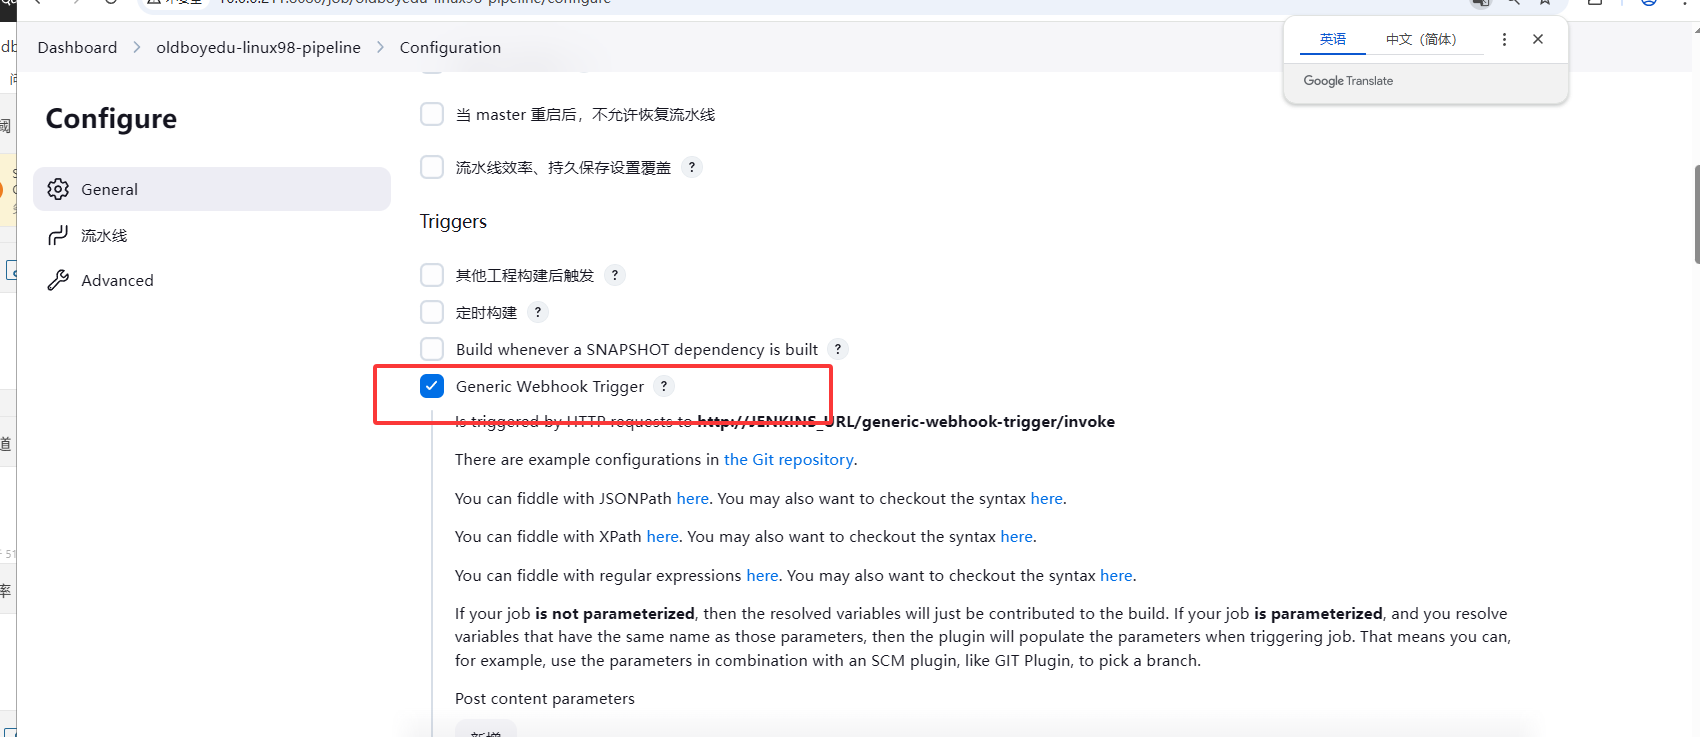
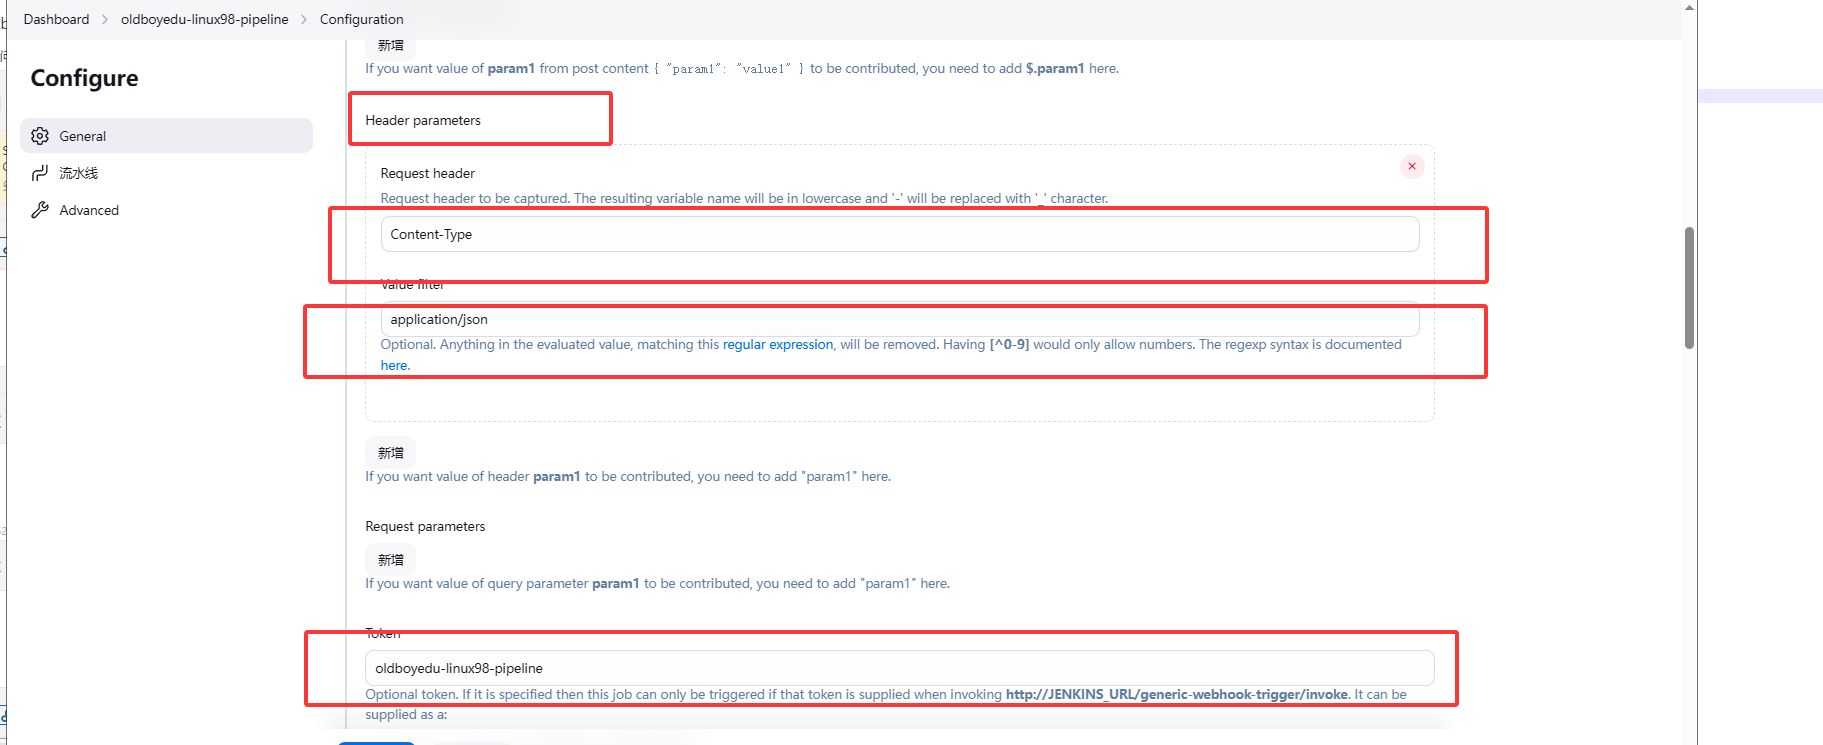
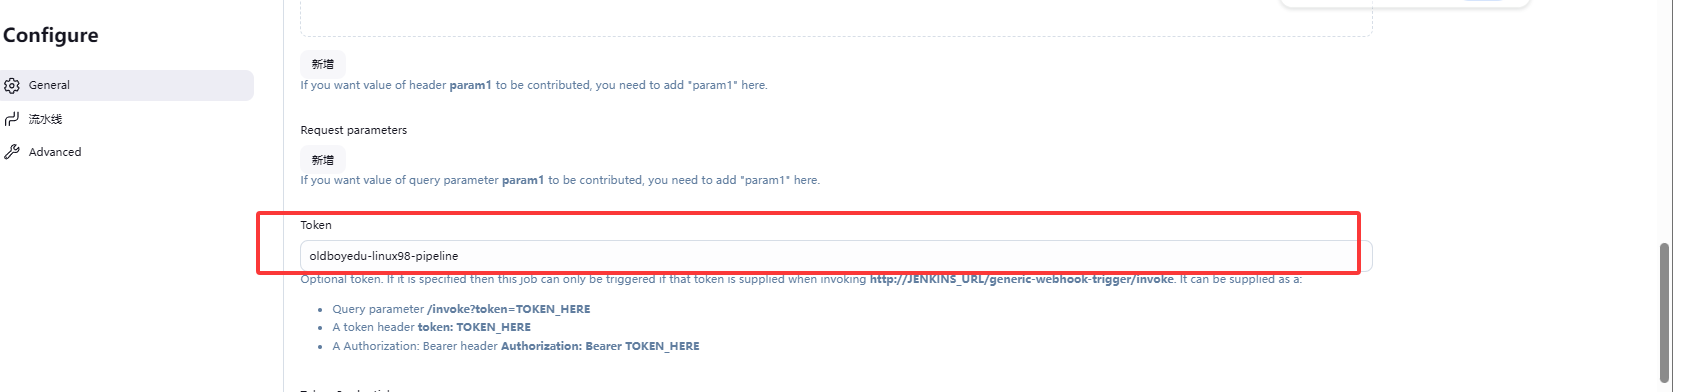
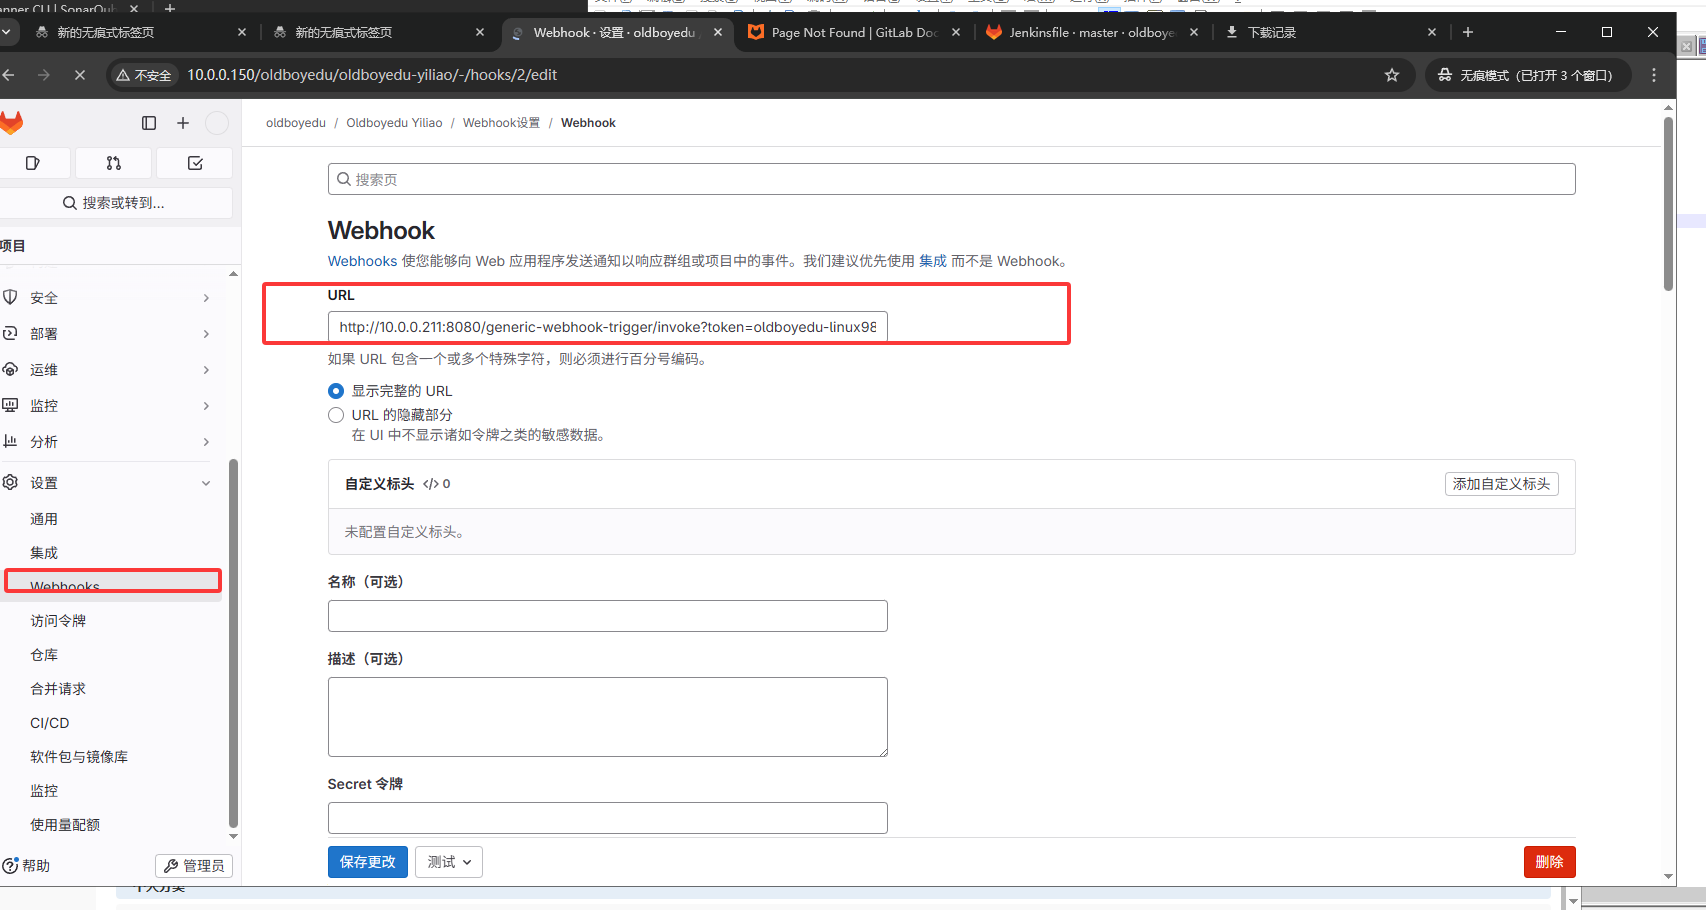
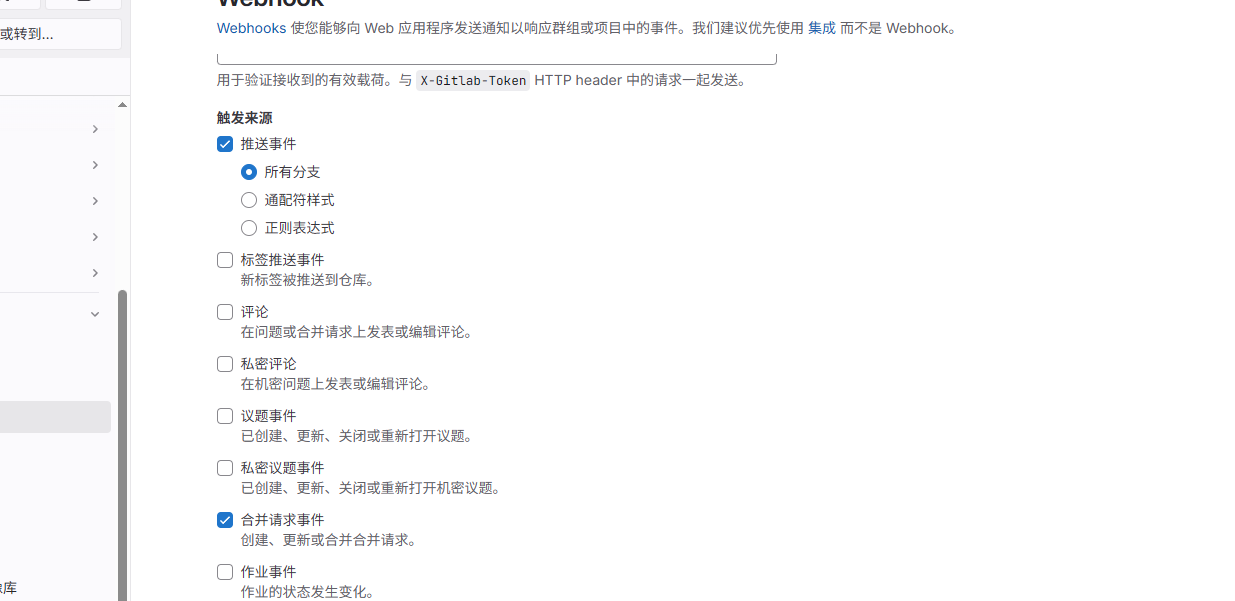
gitlab 中添加Webhook
url中添加
http://10.0.0.211:8080/generic-webhook-trigger/invoke?token=oldboyedu-linux98-pipeline
其中http://10.0.0.211:8080/generic-webhook-trigger/invoke jenkins中为
token=oldboyedu-linux98-pipeline 为
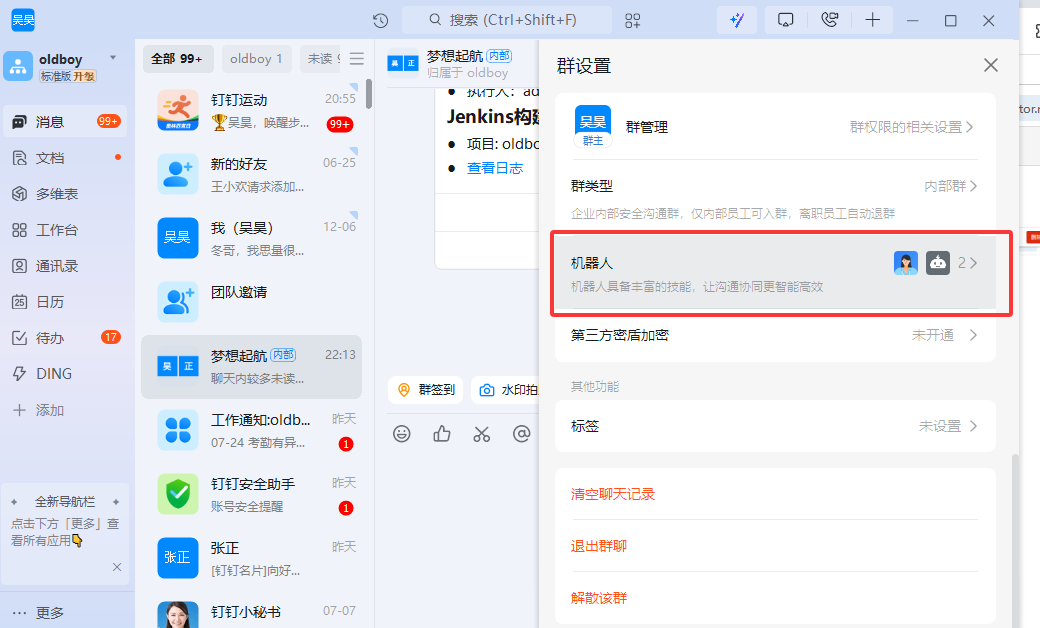
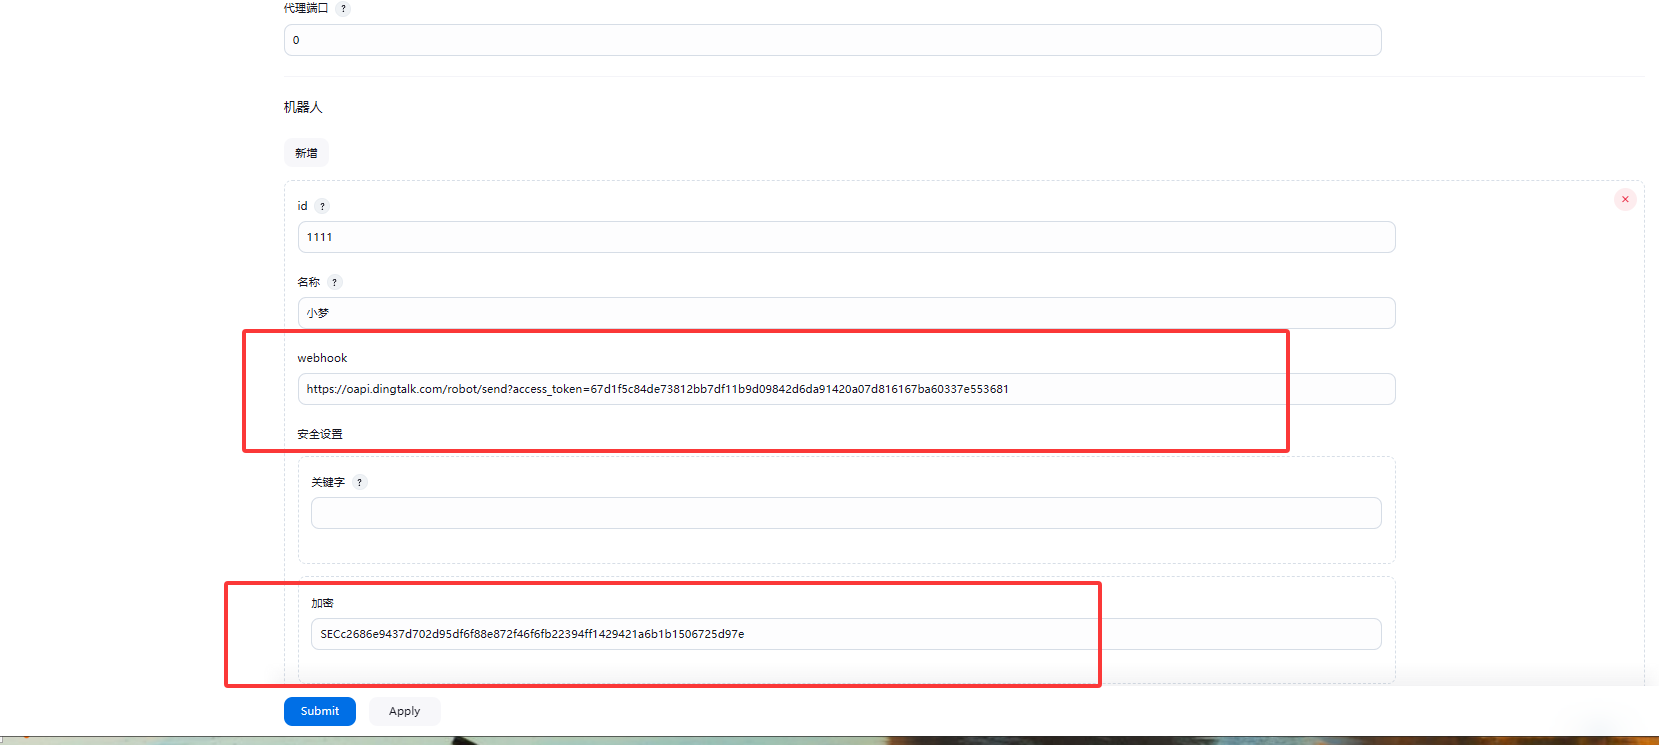
2、添加钉钉通知机器人
2.1 在钉钉群里群设置位置添加机器人
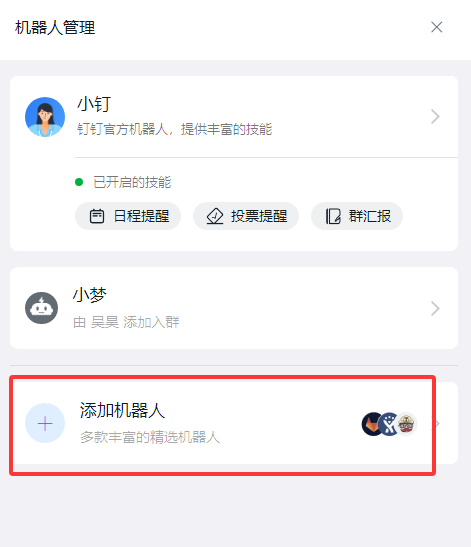
2.2机器人管理中选择添加机器人

2.3jenkins中配置添加机器人
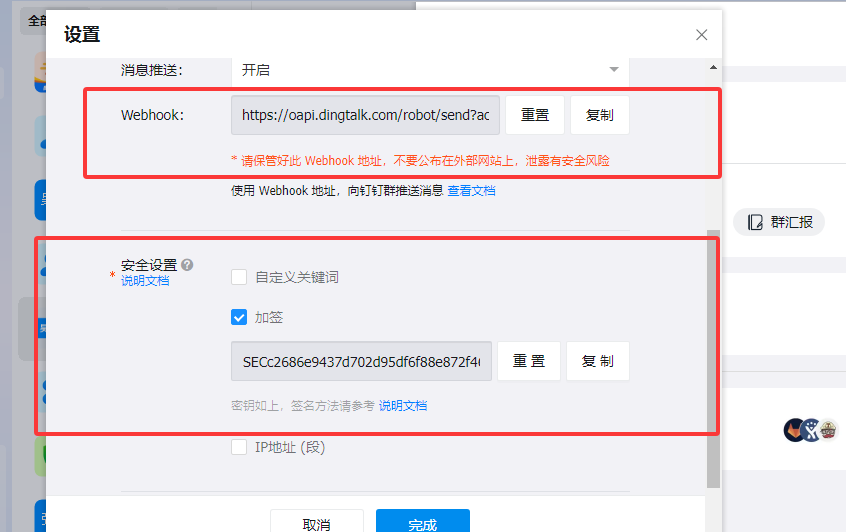
jenkins中的webhook 为钉钉机器人中的webhook 和安全设置中配置
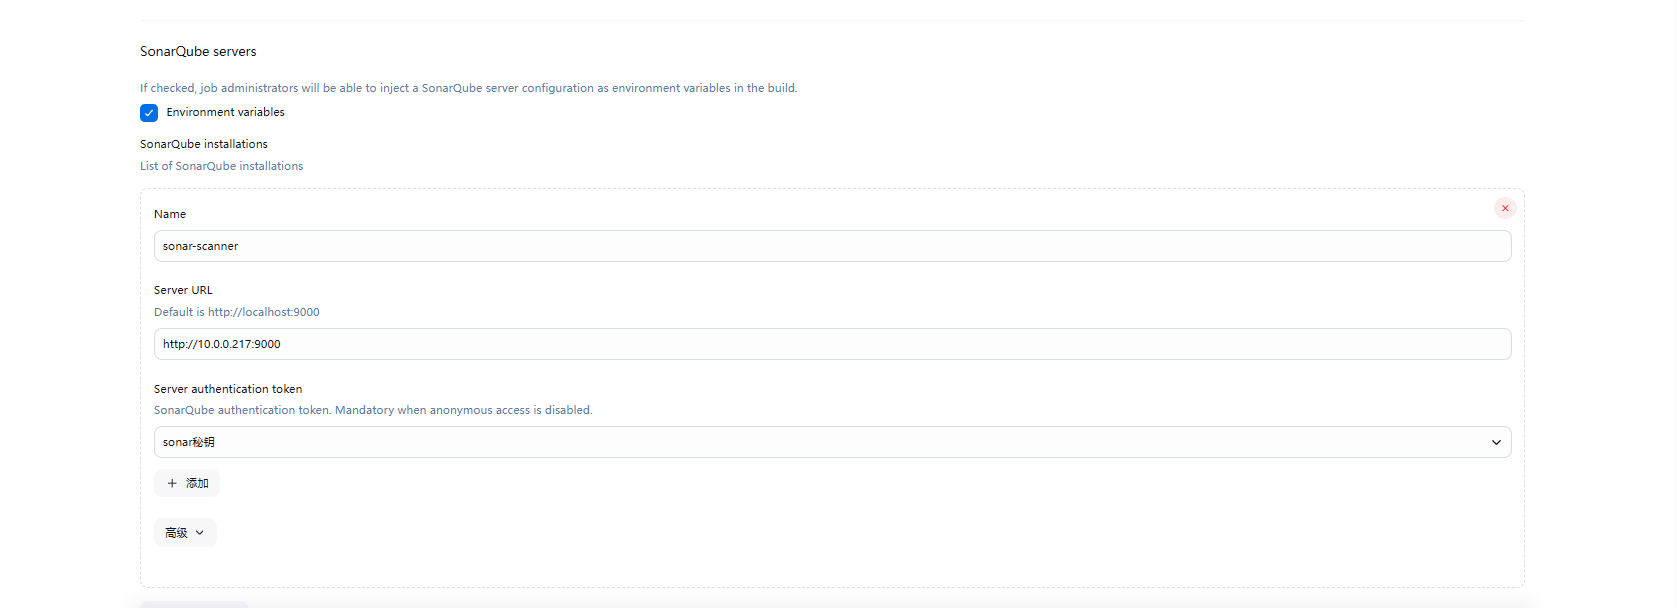
3、整合对接sonar
1、jenkins中添加配置
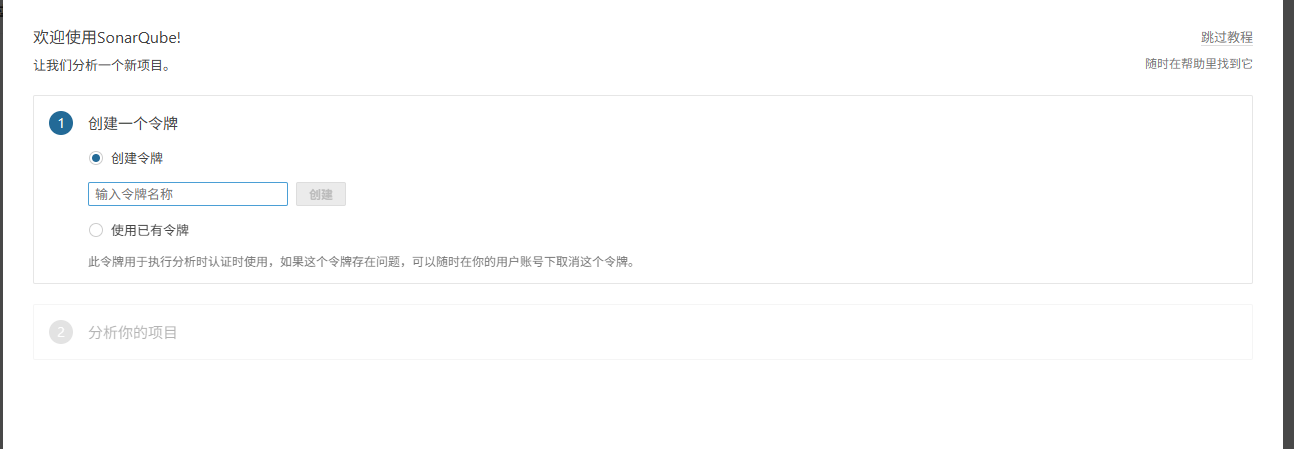
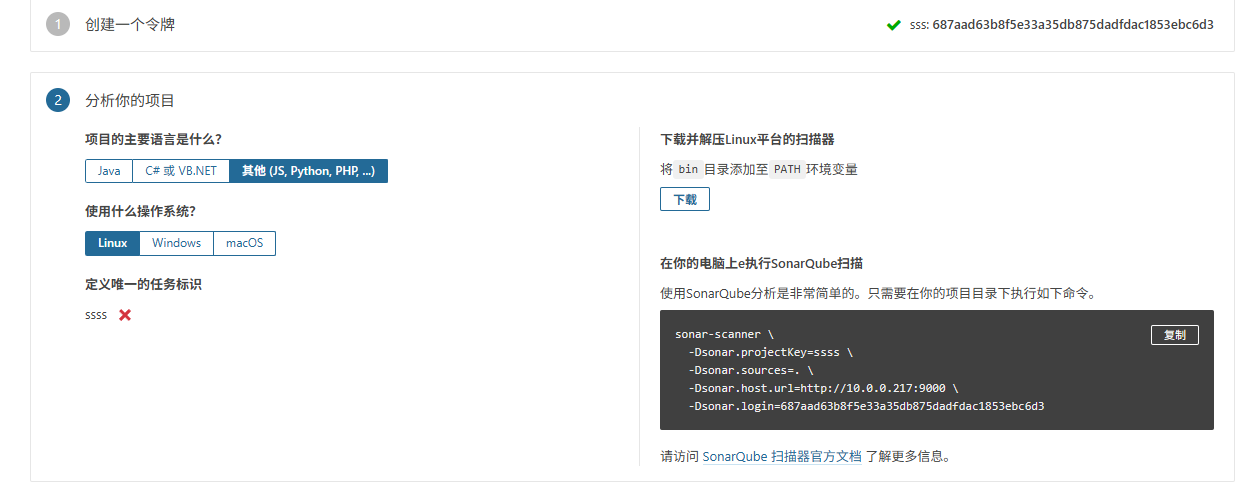
2、在sonar中创建项目并复制
sonar-scanner
-Dsonar.projectKey=oldboyedu-linux98-pipeline
-Dsonar.sources=.
-Dsonar.host.url=http://10.0.0.217:9000
-Dsonar.login=408cfdee570ef67a7f0e676c6841e11bf1b5c17a
3、在-pipeline中的jenkinsfile中添加
SonarQube阶段代码
    stages {
        stage('pull dode') {
            steps {
               git credentialsId: '791f6b31-8913-454c-a2e3-eee52c15ae72', url: 'http://10.0.0.150/oldboyedu/oldboyedu-yiliao.git'
            }
        }
        stage('SonarQube Analysis') {
            steps {
                     sh '/usr/local/sonar-scanner/bin/sonar-scanner \

            -Dsonar.projectKey=oldboyedu-linux98-pipeline \

            -Dsonar.sources=. \

            -Dsonar.host.url=http://10.0.0.217:9000 \

            -Dsonar.login=408cfdee570ef67a7f0e676c6841e11bf1b5c17a'
            }
        }
4、下载 sonar-scanner-cli-4.2.0.1873-linux.zip 客户端
unzip sonar-scanner-cli-4.2.0.1873-linux.zip -d /usr/local/
mv /usr/local/sonar-scanner-4.2.0.1873-linux/ /usr/local/sonar-scanner
vim /etc/profile
export PATH="/usr/local/sbin:/usr/local/bin:/usr/sbin:/usr/bin:/root/bin:/root/bin:/usr/loc
al/sonar-scanner/bin"
5、试执行sonar-scanner 扫描代码
   sonar-scanner \
  -Dsonar.projectKey=oldboyedu-linux98-pipeline \
  -Dsonar.sources=. \
  -Dsonar.host.url=http://10.0.0.217:9000 \
  -Dsonar.login=408cfdee570ef67a7f0e676c6841e11bf1b5c17a
6、 cat sonar-scanner.properties 添加
sonar.host.url=http://10.0.0.203:9000
sonar.login=06ad81ebd4ad6fa78556a0556bbe8c
6faed42287
#----- Default source code encoding
sonar.sourceEncoding=UTF-8

 浙公网安备 33010602011771号