

可靠投递
原理
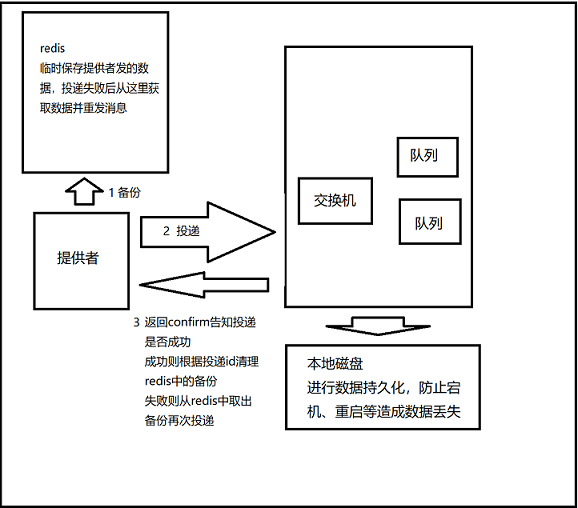
rabbitmq基于confirm模式、持久化策略,使用redis作为消息的临时储存空间
首先开启rabbitmq的confirm和持久化策略(可持久的对象为交换机、队列、消息)
1 开启confirm,在配置文件application.yml中
spring:
  rabbitmq:
    host: 192.168.200.128
    publisher-confirms: true  #开启confirm数据保护机制
2 开启交换机、队列、消息的持久化,在rabbitmq的配置类里
@Configuration
public class RabbitMQConfig {

    public static final String SECKILL_ORDER_QUEUE ="seckill_order";

    @Bean
    public Queue queue(){
        return new Queue(SECKILL_ORDER_QUEUE,true);//true为开启队列持久化
    }

}
此处没有用交换机,如果想要开启交换机持久化参考 https://www.cnblogs.com/wrc-blog/p/14340064.html
消息默认就是持久的
编写一个增强spring自带的rabbitTemplate的类
使其在向队列发消息前,先往redis中备份数据
同时实现RabbitTemplate.ConfirmCallback接口,接收confirm模式下的回调函数,根据结果执行下一步操作
package com.changgou.seckill.config;

import com.alibaba.fastjson.JSON;
import org.springframework.amqp.rabbit.connection.CorrelationData;
import org.springframework.amqp.rabbit.core.RabbitTemplate;
import org.springframework.beans.factory.annotation.Autowired;
import org.springframework.data.redis.core.RedisTemplate;
import org.springframework.stereotype.Component;

import java.util.HashMap;
import java.util.Map;
import java.util.UUID;

//增强rabbitmq
@Component
public class ConfirmMessageSender implements RabbitTemplate.ConfirmCallback {
    @Autowired
    private RabbitTemplate rabbitTemplate;
    @Autowired
    private RedisTemplate redisTemplate;


    public static final String MESSAGE_CONFIRM_KEY="message_confirm_key";

    //构造函数
    public ConfirmMessageSender(RabbitTemplate rabbitTemplate) {
        this.rabbitTemplate = rabbitTemplate;
        rabbitTemplate.setConfirmCallback(this);
    }

    //开启生产者的confirm可靠投递时,用于接收rabbit服务器返回的通知
    //参数1 消息的唯一标识,需要在发送消息时就传入,参见下方自定义发送方法
    //参数2 发送是否成功
    @Override
    public void confirm(CorrelationData correlationData, boolean ack, String cause) {
        if (ack){
            //成功 删除redis中的相关数据
            redisTemplate.delete(correlationData.getId());
            redisTemplate.delete(MESSAGE_CONFIRM_KEY+correlationData.getId());
        }else{
            //失败
            //从redis中获取失败的消息,重新发送
            Map<String,String> map = ( Map<String,String>)redisTemplate.opsForHash().entries(MESSAGE_CONFIRM_KEY + correlationData.getId());
            String exchange = map.get("exchange");
            String routingKey = map.get("routingKey");
            String message = map.get("message");
            rabbitTemplate.convertAndSend(exchange,routingKey, JSON.toJSONString(message));
        }
    }

    //自定义消息发送方法  先往redis里保存一份,再往消息队列里发送
    public void sendMessage(String exchange,String routingKey,String message){
        //将消息保存到redis中,在投递失败时重新取出再次投递
            //设置消息的唯一标识,这个类由rabbit提供,用来为消息设置唯一标识,在上方confrim用于回调时区分消息
            CorrelationData correlationData = new CorrelationData(UUID.randomUUID().toString());
            redisTemplate.opsForValue().set(correlationData.getId(),message);
            //将本次发送消息的元数据保存到redis
            Map<String,String> map = new HashMap<>();
            map.put("exchange",exchange);
            map.put("routingKey",routingKey);
            map.put("message",message);
            //注意这是哈希结构,你可以想为一大一小两个map,putAll会把上边定义的map作为小map的键值
            redisTemplate.opsForHash().putAll(MESSAGE_CONFIRM_KEY+correlationData.getId(),map);
        //携带本次消息的唯一标识,发送到消息队列
        //注意这里多了一个参数4,是我们上边定义的消息唯一标识,通过confirm模式确认可靠投递时,用corrlationData来区分不同的消息
        rabbitTemplate.convertAndSend(exchange,routingKey,message,correlationData); //这里的message是由外部传入的,如果是一个对象,要在外部先转为json
    }
}
在需要进行可靠投递时,不用原生的rabbittemplate,而注入这个类,并调用sendMessage方法,回调函数会自动执行,并判断如何继续处理
可靠接收
默认为消费者一收到消息就立刻返回已收到,rabbit服务器会将消息从队列中删除
但是,万一消费者处理中宕机,则这条消息会丢失,所以我们希望在处理完后在签收这条消息
修改消费者的appication.yml
spring:
  rabbitmq:
    host: 192.168.200.128
    listener:
      simple:
        acknowledge-mode: manual  #开启消费者手动应答,rabbit接到应答后会删除队列中的消息,默认为自动,一接到就立刻应答
在监听者中手动签收消息 无需担心操作数据库但还未签收时,消息被重复获取的问题
package com.changgou.consumer.listener;

import com.alibaba.fastjson.JSON;
import com.changgou.consumer.config.RabbitMQConfig;
import com.changgou.consumer.service.SecKillOrderService;
import com.changgou.seckill.pojo.SeckillOrder;
import com.rabbitmq.client.Channel;
import org.springframework.amqp.core.Message;
import org.springframework.amqp.rabbit.annotation.RabbitListener;
import org.springframework.beans.factory.annotation.Autowired;
import org.springframework.stereotype.Component;

import java.io.IOException;

@Component
public class ConsumerListener {
    @Autowired
    private SecKillOrderService secKillOrderService;


    @RabbitListener(queues = RabbitMQConfig.SECKILL_ORDER_QUEUE)
    public void receiveSecKillOrderMessage(Message message, Channel channel){//以往都是用String直接接收消息内容
        //转换消息格式
        SeckillOrder seckillOrder = JSON.parseObject(message.getBody(), SeckillOrder.class);
        //基于业务层完成同步musql的操作
        int result = secKillOrderService.createOrder(seckillOrder);
        if(result>0){
            //同步mysql成功
            //向rabbitmq返回成功通知,rabbitmq会删除消息队列中的相关消息
            try {
                //参数1 在消息队列中的唯一标识,参数2 开启批处理
                channel.basicAck(message.getMessageProperties().getDeliveryTag(),false);
            } catch (IOException e) {
                e.printStackTrace();
            }
        }else {
            //同步mysql失败
            try {
                //参数1 消息的唯一标识
                //参数2 true所有的消费者都会拒绝这个消息 false只有当前的消费者拒绝这个消息
                //参数3 true当前的消息会进入死信队列(延迟消息队列) false当前的消息会重新进入消息队列,默认在头部
                channel.basicNack(message.getMessageProperties().getDeliveryTag(),false,false);
            } catch (IOException e) {
                e.printStackTrace();
            }
        }

    }
}
1
1

 浙公网安备 33010602011771号